manuals.online logo
Brands
  1. Home
  2. •
  3. Brands
  4. •
  5. Big Daishowa
  6. •
  7. Industrial Equipment
  8. •
  9. Big Daishowa BASE MASTER mini User manual

Big Daishowa BASE MASTER mini User manual

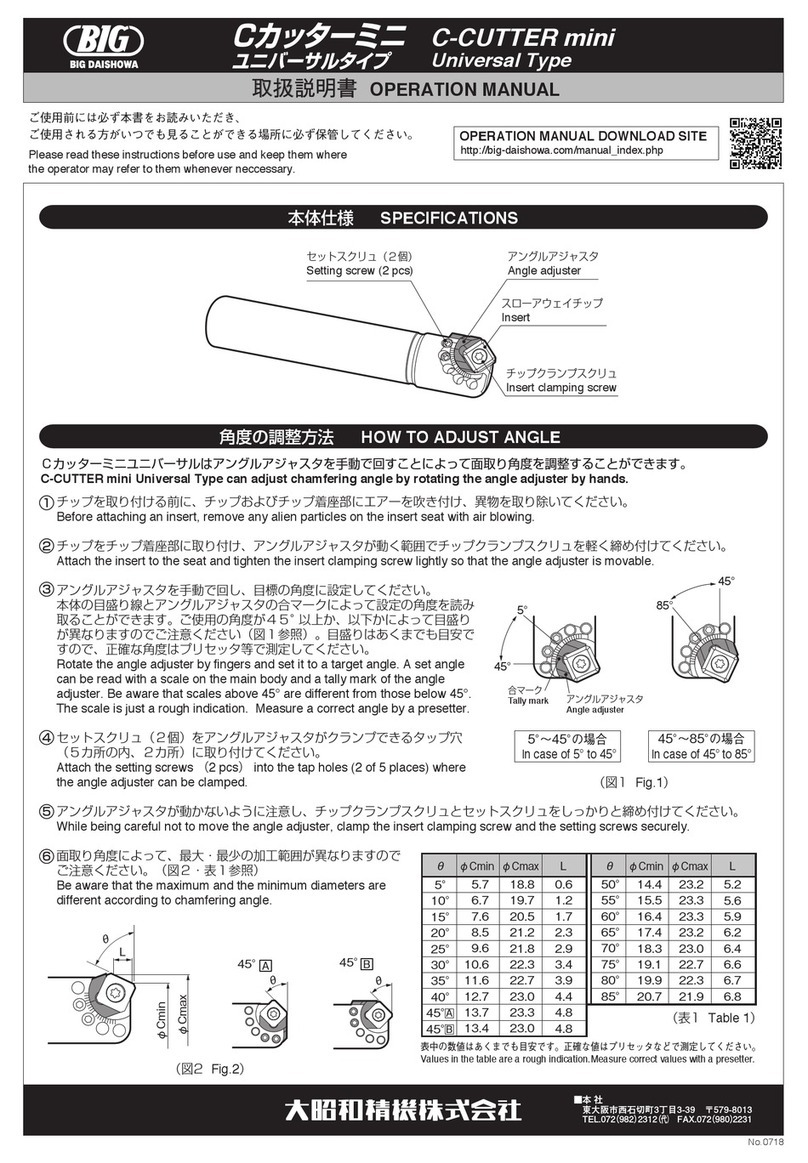
●ワーク端面(Z)基準位置検出および工具長検出
Detecting position of workpiece end surface (Z) and length of tool.
ワーク端面にベースマスターミニ(BMM-20H)を取り付け、工具を測定面に接触させると同時にLEDが点灯
します。この位置がワーク端面から20mmの位置になります。工具の長さを測定する場合は、基準工具と他の
工具の接触位置の差により工具の長さを検出することができます。
Mount the BMM-20H on the workpiece end surface. Move the tool until it touches the sensor plate, which will
instantly light the LED lamp. This will then give you an exact reading of 20mm distance from the workpiece
end surface to the tool. Tool length can be measured by comparing the contact positions between the
reference bar and the actual tool.

   
(1.77")

 
(.02")

 


 (ø.91")
 
   

LED(GREEN)
SENSOR PLATE BATTERIES
MAGNET
STROKE(.080")
BATTERY CAP

(ø.71")
(ø.30")
(.03")
(ø.16")
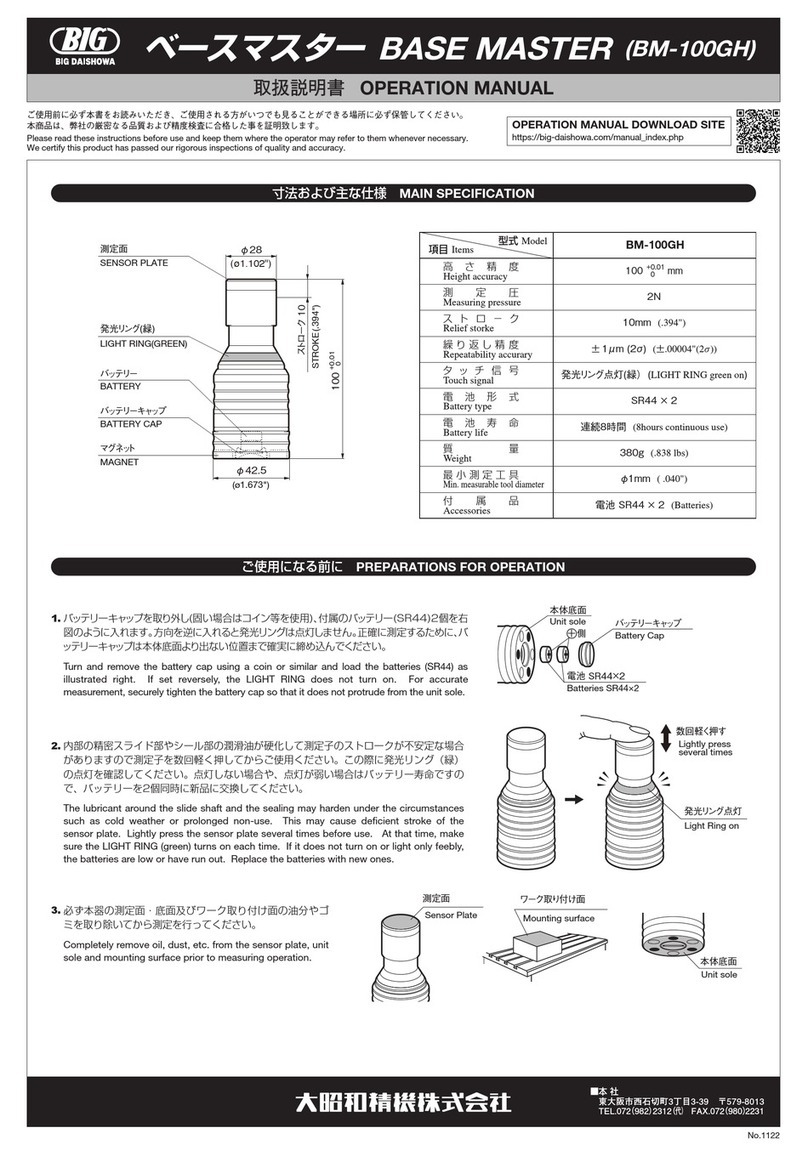
バッテリーキャップを取り外し(固い場合はコイン等を使用)、付属のバッテリー(SR44)2個を右図
のように入れバッテリーキャップを締め込んでください。方向を逆に入れるとLEDは点灯しません。
1.
Turn and remove the battery cap using a coin or similar and load the 2 batteries (SR44) as
illustrated right and tighten the cap. If set reversely, the LED does not turn on.
必ず本器の測定面・底面及びワーク取り付け面の油分やゴミを取り除いてから測定を行ってください。
3.
Completely remove oil, dust, etc. from the sensor plate, unit sole and mounting surface prior
to measuring operation.
内部の精密スライド部やシール部の潤滑油が硬化して測定子のストロークが不安定な場合が
ありますので測定子を数回軽く押してからご使用ください。この際にLED(緑)の点灯を確
認してください。点灯しない場合や、点灯が弱い場合はバッテリー寿命ですので、バッテリ
ーを2個同時に新品に交換してください。
2.
The lubricant around the slide shaft and the sealing may harden under the circumstances
such as cold weather or prolonged non-use. This may cause decient stroke of the sensor
plate. Lightly press the sensor plate several times before use. At the same time, make sure
the LED (green) turns on each time. If it does not turn on or light only feebly, the batteries
are low or have run out. Replace the batteries with new ones.

WORKPIECE


“Z”AXIS REFERENCE
SURFACE
   
Avoid a
center stub.
本社
 東大阪市西石切町3丁目3-39〒579-8013
 TEL.072(982)2312(
代)
FAX.072(980)2231
寸法及び主な仕様 MAIN SPECIFICATION
ご使用になる前に PREPARATIONS FOR OPERATION
旋盤での使い方 ON LATHES
No.1122
OPERATION MANUAL
DOWNLOAD SITE
https://big-daishowa.com/
manual_index.php
・ワーク端面中央にへそが発生している場合は測定誤差が生じますので、可能な限りへそがない状態にしてください。0.5mm以下のへそであれば、ベー
スマスターミニ(BMM-20H)中央部の逃がしで回避することができます。また、端面側にバリが発生している場合は測定誤差が生じますので、端面
側のバリを除去してから測定してください。
・Center stub, which is convex burr at the center of the workpiece end surface, may cause a measuring error. Remove it as much as possible.
BMM-20H has a recessed hole at the center of the bottom surface so that it can avoid interference with the center stub as far as its height is no more
than 0.5mm. Burrs remain other than the center of the workpiece surface must be removed before the measurement to prevent errors.
ご注意 CAUTION


Please read these instructions before use and keep them where the operator may refer to them whenever necessary.
We certify this product has passed our rigorous inspections of quality and accuracy.
BASE MASTER mini (BMM-20H)
ベースマスターミニ
OPERATION MANUAL

BMM-20H
型式Model



 
  





Height accuracy
Measuring pressure
Relief stroke
Repeatability accuracy
Touch signal
Battery type
Battery life
Weight
Min. measurable tool diameter
Accessories
項目Items
(.080")
(.00004"(2σ))
(LED green on)
10 hours (Conrinuous use)
(.15 lbs)
(.00394")
(Batteries)




 
  





 


 
BATTERIES SR44×2
BATTERY CAP

SENSOR
PLATE
   
MOUNTING
SURFACE

UNIT SOLE

 
LED GREEN ON
LIGHTLY PRESS
SEVERAL TIMES
●加工物上面(Z)基準位置検出および工具長検出
Detecting position of workpiece surface on the "Z" axis and length of tool.
加工物上面にベースマスターミニ(BMM-20H)を置き、工具を測定面に接触させると同時にLEDが点灯します。この位
置が加工物上面から20mmの位置になります。工具の長さを測定する場合は、基準バーと他の工具の接触位置の差によ
り工具の長さを検出することができます。 
Mount the BMM-20H on the workpiece surface. Move the spindle or "Z" axis carefully until the tool touches the sensor
plate, which will instantly light the LED lamp. This will then give you an exact reading of 20mm distance from the top
surface of the workpiece to the tool.Tool length can be measured by comparing the contact positions between the
reference bar and the actual tool.
●加工物側面(X,Y)基準位置検出および工具径検出
Detecting position of workpiece surface on the "X" and "Y" axis and diameter of tool.
加工物側面にベースマスターミニ(BMM-20H)を取り付け、工具外径部を測定子に接触させると同時にLEDが点灯しま
す。この位置が工具半径プラス20mmの位置になります。工具径を測定する場合は、基準バーで半径をプリセットして
おき、他の工具を測定した時の差により工具半径を検出することができます。 
Mount BMM-20H on the side surface of workpiece and move the spindle, "X" or "Y" axis carefully until the tool touches
the sensor plate, which will instantly light the LED lamp. This will give you an exact reading of 20mm distance from the
reference surface to the tool. Then add 1/2 the diameter of the tool to give you the machine spindle center distance.

Center of
sensor plate



WORKPIECE
“Z” AXIS REFERENCE
SURFACE



WORKPIECE
本社
 東大阪市西石切町3丁目3-39〒579-8013
 TEL.072(982)2312(
代)
FAX.072(980)2231
・Do not immerse the BMM-20H directly into gas oil for washing.
・
Take out the batteries when not using the BMM-20H for extended periods.
・Do not disassemble the BMM-20H.
・Store the batteries in a safe place out of reach of babies to prevent
swallowing. Dispose used batteries in a prescribed way.
・Replace two batteries at the same time when voltage becomes low.
・The precision electronic parts are contained. Take care not to
splash any coolant and avoid any accidental collisions. Do not
leave it on the machine table or the jig when not in use.
・Remove coolant immediately if it is attached to the BMM-20H.
・Specications and height are the gures under measurement
environment at a temperature of 20℃±0.5℃(equivalent to 68°F)
and at a humidity of 55%±5%. For precise measurement under
different environment, compare the height with a block gage and
compensate the difference.
・Use under low temperature below 5℃may worsen movement of the
sensor plate.
・If an accuracy problem or any malfunctions occur, immediately stop
using the device and contact us through distributors.
・測定面や本体底面の汚れた本器を使用して測定した場合、測定誤差が生じます。
そのまま加工に入ると刃具、加工物、機械等を破損する恐れがあり、また、そ
の破片で人体に危険を及ぼす恐れがあります。
・本器測定面に工具を早送りで近づけるときは余裕のある位置で止め、残りはゆ
っくりハンドルで送ってください。万一、早送りのままで本器にぶつかった場
合、本器や刃具、加工物、機械等を破損する恐れがあり、また、その破片で人
体に危険を及ぼす恐れがあります。
・Measurement may be in error, if the sensor plate or sole plane is
soiled. Any attempt to commence machining after a false reading
may lead to damage of the tool, workpiece, machine, etc. and
broken parts could endanger persons in the area.
・When any tool approaches the sensor plate at a high feed rate, then
it should be arrested at a sufcient safe distance to allow the nal
approach at ne feed by hand. Should the tool collied with the
BMM-10H at a high feed then damage may be caused and broken
parts could endanger persons in the area.
Class and Group Description
This product is a CISPR11 Group 1, Class A product in accordance with EN61326-1 and EN61326-2-3. This means that this product does not generate
and/or use intentionally radio-frequency energy, in the form of electromagnetic radiation, inductive and/or capacitive coupling, for the treatment of
material or inspection / analysis purpose and is intended for use in an industrial environment.
Note: Since this product is battery operated, this product is not connected to this low voltage power supply network.
・Manufacturer : BIG DAISHOWA SEIKI CO., LTD. Address : Nishiishikiricho 3-3-39, Higashiosakashi, Osaka, JAPAN
・Authorized Representative in EU : BIG KAISER PRECISION TOOLING LTD. Address : Glattalstrasse 516, 8153 Rümlang, Switzerland
使用上の注意 CAUTION IN USE
EMC INFORMATION
ご注意 CAUTION
ご注意 CAUTION
・軽油等へ漬けての丸洗いはしないでください。
・長期保存の場合は電池を取り外してください。
・本器の分解はできません。
・電池は幼児の手の届かない場所に保存し、不要になった電池は所定の方法で処
分してください。
・電池の電圧が低下した時は、2個同時に交換してください。
・精密電子部品を使用しておりますので、クーラントをかけたり衝撃を与えたりしな
いでください。また、ご使用後は機械テーブル上や治具上に放置しないでください。
・ご使用時にクーラントが本器に付着した場合は、放置しないで必ずクーラント
を拭き取ってください。
・仕様および高さは測定環境が温度20℃±0.5℃、湿度55%±5%の値です。
前環境以外でより正確な測定を行う場合は、ゲージブロックと比較測定し、高
さを補正してください。 
・
低温下でのご使用は、測定子の動きに影響を及ぼす恐れがあります。(低温下:5℃以下)
・精度の異常や不具合が発生した場合は直ちに使用を中止し、ご購入先を通じて
弊社支店へご連絡ください。
危険 DANGER
マシニングセンタ・汎用フライス盤等での使い方 ON MACHINING CENTERS AND MILLING MACHINES (CNC AND STANDARD)
・工具の先端部を測定面の中心に合わせて、測定を行ってください。中心よりズレますと、工具の破損や測定
が正確に行われない恐れがあります。
・工具を測定面にタッチさせる時は、タッチスピ−ドが速いと工具破損する恐れがありますので、ゆっくりと
慎重にアプロ−チを行ってください。
・測定子は2mm以上押し込まないでください。
・
The tool edge should be centered in the sensor plate. Otherwise, the tool may be damaged or precise measurement may be in error.
・When the tool approaches the sensor plate, it should be arrested at a sufciently safe distance to allow the nal approach at ne
feed by hand. Should the tool edge collide with the sensor plate at a high feed then damage may be caused.
・Do not press the sensor plate beyond 2mm(.080").
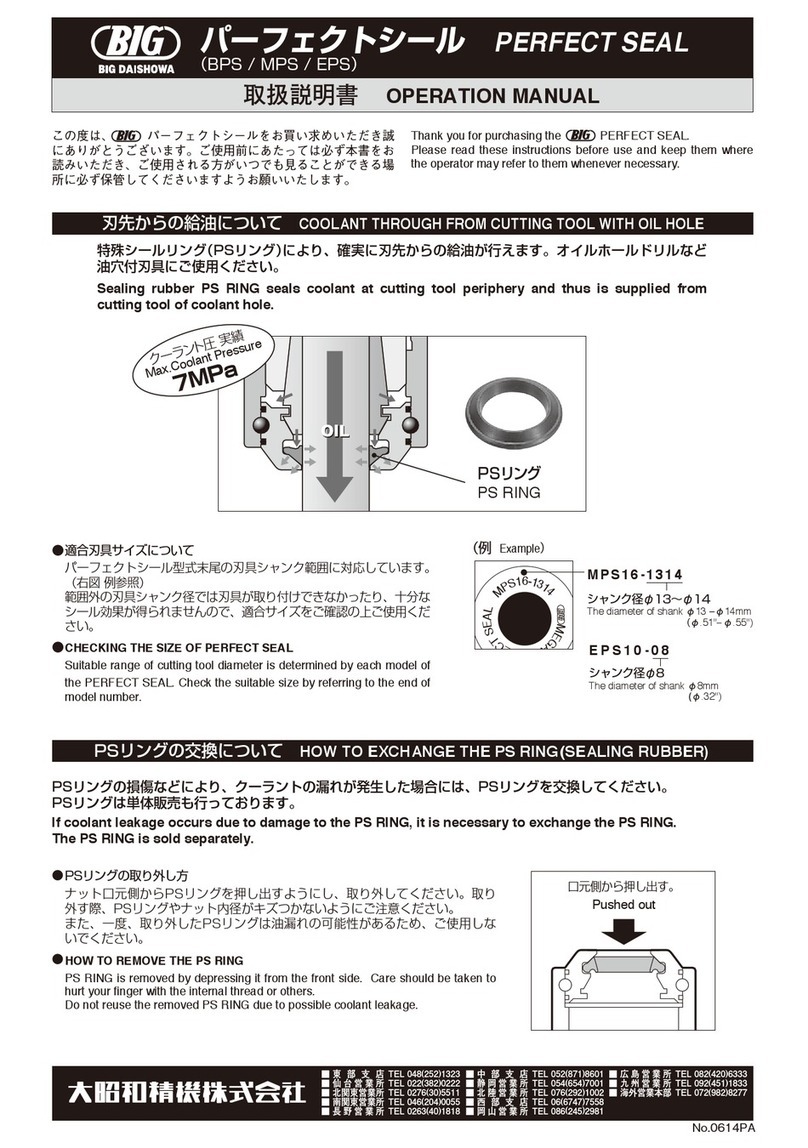
This manual suits for next models

1

Other Big Daishowa Industrial Equipment manuals

Big Daishowa BBT30 User manual

Big Daishowa

Big Daishowa BBT30 User manual

Big Daishowa NEW BABY CHUCK User manual

Big Daishowa

Big Daishowa NEW BABY CHUCK User manual

Big Daishowa SMART DAMPER User manual

Big Daishowa

Big Daishowa SMART DAMPER User manual

Big Daishowa BBT 40 User manual

Big Daishowa

Big Daishowa BBT 40 User manual

Big Daishowa BBT30 User manual

Big Daishowa

Big Daishowa BBT30 User manual

Big Daishowa Point Master PMC-20S User manual

Big Daishowa

Big Daishowa Point Master PMC-20S User manual

Big Daishowa FCR 16 User manual

Big Daishowa

Big Daishowa FCR 16 User manual

Big Daishowa BBT30 User manual

Big Daishowa

Big Daishowa BBT30 User manual

Big Daishowa C-CUTTER User manual

Big Daishowa

Big Daishowa C-CUTTER User manual

Big Daishowa KAISER CK PRESETTER User manual

Big Daishowa

Big Daishowa KAISER CK PRESETTER User manual

Big Daishowa HMC20S-NRA User manual

Big Daishowa

Big Daishowa HMC20S-NRA User manual

Big Daishowa PERFECT SEAL User manual

Big Daishowa

Big Daishowa PERFECT SEAL User manual

Big Daishowa BBT50-AG90-FMA25.4S-190S User manual

Big Daishowa

Big Daishowa BBT50-AG90-FMA25.4S-190S User manual

Big Daishowa FCR16 User manual

Big Daishowa

Big Daishowa FCR16 User manual

Big Daishowa BASE MASTER User manual

Big Daishowa

Big Daishowa BASE MASTER User manual

Big Daishowa C-CUTTER MINI User manual

Big Daishowa

Big Daishowa C-CUTTER MINI User manual

Popular Industrial Equipment manuals by other brands

Lincoln M 16 owner's manual

Lincoln

Lincoln M 16 owner's manual

ABB FSK II + instructions

ABB

ABB FSK II + instructions

Studer TO A80 operating instructions

Studer

Studer TO A80 operating instructions

Graco 17B587 instructions

Graco

Graco 17B587 instructions

Blichmann BrewEasy Compact NPT Assembly operation maintenance

Blichmann

Blichmann BrewEasy Compact NPT Assembly operation maintenance

ABB Power2 550-M44 Operation manual

ABB

ABB Power2 550-M44 Operation manual

Zimmer GH6000 Installation and operating instructions

Zimmer

Zimmer GH6000 Installation and operating instructions

SCHUNK SVP-4 Assembly and operating manual

SCHUNK

SCHUNK SVP-4 Assembly and operating manual

Wilo Helix V 2 Installation and operating instructions

Wilo

Wilo Helix V 2 Installation and operating instructions

Magnetek Laser Guard instruction manual

Magnetek

Magnetek Laser Guard instruction manual

Welker ALD-1 Installation, operation and maintenance manual

Welker

Welker ALD-1 Installation, operation and maintenance manual

Leroy-Somer LSA 47.2 Installation and Maintenance

Leroy-Somer

Leroy-Somer LSA 47.2 Installation and Maintenance

Pentair Flotec EVO-MULTIPRESS 340 SX DIGIPRESS Use and maintenance manual

Pentair Flotec

Pentair Flotec EVO-MULTIPRESS 340 SX DIGIPRESS Use and maintenance manual

MultiBlast PRO900W operating manual

MultiBlast

MultiBlast PRO900W operating manual

MyTana Mini AutoFeed-Retriever user manual

MyTana

MyTana Mini AutoFeed-Retriever user manual

Maxcess MAGPOWR Perma-Tork HC2 instruction manual

Maxcess

Maxcess MAGPOWR Perma-Tork HC2 instruction manual

Frick QUANTUM LX Control Panel Service manual

Frick

Frick QUANTUM LX Control Panel Service manual

Flowserve PSS II Repair instructions

Flowserve

Flowserve PSS II Repair instructions

manuals.online logo
manuals.online logoBrands
  • About & Mission
  • Contact us
  • Privacy Policy
  • Terms and Conditions

Copyright 2025 Manuals.Online. All Rights Reserved.