Biogents BG-Counter 2 User manual
Updates for the manual can be found on the website » https://eu.biogents.com
Status: November 2022 BG-Counter 2TM
Instruction Manual

2
Table of Contents
BG-Counter 2 Description and Set-Up . . . . . . . . . . . . . . . . . . . . . . . . . . . . . . . . . . . . . . . . . . . . . . . . . . . . . . . . . . . . . . . . . . . . . . . . . . . .
BG-Counter 2 . . . . . . . . . . . . . . . . . . . . . . . . . . . . . . . . . . . . . . . . . . . . . . . . . . . . . . . . . . . . . . . . . . . . . . . . . . . . . . . . . . . . . . . . . . . .
Safety Instructions and Warnings . . . . . . . . . . . . . . . . . . . . . . . . . . . . . . . . . . . . . . . . . . . . . . . . . . . . . . . . . . . . . . . . . . . . . . . .
How to Set-Up the BG-Counter 2 . . . . . . . . . . . . . . . . . . . . . . . . . . . . . . . . . . . . . . . . . . . . . . . . . . . . . . . . . . . . . . . . . . . . . . . .
The BG-Counter 2 needs mobile reception . . . . . . . . . . . . . . . . . . . . . . . . . . . . . . . . . . . . . . . . . . . . . . . . . . . . . .
Product Components . . . . . . . . . . . . . . . . . . . . . . . . . . . . . . . . . . . . . . . . . . . . . . . . . . . . . . . . . . . . . . . . . . . . . . . . . . .
Set-Up with the BG-Trap Station (recommended) . . . . . . . . . . . . . . . . . . . . . . . . . . . . . . . . . . . . . . . . . . . . . . . .
Connect CO2. . . . . . . . . . . . . . . . . . . . . . . . . . . . . . . . . . . . . . . . . . . . . . . . . . . . . . . . . . . . . . . . . . . . . . . . . . . . . . . . . . .
Connecting the BG-Counter 2 to Power: 3 Options . . . . . . . . . . . . . . . . . . . . . . . . . . . . . . . . . . . . . . . . . . . . . . .
Operating the BG-Counter 2 . . . . . . . . . . . . . . . . . . . . . . . . . . . . . . . . . . . . . . . . . . . . . . . . . . . . . . . . . . . . . . . . . . . . . . . . . . . . .
Registration . . . . . . . . . . . . . . . . . . . . . . . . . . . . . . . . . . . . . . . . . . . . . . . . . . . . . . . . . . . . . . . . . . . . . . . . . . . . . . . . . . . .
Starting Sequence of the BG-Counter 2 . . . . . . . . . . . . . . . . . . . . . . . . . . . . . . . . . . . . . . . . . . . . . . . . . . . . . . . . . .
First Cloud Connection. . . . . . . . . . . . . . . . . . . . . . . . . . . . . . . . . . . . . . . . . . . . . . . . . . . . . . . . . . . . . . . . . . . . . . . . . .
Reset . . . . . . . . . . . . . . . . . . . . . . . . . . . . . . . . . . . . . . . . . . . . . . . . . . . . . . . . . . . . . . . . . . . . . . . . . . . . . . . . . . . . . . . . . .
Maintenance . . . . . . . . . . . . . . . . . . . . . . . . . . . . . . . . . . . . . . . . . . . . . . . . . . . . . . . . . . . . . . . . . . . . . . . . . . . . . . . . . . .
Determination of Counting Accuracy. . . . . . . . . . . . . . . . . . . . . . . . . . . . . . . . . . . . . . . . . . . . . . . . . . . . . . . . . . . . .
Description of the BG-Counter App . . . . . . . . . . . . . . . . . . . . . . . . . . . . . . . . . . . . . . . . . . . . . . . . . . . . . . . . . . . . . . . . . . . . . . . . . . . . . . .
System Requirements . . . . . . . . . . . . . . . . . . . . . . . . . . . . . . . . . . . . . . . . . . . . . . . . . . . . . . . . . . . . . . . . . . . . . . . . . . . . . . . . . . .
Registration: New customer . . . . . . . . . . . . . . . . . . . . . . . . . . . . . . . . . . . . . . . . . . . . . . . . . . . . . . . . . . . . . . . . . . . . . . . . . . . . . .
Registration: New Trap . . . . . . . . . . . . . . . . . . . . . . . . . . . . . . . . . . . . . . . . . . . . . . . . . . . . . . . . . . . . . . . . . . . . . . . . . . . . . . . . . .
Navigating in the BG-Counter App: Quick Start . . . . . . . . . . . . . . . . . . . . . . . . . . . . . . . . . . . . . . . . . . . . . . . . . . . . . . . . . . . .
Basic concepts . . . . . . . . . . . . . . . . . . . . . . . . . . . . . . . . . . . . . . . . . . . . . . . . . . . . . . . . . . . . . . . . . . . . . . . . . . . . . . . . . . . . . . . . . .
Data storage based on Location . . . . . . . . . . . . . . . . . . . . . . . . . . . . . . . . . . . . . . . . . . . . . . . . . . . . . . . . . . . . . . . . . . . . . . . . .
Main Menu – Overview . . . . . . . . . . . . . . . . . . . . . . . . . . . . . . . . . . . . . . . . . . . . . . . . . . . . . . . . . . . . . . . . . . . . . . . . . . . . . . . . . .
Dashboard . . . . . . . . . . . . . . . . . . . . . . . . . . . . . . . . . . . . . . . . . . . . . . . . . . . . . . . . . . . . . . . . . . . . . . . . . . . . . . . . . . . . . . . . . . . . . . .
Location Table . . . . . . . . . . . . . . . . . . . . . . . . . . . . . . . . . . . . . . . . . . . . . . . . . . . . . . . . . . . . . . . . . . . . . . . . . . . . . . . . .
Location Summary Page . . . . . . . . . . . . . . . . . . . . . . . . . . . . . . . . . . . . . . . . . . . . . . . . . . . . . . . . . . . . . . . . . . . . . . . . . .
Settings page . . . . . . . . . . . . . . . . . . . . . . . . . . . . . . . . . . . . . . . . . . . . . . . . . . . . . . . . . . . . . . . . . . . . . . . . . . . . . . . . . . . .
Analyzer . . . . . . . . . . . . . . . . . . . . . . . . . . . . . . . . . . . . . . . . . . . . . . . . . . . . . . . . . . . . . . . . . . . . . . . . . . . . . . . . . . . . . . . . . . . . . . . . .
Analyzer Overview Table. . . . . . . . . . . . . . . . . . . . . . . . . . . . . . . . . . . . . . . . . . . . . . . . . . . . . . . . . . . . . . . . . . . . . . . . .
Analyzer Settings . . . . . . . . . . . . . . . . . . . . . . . . . . . . . . . . . . . . . . . . . . . . . . . . . . . . . . . . . . . . . . . . . . . . . . . . . . . . . . . .
Analyzer Charts and Tables . . . . . . . . . . . . . . . . . . . . . . . . . . . . . . . . . . . . . . . . . . . . . . . . . . . . . . . . . . . . . . . . . . . . .
Data download . . . . . . . . . . . . . . . . . . . . . . . . . . . . . . . . . . . . . . . . . . . . . . . . . . . . . . . . . . . . . . . . . . . . . . . . . . . . . . . . .
Mosquito Maps . . . . . . . . . . . . . . . . . . . . . . . . . . . . . . . . . . . . . . . . . . . . . . . . . . . . . . . . . . . . . . . . . . . . . . . . . . . . . . . . .
Traps . . . . . . . . . . . . . . . . . . . . . . . . . . . . . . . . . . . . . . . . . . . . . . . . . . . . . . . . . . . . . . . . . . . . . . . . . . . . . . . . . . . . . . . . . . . . . . . . . . .
Trap Management table . . . . . . . . . . . . . . . . . . . . . . . . . . . . . . . . . . . . . . . . . . . . . . . . . . . . . . . . . . . . . . . . . . . . . . . .
New Trap . . . . . . . . . . . . . . . . . . . . . . . . . . . . . . . . . . . . . . . . . . . . . . . . . . . . . . . . . . . . . . . . . . . . . . . . . . . . . . . . . . . . . .
Users . . . . . . . . . . . . . . . . . . . . . . . . . . . . . . . . . . . . . . . . . . . . . . . . . . . . . . . . . . . . . . . . . . . . . . . . . . . . . . . . . . . . . . . . . . . . . . . . . .
Administration Roles and their Rights . . . . . . . . . . . . . . . . . . . . . . . . . . . . . . . . . . . . . . . . . . . . . . . . . . . . . . . . . . .
Prole..................................................................................................
Troubleshooting . . . . . . . . . . . . . . . . . . . . . . . . . . . . . . . . . . . . . . . . . . . . . . . . . . . . . . . . . . . . . . . . . . . . . . . . . . . . . . . . . . . . . . . . . . . . . . . . .
Dashboard Warnings . . . . . . . . . . . . . . . . . . . . . . . . . . . . . . . . . . . . . . . . . . . . . . . . . . . . . . . . . . . . . . . . . . . . . . . . . . . . . . . . . . . .
Further Issues . . . . . . . . . . . . . . . . . . . . . . . . . . . . . . . . . . . . . . . . . . . . . . . . . . . . . . . . . . . . . . . . . . . . . . . . . . . . . . . . . . . . . . . . . . .
European Union Compliance Statement . . . . . . . . . . . . . . . . . . . . . . . . . . . . . . . . . . . . . . . . . . . . . . . . . . . . . . . . . . . . . . . . . . . . . . . . . .
Technical Data for the BG-Counter 2 . . . . . . . . . . . . . . . . . . . . . . . . . . . . . . . . . . . . . . . . . . . . . . . . . . . . . . . . . . . . . . . . . . . . . . . . . . . . . .
Links . . . . . . . . . . . . . . . . . . . . . . . . . . . . . . . . . . . . . . . . . . . . . . . . . . . . . . . . . . . . . . . . . . . . . . . . . . . . . . . . . . . . . . . . . . . . . . . . . . . . . . . . . . . .
Contact . . . . . . . . . . . . . . . . . . . . . . . . . . . . . . . . . . . . . . . . . . . . . . . . . . . . . . . . . . . . . . . . . . . . . . . . . . . . . . . . . . . . . . . . . . . . . . . . .. . . . . . . . .
3
3
4
4
4
5
6
8
9
11
11
11
11
12
12
12
13
13
13
13
14
14
15
16
17
17
18
20
23
23
24
24
30
31
32
32
32
32
32
33
34
34
35
38
39
39
40

3
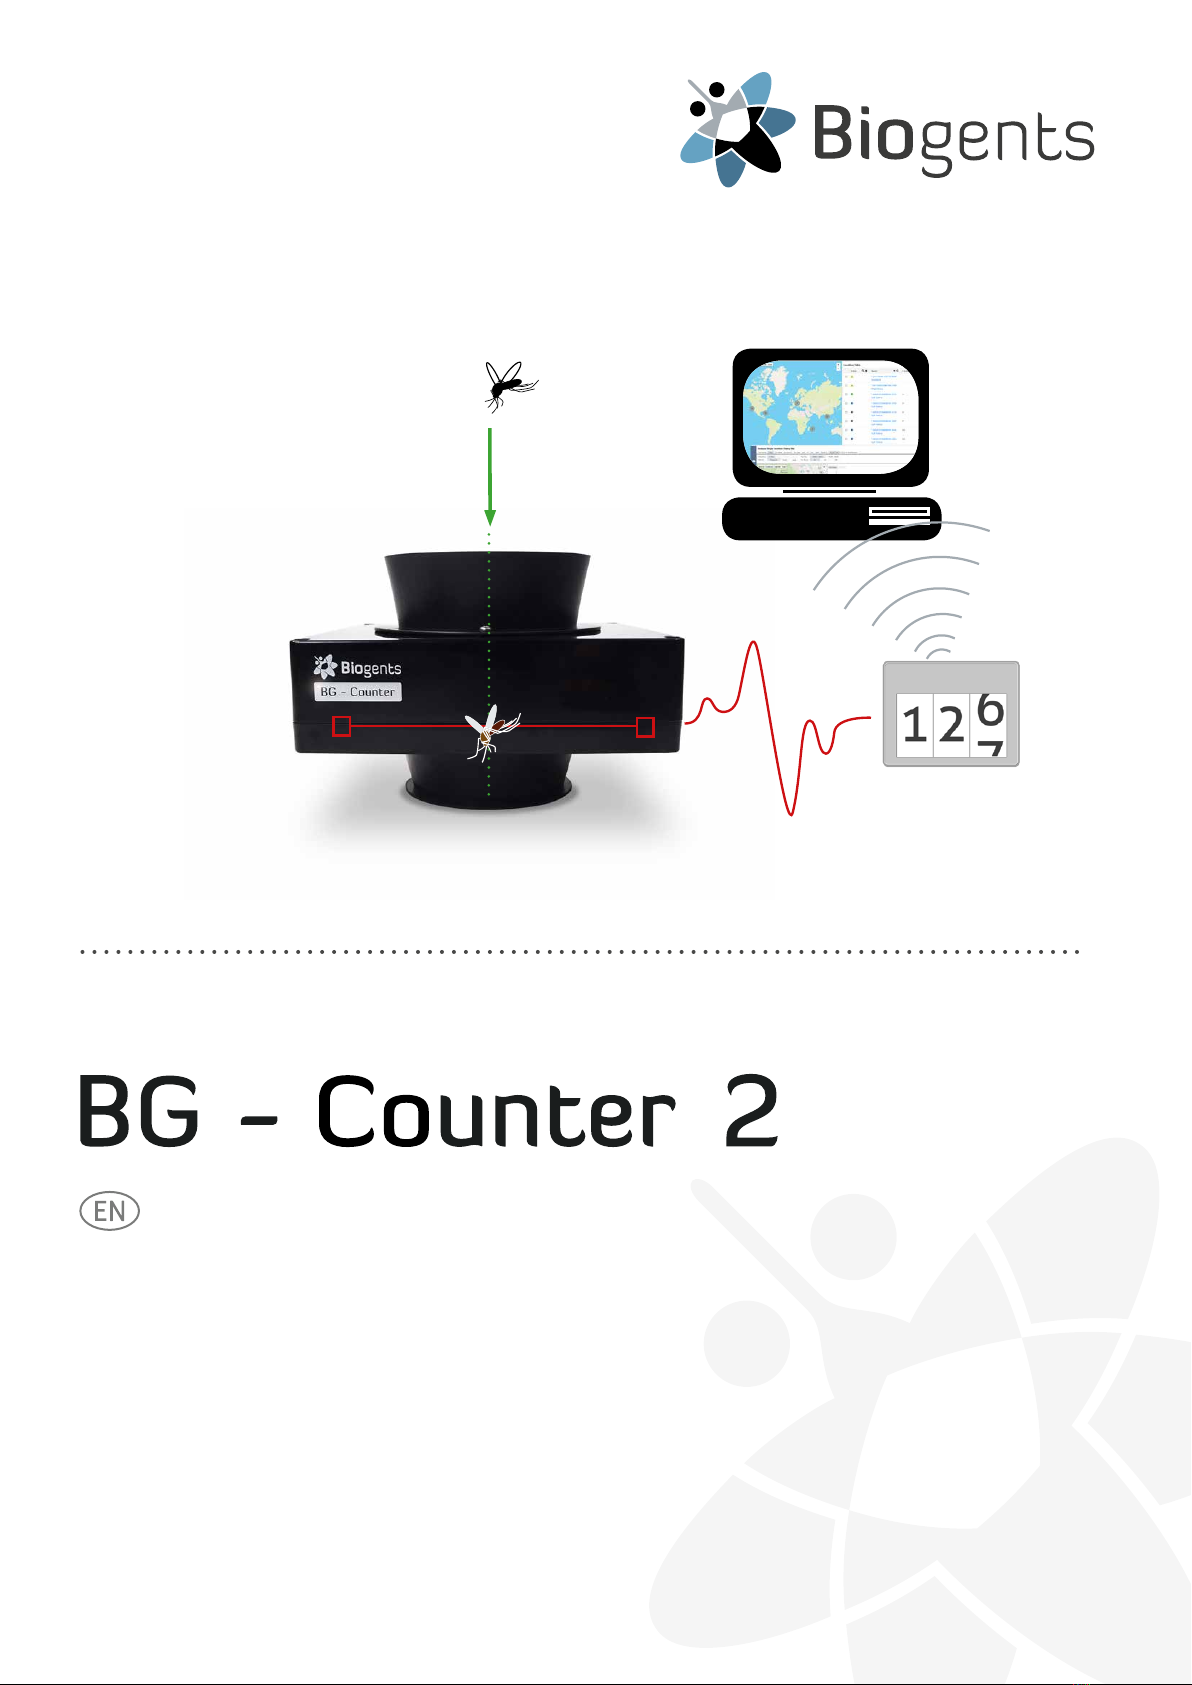
The BG-Counter 2 is an electronic device that counts mos-
quitoesastheyythroughandwirelesslytransmitsthedata
toacloudserver.Dierentiationofmosquitoesfromsmaller
or larger insects, and from other objects such as dust or rain
particles, is based on size and wing beat. Mosquitoes, small
Diptera such as chironomid midges and fungus gnats, and
otherinsectswithasimilarsizecannotbereliablydieren-
tiated.Therefore,toimproveclassicationaccuracy,theBG-
Counter 2 utilizes carbon dioxide (CO2) to attract only blood
sucking insects. By using CO2as an attractant the accuracy
of correctly counted mosquitoes is in the range of 80-90 %.
Accuracy may vary from location to location and should be
veriedfromtimetotime(seeaccuracyofcounts).
We recommend to use the BG-Counter 2 in combination with
BG-Counter 2 Description and Set-Up
a BG-Trap Station and a BG-Pro trap. The trap removes the
insects after they are counted, avoiding multiple counts of
the same insect. To ensure accurate counts, collected mos-
quitoes must not escape from the trap.
Equipped with basic sensors, the BG-Counter 2 also samples
local environmental data such as temperature, humidity
and light. The system is supported by the BG-Counter App,
a web application for storage of mosquito counts as well as
geospatial and environmental data. Via the BG-Counter App
you can remotely switch the trap and the BG-Counter 2 on
ando.Italsoallowsyoutosetupvaryingtimeschedulesto
run the trap and control the application times of CO2. The app
includes an analyzer tool that allows you to vizualize graphs,
maps and tables of your monitoring data. You can analyze
daily, weekly, or monthly trends of single or multiple traps.
The BG-Counter 2 is the next generation version of the BG-
Counter.Itoersthefollowingimprovementsoverthepre-
vious model:
1. Internal antenna
2. Notaectedbyeventualsunsetof3Gnetwork
3. Improved protection against corrosion and environmen-
talinuences
BG-Counter 2
4. Better insect classication accuracy through improved
algorithms
5. 4G Cellular Communication Module, works on the LTE
cellular network
6. The BG-Counter 2 comes with a BG-Pro trap (counter ver-
sion with 12 V fan).

4
WARNING
To avoid injury, read the following safety information and the operating instructions before using the BG-Coun-
ter 2. Failure to follow these safety instructions could result in re, electric shock, or other injury or damage to
the BG-Counter 2 or other property.
Safety Instructions and Warnings
Important safety instructions
Read and follow these instructions to use the BG-Counter 2
safely.
• Read these instructions.
• Keep these instructions.
• Heed all warnings.
• Follow all instructions.
• Install in accordance with instructions.
• Clean only with a dry cloth.
• Protect the power lead from being walked on or pinched,
particularly at the plugs and at the point where it exits
from the BG-Counter 2.
• Unplug the BG-Counter 2 during lightning storms or
when unused for long periods of time.
• Do not use the BG-Counter 2 near or immersed in water.
• Onlyuseattachments/accessoriesspeciedbyBiogents.
• Referallservicingtoqualiedservicepersonnel.Servi-
cing is required when the BG-Counter 2 has been dama-
ged in any way, such as when the housing, power lead or
plug is damaged, does not operate normally or has been
dropped.
Handling
Your BG-Counter 2 may be damaged by improper storage
or handling. Be careful not to drop the BG-Counter 2 when
transporting it.
Operation
The device contains a cellular modem emitting radio-fre-
quency electromagnetic radiation. Keep a distance of at
least 20 cm when the device is in operation. The device also
contains LED emitters of invisible infrared radiation. Do not
operate the device with the housing opened or removed.
Repairing
Do not make repairs yourself. If the BG-Counter 2 is damaged
or malfunctions, contact your Sales and Service Represen-
tative. Repairs by service providers other than Biogents or
a Biogents Authorized Service Provider may not involve the
useofBiogentsgenuinepartsandmayaectthesafetyand
functionality of the device. Any changes to the device may
aectwarranty.
Power
The BG-Counter 2 has no on/o switch. To disconnect the
BG-Counter 2 from power, unplug the power lead. Make sure
the power lead is always easily accessible. When connecting
or disconnecting the BG-Counter 2, always hold the plug by
itssides.Don’tpullonthecable.Keepngersawayfromthe
metal part of any plugs or solar wires.
WARNING: To reduce the risk of re or electric shock, do not
expose the BG-Counter to liquids, excessive heat or naked
ame.
The BG-Counter 2 needs mobile reception to transmit data to
the web server. Therefore, place the BG-Counter 2 with the
trap only in areas with mobile reception. You can check the
local reception with your mobile phone.
The BG-Counter 2 needs mobile reception
The BG-Counter 2 will automatically select a mobile provider
available at the location.
Contact Biogents Technical Support for a list of mobile provi-
ders supported in your country.
How to Set-Up the BG-Counter 2
5
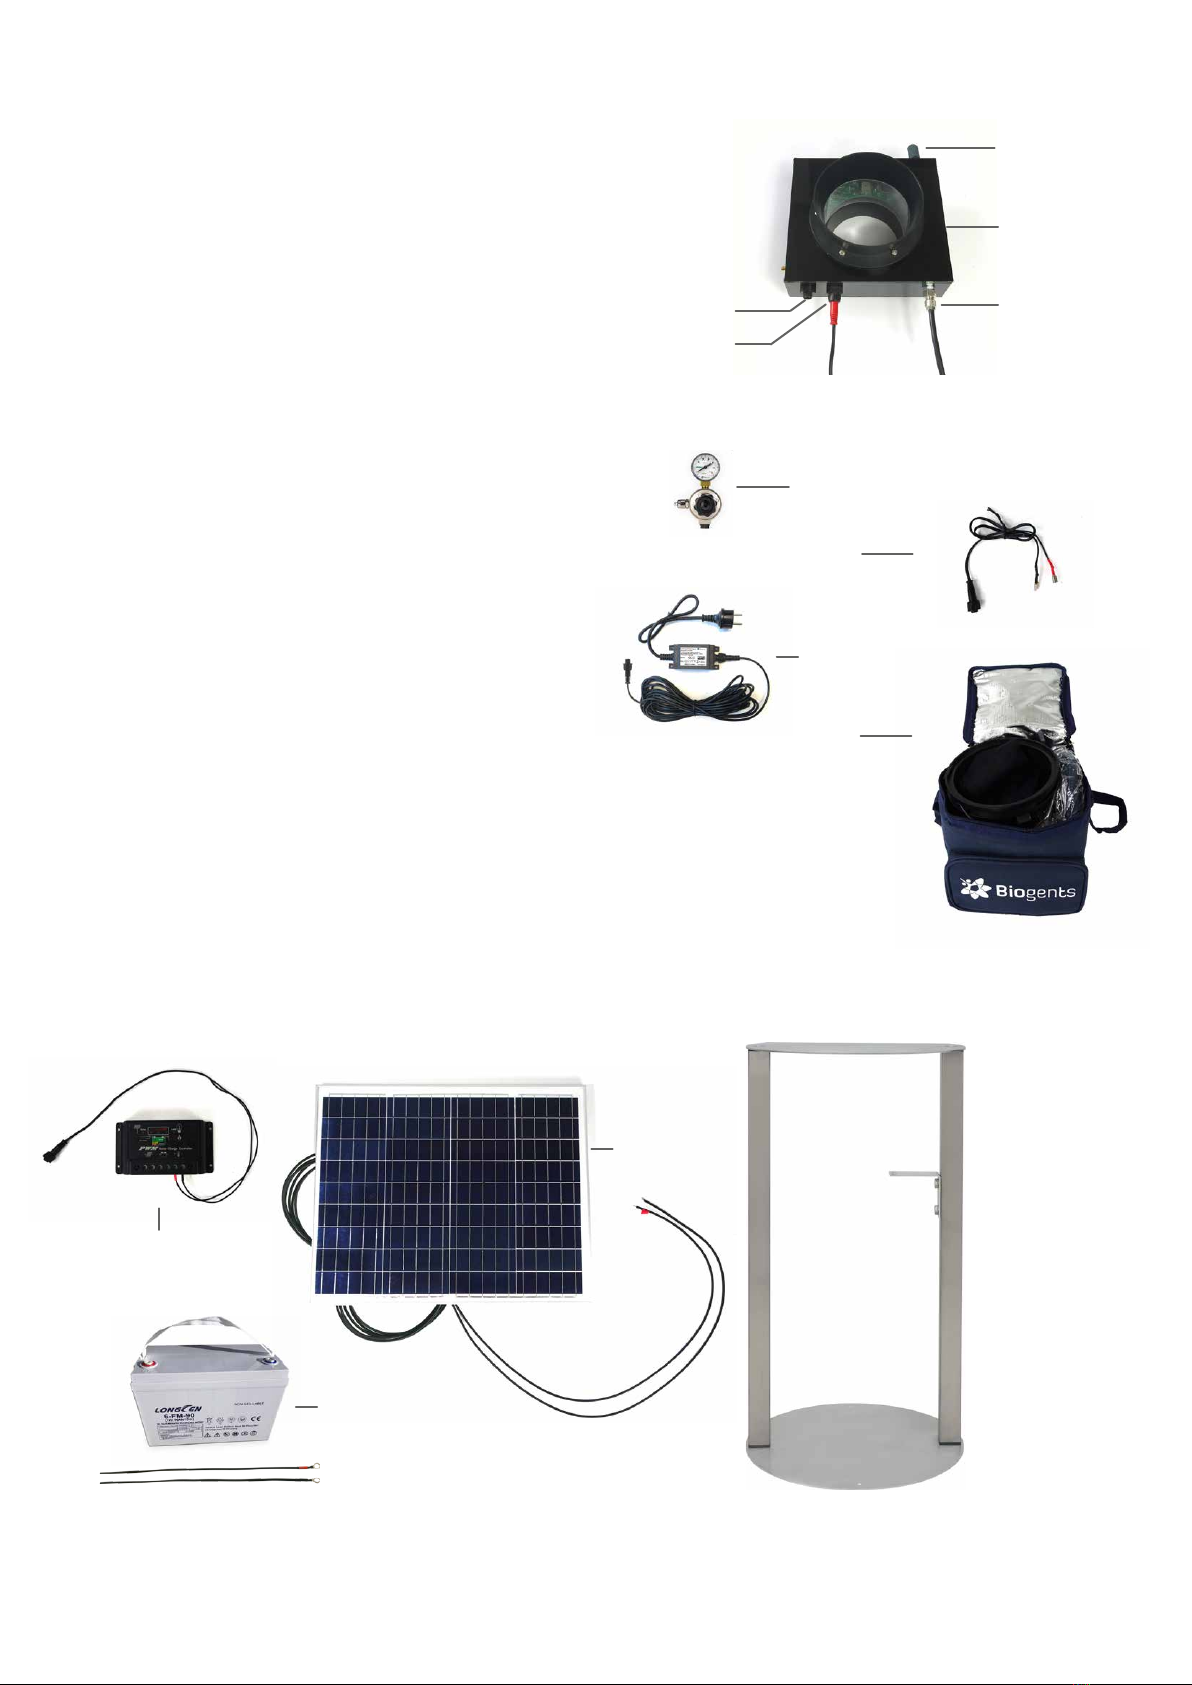
1. BG-Counter 2
1.1. Body with internal antenna
1.2. Connector for 12 V power
1.3. Fan connector (red) with attached fan adapter
cable
1.4. CO2input port with attached CO2tube
1.5. CO2release port
1.6. Adjustable pressure regulator
1.7. Battery adapter cable
1.8. Outdoor power supply
1.9. BG-Pro Counter version: 1x funnel net, 2x catch
bag, 1x inner cylinder with upper part and lower
part with 12 V fan, 1x trap body, 1x carrying bag,
1x tripod that enables the trap to stand on the
ground
Optional
2. Solar system
2.1. Solar panel with connectors
2.2. Charge controller with connectors
2.3. Battery with battery cables (order no. 10766)
3. BG-Trap Station (recommended)
3.1. Metal stand with bottom ring, lid, 2 beams, screws,
and nuts
Product Components
1.7.
1.2.
1.5.
1.6.
1.1.
1.3.
1.4.
1.8.
2.1.
2.2.
1.9.
3.1.
2.3.
{
order no. 10755-1

6
Set-Up with the BG-Trap Station (recommended)
1. Assemble BG-Pro parts
Follow the assembly instructions for the BG-Pro. See ma-
nual at » www.biogents.com.
In case you have already a BG-Pro:
• Do not add a UV light.
• Do not add a funnel.
• Always run the BG-Counter 2 with the 12V BG-Counter
fan included in the contents of the BG-Counter 2.
• If you do not use a BG-Trap Station, attach the tripod to
place the trap on the ground.
2. Add a BG-Lure
We recomend to add a BG-Lure into the body of the BG-
Pro [F1]. When using the BG-Lure in addition to CO2, it
acts as an synergist and can multiply your mosquito catch
rates and increase the accuracy of the BG-Counter 2.
Central upper bracket
WARNING
The BG-Counter 2 runs on 12 V. Never connect the BG-Counter 2 to a voltage
above 14.4 V.
When using the BG-Counter 2, always conrm that the rated voltage on the
fan label is 12 V (Biogents SKU 10042). Do not connect a 6 V fan!
3. Assemble the BG-Trap Station
Assemble the stand by xing the beams on the lower
plate with the enclosed socket screws. Place the upper
plateontheotherendsofthebeamsandalsoxthem
with socket screws [F2].
F2
F1

7
Beams
lower plate
F4F3
F5
Trap holder
4. Set up the BG-Pro in the stand
Insert an enclosed screw through one of the holes on
the central upper bracket of the BG-Pro [F3]. Continue
to insert the screw through one of the holes of the trap
holderoftheBG-Trapstation[F4]andxitwithanut.
Repeat this process with another screw and the second
hole.TheBG-Proshouldnowbermlyattachedtothe
BG-Trap station [F5].
5. For routine operation of the BG-Counter 2, we recom-
mend to not install a catch bag.
A catch bag and funnel net can be installed when the
trap and BG-Counter 2 are run only overnight or for a
few hours, with the aim to manually inspect the catch
bag:
Attach a funnel net and a catch bag to the bottom part
of the BG-Counter 2 [F6]. The funnel net is important to
avoid double counts of insects crawling out.
For more information about this topic see chapter “De-
termination of Counting Accuracy”.
6. Place the BG-Counter 2 into the opening on top of the
trap[F7]andturnitclockwiseuntilittstight.
7. Connect the fan to the BG-Counter 2
Connect the red fan adapter cable with the fan cable of
the trap. Please pay attention to always connect with
the arrow in line with the black marking line [F8].
F7
F12
F8
F6, optional
upper plate

8
The CO2bottle is not included, and must be provided by the
user.
ThettingsoftheregulatorsareeitherUSCGA-320orEuro-
pe W21.8x1/14 RH standards.
1. Install the CO2pressure regulator on tank and make sure
it is tight by using a wrench or pliers [F9].
2. Connect the free end of the CO2tubing to the regulator
Connect CO2
F10
F9
[F10]: unscrew the nut on the outlet, thread the end of
the CO2tube through the nut, insert the end of the CO2
tube rmly onto the outlet and re-screw the nut back
onto the outlet.
3. Now open the valve on the top of the CO2bottle to start
the release of CO2.
4. Adjust the pressure to the mark “C” on the dial of the
pressure regulator (2.6 bar).

9
Option 1: Power cord with transformer
This is recommended if AC power is available at the counter location.
• Use only the provided AC adapter, and conrmlocaloutletstylebefore
ordering:
• US: Nema 1-15
• Europe: CEE 7
Only connect to outdoor AC outlets with a weather-proof cover comply-
ing with local electrical codes.
3 options to connect the
BG-Counter 2 to power via
the 12 V power connection
Option 2: 12 V battery (provided by user)
This is recommended if the counter is operated in a location for a few days,
before being serviced or moved. The minimum number of hours of operation
possible with a full battery can be calculated as follows:
Operation hours = Battery capacity (Ah) x 2.
For example, with a battery capacity of 60 Ah (Ampere hours), the counter and
fan can be operated for at least 60 x 2 = 120 hours = 5 full days.
Use only “deep cycle” lead-acid batteries. Normal car batteries are not desig-
ned for continuous charge/discharge cycling, and thus would have signicantly
reduced lifetime.
• Connect battery using battery cable
Connecting the BG-Counter 2 to Power: 3 Options

10
Option 3: Solar panel with solar battery
This is recommended when the system needs to be operated autonomously for extended periods of time.
While the trap/Counter are usually placed in a shady location, the solar panel should be placed in a sunny spot nearby; the
charge controller and battery should be placed near the counter.
Charge controller
F11.2
F14.2
Before making any connections to the charge controller:
1. Conrm the BG-Counter 2 is disconnected (nothing
plugged into the black power connector on the left side
of the counter front panel).
2. Reviewtheinstructionleaetforthechargecontroller
(model may vary).
3. Conrm the battery is a fully charged 12 V lead-acid
deep cycle battery; the voltage across the terminals
should read no less than 12 V and no higher than 13.8 V.
4. The battery must not be a lithium battery of any kind to
avoidarehazardandsystemdamage.
In case of any questions or concerns at this stage, contact
your distributor or Biogents.
F11.3
Then, make the charge controller connections in this order:
1. Connect battery clamps to the battery and the other
ends to the charge controller [F11.1]. Pay attention to
connect minus-pole to minus-pole (black) and plus-pole
to plus-pole (red).
This is necessary to power up the controller, enable its
control and protection functions to avoid damage.
2. Connect the solar panel [F11.2], making sure the polarity
is correct.
Now check the voltage and/or indicator LEDs on the
controllerfrontpanelandconrmfunctionaccordingto
theinstructionleaet.Specically,anyvoltagereading
should indicate a 12 V system.
3. Connect the BG-Counter 2 power cable to the solar con-
troller [F11.3] but don’t yet plug the other end into the
BG-Counter 2; re-check the solar controller indications.
4. Plug the BG-Counter 2 power cable [F11.4] into the left-
most connector on the front panel.
Any other sequence may damage the charge controller or the BG-Counter 2 and
may void the warranty.
ForanyservicetotheBG-Counter2or battery,rstdisconnectthe BG-Counter2
power cable at the front panel; then follow the sequence in reverse order.
F11.4
F11.1
WARNING
When setting up solar system connections, it is mandatory to follow these instructions!
1. Never connect the BG-Counter 2 to the charge controller unless a fully charged 12 V battery is connec-
ted rst.
2. Never disconnect the battery without rst disconnecting the BG-Counter 2.
3. Do not alter the wires provided with the solar sytem

11
1. Automatic start-up
TheBG-Counter2hasnoon/oswitchorotherbuttons.It
automatically starts when connected to 12 V power.
2. Battery check
After the counter is connected to power, there will be from 1
to 4 beeps, depending on battery voltage.
• 4beepsmeanthebatteryissucientlycharged
• If you hear 1-3 beeps, it indicates that the battery is low
and needs charging. The counting function, fan, and CO2
willbeountilthevoltageincreasesto>11.8V
• If there is no beep at all, see chapter Troubleshooting /
Trap does not start up
3. Cellular connection check
Following the battery check, the device proceeds to check
the strength of the cellular connection. This usually takes
less than 30 seconds, but may take several minutes, for ex-
ample, if the counter has been moved to a new location with
adierentcellularprovider.
At the end of the check, the counter indicates signal strength
as follows:
• 1-5 long beeps: corresponding to 1-5 bars of signal
• 2 short beeps: no signal, no cellular connection possible
If no cellular connection is available, the counter can still be
operated. Data will be stored internally, and transmitted the
next time a connection is available.
4. Fan and CO2 ow check
After powering up, the fan and CO2valve are switched on
until the next round 15-minute interval (for example, if po-
wered up at 16:03 until 16:15). This provides time for the
operatortoconrmthattheBG-Pro12Vfanisworking,and
the CO2owison.
Conrmfanoperationvisuallybylookingintothetrapfun-
nel, or by holding a piece of tissue paper above the funnel.
By default, the CO2owisadjustedto50g/h.TheCO2dosing
valveislocatedinsidethecounterhousing.Itbrieyturnson
andoevery4seconds.
Check for the presence of CO2 ow as follows:
• Make sure that the CO2tank valve open
• You should listen a click sound from the valve
• You should listen a hissing sound from the CO2release port
5. Counter check
You can verify the functioning of the counter by throwing
a small object (for example a small piece of paper) into the
trap funnel. A short beep indicates that the counter has re-
gistered the object.
Seepage13forrst-timeuserregistration.
Operating the BG-Counter 2
Starting Sequence of the BG-Counter 2
Registration
First Cloud Connection
Therstconnectiontothecloudtakesplaceattherstfull
15 minutes after the counter was started (for example at
16:15, if you started the counter at 16:07).
When connecting to the cloud, results are uploaded, and the
scheduledenedonthewebsiteisdownloadedandactiva-
ted.
Depending on the schedule, fan, CO2and/or counting
functionmaybeturnedoatthistime.
Ifthisisanewcounter,therstconnectionalsoauto-registers
the counter on the website.

12
Determination of Counting Accuracy
Catch bag
For routine operation, it is not recommended to use a catch
bagasitmightlluptooquicklyandresultincountinger-
rors. For routine operation with the BG-Counter 2, the BG-Pro
is used without a catch bag. Mosquitoes are sucked through
the ventilator and end up dead at the bottom of the trap.
A catch bag can be installed when the BG-Counter 2 runs
only for a few hours in order to check if the number of coun-
ted mosquitoes by the BG-Counter 2 corresponds with the
actual number of collected mosquitoes. In this way the accu-
racy of the BG-Counter 2 can be determined.
Protect the trap from predators
When comparing manual catch bag counts to electronic
counts, note that mosquitoes can “disappear” from the catch
bag:
Mosquitoes and other insects may be “stolen” by ants, spi-
ders, or geckos. Therefore, make sure for all calibration ex-
periments that ants or other predators have no access to the
catch bag. You can protect the trap by placing a water sur-
face around it, or by adding glue or PTFE to all trap parts that
might be accessible for predators.
Check CO2 settings
The accuracy of the BG-Counter 2 strongly depends on the
presence of CO2. Make sure that CO2is turned on during the
whole time range that you select for determination of the
Counter‘saccuracy.Werecommendaow-rateof50g/h.
Compare
If you make sure that mosquitoes do not leave the catch bag
after they have been sucked in, the accuracy of the BG-Coun-
ter 2 for correctly counted mosquitoes is expected to range
between 80% and 90%.
Make sure to compare the catch bag results with the electro-
nic results reported for the same time interval!
This means, that you should install and take out the catch
bag as close as possible to a round 15 min intervall. Make
a note of the exact time range in which your catch bag was
attached to the BG-Counter 2 (e.g. the time range of your
manual counts. After downloading the raw data of the BG-
Counter 2 (p. 30), make sure to only consider the number of
mosquitoes that were counted in the same time range!
The BG-Counter 2 is reset every time the power is disconnected and re-connected, and the start-up sequence commences as
described above.
Daily
Check the dashboard of the BG-Counter 2 web app for
warnings or error messages. If a fan or voltage problem is
indicated, or there are no new transmissions, take corrective
actions immediately.
Every 2 weeks
Inspect and clean the counter and trap, as necessary:
• Remove everything that deters mosquitoes from ente-
ring the trap such as spider webs, leaves, and dirt.
• Empty the catch bag.
• Wipe the counter housing and the inside of the funnel
to remove dust or other contaminants.
Depending on local conditions, more frequent service
may be required.
CO2
• ReplaceorllCO2tank as necessary.
• Access the web app and update the CO2trap settings at
each replacement (blue “Fill CO2” button).
BG-Lure
• Replace the BG-Lure every 5 months.
Reset
Maintenance

13
The BG-Counter App is a multifunctional tool that allows you
to manage your BG-Counter/s. You can for example remotely
switchtrapsintheeldonandoandsetupvaryingtime
schedules for the traps and application times of CO2. There
aredashboardnoticationicons,whenoneofyourtrapshas
an issue, such as for example connection problems, ventila-
tor fail, or low CO2level. Furthermore, you have access to all
collected mosquito count data, and local environmental data
such as temperature, humidity, or ambient light. The web
app includes an analyzer tool that you can use for explora-
tory analysis of the catch count data of single or multiple
traps. You can for example compare the mean catch rates of
dierent neighborhoods, or simply visualize the mosquito
catchesofasingletrapondierenttimerangesandfordif-
ferent temporal aggregations (e.g., 15 min, 1 day, 1 week or
1 month).
The address of the BG-Counter web app is:
» https://bg-counter.biogents.com/app
The BG-Counter App is optimized for usage on a screen with
a diameter of at least 13 inches. We therefore recommend
using a laptop or desktop computer.
Windows PC with Windows 10
Browser: Google Chrome, Firefox, or Edge. Internet Explorer
is not supported.
Macintosh with macOS X 12 or later
Browser: Google Chrome, Firefox, or Safari.
Go to » https://bg-counter.biogents.com/registration/
The“NewCustomerRegistration”pagehastheeldsspeci-
edbelowthatyoushouldllin.Theeldsmarkedwithan
asteriskaremandatorytoll,whiletheothersareoptional.
• Personal Information*
• Mailing Address
• Technical Contact
• Billing Contact
Afterclicking the “Conrm”button,a newaccount iscrea-
ted.Youwillreceiveaconrmatione-mail(pleasehavealso
a look for the e-mail in your spam folder). Follow the e-mail
verication link. After verifying your e-mail and setting a
password, you can access your account at:
» https://bg-counter.biogents.com/app
Go to “Traps” and click on the blue “New Trap” button in the
top right corner of the screen. Enter one or multiple IMEIs
(commaseparated)intheeld.Clicktheblue“Assign”button
toregisteryourBG-Counter(s).YoundtheIMEIonasticker
at the side of the BG-Counter 2, on a sticker on the regist-
rationyerintheBG-Counter2box,andatthesideofthe
BG-Counter 2 box.
Description of the BG-Counter App
System Requirements
Registration: New Customer
Registration: New Trap

14
Trap
On the website and in these instructions, the word “trap”
refers to a complete system including a trap (BG-Pro or BG-
Sentinel) and a BG-Counter 2. Each trap is uniquely identi-
edbytheIMEIoftheBG-Counter2.
Location
Each trap is assigned to a location – the place where the trap
is installed to count and collect mosquitoes.
IMEI
IMEI stands for International Mobile Equipment Identity.
ThinkofitasyourBG-Counter‘sngerprint—it‘sa15-digit
number unique to each device.
Info Icons
Youndinfoiconsatseveralplacesofthewebapp.Hover
over the icon with the mouse and a window with more infor-
mation will pop up.
Basic Concepts
Geo-tags
Each Location automatically gets the geo-tags “Country”,
“State”, and “City” assigned.
Therearetwoadditionalgeo-tagsthatyoucandeneyour-
self: “Custom Group 1” and “Custom Group 2”. If you have
multiple traps in the same city, you could, for example, use
“Custom Group 1” to specify the neighborhood, and “Custom
Group 2” to characterize the biotope, such as for example:
suburban, urban, forest, lake, swamp, park, or similar. It is not
mandatory to assign your locations to custom groups. The
geo-tags allow you to make group-based analyses of your
catch count data.
Tables
Sorting function
All tables include a sorting function for every column: click
on the arrow that appears, when you hover with the mouse
over the name of each column. When you click on the arrow
forthersttime,itwillshowupwardsandsortthetableinan
ascending order. When you click on the same arrow again, it
will point downwards and sort the table in a descending or-
der. This function is helpful if you have many traps and want
to easily identify for example those traps, that have error no-
tications,ortrapsthathadanunusuallyhighorlowcatch
rate in the previous night.
Search function
All columns that have a magnifying glass icon include a
search function: click on the magnifying glass and type in
some info that makes it easier for you to nd the desired
trap/s. For example, in the dashboard, you can specify in the
“Catch Count” column, that you only want to see the traps
that collected between 150 and 200 mosquitoes since last
noon.
• go to “Dashboard”, then click on a location name, then
on the “View/Edit” button to set the trap name, schedu-
le, mosquito catch threshold, custom groups, etc.
• go to “Traps” to check the subscription status of your
devices, to assign a manually created location to an IMEI,
to register traps, to change the geolocation mode of your
traps.
BG-Counter App: Quick Start
• go to “Users”, then click on the “New User” button to
invite other users
• click on “Analyzer” to analyze your data (charts, tables,
and maps)
• go to “Prole” to set a new password for your account

15
Trap counts, environmental data, and other parameters like CO2schedule are stored by location. Traps can be assigned to lo-
cations manually, or automatically using transmitted GPS coordinates.
Data storage based on Location
When Geolocation is set to “Auto” (= default setting), the lo-
cation will be automatically determined via geofencing:
• When a trap is within the geofence radius (100 m) of an
existing location, it will automatically assign itself to that
location
• Otherwise, a new location will be created automatically
with a default name that includes the IMEI.
When Geolocation is set to “Fixed”, the trap data will be assi-
gned to a selected location independent of transmitted GPS
coordinates.
You can edit a location at any time in the Trap Info table of
the “Settings: Single Locations” page (see p. 20 for details).
Examples: What does data storage based on location mean for you
These examples are also explained in the video linked on page 39.
Example 1: You have several traps, but you use them only
during a part of the year.
At the start of the new season, when you put the traps back
to the eld at already existing locations, set geolocation
to auto and the traps will automatically assign themselves
to their locations. You don’t need to make sure that a BG-
Counter 2 unit with a certain IMEI is placed again at the same
location, to have a continuation of historical data.
Example 2: You have more locations than traps and rotate
the traps between them.
The collected data will be automatically stored for the lo-
cation the trap is currently at. Instead of having all the data
stored for one IMEI, it is stored for as many locations as the
trap was used at.
Example 3: A BG-Counter 2 is defective and replaced. The
new BG-Counter 2 is placed at the same location.
The data of the two BG-Counter 2 units (e.g., 2 IMEIs) will be
stored for the same location and you will have continuation
of your historical data for that location.
Example 4: You need to place two traps within 100 m.
This is also possible, but we recommend creating the loca-
tions manually in this case: Click on the “New Location” but-
ton above the Location Table of the dashboard. Use Satellite
View to determine the exact position on the map and use the
right mouse button to set the Location pin on the map. In the
“Trap Management” table (main menu: “Traps”), set Geoloca-
tion to Fixed and select the location for each trap from the
drop-down list of the “Current Location” column.

16
Main Menu - Overview
Dashboard
• Overviewofalllocations:LocationTable->identify
locations with a high catch count or counters with issues
(such as fan fail, low CO2, etc.)
• Access to the Location Summary Page: Catch Count
graph, trap status parameters, Location Info table, and
Catch Statistics
• Access to the Settings page (for one or multiple traps)
Analyzer
• Overview table: Choose which location/s or group/s you
want to analyze
• Analyzeyourcatchdatafordierenttimerangesand
temporal aggregations (15 min, 1 Day, 1 Week, 1 Month)
in graphs, tables, and maps.
• Data download (raw data).
Traps
• Trap Management table: A list of your traps with infor-
mation on subscription status, IMEI, Location, Geoloca-
tion, diagnostic information, etc.
• Register new BG-Counters
Users
Invite users and give them a role (“Administrator”, “Opera-
tor” or “Observer”).
Prole
Set a new password
Logout
Logout, or change your login
17
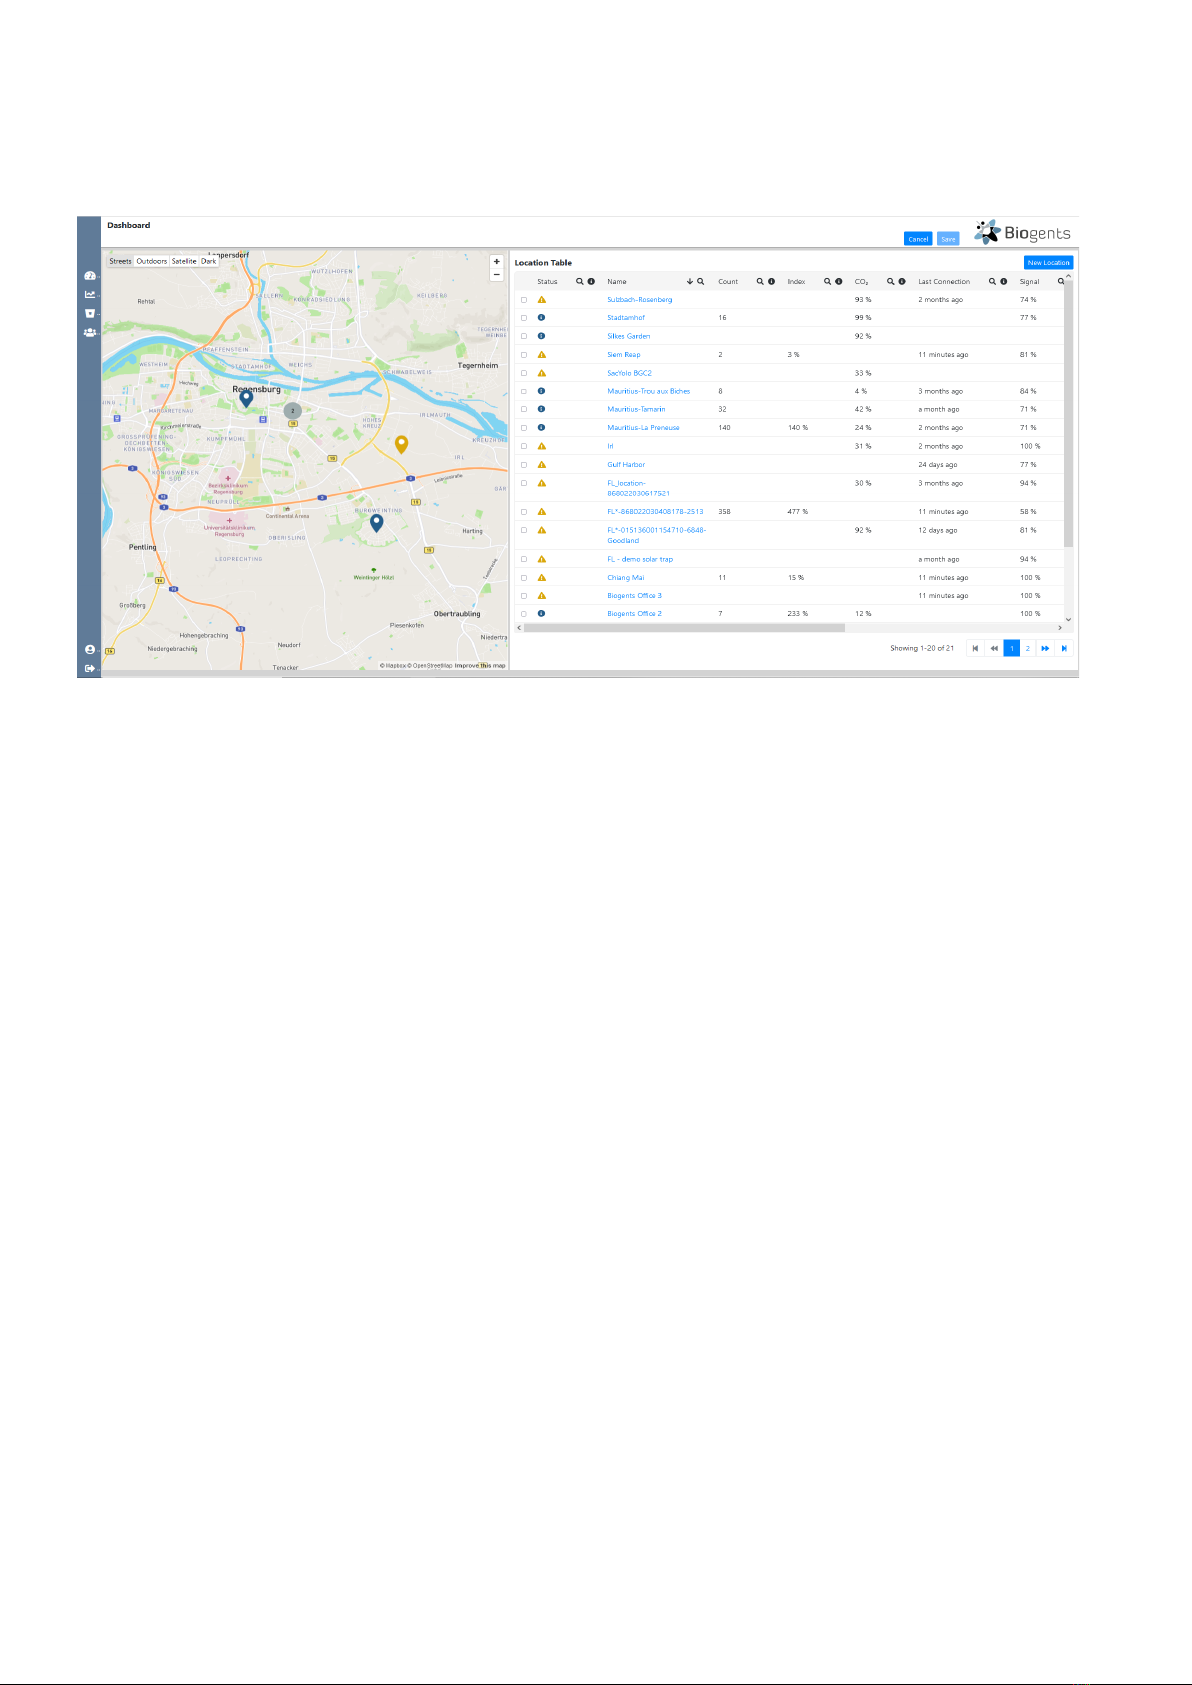
Dashboard
Whenyouaccessthedashboard(gurebelow),yougetanoverviewofallyourlocationsintheformofamapandatable.
Everypinonthemapreferstoatraplocation,andthecolorofthepinreferstoanoticationwarninglevel.
Location Table
The Location Table gives an overview of your locations and
helps you to plan your operations, as it includes relevant in-
formation such as the catch count since last noon, warning
icons, info about signal strength, voltage range and similar.
You can sort the Location table by every column by clicking
on the arrow that appears, when you hover with the mouse
over the name of each column. This function is helpful if you
have many traps and want to easily identify for example tho-
setraps,thathavewarningnotications,ortrapsthathadan
unusually high or low catch rate in the previous night.
The table includes the following columns:
• Status: Color-coded icons. When you hover over a yel-
low, blue, or red warning icon, the type of warning is dis-
played.
»Green: everything is functioning
»Blue: Info such as “No trap currently assigned”, “Trap
assigned but no transmission received”
»Yellow: Warning such as “No connection in the last
8 – 24 h”, “CO2supply at < 25%”
»Red: Error message such as “Rell CO2(very low or
empty)”, “Subscription expired, transmission disab-
led”, “Trap fan failure detected!”
Youndmoredetailedinformationonthedashboardwar-
nings in the section “Troubleshooting” (p. 34).
• Name: Location name. Automatically or manually assig-
ned.Clickonthenameofaspeciclocationtoaccessthe
Location Summary page.
• Count: Number of mosquitoes counted since last noon.
• Index: Number of counted mosquitoes in relation to set
Mosquito Catch Index Threshold. Theeldremainsemp-
ty if you did not specify a threshold. The Mosquito Catch
IndexThresholdisanintegernumber(>0)thatyoucan
specify for each trap. You can set a threshold on the set-
tings page that you reach by clicking the blue “View/Edit”
button next to the Location Info table (see p. 18).
• CO2: Estimated CO2level of the cylinder. To get a good
estimate, make sure to always inform on the settings
pagewhen you rellCO2. Also make sure to select the
correctcylindersizeandthedesiredowrate.
• Last Connection: The last time when data was transmit-
ted.
• Signal: Strength of the transmission signal.
• Voltage Range: Min and max supply voltage in the past
24h.Fullychargedbattery:>12.8V.Batterydrainingor
inadequate solar charging: < 11.5 V. The counter will be
turned o when the voltage drops to less than 11.2V
toprotecttheelectronics.Onceturnedo, thecounter
remainsturned o until thevoltagebuilds upagain to
11.8 V.
• Fan Status: Either “On”, or “Fail”. Fail: currently turned on
but no current detected (fan is either defective or not po-
wered).
• Fan Current: Current that is drawn by the trap ventilator.
Normal range: BG-Pro: 250 mA +/- 20 %. BG-Sentinel:
400mA+/-20%.<50mA:faniseitherturnedo,not
connected, or defective. Reading suddenly exceeding
normal range: fan blocked by twig or similar.
18
Location Info table
This table (1) provides an overview of relevant information for the location. You can change some of these parameters on the
settings page that you reach by clicking the blue “View/Edit” button next to “Location Info”:
Location Summary Page
There are two ways to access the Location Summary page of
aspeciclocation.Choosealocationinthetableandclick
on the blue text in the “Name” column. Alternatively, click
on a Location on the map. A window with the location name
appears. Click on the blue location name.
The objective of the Location Summary page is to give you
a comprehensive overview of all location attributes and key
• Name: Every trap has an automatically assigned location
name that includes the IMEI and geographical informati-
on.Clickontheeldtochangethisnameinawaythat
makes it easy for you to identify the trap e.g., the location.
• Description: If you want, add a description to your trap
such as for example “close to a forest”, “airport”, “uni-
versity campus” or whatever best describes the location.
• Latitude and Longitude: can be adjusted, by either typing
incorrectcoordinatesinthetwoelds,orbymovingthe
location pin in the map to the exact location.
• Last Connection: The last time the trap successfully con-
nected and sent data.
• Country: The country of the location (geo-tag, automati-
cally assigned by geolocation).
• State: The state of the location (geo-tag, automatically
assigned by geolocation).
• City: The city of the location (geo-tag, automatically assi-
gned by geolocation).
• Custom Group 1: Geo-tag. Shows a name if the trap was
assigned to a custom group (for example: neighborhood,
nameofaregion,biotope,etc.).Thiseldisnoteditable.
To assign this trap to a custom group, click on the blue
„View/Edit“ button to access the settings page. Note that
you can conduct group-based analyses when you assign
your traps to custom groups.
• Custom Group 2: See above. This is a second Custom
Groupthatyoucandene.
• IMEI: Serial number (IMEI) of the trap that is currently as-
signed to this location; if empty, you can assign a trap in
theTrapmenu.Thiseldisnoteditable.
• Geolocation Mode: Auto: trap has been assigned by Geo-
location; Fixed: trap has been assigned manually. This
eld is not editable. You can change the geolocation
mode in the Traps menu.
trap parameters to make sure your trap is functioning as pl-
anned. When errors occur, this page can help you to pinpoint,
when and why certain problems came up.
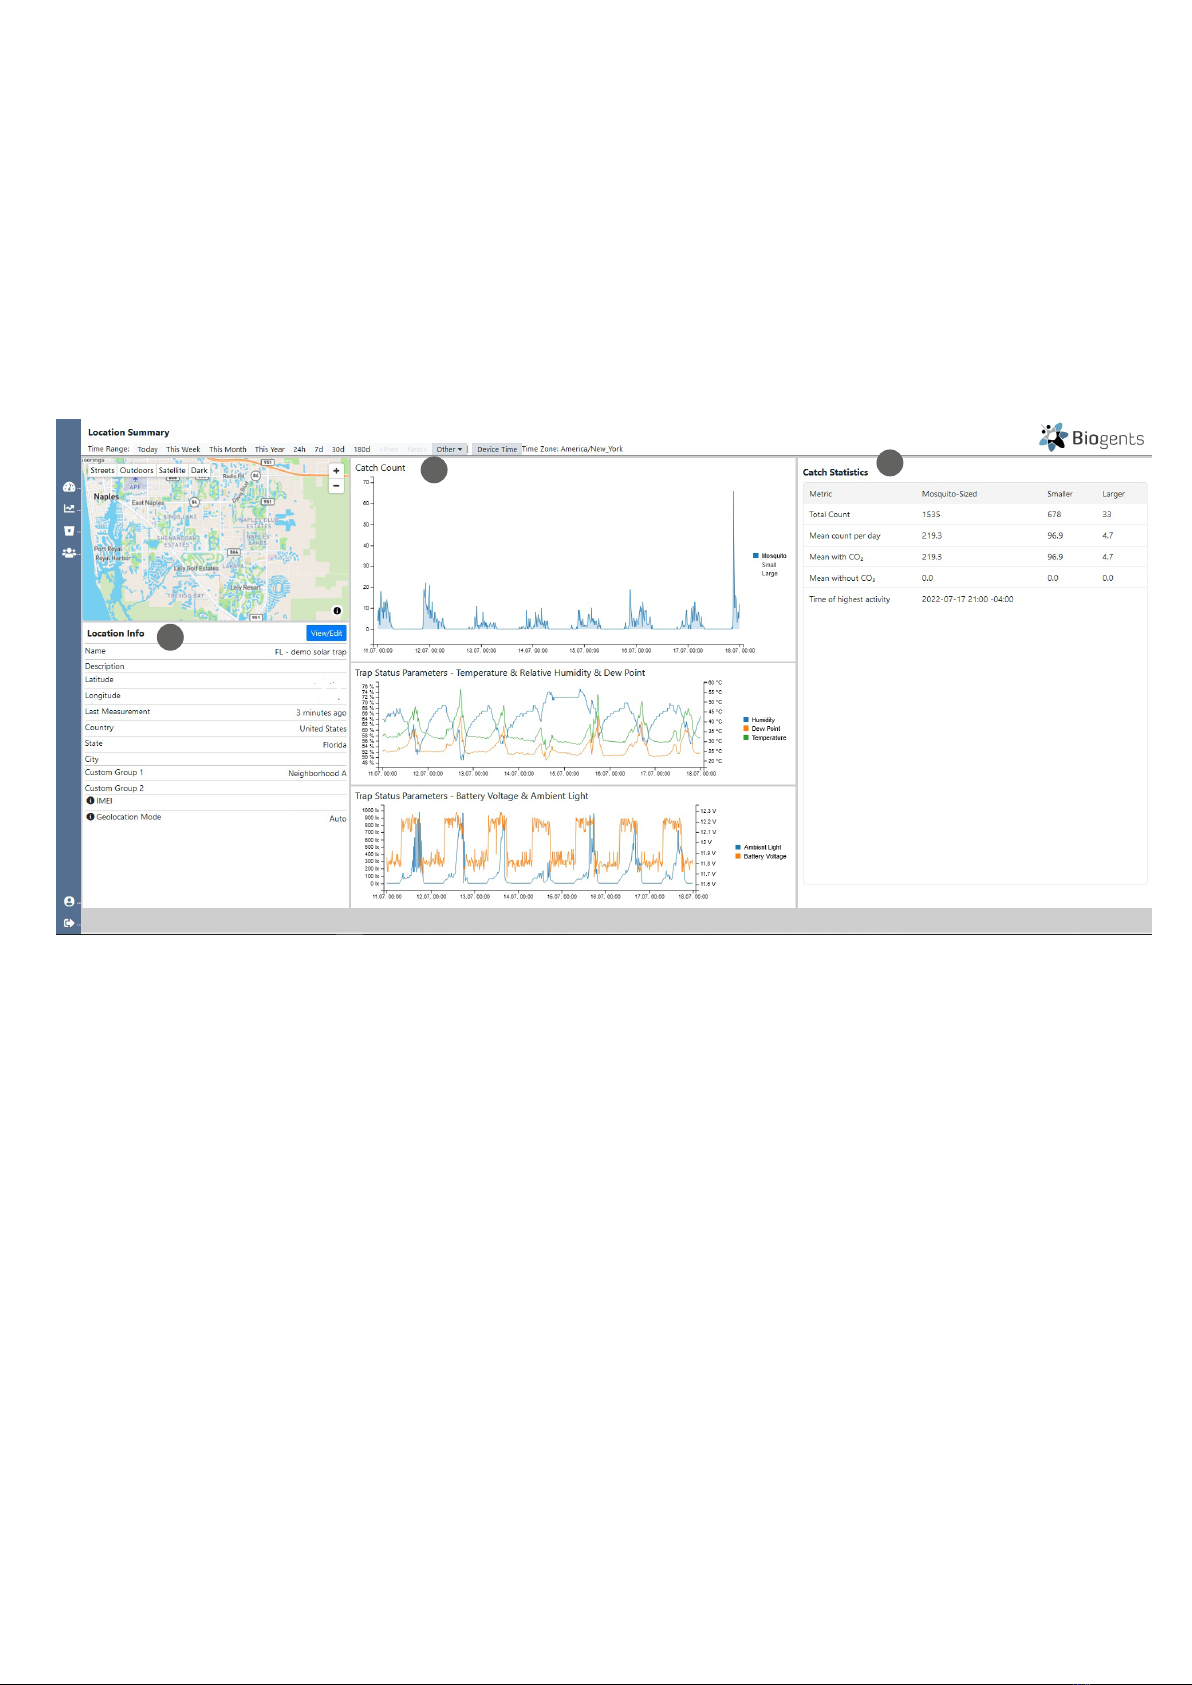
TheLocationSummarypage(gurebelow)includestheLo-
cation Info table (1) with details about the location, a graphi-
cal overview of your catch counts (2) and dierent trap sta-
tus parameters (temperature, relative humidity, dew point,
battery voltage, ambient light), and the Catch Statistics table
(3).
1
2 3

19
Graphs
There are three line charts on the Location Summary page:
• “Catch Count” (2)
• “Trap Status Parameters - Temperature, Relative Humidity & Dew Point”
• “Trap Status Parameters - Battery Voltage & Ambient Light”
•
The “Catch Count” graph shows mosquito counts by default,
but you can click on “Large” and/or “Small” in the graph’s le-
gend (7), to add the count data of large and/or small objects.
By clicking on a category that is currently shown in the graph,
you can remove it. The same applies for the two other graphs.
All graphs show the data on a temporal resolution of 15 mi-
nutes. In the upper left menu, you can change the time range
(4) of the x-axes of all three graphs. By clicking on “other” (5),
you can specify a customized time range. When you select
one of the time range options “Today”, “This Week”, “This
Month”, or “This Year”, you can use the <Prev and the Next>
buttons (6) to navigate from one day, week, month, or year to
the previous or next day, week, month, or year.
Catch Statistics table
The Catch Statistics table shows you the statistics of the chosen Time Range: Total Count of mosquitoes, small and large
objects,themeancountperday(iftimerange>1day),meancountwithandwithoutCO2, and the time of highest mosquito
activity.
For example, you can display only the temperature, humidity,
or dew point, instead of all three at the same time. Use the
scrollingwheelofyourmousetozoominandoutatspecic
positions in the graphs.
7
4 6 5

20
Settings Page
The settings page can be accessed for a single trap, or for
multiple traps that you select via checkboxes in the Location
Table.
Go to the Dashboard and click on the check boxes at the left
side of the Location Table to select the location/s that you
want to change settings. A blue “View/Edit” button will ap-
pear in the top right corner of the screen. The number in bra-
ckets behind “View/Edit” indicates the number of traps that
• Name: choose a name for the Location. This name will
appear in the Location overview table and in the analyzer
overview table.
• Description: You can add an additional description to this
location. The description is only visible at the Location
summary page.
• Latitude and Longitude: Here you can manually ne-
adjust the trap position. You can also use the mouse to
move the position pin on the map. Fine adjustment of the
position is also possible when geolocation mode is set
to automatic.
Settings: Selected Locations
Thesettingspageforselectedlocationslooksabitdierent:
Instead of the location info table, there is a list (Selected Lo-
cations) of the traps that you have previously selected by
using the checkboxes of the dashboard location table.
All settings that you change on the Settings: Selected Loca-
tions page will apply to all of the locations that you have
selected.
Changing settings for multiple traps at the same time can be
very convenient if you have many traps. For example: If you
want to assign 20 of your traps to the same custom group,
and another 30 traps to another, you can accomplish the as-
signment of 50 traps in only 2 steps.
Settings: Single Location
Thesettingspageforasinglelocationisdividedintwoparts.Attheleft,youndthe“LocationInfo”table,asexplainedabove
forthe“LocationSummary”page.Youcaneditsomeoftheelds:
you selected. Click this button to access the settings page.
When accessing the Settings page for multiple locations, all
setting changes will be applied to all selected traps at the
same time. Be sure to carefully select the traps when you
want to apply the same settings to multiple traps.
For a single trap you can alternatively access the settings
page through the blue “View/Edit” button next to the Loca-
tion Info table of the Location Summary page.
Other manuals for BG-Counter 2
2
Table of contents
Other Biogents Cash Counter manuals


