manuals.online logo
Brands
  1. Home
  2. •
  3. Brands
  4. •
  5. Bosch
  6. •
  7. Cell Phone
  8. •
  9. Bosch B465 User manual

Bosch B465 User manual

1 | Overview 2 | Installation
This section describes basic hardware installation procedures
for installing the enclosure, B465 and B46 modules, and
knockout locations for wire routing. For information on
configuration, LED descriptions, and troubleshooting refer to
the
B465 Installation and Operation Guide (P/N: F01U311207).
CAUTION!
Remove all power (AC and battery) before making
any connections. Failure to do so might result in
personal injury and/or equipment damage.
NOTICE!
Notify the central station and the local authority
before installing the B465 in an existing system.
2
3
7
13
15
1
4
5
8
9
6
10
11
TMPR
BAT
ETHERNET
EXTERNAL
ANNUNC
X
MODULE 1
Y
MODULE
RELEASE
1 COM 2 3 COM 4 T R
PNL LINE 1
C NO
RELAY2
16.5VAC
NC C NO
RELAY1
TRBL
TX
RX
PWR
PANEL
LINE 2
USB
ETHERNET
100BASE-T
LINK
COMMUNICATION MODULE 1
3 COM 41 COM 2
R Y G B
SDI2
Device Bus
BATTERY
PANEL
LINE 1
BATTERY
POWER
RX
TX
SYSTEM TROUBLE
INPUTS
2.2 k End of
Line Resistors
C NO
RELAY3
12V
AUX COM
16 1214
T R
PNL LINE 2
24 VDC
or
16.5 VAC
+ -
BATTERY
The B465 Conettix Universal Dual Path Communicator links the
digital dialer from a intrusion/fire control panel to an Ethernet
connection on a local area network (LAN) or wide area network
(WAN). The module uses its built-in Ethernet connection, and/or
a Conettix plug-in cellular module (B440/B441/B442/B443) to
send reports to the central station receiver.
Figure 1.1: Board overview
Callout ― Description Callout ― Description
1 ― Holes to stabilize plug-in
modules
9 ― Control panel phone line
connectors
2 ― Plug-in module connector 10 ― Input loop terminals
(COM 1 to COM 4)
3 ― Plug-in module retention clip 11 ― 12V AUX/COM terminal
4 ― Ethernet connector 12 ― Programmable output
relays to a control panel
5 ― USB connector 13 ― Heartbeat LED
6 ― Status LEDs (SYSTEM
TROUBLE, TX, RX, POWER, and
BATTERY)
14 ― 12 VDC sealed lead-acid
rechargeable battery terminals
7 ― External Annunciator
connector (connected to a B46)
15 ― Earth ground terminal
8 ― Tamper switch 16 ― 16.5 VAC or 24 VDC
power supply input terminals
2.1 | Remove enclosure knockouts
2.4 | Apply the wiring label into the enclosure
Apply the supplied wiring label to the inside, enclosure door.
Refer to Figure 2.3 for wiring label location.
Callout ― Description
1 ― Suggested knockout locations for B465 wiring
2 ― Knockouts for B46 LED cover and module (optional for non-fire
applications)
3 ― Lockset mounting knockout
Figure 2.1: Enclosure knockout locations (B10 shown)
1
1
1
1
3
2
4
2.3 | Mount the enclosure
Mount the UL Listed enclosure such as the B10/B10R, B11/
B11R, or D8103 enclosure in the desired location. Refer to
Figure 2.3.
2.5 | Insert enclosure earth ground wiring
Insert the supplied earth ground wire onto the inside clip of a
B10/B10R or B11/B11R the enclosure door. Refer to Figure 2.3
for ground wire location.
Review knockout locations before installing onto any surface.
Each enclosure is slightly different regarding knockout locations.
Use a hammer and punch to remove the desired knockout
locations. Use pliers to remove metal debris. Refer to Figure 2.1.
Callout ― Description
1 ― B10/B10R enclosure
2 ― B11/B11R enclosure
3 ― Mounting plastic standoff locations for B465
Figure 2.5: Mount the module
2
3
3
1233
3
3
4
5
Figure 2.3: Mount the enclosure (B10/B10R shown)
Callout ― Description
1 ― B465 wiring label (label insertion location)
2 ― Earth ground wiring enclosure location
3 ― Enclosure mounting holes (4)
4 ― B46 mounting locations*
5 ― Tamper switch mounting locations (optional)
* Use the upper, right-hand 3-hole mounting location for installing the optional B46
module in a B10 enclosure.
2.6 | Insert plastic standoff
Snap the four supplied plastic standoffs onto four enclosure
support posts. Refer to Figure 2.4. and Figure 2.5.
Figure 2.4: Mount the plastic standoff onto the enclosure
Callout ― Description
1 ― Module with mounting bracket installed
2 ― Enclosure (side wall)
3 ― Mounting screws (3)
Figure 2.7: Mount the B46 module
1
3
2
Callout ― Description
1 ― B46
2 ― Enclosure
Figure 2.8: Installing into an enclosure
2
1
2.8 | Mount the B46 module (optional)
Mount the B46 into the enclosure’s side, 3-hole mounting
pattern using the supplied mounting screws, and
secure onto the enclosure. Refer to Figure 2.7. For more
information on the B46 installation, refer to the B46
Installation and Operation Guide (P/N: F01U312441).
2.7 | Inserting the screws
Mount the B465 into the enclosure’s 4-hole plastic standoffs
using the supplied screws and a slotted screwdriver. Refer
to Figure 2.6.
Figure 2.6: Mount the enclosure
NOTICE!
The SDI2 Device Bus terminal connector located
about callouts 11 and 12 is for future use.
© 2015 Bosch Security Systems, Inc. F.01U.311.091 | 03 | 2015.09
Bosch Security Systems, Inc. product manufacturing dates
Use the serial number located on the product label and refer to the Bosch Security
Systems, Inc. website at http://www.boschsecurity.com/datecodes/.
Copyright
Use the serial number located on the product label and refer to the Bosch Security
Systems, Inc. website at http://www.boschsecurity.com/datecodes/.
Trademarks
All hardware and software product names used in this document are likely to be registered
trademarks and must be treated accordingly.
8 |
Specifications
Dimensions 79 mm x 128 mm x 38 mm (3.11 in x 5.03 in x 1.50 in)
Voltage output
(operating)
12 VDC nominal (Special application)
Standby battery
current
requirements
*Battery input: B465: Idle 150 mA; Alarm 230 mA
Alarm: B465 with B440/B441/B442/B443 = 180 mA
24 VDC input
current
requirements
*24 VDC input: B465: Idle 120 mA; Alarm 160 mA
USB cable USB cable (Type A to A male-to-male) - not supplied.
Use a Bosch supported cable such as the B99 cable
(F01U278853)
Compatible
transformers
D1640, 120 VAC input, 16.5 VAC, 40 VA output Class 2
plug-in
D1640-CA 120 VAC input, 16.5 VAC, 40 VA output Class
2 plug-in
D1640-120WI, 120 VAC input, 16.5 VAC, 40 VA output
Class 2 wire-in
Compatible
digital dialer
formats
Contact ID
Pulse 3/1, Pulse 4/2
SIA (SIA8, SIA20)
Compatible
receivers
D6600/D6100IPv6/D6100i
Compatible
enclosures
B10/B10R Medium Control Panel Enclosure
B11/B11R Small Control Panel Enclosure
D8103 Enclosure
Compatible
module
B46 module (must use supporting B46 cable to connect
to the B465)
Relative
humidity
Up to 93% non-condensing
Temperature
(operating)
0° to +49° C (+32° to 120° F)
*Refer to the Standby battery requirements and calculations section in the
B465 Installation and Operation Guide for the current draw requirements of
other system components
7 |
Certifications
Region Certification
US FCC Part 15 Class B
NIST FIPS 197 AES Certification (IP Communications)
California State Fire Marshall (CSFM)
UL 365 – Police Station Connected Burglar Alarm Units and
Systems
UL 609 – Local Burglar Alarm Units and Systems
UL 864 – Control Units and Accessories for Fire Alarm Systems
UL 985 – Household Fire Warning System Units
UL 1023 – Household Burglar Alarm System Units
UL 1076 – Proprietary Burglar Alarm Units and Systems
UL 1610 – Central Station Burglar Alarm Units
Canada CAN/ULC S303 – Local Burglar Alarm Units and Systems
CAN/ULC S304 – Signal Receiving Centre and Premise Alarm
Control Units
ULC - S545 – Residential Fire Warning System Control Units
ULC – ORD C1023 – Household Burglar Alarm System Units
ULC – ORD C1076 – Proprietary Burglar Alarm Units and Systems
ICES – 003 – Digital Apparatus
Bosch Security Systems, Inc.
130 Perinton Parkway
Fairport, NY 14450
USA
www.boschsecurity.com
Bosch Sicherheitssysteme GmbH
Robert-Bosch-Ring 5
85630 Grasbrunn
Germany
2.11 |
Earth ground wiring
Connect the system to earth ground before making other
connections. Doing so prevents damage from electrostatic
discharges or other transient electrical surges. Use a
recommended earth ground reference such as a grounding
rod, or a cold water pipe. Make the connection using 14
AWG (1.8 mm) to 16 AWG (1.5 mm) wire. Refer to the
B465
Installation and Operation Guide (P/N: F01U311207).
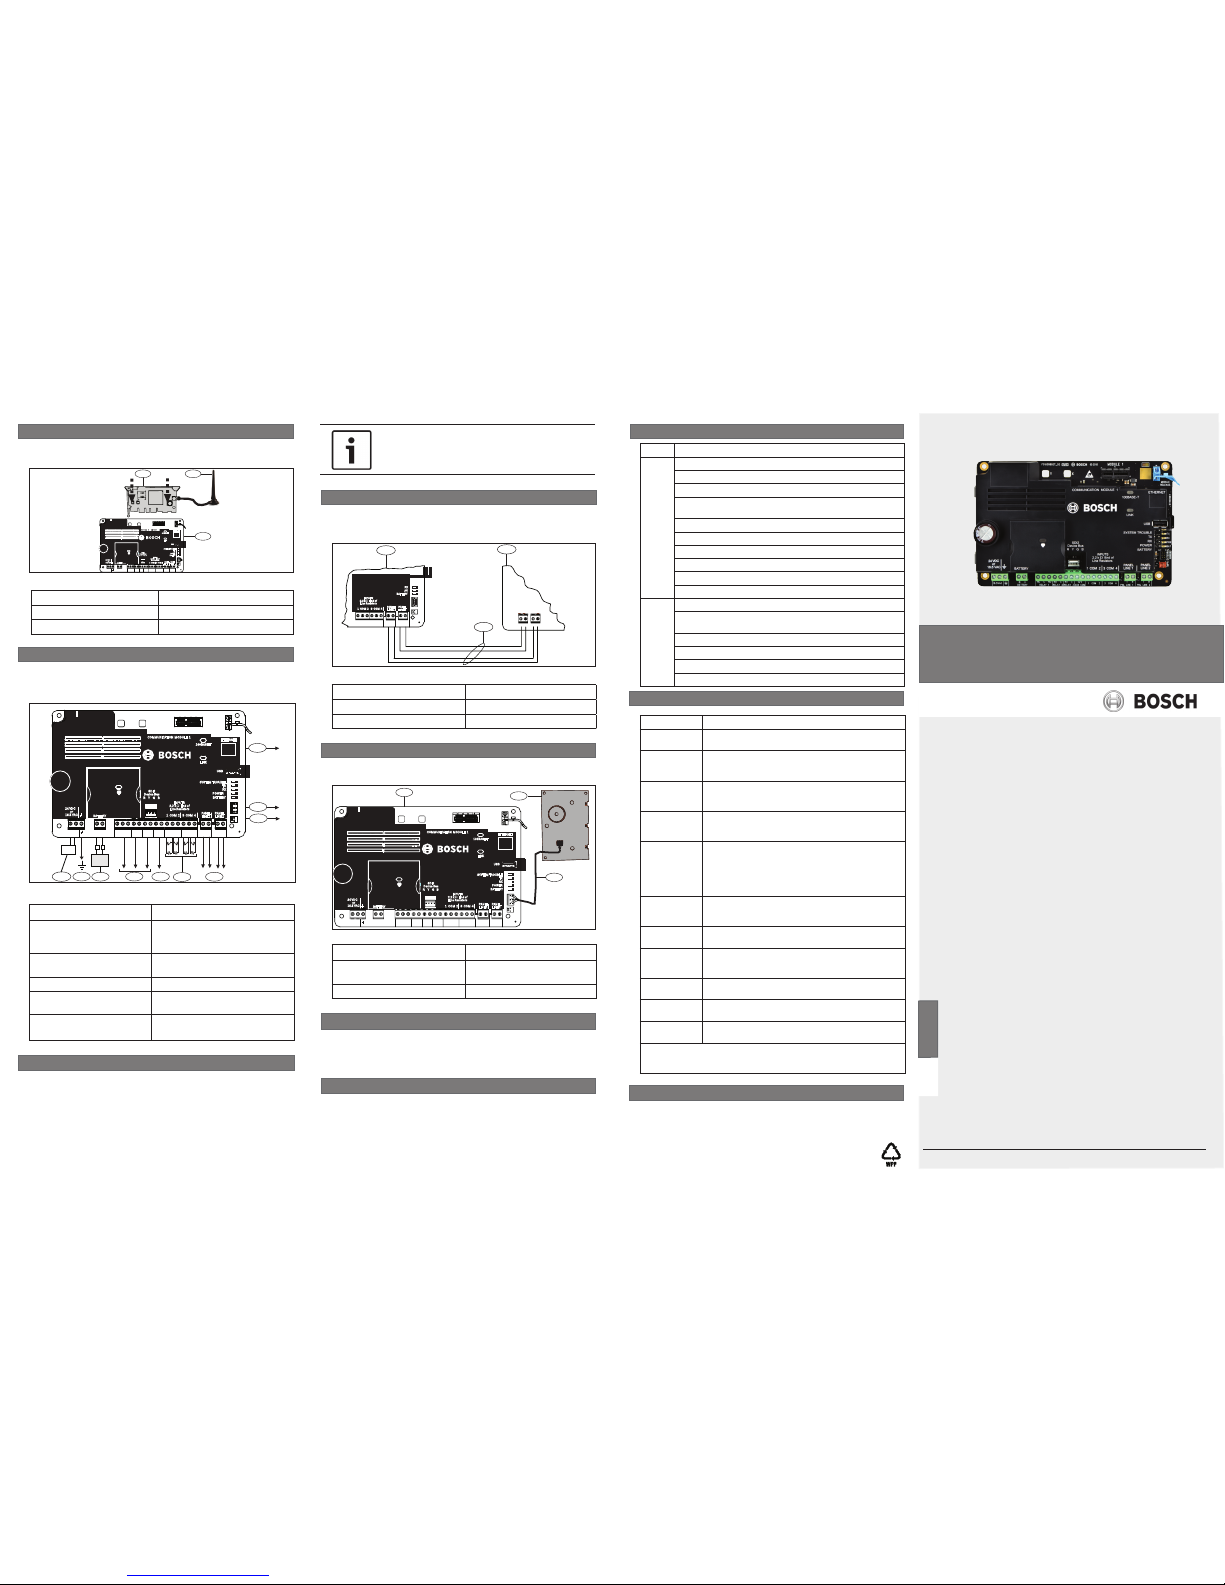
2.9 | Insert the cellular module (optional)
Insert the cellular module into the slot of the B465 until the
module “clicks” into place. Refer to Figure 2.9.
Callout ― Description Callout ― Description
1 ― B44x cellular module 3 ― B465
2 ― Antenna
Figure 2.9: Insert the cellular communication module
TMPR
BAT
ETHERNET
EXTERNAL
ANNUNC
X
MODULE1
Y
MODULE
RELEASE
1 COM 23COM 4 T R
PNLLINE 1
C NO
RELAY2
+ BAT-16.5VAC
NC C NO
RELAY1
TRBL
TX
RX
PWR
PANEL
LINE2
USB
ETHERNET
100BASE-T
LINK
COMMUNICATIONMODULE 1
3 COM 41 COM 2
R Y G B
SDI2
DeviceBus
BATTERY
PANEL
LINE1
BATTERY
POWER
RX
TX
SYSTEMTROUBLE
INPUTS
2.2k Endof
LineResistors
C NO
RELAY3
12V
AUXCOM
T R
PNLLINE 2
24VDC
or
16.5VAC
1 2
3
2.10 | Wire to the control panel
Refer to the enclosure wiring label supplied with the B465, or
the B465 Installation and Operation Guide for specific wire routing
information. Refer to Figure 2.10 for basic wiring routes.
Figure 2.10: System wiring
TMPR
BAT
ETHERNET
EXTERNAL
ANNUNC
X
MODULE 1
Y
MODULE
RELEASE
1 COM 2 3 COM 4 T R
PNL LINE 1
C NO
RELAY2
16.5VAC
NC C NO
RELAY1
TRBL
TX
RX
PWR
PANEL
LINE 2
USB
ETHERNET
100BASE-T
LINK
COMMUNICATION MODULE 1
3 COM 41 COM 2
R Y G B
SDI2
Device Bus
BATTERY
PANEL
LINE 1
BATTERY
POWER
RX
TX
SYSTEM TROUBLE
INPUTS
2.2 k End of
Line Resistors
C NO
RELAY3
12V
AUX COM
T R
PNL LINE 2
24 VDC
or
16.5 VAC
54
6
7
8
9
10
1
2
+_
+
-
BATTERY
3
Callout ― Description Callout ― Description
1 ― RJ 45 Ethernet
connection to central station
6 ― 12V AUX/COM terminals
(optional output power source,
Special Application 9.9 - 13.8 V)
2 ― External Annunciator
terminal (connected to B46)
7 ― Programmable output relays
(Relay 1, Relay 2, Relay 3)
3 ― To tamper switch 8 ― Battery (7-18 Ah)
4 ― Phone Line 1/2 to control
panel terminals
9 ― To earth ground
5 ― EOL input loop 10 ― 16.5 VAC or 24 VDC power
supply input terminals
4 |
LED descriptions
The B465 and B46 modules include on-board LEDs to assist
with troubleshooting issues as well as communication status.
For detailed information on all LED descriptions, refer to the
B465 Installation and Operation Guide (P/N: F01U311207).
You can configure the B465 using USB. For information on
configuring the B465, refer to the B465 Installation and Operation
Guide (P/N: F01U311207).
3 |
Configuration
Callout ― Description Callout ― Description
1 ― B465 module 3 ― Intrusion/Fire control panel
2 ― Phone wiring connection
Callout ― Description Callout ― Description
1 ― B465 module 3 ― B46 wiring harness (P/N:
F01U310747)
2 ― B46 module
2.12 | Wire to the control panel
Use supporting wiring when connecting a B465 to a intrusion/
fire control panel in order to establish communication. Refer to
Figure 2.11.
Figure 2.11: System wiring
TMPR
BAT
REMOTE
INTERFACE
1 COM 2 PNL LINE 2
3 COM 4 PNL LINE 1
RX
AC
PANEL
LINE 2
3 COM 41 COM 2 PANEL
LINE 1
BATTERY
AC
RX
INPUTS
2.2 k End of
Line Resistors
1
T R T R
2
3
2.13 | Wire to B46 (optional)
Use supporting B46 cable to connect to the B465. Refer to
Figure 2.12.
Figure 2.12: B46 wiring
TMPR
BAT
ETHERNET
EXTERNAL
ANNUNC
X
MODULE 1
Y
MODULE
RELEASE
1 COM 23COM 4 T R
PNL LINE 1
C NO
RELAY2
+
-
BATTERY
16.5VAC
NC C NO
RELAY 1
TRBL
TX
RX
PWR
PANEL
LINE 2
USB
ETHERNET
100BASE-T
LINK
COMMUNICATION MODULE 1
3 COM 41 COM 2
R Y G B
SDI2
Device Bus
BATTERY
PANEL
LINE 1
BATTERY
POWER
RX
TX
SYSTEM TROUBLE
INPUTS
2.2 k Endof
Line Resistors
C NO
RELAY3
12V
AUX COM
T R
PNL LINE 2
24 VDC
or
16.5 VAC
12
3
NOTICE!
The D8004 is required for any Commercial Fire
installations that use a plug-in transformer.
en Quick Start Guide
Conettix Universal Dual Path
Communictor
B465

Other manuals for B465

2

Other Bosch Cell Phone manuals

Bosch CONETTIX B444-A2 User manual

Bosch

Bosch CONETTIX B444-A2 User manual

Bosch ITS-DX4020-G Operating instructions

Bosch

Bosch ITS-DX4020-G Operating instructions

Bosch DS7240-UK User manual

Bosch

Bosch DS7240-UK User manual

Bosch WORLD 718 User manual

Bosch

Bosch WORLD 718 User manual

Bosch GSM 909 DUAL S User manual

Bosch

Bosch GSM 909 DUAL S User manual

Bosch GSM-Com 608 User manual

Bosch

Bosch GSM-Com 608 User manual

Bosch B442 User manual

Bosch

Bosch B442 User manual

Bosch SAFECOM SC3100 Quick start guide

Bosch

Bosch SAFECOM SC3100 Quick start guide

Bosch D7212G User manual

Bosch

Bosch D7212G User manual

Bosch D9068 Quick start guide

Bosch

Bosch D9068 Quick start guide

Bosch ITS-DX4020-G User manual

Bosch

Bosch ITS-DX4020-G User manual

Bosch Doro Secure 680 User manual

Bosch

Bosch Doro Secure 680 User manual

Bosch B443 User manual

Bosch

Bosch B443 User manual

Bosch B465 User manual

Bosch

Bosch B465 User manual

Bosch GSM 908 User manual

Bosch

Bosch GSM 908 User manual

Bosch DS7060 User manual

Bosch

Bosch DS7060 User manual

Bosch D6412 User manual

Bosch

Bosch D6412 User manual

Bosch B465 User manual

Bosch

Bosch B465 User manual

Bosch QSM 1800 User manual

Bosch

Bosch QSM 1800 User manual

Bosch GSM 1900 User manual

Bosch

Bosch GSM 1900 User manual

Bosch B441 User manual

Bosch

Bosch B441 User manual

Bosch Conettix ITS-300GSM User manual

Bosch

Bosch Conettix ITS-300GSM User manual

Bosch B430 User manual

Bosch

Bosch B430 User manual

Bosch GMS 509 DUAL User manual

Bosch

Bosch GMS 509 DUAL User manual

Popular Cell Phone manuals by other brands

Nokia 6620 - Smartphone 12 MB user guide

Nokia

Nokia 6620 - Smartphone 12 MB user guide

Motorola W270 user guide

Motorola

Motorola W270 user guide

LG P875 user guide

LG

LG P875 user guide

UTStarcom PPC 6700 Getting started

UTStarcom

UTStarcom PPC 6700 Getting started

Samsung SGH-X680 Service manual

Samsung

Samsung SGH-X680 Service manual

Nexus GO775 user manual

Nexus

Nexus GO775 user manual

Motorola i605 user guide

Motorola

Motorola i605 user guide

Samsung GT-S8000L user manual

Samsung

Samsung GT-S8000L user manual

LG LG-E510g user guide

LG

LG LG-E510g user guide

LG GB110 user guide

LG

LG GB110 user guide

Philips CT0193BLK/00 manual

Philips

Philips CT0193BLK/00 manual

Zte A16 user manual

Zte

Zte A16 user manual

Samsung SGH-D848 user guide

Samsung

Samsung SGH-D848 user guide

LG L1400 Specifications

LG

LG L1400 Specifications

LG X147 user guide

LG

LG X147 user guide

Samsung SGH-A107 user manual

Samsung

Samsung SGH-A107 user manual

LG AX8575 Black Specifications

LG

LG AX8575 Black Specifications

xolo A500 user guide

xolo

xolo A500 user guide

manuals.online logo
manuals.online logoBrands
  • About & Mission
  • Contact us
  • Privacy Policy
  • Terms and Conditions

Copyright 2025 Manuals.Online. All Rights Reserved.