BREIL AS10 User manual

Instruction book pag. 1 • Mode d'emploi pag. 27
Gebrauchsanleitung pag. 53 • Manuale di funzionamento pag. 79
Manual de instrucciones pag. 105
CHRONO ALARM
DUAL TIME
AS10
281_CHONO_AL_COP 26-09-2003 14:22 Pagina 3
6
12
18
24
T
M
E
.4
.0
.6
.2
.8
C
H
R
L-T
L-T
ALM
ALM
TME
CHR
O
N
A
L
A
R
M
O
F
F
281_CHONO_AL_COP 26-09-2003 14:22 Pagina 1

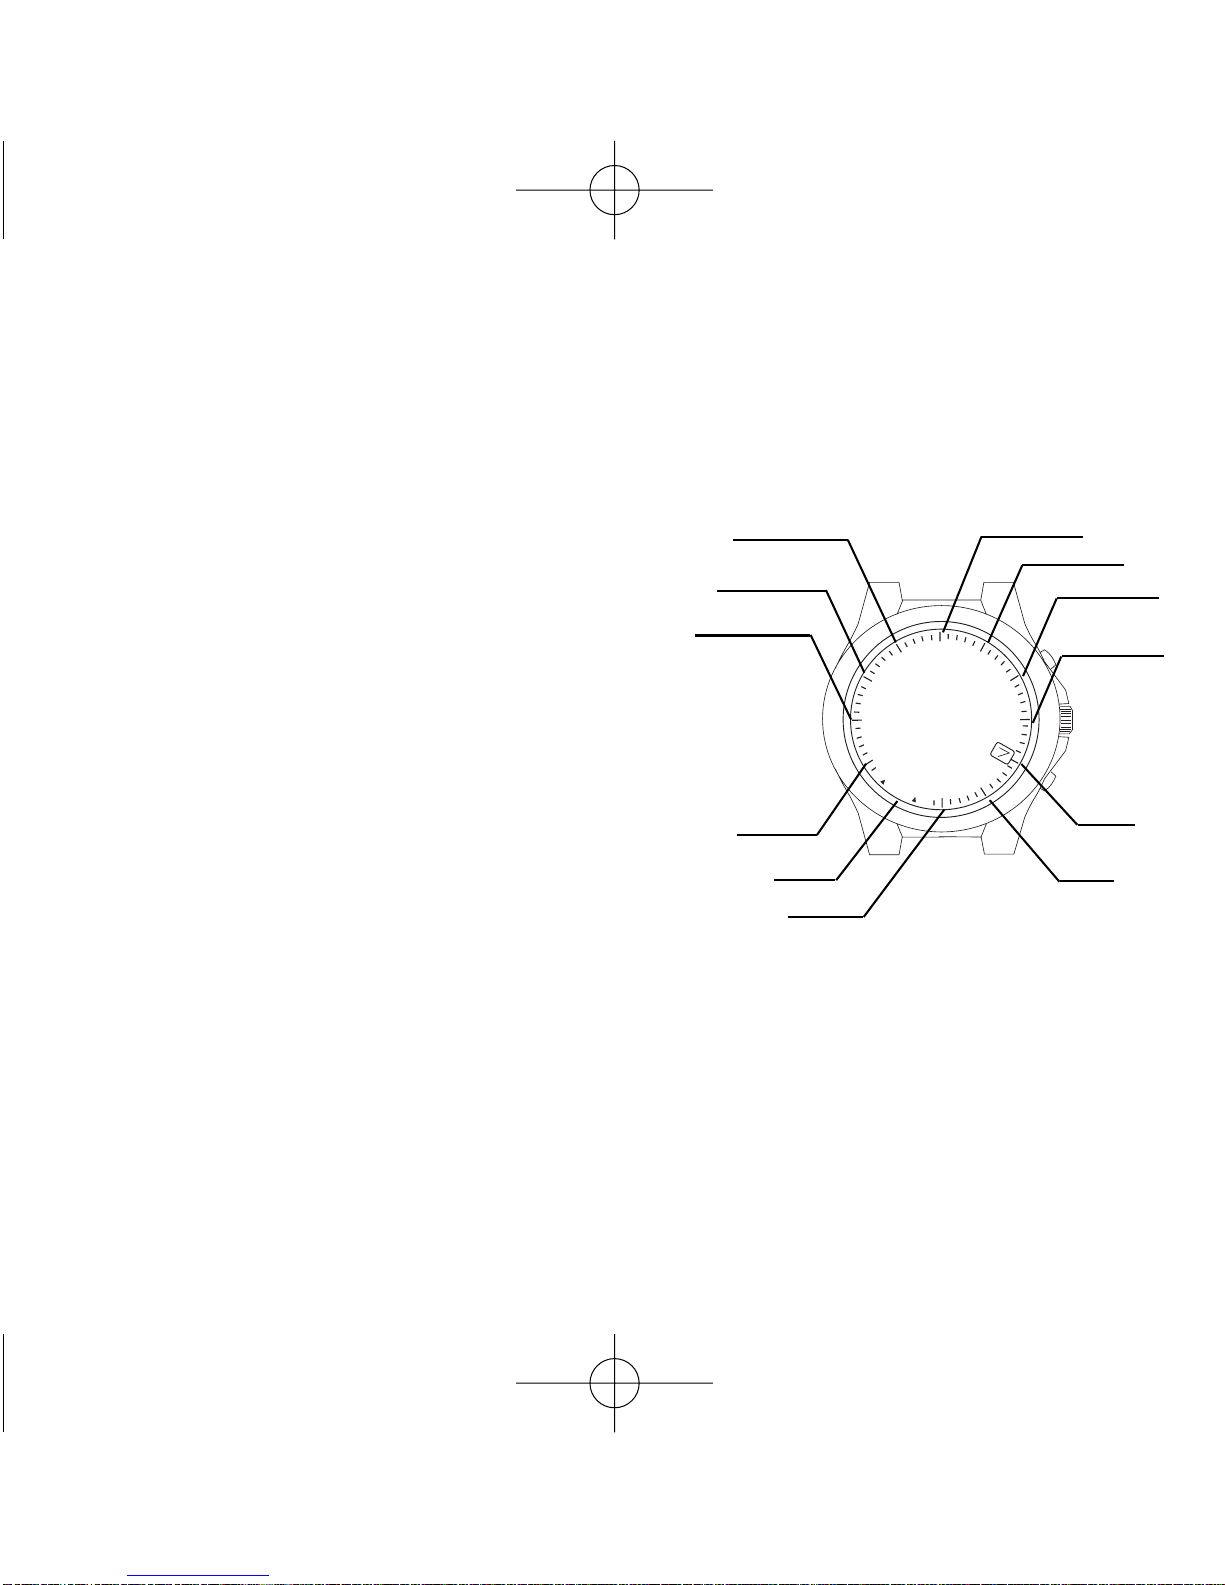
When reading this instruction booklet, keep the watch diagram on the left
unfolded and in full view. The symbols (A, B, etc.) on the diagram are
those referred to in the section describing the operating instructions.
Pendant la lecture de ce mode d'emploi, gardez le schéma d'illustration
de la montre ci-contre ouvert et bien en vue. Les symboles (A, B, etc.)
utilisés dans les différents chapitres du mode d'emploi correspondent à
ceux indiqués sur ce schéma.
Zur Lektüre dieser Gebrauchsanleitung sollten Sie die nebenstehend
gezeigte Übersichtsdarstellung der Uhr ausklappen und im Blick
behalten. Die in den einzelnen Abschnitten der Gebrauchsanleitung
verwendeten Zeichen (A, B, usw.) entsprechen den Kennzeichnungen in
dieser Übersicht.
Durante la lettura di questo manuale di istruzioni, tenere lo schema
illustrativo dell’orologio a sinistra aperto e in vista. I simboli (A, B, ecc.)
usati nelle sezioni delle istruzioni sul funzionamento corrispondono a
quelli indicati in questo schema.
Mientras lee este manual de instrucciones, mantenga el esquema
ilustrativo del reloj aquí presentado al lado izquierdo, abierto y bien
visible. Los símbolos (A, B, etc.) utilizados en las secciones de
instrucciones sobre el funcionamiento, corresponden a los que se
utilizan en este esquema.
281_CHONO_AL_COP 26-09-2003 14:22 Pagina 2

Thank you very much for purchasing a BREIL WATCH. To ensure its correct use, please
read these instructions carefully.
In order to be able to make full use of the guarantee service (subject to the guarantee
terms), please ensure that the Breil international guarantee card is supplied with the
watch at the time of purchase.
Nous vous remercions de la préférence que vous nous avez accordée en achetant une
montre BREIL. En vue d'une utilisation correcte de celle-ci, lire attentivement les
instructions contenues dans ce livret.
Lors de l'achat, contrôlez que la montre soit accompagnée de la garantie qui devra être
présentée pour obtenir les prestations qui y sont décrites.
Wir danken Ihnen für das Vertrauen, daß Sie uns mit dem Kauf einer BREIL Uhr
erwiesen haben. Damit Sie Ihre Uhr immer einwandfrei gebrauchen können, möchten wir
Sie bitten, die in dieser Gebrauchsanleitung enthaltenen Anweisungen gewissenhaft zu
lesen.
Beim Kauf sollten Sie kontrollieren, ob Ihnen zusammen mit der Uhr auch die
Garantiekarte ausgehändigt wurde, denn diese Karte müssen Sie vorlegen, um die darin
genannten Leistungen in Anspruch nehmen zu können.
Vi ringraziamo per la preferenza accordataci con l’acquisto di un orologio BREIL.
Per un corretto uso dello stesso, Vi preghiamo leggere attentamente le istruzioni
contenute in questo libretto.
Al momento dell’acquisto controllate che insieme all’orologio Vi venga fornita anche la
garanzia, da presentare per ottenere le prestazioni in essa descritte.
Le agradecemos su preferencia por un reloj BREIL. Para poder utilizar correctamente el
reloj, le rogamos leer atentamente las instrucciones contenidas en este folleto.
Al comprarlo, controle que junto al reloj le sea entregada la garantía que debe ser
presentada para obtener los servicios que en la misma se describen.
281_CHONO_AL_COP 26-09-2003 14:22 Pagina 4

CONTENTS
MAIN COMPONENTS . . . . . . . . . . . . . . . . . . . . . . . . . . . . . . . . . .2
NAMES OF COMPONENTS . . . . . . . . . . . . . . . . . . . . . . . . . . . . .3
SWITCHING THE MODE . . . . . . . . . . . . . . . . . . . . . . . . . . . . . . . .6
HAND 0-POSITION CHECK AND CORRECTION . . . . . . . . . . . . .7
SETTING THE TIME AND DATE . . . . . . . . . . . . . . . . . . . . . . . . .11
USING THE CHRONOGRAPH . . . . . . . . . . . . . . . . . . . . . . . . . . .15
SETTING LOCAL TIME . . . . . . . . . . . . . . . . . . . . . . . . . . . . . . . .17
USING THE ALARM . . . . . . . . . . . . . . . . . . . . . . . . . . . . . . . . . .19
ALL-RESET . . . . . . . . . . . . . . . . . . . . . . . . . . . . . . . . . . . . . . . . .21
PRECAUTIONS AND USEFUL INFORMATION . . . . . . . . . . . . . .22
TECHNICAL DATA . . . . . . . . . . . . . . . . . . . . . . . . . . . . . . . . . . . .26
A
B
C
D
E
F
G
GB
H
I
J
K
281_CHRONO_AL_ING 26-09-2003 14:40 Pagina 1

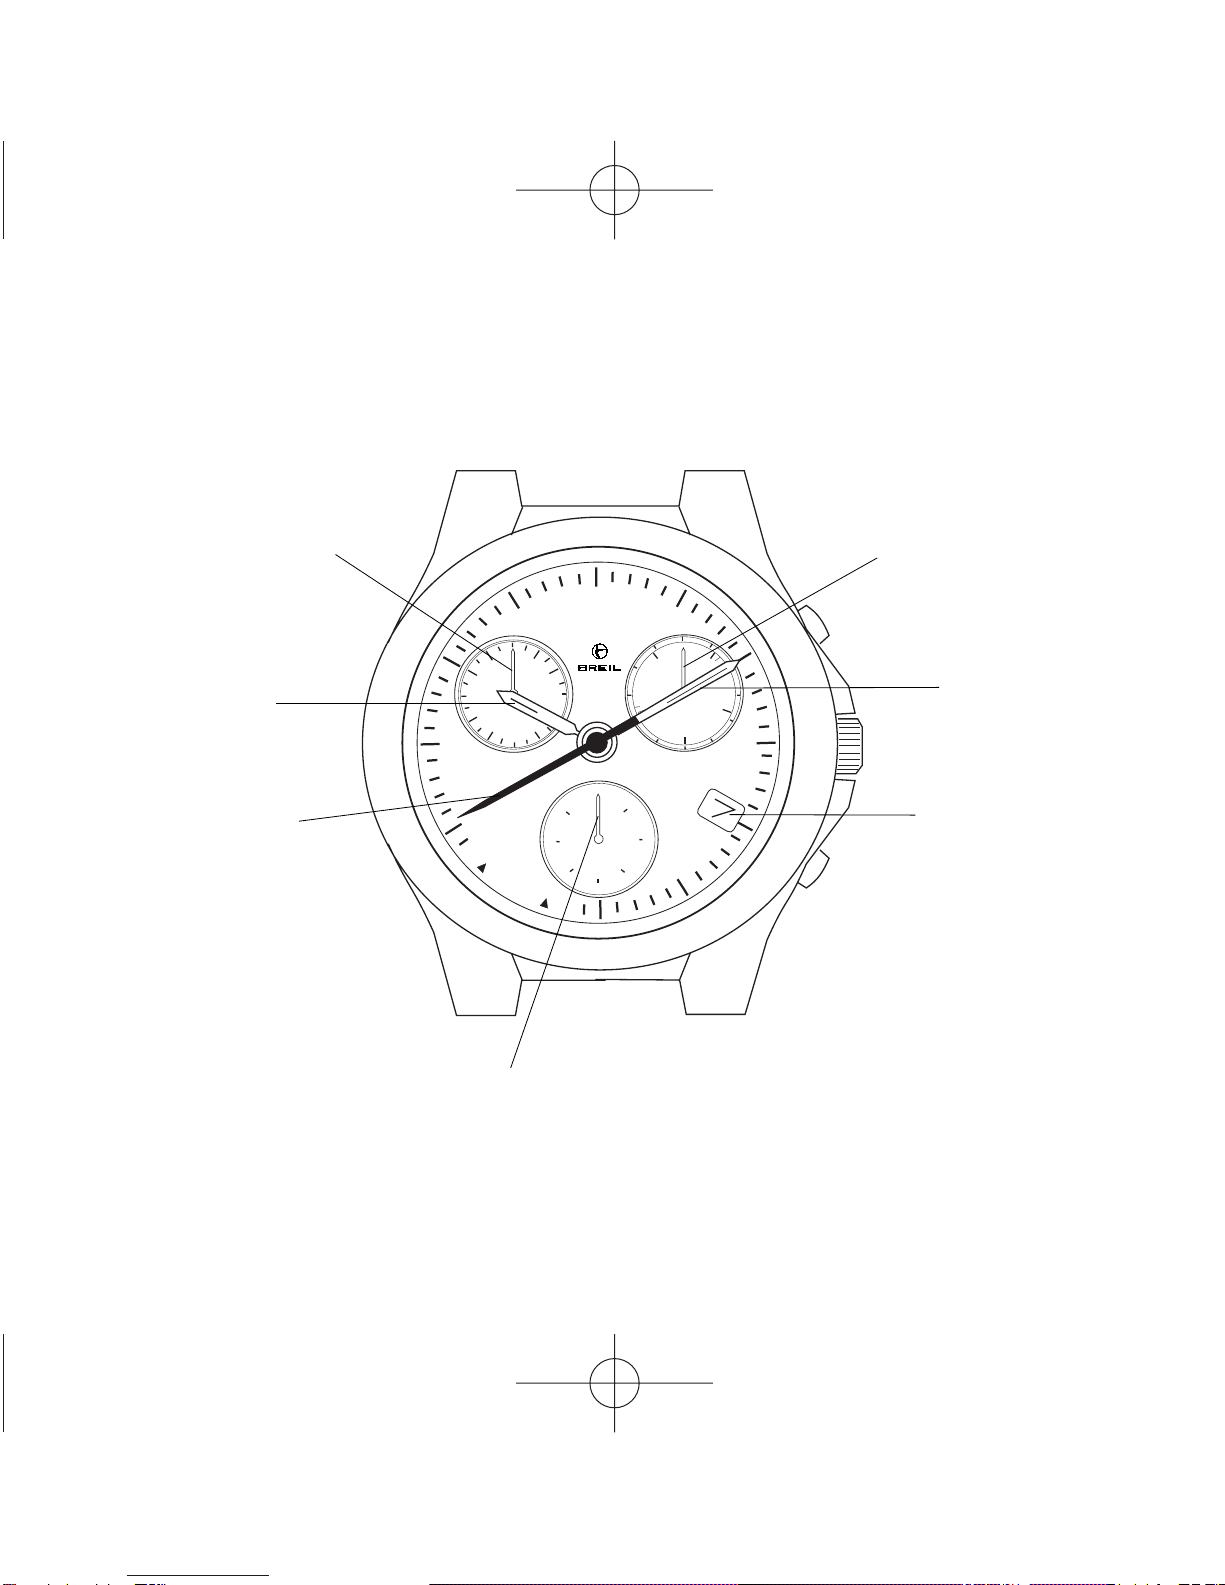
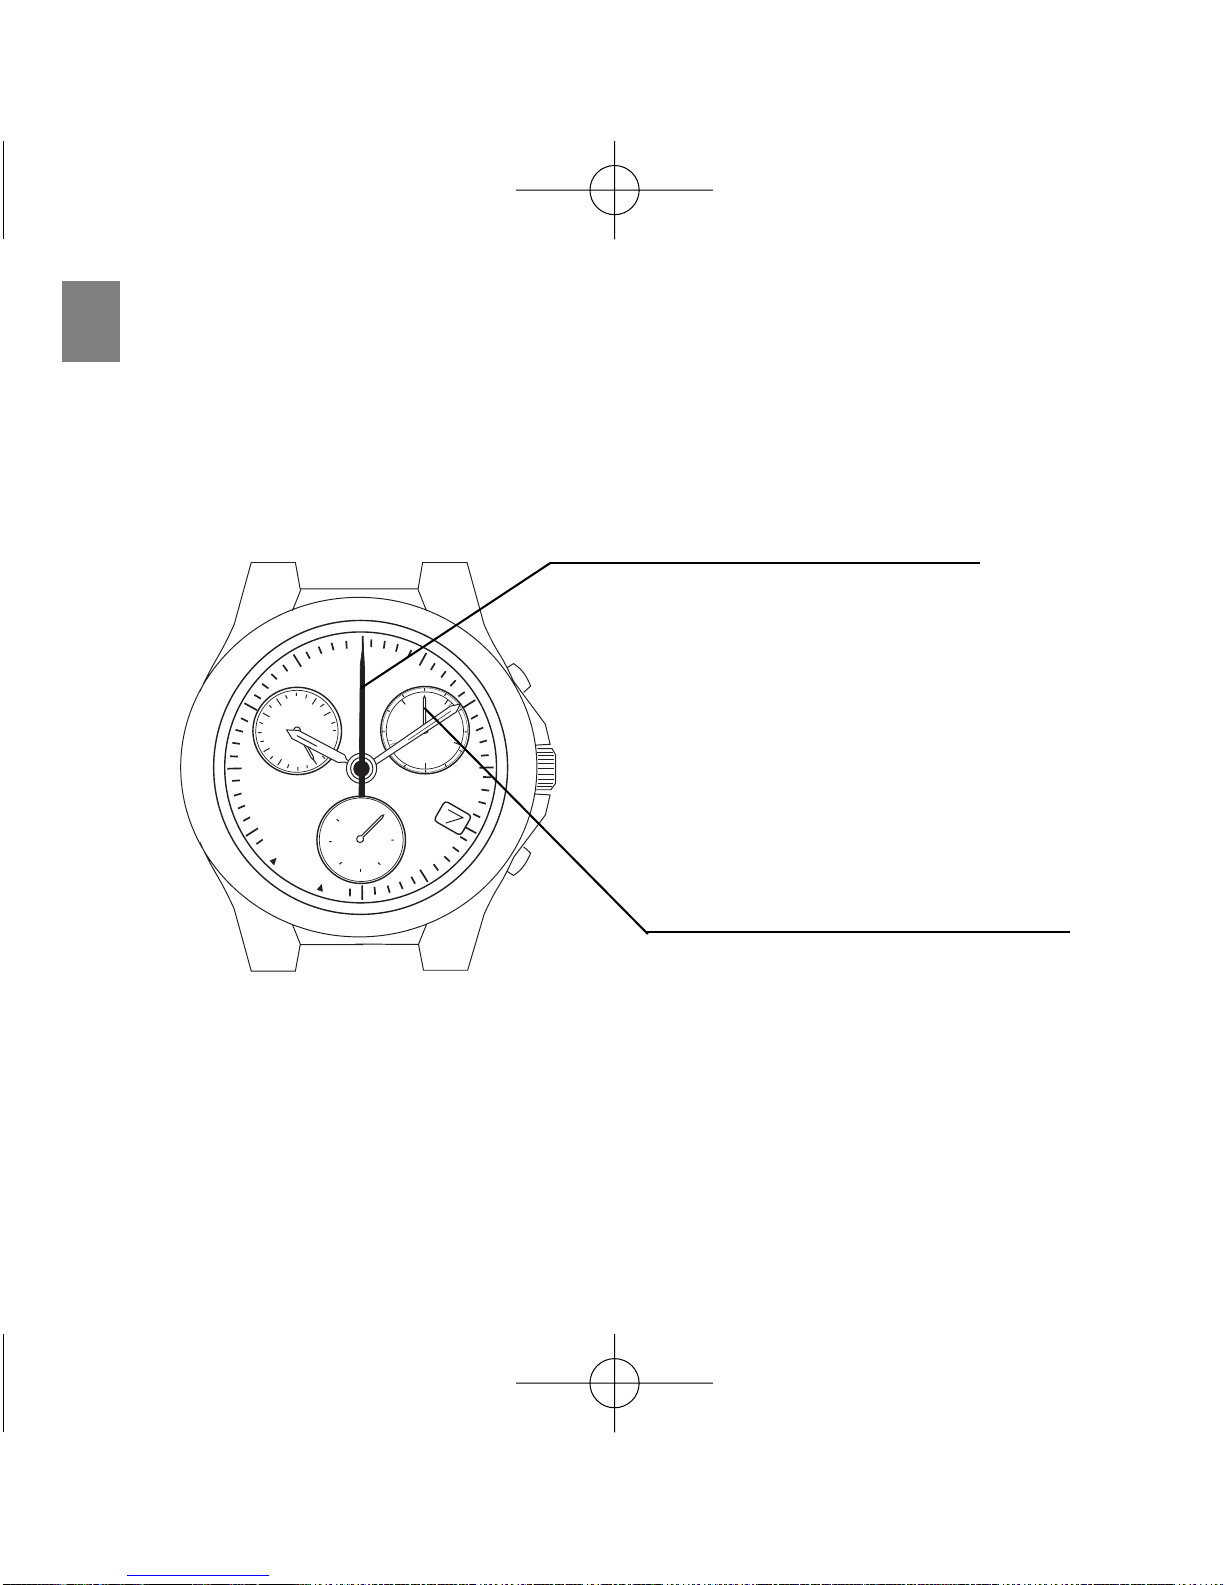
2
MAIN COMPONENTS
Hour hand Button
Function hand Button
Minute hand Crown
Calendar
Mode hand
Second hand
24-hour hand
This watch is an analog quartz watch equipped with multiple functions including an auto
calendar function that changes the date automatically, a daily alarm function that can be
set based on a 24-hour clock, and a chronograph function that allows measurement of
time in 1/20 second units up to 59 minutes, 59.95 seconds.
A
281_CHRONO_AL_ING 26-09-2003 14:40 Pagina 2

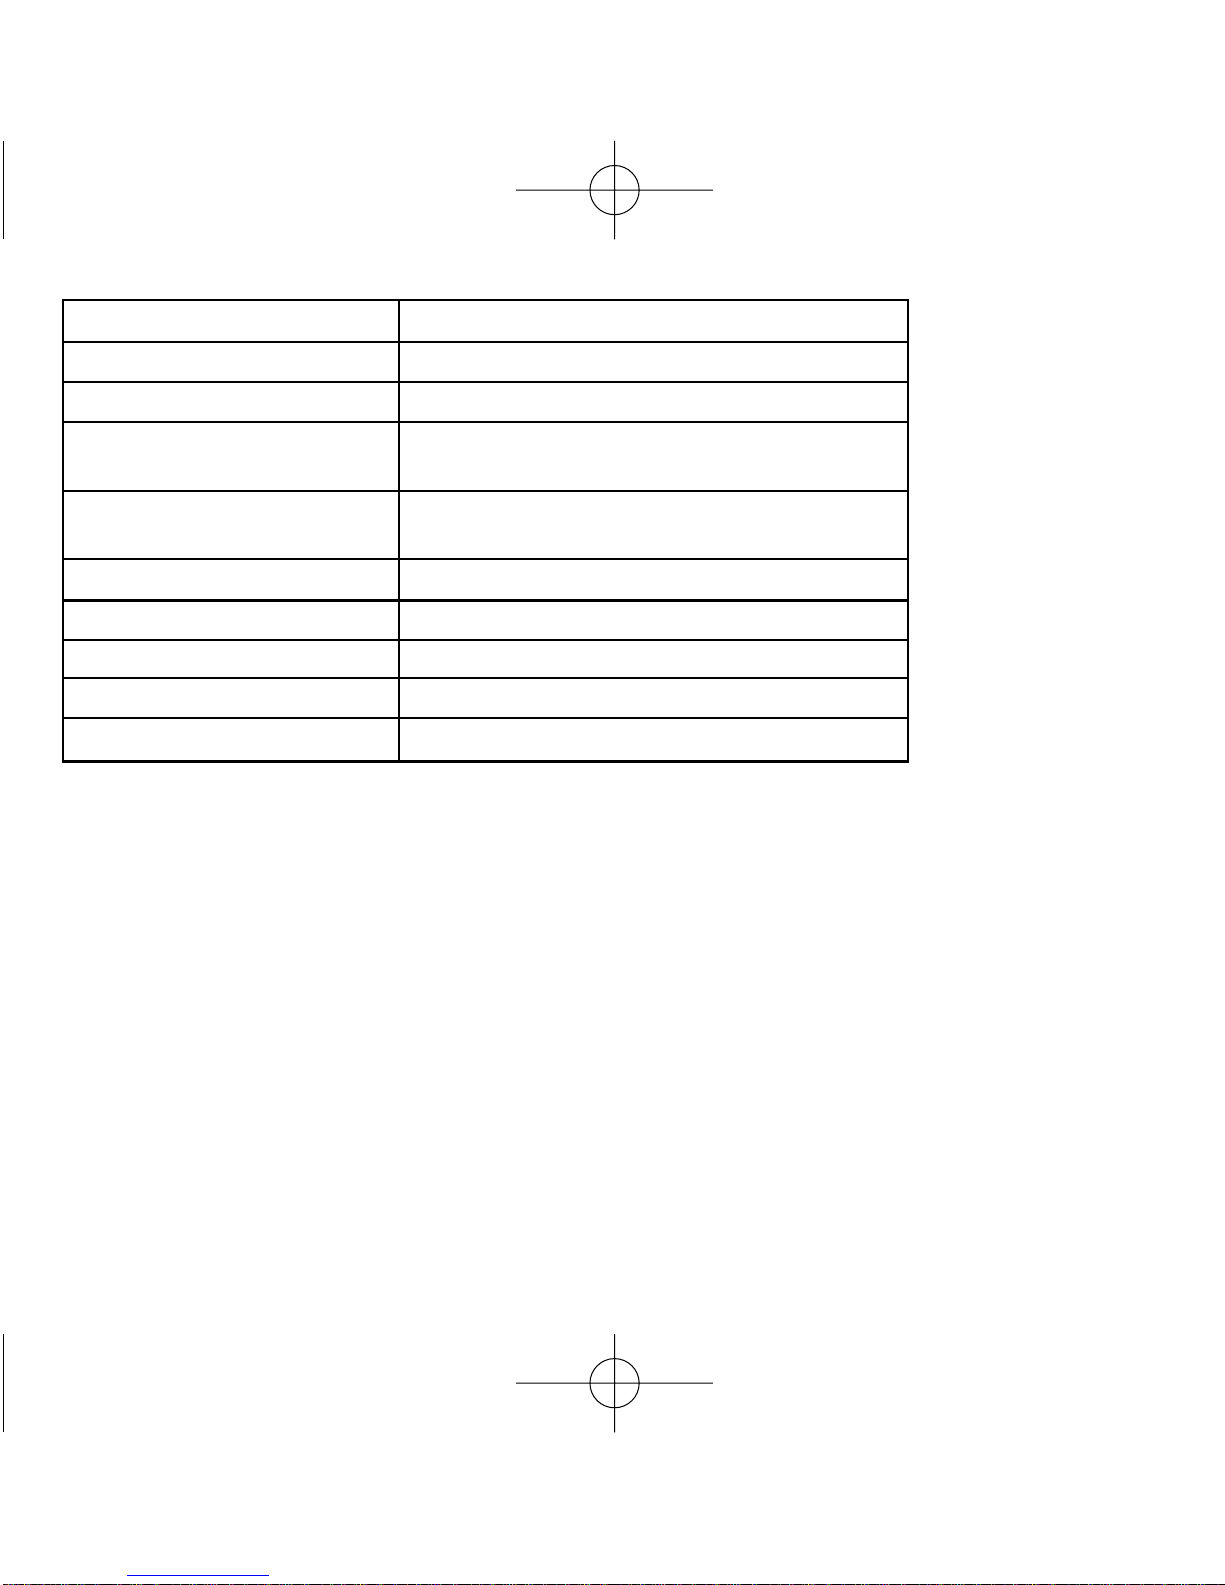
NAMES OF COMPONENTS
Name/Mode Time/Calendar Chronograph
Mode hand TME CHR
Function hand Stops at 0-position Chronograph minutes,
1/20th seconds
Date Displays date Date display
(TME or L-T)
Hour hand Displays hours Displays hours
(TME, L-T or ALM)
Minute hand Displays minutes Displays minutes
(TME, L-T or ALM)
Second hand Displays seconds Chronograph seconds
24-hour hand 24-hour time display in 24-hour time display in
coordination with hour hand coordination with hour hand
Local Time Alarm
L-T ALM
Stops at 0-position Stops at 0-position
Displays date of local time Date display (TME or L-T)
Displays hours of local time Displays alarm hours
Displays minutes of local time Displays alarm minutes
Displays seconds Displays ON/OFF
24-hour local time display in 24-hour alarm time display in
coordination with hour hand coordination with hour hand 3
B
281_CHRONO_AL_ING 26-09-2003 14:40 Pagina 3

Name Crown Time/Calendar Chronograph
position
Normal position Mode switching Mode switching
Crown Position 1 Calendar correction 0-position check/correction
(function hand, date wheel)
Position 2 Time correction 0-position check/correction
(second hand, 24-hour hand, hour
hand, minute hand)
Normal position Not used Start/stop, reset
(pressing continuously for at
least 2 seconds)
Button Position 1 Not used Function hand and date
wheel 0-position correction
Position 2
Not used Second hand 0-position
correction
Normal position Not used Recalls 1/20 seconds when
stopped
Button Position 1 Month correction Not used
Position 2 Not used Not used
4
281_CHRONO_AL_ING 26-09-2003 14:40 Pagina 4
5
Local Time Alarm
Mode switching Mode switching
Local time display Alarm ON/OFF setting
Local time correction Alarm time correction (including
ON/OFF switching)
Not used Alarm tone monitor (pressing continuously
for at least 2 seconds)
Not used ON/OFF switching
Not used ON/OFF switching
Not used Not used
Not used Not used
Not used Not used
281_CHRONO_AL_ING 26-09-2003 14:40 Pagina 5

6
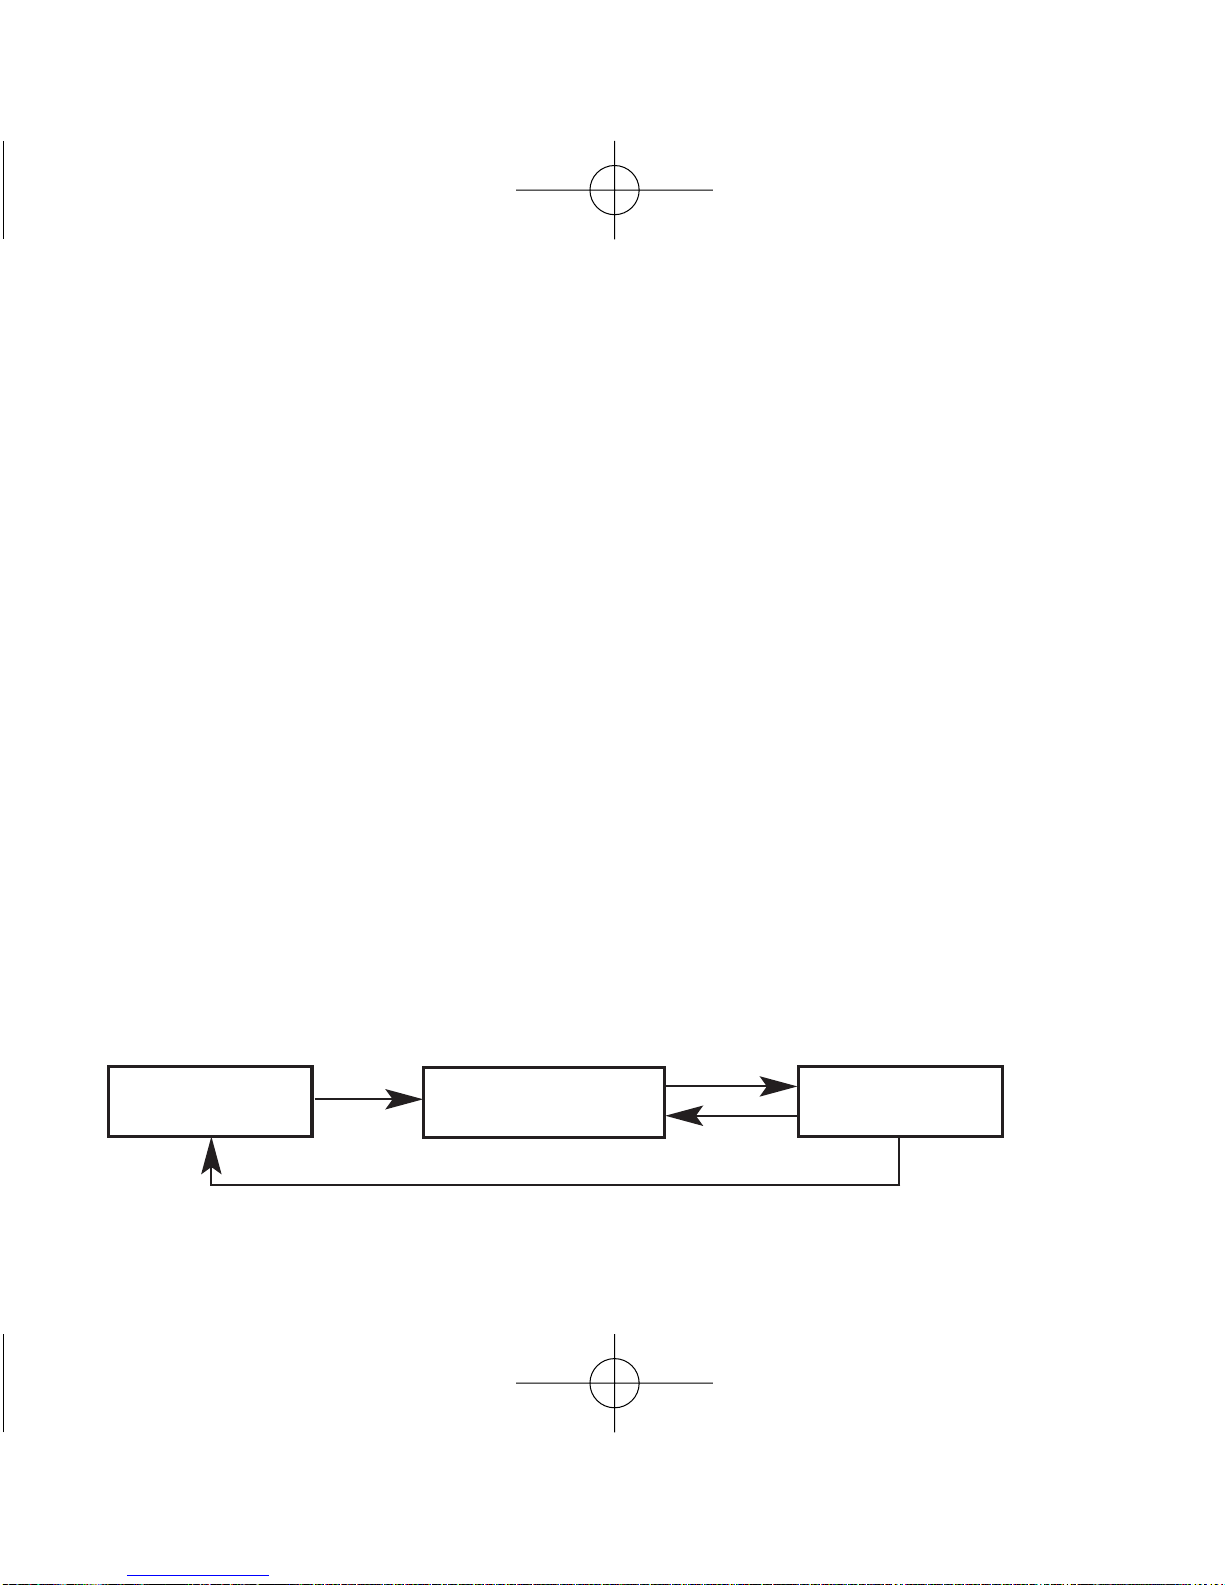
SWITCHING THE MODE
This watch is equipped with four modes consisting of Time/calendar, Chronograph, Local
time andAlarm. Since the mode changes when the crown is turned, the current mode can
be confirmed with the mode hand.
C
ALM
Alarm Mode TME
Time/calendar Mode
L-T
Local Time Mode
CHR
Chronograph/
0-Position Check Mode
[Modes/Display Functions]
Mode hand
T
M
E
C
H
R
L-T
L-T
ALM
ALM
TME
CHR
O
N
A
L
A
R
M
O
F
F
281_CHRONO_AL_ING 26-09-2003 14:40 Pagina 6
HAND 0-POSITION CHECK AND CORRECTION
Before using this watch, check that the functions of the watch operate properly by
performing the following procedure.
0-Position: This refers to the base position of each hand that enables the
watch to function properly.
[0-Position Check]
1. Turn the crown to switch the watch to the chronograph [CHR] mode.
2. Pull the crown out to Position (1) to check the 0-position (function hand and date wheel
correction mode). Confirm that the 24 hour hand, hour hand, minute hand, second hand
and function hand rapidly advance to the 0 position, and the date wheel displays “1”.
D
7
281_CHRONO_AL_ING 26-09-2003 14:40 Pagina 7

8
0 Positions of each Hand (Base Positions):
24 hour hand: 24:00
Hour hand, minute hand: 00:00
Second hand: 00 seconds
Function hand: 0 position (12:00 position)
Date wheel: 1st
Perform the “0-Position Correction” when the hands and date wheel are not at the
positions indicated above.
0-Position
Correction
6
12
18
24
T
M
E
.4
.0.0
.6
.2
.8
C
H
R
L-T
L-T
ALM
ALM
TME
CHR
O
N
A
L
A
R
M
O
F
F
(1)
281_CHRONO_AL_ING 26-09-2003 14:40 Pagina 8

9
[0-Position Correction]
0-Position Correction of Function Hand and Date Wheel:
1. Pull the crown out to Position (1) in the chronograph [CHR] mode to correct the function
hand and date wheel.
2. Click (turn) the crown to the left to align the date wheel.
(1) Clicking the crown once causes the function hand to make four revolutions and the
date to be corrected by one day.
(2) Turning the crown rapidly (clicking continuously two or more times) causes the
function hand to advance continuously. When stopping the function hand, click the
crown once to the right or left. When the function hand is not stopped manually, it
stops automatically after advancing 31 days.
The 12:00 position immediately after the date changes to the “1st”is the 0 position of the
function hand. After correcting the date wheel to the “31st”by turning the crown, press
button to finely correct the function hand so that the function hand is aligned at the
0 position after the date wheel changes to the “1st”.
281_CHRONO_AL_ING 26-09-2003 14:40 Pagina 9

10
0-Position Correction of 24 Hour Hand, Hour Hand, Minute Hand and Second Hand:
1. Pull the crown out to Position (2) the chronograph [CHR] mode to correct each hand.
2. Pressing button causes the second hand to be corrected by one second at a time
each time it is pressed. Continuously pressing button causes the second hand to
advance rapidly.
3. Clicking the crown allows correction of the 24 hour hand, hour hand and minute hand.
(1) Clicking the crown once to the right causes the hour and minute hands to move
clockwise.
(2) Clicking the crown once to the left causes the hour and minute hands to move
counter-clockwise.
•Turning the crown rapidly (clicking continuously two or more times) causes the hands
to advance rapidly. When stopping the hands, click the crown once to the right or left.
When the hands are not stopped manually, they stop automatically after being
corrected by 12 hours.
281_CHRONO_AL_ING 26-09-2003 14:40 Pagina 10

11
ESETTING THE TIME AND DATE
[Setting the Time]
1. Turn the crown and align the mode hand at the time/calendar [TME] mode.
Hour hand Minute hand
(1) Date correction position
(2) Time setting position
Normal position
Mode hand
Second hand
24 hour hand
6
12
18
24
T
M
E
.4
.0
.6
.2
.8
C
H
R
L-T
L-T
ALM
ALM
TME
CHR
O
N
A
L
A
R
M
O
F
F
Date
281_CHRONO_AL_ING 26-09-2003 14:40 Pagina 11

12
2. When the crown is pulled out to Position (2) (time setting position), the second hand
rapidly advances to the 0 seconds position and stops.
Note: When the second hand does not stop at the 0 seconds position, reset the base
position in the “0-Position Correction Mode”.
3. Click (turn) the crown to set the time.
(1) Clicking the crown once to the right causes the 24 hour hand, hour hand and
minute hand to move on the clockwise direction.
(2) Clicking the crown to the left causes the 24 hour hand, hour hand and minute hand
to move in the counter-clockwise direction.
•Turning the crown rapidly (continuously clicking two or more times) causes the
hands to advance rapidly. When the hands are not stopped manually, they stop
automatically after being corrected by 12 hours.
4. Return the crown to the normal position in synchronization with a telephone time signal
or other time service.
281_CHRONO_AL_ING 26-09-2003 14:40 Pagina 12

13
[Setting the Date]
As a result of being equipped with an auto calendar function, it is not necessary to correct
the date at the end of each month. However, since the watch uses 28 days for the month
of February, it is necessary to correct the date at the end of February, but only in leap years.
1. Turn the crown to switch the watch to the time/calendar [TME] mode.
2. When the crown is pulled out to Position (1) (date correction position), the second hand
rapidly advances to the month display position stored in memory and stops.
3. Click (turn) the crown to the left to set the date.
•Clicking the crown once to the left causes the function hand to make four revolutions
and the date to be corrected by one day.
(1) Date correction position
Normal position
6
12
18
24
T
M
E
.4
.0
.6
.2
.8
C
H
R
L-T
L-T
ALM
ALM
TME
CHR
O
N
A
L
A
R
M
O
F
F
Date
Month
281_CHRONO_AL_ING 26-09-2003 14:40 Pagina 13
14
*Interpretation of Month/
Position of Second Hand*
January: 1:00 position
February: 2:00 position
March: 3:00 position
:
December: 12:00 position
•Turning the crown rapidly (continuously clicking two or more times) causes the hand
to advance continuously. When stopping the hand, click the crown once to the right
or left. When the hand is not stopped manually, it stops automatically after being
advanced 31 days.
4. Pressing the button allows correction of the month. Press button and align the
second hand at the position corresponding to the month.
5. Return the crown to the normal position after setting the date. The watch will resume
keeping time once the second hand catches up to the current seconds.
<When the Calendar has been Set to a Non-existent Date>
When the watch is set to a date that does not exist (February 30, for example), the watch
automatically switches to the 1st day of the following month when the crown is returned
to the normal position.
January
February
March
April
July
August
September
October
November December
O
N
A
L
A
R
M
O
F
F
May
June
281_CHRONO_AL_ING 26-09-2003 14:40 Pagina 14
15
USING THE CHRONOGRAPH
The chronograph is able to measure time up to a maximum of 59 minutes 59.95 seconds
in 1/20th second units, after which it resets to 0 seconds.
F
[Explanation of Hands During Chronograph Measurement]
When the crown is turned and the mode hand is set to the chronograph [CHR] mode, the
second hand and function hand are rapidly advanced to the 0 position and the watch
enters the chronograph mode.
Second hand (chronograph seconds)
Function hand (chronograph minutes
or chronograph 1/20th seconds)
6
12
18
24
T
M
E
.4
.0
.6
.2
.8
C
H
R
L-T
L-T
ALM
ALM
TME
CHR
O
N
A
L
A
R
M
O
F
F
281_CHRONO_AL_ING 26-09-2003 14:40 Pagina 15
16
•Second hand:
Switches to the chronograph second hand. The second hand advances rapidly and
makes one revolution only when starting at 0 seconds, after which it moves in 1 second
increments to measure chronograph seconds
•Function hand:
Switches to either chronograph minutes or chronograph 1/20th seconds. The function
hand moves in one minute increments to measure chronograph minutes. When button
is pressed when the chronograph is stopped, the function hand switches to 1/20th
seconds display during time button is pressed.
Note: 24 hour hand, hour hand, minute hand, date wheel:
•Continues to display the current time when the watch has been switched from the
time/calendar mode.
•Continues to display local time when the watch has been switched from the local time
mode.
•Continues to display the alarm set time when the watch has been switched form the
alarm mode.
[Chronograph Measurement]
1. Turn the crown to set the mode hand to the chronograph [CHR] mode.
2. Press button to start and stop the chronograph. A confirmation tone is heard
whenever button is pressed.
3. Continuously pressing button when the chronograph is stopped causes the
chronograph second hand and chronograph minute hand to be reset to the 0 position.
Reset Measurement Stop
Pressed continuously
281_CHRONO_AL_ING 26-09-2003 14:40 Pagina 16
Table of contents
Languages:
Other BREIL Watch manuals

BREIL
BREIL OT10 User manual

BREIL
BREIL CHRONO VD57 User manual

BREIL
BREIL CHRONO FS10 User manual

BREIL
BREIL 1S13 User manual

BREIL
BREIL Chrono 8162 User manual

BREIL
BREIL ABARTH 595 SCORPIONEORO User manual

BREIL
BREIL X.LARGE PRO User manual

BREIL
BREIL 1L10 User manual

BREIL
BREIL Manta P.R.O User manual

BREIL
BREIL YM62 User manual

BREIL
BREIL 6U50 User manual

BREIL
BREIL CHRONO YM92 User manual

BREIL
BREIL CHRONO OS11 User manual

BREIL
BREIL CHRONO OS10 User manual

BREIL
BREIL FS41 User manual

BREIL
BREIL 2025 User manual

BREIL
BREIL Time 1M52 User manual

BREIL
BREIL CHRONO FS20 User manual

BREIL
BREIL ABARTH 595 SCORPIONEORO User manual

BREIL
BREIL CHRONO ALARM YM52 User manual


