BREIL CHRONO ALARM YM52 User manual

Instruction book pag. 1 •Mode d’emploi pag. 23
Gebrauchsanleitung pag. 45 •Manuale di funzionamento pag. 67
Manual de instrucciones pag. 89
CHRONO ALARM
YM52

Thank you very much for purchasing a BREILWATCH.To ensure its correct use,
please read these instructions carefully.
In order to be able to make full use of the guarantee service (subject to the
guarantee terms),please ensure that the Breil international guarantee card is
supplied with the watch at the time of purchase.
Nous vous remercions de la préférence que vous nous avez accordée en achetant
une montre BREIL.En vue d'une utilisation correcte de celle-ci, lire attentivement
les instructions contenues dans ce livret.
Lors de l'achat, contrôlez que la montre soit accompagnée de la garantie qui devra
être présentée pour obtenir les prestations qui y sont décrites.
Wir danken Ihnen für dasVertrauen,daß Sie uns mit dem Kauf einer BREIL
QUARTZ-Uhr erwiesen haben. Damit Sie Ihre Uhr immer einwandfrei gebrauchen
können,möchten wir Sie bitten, die in dieser Gebrauchsanleitung enthaltenen
Anweisungen gewissenhaft zu lesen.
Beim Kauf sollten Sie kontrollieren, ob Ihnen zusammen mit der Uhr auch die
Garantiekarte ausgehändigt wurde,denn diese Karte müssen Sie vorlegen,um die
darin genannten Leistungen in Anspruch nehmen zu können.
Vi ringraziamo per la preferenza accordataci con l’acquisto di un orologio BREIL.
Per un corretto uso dello stesso,Vi preghiamo leggere attentamente le istruzioni
contenute in questo libretto.
Al momento dell’acquisto controllate che insieme all’orologioVi venga fornita
anche la garanzia, da presentare per ottenere le prestazioni in essa descritte.
Le agradecemos su preferencia por un reloj BREIL.Para poder utilizar
correctamente el reloj,le rogamos leer atentamente las instrucciones contenidas
en este folleto.
Al comprarlo,controle que junto al reloj le sea entregada la garantía que debe ser
presentada para obtener los servicios que en la misma se describen.

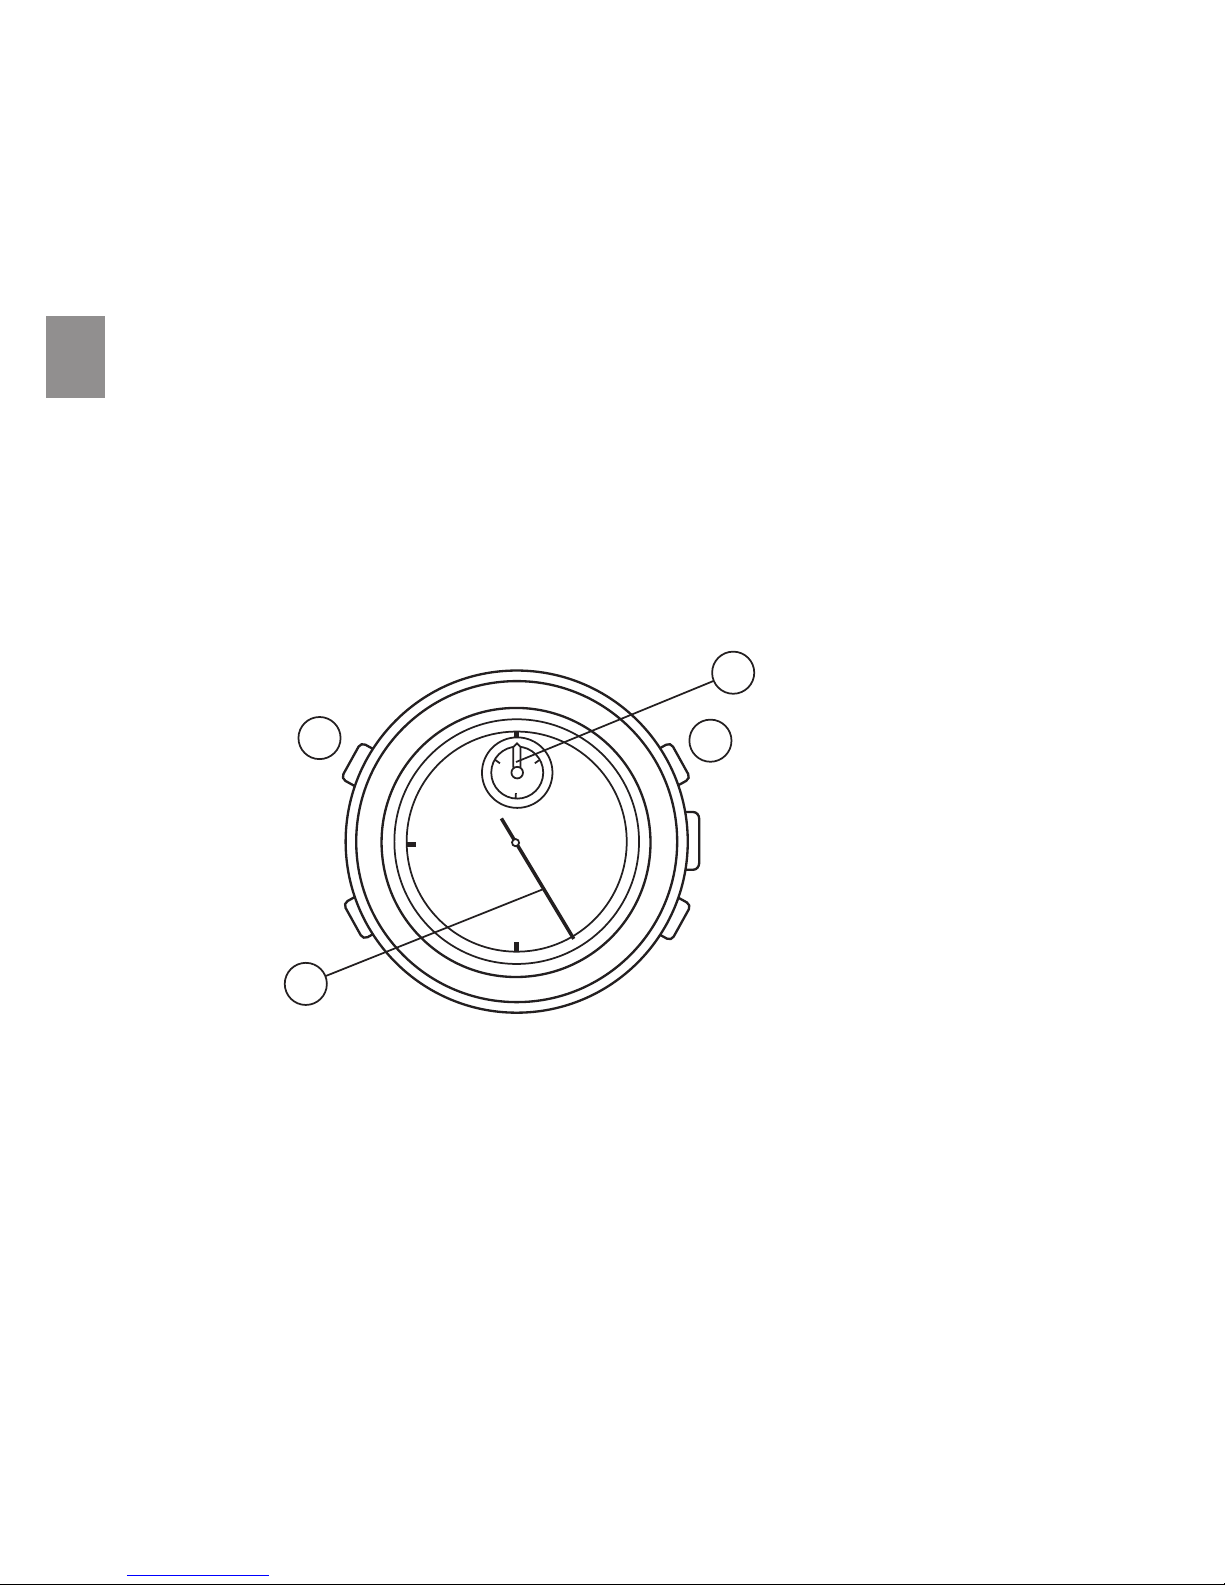
When reading this instruction booklet, keep the watch diagram on the
left unfolded and in full view.The symbols (A, B, etc.) on the diagram
are those referred to in the section describing the operating instructions.
Pendant la lecture de ce mode d'emploi, gardez le schéma d'illustration
de la montre ci-contre ouvert et bien en vue.Les symboles (A, B, etc.)
utilisés dans les différents chapitres du mode d'emploi correspondent à
ceux indiqués sur ce schéma.
Zur Lektüre dieser Gebrauchsanleitung sollten Sie die nebenstehend
gezeigte Übersichtsdarstellung der Uhr ausklappen und im Blick
behalten.Die in den einzelnen Abschnitten der Gebrauchsanleitung
verwendeten Zeichen (A, B, usw.) entsprechen den Kennzeichnungen
in dieser Übersicht.
Durante la lettura di questo manuale di istruzioni, tenere lo schema
illustrativo dell’orologio a sinistra aperto e in vista.I simboli (A, B, ecc.)
usati nelle sezioni delle istruzioni sul funzionamento corrispondono a
quelli indicati in questo schema.
Mientras lee este manual de instrucciones, mantenga el esquema
ilustrativo del reloj aquí presentado al lado izquierdo, abierto y bien
visible.Los símbolos (A, B, etc.) utilizados en las secciones de
instrucciones sobre el funcionamiento, corresponden a los que se
utilizan en este esquema.
(0) (1) (2)
28
(0) (1)
•
l
l
l
l
•
l
l
l
l
•
l
l
l
l
•
l
l
l
l
•
l
l
l
l
•
l
•
l
l
l
l
•
l
l
l
l
•
l
l
l
l
•
l
l
l
l
•
l
l
l
l
•
l
l
l
l
•
l
l
l
l
•
l
l
l
l
•
l
l
l
l
•
l
l
l
l
•
l
•
l
l
l
l
•
l
l
l
l
•
l
l
l
l
•
l
l
l
l
•
l
l
l
l
•
l
l
l
l
•
l
l
l
l
•
l
l
l
l
•
l
l
l
l
•
l
l
l
l
•
l
2
6
A
D
E
1
3
4
5
7
B
C
1020
30
639 12
60
30

MAIN COMPONENTS
FEATURES
TIME SETTING
DATE SETTING
ALARM
STOPWATCH
HOWTO USETHETACHYMETER
ADJUSTINGTHE HAND POSITION
RESETTINGTHE BUILT-IN IC
BATTERY LIFE INDICATOR
PRECAUTIONS AND USEFUL INFORMATION
GB
A2
4
5
6
7
10
12
15
16
17
18
B
C
D
E
F
G
H
I
J
K
CONTENTS

2
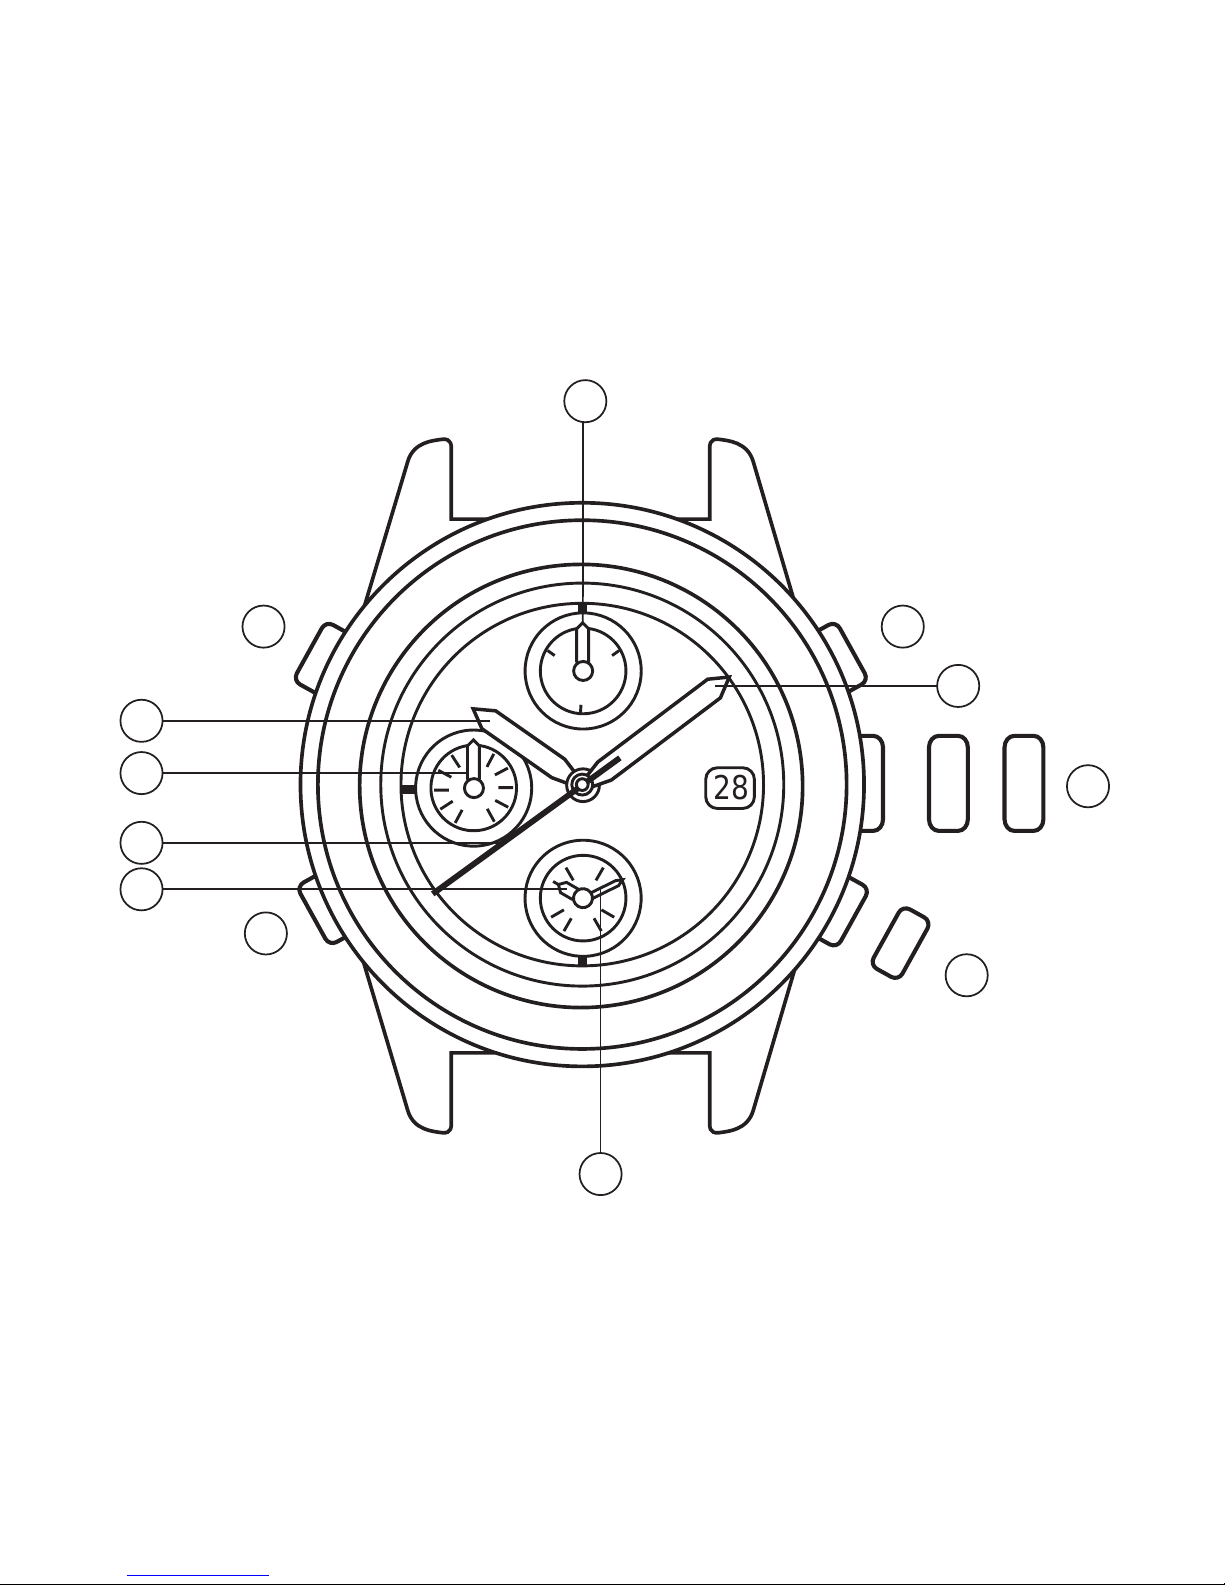
MAIN COMPONENTS
Hour hand
Minute hand
Stopwatch second hand
Alarm hour hand
Alarm minute hand
Stopwatch minute hand
Continuous second small hand
A
ABotton
Botton
Botton
Crown 2
Crown 1
B
C
D
E
6
7
1
2
3
4
5
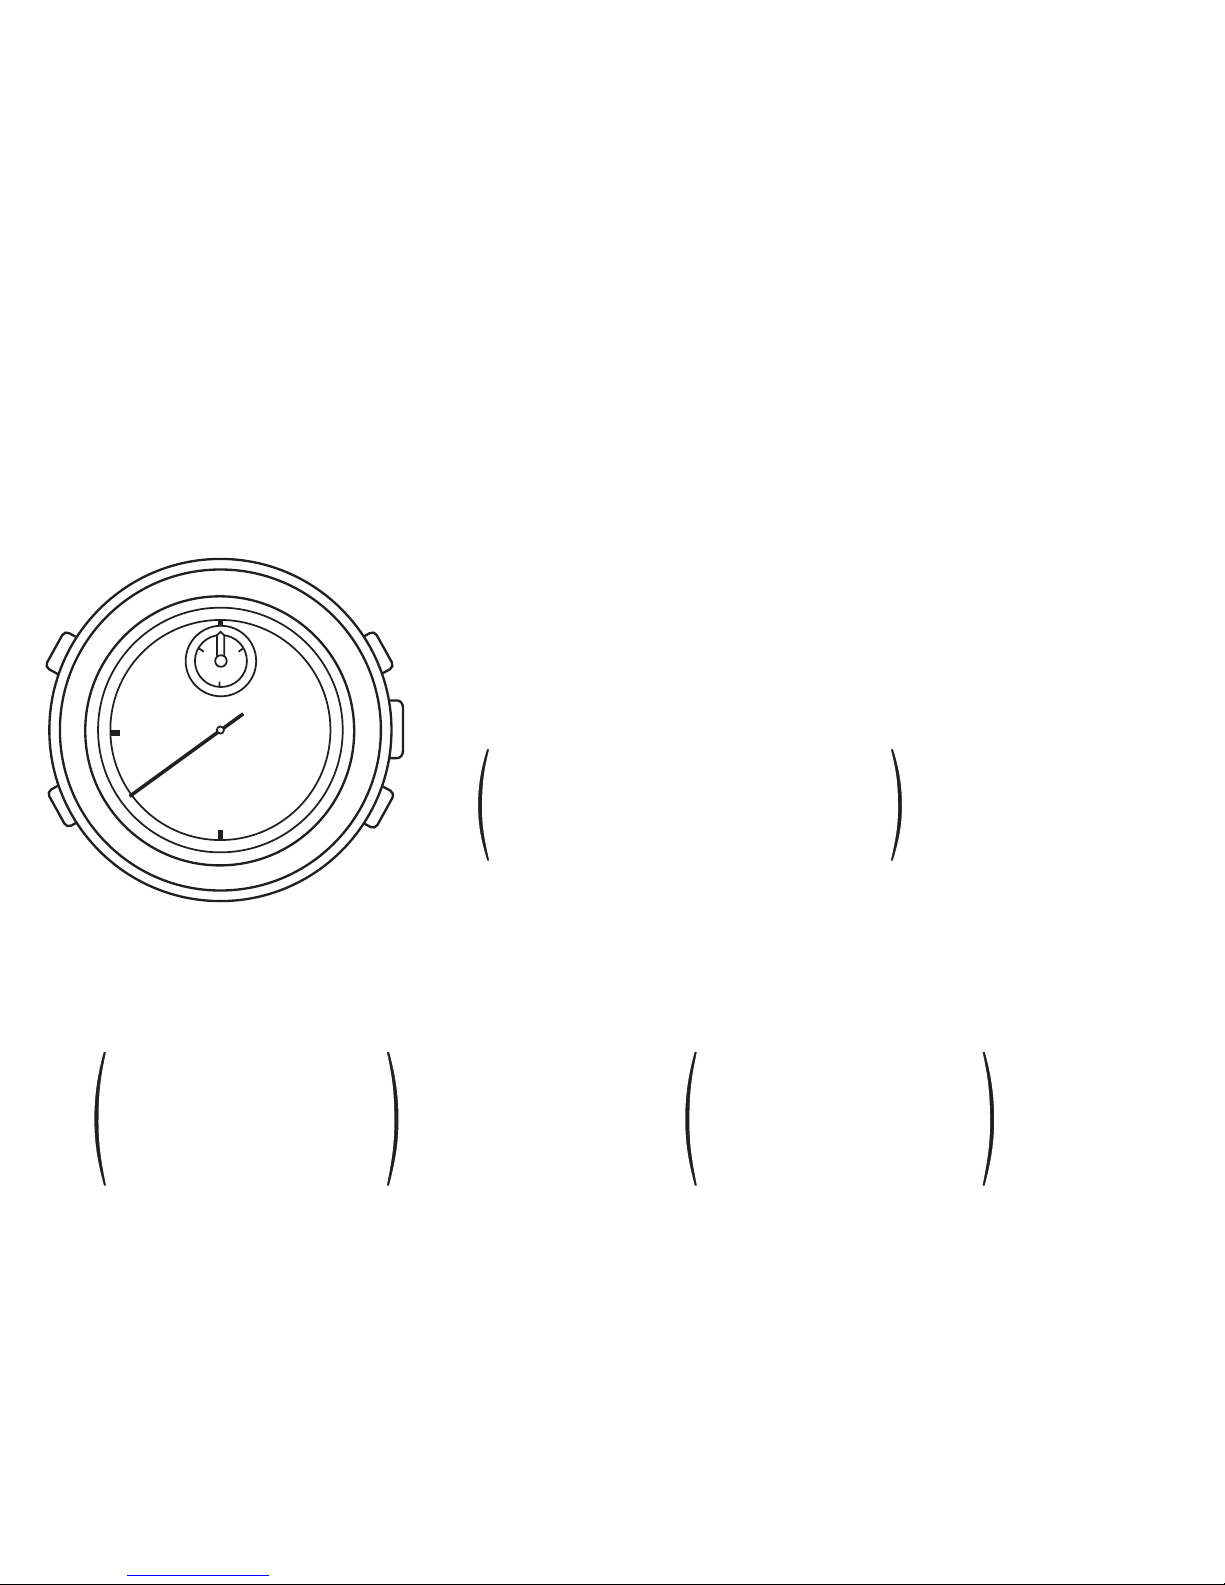
E Crown 1
0) Normal position:Free
1) First click:
Clockwise:Date setting
Counterclockwise:Free
2) Second click:Main time setting
DCrown 2
0) Normal position:Free
1) First click:Alarm engagement
2) Second click:Alarm hour and minute hand setting

3
SCREW DOWN CROWN
(For the models with a screw down crown)
•
•
How to unlock the crown
Unscrew the crown by turning it counterclockwise until you no longer feel the threads
turning.
The crown can be pulled out to the first or second click for time/calendar setting.
How to lock the crown
After all the adjustments are completed, push the crown back to the normal position.
Turn the crown clockwise while pressing it lightly until tight.

4
FEATURES
This is a multi-display analogue watch featuring alarm and stopwatch functions.
MAINTIME DISPLAY
Hour and minute hands with a continuous second small hand.
CALENDAR
Date in displayed in numerals.
ALARM
The alarm is set on a 12-hour basis with 2 small hands displaying the designated alarm
time.
STOPWATCH
It can measure up to 30 minutes.
BATTERY LIFE INDICATOR
The continuous second small hand moves at two-second intervals when the battery
needs to be replaced.
TACHYMETER
Some models are provided with a tachymeter with a graduated dial.
B
28
•
l
l
l
l
•
l
l
l
l
•
l
l
l
l
•
l
l
l
l
•
l
l
l
l
•
l
l
l
l
•
l
l
l
l
•
l
l
l
l
•
l
l
l
l
•
l
l
l
l
•
l
60
30
1 2
7
5
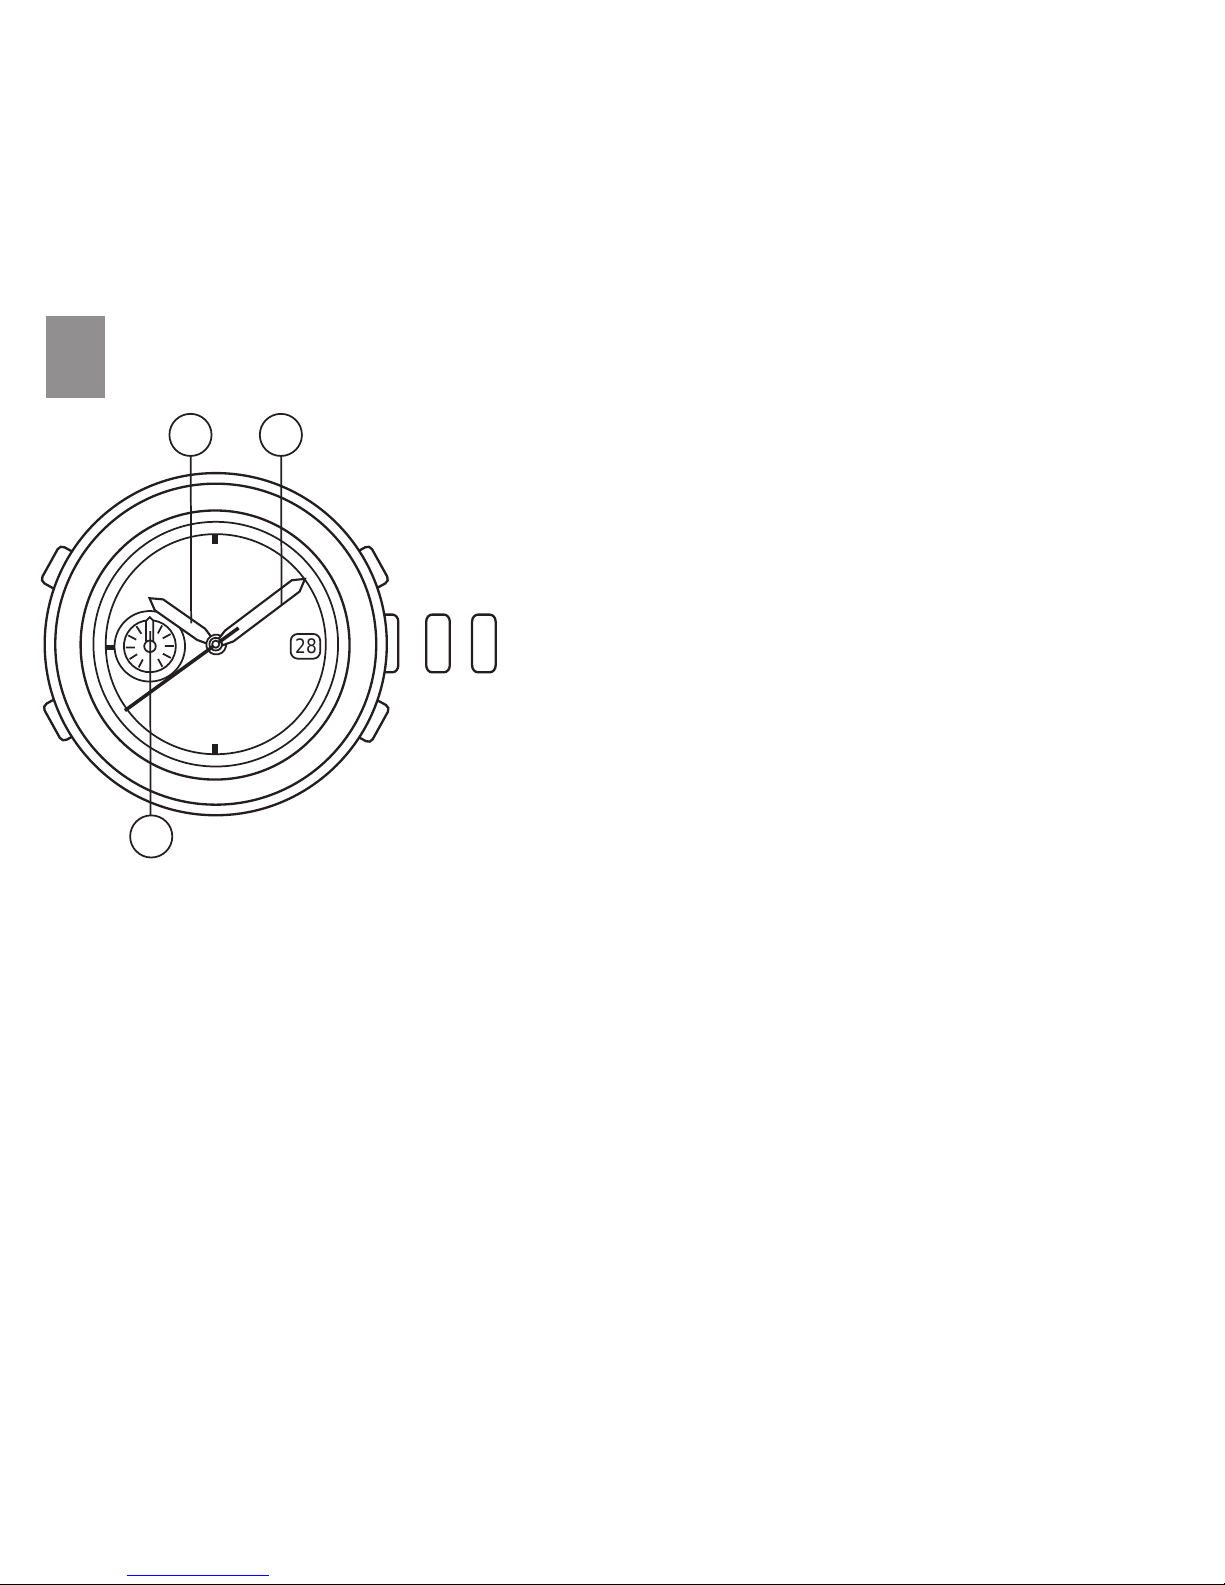
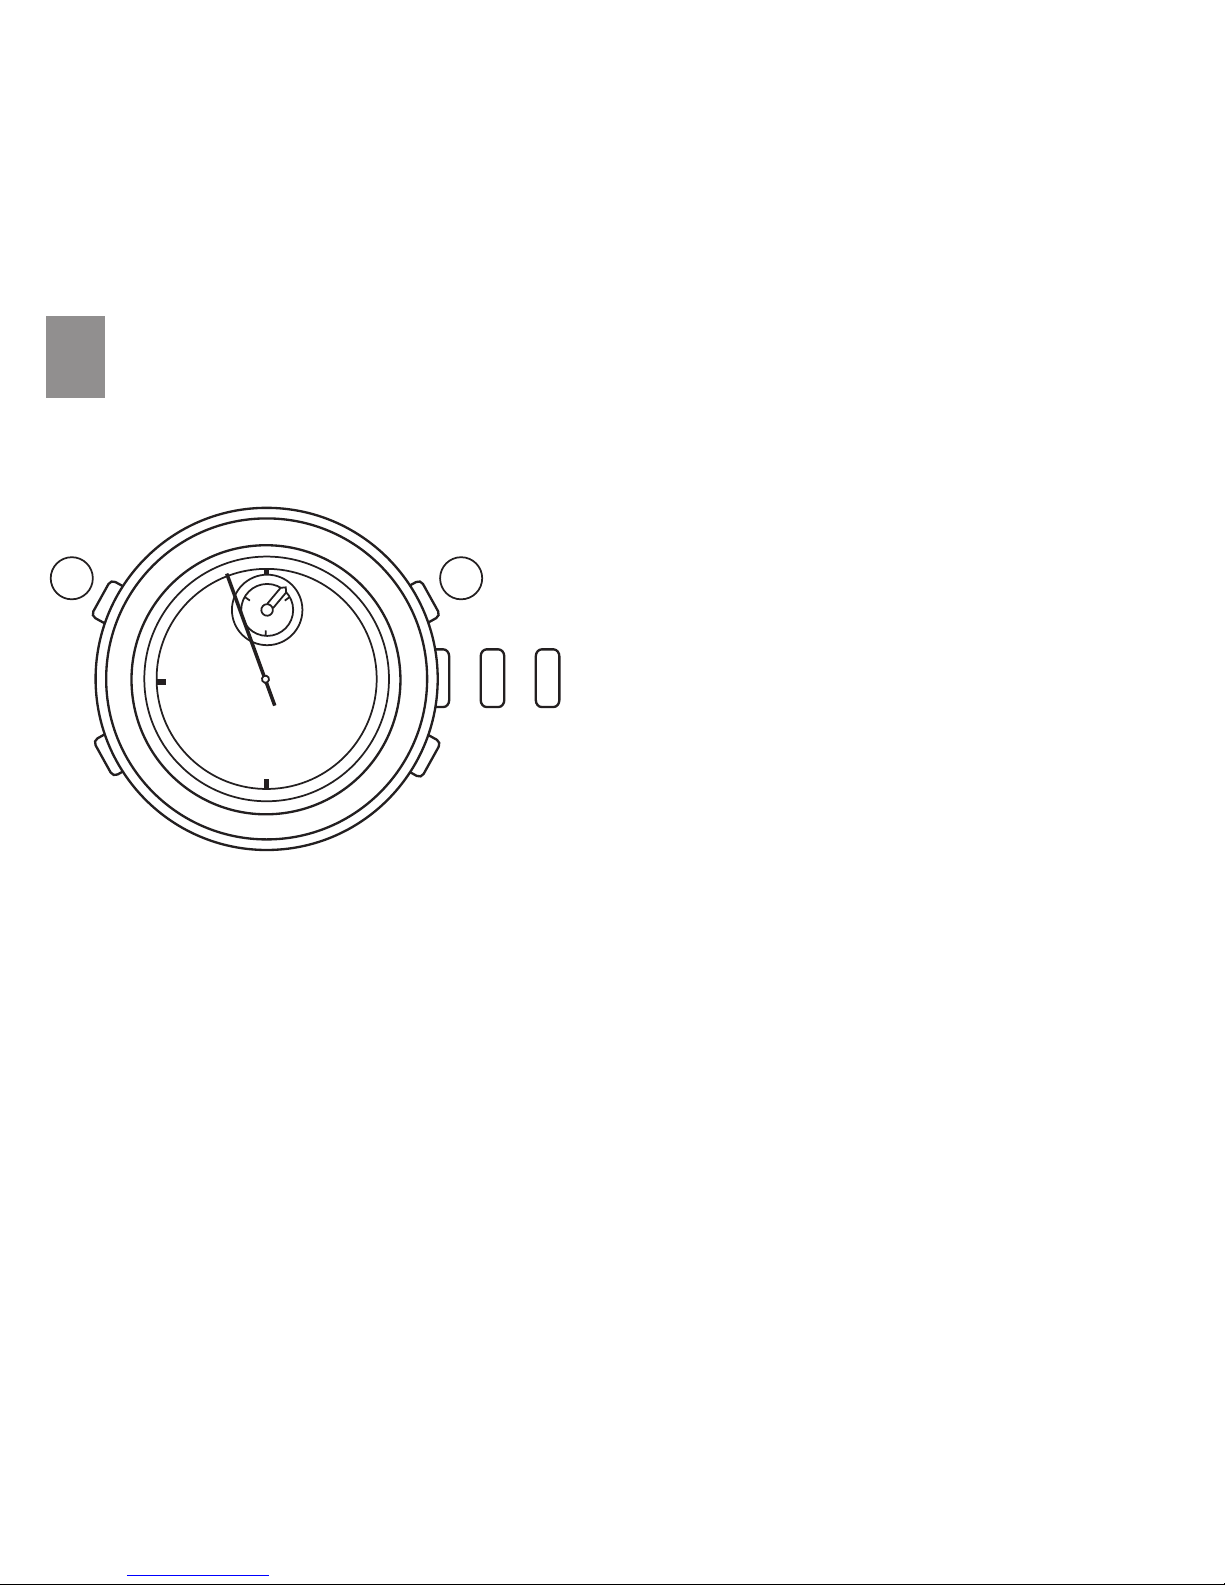
TIME SETTING
1.
2.
3.
C
Pull out crown “1”all the way to the
second click when the continuous
second small hand ➆is at the 12
o’clock position.
Turn crown “1”to set the hour and
minute hands ➀and ➁to the
current time.
Push crown “1”back in to the
normal position in accordance with
a time signal.
Notes:
1.
2.
When setting the hour hand, check that AM/PM is correctly set.The watch is so
designed that the date changes once in 24 hours.Turn crown “1”clockwise until the
hour hand passes the 12 o’clock marker to determine whether the watch is set for
the A.M.or P.M.period.If the date does not changes, the time is set for the A.M.
period.If the date does not change, the time is set for the P.M.period.
When setting the minute hand, advance it 4 to 5 minutes ahead of the desired time
and then turn it back to the exact minute.
(1)(0) (2)
Crown 1

6
6
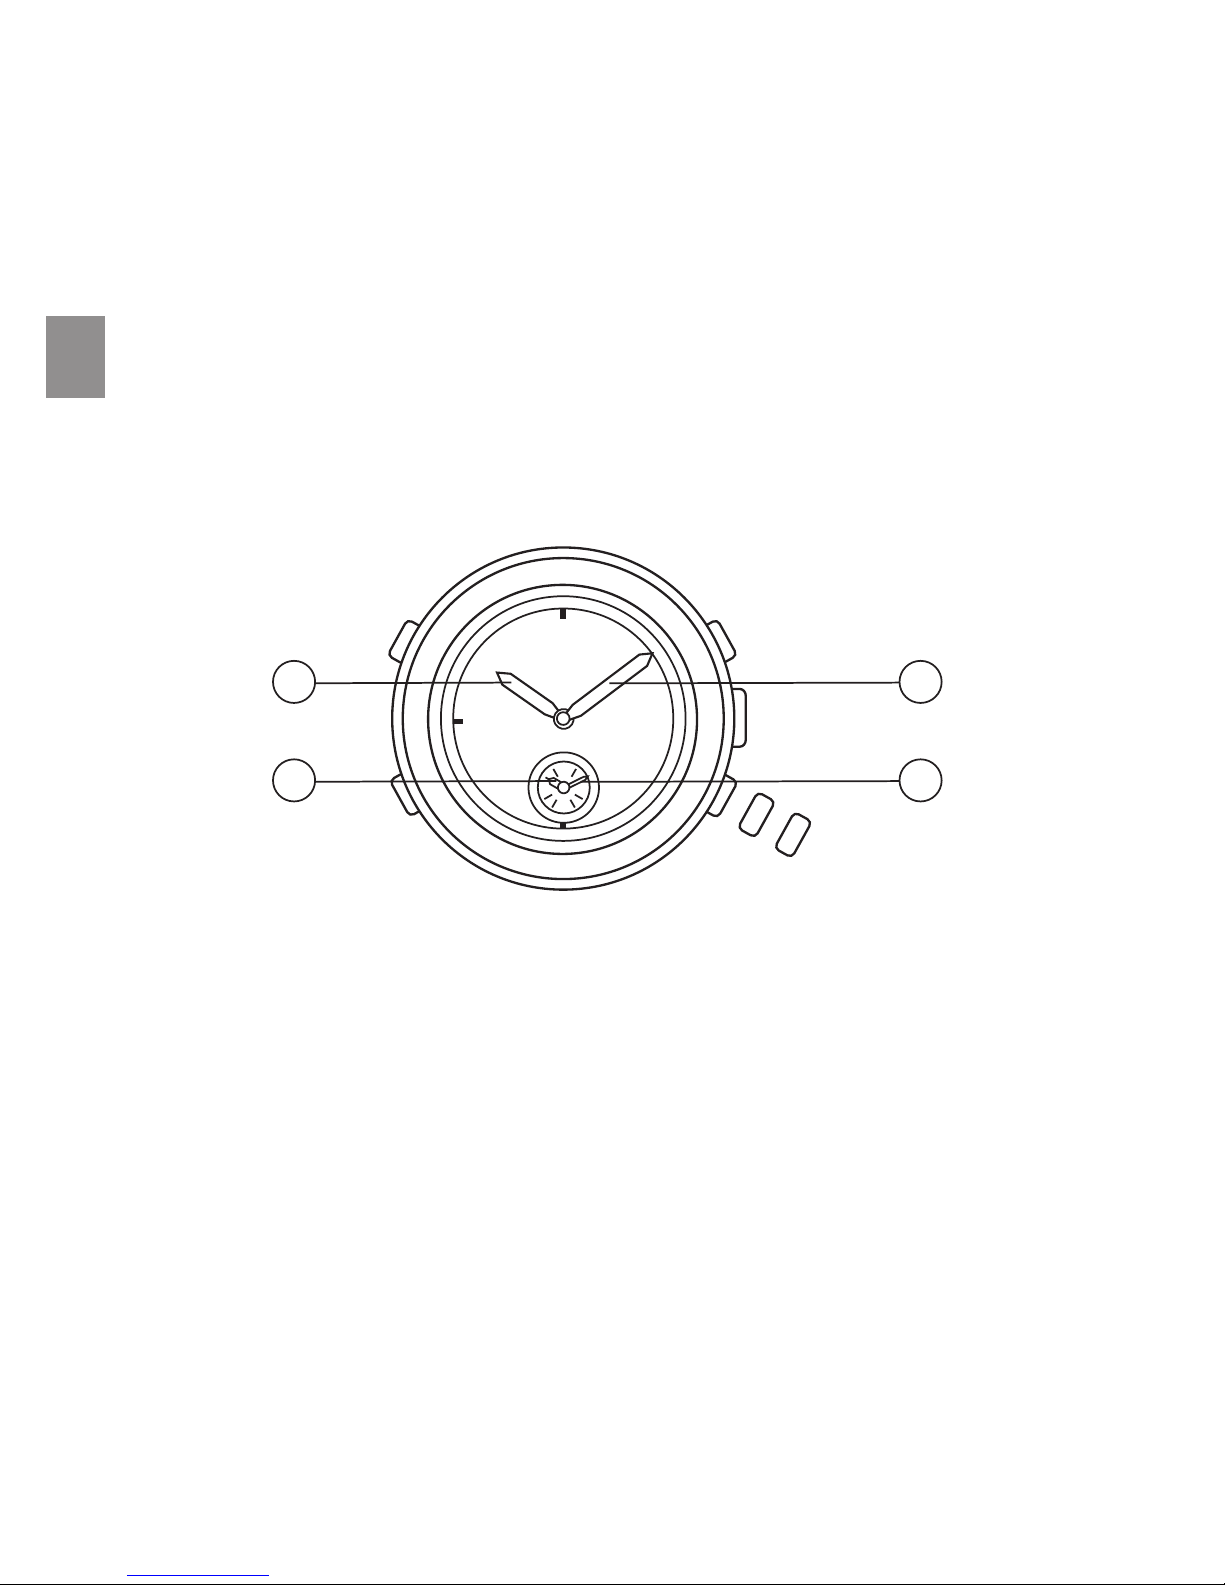
DATE SETTING
1.
2.
3.
4.
D
(1)(0)
Pull out crown “1”to the first click.
Turn crown “1”clockwise till the date for
the previous day appears.
Pull out crown “1”to the second click,
advance the hour and minute hands till the
desired date appears.Reset the time
according to time setting.
Push crown “1”back in to the normal
position.
Crown 1
Note
Do not set the date between 9:00 p.m.and 3:00 a.m.Otherwise, the date may not
change properly.If it is necessary to set the date during that time period, first change
the time to any time outside this period, set the date and then reset the correct time.
Date
•
l
l
l
l
•
l
l
l
l
•
l
l
l
l
•
l
l
l
l
•
l
l
l
l
•
l
l
l
l
•
l
l
l
l
•
l
l
l
l
•
l
l
l
l
•
l
l
l
l
•
l
639 12
(0) (1) (2)
4 5
1 2
Crown 2
7
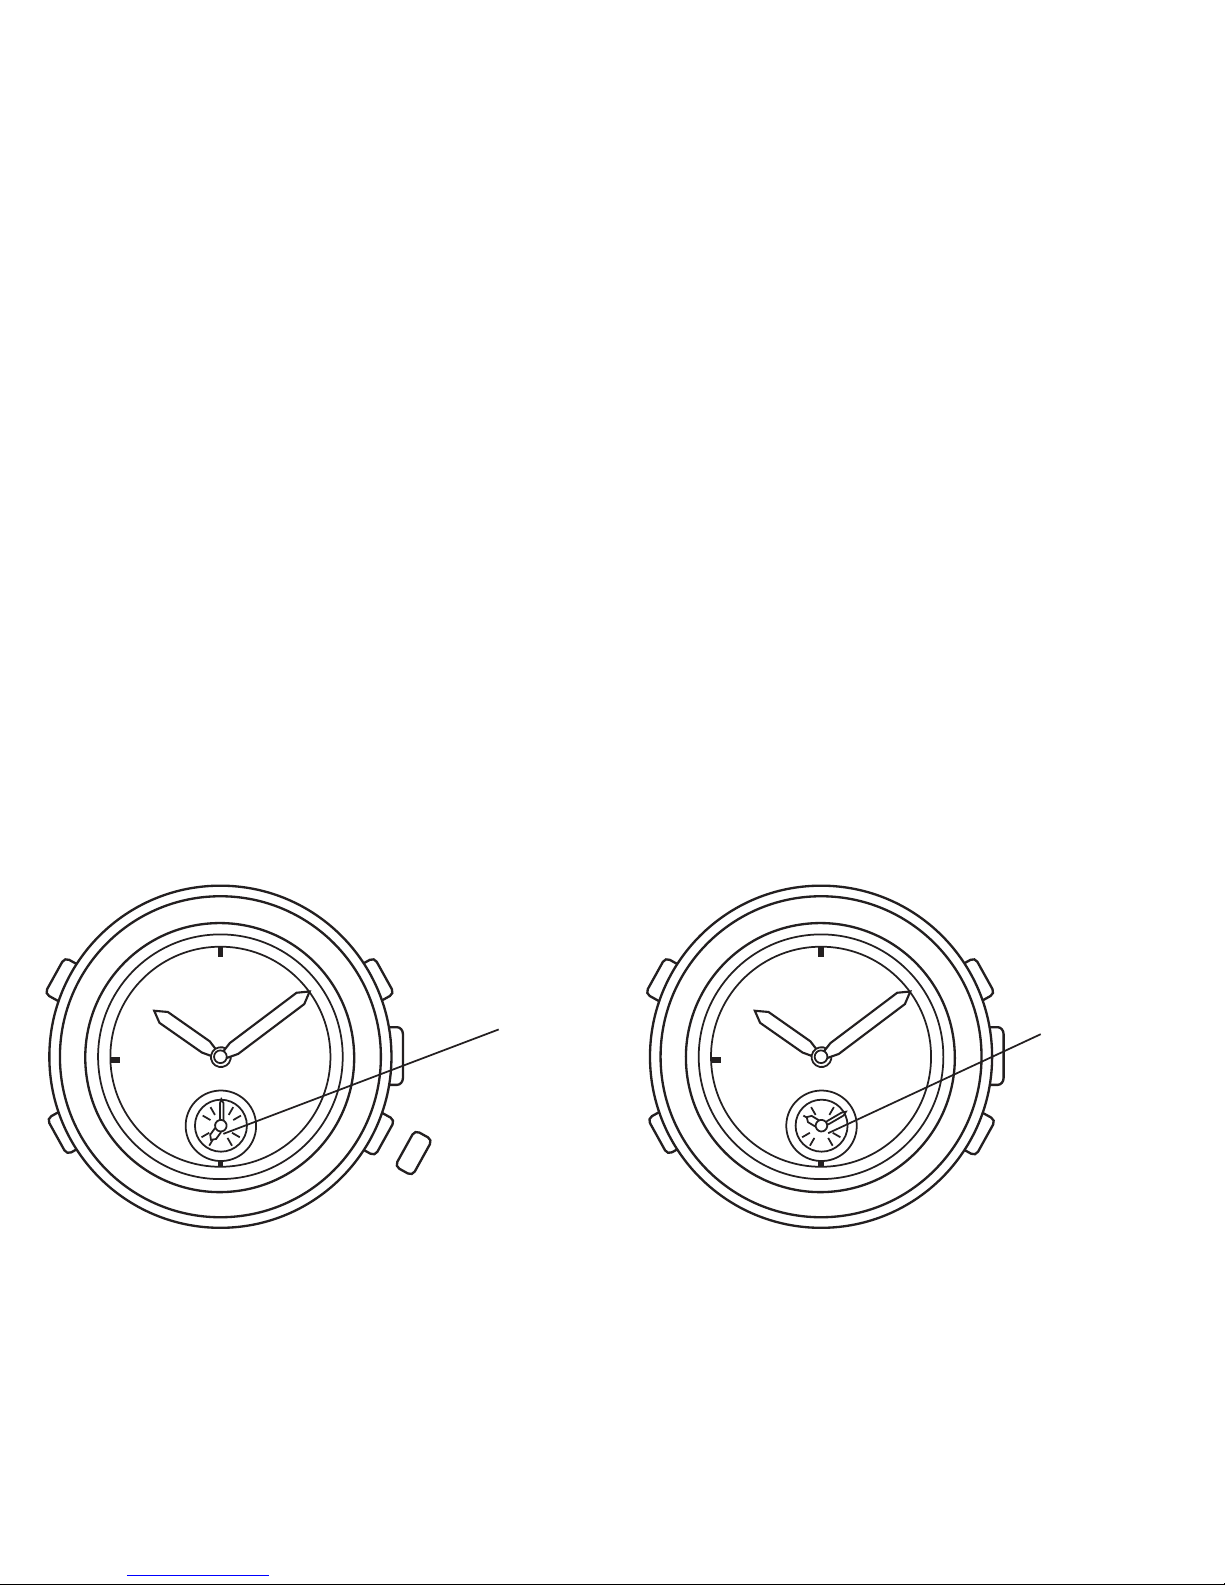
ALARME
The alarm time is set on a 12-hour basis and indicated by the alarm hour and minute
hands that move independently of the main time hands.
Alarm setting
For alarm setting, first set the alarm hands to the current time (time indicated by the
main time hands), and then set them to the alarm time.
1.
2.
Pull out crown “2”all the way to the second click.
There is a beep for one second.
Turn crown “2”to set the alarm hands to the time that the main time hands indicate.
*When setting the alarm minute hand, advance it 4 to 5 minutes ahead of the
desired alarm time and then turn it back to the exact minute.
•
l
l
l
l
•
l
l
l
l
•
l
l
l
l
•
l
l
l
l
•
l
l
l
l
•
l
l
l
l
•
l
l
l
l
•
l
l
l
l
•
l
l
l
l
•
l
l
l
l
•
l
639 12
•
l
l
l
l
•
l
l
l
l
•
l
l
l
l
•
l
l
l
l
•
l
l
l
l
•
l
l
l
l
•
l
l
l
l
•
l
l
l
l
•
l
l
l
l
•
l
l
l
l
•
l
639 12
Crown 2
(0)
Normal
position
[Alarm
disengaged]
[Alarm
engaged]
(0) (1) Crown 2
First click
8
3.
4.
Alarm engagement/disengagement
•
•
Push back crown “2”all the way in to the normal position.
Then, pull it out again to the first click.The alarm demonstration sound beeps, if crown
“2”is pulled out to the first click within one minute after being pushed back in to the
normal position.Press Crepeatedly to set the desired alarm time.
*With each press of Cthe alarm hands move one minute.
They move quickly if Cis kept pressed.
Push back crown “2”in to the normal position.
The alarm hands move to show the current time.
To engage the alarm, pull out cronw “2”to the first click.The alarm hands move to
indicate the designated alarm time set previously.
*
When crown “2”is at the normal position, the alarm is disengaged, and the alarm
hands indicate the current time.
The alarm rings at the designated time for 20 seconds.To stop it manually, press
A, Bor C, or push back crown “2”in to the normal position.

9
Note:
Please note, if crown “2”is pulled out to the second click, the designated alarm time is
canceled with a beep.In that case, set the alarm hour and minute hands to the main
time again, push crown “2”back in to the normal position, and then, pull it out to the
first click and set the desired alarm time again by pressing C.However, if crown “2”is
pushed back in to the normal position before the beep stops, the designated alarm
time will not be canceled.
•
l
l
l
l
•
l
l
l
l
•
l
l
l
l
•
l
l
l
l
•
l
l
l
l
•
l
1020
30
STOPWATCHF
The stopwatch can measure up to 30 minutes at 1 second intervals.After 30 minutes,
it will start counting again from “0”repeatedly up to 6 hours.
*Before using the stopwatch, be sure to check that crowns “1”and “2”are set at the
normal position, and press “B”to reset the stopwatch hands to “0”position.
10
A
Crown 2
B
Crown 1
3
6

11
1.
2.
Standard measurement
To start
To stop
To reset
Accumulated elapsed time
measurement
To start
To stop
To restart
To stop
* Restart and stop of the stopwatch can
be repeated by pressing A.
To reset
:Press A
:Press A
:Press B
:Press A
:Press A
:Press A
:Press A
:Press B
:Press A
:Press B
:Press B
:Press A
:Press B
:Press A
:Press B
:Press A
:Press B
:Press B
3.
*
4.
Split (intermediate) time measurement
To start
To measure split time
To release split time
Measurement and release of the split time can be repeated
by pressing “B”.
To stop
To reset
Measurement of two competitors
To start
To measure the finish time of the first competitor
When the second competitor finishes
To measure the finish time of the second competitor
To reset
BA

BA
HOWTO USETHETACHYMETERG
(For the models with a tachymeter scale on the dial)
12
Notes on crown operation while the stopwatch is in use
Crown “1”:
Crown “2”:
*
Even if crown “1”is pulled out to the first click, the stopwatch continues
measuring.However, if it is pulled out to the second click, the stopwatch
hands are reset to “0”position.
If crown “2”is pulled out to the first or second click, the stopwatch hands
are reset to “0”position.
When the stopwatch has been reset and Ais pressed before the hand reaches “0”
position, the stopwatch still starts counting time when Ais pressed.
•
The tachymeter can be used for the following
purposes.
Use the tachymeter with the stopwatch.
Stopwatch operation (Standard
measurement)
To start
To stop
To reset
:Press A
:Press A
:Press B
•
l
l
l
l
•
l
l
l
l
•
l
l
l
l
•
l
l
l
l
•
l
l
l
l
•
l
1020
30
Please note that the tachymeter scale can be used only when the time required is
less than 60 seconds.If it exceeds 60 seconds, shorten the measuring distance.
(Refer to “Ex.2”below.)
13
Ex.:1)
If it takes 40 seconds to go one kilometer (or one mile), the
stopwatch second hand indicates“90”on the tachymeter
scale.This means that the average speed of the vehicle is
90 kilometers (or miles) per hour.
Use the stopwatch to determine how many seconds it takes to go one kilometer (or
one mile).The tachymeter scale indicated by the stopwatch second hand gives the
average speed per hour.
*
Tachymeter scale
figure at 40 seconds
position x 1 (km or mile)
90
To measure the hourly average speed of a vehicle(1)
•
= 90 km/h (o mph)
Ex.:2)
If the measuring distance is extended to 2 kilometers (or miles) or shortened to 0.5
kilometers (miles), multiply the figure on the tachymeter scale by 2 or 0.5 respectively.
We recommend that you utilize the tachymeter in a rally, speedway or circuit race.
Tachymeter
scale figure
at 40 seconds position
x 2
(Kilometers
or miles)
90
= 180 km/h (o mph)
Tachymeter
scale figure
at 40 seconds position
x 0,5
(Kilometers
or miles)
90
= 45 km/h (o mph)

•
l
l
l
l
•
l
l
l
l
•
l
l
l
l
•
l
l
l
l
•
l
l
l
l
•
l
1020
30
14
Ex.:1)
Use the stopwatch to measure the time required to
complete one job.
If it takes 20 seconds, the stopwatch second hand
indicates“180”on the tachymeter scale.This means that
180 jobs will be accomplished in one hour.
The tachymeter is extremely useful in calculating factory operation efficiency or
machine products amount.
Tachymeter scale
figure at 20 seconds
position x 1 job
180
(2)To measure the hourly rate of operation
= 180 jobs
Ex.:2)
Use the stopwatch to determine how many jobs are accomplished in a specific period
of time.
If 15 jobs are completed in 20 seconds, multiply “180”, the figure on the tachymeter
scale indicated by the stopwatch second hand, by 15.Thus, it is estimated that 2,700
jobs will be accomplished in one hour.
Tachymeter scale
figure at 20 seconds
position x 15 jobs
180
= 2,700 jobs per hour

ADJUSTINGTHE HAND POSITION
H
• If the stopwatch hands ➂and ➅will not return to the 12 o’clock position when the
stopwatch is reset or when the battery is replaced with a new one, follow the
procedure below to reset the hands to the 12 o’clock position.
1.
2.
3.
Pull out crown “1”to the second click.
Press Aand Brepeatedly but
separately to reset the stopwatch hands
to the 12 o’clock position, respectively.
*
Push crown “1”back in to the normal
position.
The hands move quickly if the
respective buttons are kept pressed.
A
Crown 1
B
(0) (1) (2)
•
l
l
l
l
•
l
l
l
l
•
l
l
l
l
•
l
l
l
l
•
l
l
l
l
•
l
1020
30
15
A
Crown 1
B
(0) (1) (2)
•
l
l
l
l
•
l
l
l
l
•
l
l
l
l
•
l
l
l
l
•
l
l
l
l
•
l
1020
30
RESETTINGTHE BUILT-IN IC
I
• In case any of the watch hands should move improperly, follow the procedure below to
adjust the hand movement.
1.
2.
3.
Pull out crown “1”to the second click.
Press Aand Bsimultaneously.
Push back crown “1”in to the normal
position.The built-in IC will be reset,
and normal movement of the hands will
return.Before using the watch again, be
sure to set the main time and alarm
hands to the desired time and adjust
the position of the stopwatch hands
following the procedure in “Adjusting
the hand position”.
16
Table of contents
Languages:
Other BREIL Watch manuals

BREIL
BREIL 6U50 User manual

BREIL
BREIL YM91 User manual

BREIL
BREIL FS41 User manual

BREIL
BREIL CHRONO YM92 User manual

BREIL
BREIL OT10 User manual

BREIL
BREIL CHRONO OS10 User manual

BREIL
BREIL CHRONO VD57 User manual

BREIL
BREIL CHRONO FS10 User manual

BREIL
BREIL ABARTH 595 SCORPIONEORO User manual

BREIL
BREIL 1S13 User manual

BREIL
BREIL OS80 Manta User manual

BREIL
BREIL ABARTH 595 SCORPIONEORO User manual

BREIL
BREIL Watch User manual

BREIL
BREIL ABARTH 595 SCORPIONEORO User manual

BREIL
BREIL 1L10 User manual

BREIL
BREIL X.LARGE PRO User manual

BREIL
BREIL AS10 User manual

BREIL
BREIL CHRONO OS11 User manual

BREIL
BREIL Abarth 500e User manual

BREIL
BREIL YM62 User manual


