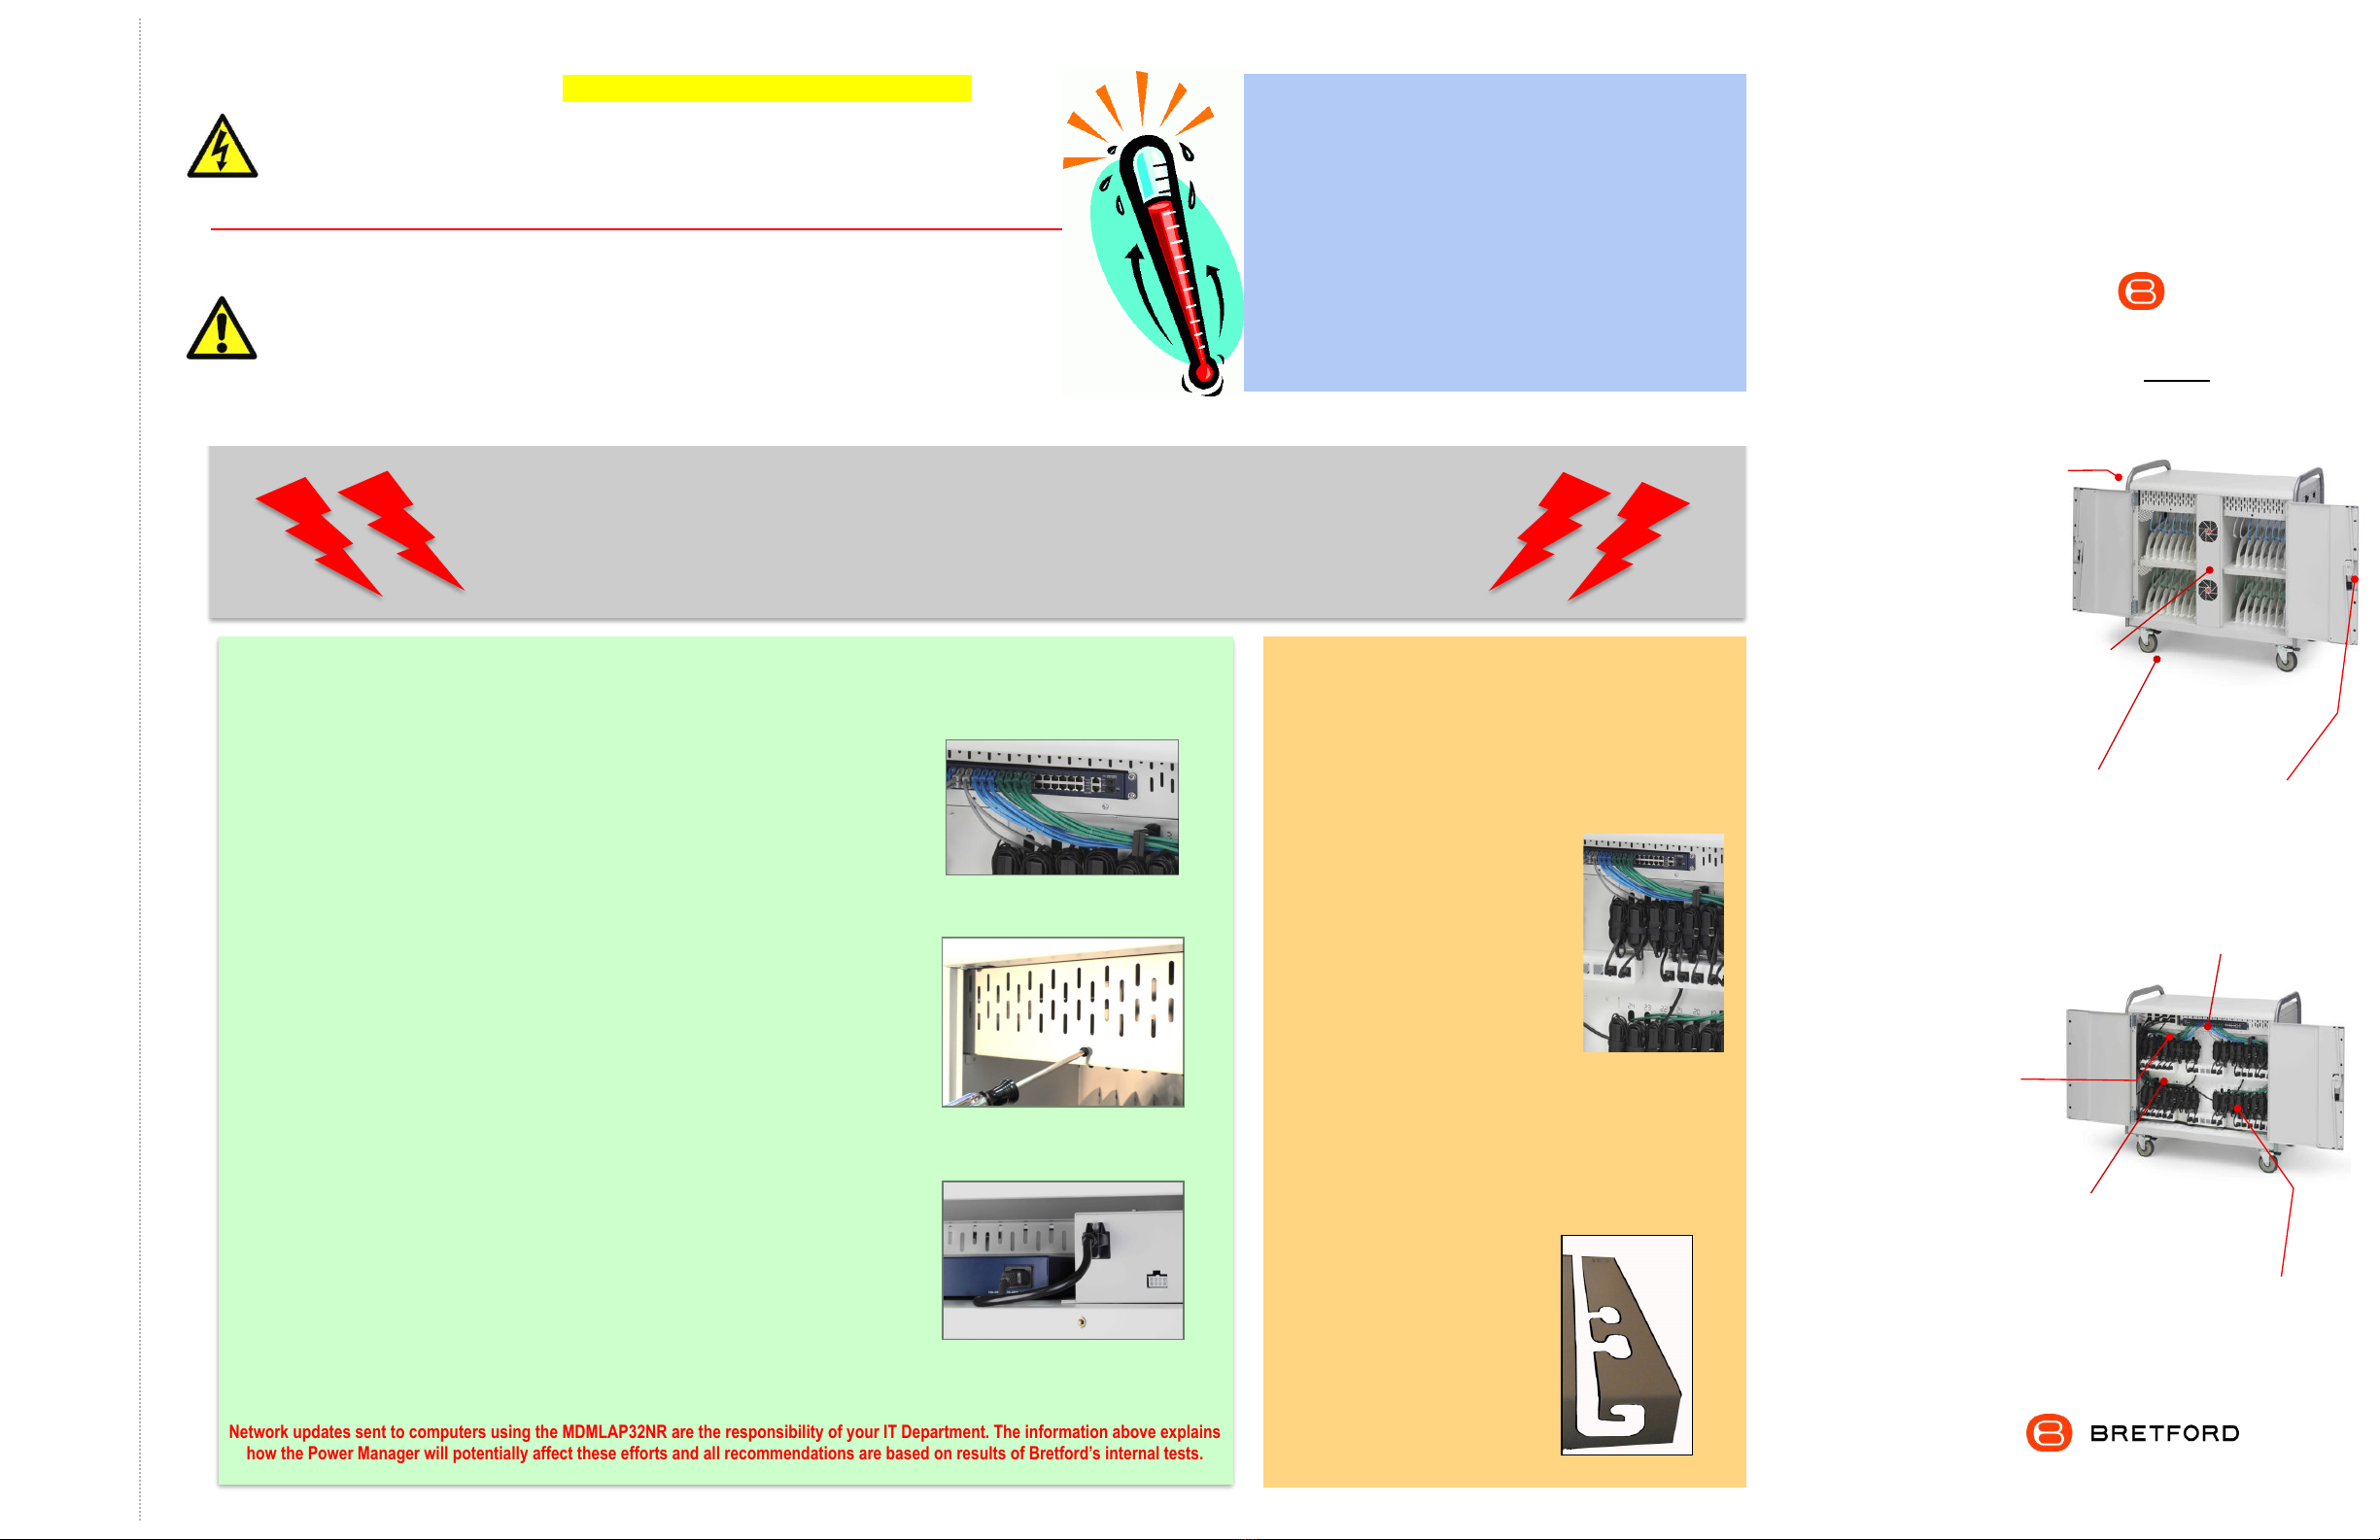
manuals.online logo
Brands
  1. Home
  2. •
  3. Brands
  4. •
  5. Bretford
  6. •
  7. Indoor Furnishing
  8. •
  9. Bretford MDMLAP32NR User manual

Bretford MDMLAP32NR User manual

The “Power Manager” has two LED indicator lights that let you know what it is happening
The left light is Amber and the right one is Red
Amber
Red
1. When the power button is switched to the “On” position, both
indicator lights will light up for approximately 2 seconds.
2. Both lights will then turn off while the “Power Manager” evaluates
the power required to charge the first set of devices.
3. The Amber light will come on and stay lit indicating that the “Power
Manager” is now in “Smart Charge” mode. This means that laptops
will be charged in groups, three minutes at a time.
4. Once the power needed to charge all of the devices in the cart
reaches a level that will not trip the circuit, the “Power Manager”
enters “All Charge” mode and both lights will be off. All devices are
now charging.
1. If both the Amber and Red lights start to blink, it means one set of devices is drawing too much current and the “Power
Manager” needs to be reset by turning it off and back on. If problem persists there may be a faulty device that needs to be
removed.
2. If the Amber light displays single blinks, it means the current required to power the auxiliary outlet is too high. Unplugging
whatever is in the auxiliary outlet should allow the “Power Manager” to resume charging the devices.
3. If the Amber light displays double blinks, the internal temperature of the cart is too high. Open the doors of the cart and/or move
the cart to a cooler room. The cart should cool down without having to turn off the “Power Manager”

MDMLAP32NR
32 Laptop Computers in Vertical Slots
Maximize your Tech Investment
The MDM Network Ready Laptop Cart provides
you the infrastructure to secure, charge and
update 32 computers.
The cart ships fully assembled with:
• 33 Ethernet cables pre-wired and ready to
plug into your laptops
• Dedicated space for your 19” rack-mounted
network switch
• Two thermally-controlled fans to dissipate
heat while your computers are updating
Save time and money by sending patches,
updates and content to all of the devices in the
cart at once.
Dual-Locking Swing Handle
Flexible Security
The MDM Laptop Cart is secured with a
unique dual-locking handle built right
into the doors. The handle can be
opened by using EITHER the three digit
combination or a key.
2. Using the Combination Lock
• Dial in the factory set combination
– “000”
• Turn the wing knob 180 degrees
counter clockwise until the arrow
points straight up (3). Lift and turn
the handle to open the door.
• To re-lock, turn the wing knob 180
degrees clockwise and scramble
the combination.
• The MDM Laptop Cart features the new and improved Power Manager, which is designed to continuously charge even
the most power hungry laptops using only one wall outlet.
• The system uses a “Round Robin” charging cycle that constantly evaluates the demand for power and allows each
electrical strip time to cool down. Cooler batteries last longer, and extended battery life saves you money.
• When the total draw of the devices allows it, the Network Switch will turn on automatically and receive continuous power
until the unit is powered off.
• Two Heat Sensors inside the cart communicate the internal temperature to the Power Manager. When it exceeds 77°F
the fans will turn on and if it gets above 100°F the system will stop sending power until the cart cools down.
Power Management System … The “Power Manager
11000 Seymour Avenue Franklin Park, IL 60131 USA 800 521 9614
www.bretford.com
1. Using the Key
• Insert the key into the lock and
turn it 180 degrees counter
clockwise (2)
• Lift and turn the handle to open
the door.
• To re-lock, turn the key 180
degrees clockwise.
3. Changing the Combination
• Put the keylock in the locked
position and dial in the existing
combination.
• Turn the wing knob 180
degrees + 15 degrees counter
clockwise (3) & (4). Enter the
desired new combination.
• Turn the wing knob 15 degrees
clockwise. The new
combination is now set.
Cut Here - Finished size = 16W x 11H - Folded three times, like a map
!" #$%&'"()*+," -&."()*+," /&01)1*" 2345631"
7" 2)1*4&"84)19:" ;<" #5=)4)0'>"?'0@)1*"A33"/5B+"C3@&'" D1E45*"#5=)4)0'>"
F" ?35%4&"84)19:" ;<" G1,&'104"A&$E"3H"I0',"A33"J)*+" ;E&1"?33':K/3L&"I0',"
M" 2)1*4&"84)19:" 2)1*4&"84)19:" ;1&"2&,"?'0@)1*"A33"/5B+"C3@&'" A5'1";<"N";1"
!" #$%&'"()*+," -&."()*+," /&01)1*"
7" ;1" ;1" 2,0',ODE"
F" ;<" ;<" 2&4HOA&:,"
M" ;1" ;<" 2$0',"I+0'*&"/3.&"
P" ;<" ;<" #44"I+0'*&"/3.&"
Please Note: It is recommended that
nothing be plugged into the Auxiliary
outlet while charging
What is the “Power Manager” doing?
BBaassiiccTTrroouubblleesshhoooottiinngg
Part #: 031-9405 03/13/2012
MDM Network Ready
Laptop Cart
USER GUIDE
Directional Locking
Casters can be locked as a
rigid caster for easy rolling down
the hallway, or unlocked to swivel
for easily getting into tight spaces.
Security provided by dual-
locking handles built right into the
steel constructed doors
Front View
Two Fans in the front of
the cart vacate heat, keeping
the internal temperature of the
cart within recommended
operating levels.
Removable Cord
Management panels let IT
Coordinator wrap cable sets at a desk.
No more kneeling or bending behind
the cart organizing the power cords.
Ethernet Cables
pre-wired in the rear of
the cart.
Back View
MDM Network Ready
Laptop Cart
USER GUIDE
11000 Seymour Avenue Franklin Park, IL 60131 USA 800 521 9614
www.bretford.com
MDMLAP32NR
32 Laptop Computers in Vertical Slots
How Does the Network Ready Cart Manage Heat?
When computers are charging, the source of heat is the adapter/transformer.
However, when they are receiving updates from your network, the computers must
be powered on meaning the source of the heat inside the cart is the computers’
ventilating themselves to keep their internal batteries cool. The air emitted from each
computer is very hot and with all 32 laptops ventilating at once, the internal
temperature of the cart rises dramatically while they are updating.
Computer manufacturers recommend a safe temperature range of 50°F to 95 °F for
operating laptops. To keep the internal temperature of the cart within these limits,
the MDM Network Ready Laptop Cart features ventilation on the side panels and is
equipped with two thermally-controlled fans that turn on when the temperature
inside the cart exceeds 77°F. Bretford has conducted extensive testing that
confirms the effectiveness of these features.
ELECTRICAL: Avoid sparks. Avoid arcing Always turn OFF the power to the cart before plugging IN or OUT!
ELECTRICAL: For Safety Purposes, make sure all electrical components do not exceed the the maximum load rating of 12 amps.
ELECTRICAL: Risk of electrical shock. Do not plug the power cord into another extension cord or relocatable power tap.
ELECTRICAL: The power strips inside the laptop cart are only for charging laptop computers. Any other use may cause an
overload for the Power Management System, causing the Power Managerto shutdown. To reset the “Power Manager”, turn off the
main power switch, unplug the non-laptop device, then turn the main switch back on.
CAUTION: Be sure each laptop computer is turned OFF before plugging into the cart..
CAUTION: Do Not block the ventilation holes or fans on the cart. Proper air flow is required for safe operation of equipment.
CAUTION: Cart with computers should be kept in a room with a maximum temperature not to exceed 77° F or 25° C.
CAUTION: Maximum weight of accessories on top of cabinet is 25 pounds.
CAUTION: Avoid loading equipment in the cart in a uneven fashion. Uneven weight distribution could cause a hazardous condition.
Laser-Cut ID #’s in
front & back keep computers
and their cable sets in the right
place and make it easy to
identify if something is
missing.
The “Desktop” Cord Management system allows you to
organize the computer cord sets while seated at a table. No more
bending or kneeling behind the cart!! Simply remove the four
steel panels, secure the adapters with the Velcro straps, and re-
hang them in the rear of the cart.
Cable Management … Done at your Desk!
Power Manager
Uses the power from a
single wall outlet to charge
and update laptops safely
and efficiently.
When the Power Manager has moved through all of power modes described
in the blue box on the reverse side of this guide, the power required for all six
power strips will be below 10 amps and the network switch will be powered
on. Once on, the network switch will ALWAYS receive power until the Power
Manager is manually turned off.
If the combined draw of the power strips and network switch exceeds 10
amps, the cart will revert to “Smart Charge” mode. The network switch will
continue to get power but some computers will be running on battery power
every three minutes as the Power Manager redistributes the current.
Note that if the computers are updated remotely, they must be receiving AC
power to receive a “wake up” packet. Therefore, when using Wake-On LAN
we recommend the computers be “awakened” in stages to prevent the
Power Manager from reverting to “Smart Charge” mode. For example, the
“wake-up” packet would be sent to the computers in slots 1-8; once they are
on, the packet would be sent to the computers in slots 9-16, and so on until all
32 devices are powered on.
Since computers can receive updates while operating on battery power, the
update can now be sent to all 32 of them at once. If the computers are
powered on manually, updates can be sent to the entire cart simultaneously.
Dedicated Space
for your 19” rack-mounted
network switch.
For Best Results When Using the Networking Functionality,
We Recommend that All of the Computers in the Cart be
Fully Charged
Networking with the Power Manager
Mount your switch in the back of the cart
Remove the top panel in front of the cart
Plug your switch into the Power Manager
Getting Started
The cable management
channel includes a cut-out
designed to hold the Ethernet
cable and power cord in place.
Place the power cord on top of
the Ethernet cable and loop it into
the “notch” and over the hook at
the front.
Be sure to leave enough slack at both
ends of the power cord to be able to
plug one end into the power strip and
pass the other end through the divider
panel to the front of its assigned storage
slot. Use the Laser Cut ID Numbers to
quickly match computers with their cord
sets.
The MDM Network Ready Laptop Cart ships with 32 Ethernet
cables pre-wired in the rear of the cart. One end will be routed
to the dedicated space for your network switch and the other
end will be threaded through the divider panel into the cable
management channel in the front section of the cart.
Network updates sent to computers using the MDMLAP32NR are the responsibility of your IT Department. The information above explains
how the Power Manager will potentially affect these efforts and all recommendations are based on results of Bretford’s internal tests.
CAUTION: Before moving cart from one room to the next, wrap the power cords on the winders located on the side of the cart.
CAUTION: No TV/Monitor to be used on top of cart.

Other Bretford Indoor Furnishing manuals

Bretford FLIP TOP QUATTRO TABLE User manual

Bretford

Bretford FLIP TOP QUATTRO TABLE User manual

Bretford 35SD27 User manual

Bretford

Bretford 35SD27 User manual

Bretford CDQ2436 User manual

Bretford

Bretford CDQ2436 User manual

Bretford LAP30ULV-CT User manual

Bretford

Bretford LAP30ULV-CT User manual

Bretford FPPC72V200 User manual

Bretford

Bretford FPPC72V200 User manual

Bretford TechGuard Connect User manual

Bretford

Bretford TechGuard Connect User manual

Bretford Edu 2.0 User manual

Bretford

Bretford Edu 2.0 User manual

Bretford TechGuard TLMTKIT5 User manual

Bretford

Bretford TechGuard TLMTKIT5 User manual

Bretford Basics BB44 User manual

Bretford

Bretford Basics BB44 User manual

Bretford LECTTG3018 User manual

Bretford

Bretford LECTTG3018 User manual

Bretford 3577 User manual

Bretford

Bretford 3577 User manual

Bretford QUATTRO Computer Table User manual

Bretford

Bretford QUATTRO Computer Table User manual

Bretford EXPLORE User manual

Bretford

Bretford EXPLORE User manual

Bretford TechGuard Connect User manual

Bretford

Bretford TechGuard Connect User manual

Bretford 35XTC17 User manual

Bretford

Bretford 35XTC17 User manual

Bretford CR4500 User manual

Bretford

Bretford CR4500 User manual

Bretford EC7000 User manual

Bretford

Bretford EC7000 User manual

Bretford ec7000 User manual

Bretford

Bretford ec7000 User manual

Bretford ECILS2M-BK User manual

Bretford

Bretford ECILS2M-BK User manual

Bretford 1-Bay User manual

Bretford

Bretford 1-Bay User manual

Bretford EDU 2.0 User manual

Bretford

Bretford EDU 2.0 User manual

Bretford TVSW12AC User manual

Bretford

Bretford TVSW12AC User manual

Bretford RHOMBII Owner's manual

Bretford

Bretford RHOMBII Owner's manual

Popular Indoor Furnishing manuals by other brands

Universal Furniture 597636 instruction sheet

Universal Furniture

Universal Furniture 597636 instruction sheet

FMD Möbel 4012-003 Assembly instruction

FMD Möbel

FMD Möbel 4012-003 Assembly instruction

Costway HW70441 user manual

Costway

Costway HW70441 user manual

HB Moveis Buffet Melodia manual

HB Moveis

HB Moveis Buffet Melodia manual

Monarch Specialties I 1900 Assembly instructions

Monarch Specialties

Monarch Specialties I 1900 Assembly instructions

BDI SEQUEL 6051 owner's manual

BDI

BDI SEQUEL 6051 owner's manual

LIVARNO 85943 Assembly instruction

LIVARNO

LIVARNO 85943 Assembly instruction

Seconique MILAN Assembly instructions

Seconique

Seconique MILAN Assembly instructions

Pitarch 1022 Assembly instructions

Pitarch

Pitarch 1022 Assembly instructions

Victory Land Group BH10-084-902-13 Assembly instructions

Victory Land Group

Victory Land Group BH10-084-902-13 Assembly instructions

Extreme marquees 16m SINGLE POLE STAR SHADE installation instructions

Extreme marquees

Extreme marquees 16m SINGLE POLE STAR SHADE installation instructions

Bestsign ICD001RBK Assembly instructions

Bestsign

Bestsign ICD001RBK Assembly instructions

Argos Home Mia Hearts 3196399 Assembly instructions

Argos Home

Argos Home Mia Hearts 3196399 Assembly instructions

Furniture of America Gatria CM6982 Assembly instructions

Furniture of America

Furniture of America Gatria CM6982 Assembly instructions

DURAVIT L-Cube LC 7651 Mounting instructions

DURAVIT

DURAVIT L-Cube LC 7651 Mounting instructions

pakoworld 8265 Assembly instruction

pakoworld

pakoworld 8265 Assembly instruction

Altra furniture B345962215COM manual

Altra furniture

Altra furniture B345962215COM manual

Inside Weather ADA DINING CHAIR manual

Inside Weather

Inside Weather ADA DINING CHAIR manual

manuals.online logo
manuals.online logoBrands
  • About & Mission
  • Contact us
  • Privacy Policy
  • Terms and Conditions

Copyright 2025 Manuals.Online. All Rights Reserved.