Broan 355SOBK User manual

MODELS 355SOBK • 355SOBR • 355SOWW
Page 1
WARNING
TO REDUCE THE RISK OF FIRE, ELECTRIC SHOCK, OR INJURY
TO PERSONS, OBSERVE THE FOLLOWING:
1. Use this unit only in the manner intended by the manufacturer.
If you have questions, contact the manufacturer at the address
or telephone number listed in the warranty.
2. Before servicing or cleaning unit, disable the ventilator by cover-
ing the solar panel with cardboard or disconnecting the wires
from the motor terminals (note wire locations when disconnect-
ing).
3. Installation work must be done by a qualified person(s) in ac-
cordance with all applicable codes and standards, including
fire-rated construction codes and standards.
4. If removing an existing 120 VAC powered attic ventilator, use
only a qualified person(s) to remove any electrical wiring in
accordance with all applicable codes and standards.
5. Sufficient air is needed for proper combustion and exhausting
of gases through the flue (chimney) of fuel burning equipment
to prevent backdrafting. Follow the heating equipment manufac-
turer's guidelines and safety standards such as those published
by the National Fire Protection Association (NFPA), and the
American Society for Heating, Refrigeration and Air Condition-
ing Engineers (ASHRAE), and the local code authorities.
6. When cutting or drilling into wall or ceiling, do not damage
electrical wiring and other hidden utilities.
CAUTION
1. Fo r general ventilating use only. Do not use to exhaust hazard-
ous or explosive materials and vapors.
2. To avoid motor bearing damage and noisy and/or unbalanced
impellers, keep drywall spray, construction dust, etc. off power
unit.
3. This unit has an unguarded impeller. Do not use in locations
readily accessible to people or animals.
4. This ventilator operates when the solar panel is exposed to
sun light. To reduce risk of injury while installing, servicing or
cleaning unit, cover the solar panel with cardboard or discon-
nect the wires from the motor terminals (note wire locations
when disconnecting).
5. The recommended open air inlet for this ventilator is 4.25
square feet. The best location for these air intake vents are
under the eaves with direct access to the attic. Failure to pro-
vide these intakes could cause natural-draft gas appliances to
backdraft.
6. Your attic fan installation will create a screened opening into
your attic space. During a heavy rain storm there could be a
light spray of rain into this attic space. This is a normal condi-
tion with all attic ventilators and will not cause any damage to
the structure. We recommend that you do not store any valu-
able articles directly under the fan opening in the roof.
7
. This ventilator is intended for roof installation. Broan Models
353 & 353SOBK Gable Mount Ventilators are available for
side wall applications.
8. The plastic ventilator dome and base may be painted with
high quality paint. Follow the paint manufacturer's recommen-
dations for acrylic and ABS plastic as appropriate. Take care
to avoid getting paint on the solar panel.
9. Please read specification label on product for further informa-
tion and requirements.
10. The installation instructions contained in this document are
only a recommendation and individual professionals may
have their own methods of installation. If your roof has an
existing warranty, installation of this product by anyone other
than those who installed the roof may jeopardize any future
warranty claim. Please check with the original installer of your
roof if this is a concern.
11. When working with asphalt shingles in cold weather (below
400 F), take care to avoid damage to the shingle edges and
corners.
ROOF-MOUNT
SOLAR POWERED
ATTIC VENTILATOR
READ AND SAVE THESE INSTRUCTIONS
r
Drill
r
1/4" Drill Bit
r
Sabre Saw or Keyhole Saw
r
Hammer
r
Ruler / Tape Measure
r
Pencil, Marker or Scribe
r
Utility Knife
r
Pry Bar (to remove roofing nails)
r
5/16" Socket and Extension
r
Roofing Cement
r
Galvanized Roofing Nails (1¾" min.)
TOOLS AND MATERIALS REQUIRED
Register your product online at:
www.broan.com/register

MODELS 355SOBK • 355SOBR • 355SOWW
Page 2
4. Working from the inside of your attic, find the desired
ventilator location and mark a spot halfway between
rafters at a point that is 24” – 36” below the roof ridge.
5. Drill a guide hole through the roof at this mark.
6
12345789
INSTALLATION
Note: This ventilator is capable of replacing an existing
120 volt powered attic ventilator. Only a qualified per-
son should remove any electrical wiring in accordance
with local codes and standards.
1. Determine the sun’s best exposure location on your roof
barring shade (trees, other buildings etc.) at 4:00pm in
the hottest month of the year. Generally, we recommend
a point located 24” – 36” on center below the roof peak
and centrally along the ridgeline on the south, southwest,
or west side of the home.
2. Prior to installation, we recommend setting up the
ventilator to verify operation. Take the ventilator to a
location exposed to sun. Removing the cardboard
cover from the solar panel should cause the ventilator
to operate. Secure cardboard in place over solar panel
(for safety).
3. Separate the dome from the base by removing four (4)
5/16” stainless steel sheet metal screws. Set dome aside.

MODELS 355SOBK • 355SOBR • 355SOWW
Page 3
7. Cut out the shingles inside of the circle.
8. Using the same nail and string shown in step 6, scribe
a 14” diameter circle on the black paper or roof decking.
Note: if replacing an existing ventilator the hole diameter
may be larger than 1 4 ”. This is acceptable provided the
ventilator base is adequately supported by the roof
decking.
9. Drill a large starting hole for the sabre saw just inside of
the line or the 14" circle created in Step 8.
10. Cut out the roof board(s) inside of the line.
11. For proper removal of roofing nails, draw a 26" square,
centered around the hole. Remove nails holding shingles
down from top two-thirds of square.
6. From the roof side, using the guide hole as the center
point, use a nail and string to scribe a 16-1/2” diameter
circle on the shingles. Note: If replacing an existing
ventilator, the hole diameter may be larger than 16-1/2”.
This is acceptable provided the roofing material overlaps
the ventilator by at least 1” on all sides.

MODELS 355SOBK • 355SOBR • 355SOWW
Page 4
13. Make sure the ventilator base is parallel to the roof ridge,
carefully lift shingles and nail or screw base securely to
the roof using galvanized roofing nails or screws. Nail all
corners and around perimeter of base every 6 inches.
12. Apply a large bead of roofing cement in the molded
groove on the bottom side of ventilator base. Making
sure the arrow on the ventilator base is pointed toward
the roof ridge, start two-thirds of the way down from the
top of the 26” square and slide the ventilator base under
the shingles. Do not bend the shingles any more than
necessary. Center the ventilator base over the hole.
NAIL UNDER SHINGLES
14. Using a good grade of roofing cement material, seal
shingles and all nail heads. DO NOT seal the bottom
edge of the ventilator base.
15. Install the ventilator dome to the ventilator base using
the four (4) stainless steel 5/16” sheet metal screws
removed during step 3. Remove cardboard from the
solar panel and make sure the ventilator operates.

MODELS 355SOBK • 355SOBR • 355SOWW
Page 5
Model Model Model
Key 355SOBK 355SOBR 355SOWW Description
No. (Black) (Brown) (Weather Wood)
1 S99527247 S99527248 S99527249 Solar Panel Assembly (Dome)
2 S99527261 S99527261 S99527261 Fan Blade w/ Set Screw
3 S99527257 S99527257 S99527257 Motor, DC
4 S99527250 S99527251 S99527252 Base (Roof Sheet)
1
2
3
4
SERVICE PARTS
Replacement parts
can now be ordered
on our website.
Please visit us at
www.Broan.com

MODELS 355SOBK • 355SOBR • 355SOWW
Page 6
WARRANTY
BROAN-NUTONE LLC
– Exclusive Limited Warranty –
The Exclusive Limited Warranty Agreement (the “Warranty”) is entered into by and between Customer and Broan-NuTone LLC
(“Broan”). Customer has carefully reviewed this Warranty and agrees that Broan’s performance of its obligations hereunder will
provide Customer with an adequate remedy which will serve the essential purpose of the parties’ agreement relating to the products
manufactured by Broan and identified on the reverse side hereof (the “Products”). Customer acknowledges and agrees that he/she is
purchasing the Products for residential purposes (and not for industrial or commercial purposes) after careful inspection of the same.
Customer’s rights and benefits hereunder inure solely to Customer, as the original purchaser of the Products, and are non-assignable
and non-transferable. No other party or entity, including, without limitation, subsequent purchasers or owners of the Products shall
have or be entitled to assert any rights or benefits hereunder.
EXCLUSIVE LIMITED WARRANTY; LIMITATION OF REMEDIES. Broan hereby warrants the Customer that the Products’ motors
are and will remain for a period of two (2) years from the date of delivery to Customer; and the Products are and will remain for a
period of six (6) years from the date of delivery to Customer (collectively, the “Warranty Period”), free of defects in materials and
workmanship, provided that such Products are used for their intended purpose and are properly serviced in accordance with the
User’s Manual provided to Customer. Subject to the foregoing, if at any time during the Warranty Period any Product fails to conform
to the foregoing warranty by reason of defects in materials or workmanship, Customer shall properly notify Broan in writing and shall
include with such notice a sales receipt or proof of purchase of the defective Product, and Broan at its option shall repair or replace
the defective Product or component part without charge to Customer, except for: (A) costs incurred in transporting the Products or
component parts to and from Broan’s designated dealer or its manufacturing plant in Hartford, Wisconsin; and (B) charges for labor
or other costs incidental to the removal or remounting of component parts repaired or replaced under this Warranty, both of which
shall be borne by Customer. Notwithstanding any provision herein to the contrary, this Warranty shall not extend or obligate Broan
to take any action with respect to: (A) Products which have been modified, altered, installed, used or operated in a manner which is
not recommended by Broan, including any Products in which parts not manufactured or approved by Broan have been installed; (B)
Products which have not been regularly or properly serviced in accordance with the User’s Manual or which have otherwise been
neglected; and (C) ordinary wear and tear, service and maintenance and replacement items. THIS WARRANTY APPLIES ONLY
TO MACHINERY, EQUIPMENT AND COMPONENT PARTS MANUFACTURED BY BROAN. THIS WARRANTY DOES NOT APPLY
OR EXTEND TO: (A) PARTS PURCHASED SEPARATELY FROM SUCH MACHINERY AND EQUIPMENT, WHICH ARE COVERED
BY A SEPARATE WRITTEN WARRANTY; OR (B) ITEMS OF EQUIPMENT OR ACCESSORIES MANUFACTURED BY PARTIES
OTHER THAN BROAN.
EXCEPT AS SPECIFICALLY STATED IN THE PARAGRAPH IMMEDIATELY ABOVE, BROAN MAKES NO WARRANTY OR REP-
RESENTATION, EXPRESS OR IMPLIED, INCLUDING, WITHOUT LIMITATION, ANY WARRANTY OF MERCHANTABILITY OR
FITNESS FOR A PARTICULAR PURPOSE. THE WARRANTY SET FORTH IN THE PRECEDING PARAGRAPH AND THE OB-
LIGATIONS AND LIABILITIES OF BROAN THEREUNDER REPRESENT CUSTOMER’S SOLE AND EXCLUSIVE REMEDIES
AND ARE EXPRESSLY MADE IN LIEU OF ANY AND ALL OTHER REMEDIES, WARRANTIES, GUARANTIES OR LIABILITIES,
EXPRESS OR IMPLIED, ALL OF WHICH ARE HEREBY EXPRESSLY WAIVED BY CUSTOMER. THERE ARE NO WARRANTIES
WHICH EXTEND BEYOND THE DESCRIPTION ON THE FACE HEREOF. IN NO EVENT SHALL BROAN’S LIABILITY HERE-
UNDER EXCEED THE PURCHASE PRICE FOR THE PRODUCTS. ADDITIONALLY, BROAN SHALL NOT BE LIABLE FOR ANY
SPECIAL, INDIRECT, INCIDENTAL OR CONSEQUENTIAL DAMAGES OF ANY NATURE WHATSOEVER.
Broan reserves the right to modify, alter or improve any products or equipment manufactured by Broan without incurring any duty or
obligation to modify, alter, improve or replace any of the Products covered hereby.
THIS WARRANTY SETS FORTH THE PARTIES’ FINAL, COMPLETE AND EXCLUSIVE AGREEMENT CONCERNING THE
PRODUCTS AND BROAN’S WARRANTY OBLIGATIONS. NO AFFIRMATION OF FACT, PROMISE, DESCRIPTION, DEMON-
STRATION, SAMPLE OR MODEL CONSTITUTES A WARRANTY OR OTHERWISE MODIFIES, EXTENDS OR ALTERS THIS
WARRANTY UNLESS IN A WRITTEN INSTRUMENT SIGNED BY AN AUTHORIZED BROAN OFFICER.
This Warranty shall be governed by and construed in accordance with the laws of the State of Wisconsin. The venue for any action
arising out of or related to this Warranty shall be in Washington County, Wisconsin.
Broan-NuTone LLC Hartford, Wisconsin www.broan.com 800-558-1711
99527232B

MODÈLES 355SOBK 355SOBR • 355SOWW
Page 7
AVERTISSEMENT
AFIN DE DIMINUER LES RISQUES D'INCENDIE,
D'ÉLECTROCUTION OU DE BLESSURES, SUIVEZ CES
DIRECTIVES :
1. N'utilisez cet appareil que de la manière prévue par le fabricant.
Si vous avez des questions, communiquez avec le fabricant à
l'adresse ou au numéro de téléphone indiqués dans la garantie.
2. Avant d’entretenir ou de nettoyer l’appareil, désactivez le
ventilateur en couvrant le panneau solaire d’un carton ou en
débranchant les fils des bornes du moteur (notez leur position
en les débranchant).
3. Les travaux d'installation doivent être effectués par des
personnes qualifiées conformément à la réglementation et aux
codes en vigueur, notamment les normes de la construction
ayant trait à la protection contre les incendies.
4. Si vous enlevez un ancien ventilateur électrique de 120 VCA,
ne faites appel qu’à des personnes qualifiées pour enlever le
câblage conformément aux codes et aux normes en vigueur.
5. Pour éviter les refoulements, l'apport d'air doit être suffisant pour
brûler les gaz produits par les appareils à combustion et les
évacuer dans le conduit de fumée (cheminée). Respectez les
directives du fabricant de l'appareil de chauffage et les normes
de sécurité, notamment celles publiées par la National Fire
Protection Association (NFPA), l'American Society for Heating,
Refrigeration and Air Conditioning Engineers (ASHRAE) et les
codes des autorités locales.
6. Veillez à ne pas endommager le câblage électrique ou d'autres
équipements non apparents lors de la découpe ou du perçage
du mur ou du plafond.
ATTENTION
1.
Pour ventilation générale uniquement. Ne pas utiliser
cet appareil pour évacuer des matières ou des vapeurs
dangereuses ou explosives.
2. Pour éviter d'endommager les roulements de moteur, de
déséquilibrer les pales ou de les rendre bruyantes, débarrassez
l'appareil de la poussière de plâtre, de construction, etc.
3. Cet appareil comporte une hélice non protégée. Ne l'utilisez
pas dans un endroit facilement accessible aux personnes ou
aux animaux.
4. Ce ventilateur se met en marche lorsque le panneau solaire
est exposé au soleil. Pour réduire les risques de blessure lors
de l’installation, de l’entretien ou du nettoyage de l’appareil,
couvrez le panneau solaire d’un carton ou débranchez les fils
des bornes du moteur (notez leur position en les débranchant).
5. L’entrée d’air recommandée pour ce ventilateur est de 0,40 m2
(4,25 pi2). Le meilleur emplacement de ces entrées d’air est
sous les avant-toit accédant directement au grenier. Négliger
d’aménager telles entrées d’air risque d'entraîner le refoulement
des gaz des appareils de combustion.
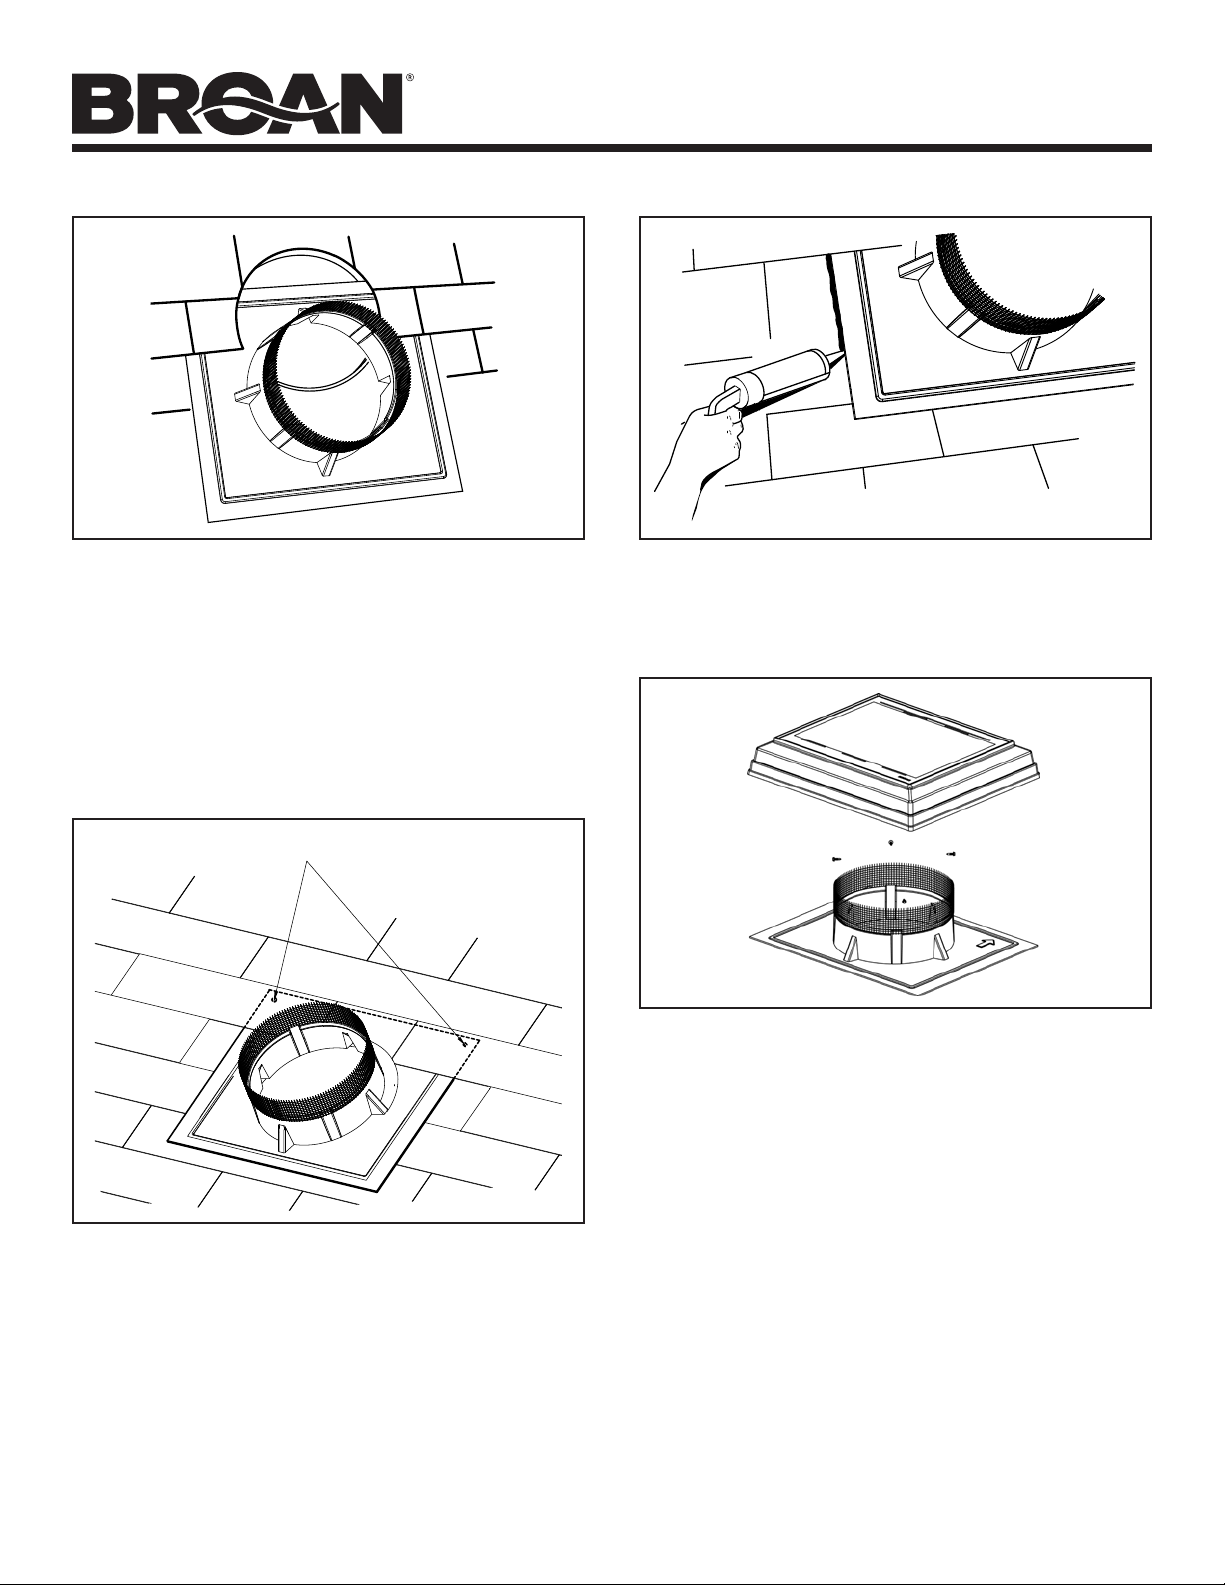
6. L'installation créera une ouverture grillagée accédant à l'espace
du grenier. Lors d'un orage violent, une fine bruine de pluie
pourrait pénétrer dans le grenier. Ceci est normal pour tous les
ventilateurs de grenier et n'entraînera aucun dommage à la
structure. Nous vous conseillons de ne pas ranger d'objets de
valeur directement sous l'ouverture du ventilateur dans le toit.
7. C e ventilateur est conçu pour être installé sur un toit. Les
ventilateurs de pignon Broan modèles 353 et 353SOBK sont
disponibles pour les applications murales.
8. Le dôme et la base en plastique du ventilateur peuvent être
peints avec une peinture de qualité supérieure. Suivez les
recommandations du fabricant de la peinture pour l'acrylique
et le plastique ABS. Évitez de mettre de la peinture sur le
panneau solaire.
9. Veuillez lire l'étiquette de spécifications du produit pour obtenir
plus de renseignements, notamment sur les exigences.
10. Les directives d’installation contenues dans ce document ne
sont que des recommandations et des professionnels peuvent
avoir leur propre méthode d’installation. Si votre toit est l’objet
d’une garantie, l’installation de ce produit par des personnes
autres que les couvreurs qui ont effectué les travaux du toit
risque de compliquer toute réclamation future. Veuillez consulter
le couvreur original de votre toit pour déterminer s’il peut y avoir
un problème à ce sujet.
VENTILATEUR DE GRENIER
À ÉNERGIE SOLAIRE
MONTÉ SUR LE TOIT
LIRE CES DIRECTIVES ET LES CONSERVER
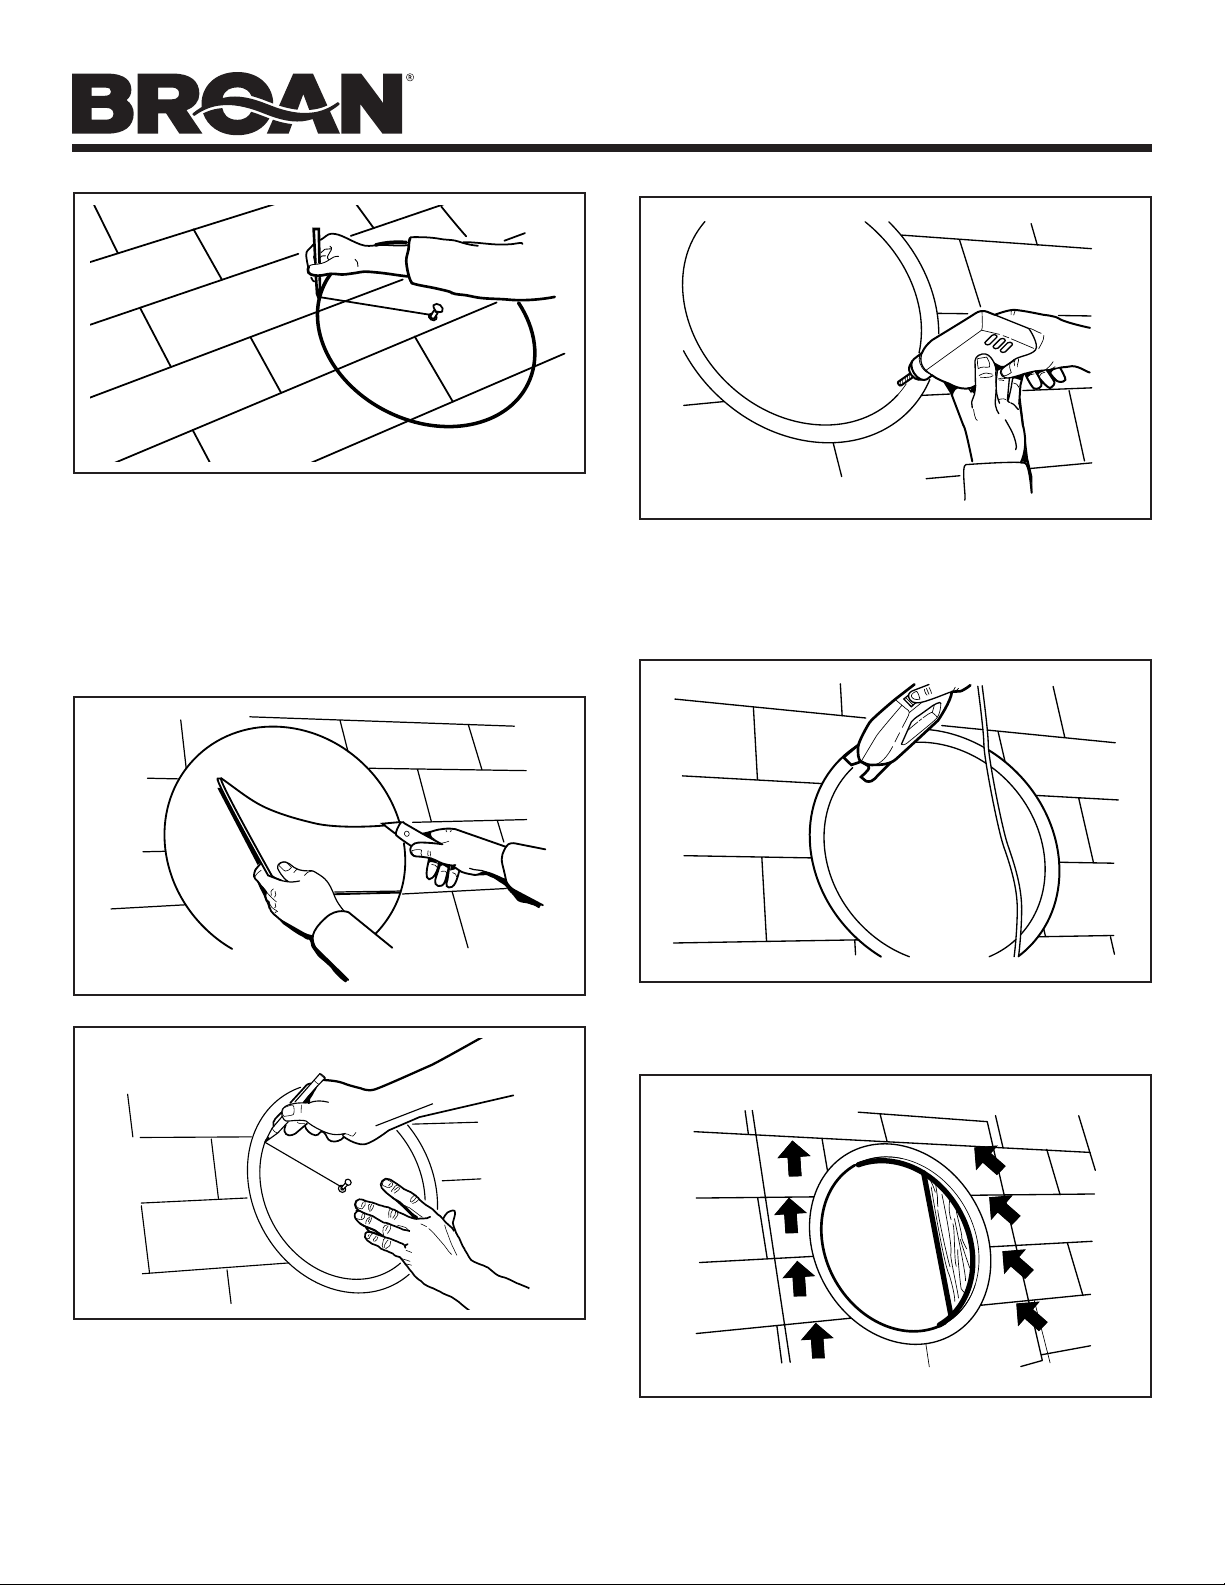
r
Perceuse
r
Mèche 1/4 po
r
Scie sauteuse ou scie passe-partout
r
Marteau
r
Règle / ruban à mesurer
r
Crayon, feutre ou stylet
r
Couteau universel
r
Barre à clous (pour enlever les clous à toiture)
r
Douille 5/16 po et rallonge
r
Enduit à toiture
r
Clous à toiture galvanisés de 4,4 cm (1¾ po) min.
OUTILS ET MATÉRIEL REQUIS
Enregistrez votre produit en ligne à :
www.broan.com/register

MODÈLES 355SOBK 355SOBR • 355SOWW
Page 8
4. En travaillant de l’intérieur du grenier, trouvez l’endroit
voulu et marquez un point à mi-chemin entre deux
chevrons à environ 61 à 91 cm (24 à 36 po) en dessous
du faîte du toit.
5. Percez un avant-trou dans le toit au niveau du repère.
6
12345789
INSTALLATION
Remarque : Ce ventilateur peut remplacer un ventilateur
électrique de 120 volts pour grenier. Seule une personne
qualifiée peut enlever le câblage conformément aux
codes et aux normes en vigueur.
1. Déterminez l’emplacement le plus exposé au soleil sur le
toit et sans ombre (arbres, autres bâtiments, etc.) à 16 h
dans le mois le plus chaud de l’année. En règle générale,
nous recommandons un point situé à environ 61 à
91 cm (24 à 36 po) au centre en dessous du faîte du
toit et centré sur le pan sud, sud-ouest ou ouest du toit.
2. Avant l’installation, il est conseillé d’essayer le ventilateur
pour vérifier son fonctionnement. Placez le ventilateur à
un endroit exposé au soleil. Enlever le carton qui couvre
le panneau solaire devrait faire démarrer le ventilateur.
Fixez le carton en place sur le panneau solaire
(pour des raisons de sécurité).
3. Séparez le dôme du ventilateur de sa base en enlevant
les quatre (4) vis à tôle de 5/16 po en acier inoxydable.
Mettez le dôme de côté.

MODÈLES 355SOBK 355SOBR • 355SOWW
Page 9
7. Coupez les bardeaux à l’intérieur du cercle.
8. En utilisant toujours l’avant-trou comme point central,
à l’aide d’un clou et d’une corde, tracez un cercle de
35,6 cm (14 po) de diamètre sur le papier noir ou le
panneau du toit. Remarque : Si vous remplacez un
ancien ventilateur, le diamètre de l’ouverture peut être
plus grand que 35,6 cm (14 po), ce qui ne pose pas
de problème tant que la base du ventilateur est bien
soutenue par les panneaux du toit.
9. Percez un grand trou de départ pour la scie sauteuse
juste à l'intérieur de la ligne du cercle de 35,6 cm
(14 po) tracé à l’étape 8.
10. Coupez le ou les panneaux du toit à l'intérieur de la ligne.
11. Pour enlever correctement les clous à toiture, tracez un
carré de 66 cm (26 po) de côté, centré sur l’ouverture.
Enlevez les clous retenant les bardeaux sur les deux
tiers supérieurs du carré.
6. En travaillant du côté extérieur du toit et en utilisant
l’avant-trou comme point central, à l’aide d’un clou et
d’une corde, tracez un cercle de 42 cm (16-1/2 po)
de diamètre sur les bardeaux. Remarque : Si vous
remplacez un ancien ventilateur, l’ouverture peut être
plus grande que 42 cm (16-1/2 po), ce qui ne pose pas
de problème tant que le revêtement du toit chevauche
le contour du ventilateur d’au moins 2,5 cm (1 po) sur
tous les côtés.

MODÈLES 355SOBK 355SOBR • 355SOWW
Page 10
13. Assurez-vous que la base du ventilateur est parallèle à
la ligne du faîte, soulevez délicatement les bardeaux et
clouez ou vissez la base sur le toit à l’aide de clous à
toiture galvanisés ou de vis.
12. Appliquez un gros cordon de silicone dans la rainure du
dessous de la base du ventilateur. Tout en vous assurant
que la flèche sur la base du ventilateur est pointée vers
le faîte du toit, glissez la base du ventilateur sous les
bardeaux des deux tiers supérieurs du carré de 66 cm
(26 po). Ne pliez pas les bardeaux plus que nécessaire.
Centrez la base du ventilateur sur l’ouverture.
CLOUS SOUS LES BARDEAUX
14. Imperméabilisez les bardeaux et les têtes de clou
à l'aide d'un enduit à toiture de bonne qualité.
N'IMPERMÉABILISEZ PAS le bord inférieur de la base
du ventilateur.
15. Installez le dôme du ventilateur sur la base du
ventilateur à l’aide des quatre (4) vise à tôle de
5/16 po en acier inoxydable enlevées à l’étape 3.
Retirez le carton du panneau solaire et vérifiez le
fonctionnement du ventilateur.

MODÈLES 355SOBK 355SOBR • 355SOWW
Page 11
1
2
3
4
PIÈCES DE RECHANGE
Les pièces de
rechange peuvent
être commandées
sur notre site Web.
Visitez notre site à
www.Broan.com
Repère
Modèle
355SOBK
(noir)
Modèle
355SOBR
(brun)
Modèle
355SOWW
(bois patiné)
Description
1S99527247 S99527248 S99527249 Ensemble de panneau solaire (dôme)
2S99527261 S99527261 S99527261 Hélice de ventilateur avec vis d’arrêt
3S99527257 S99527257 S99527257 Moteur, CC
4S99527250 S99527251 S99527252 Base (Panneau de toiture)

MODÈLES 355SOBK 355SOBR • 355SOWW
Page 12
Garantie
Garantie exclusive limitée de
BROAN-NUTONE LLC
Le contrat de garantie exclusive limitée (la « Garantie ») est conclu entre le client et Broan-NuTone LLC (« Broan »). Le client a
lu attentivement cette garantie et convient que l’exécution des obligations de Broan ci-dessous lui fournira un recours adéquat qui
servira aux fins essentielles de l’accord des parties relativement aux produits fabriqués par Broan et identifiés au verso de la présente
(les « Produits »). Le client reconnaît et convient qu’il a acheté les produits à des fins résidentielles (et non industrielles ou commerciales)
après les avoir soigneusement inspectés. Les droits et avantages du client, tels que stipulés ci-dessous, incombent uniquement au
client en tant qu’acheteur original des produits, et ne sont ni cessibles ni transférables. Aucune autre partie ou entité, y compris, entre
autres, tout acheteur ou propriétaire ultérieur des produits, ne pourra prétendre à aucun des droits et avantages ci-dessous.
GARANTIE EXCLUSIVE LIMITÉE; LIMITATION DES RECOURS. Par la présente, Broan garantit au client que le moteur des produits
est et demeurera pour une période de quinze (15) mois à compter de la date de livraison au client; et que les produits sont et
demeureront pour une période de cinq (5) ans à compter de la date de livraison au client (collectivement, la « période de garantie »),
libres de tout vice de matériau ou de fabrication, à condition que ces produits soient utilisés aux fins pour lesquelles ils ont été
conçus et aient été correctement entretenus conformément au Manuel de l’utilisateur fourni au client. Eu égard à ce qui suit, si à tout
moment au cours de la période de garantie le produit n’est pas conforme à la présente garantie en raison d’un vice de matériau ou
de fabrication, le client en informera Broan par écrit, en joignant le reçu ou la preuve d’achat du produit défectueux, afin que Broan
puisse, à sa discrétion, réparer ou remplacer ce produit ou l’une de ses pièces sans frais pour le client, à l’exception : (A) des coûts
de transport du produit ou de ses pièces du et au concessionnaire désigné par Broan ou à son usine de Hartford, Wisconsin; et (B)
des frais de main-d’œuvre ou autres coûts indirects relatifs à l’enlèvement ou au remontage des pièces réparées ou remplacées en
vertu de cette garantie, lesquels sont à la charge du client. Nonobstant toute disposition contraire des présentes, cette garantie ne
saurait obliger Broan à prendre des dispositions en ce qui a trait à : (A) des produits ayant été modifiés, altérés, installés, utilisés ou
ayant servi d’une manière non recommandée par Broan, y compris tout produit dans lequel des pièces qui n’ont pas été fabriquées ou
approuvées par Broan ont été installées; (B) des produits qui n’ont pas été régulièrement ou adéquatement entretenus conformément
au Manuel de l’utilisateur ou qui ont été autrement négligés; et (C) l’usure normale, les travaux de service et d’entretien et les articles
à remplacer. CETTE GARANTIE NE S’APPLIQUE Q U ’À LA MACHINERIE, À L’ÉQUIPEMENT ET AUX PIÈCES FABRIQUÉES
PAR BROAN. ELLE NE S’APPLIQUE PAS : (A) AUX PIÈCES ACHETÉES SÉPARÉMENT DE LADITE MACHINERIE OU DUDIT
ÉQUIPEMENT, QUI SONT COUVERTES PAR UNE GARANTIE ÉCRITE DISTINCTE; NI (B) AUX ARTICLES, ÉQUIPEMENTS OU
ACCESSOIRES FABRIQUÉS PAR D’AUTRES PARTIES QUE BROAN.
SAUF CE QUI EST STIPULÉ AU PARAGRAPHE PRÉCÉDENT, BROAN N’OFFRE AUCUNE GARANTIE NI REPRÉSENTATION,
EXPRESSE OU IMPLICITE, Y COMPRIS, ENTRE AUTRES, TOUTE GARANTIE DE VALEUR MARCHANDE OU D'ADAPTATION
À UN USAGE PARTICULIER. LA GARANTIE STIPULÉE DANS LE PARAGRAPHE PRÉCÉDENT ET LES OBLIGATIONS ET
RESPONSABILITÉS DE BROAN QUI EN DÉCOULENT REPRÉSENTENT LE SEUL ET UNIQUE RECOURS DU CLIENT ET
REMPLACENT TOUT AUTRE RECOURS, GARANTIE, OU RESPONSABILITÉ, EXPRESSE OU IMPLICITE, AUXQUELS
LE CLIENT RENONCE EXPRESSÉMENT IL N’Y A AUCUNE GARANTIE DÉPASSANT LA DESCRIPTION QUI SUIT. LA
RESPONSABILITÉ DE BROAN NE SAURAIT EN AUCUN CAS DÉPASSER LA VALEUR DU PRIX D’ACHAT DU PRODUIT. DE
PLUS, BROAN DÉCLINE TOUTE RESPONSABILITÉ QUANT AUX DOMMAGES SPÉCIAUX, INDIRECTS, ACCESSOIRES OU
CONSÉCUTIFS, DE QUELQUE NATURE QUE CE SOIT.
Broan se réserve le droit de modifier, altérer ou améliorer tout produit ou équipement qu’elle fabrique sans avoir le devoir ni l’obligation
de modifier, altérer, améliorer ou remplacer aucun des produits couverts par la présente.
CETTE GARANTIE ÉNONCE L’ENTENTE FINALE, COMPLÈTE ET EXCLUSIVE ENTRE LES PARTIES AU SUJET DES
PRODUITS AINSI QUE LES OBLIGATIONS DE BROAN EN MATIÈRE DE GARANTIE. AUCUNE AFFIRMATION RELATIVE À
DES FAITS, NI PROMESSE, DESCRIPTION, DÉMONSTRATION, EXEMPLE OU MODÈLE NE CONSTITUE UNE GARANTIE NI
AUTREMENT NE MODIFIE, NE COUVRE OU N’ALTÈRE CETTE GARANTIE, À MOINS QUE CE SOIT DANS UN INSTRUMENT
ÉCRIT, SIGNÉ PAR UN RESPONSABLE AUTORISÉ PAR BROAN.
Cette garantie est soumise et doit être interprétée conformément aux lois de l’État du Wisconsin. Toute action en justice découlant de
cette garantie ou y étant associée doit avoir lieu dans le comté de Washington, Wisconsin.
Broan-NuTone LLC Hartford, Wisconsin www.broan.com 800-558-1711
99527232B

MODELOS 355SOBK 355SOBR • 355SOWW
Página 13
ADVERTENCIA
PARA REDUCIR EL RIESGO DE INCENDIOS, DESCARGAS
ELÉCTRICAS O LESIONES PERSONALES, OBSERVE LAS
SIGUIENTES PRECAUCIONES:
1. Use la unidad sólo de la manera indicada por el fabricante.
Si tiene preguntas, comuníquese con el fabricante a la dirección
o al número telefónico que se incluye en la garantía.
2. Antes de dar servicio o de limpiar la unidad, desactive el
ventilador cubriendo el panel solar con cartón o desconectando
los cables de las terminales del motor (tome nota de las
ubicaciones de los cables al desconectarlos).
3. Una o más personas calificadas deben realizar el trabajo
de instalación, de acuerdo con todos los códigos y normas
correspondientes, incluidos los códigos y las normas
de construcción específicos de protección contra incendios.
4. Si va a quitar un ventilador eléctrico para ático de 120 VCA ya
existente, sólo personas calificadas deben quitar el cableado
eléctrico, de acuerdo con todos los códigos y las normas
correspondientes.
5. Se necesita suficiente aire para que se lleve a cabo una
combustión y una extracción adecuadas de los gases a
través del tubo de humos (chimenea) del equipo quemador
de combustible, con el fin de evitar el contratiro. Siga las
directrices y las normas de seguridad del fabricante del equipo
de calefacción, como las publicadas por la Asociación Nacional
de Protección contra Incendios (National Fire Protection
Association, NFPA), y la Sociedad Americana de Ingenieros
en Calefacción, Refrigeración y Aire Acondicionado (American
Society for Heating, Refrigeration and Air Conditioning
Engineers, ASHRAE), y las autoridades de los códigos locales.
6.
Al cortar o perforar a través de la pared o del techo, tenga cuidado
de no dañar el cableado eléctrico ni otros servicios ocultos.
PRECAUCIÓN
1. Sólo para usarse como medio de ventilación general. No debe
usarse para la extracción de materiales ni vapores peligrosos
o explosivos.
2. Para evitar daños a los cojinetes del motor y rotores ruidosos
o desbalanceados, mantenga la unidad de potencia protegida
contra rociados de yeso, polvos de construcción, etc.
3. Esta unidad tiene un impulsor sin protección. No lo use en sitios
fácilmente accesibles para personas o animales.
4. Este ventilador se acciona cuando el panel solar se expone a la
luz del sol. Para reducir el riesgo de lesiones mientras instala,
da servicio o limpia la unidad, cubra el panel solar con cartón
o desconecte los cables de las terminales del motor (tome nota
de las ubicaciones de los cables cuando los desconecte).
5. La entrada de aire abierta recomendada para este ventilador
es de 4.25 pies cuadrados (0.4 metros cuadrados). La mejor
ubicación para estas ventilaciones de admisión de aire es debajo
de los aleros con acceso directo al ático. De no suministrar
estas entradas se podría ocasionar que se invierta la corriente
natural de los electrodomésticos de gas.
6. La instalación de su ventilador para ático creará una abertura
con malla hacia el espacio de su ático. Si hubiera una lluvia
muy intensa podría provocarse un ligero rociado de la lluvia en
este espacio del ático. Esta situación es normal con todos los
ventiladores de ático y no provocará daños a la estructura. Le
recomendamos que no guarde artículos de valor directamente
debajo de la abertura del ventilador en el techo.
7.
Este ventilador está diseñado para instalarse en el techo. Los
ventiladores para montaje en hastial Broan Modelos 353 y
353SOBK están disponibles para aplicaciones de muros laterales.
8. El domo del ventilador y la base de plástico se pueden pintar
con pintura de alta calidad. Siga las recomendaciones del
fabricante de pintura para el acrílico y el plástico ABS, según
corresponda. Tenga cuidado de evitar que le caiga pintura al
panel solar.
9. Lea la etiqueta de especificaciones que tiene el producto para
ver información y requisitos adicionales.
10. Las instrucciones de instalación contenidas en este documento
son solamente recomendaciones, y cada profesional en
particular puede tener sus propios métodos de instalación.
Si el techo ya cuenta con una garantía, la instalación de este
producto realizada por otra persona diferente al instalador del
techo puede poner en riesgo cualquier reclamo de garantía
en el futuro. Verifique con el instalador original del techo por si
esto fuera motivo de preocupación.
VENTILADOR SOLAR
PARA ÁTICO DE
MONTAJE EN EL TECHO
LEA Y CONSERVE ESTAS INSTRUCCIONES
r
Taladro
r
Broca para taladro de 1/4 pulg.
r
Sierra de vaivén o sierra de calar
r
Martillo
r
Regla/cinta de medir
r
Lápiz o marcador
r
Navaja utilitaria
r
Barra de palanca (para quitar los clavos del techo)
r
Dado de 5/16 pulg. y extensión
r
Cemento para techo
r
Clavos galvanizados para techo (mínimo de 1¾ pulg.)
HERRAMIENTAS Y MATERIALES
REQUERIDOS
Registre su producto en Internet en:
www.broan.com/register

MODELOS 355SOBK 355SOBR • 355SOWW
Página 14
4. Desde el interior del ático, encuentre la ubicación
deseada para el ventilador y marque un punto a la
mitad entre las vigas, que se encuentre de 24 a 36 pulg.
(61 a 91 cm) debajo de la saliente del techo.
5. Haga un orificio guía a través del techo en esta marca.
6
12345789
INSTALACIÓN
Nota: Este ventilador tiene capacidad para reemplazar
un ventilador para ático existente de 120 voltios.
Sólo el personal calificado debe quitar el cableado
eléctrico de acuerdo con los códigos y las normas
locales.
1. Determine la ubicación del techo con la mejor exposición
al sol y que no tenga sombra (de árboles, otros edificios,
etc.) a las 4:00 p.m. en el mes más cálido del año.
Por lo general, recomendamos un punto situado de
24 a 36 pulg. (61 a 91 cm) por debajo del punto más alto
del techo y centrado a lo largo de la línea del reborde
sobre el lado sur, suroeste u oeste de la casa.
2. Antes de realizar la instalación, recomendamos
configurar el ventilador para verificar el funcionamiento.
Lleve el ventilador a un sitio expuesto al sol. Quitar la
cubierta de cartón del panel solar debe hacer que el
ventilador funcione. Asegure el cartón en su lugar sobre
el panel solar (por seguridad).
3. Separe el domo de la base quitando los cuatro
(4) tornillos de 5/16 pulg. de acero inoxidable para lámina
metálica. Deje el domo a un lado.

MODELOS 355SOBK 355SOBR • 355SOWW
Página 15
7. Recorte las tejas dentro del círculo.
8. Usando el mismo clavo y el cordón indicados en el
paso 6, marque un círculo de 14 pulg. (35.6 cm) de
diámetro sobre el papel negro o la cubierta del techo.
Nota: Si reemplaza un ventilador existente, el diámetro
del orificio puede ser mayor de 14 pulg. (35.6 cm). Esto
es aceptable, siempre y cuando la base del ventilador
tenga un buen soporte en la cubierta del techo.
9. Perfore un orificio iniciador grande para la sierra de
vaivén, justo dentro de la línea o del círculo de 14 pulg.
(35.6 cm) creado en el paso 8.
10. Recorte las tablas del techo dentro de la línea.
11. Pa r a poder quitar adecuadamente los clavos del techo,
dibuje un cuadrado de 26 pulg. (66 cm) centrado
alrededor del orificio. Retire los clavos que sostienen
las tejas desde los dos tercios superiores del cuadrado.
6. Desde el lado del techo, usando el orificio guía como
punto central, use un clavo y un cordón para marcar
un círculo de 16 1/2 pulg. (42 cm) de diámetro sobre
las tejas. Nota: Si reemplaza un ventilador existente,
el diámetro del orificio puede ser mayor de 16 1/2 pulg.
(42 cm). Esto es aceptable, siempre y cuando el material
del techo se traslapa al ventilador por lo menos 1 pulg.
(2.5 cm) en todos los lados.

MODELOS 355SOBK 355SOBR • 355SOWW
Página 16
13. Asegúrese de que la base del ventilador esté paralela
a la saliente del techo, y con cuidado levante las tejas
y clave o atornille la base firmemente al techo usando
clavos o tornillos galvanizados para techo.
12. Aplique un cordón grande de silicona en la ranura
moldeada en la parte inferior de la base del ventilador.
Asegurándose de que la flecha en la base del ventilador
apunte hacia la saliente del techo, inicie en los dos
tercios inferiores del cuadrado de 26 pulg. (66 cm) y
deslice la base del ventilador debajo de las tejas. No
doble las tejas más de lo necesario. Centre la base del
ventilador sobre el orificio.
CLAVE DEBAJO DE LAS TEJAS
14. Con un buen cemento con grado para techo selle todas
las tejas y las cabezas de los clavos. NO selle el borde
inferior de la base del ventilador.
15. Instale el domo del ventilador sobre la base del
ventilador usando los cuatro (4) tornillos de lámina
metálica de 5/16 pulg. de acero inoxidable que quitó en
el paso 3. Quite el cartón del panel solar y asegúrese
de que el ventilador funcione.

MODELOS 355SOBK 355SOBR • 355SOWW
Página 17
1
2
3
4
PIEZAS DE SERVICIO
Ahora se puede
hacer los pedidos
de las piezas
de repuesto en
nuestro sitio Web.
Visítenos en
www.Broan.com
Clave
N.o
Modelo
355SOBK
(negro)
Modelo
355SOBR
(café)
Modelo
355SOWW
(madera curtida)
Descripción
1S99527247 S99527248 S99527249 Conjunto del panel solar (domo)
2S99527261 S99527261 S99527261 Aspa del ventilador con tornillo
de fijación
3S99527257 S99527257 S99527257 Motor, CC
4S99527250 S99527251 S99527252 Base (hoja del techo)

MODELOS 355SOBK 355SOBR • 355SOWW
Página 18
Garantía
Garantía limitada exclusiva de
BROAN-NUTONE LLC
El Convenio de Garantía Limitada Exclusiva (la "Garantía”) se celebra entre el Cliente y Broan-NuTone LLC (“Broan”). El Cliente ha
revisado cuidadosamente esta Garantía y está de acuerdo en que el desempeño de las obligaciones de Broan al amparo de este
documento brindará al Cliente un remedio adecuado que servirá para el propósito esencial del acuerdo de las partes relacionado con
los productos fabricados por Broan e identificados al reverso de la presente (los "Productos"). El Cliente reconoce y acepta que está
comprando los Productos para fines residenciales (y no para fines industriales o comerciales) después de una cuidadosa inspección
de los mismos. Los derechos y los beneficios del Cliente al amparo de este documento incumben exclusivamente al Cliente como
comprador original de los Productos, y no se pueden ceder ni transferir. Ninguna otra parte o entidad, lo cual incluye, entre otros, a
los compradores o propietarios subsiguientes de los Productos, tendrá derecho de hacer valer ningún derecho o beneficio al amparo
de la presente.
GARANTÍA LIMITADA EXCLUSIVA; LIMITACIÓN DE REMEDIOS. Por la presente, Broan garantiza al Cliente que los motores de los
Productos están y se mantendrán por un periodo de quince (15) meses a partir de la fecha de entrega al Cliente; y que los productos
están y se mantendrán por un periodo de cinco (5) años a partir de la fecha de entrega al Cliente (de manera colectiva, el “Periodo
de garantía”), libre de defectos en materiales y mano de obra, siempre y cuando dichos Productos se usen para el propósito para
el que fueron diseñados y reciban el servicio adecuado de conformidad con el Manual del usuario que se entregó al Cliente. Sujeto
a lo anterior, si en algún momento durante el Periodo de garantía, algún Producto deje de apegarse a la garantía anterior por una
razón de defecto en materiales o mano de obra, el Cliente deberá notificar adecuadamente por escrito a Broan, e incluir con dicho
aviso un recibo de ventas o un comprobante de compras del Producto defectuoso, y Broan, a su discreción, reparará o reemplazará
el Producto o componente defectuoso sin cargo al Cliente, excepto por: (A) Costos incurridos en el transporte de los Productos o
piezas componentes hacia y desde el distribuidor designado por Broan o su planta de manufactura en Hartford, Wisconsin; y (B)
Cargos por mano de obra u otros costos incidentales al retiro o remontaje de piezas componentes reparadas o reemplazadas al
amparo de esta Garantía; ambos correrán a cargo del Cliente. No obstante cualquier disposición en la presente que señale otra
cosa, esta Garantía no se ampliará para Broan ni la obligará a tomar medida alguna con respecto a: (A) Productos que hayan sido
modificados, alterados, instalados, usados u operados de una manera que no sea recomendada por Broan, incluyendo cualesquiera
Productos en los cuales se hayan instalado piezas no fabricadas ni aprobadas por Broan; (B) Productos que no hayan recibido el
servicio de manera regular o adecuada de acuerdo con el Manual del usuario, o que de otra manera se hayan desatendido; y (C)
El uso y desgaste, servicio y mantenimiento, y elementos de reemplazo ordinarios. ESTA GARANTÍA SE APLICA ÚNICAMENTE A
MAQUINARIA, EQUIPO Y PIEZAS COMPONENTES FABRICADAS POR BROAN. ESTA GARANTÍA NO SE APLICA NI EXTIENDE
A: (A) PIEZAS COMPRADAS POR SEPARADO DE DICHA MAQUINARIA Y EQUIPO, CUBIERTAS POR UNA GARANTÍA ESCRITA
POR SEPARADO; O (B) ELEMENTOS DEL EQUIPO O ACCESORIOS FABRICADOS POR ENTIDADES AJENAS A BROAN.
EXCEPTO COMO SE DECLARE ESPECÍFICAMENTE EN EL PÁRRAFO INMEDIATO ANTERIOR, BROAN NO OTORGA
GARANTÍA NI HACE UNA DECLARACIÓN, EXPRESA O IMPLÍCITA QUE INCLUYA, SIN LIMITACIONES, ALGUNA GARANTÍA
DE COMERCIALIZACIÓN O APTITUD PARA UN FIN EN PARTICULAR. LA GARANTÍA ESTABLECIDA EN EL PÁRRAFO
ANTERIOR Y LAS OBLIGACIONES Y RESPONSABILIDADES DE BROAN SEGÚN ESTE DOCUMENTO REPRESENTAN LOS
ÚNICOS Y EXCLUSIVOS REMEDIOS DEL CLIENTE, Y ESTÁN EXPRESAMENTE EN LUGAR DE CUALQUIERA Y TODOS
LOS DEMÁS REMEDIOS, GARANTÍAS O RESPONSABILIDADES, EXPRESOS O IMPLÍCITOS, Y DE TODOS LOS CUALES
EL CLIENTE SE EXIME EXPRESAMENTE. NO HAY GARANTÍAS QUE SE EXTIENDAN MÁS ALLÁ DE LA DESCRIPCIÓN
DEL TEXTO DE LA PRESENTE. EN NINGÚN CASO, LA RESPONSABILIDAD DE BROAN AL AMPARO DE LA PRESENTE
EXCEDERÁ EL PRECIO DE COMPRA DE LOS PRODUCTOS. ADEMÁS, BROAN NO SERÁ RESPONSABLE DE DAÑOS
ESPECIALES, INDIRECTOS, INCIDENTALES O DE CONSECUENCIA DE NINGUNA NATURALEZA EN LO ABSOLUTO.
Broan se reserva el derecho de modificar, alterar o mejorar cualquier producto o equipo fabricado por Broan sin incurrir en ningún
deber u obligación de modificar, alterar, mejorar o reemplazar cualquiera de los productos cubiertos por la presente.
ESTA GARANTÍA ESTABLECE EL ACUERDO FINAL, COMPLETO Y EXCLUSIVO DE LAS PARTES RELACIONADO CON
LOS PRODUCTOS Y LAS OBLIGACIONES DE GARANTÍA DE BROAN. NINGUNA AFIRMACIÓN DE HECHO, PROMESA,
DESCRIPCIÓN, DEMOSTRACIÓN, MUESTRA O MODELO CONSTITUYE UNA GARANTÍA NI DE OTRA MANERA MODIFICA,
EXTIENDE O ALTERA ESTA GARANTÍA, A MENOS QUE SEA MEDIANTE UN INSTRUMENTO POR ESCRITO FIRMADO POR
UN FUNCIONARIO AUTORIZADO DE BROAN.
Esta Garantía estará regida e interpretada de conformidad con las leyes del estado de Wisconsin. El medio para cualquier acción
que surja o se relacione con esta Garantía deberá ser en el Condado de Washington, Wisconsin.
Broan-NuTone LLC Hartford, Wisconsin www.broan.com 800-558-1711
99527232B

MODELOS 355SOBK 355SOBR • 355SOWW
Página 19

MODELOS 355SOBK 355SOBR • 355SOWW
Página 20
99527232B
This manual suits for next models
2
Table of contents
Languages:
Other Broan Fan manuals

Broan
Broan ZB80M User manual

Broan
Broan InVent AE110S Installation guide

Broan
Broan ZB80ML User manual

Broan
Broan 791LED User manual

Broan
Broan XB90LC User manual

Broan
Broan LOSONE SELECT L2000L User manual

Broan
Broan PH416 Series User manual

Broan
Broan SMD6 User manual

Broan
Broan 761BN User manual

Broan
Broan 345CSOBK User manual
Popular Fan manuals by other brands

PROGRESS LIGHTNING
PROGRESS LIGHTNING AirPro P2598 installation manual

Tecnosystemi
Tecnosystemi TOTAL AIR 200P EVO PLUS user manual

lobal Product Resources
lobal Product Resources DECO BREEZE instruction manual

S&P
S&P SILENT DUAL Series manual

Klarstein
Klarstein 10027944 manual

flowair
flowair KM EL LITE Technical documentation operation manual