Brune B 600 User manual

Humidity Systems - since 1928
1
OPERATING INSTRUCTIONS
Evaporative humidier

2
PLEASE READ THESE OPERATING INSTRUCTIONS CAREFULLY BEFORE STARTING ANY WORK!
Information on the operating instructions
These instructions enable the safe and ecient use of the evaporative humidier B 600 Professional.The instructions are part of the humidier
and must be kept in the immediate vicinity of the unit and accessible at all times.
The user must have carefully read and understood these instructions before starting any work. The basic prerequisite for safe working is com-
pliance with all the safety instructions and instructions for action given in this manual.
In addition, the local accident prevention regulations and general safety regulations for the area of use of the humidier apply.
Due to continuous further developments, illustrations, functional steps and technical data may deviate slightly. Original operating instruc-
tions.
Copyright protection
The contents of this manual are protected by copyright. Their use is permitted within the scope of use of the unit. Any other use is not permit-
ted without the written consent of BRUNE Luftbefeuchtung Proklima GmbH.
Customer service
Address BRUNE
Luftbefeuchtung Proklima GmbH
Schwarzacher Straße 13
D-74858 Aglasterhausen
Phone +49 (0) 6262 / 54 54
Fax +49 (0) 6262 / 32 55
E-mail [email protected]
Web www.brune.info

3
1. The B 600 evaporative humidier ........................................................... 4
1.1 General overview ....................................................................................... 4
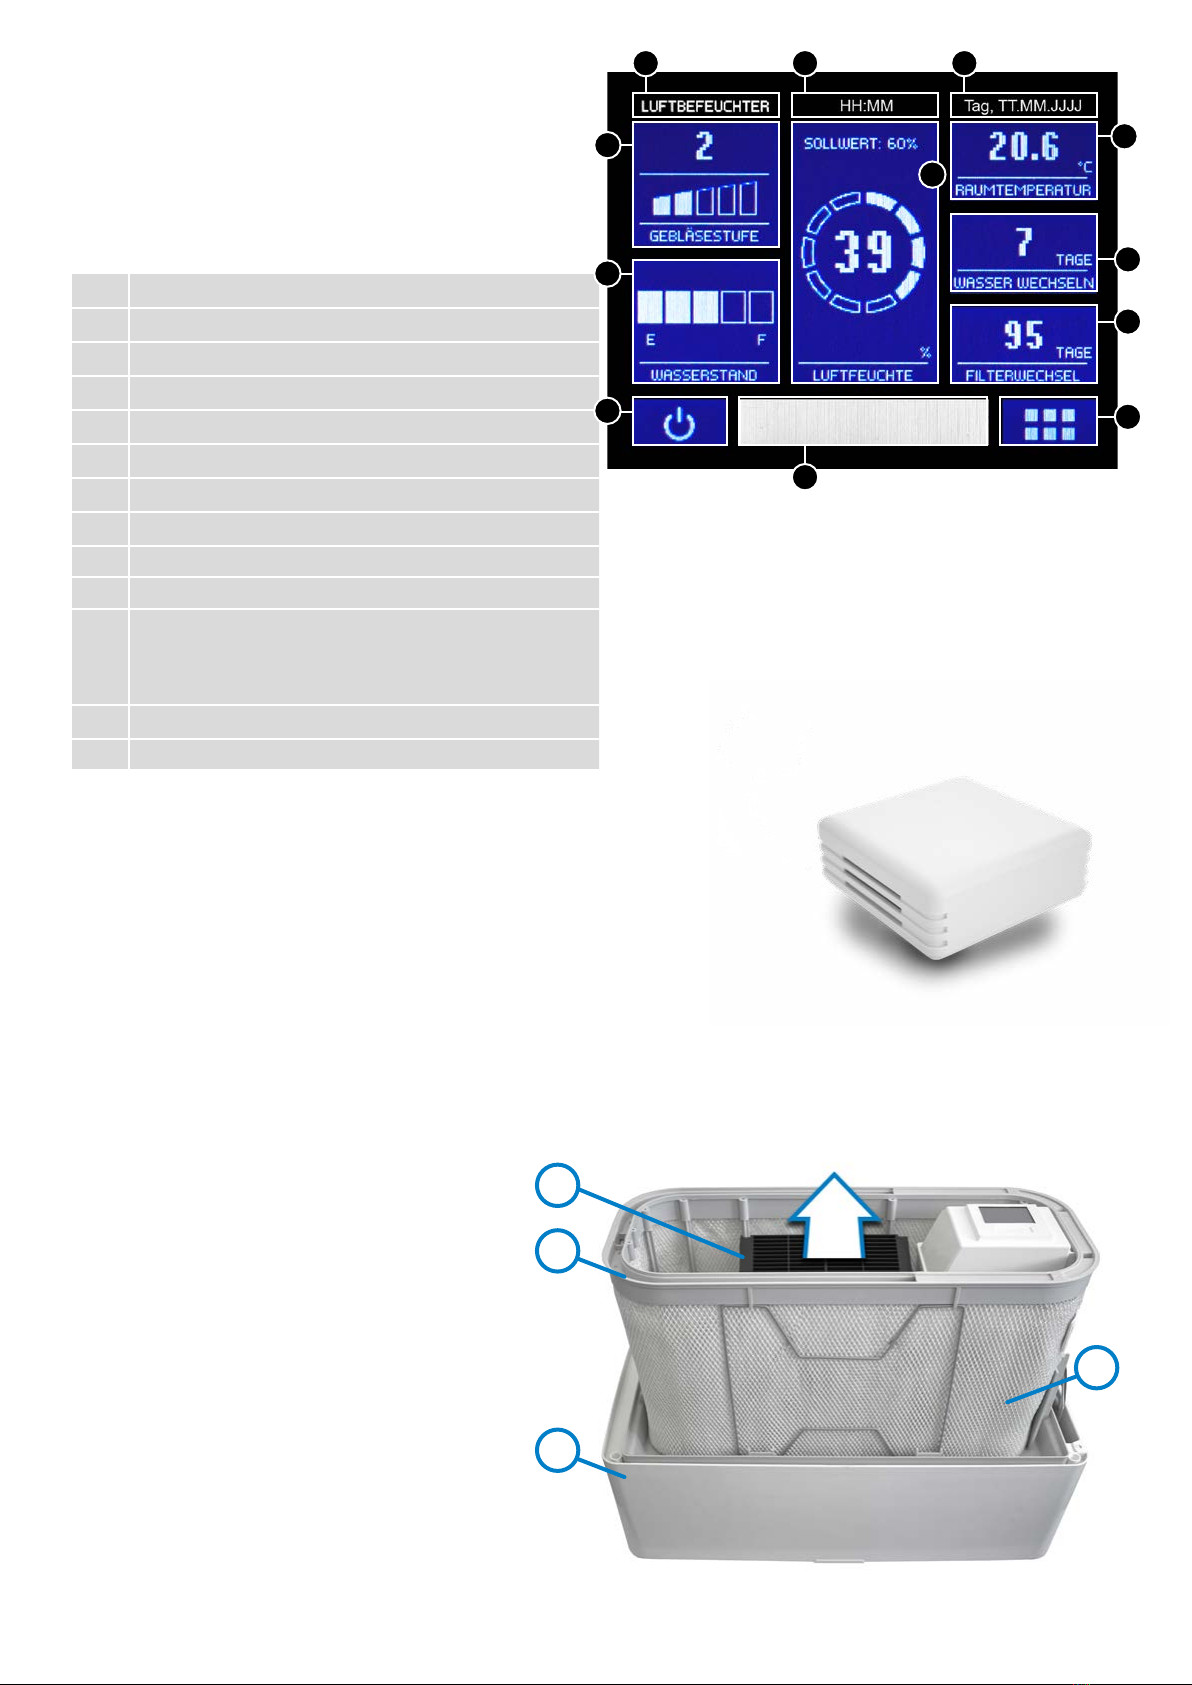
1.2 Touch display .............................................................................................. 5
1.3 Radio humidity transmitter .................................................................... 5
1.4 Functional description ............................................................................. 5
2. Security ............................................................................................................ 6
2.1 Symbols in this manual ........................................................................... 6
2.2 Intended use ............................................................................................... 7
2.3 Symbols on the unit ................................................................................. 8
2.4 Safety and dangers ................................................................................... 8
2.5 Responsibility of the operator ............................................................ 10
2.6 Personnel requirements ....................................................................... 10
2.7 Environmental protection .................................................................... 11
3. Transport and storage .............................................................................. 12
3.1 Safety instructions for transport and storage ................................ 12
3.2 Symbols on the packaging .................................................................. 12
3.3 Storage of packages ............................................................................... 12
3.4 Transport inspection .............................................................................. 12
3.5 Storage when not in use ....................................................................... 13
4. Commissioning .......................................................................................... 14
4.1 Safety instructions for initial commissioning ................................ 14
4.2 Requirements for the location ............................................................ 14
4.3 Putting the humidier into operation for the rst time ............. 14
5. Operating the humidier ........................................................................ 17
5.1 Displays on the unit ................................................................................ 17
5.2 Switching on and o .............................................................................. 19
5.3 Filling the water tank.............................................................................. 20
5.4 Set desired humidity .............................................................................. 20
5.5 Setting the fan speed ............................................................................. 21
5.6 Radio humidity transmitter coding .................................................. 21
5.7 Change menu settings .......................................................................... 23
5.8 Operating modes .................................................................................... 25
5.8.1 Air purier mode .................................................................................. 25
5.8.2 Humidier mode .................................................................................. 25
5.8.3 Operating modes xed value & timer ........................................... 26
6. Cleaning and caring for humidiers .................................................... 26
6.1 Safety instructions for cleaning and care ........................................ 26
6.2 Cleaning schedule .................................................................................. 27
6.3 Cleaning work .......................................................................................... 27
6.3.1 Monthly cleaning ................................................................................. 27
6.3.2 Change lter .......................................................................................... 29
6.3.2.1 Change evaporation lter ............................................................. 29
6.3.2.2 Change cleaning lter .................................................................... 31
6.3.2.3 Insert activated carbon cleaning lter ...................................... 32
6.3.3 Cleaning the water tank .................................................................... 33
6.3.4 Descale appliance ............................................................................... 34
7. Recognising and remedying faults ...................................................... 37
7.1 Safety instructions for troubleshooting .......................................... 37
7.2 Fault indication ........................................................................................ 37
7.3 Error table .................................................................................................. 39
7.4 Troubleshoot ............................................................................................ 40
7.4.1 Replace pump ....................................................................................... 40
7.4.2 Replace blower ..................................................................................... 42
8. Accessories .................................................................................................. 44
8.1 UV disinfection and lime conversion cartridge ............................. 44
8.1.1 UV disinfection and lime conversion cartridge cleaning ....... 45
8.1.2 Replace UV lamp .................................................................................. 47
8.2 Automatic water supply ........................................................................ 49
8.3 Automatic ushing device ................................................................... 50
8.4 Safety catch basin ................................................................................... 51
8.5 Safety water sensor ................................................................................ 51
8.6 External water monitor ......................................................................... 51
8.7 Water Fresh ................................................................................................ 52
9. Spare parts ................................................................................................... 52
9.1 Filter overview .......................................................................................... 53
10. Dispose of humidier ............................................................................ 53
11. Technical data ........................................................................................... 53
11.1 Dimensions and weight ..................................................................... 53
11.2 Connected loads ................................................................................... 53
11.3 Operating conditions .......................................................................... 54
11.4 Nameplate .............................................................................................. 54
Appendix .......................................................................................................... 54
Table of contents

1
2
4
1. The B 600 evaporative humidier
Fig. 1.1.1: Evaporative humidier B 600
1. Filling opening (under glass plate)
2. Air outlet
3. Touch display (under glass plate)
4. Air inlet opening
5. Water tank
1.1 General overview
Scope of
Pos. Number Designation
Fig. 1.1.1 1 Evaporative Humidier B 600
Fig. 1.1.2 (1) 1 Radio humidity transmitter
Fig. 1.1.2 (2) 1 Cleaning brush
1 Operating instructions
Fig. 1.1.2: Scope of
4
4
3
2
5
The batteries required for the radio humidity transmitter are not part of the
scope of delivery! Two AA batteries are required.
1

5
1.2 Touchdisplay
The touch display provides information about the status of the unit.
Among other things, it provides information about the current
water level, the current actual and target humidity values and any
faults in the unit.
All settings on the unit can be managed via the touch display. A
smartphone connection via app is also possible.
Pos. Explanation
1 Operating mode (humidier/air purier)
2 Time HH:MM
3 Date (Day, DD.MM.YYYY)
4Current fan speed speed menu setting
5 Water level indicator
6Setpoint & actual humidity in % Setpoint humidity menu
7 Room temperature
8 Display next water change/ next cleaning
9 Display next lter change
10 O and on switch: Submenu:
• Switch o
• System settings
• Lock touch display
11 Display Notes & Error Messages
12 Menu
1.3 Radio humidity transmitter
The radio humidity transmitter controls the humidier automatically. It measures the
current air humidity and sends the value to the humidier at three-minute intervals or if
the humidity changes by more than 2 %. In automatic mode, the fan speed is regulated
according to the set humidity value.
Fig. 1.2.1: Touch display
Fig. 1.3.1: Radio humidity
1.4 Functional description
The B 600 humidier works according to the natural
principle of evaporation. A water pump continuously
conveys water from the water tank (3) into the oval water
channel (2). The water seeps through the drain holes
inside the trough and moistens the evaporation lter (4).
A fan (1) inside the humidier draws in the air. This ows
through the evaporation lter and is cleaned and
humidied in the process. The humidied air is then
released back into the room through the air outlet
opening on the top (arrow).
The humidier is lled manually via the lling opening
under the glass plate. Optionally, the unit can also be
connected to the local water supply. In this case, the
humidier is lled automatically and manual lling is not
necessary (chapter„8. Accessories" on page 44).
You have the option of operating the unit either as an air
humidier or air purier. The units are delivered from the
factory in humidier mode. In air purier mode, the unit is
operated without water. The fan always runs and the
water pump is deactivated (chapter 5.8 "Operating mo-
des"). Abb. 1.4.1: Funktionsprinzip
2
1
3
4
12 3
9
8
12
6
7
11
4
5
10

6
2. Security
This section provides an overview of all important safety aspects for the protection of persons and for safe and trouble-free operation. Further
task-related safety instructions are contained in the sections on the individual life phases.
2.1 Symbols in this manual
Safety instructions
Safety instructions in this manual are marked by symbols. The safety instructions are introduced by signal words, expressing the extent of
the hazard.
DANGER!
This combination of symbol and signal word indicates
an imminently hazardous situation which, if not
avoided, will result in death or serious injury.
WARNING!
This combination of symbol and signal word indicates
a possibly dangerous situation which can lead to
death or serious injury if not avoided.
CAUTION!
This combination of symbol and signal word indicates
a potentially hazardous situation which, if not
avoided, may result in minor or slight injury.
NOTE!
This combination of symbol and signal word indicates
a potentially hazardous situation which, if not
avoided, may result in environmental and property
damage.
Sicherheitshinweise in Handlungsanweisungen
Safety instructions can refer to specic, individual instructions for action. Such safety instructions are embedded in the handling instructions
so that they do not interrupt the ow of reading when performing the action. The signal words described above are used.
Example:
1. Loosen the screw.
2.
Carefully close the lid.
3. Tighten the screw.
CAUTION!
Danger of jamming the
Tips and recommendations
This symbol highlights useful tips and recommendations as well as informa-
tion for ecient and trouble-free operation.

7
Other markings
The following labels are used in this manual to highlight instructions, results, listings, references and other elements:
Labelling Explanation
Step-by-step action instructions
References to sections of this manual and to applicable documents
Listings without a xed order
2.2 Intended Use
The B 600 Professional evaporative humidier is intended exclusively for humidifying room air in private and professional environments.
Not intended for use in medical facilities!
Intended use also includes compliance with all the information in these instructions.
Any use beyond the intended use or any other use is considered misuse.
WARNING!
Danger in case of misuse!
Misuse of the evaporative humidier B 600 Professional can lead to dangerous situations.
Operate humidier only with fresh, cold ordinary tap water (max. 150 CFU/ml).
Only use additives approved by BRUNE Luftbefeuchtung Proklima GmbH.
Never operate the unit in humidier mode with an empty water tank.
Never operate the appliance near open water sources.
Only operate the unit on a stable and horizontal surface.
Never expose the appliance to strong heat sources.
Never cover the appliance.
Never place objects on the humidier. This applies in particular to electrical appliances or containers lled with
liquid.
Never place the appliance near furnishings that absorb water (e.g. curtains, wallpaper or carpets).
Never operate the unit in an explosive environment.
WARNING!
Hygienic operation
When operated with clean fresh drinking water and according to this manual, the unit is safe to use for
humidication. However, drinking water contains bacteria and microorganisms. To ensure hygienic and proper
operation of the humidier, regular water replacement and cleaning is essential. If this is not observed, it may cause
health problems under certain circumstances. Therefore, always follow the cleaning instructions and keep your
appliance clean and fresh.

8
2.3 Symbols on the device
The following symbols and information signs are attached to the unit. They refer to the immediate environment in which they are applied.
WARNING!
Danger if signage is illegible!
Over time, stickers and signs can become dirty or otherwise unrecognisable, so that hazards cannot be recognised and
necessary operating instructions cannot be followed.
This creates a risk of injury.
Keep all safety, warning and operating instructions in a legible condition at all times.
Replace damaged signs or stickers immediately.
Sign "electrical voltage
Warning of dangerous electrical voltage.
Pull out mains plug" sign
Always unplug the appliance from the mains before cleaning or troubleshooting.
Fill here" sign
This plate marks the lling opening of the water tank. Only use this opening for
lling the water tank.
2.4 Safety and Dangers
The humidier is designed according to the state of the art and current safety requirements. Nevertheless, there are residual dangers that
require prudent action. The residual dangers and the resulting behaviour and measures are listed below.
Electric current
DANGER!
Danger to life due to electric current!
In case of contact with live parts, there is an immediate danger to life due to electric shock. Damage to the
insulation or individual components can be life-threatening.
Only allow work on the electronics to be carried out by qualied electricians.
If the mains cable is damaged, switch o the humidier immediately and arrange for repair.
Damaged mains connection cables may only be replaced by the manufacturer or its customer service or a similarly
qualied person.
Keep moisture away from live parts. This can lead to a short circuit.
Never immerse the unit in water.
Never point the outlet at electrical appliances or sockets.
Always lay the mains cable so that it cannot come into contact with sources of heat, moisture, oil, sharp objects,
sharp edges, etc.
Always disconnect the mains plug before cleaning and troubleshooting.
Never touch the mains plug with wet hands.
When pulling the mains plug, always pull on the plug, never on the cable.
Never pull the unit by the cable.

9
Children
WARNING!
Risk of injury for children!
Children cannot assess the dangers when handling the humidier. This can lead to serious injuries.
Batteries and other small parts can be swallowed. Insert batteries immediately after receiving the humidier or keep
them out of reach of children.
Packaging materials must not be used for play. There is an acute risk of suocation. Dispose of packaging materials
immediately or keep them out of reach of children.
Always supervise children to ensure that they do not play with the appliance or use it as a climbing aid.
Poor cleaning
WARNING!
Health hazard due to inadequate cleaning!
Poor cleaning can release bacteria and germs.
Replace the evaporation lter after four months at the latest. If the ambient air is heavily contaminated, shorten the
time interval accordingly.
Always follow the cleaning intervals described in „6.2 Cleaning schedule" on page 27.
Empty the water tank completely at least once a week and rell the water tank.
Humidity too high
WARNING!
Health hazard due to excessive humidity!
Air that is too humid promotes the formation of mould and harmful germs.
In living rooms, do not exceed the recommended value of 50 - 60 % humidity.
To prevent damage to health, persons with asthma, respiratory diseases or lung complaints should consult a doctor
before using the humidier.
In case of respiratory problems possibly related to the use of the humidier, stop using the humidier immediately
and consult a doctor.
Puddles of water
CAUTION!
Risk of injury from slipping in puddles of water!
Slipping in puddles of water in the oor area can lead to a fall. This can lead to injuries.
Place the humidier on a horizontal surface.
Wipe up puddles of water immediately with a cloth.
Regularly check the safety drip tray (optional accessory) and empty it if necessary.
Stumble
CAUTION!
Risk of injury from tripping over the mains cable!
Careless laying of the mains cable can cause tripping hazards. These can lead to falls and injuries.
Lay the mains cable in such a way that there are no trip hazards.

10
Wrong choice of
NOTE!
Risk of material damage due to incorrect placement of the humidier!
If the humidier is operated on oors that are not moisture-resistant, there is a risk of damaging them.
Only place the humidier on moisture-resistant oors.
A safety drip tray to protect against leaking water („8.4 Safety drip tray" on page 51).
Never place the appliance near furnishings that absorb water (e.g. curtains, wallpaper or carpets).
2.5 Responsibility of the operator
Operator
The operator is the person who operates the humidier for commercial or economic purposes himself or who makes it available to a third
party for use/application and who bears the legal product responsibility for the protection of the user, the personnel or third parties during
operation. If the humidier is used for commercial or economic purposes, the following operator obligations must be observed.
Operator duties
If the unit is used in the commercial sector, the operator is subject to the legal obligations for occupational safety.
In addition to the safety instructions in this manual, the safety, occupational health and safety and environmental protection regulations
applicable to the area of use of the humidier must be observed.
The following applies in particular:
The operator must clearly regulate and dene the responsibilities for installation, operation, troubleshooting and cleaning.
The operator must ensure that all persons handling the unit have read and understood these instructions.
The operator must provide the personnel with the required protective equipment and issue binding instructions for the wearing of
the required protective equipment.
The operator must ensure that the cleaning intervals described in these instructions are observed.
2.6 Personnel requirements
WARNING!
Risk of injury if sta are not suciently qualied!
If unqualied persons carry out work on the humidier, hazards arise which can cause serious injuries and considerable
damage to property.
All activities must only be carried out by qualied persons.
Always keep unauthorised persons, especially children, away from the appliance.
This guidance identies the sta qualications listed below for the dierent areas of activity:
Operator
The operator uses and operates the unit within the scope of its intended use.
If the humidier is used in a commercial or industrial environment, the operator must be instructed by the owner about the tasks assigned
to him and possible dangers in case of improper behaviour. The operator may only perform tasks that go beyond operation during normal
operation if this is specied in these instructions and the operator has expressly entrusted him with them.
Manufacturer
Certain work may only be carried out by specialist personnel of the manufacturer. Other personnel are not authorised to carry out this work.
Contact our customer service department to carry out any work that may be required.
Licensed electrician
Due to his many years of knowledge and experience as well as his knowledge of the relevant standards and regulations, the licensed
electrician is able to carry out work on electrical systems and to independently recognise and avoid possible dangers. In addition, he must
provide proof of his professional qualication, which certies his ability to carry out work on electrical systems.
The licensed electrician must comply with the provisions of the applicable statutory accident prevention regulations.

11
2.7 Environmental protection
NOTE!
Danger to the environment due to incorrect handling
of environmentally hazardous substances!
Incorrect handling of environmentally hazardous
substances, especially incorrect disposal, can cause
considerable damage to the environment.
Always observe the instructions below on hand-
ling and disposing of environmentally hazardous
substances.
If environmentally hazardous substances are acci-
dentally released into the environment, take ap-
propriate measures immediately. In case of doubt,
inform the responsible local authority about the
damage and ask for suitable measures
The following environmentally hazardous substances
are used:
Batteries
Batteries contain toxic heavy metals. They are subject to
hazardous waste treatment and must be handed in at
municipal collection points or disposed of by a specialist
Sanitation specialist
The sanitation specialist is trained and certied for the specic task area in which he/she works and knows the applicable standards and re-
gulations.
Due to their professional training and experience, sanitary specialists are able to carry out work on all sanitary installations and to
independently recognise and avoid possible hazards.
It must also provide evidence of its professional qualications, certifying its ability to carry out work on sanitary installations.
This appliance can be used by children aged from 8 years and above and persons with reduced physical, sensory or mental
capabilities or lack of experience and knowledge if they have been given supervision or instruction concerning use of the appliance
in a safe way and understand the hazards involved. Children must not play with the appliance. Cleaning and user maintenance must not be
carried out by children without supervision.

12
3. Transport and Storage
3.1 Safety instructions for transport and storage
Improper transport
NOTE!
Material damage due to improper transport!
In case of improper transport, transport pieces can fall or topple over. This can cause considerable damage to property.
When unloading the transport pieces on delivery, proceed carefully and observe the symbols and instructions on the
packaging.
Always transport parcels upright and never throw them.
Do not remove the packaging until shortly before commissioning.
Never transport the humidier when it is full. Water may leak out and cause damage to the unit or to furnishings.
3.2 Symbols on the packaging
The following symbols are axed to the transport packaging:
Fragile
Marks packages with fragile or sensitive contents.
Handle the package with care, do not drop it and do not subject it to shocks.
Protect from moisture
Protect packages from moisture and keep them dry.
Top
The arrowheads of the mark indicate the top of the package. They must always point upwards,
otherwise the contents could be damaged.
3.3 Storage of the packages
Store packages under the following conditions:
Do not store outdoors.
Store in a dry and dust-free place.
Do not expose to aggressive media.
Protect from sunlight.
Avoid mechanical shocks.
Storage temperature: 5 to 40 °C (41 to 104 °F).
Relative humidity: max. 55 %.
If stored for longer than 3 months, regularly check the general condition of all parts and the packaging.
Under certain circumstances,
there may be instructions for
storage on the packages that go
beyond the requirements
mentioned here. Observe these
accordingly.
3.4 Transport inspection
Check the delivery for completeness and transport damage
immediately upon receipt.
In case of externally visible transport damage, proceed as follows:
not accept delivery or accept it only with reservations.
Note the extent of damage on the transport documents or
on the carrier's delivery note.
Initiate a complaint.
Complain about any defect as
soon as it is detected. Claims for
damages can only be asserted
within the applicable complaint
periods.

13
Fig. 3.6.2: Moving the humidier forwards and
3.5 Storage wh en not in u se
If the humidier is taken out of operation for a longer period of time, proceed as follows:
Personnel: Operator
1. Empty and clean the water tank („6.3.3 Cleaning the water tank" on page 33).
2. Remove the evaporation lter („6.3.2.1 Changing the evaporation lter" on page 29).
3. Clean the humidier („6.3.4 Descale the unit" on page 34).
4. Store the humidier according to the instructions („3.3 Storage of packages" on page 12).
3.6 Transport humidier
NOTE!
Danger of material damage due to
tipping of the humidier!
If the humidier is pushed backwards
and forwards, there is a risk that the unit
will tip over. This can cause damage to
the unit or the oor.
Move the humidier along the
longitudinal axis whenever pos-
sible.
Always empty the water tank be-
fore changing location.
The humidier has 4 castors on the underside. This allows the unit
to be moved by pulling or pushing it. Observe the following points
when moving the humidier:
Whenever possible, move the humidier along the longitu-
dinal axis. To do this, grasp the humidier at the point mar-
ked in blue.
If the humidier is pushed backwards and forwards, gripthe
underside additionally.
Fig. 3.6.1: Move humidier

14
4. Commissioning
4.1 Safety instructions for initial commissioning
DANGER!
Danger to life due to commissioning of a defective unit!
Starting up a defective unit can lead to life-threatening situations and cause considerable damage to property.
• Never operate a defective unit.
• Always check the mains cable for damage.
4.2 Requirements for the site
In order for the humidier to function properly, observe the following points when selecting a location:
Place the humidier on a at, horizontal surface.
Ensure that the circulation of the air is guaranteed. The air inlet opening and air outlet opening must not be covered.
Do not place the humidier in trac routes or in the swing area of doors.
The distance to other objects in the environment must be at least 10 cm (4 inches) to the side and at least 10 cm (4 inches) above.
For optimal function, the unit can be placed near a heat source. However, direct temperature exposure should not exceed 70 °C (158
°F).
Additional safety measures must be taken for water-sensitive oors.
4.3 Putting the humidier into operation for the rst time
To put the humidier into operation, proceed as follows:
Sta: Operator
1. Lift the upper part of the humidier housing upwards and put it
aside.
2. Visually inspect the unit for defects and correct seating of the lter.
Fig. 4.3.1: Removing the upper part of
Preparation
Remove the side cover.
Remove the radio transmitter and cleaning brush from the unit.
Open the cable gland (1) and pass the mains cable through the opening.
Close the side panel again.
Replace the upper part of the housing.
Fig. 4.3.2: Removing the upper part of
NOTE!
Make sure that the lter is positioned along the entire
length of the water distribution inside the U-shaped rail.
If individual bres of the lter stick out, water could
leak out of the appliance.
1
NOTE!
There is a small notch in the cover of the cable
guide. This is where the mains cable is inserted.

15
Putting the radio humidity transmitter
Sta: Operator
1. Carefully lift the cover of the radio humidity transmitter with
a small screwdriver and remove it.
Fig. 4.3.3: Opening the cover
1
2. Insert the appropriate batteries as shown in the illustration (1). The
plus and minus poles are marked on both the circuit board and the
batteries. The batteries are inserted correctly if these markings match.
Fig. 4.3.4: Insert batteries
3. Check the radio humidity transmitter for proper functioning. To do this,
press the black button (1).
ÎThe diode (2) lights up briey, the radio humidity transmitter is ready
for operation. If a warning tone sounds, the batteries must be replaced.
Fig. 4.3.5: Check functionality
1
2
NOTE!
The radio humidity transmitter is delivered precoded
from the factory. If you want a dierent
coding, you can change it at any time (chapter
"5.6 Coding the radio humidity transmitter" on page
21).
The batteries required for the radio humidity
transmitter are not part of the scope of delivery! Two
AA batteries are required.

16
Putting the humidier into operation
Sta: Operator
1. Connect the mains plug of the humidier to the mains.
2. Switch the humidier on via on the touch display.
3. Fill the water tank of the humidier with tap water.
Proceed according to the instructions („5.3 Filling the water
tank" on page 20).
4. Enter the desired value for the air humidity via the "AIR
HUMIDITY" menu item.
5. Then adjust the fan speed using the fan menu*.
*Open the fan menu:
1. Select the "Fan speed" button in the start menu
2. Open the main menu and select the menu item "FAN" on
page 2
Fig. 4.3.6: Switching on the humidier
Fig. 4.3.7: B 600 Start menu
NOTE!
entry of new values (fan speed, target humidity, etc.)
must always be conrmed with

17
5. Operating the humidier
This chapter only describes the operation of the standard version of the
humidifier. For the operation of accessories, see chapter "8. Accessories"
on page 44.
5.1 Displays on the
Water level display
The water level is measured by a water level sensor in the water tank and shownon
the touch display.
When the water supply has been used up and the lower level indicator is reached,
the appliance switches o automatically. Due to its function, approx. 10 litres (2.5
gallons) of residual water remain in the appliance.
The message "WATER TANK EMPTY" appears on the display.
Display of the fan speed
The speed of the fan can be adjusted in eight steps. In addition, the unit has an
automatic function. The fan speed is shown on the touch display.
With the automatic function, the unit regulates the fan power automatically,
depending on the required power. This means that the change in humidity is
measured via the radio humidity transmitter and the fan power is increased or
reduced accordingly.
For more information, see chapter "5.5 Setting the fan speed" on page 21.
Display setpoint/actual value humidity
The setpoint value (1) corresponds to your preset humidity. This can be read in the
centre eld of your touch display.
The current actual value (2) is displayed directly below.
1
2
Abb. 5.1.1: Anzeige Gebläsestufe
Fig. 5.1.2: Water level display
Fig. 5.1.3: Display setpoint & actual air

18
Display water change
The unit has a water change interval display. The interval can be individually adjus-
ted to the conditions on site in the main menu under the menu item "SER-
VICE" The units are delivered from the factory with a preset water change
interval of seven days.
Device cleaning display
The unit has a display of the cleaning interval. The interval can be set individually
to the conditions on site in the main menu under the menu item "SERVICE"
. The units are delivered from the factory with a preset cleaning interval of
98 days.
NOTE:
The "CHANGE WATER" and "CLEAN UNIT" display
always appear alternately for about 7 seconds.
Display current room temperature
The unit has a display of the current room temperature.
Filter change indicator
The unit has a lter change indicator that shows when a lter change is necessary
depending on the running time of the pump, the water hardness and the fan. In
the best case, the lter needs to be changed after 98 days, in the worst case after
56 days. This is only a recommendation, which can be inuenced positively or ne-
gatively by external inuences (air pollution). Despite this indication, the evapora-
tion and cleaning lters must be checked visually for signs of wear. To change the
lter, see chapter "6.3.2.1 Changing the evaporative lter" on page 29.
Fig. 5.1.4: Display room temperature
Fig. 5.1.5: Display next recommended water change
Fig. 5.1.6: Next recommended cleaning display
Fig. 5.1.7: Display next recommended lter change

19
5.2 Switching on and o
Switching on
Sta: Operator
1. Make sure that the humidier is properly connected to
themains.
2. Fold the glass cover upwards.
3. Press the [ON/OFF] button on the touch display.
ÎThe humidier is switched on.
The radio humidity transmitter only sends a signal
every three minutes. Therefore, the error code "Ra-
dio signal missing" always appears when switching
on. However, this disappears automatically after
three minutes at the latest. The process can be acce-
lerated by breathing on the ventilation slots of the
radio humidity transmitter.
Switch o
Sta: Operator
1. Press the [ON/OFF] button on the touch display (bot-
tom left corner). A small selection menu opens.
2. Select "POWER OFF" to switch the unit to standby mode.
DANGER!
Danger to life due to electric current!
The humidier is not switched o, but is in standby
mode. The unit is always supplied with power.
Always unplug the appliance from the mains
before cleaning or troubleshooting.
Display notes and error messages
In the lower area of the touch display you will nd a white eld. Possible warning
messages or notes are displayed here.
For an overview of the various messages, see chapter "7.2 Fault indication" on
page 37.
Fig. 5.1.8: Display notes & error messages
Fig. 5.2.1: Switching on the unit
Fig. 5.2.2: Switching o the unit

20
5.3 Filling the water tank
Improper lling
DANGER!
Danger of electric shock if lled im-
properly!
Improper lling can result in serious or
fatal injury from electric shock.
• Carefully pour in the water.
NOTE!
Risk of material damage if lled incorrectly!
Incorrect lling of the water tank can lead to faults in the water level
indicator or to defects in the appliance. In addition, water may leak
from the appliance and cause damage to property.
• Fill the water tank only with fresh, cold, ordinary tap wa-
ter(max. 150 KBE/ml, 150 CFU/ml). Fill the water tank on ali-
quid-resistant surface.
• Do not use avourings.
• Make sure that no water is spilled and enters the unit.
• Completely empty and rell the water tank at least once a
week.
Filling the water tank is not necessary
for appliances with automatic water
supply Chapter "8.2 Automatic water
supply" on page 49.
Sta: Operator
1. Connect the mains plug of the humidier to the mains supply and switch
on the humidier.
2. Fold the glass cover upwards (1).
3. Use a watering can to carefully ll the water tank (maximum 50 litres /
13.2 gallons).
4. Close the glass lid again.
Fig. 5.3.1: Opening the ller ap
ÎThe water level display shows the cur-
rent ll level (max. 5 bars).
5.4 Set the desired humidity
WARNING!
Danger to health if the air is overhumidied!
Over humidication of the air promotes the formation of
germs and mould.
It is recommended not to exceed 50 - 60 % humi-
dity in living rooms.
The maximum adjustable humidity value is 90 %.
Sta: Operator
1. Select the menu item "AIR HUMIDITY".
2. Set the desired target humidity value with the buttons and .
3. Conrm your entry with .
1
Fig. 5.4.2: Set target humidity
Abb. 5.4.1: Air humidity display
Other manuals for B 600
1
Table of contents
Other Brune Humidifier manuals

Brune
Brune B 125 User manual

Brune
Brune B 250 Electronic User manual

Brune
Brune B 120 User manual

Brune
Brune B 260 User manual

Brune
Brune B 280 User manual

Brune
Brune B 300 User manual

Brune
Brune B 250 Electronic User manual

Brune
Brune B 125 User manual

Brune
Brune B 300 User manual

Brune
Brune B 300 User manual
Popular Humidifier manuals by other brands

Sunbeam
Sunbeam SCM1300-CN Instruction leaflet

GeneralAire
GeneralAire GENERAL 65 installation instructions

Bionaire
Bionaire BCM7305RC Instruction leaflet

GeneralAire
GeneralAire 1000 SERIES installation instructions

Scarlett
Scarlett Comfort SC-AH986M14 instruction manual

Ansult
Ansult 417-067 User instructions