Buffalo G784 User manual

Groentesnijder
Handleiding
Robot coupe-légumes
Mode d'emploi
Gemüseschneider
Bedienungsanleitung
Tagliaverdure
Manuale di istruzioni
Cortador de vegetales
Manual de instrucciones
Cortador de legumes
Manual de instruções
Grönsaksberedare
Bruksanvisning
Grøntsagshakker
Instruktionsvejledning
Grønnsakskutter
Brukerhåndbok
Vihannesleikkuri
Ohjekirja
NL
FR
DE
IT
ES
PT
S
DK
N
FIN
Vegetable Cutter
Instruction manual
Model •Modèle •Modell •Modello •Modelo •Malli:
G784

Table of Contents
Safety Tips . . . . . . . . . . . . . . . . . . . . . . . . . . . . . . . . . . . . . . . . . . . . . . . . . . . . . . . . . . . . . . . . . 1
Introduction . . . . . . . . . . . . . . . . . . . . . . . . . . . . . . . . . . . . . . . . . . . . . . . . . . . . . . . . . . . . . . . . 1
Pack Contents . . . . . . . . . . . . . . . . . . . . . . . . . . . . . . . . . . . . . . . . . . . . . . . . . . . . . . . . . . . . . . 1
Operation . . . . . . . . . . . . . . . . . . . . . . . . . . . . . . . . . . . . . . . . . . . . . . . . . . . . . . . . . . . . . . . . . 2
Location of Controls . . . . . . . . . . . . . . . . . . . . . . . . . . . . . . . . . . . . . . . . . . . . . . . . . . 2
Cutting Vegetables . . . . . . . . . . . . . . . . . . . . . . . . . . . . . . . . . . . . . . . . . . . . . . . . . . . . 2
Selecting a Cutting Disc . . . . . . . . . . . . . . . . . . . . . . . . . . . . . . . . . . . . . . . . . . . . . . . . 3
Changing the Cutting Disc . . . . . . . . . . . . . . . . . . . . . . . . . . . . . . . . . . . . . . . . . . . . . . 4
Using the Base Discs . . . . . . . . . . . . . . . . . . . . . . . . . . . . . . . . . . . . . . . . . . . . . . . . . . . 4
Cleaning, Care & Maintenance . . . . . . . . . . . . . . . . . . . . . . . . . . . . . . . . . . . . . . . . . . . . . . . . . 4
Changing Blades . . . . . . . . . . . . . . . . . . . . . . . . . . . . . . . . . . . . . . . . . . . . . . . . . . . . . . 5
Troubleshooting . . . . . . . . . . . . . . . . . . . . . . . . . . . . . . . . . . . . . . . . . . . . . . . . . . . . . . . . . . . . 5
Technical Specifications . . . . . . . . . . . . . . . . . . . . . . . . . . . . . . . . . . . . . . . . . . . . . . . . . . . . . . . 5
Electrical Wiring . . . . . . . . . . . . . . . . . . . . . . . . . . . . . . . . . . . . . . . . . . . . . . . . . . . . . . . . . . . . 6
Compliance . . . . . . . . . . . . . . . . . . . . . . . . . . . . . . . . . . . . . . . . . . . . . . . . . . . . . . . . . . . . . . . . 6
Inhoudsopgave
Veiligheidstips . . . . . . . . . . . . . . . . . . . . . . . . . . . . . . . . . . . . . . . . . . . . . . . . . . . . . . . . . . . . . . 7
Inleiding . . . . . . . . . . . . . . . . . . . . . . . . . . . . . . . . . . . . . . . . . . . . . . . . . . . . . . . . . . . . . . . . . . . 7
Verpakkingsinhoud . . . . . . . . . . . . . . . . . . . . . . . . . . . . . . . . . . . . . . . . . . . . . . . . . . . . . . . . . . 7
Bediening . . . . . . . . . . . . . . . . . . . . . . . . . . . . . . . . . . . . . . . . . . . . . . . . . . . . . . . . . . . . . . . . . . 8
Locatie van bedieningselementen . . . . . . . . . . . . . . . . . . . . . . . . . . . . . . . . . . . . . . . . . . . . . . . 8
Groente snijden . . . . . . . . . . . . . . . . . . . . . . . . . . . . . . . . . . . . . . . . . . . . . . . . . . . . . . 8
De juiste snijschijf kiezen . . . . . . . . . . . . . . . . . . . . . . . . . . . . . . . . . . . . . . . . . . . . . . . 9
Snijschijf verwisselen . . . . . . . . . . . . . . . . . . . . . . . . . . . . . . . . . . . . . . . . . . . . . . . . . . . 9
De basisschijven gebruiken . . . . . . . . . . . . . . . . . . . . . . . . . . . . . . . . . . . . . . . . . . . . . . 10
Reiniging, zorg & onderhoud . . . . . . . . . . . . . . . . . . . . . . . . . . . . . . . . . . . . . . . . . . . . . . . . . . . 10
Messen van de snijschijven vervangen . . . . . . . . . . . . . . . . . . . . . . . . . . . . . . . . . . . . . 11
Oplossen van problemen . . . . . . . . . . . . . . . . . . . . . . . . . . . . . . . . . . . . . . . . . . . . . . . . . . . . . 11
Technische specificaties . . . . . . . . . . . . . . . . . . . . . . . . . . . . . . . . . . . . . . . . . . . . . . . . . . . . . . . 12
Elektrische bedrading . . . . . . . . . . . . . . . . . . . . . . . . . . . . . . . . . . . . . . . . . . . . . . . . . . . . . . . . 12
Productconformiteit . . . . . . . . . . . . . . . . . . . . . . . . . . . . . . . . . . . . . . . . . . . . . . . . . . . . . . . . . . 12
Sommaire
Conseils de sécurité . . . . . . . . . . . . . . . . . . . . . . . . . . . . . . . . . . . . . . . . . . . . . . . . . . . . . . . . . . 13
Introduction . . . . . . . . . . . . . . . . . . . . . . . . . . . . . . . . . . . . . . . . . . . . . . . . . . . . . . . . . . . . . . . . 13
Contenu de l'emballage . . . . . . . . . . . . . . . . . . . . . . . . . . . . . . . . . . . . . . . . . . . . . . . . . . . . . . . 13
Functionnement . . . . . . . . . . . . . . . . . . . . . . . . . . . . . . . . . . . . . . . . . . . . . . . . . . . . . . . . . . . . . 14
Emplacement des commandes . . . . . . . . . . . . . . . . . . . . . . . . . . . . . . . . . . . . . . . . . . . 14
Coupe des légumes . . . . . . . . . . . . . . . . . . . . . . . . . . . . . . . . . . . . . . . . . . . . . . . . . . . . 14
Sélection du disque de coupe qui convient . . . . . . . . . . . . . . . . . . . . . . . . . . . . . . . . . 15
Changement du disque de coupe . . . . . . . . . . . . . . . . . . . . . . . . . . . . . . . . . . . . . . . . . 15
Utilisation du disque de base . . . . . . . . . . . . . . . . . . . . . . . . . . . . . . . . . . . . . . . . . . . . 16
Nettoyage, entretien et maintenance . . . . . . . . . . . . . . . . . . . . . . . . . . . . . . . . . . . . . . . . . . . . 16
Changement de lames . . . . . . . . . . . . . . . . . . . . . . . . . . . . . . . . . . . . . . . . . . . . . . . . . . 17
Dépannage . . . . . . . . . . . . . . . . . . . . . . . . . . . . . . . . . . . . . . . . . . . . . . . . . . . . . . . . . . . . . . . . . 17
Spécifications techniques . . . . . . . . . . . . . . . . . . . . . . . . . . . . . . . . . . . . . . . . . . . . . . . . . . . . . . 18
Raccordement électrique . . . . . . . . . . . . . . . . . . . . . . . . . . . . . . . . . . . . . . . . . . . . . . . . . . . . . 18
Conformité . . . . . . . . . . . . . . . . . . . . . . . . . . . . . . . . . . . . . . . . . . . . . . . . . . . . . . . . . . . . . . . . . 18
UK
NL
FR

Inhalt
Sicherheitshinweise . . . . . . . . . . . . . . . . . . . . . . . . . . . . . . . . . . . . . . . . . . . . . . . . . . . . . . . . . . 19
Einführung . . . . . . . . . . . . . . . . . . . . . . . . . . . . . . . . . . . . . . . . . . . . . . . . . . . . . . . . . . . . . . . . . 19
Packungsinhalt . . . . . . . . . . . . . . . . . . . . . . . . . . . . . . . . . . . . . . . . . . . . . . . . . . . . . . . . . . . . . . 19
Betrieb . . . . . . . . . . . . . . . . . . . . . . . . . . . . . . . . . . . . . . . . . . . . . . . . . . . . . . . . . . . . . . . . . . . . 20
Bedienelemente . . . . . . . . . . . . . . . . . . . . . . . . . . . . . . . . . . . . . . . . . . . . . . . . . . . . . . 20
Gemüse schneiden . . . . . . . . . . . . . . . . . . . . . . . . . . . . . . . . . . . . . . . . . . . . . . . . . . . . 20
Schneidscheibe wählen . . . . . . . . . . . . . . . . . . . . . . . . . . . . . . . . . . . . . . . . . . . . . . . . . 21
Schneidscheibe auswechseln . . . . . . . . . . . . . . . . . . . . . . . . . . . . . . . . . . . . . . . . . . . . . 21
Die unteren Scheiben verwenden . . . . . . . . . . . . . . . . . . . . . . . . . . . . . . . . . . . . . . . . 22
Reinigung, Pflege und Wartung . . . . . . . . . . . . . . . . . . . . . . . . . . . . . . . . . . . . . . . . . . . . . . . . . 22
Messer auswechseln . . . . . . . . . . . . . . . . . . . . . . . . . . . . . . . . . . . . . . . . . . . . . . . . . . . 23
Fehlersuche . . . . . . . . . . . . . . . . . . . . . . . . . . . . . . . . . . . . . . . . . . . . . . . . . . . . . . . . . . . . . . . . 23
Technische Spezifikationen . . . . . . . . . . . . . . . . . . . . . . . . . . . . . . . . . . . . . . . . . . . . . . . . . . . . 24
Elektroanschlüsse . . . . . . . . . . . . . . . . . . . . . . . . . . . . . . . . . . . . . . . . . . . . . . . . . . . . . . . . . . . 24
Konformität . . . . . . . . . . . . . . . . . . . . . . . . . . . . . . . . . . . . . . . . . . . . . . . . . . . . . . . . . . . . . . . . 24
Indice
Suggerimenti per la sicurezza . . . . . . . . . . . . . . . . . . . . . . . . . . . . . . . . . . . . . . . . . . . . . . . . . . 25
Introduzione . . . . . . . . . . . . . . . . . . . . . . . . . . . . . . . . . . . . . . . . . . . . . . . . . . . . . . . . . . . . . . . 25
Contenuto della confezione . . . . . . . . . . . . . . . . . . . . . . . . . . . . . . . . . . . . . . . . . . . . . . . . . . . 25
Funzionamento . . . . . . . . . . . . . . . . . . . . . . . . . . . . . . . . . . . . . . . . . . . . . . . . . . . . . . . . . . . . . 26
Posizione dei comandi . . . . . . . . . . . . . . . . . . . . . . . . . . . . . . . . . . . . . . . . . . . . . . . . . 26
Taglio delle verdure . . . . . . . . . . . . . . . . . . . . . . . . . . . . . . . . . . . . . . . . . . . . . . . . . . . 26
Selezione di un disco di taglio . . . . . . . . . . . . . . . . . . . . . . . . . . . . . . . . . . . . . . . . . . . . 27
Cambio del disco di taglio . . . . . . . . . . . . . . . . . . . . . . . . . . . . . . . . . . . . . . . . . . . . . . 27
Utilizzo dei dischi di base . . . . . . . . . . . . . . . . . . . . . . . . . . . . . . . . . . . . . . . . . . . . . . . 28
Pulizia e manutenzione . . . . . . . . . . . . . . . . . . . . . . . . . . . . . . . . . . . . . . . . . . . . . . . . . . . . . . . 28
Cambio delle lame . . . . . . . . . . . . . . . . . . . . . . . . . . . . . . . . . . . . . . . . . . . . . . . . . . . . 29
Risoluzione dei problemi . . . . . . . . . . . . . . . . . . . . . . . . . . . . . . . . . . . . . . . . . . . . . . . . . . . . . . 29
Specifiche tecniche . . . . . . . . . . . . . . . . . . . . . . . . . . . . . . . . . . . . . . . . . . . . . . . . . . . . . . . . . . 30
Cablaggi elettrici . . . . . . . . . . . . . . . . . . . . . . . . . . . . . . . . . . . . . . . . . . . . . . . . . . . . . . . . . . . . 30
Conformità . . . . . . . . . . . . . . . . . . . . . . . . . . . . . . . . . . . . . . . . . . . . . . . . . . . . . . . . . . . . . . . . . 30
Índice
Consejos de Seguridad . . . . . . . . . . . . . . . . . . . . . . . . . . . . . . . . . . . . . . . . . . . . . . . . . . . . . . . . 31
Introducción . . . . . . . . . . . . . . . . . . . . . . . . . . . . . . . . . . . . . . . . . . . . . . . . . . . . . . . . . . . . . . . 31
Contenido del Conjunto . . . . . . . . . . . . . . . . . . . . . . . . . . . . . . . . . . . . . . . . . . . . . . . . . . . . . . 31
Funcionamiento . . . . . . . . . . . . . . . . . . . . . . . . . . . . . . . . . . . . . . . . . . . . . . . . . . . . . . . . . . . . . 32
Ubicación de los controles . . . . . . . . . . . . . . . . . . . . . . . . . . . . . . . . . . . . . . . . . . . . . . 32
Corte de Vegetales . . . . . . . . . . . . . . . . . . . . . . . . . . . . . . . . . . . . . . . . . . . . . . . . . . . . 32
Selección de un disco de corte . . . . . . . . . . . . . . . . . . . . . . . . . . . . . . . . . . . . . . . . . . 33
Cambio de los discos de corte . . . . . . . . . . . . . . . . . . . . . . . . . . . . . . . . . . . . . . . . . . . 33
Utilización de los discos de base . . . . . . . . . . . . . . . . . . . . . . . . . . . . . . . . . . . . . . . . . 34
Limpieza, Cuidado y Mantenimiento . . . . . . . . . . . . . . . . . . . . . . . . . . . . . . . . . . . . . . . . . . . . . 34
Cambio de las cuchillas . . . . . . . . . . . . . . . . . . . . . . . . . . . . . . . . . . . . . . . . . . . . . . . . . 35
Resolución de problemas . . . . . . . . . . . . . . . . . . . . . . . . . . . . . . . . . . . . . . . . . . . . . . . . . . . . . 35
Especificaciones Técnicas . . . . . . . . . . . . . . . . . . . . . . . . . . . . . . . . . . . . . . . . . . . . . . . . . . . . . . 36
Cableado Eléctrico . . . . . . . . . . . . . . . . . . . . . . . . . . . . . . . . . . . . . . . . . . . . . . . . . . . . . . . . . . 36
Cumplimiento . . . . . . . . . . . . . . . . . . . . . . . . . . . . . . . . . . . . . . . . . . . . . . . . . . . . . . . . . . . . . . 36
DE
IT
ES

Índice
Conselhos de segurança . . . . . . . . . . . . . . . . . . . . . . . . . . . . . . . . . . . . . . . . . . . . . . . . . . . . . . 37
Introdução . . . . . . . . . . . . . . . . . . . . . . . . . . . . . . . . . . . . . . . . . . . . . . . . . . . . . . . . . . . . . . . . . 37
Conteúdo da embalagem . . . . . . . . . . . . . . . . . . . . . . . . . . . . . . . . . . . . . . . . . . . . . . . . . . . . . 37
Funcionamento . . . . . . . . . . . . . . . . . . . . . . . . . . . . . . . . . . . . . . . . . . . . . . . . . . . . . . . . . . . . . 38
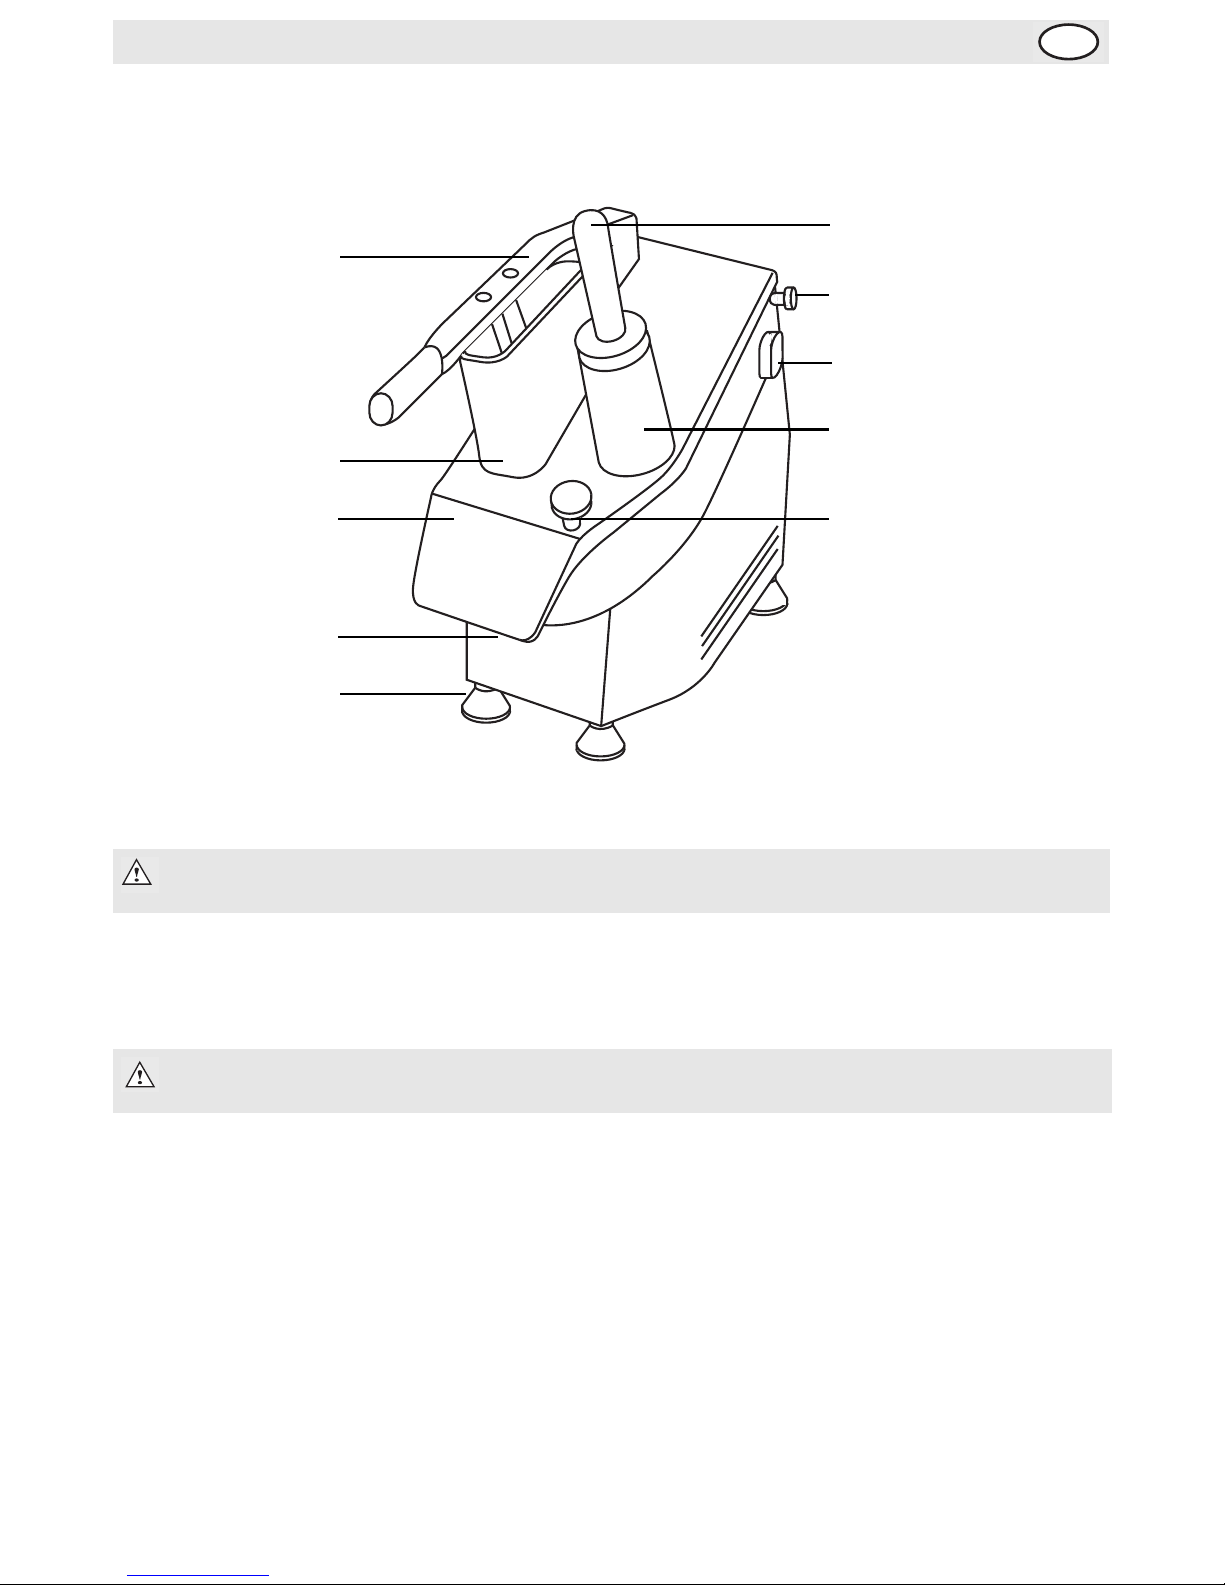
Localização dos comandos . . . . . . . . . . . . . . . . . . . . . . . . . . . . . . . . . . . . . . . . . . . . . . 38
Cortar legumes . . . . . . . . . . . . . . . . . . . . . . . . . . . . . . . . . . . . . . . . . . . . . . . . . . . . . . . 38
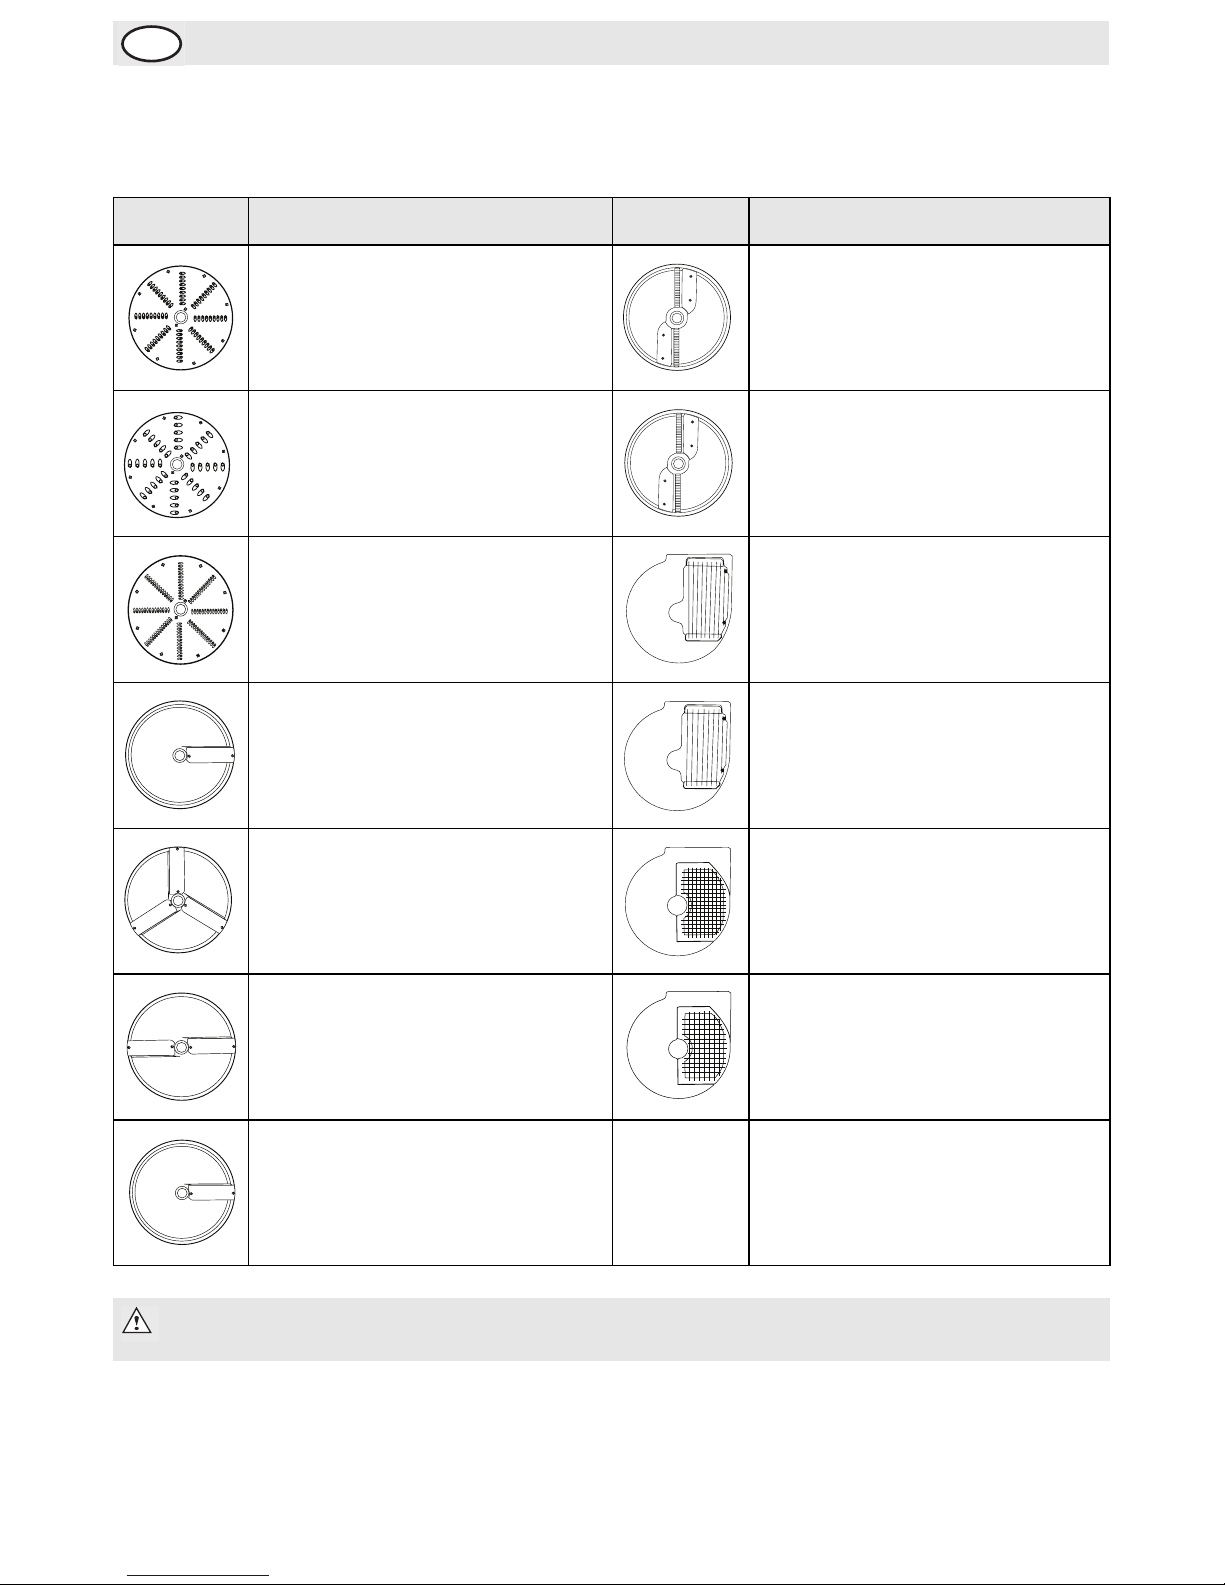
Seleccionar um disco de corte . . . . . . . . . . . . . . . . . . . . . . . . . . . . . . . . . . . . . . . . . . . 39
Substituir o disco de corte . . . . . . . . . . . . . . . . . . . . . . . . . . . . . . . . . . . . . . . . . . . . . . 39
Usar os discos de base . . . . . . . . . . . . . . . . . . . . . . . . . . . . . . . . . . . . . . . . . . . . . . . . . 40
Limpeza, cuidados & manutenção . . . . . . . . . . . . . . . . . . . . . . . . . . . . . . . . . . . . . . . . . . . . . . . 40
Substituir as lâminas . . . . . . . . . . . . . . . . . . . . . . . . . . . . . . . . . . . . . . . . . . . . . . . . . . . 41
Resolução de problemas . . . . . . . . . . . . . . . . . . . . . . . . . . . . . . . . . . . . . . . . . . . . . . . . . . . . . . 41
Especificações técnicas . . . . . . . . . . . . . . . . . . . . . . . . . . . . . . . . . . . . . . . . . . . . . . . . . . . . . . . 42
Cablagem eléctrica . . . . . . . . . . . . . . . . . . . . . . . . . . . . . . . . . . . . . . . . . . . . . . . . . . . . . . . . . . 42
Conformidade. . . . . . . . . . . . . . . . . . . . . . . . . . . . . . . . . . . . . . . . . . . . . . . . . . . . . . . . . . . . . . . 42
Innehållsförteckning
Säkerhetsråd . . . . . . . . . . . . . . . . . . . . . . . . . . . . . . . . . . . . . . . . . . . . . . . . . . . . . . . . . . . . . . . 43
Inledning . . . . . . . . . . . . . . . . . . . . . . . . . . . . . . . . . . . . . . . . . . . . . . . . . . . . . . . . . . . . . . . . . . . 43
Förpackningsinnehåll . . . . . . . . . . . . . . . . . . . . . . . . . . . . . . . . . . . . . . . . . . . . . . . . . . . . . . . . . 43
Drift . . . . . . . . . . . . . . . . . . . . . . . . . . . . . . . . . . . . . . . . . . . . . . . . . . . . . . . . . . . . . . . . . . . . . . 44
Reglagens placering . . . . . . . . . . . . . . . . . . . . . . . . . . . . . . . . . . . . . . . . . . . . . . . . . . . . 44
Skära grönsaker . . . . . . . . . . . . . . . . . . . . . . . . . . . . . . . . . . . . . . . . . . . . . . . . . . . . . . 44
Välja skärskiva . . . . . . . . . . . . . . . . . . . . . . . . . . . . . . . . . . . . . . . . . . . . . . . . . . . . . . . . 45
Byta skärskiva . . . . . . . . . . . . . . . . . . . . . . . . . . . . . . . . . . . . . . . . . . . . . . . . . . . . . . . . 45
Använda basskivorna . . . . . . . . . . . . . . . . . . . . . . . . . . . . . . . . . . . . . . . . . . . . . . . . . . . 46
Rengöring, omvårdnad och underhåll . . . . . . . . . . . . . . . . . . . . . . . . . . . . . . . . . . . . . . . . . . . . 46
Byta blad . . . . . . . . . . . . . . . . . . . . . . . . . . . . . . . . . . . . . . . . . . . . . . . . . . . . . . . . . . . . 47
Felsökning . . . . . . . . . . . . . . . . . . . . . . . . . . . . . . . . . . . . . . . . . . . . . . . . . . . . . . . . . . . . . . . . . 47
Tekniska specifikationer . . . . . . . . . . . . . . . . . . . . . . . . . . . . . . . . . . . . . . . . . . . . . . . . . . . . . . 48
Elektriska kablar . . . . . . . . . . . . . . . . . . . . . . . . . . . . . . . . . . . . . . . . . . . . . . . . . . . . . . . . . . . . 48
Tillmötesgående . . . . . . . . . . . . . . . . . . . . . . . . . . . . . . . . . . . . . . . . . . . . . . . . . . . . . . . . . . . . . 48
Indholdsfortegnelse
Sikkerhedstips . . . . . . . . . . . . . . . . . . . . . . . . . . . . . . . . . . . . . . . . . . . . . . . . . . . . . . . . . . . . . . 49
Indledning . . . . . . . . . . . . . . . . . . . . . . . . . . . . . . . . . . . . . . . . . . . . . . . . . . . . . . . . . . . . . . . . . . 49
Pakkens indhold . . . . . . . . . . . . . . . . . . . . . . . . . . . . . . . . . . . . . . . . . . . . . . . . . . . . . . . . . . . . . 49
Brug . . . . . . . . . . . . . . . . . . . . . . . . . . . . . . . . . . . . . . . . . . . . . . . . . . . . . . . . . . . . . . . . . . . . . . 50
Placering af betjeningerne . . . . . . . . . . . . . . . . . . . . . . . . . . . . . . . . . . . . . . . . . . . . . . . 50
Sådan skæres grøntsagerne . . . . . . . . . . . . . . . . . . . . . . . . . . . . . . . . . . . . . . . . . . . . . 50
Valg af en skæreskive . . . . . . . . . . . . . . . . . . . . . . . . . . . . . . . . . . . . . . . . . . . . . . . . . . 51
Udskiftning af skæreskiven . . . . . . . . . . . . . . . . . . . . . . . . . . . . . . . . . . . . . . . . . . . . . . 51
Brug af grundskiverne . . . . . . . . . . . . . . . . . . . . . . . . . . . . . . . . . . . . . . . . . . . . . . . . . . 52
Rengøring, pleje og vedligeholdelse . . . . . . . . . . . . . . . . . . . . . . . . . . . . . . . . . . . . . . . . . . . . . 52
Udskiftning af skærebladene . . . . . . . . . . . . . . . . . . . . . . . . . . . . . . . . . . . . . . . . . . . . . 53
Fejlfinding . . . . . . . . . . . . . . . . . . . . . . . . . . . . . . . . . . . . . . . . . . . . . . . . . . . . . . . . . . . . . . . . . . 53
Tekniske specifikationer. . . . . . . . . . . . . . . . . . . . . . . . . . . . . . . . . . . . . . . . . . . . . . . . . . . . . . . 54
El-kabler . . . . . . . . . . . . . . . . . . . . . . . . . . . . . . . . . . . . . . . . . . . . . . . . . . . . . . . . . . . . . . . . . . . 54
Overensstemmelseserklæring . . . . . . . . . . . . . . . . . . . . . . . . . . . . . . . . . . . . . . . . . . . . . . . . . . 54
PT
S
DK

Innhold
Sikkerhetstips . . . . . . . . . . . . . . . . . . . . . . . . . . . . . . . . . . . . . . . . . . . . . . . . . . . . . . . . . . . . . . . 55
Innledning . . . . . . . . . . . . . . . . . . . . . . . . . . . . . . . . . . . . . . . . . . . . . . . . . . . . . . . . . . . . . . . . . . 55
Pakkeinnhold . . . . . . . . . . . . . . . . . . . . . . . . . . . . . . . . . . . . . . . . . . . . . . . . . . . . . . . . . . . . . . . 55
Bruk . . . . . . . . . . . . . . . . . . . . . . . . . . . . . . . . . . . . . . . . . . . . . . . . . . . . . . . . . . . . . . . . . . . . . . 56
Betjeningsorganenes plassering . . . . . . . . . . . . . . . . . . . . . . . . . . . . . . . . . . . . . . . . . . 56
Kutting av grønnsaker . . . . . . . . . . . . . . . . . . . . . . . . . . . . . . . . . . . . . . . . . . . . . . . . . . 56
Valg av kutteskive . . . . . . . . . . . . . . . . . . . . . . . . . . . . . . . . . . . . . . . . . . . . . . . . . . . . . 57
Bytte av skjæreskive . . . . . . . . . . . . . . . . . . . . . . . . . . . . . . . . . . . . . . . . . . . . . . . . . . . 57
Bruk av baseskiver . . . . . . . . . . . . . . . . . . . . . . . . . . . . . . . . . . . . . . . . . . . . . . . . . . . . 58
Rengjøring, stell og vedlikehold . . . . . . . . . . . . . . . . . . . . . . . . . . . . . . . . . . . . . . . . . . . . . . . . . 58
Bytte av blader . . . . . . . . . . . . . . . . . . . . . . . . . . . . . . . . . . . . . . . . . . . . . . . . . . . . . . . 59
Feilsøking . . . . . . . . . . . . . . . . . . . . . . . . . . . . . . . . . . . . . . . . . . . . . . . . . . . . . . . . . . . . . . . . . . 59
Tekniske spesifikasjoner. . . . . . . . . . . . . . . . . . . . . . . . . . . . . . . . . . . . . . . . . . . . . . . . . . . . . . . 60
Elektrisk tilkopling . . . . . . . . . . . . . . . . . . . . . . . . . . . . . . . . . . . . . . . . . . . . . . . . . . . . . . . . . . . 60
Samsvar . . . . . . . . . . . . . . . . . . . . . . . . . . . . . . . . . . . . . . . . . . . . . . . . . . . . . . . . . . . . . . . . . . . 60
Sisällysluettelo
Turvallisuusvihjeitä . . . . . . . . . . . . . . . . . . . . . . . . . . . . . . . . . . . . . . . . . . . . . . . . . . . . . . . . . . . 61
Johdanto . . . . . . . . . . . . . . . . . . . . . . . . . . . . . . . . . . . . . . . . . . . . . . . . . . . . . . . . . . . . . . . . . . . 61
Pakkauksen sisältö . . . . . . . . . . . . . . . . . . . . . . . . . . . . . . . . . . . . . . . . . . . . . . . . . . . . . . . . . . . 61
Käyttö . . . . . . . . . . . . . . . . . . . . . . . . . . . . . . . . . . . . . . . . . . . . . . . . . . . . . . . . . . . . . . . . . . . . 62
Ohjauslaitteiden sijainti . . . . . . . . . . . . . . . . . . . . . . . . . . . . . . . . . . . . . . . . . . . . . . . . . 62
Vihannesten leikkaaminen . . . . . . . . . . . . . . . . . . . . . . . . . . . . . . . . . . . . . . . . . . . . . . . 62
Leikkuuterän valinta . . . . . . . . . . . . . . . . . . . . . . . . . . . . . . . . . . . . . . . . . . . . . . . . . . . 63
Leikkuuterän vaihtaminen . . . . . . . . . . . . . . . . . . . . . . . . . . . . . . . . . . . . . . . . . . . . . . . 63
Aluskiekkojen käyttö . . . . . . . . . . . . . . . . . . . . . . . . . . . . . . . . . . . . . . . . . . . . . . . . . . 64
Puhdistus, hoito & huolto . . . . . . . . . . . . . . . . . . . . . . . . . . . . . . . . . . . . . . . . . . . . . . . . . . . . . 64
Terien vaihtaminen . . . . . . . . . . . . . . . . . . . . . . . . . . . . . . . . . . . . . . . . . . . . . . . . . . . . 65
Vianetsintä . . . . . . . . . . . . . . . . . . . . . . . . . . . . . . . . . . . . . . . . . . . . . . . . . . . . . . . . . . . . . . . . . 65
Tekniset tiedot . . . . . . . . . . . . . . . . . . . . . . . . . . . . . . . . . . . . . . . . . . . . . . . . . . . . . . . . . . . . . 66
Sähköjohdot . . . . . . . . . . . . . . . . . . . . . . . . . . . . . . . . . . . . . . . . . . . . . . . . . . . . . . . . . . . . . . . . 66
Vaatimustenmukaisuus . . . . . . . . . . . . . . . . . . . . . . . . . . . . . . . . . . . . . . . . . . . . . . . . . . . . . . . 66
N
FIN

1
UK
Safety Tips
• Position on a flat, stable surface.
• A service agent/qualified technician should carry out installation and any repairs if required. Do not
remove any components on this product.
• Consult Local and National Standards to comply with the following:
• Health and Safety at Work Legislation
• BS EN Codes of Practice
• Fire Precautions
• IEE Wiring Regulations
• Building Regulations
• DO NOT immerse the appliance in water.
• DO NOT place hands in either food chute.
• DO NOT attempt to cut frozen food with the appliance.
• Suitable for indoor use only.
• Always switch off and disconnect the power supply to the appliance when not in use.
• Regularly check the screws fixing the blades to the cutting discs and tighten as necessary.
• This appliance must only be used in accordance with these instructions and by persons competent to
do so.
• This appliance is not suitable for use by children.
• Keep all packaging away from children. Dispose of the packaging in accordance to the regulations of
local authorities.
• If the power cord is damaged, it must be replaced by an BUFFALO agent or a recommended qualified
technician in order to avoid a hazard.
Introduction
Please take a few moments to carefully read through this manual. Correct maintenance and operation of
this machine will provide the best possible performance from your BUFFALO product.
Pack Contents
The following is included:
BUFFALO prides itself on quality and service, ensuring that at the time of packaging the contents are
supplied fully functional and free of damage.
Should you find any damage as a result of transit, please contact your BUFFALO dealer immediately.
THE VEGETABLE CUTTER IS AHAZARDOUS APPLIANCE AND MUST ONLY BE
USED BY TRAINED PERSONNEL IN ACCORDANCE WITH THESE INSTRUCTIONS
Note: Cutting discs are available separately. Contact your supplier for more details.
• BUFFALO Vegetable Cutter
• Food pusher
•Deflector
• Cleaning brush
• Instruction manual

2
UK
Telephone Helpline: 0845 146 2887 (United Kingdom)
Operation
Location of Controls
Cutting Vegetables
1. Connect the appliance to the mains power supply.
2. Place the vegetables in the required food chute.
3. Lower the handle or place the food pusher in the chute.
4. Place a suitable container beneath the exit chute to collect the cut vegetables.
5. Turn the power On [I]. The discs begin to spin.
6. Press down on the handle or the food pusher. As the vegetables are cut they are ejected from the
cutter mouth.
7. Once all vegetables are cut turn Off the appliance and disconnect it from the power supply.
Note: Before using the first time clean all parts that come into contact with food with
warm soapy water.
WARNING: Do not use anything other than the food pusher supplied with the appliance
to press vegetables against the blades.
Pusher handle
Large chute
Lid
Cutter mouth
Feet
Pusher
Lid Release pin
On/Off button
Small chute
Lid Release knob

3
UK
Selecting a Cutting Disc
The BUFFALO vegetable cutter utilises various discs for different tasks.
Disc Use Disc Use
4mm Grating Disc
Suitable for medium/coarse grating
Product Code: AA077
2.5mm Julienne Disc
Suitable for thin slicing
Product Code: AA084
7mm Grating Disc
Suitable for coarse grating
Product Code: AA078
4mm Julienne Disc
Suitable for medium slicing
Product Code: AA085
3mm Grating Disc
Suitable for medium grating
Product Code: AA081
8 x 8mm French Fries Disc
For French fries
Product Code: AA086
Use with 8mm Slicing Disc (AA079)
8mm Slicing Disc
Suitable for medium/thick slicing
Product Code: AA079
10 x 10mm French Fries Disc
For French fries
Product Code: AA087
Use with 10mm Slicing Disc (AA083)
2mm Slicing Disc
Suitable for thin slicing
Product Code: AA080
8 x 8mm Dicing Disc
For Diced vegetables
Product Code: AA088
Use with 8mm Slicing Disc (AA079)
4mm Slicing Disc
Suitable for medium slicing
Product Code: AA082
10 x 10mm Dicing Disc
For Diced vegetables
Product Code: AA089
Use with 10mm Slicing Disc (AA083)
10mm Slicing Disc
Suitable for thick slicing
Product Code: AA083
Note: Regularly check the screws fixing the blades to the cutting discs and tighten as
necessary.

4
UK
Telephone Helpline: 0845 146 2887 (United Kingdom)
Changing the Cutting Disc
1. Disconnect the appliance from the mains power supply.
2. Turn the lid release knob anti-clockwise.
3. Remove the food pusher (if inserted) and carefully lift the lid.
4. Turn the disc anti-clockwise and lift it away from the appliance. This may require a sharp tap to free it
from the shaft.
5. Slot the new disc in place. Turn the disc if necessary to drop it in place over the lugs.
6. Turn the disc clockwise to secure it in position.
7. Lower the lid and turn the lid release knob clockwise to secure it in place.
Using the Base Discs
Some cutting processes require two discs to be inserted into the
appliance.
1. Open the lid and remove the cutting disc(s), as described above.
2. Slot the desired base disc onto the appliance.
3. Slot the 8 or 10mm slicing disc on top of the base disc, ensuring
it is securely connected to the centre pin and spins freely.
4. Lower the lid and turn the lid release knob clockwise to secure it
in place.
Cleaning, Care & Maintenance
• Always turn off and disconnect the appliance from the power
supply before cleaning.
• Use soapy water and a damp cloth to clean the appliance and cutting discs.
• DO NOT wash the cutting discs in the dishwasher.
•Drythoroughlyafter cleaning.
• Ensure all foodstuffs are removed from the appliance after each use.
• If required, lift the cover and loosen the two Lid Release knobs to remove the lid and clean.
WARNING: The blades on the cutting disc are sharp. Take care to avoid the edges when
changing discs.
Note: Ensure the appliance is clean and free from food debris when changing discs to
ensure the disc can be securely fitted.
Note: The deflector can also be removed by following this procedure. Removing the
deflector is necessary to thoroughly clean the appliance.
Note: The base cutting disc is not perfectly circular
and has a lip that sits in the cutter mouth to keep it
securely in place.
WARNING: Only the thinner aluminium cutting
discs are suitable for use with the base discs. DO
NOT use the thicker plastic cutting discs.

5
UK
Troubleshooting
Technical Specifications
Electrical Wiring
This appliance is supplied with a 3 pin, moulded, BS1363 plug and lead, with a 13 amp fuse as standard.
The plug is to be connected to a suitable mains socket.
This appliance is wired as follows:
• Live wire (coloured brown) to terminal marked L
• Neutral wire (coloured blue) to terminal marked N
• Earth wire (coloured green/yellow) to terminal marked E
This appliance must be earthed, using a dedicated earthing circuit.
If in doubt consult a qualified electrician.
Electrical isolation points must be kept clear of any obstructions. In the event of any emergency
disconnection being required they must be readily accessible.
Compliance
The WEEE logo on this product or its documentation indicates that the product must
not be disposed of as household waste. To help prevent possible harm to human
health and/or the environment, the product must be disposed of in an approved and
environmentally safe recycling process. For further information on how to dispose of
this product correctly, contact the product supplier, or the local authority responsible
for waste disposal in your area.
BUFFALO parts have undergone strict product testing in order to comply with
regulatory standards and specifications set by international, independent, and federal
authorities.
BUFFALO products have been approved to carry the following symbol:
Fault Probable Cause Action
The unit is not working The unit is not switched on Check the unit is plugged in correctly and
switched on
Plug and lead are damaged Call BUFFALO agent or qualified technician
Fuse in the plug has blown Replace the plug fuse
Power supply Check power supply
Internal wiring fault Call BUFFALO agent or qualified technician
Vegetables are not being
ejected from chute
Internal blockage Disconnect from power supply and empty
chute/cutting area of vegetables
Model Voltage Power Current Cutting Disc RPM Dimensions
h x w x d mm Weight
G784 230V 50Hz 550W 2.4A 270 470 x 220 x 490 22.5kg

6
UK
Telephone Helpline: 0845 146 2887 (United Kingdom)
All rights reserved. No part of these instructions may be produced or transmitted in any form or by any means,
electronic, mechanical, photocopying, recording or otherwise, without the prior written permission of BUFFALO.
Every effort is made to ensure all details are correct at the time of going to press, however, BUFFALO reserve the
right to change specifications without notice.

7
NL Klantenondersteuning: 050 – 609999 (België)
Veiligheidstips
• Plaatsen op een vlakke en stabiele ondergrond.
• De installatie en eventuele reparaties zijn door een servicetechnicus/vaktechnicus uit te voeren.
Verwijder geen componenten of servicepanelen van dit product.
• Raadpleeg en volg de plaatselijke en nationale regelgeving op m.b.t. tot het volgende:
• Wetgeving van gezondheid en veiligheid op de werkplaats
• Werkregels
• Brandpreventie
• IEE bekabelingsnormen
• Bouwverordeningen
• De groentesnijder is een gevaarlijk apparaat en mag uitsluitend door.
• Opgeleid personeel in overeenstemming met deze instructies worden gebruikt.
• Handen NIET in één van beide voedselcompartimenten plaatsen.
• Bevroren levensmiddelen NIET met dit apparaat proberen te snijden.
• Tijdens gebruik, NOOIT het apparaat zonder toezicht staan.
• Dit apparaat mag uitsluitend in overeenstemming met deze instructies en door hiervoor opgeleide
personen worden gebruikt.
• Dit apparaat is niet geschikt voor kinderen.
• Laat verpakkingsmateriaal niet binnen handbereik van kinderen. Verpakkingsmateriaal in
overeenstemming met de regelgeving van de plaatselijke overheden als afval laten verwerken.
• Indien de stroomkabel beschadigd raakt, dient men deze door een BUFFALO technicus of aanbevolen
vaktechnicus te laten vervangen om gevaarlijke situaties te verhinderen.
Inleiding
Neem de tijd en lees deze handleiding aandachtig door. Een correct gebruik en onderhoud van deze
machine waarborgt de beste prestatie van uw BUFFALO product.
Verpakkingsinhoud
De verpakking bevat het volgend:
BUFFALO is trots op de haar productkwaliteit en dienstverlening en controleer de inhoud van de
verpakkingen, tijdens de verpakkingsfase, op functionaliteit en schade.
Mocht u product door transport zijn beschadigd, neem dan onmiddellijk contact op met uw BUFFALO dealer.
DE GROENTESNIJDER IS EEN GEVAARLIJK APPARAAT EN MAG UITSLUITEND
DOOR OPGELEID PERSONEEL IN OVEREENSTEMMING MET DEZE INSTRUCTIES
WORDEN GEBRUIKT
Opmerking: snijschijven zijn apart beschikbaar. Neem contact op met uw leverancier
voor meer informatie.
• BUFFALO Groentesnijder
• Groenteaandrukker
•Deflector
• Reinigingsborstel
• Handleiding

8
NL
Klantenondersteuning: 040 – 2628080 (Nederland)
Bediening
Locatie van bedieningselementen
Groente snijden
1. Steek de steker van het apparaat in het stopcontact.
2. Plaats de groente in het hiervoor bestemde groentecompartiment.
3. Breng de hendel naar beneden of plaats de aandrukker in het groentecompartiment.
4. Plaats een geschikte opvangbak onder het groentecompartiment om de gesneden groentes op te
vangen.
5. Zet de stroomschakelaar op On [I] (Aan). De snijschijven beginnen te draaien.
6. Druk de hendel of de groenteaandrukker naar beneden. Als de groente is gesneden, komt de
gesneden groente uit de snijmond.
7. Heeft u eenmaal alle groente gesneden, zet dan het apparaat uit en haal de steker uit het stopcontact.
Opmerking: Vóór het eerste gebruik van het apparaat dient men alle delen die in contact
komen met voedsel met warm zeepwater te reinigen.
WAARSCHUWING: Gebruik uitsluitend de met het apparaat meegeleverde
groenteaandrukker om groente tegen de snijbladen te drukken.
Duwhendel
Groot
voedselcompartiment
Deksel
Snijmond
Pootjes
Aandrukker
Dekselontgrendelings
pin
On/Off (Aan/Uit)
knop
Klein
groentecompartiment
Dekselontgrendelings
knop

9
NL Klantenondersteuning: 050 – 609999 (België)
De juiste snijschijf kiezen
De BUFFALO groentesnijder heeft diverse snijschijven voor verschillende taken.
Snijschijf verwisselen
1. Haal de steker van het apparaat uit het stopcontact.
2. Draai de dekselontgrendelingsknop naar links.
3. Verwijder de groenteaandrukker (indien geplaatst) en verwijder de deksel voorzichtig.
Schijf Gebruiken voor Schijf Gebruiken voor
4mm raspschijf
Geschikt voor medium/grof raspen
Productcode: AA077
2,5mm Julienne schijf
Geschikt voor dun snijden
Productcode: AA084
7mm raspschijf
Geschikt voor grof raspen)
Productcode: AA078
4mm Julienne schijf
Geschikt voor medium snijtaken
Productcode: AA085
3mm raspschijf
Geschikt voor medium raspen)
Productcode: AA081
8 x 8mm Patatschijf
Voor het maken van frietjes
Productcode: AA086
Gebruiken met 8mm snijschijf (AA079)
8mm snijschijf
Geschikt voor het gemiddelde/dikke
snijtaken
Productcode: AA079
10 x 10mm Patatschijf
Voor het maken van patat
Productcode: AA087
Gebruiken met 10mm snijschijf (AA083)
2mm snijschijf
Geschikt voor dun snijden
Productcode: AA080
8 x 8mm blokjesschijf
Voor gesneden groenteblokjes
Productcode: AA088
Gebruiken met 8mm snijschijf (AA079)
4mm snijschijf
Geschikt voor medium snijtaken
Productcode: AA082
10 x 10mm blokjesschijf
Voor gesneden groenteblokjes
Productcode: AA089
Gebruiken met 10mm snijschijf (AA083)
10mm snijschijf
Geschikt voor dikke snijtaken
Productcode: AA083
WAARSCHUWING: het mes van de snijschijf is scherp. Raak de snijkanten niet aan
tijdens het verwisselen van schijven.

10
NL
Klantenondersteuning: 040 – 2628080 (Nederland)
4. Draai de schijf naar links en til het uit het apparaat. Om de snijschijf van de schacht te krijgen, kan het
gebruik van een scherpe tap nodig zijn.
5. Plaats de nieuwe snijschijf. Indien nodig, draai de snijschijf zodat deze in de pinnen valt.
6. Draai de schijf naar rechts om deze op zijn plaats te bevestigen.
7. Sluit de deksel en draai de dekselontgrendelingsknop naar rechts op zijn plaats.
De basisschijven gebruiken
Sommige snijprocessen vereisen de plaatsing van twee schijven in
het apparaat.
1. Open de deksel en verwijder de snijschijf (snijschijven) zoals
eerder beschreven.
2. Plaats de gewenste basissnijschijf in het apparaat.
3. Plaats de 8 of 10mm snijschijf bovenop de basisschijf, en
controleer hierbij of deze goed op de centrale pin zit en vrij kan
ronddraaien.
4. Sluit de deksel en draai de dekselontgrendelingsknop naar
rechts op zijn plaats.
Reiniging, zorg & onderhoud
• Alvorens het apparaat te reinigen dient men altijd de stroomvoorziening uit te schakelen.
• Gebruik zeepwater en een vochtige doek voor de reiniging van het apparaat en de snijschijven.
• Snijschijven NIET in de vaatmachine wassen.
• Na reiniging goed drogen.
• Zorg dat na elk gebruik al het voedsel uit het apparaat wordt gehaald.
• Indien nodig, open de deksel en maak de twee dekselontgrendelingknoppen los om de deksel eraf te
halen en te kunnen reinigen.
Opmerking: Bij het verwisselen van snijschijven, dient u te controleren of het apparaat
schoon en vrij van voedselresten is, zodat de schijf correct kan worden geplaatst.
Opmerking: De deflector kan ook door het volgen van deze procedure worden
verwijderd. De verwijdering van de deflector helpt bij het reinigen van het apparaat.
Opmerking: De basissnijschijf is niet perfect
cirkelvormig en heeft een lipje dat in de snijmond
komt te liggen om de basisschijf goed op zijn plaats
te houden.
WAARSCHUWING: Uitsluitend de dunnere
aluminium snijschijven zijn geschikt voor gebruik
met de basisschijven. Dikkere plastic snijschijven
NIET gebruiken.

11
NL Klantenondersteuning: 050 – 609999 (België)
Oplossen van problemen
Indien er een storing van uw BUFFALO product optreedt, dient u de onderstaande tabel te raadplegen
alvorens contact op te nemen met uw BUFFALO dealer of de Hulplijn te bellen.
Technische specificaties
Elektrische bedrading
Men dient de steker op een geschikt stopcontact aan te sluiten.
De bedrading van dit apparaat is als volgt:
• Stroomkabel (bruin) naar de aansluitklem gemarkeerd met L
• Neutraalkabel (blauw) naar de aansluitklem gemarkeerd met N
• Aardekabel (groen/geel) naar de aansluitklem gemarkeerd met E
Dit apparaat moet worden geaard met behulp van een adequaat aardingscircuit.
Bij twijfels raadpleeg een vakkundige elektricien.
De elektrische isolatiepunten mogen niet worden geblokkeerd. In geval van een nooduitschakeling moeten
de isolatiepunten direct toegankelijk zijn.
Probleem Mogelijke oorzaak Handeling
Het apparaat werkt niet Het apparaat staat uit Controleer of de stroomkabel van het
apparaat is aangesloten en of het
apparaat is ingeschakeld
Steker en kabel zijn
beschadigd
Laat een BUFFALO technicus of een
vaktechnicus komen
Het apparaat werkt niet De zekering in de steker is
gesprongen
Vervang de zekering in de steker
Stroomvoorziening Controleer de stroomvoorziening
Er komt geen groente uit de
snijmond
Interne blokkering Haal de steker uit het stopcontact en
haal de groente uit het
compartiment/snijgebied
Model Voltage Vermogen Stroom Snijschijf
RPM Afmetingen
h x b x d mm Gewicht
G784 230V 50Hz 550W 2,4A 270 470 x 220 x 490 22,5kg

12
NL
Klantenondersteuning: 040 – 2628080 (Nederland)
Productconformiteit
Het WEEE-logo op dit product of bijbehorende documentatie geeft aan dat het product
niet onder huisvuil valt en als zodanig ook niet mag worden verwerkt. Ter preventie
van mogelijke gevaren voor de gezondheid van personen en/of voor het milieu, dient
men dit product in overeenstemming met het voorgeschreven en milieuveilige
recyclingproces als afval te verwerken. Raadpleeg uw productleverancier of uw
plaatselijk afvalverwerkingsbedrijf voor meer informatie over de juiste
afvalverwerking van dit product.
De onderdelen van BUFFALO producten hebben strenge producttesten ondergaan om
te voldoen aan wettelijke regels en specificaties die door internationale,
onafhankelijke en landelijke overheden worden voorgeschreven.
BUFFALO producten zijn goedgekeurd en voorzien van het volgende symbool:
Alle rechten voorbehouden. Het is verboden om deze handleiding, hetzij volledig of gedeeltelijk, elektronisch of
mechanisch te reproduceren, kopiëren, op opslagmedia op te slaan of op enigerlei wijze over te dragen, zonder
voorafgaande goedkeuring van BUFFALO.
Wij hebben er alles aan gedaan om er zeker van te zijn dat op publicatiedatum van de handleiding alle details
correct zijn, desondanks, behoudt BUFFALO het recht voor om specificaties zonder aankondiging te wijzigen.

13
FR Standard d'assistance téléphonique: 050 – 600006 (Belgique)
Conseils de sécurité
• Placez l'appareil sur une surface plane, stable.
• L'installation et les éventuelles réparations doivent être confiées à un dépanneur / technicien qualifié.
Ne retirez aucun composant ou cache de ce produit.
• Consultez les normes locales et nationales pour vous conformer aux :
• lois sur l'hygiène et la sécurité au travail ;
• codes de bonnes pratiques BS EN ;
• précautions contre le risque d'incendie ;
• réglementations sur les branchements électriques IEE ;
• règlements sur la construction.
• NE PAS mettre les mains dans les goulottes.
• NE PAS essayer de couper des aliments surgelés avec cet appareil.
• Ne vous éloignez JAMAIS de l'appareil en service.
• L'utilisation de cet appareil est exclusivement réservée aux personnes formées en la matière et doit se
conformer à ces instructions.
• Cet appareil n'a pas été conçu pour être utilisé par un enfant.
• Gardez les emballages hors de portée des enfants. Débarrassez-vous des emballages conformément
aux règlements des autorités locales.
• Un cordon d'alimentation endommagé doit être remplacé par un agent BUFFALO ou un technicien
qualifié recommandé, pour éviter tout danger.
Introduction
Nous vous invitons à consacrer quelques instants à la lecture attentive de ce manuel. L'entretien et
l'utilisation appropriés de cet appareil vous permettront de tirer le meilleur de votre produit BUFFALO.
Contenu de l'emballage
Eléments fournis de série :
BUFFALO attache une grande importance à la qualité et au service et veille à fournir des produits en parfait
état opérationnel, parfaitement intacts au moment de l'emballage.
Nous vous prions de contacter votre revendeur BUFFALO immédiatement si vous constatez un dommage
quelconque survenu pendant le transport du produit.
LE ROBOT COUPE-LÉGUMES EST UN APPAREIL DANGEREUX DONT L'UTILISATION EST
RÉSERVÉE AUX PROFESSIONNELS AU COURANT DES CONSIGNES DE CE MODE D'EMPLOI
Remarque : Disques de coupe vendus séparément. Contactez votre fournisseur pour de
plus amples détails.
• Robot coupe-légumes BUFFALO
• Poussoir
• Chicane
• Brosse de nettoyage
• Mode d'emploi

14
FR
Standard d'assistance téléphonique: 08 20 30 01 16 (Français)
Functionnement
Emplacement des commandes
Coupe des légumes
1. Branchez l'appareil à la prise d'alimentation secteur.
2. Placez les légumes dans la goulotte qui convient.
3. Baissez la poignée ou insérez le poussoir dans la goulotte.
4. Placez un récipient approprié sous la goulotte de sortie, pour récupérer les légumes coupés.
5. Mettez l'interrupteur de mise sous tension sur On [I]. Les disques tournent.
6. Appuyez sur la poignée du poussoir. Les légumes coupés sont éjectés de la bouche du coupe-légume.
7. Une fois les légumes coupés, éteignez l'appareil et débranchez-le de la prise secteur.
Remarque : Avant la première mise en service, lavez toutes les pièces qui touchent aux
aliments à l'eau savonneuse tiède.
AVERTISSEMENT : N'utilisez que le poussoir fourni avec l'appareil pour pousser les
légumes contre les lames.
Poignée de poussoir
Grande goulotte
Couvercle
Bouche du coupe-
légume
Pieds
Poussoir
Axe de retrait du
couvercle
Bouton Marche /
arrêt
Petite goulotte
Bouton de retrait du
couvercle

15
FR Standard d'assistance téléphonique: 050 – 600006 (Belgique)
Sélection du disque de coupe qui convient
Le robot coupe-légumes BUFFALO utilise des disques différents, en fonction de la tâche à accomplir.
Changement du disque de coupe
1. Débranchez l'appareil de la prise d'alimentation secteur.
2. Faites tourner le bouton de retrait du couvercle dans le sens anti-horaire.
3. Retirez le poussoir (si inséré) et soulevez doucement le couvercle.
Disque Usage Disque Usage
Disque râpeur 4 mm
Convient pour râper moyen / gros
Référence produit : AA077
Disque à julienne 2,5 mm
Convient pour émincer fin
Référence produit : AA084
Disque râpeur 7 mm
Convient pour râper gros
Référence produit : AA078
Disque Julienne 4 mm
Convient pour émincer moyen
Référence produit : AA085
Disque râpeur 3 mm
Convient pour râper moyen
Référence produit : AA081
Disques à frites 8 x 8 mm
Pour les frites
Référence produit : AA086
À utiliser avec le disque éminceur 8 mm
(AA079)
Disque éminceur 8 mm
Convient pour émincer moyen / épais
Référence produit : AA079
Disques à frites 10 x 10 mm
Pour les frites
Référence produit : AA087
À utiliser avec le disque éminceur 10 mm
(AA083)
Disque éminceur 2 mm
Convient pour émincer fin
Référence produit : AA080
Disque macédoine 8 x 8 mm
Pour les dès de légumes
Référence produit : AA088
À utiliser avec le disque éminceur 8 mm
(AA079)
Disque éminceur 4 mm
Convient pour émincer moyen
Référence produit : AA082
Disque macédoine 10 x 10 mm
Pour les dès de légumes
Référence produit : AA089
À utiliser avec le disque éminceur 10 mm
(AA083)
Disque éminceur 10 mm
Convient pour émincer épais
Référence produit : AA083
AVERTISSEMENT : Les lames des disques de coupe sont bien affûtées. Veillez à en éviter
les bords en changeant le disque.
Other manuals for G784
1
Table of contents
Languages:
Other Buffalo Kitchen Appliance manuals

Buffalo
Buffalo CP868 User manual

Buffalo
Buffalo ce225 User manual

Buffalo
Buffalo CT931 User manual

Buffalo
Buffalo CC039 User manual

Buffalo
Buffalo CP829 User manual

Buffalo
Buffalo U626 User manual

Buffalo
Buffalo GF439 User manual

Buffalo
Buffalo FT691 User manual

Buffalo
Buffalo Bain Marie 600 Series User manual

Buffalo
Buffalo GH160 User manual

Buffalo
Buffalo CH919 User manual

Buffalo
Buffalo DB191 User manual

Buffalo
Buffalo CC039 User manual

Buffalo
Buffalo CJ373 User manual

Buffalo
Buffalo GF439 User manual

Buffalo
Buffalo CT931 User manual

Buffalo
Buffalo GL190 User manual

Buffalo
Buffalo CC770 User manual

Buffalo
Buffalo CC729 User manual

Buffalo
Buffalo DM079 User manual