manuals.online logo
Brands
  1. Home
  2. •
  3. Brands
  4. •
  5. Burtonsafes
  6. •
  7. Lock
  8. •
  9. Burtonsafes PS610 User manual

Burtonsafes PS610 User manual

• Ensure that the bolts are fully retracted
(if necessary rotate the handle clockwise to
retract the bolts)
• Gently push the door shut. Always ensure
that there are no objects or people in the
way of the closing door
• Turn the handle anti-clockwise until
the stop position is reached
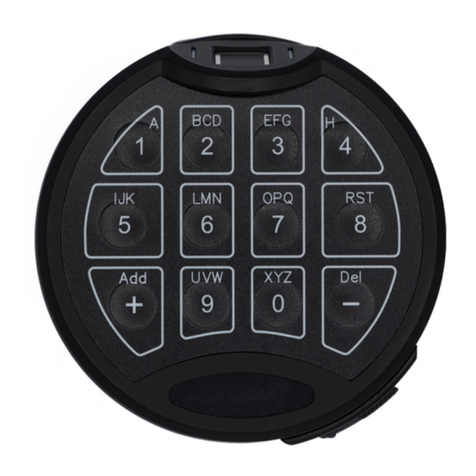
• Press the [ON] key
• Enter a valid 6-digit code
(the factory default is ‘123456’)
• Press the [ENTER] key
• Within 4 seconds, turn the handle clockwise
until the stop position is reached
• Open the safe door
How to close the safe
PS610/E36
PS310/E92
Home Safe Size 1-3 Lock
Home Safe Size 4 Lock
• Open the lock using a valid
6-digit master code
• Open the safe door
• Press the [ON] key
• Press the [ENTER] key
• Press key [1] followed by the [ENTER] key
• Enter the existing 6-digit master code (the
factory default is ‘123456’)
• Press the [ENTER] key
• Enter a new 6-digit code followed
by the [ENTER] key
• Re-enter the new 6-digit code,
then press the [ENTER] key to confirm
Changing the master code
How to open the safe
• If an incorrect code has been entered, the red
LED will flash
• After 3 incorrect entries, a penalty time of 1
minute will begin. During this time no other
code entries can be made
• When the penalty time is over press the [ON] key
• Enter a valid 6-digit code
Incorrect Entry
This lock requires a 6-digit code to open the
lock. You can have a master code and up
to 9 user codes.
In order to activate the user codes, you will
need the master code.
The master code can’t be deleted but you can
remove user codes. The lock also features
dual code opening and time delay opening.
burtonsafes.co.uk
About the lock
USER INSTRUCTIONS
PS310 & PS610 Lock
Everytime an incorrect entry code is
entered continuously the penalty time is
extended for 2, 4, 8, up to the maximum
of 16 minutes
Issue 1
13/6/2022
(using the master code)
Activating a user code
There are 9 user codes under the user numbers
1-9. To set up a user code,
you need to input the user number first.
• Press the [ON] key
• Press the [ENTER] key
• Press key [2] followed
by the [ENTER] key
• Enter the user number you want to set
up, i.e. enter key [1] for user
number 1 or key [2] for user
number 2 and so on
• Press the [ENTER] key
• Enter the 6-digit MASTER code
followed by the [ENTER] key
• Enter a new 6-digit code for your
chosen user code
• Press the [ENTER] key
• Re-enter the new 6-digit user code,
then press the [ENTER] key to confirm
(using the master code)
Deleting a user code
There are 9 user codes under the user numbers
1-9. To set up a user code,
you need to input the user number first.
• Press the [ON] key
• Press the [ENTER] key
• Press key [0] followed by
the [ENTER] key
• Enter the user number for the code
you wish to delete, i.e. key [2]
• Press the [ENTER] key
• Enter the existing 6-digit MASTER
code followed by the [ENTER] key
(using a user code)
Changing a user code
• Press the [ON] key
• Press the [ENTER] key
• Press key [3] followed by the
[ENTER] key
• Enter the user number for the code you
wish to change, i.e. key [2]
• Enter the existing 6-digit user code
• Press the [ENTER] key
• Enter a new 6-digit code followed
by the [ENTER] key
• Re-enter the new 6-digit code,
then press the [ENTER] key to confirm
The Dual Code function means that you will
require 2 different codes to open the safe,
the master code and any other user code.
Ensure that you have at least one user code
programmed in the lock as well as the
master code before you turn on this
function.
A Time Delay is the time you have to
wait in between the entry of your code
and the opening of your safe. An Open
Window is the amount of time you have
to open your safe after the time delay.
For example, if you wanted a 30 minute
Time Delay and a 9 minute Open
Window, this would mean that once you
have entered a valid 6-digit code, you
have to wait 30 minutes before you can
open the safe door. After 30 minutes
you will have 9 minutes to open the
safe door. If you wait longer than 9
minutes, you have to start the process
again. In this lock you can program a
Time Delay from 1 - 99 minutes and an
Open Window of 1 - 9 minutes.
Turning on the Dual Code function
• Press the [ON] key
• Press key [0] followed by the [ENTER] key
• Enter the 6-digit master code
followed by the [ENTER] key
• Within 1 minute enter a user number i.e.
press key [2], followed by the [ENTER] key
• Enter the 6-digit user code for that user
followed by the [ENTER] key
• Within 4 seconds, turn the handle
clockwise until the stop position is reached
• Open the safe door
Turning off the Dual Code function
Opening the safe with the
Dual Code function
• Press the [ON] key
• Press the [ENTER] key
• Press key [6] followed by the
[ENTER] key
• Enter the 6-digit master code
followed by the [ENTER] key
• Enter the 3 digits for your
Time Delay and Open Window, i.e.
[3][0][9] (this would be for a 30 minute
Time Delay and a 9 minute
Open Window)
• Press the [ENTER] key
Programming the Time Delay
• Press the [ON] key
• Press the [ENTER] key
• Press key [7] followed by the [ENTER] key
• Enter the 6-digit master code followed by
the [ENTER] key
• Press the [ON] key
• Press the [ENTER] key
• Press key [8] followed by the [ENTER] key
• Enter the 6-digit master code
followed by the [ENTER] key
How to remove the Time Delay
• Press the [ON] key
• Press the [ENTER] key
• Press key [6] followed by the[ENTER] key
• Enter the 6-digit master code
followed by the [ENTER] key
• Enter [0][0][0]
• Press the [ENTER] key
Opening the safe with the Time Delay
• Press the [ON] key
• Enter a valid 6-digit code
• Press the [ENTER] key
• Wait for the Time Delay to finish.
An acoustic signal will sound when
the Time Delay is over, i.e. 30 minutes
• Re-enter the same 6-digit code
during the Open Window
• Press the [ENTER] key
Power supply / Battery change
A series of beeps indicates that the
battery is weak and must be replaced.
To change the battery, you will need to open
the safe and remove the plate on the back of
the door with a small screwdriver.
Press the catch on the top edge of the battery
cover with a screwdriver and lever off the
battery lid. Pull the battery out carefully until
the battery clip is visable. Release the battery
from the clip and replace. When the new
battery is in place, re-engage the lid. Please
ensure that the cable is not damaged.
Emergency power supply
• If the safe has run out of power hold a 9V
Duracell battery to the front of the
lock against the + and - connectors
• While keeping contact at all times with the
battery, press the [ON] key
• Enter a valid 6-digit code followed
by the [ENTER] key
• Within 4 seconds, turn the handle
clockwise until the stop position is reached
• Once inside the safe, follow the above
instructions to change the battery
Replace the battery with a new one
(9V, type 6LF22).
Once you have replaced the battery, slide
the battery box back inside the lock.
Ensuring that you secure the battery
box with the screw.
PS310/E92 Lock
PS610/E36 Lock
The pullout battery box is located on the
bottom of the lock
Remove the screw that secures the battery box
Squeeze latches and pull the battery box down
Disconnect the battery from the contact pad
Only use 9V ALKALINE batteries
with this lock
Burton Safes recommend the
Duracell brand
Only use 9V ALKALINE batteries
with this lock
Burton Safes recommend the
Duracell brand
www.burtonsafes.co.uk | +44 (0) 1484 663388 | enquiries@burtonsafes.co.uk
Brockholes Business Park, Rock Mill Road, Holmfirth, HD9 7BN
PROTECT YOUR
FAMILY POSSESSIONS
IF IT MATTER TO YOU SECURE IT WITH US

This manual suits for next models

3

Other Burtonsafes Lock manuals

Burtonsafes Keyguard XL Digital User manual

Burtonsafes

Burtonsafes Keyguard XL Digital User manual

Burtonsafes KEYGUARD KEY SAFE 74 User manual

Burtonsafes

Burtonsafes KEYGUARD KEY SAFE 74 User manual

Burtonsafes KEYGUARD XL DIGITAL User manual

Burtonsafes

Burtonsafes KEYGUARD XL DIGITAL User manual

Burtonsafes PS310 User manual

Burtonsafes

Burtonsafes PS310 User manual

Burtonsafes TORINO User manual

Burtonsafes

Burtonsafes TORINO User manual

Burtonsafes KeyGuard digital xl User manual

Burtonsafes

Burtonsafes KeyGuard digital xl User manual

Burtonsafes FIREBRAND User manual

Burtonsafes

Burtonsafes FIREBRAND User manual

Burtonsafes Keyguard Combi User manual

Burtonsafes

Burtonsafes Keyguard Combi User manual

Burtonsafes KS User manual

Burtonsafes

Burtonsafes KS User manual

Burtonsafes Burton Duo FPC-1808-II VdS User manual

Burtonsafes

Burtonsafes Burton Duo FPC-1808-II VdS User manual

Burtonsafes IGNIS User manual

Burtonsafes

Burtonsafes IGNIS User manual

Burtonsafes KEYGUARD XL DIGITAL User manual

Burtonsafes

Burtonsafes KEYGUARD XL DIGITAL User manual

Burtonsafes Keyguard XL Digital User manual

Burtonsafes

Burtonsafes Keyguard XL Digital User manual

Burtonsafes BURTON PULSE User manual

Burtonsafes

Burtonsafes BURTON PULSE User manual

Burtonsafes BURTON DUO DEAD - BOLT User manual

Burtonsafes

Burtonsafes BURTON DUO DEAD - BOLT User manual

Popular Lock manuals by other brands

LockMasters LockOne LKM7000 installation instructions

LockMasters

LockMasters LockOne LKM7000 installation instructions

COMPX TS1058BD Dimensional drawing

COMPX

COMPX TS1058BD Dimensional drawing

AAT KaDe KDA-LOCK180Z-II installation manual

AAT

AAT KaDe KDA-LOCK180Z-II installation manual

Turbolock TL116 manual

Turbolock

Turbolock TL116 manual

Sewosy EXT400CTC installation instructions

Sewosy

Sewosy EXT400CTC installation instructions

BEST ACCESS SYSTEMS 6K Series Service manual

BEST ACCESS SYSTEMS

BEST ACCESS SYSTEMS 6K Series Service manual

R.E Williams Contractor CODELOCK CL4210 installation guide

R.E Williams Contractor

R.E Williams Contractor CODELOCK CL4210 installation guide

Scolmore ESP Aperta A1SLS manual

Scolmore

Scolmore ESP Aperta A1SLS manual

VIZpin Grade 1 Cylindrical Smartlock installation instructions

VIZpin

VIZpin Grade 1 Cylindrical Smartlock installation instructions

Motormate Yamaha 10-301 installation instructions

Motormate

Motormate Yamaha 10-301 installation instructions

TellCard Systems EGT/E6291(2) KB/KU1(2) Programming manual

TellCard Systems

TellCard Systems EGT/E6291(2) KB/KU1(2) Programming manual

COMPX C8384 Dimensional drawing

COMPX

COMPX C8384 Dimensional drawing

DITEC DAS802LOKA installation manual

DITEC

DITEC DAS802LOKA installation manual

Phoenix SELO-B User instructions

Phoenix

Phoenix SELO-B User instructions

I.H.T DDL - 909 user manual

I.H.T

I.H.T DDL - 909 user manual

danalock V3 BT HK SCANDI manual

danalock

danalock V3 BT HK SCANDI manual

National Cabinet Lock C8133 Dimensional drawing

National Cabinet Lock

National Cabinet Lock C8133 Dimensional drawing

WEST UNICA-PP 962 FITTING INSTRUCTION

WEST

WEST UNICA-PP 962 FITTING INSTRUCTION

manuals.online logo
manuals.online logoBrands
  • About & Mission
  • Contact us
  • Privacy Policy
  • Terms and Conditions

Copyright 2025 Manuals.Online. All Rights Reserved.