Call Aid UK 1155 Series Instruction Manual

Call Aid UK Ltd
50 Cornhill Road, Carlton, Nottingham, NG4 1GE
Tel: 0115 940 0905 sales@callaiduk.com www.callaiduk.com Fax: 0115 853 1969
1155 Series PAM System with portable 1142RX receiver –Jan 14
1155 Series - PAM (Portable Activity Monitor) System
with
1142RX Portable Radio Receiver
Installation & User Manual

Call Aid UK Ltd
50 Cornhill Road, Carlton, Nottingham, NG4 1GE
Tel: 0115 940 0905 sales@callaiduk.com www.callaiduk.com Fax: 0115 853 1969
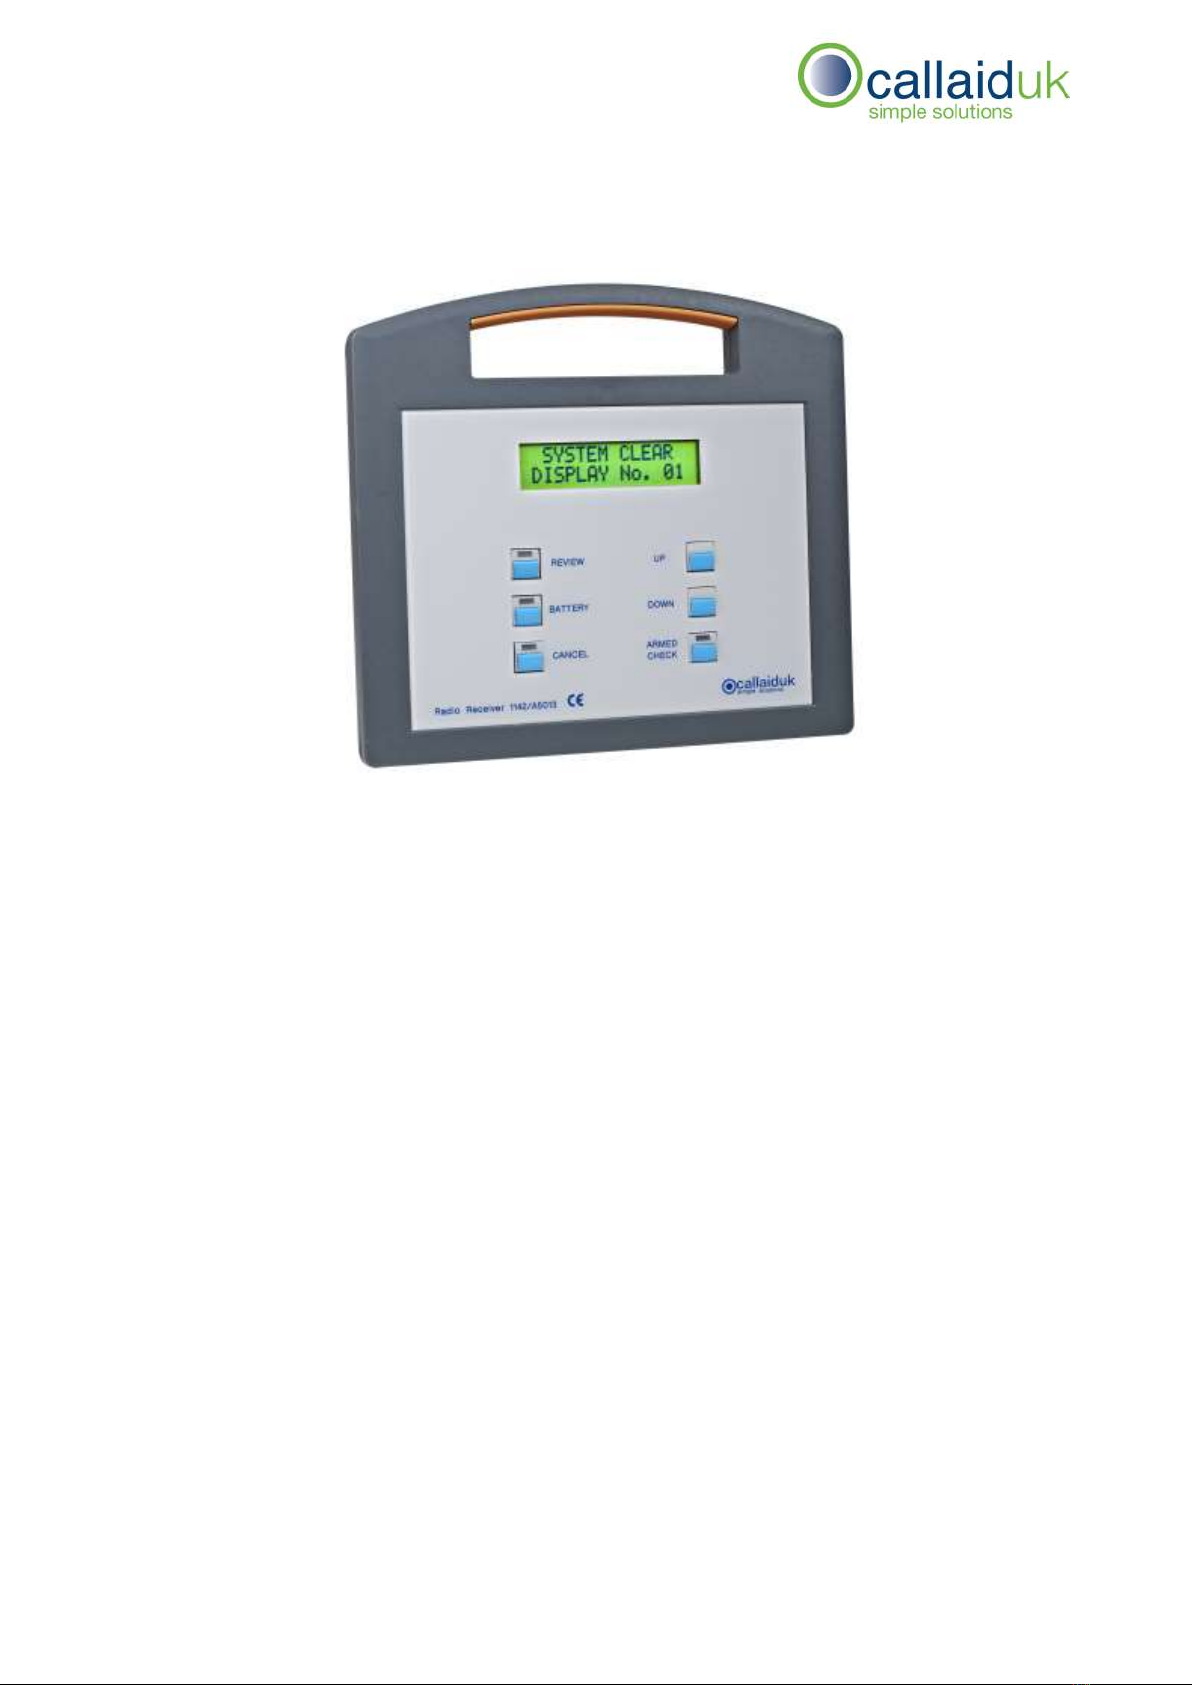
The PAM Unit 1155 user instructions
Important: Please ensure the PAM unit is fully charged before use.
Using the PAM
To switch on the PAM briefly press the top button, three
bleep tones are heard to confirm the signal is OK.
A fifteen second delay is incorporated before the detector is
activated to allow the Carer time to leave the room, the red
lamp in the top button flashes ON & OFF during this period.
Please note: there will be no confirmation three bleeps if the
PAM cannot contact the 1142 receiver. This is a failsafe
feature to ensure that the PAM is always within range of the
1142 receiver.
It is good practice to check that the PAM that has been
switched on is logged on at the 1142 receiver.
To switch off/cancel a call, briefly press the top button and
wait for five bleeps.
When a PAM battery is getting low a “Low Battery” warning is sent to the 1142
receiver. This message will remain on the display until the PAM is switched OFF.
The PAM must be fully charged before being used again.
PAM Charging
Please ensure the PAM unit is fully charged before use.
The PAM unit cannot be used for monitoring when on charge.
When charging the red lamp on the top button is constantly illuminated.
When the battery is fully charged the red lamp will flash. The charging
time will vary depending on the charged state of the battery.
Battery life is calculated at approx. 24 hours in monitor/armed mode.

Call Aid UK Ltd
50 Cornhill Road, Carlton, Nottingham, NG4 1GE
Tel: 0115 940 0905 sales@callaiduk.com www.callaiduk.com Fax: 0115 853 1969
The 1142RX radio master receiver
(Portable version)
The 1142RX Receiver Display
When PAM's are switched on they send a radio signal to the 1142 receiver to
“Log on”. If this signal is not confirmed back to the PAM, the PAM will not switch
to monitor mode. To find a better signal move the PAM to another position within
the bedroom try setting the PAM again.
When “logged on” the number of the PAM will be shown in the bottom left hand
side of the display. When there is more than one PAM in use the number of these
PAM's is scrolled in the order that they are switched ON. The green lamp over
the “armed check” button will be lit.
Low Battery
When there is a PAM on low battery alert this will be PAM number will be
displayed at the 1142 receiver; the green warning lamp will be lit above the
battery button. This alert will replace the display showing the switched on PAM's.
The PAM with the low battery must be switched off and put on charge
immediately.

Call Aid UK Ltd
50 Cornhill Road, Carlton, Nottingham, NG4 1GE
Tel: 0115 940 0905 sales@callaiduk.com www.callaiduk.com Fax: 0115 853 1969
Out of range message
This is a warning at the 1142 receiver that a PAM has lost signal contact with the
1142 receiver usually because it is out of range. This could be that the battery is
running down and there is insufficient power to drive the transmitter. Check the
PAM and if necessary recharge the battery or try to move the receiver closer to
the PAM.
PAM Armed
oThis is displaying all the PAMs that are turn on and armed.
Low Battery
oThis is displaying all the PAMs that have low battery and should be
charged at once.
Out of range
oThis is a warning that the PAM is not receiving a signal from the 1142
receiver and is out of range from the 1142 receiver. Please check
the PAM and if necessary try to move the receiver closer to the
PAM.
Emergency
oThis is a warning that a PAM has been triggered and is cancelled at
the PAM by pressing and holding the top button. See PAM user
instructions.
Buzzer levels
There is a white switch on the side of the receiver to change the level of
the buzzer
Charging the 1142 Receiver
When not being moved around the 1142 receiver should always be
plugged into the charger.
Should the 1142 receiver be turned off when any PAMs are armed all
PAMs will need to be disarmed and rearmed. This is to keep the PAMs and
the 1142 receiver in sync.
The 1142 Receiver Display
PAM Armed
If you cannot setup the system due to low signals please contact Call Aid UK on
0115 940 0905 for technical assistance.

Call Aid UK Ltd
50 Cornhill Road, Carlton, Nottingham, NG4 1GE
Tel: 0115 940 0905 sales@callaiduk.com www.callaiduk.com Fax: 0115 853 1969
PAM 1142RX Coding Instructions
Adding an additional PAM unit
Before proceeding, please ensure that all PAM units are turned off and no other
PAM units are active within radio range of the receiver. If any PAMs are active
near the receiver, this will interfere with the operation.
1.
With the radio receiver powered on and in standby mode (NO PAMS ARMED),
press the ‘UP’ and ‘DOWN’ buttons together briefly until the ‘MENU/ ADD NEW
DEVICE’ shows on the display.
2.
Press the ‘ARMED CHECK’ button on the receiver. The ‘SELECT DEVICE ID’ menu
should be now showing on the display.
(The device ID menu is used to choose which number will show on the display
when the PAM unit is in operation. This number can be any number from 1-50. )
3.
Please use the ‘UP’ and ‘DOWN’ buttons on the receiver to select the desired ID
number for the PAM unit.
(The ‘UP’ button will increase the ID by one until fifty, while the ‘DOWN’ button will
decrease the ID by one until it reaches one.)

Call Aid UK Ltd
50 Cornhill Road, Carlton, Nottingham, NG4 1GE
Tel: 0115 940 0905 sales@callaiduk.com www.callaiduk.com Fax: 0115 853 1969
4.
Press the ‘ARMED CHECK’ button when the desired ID is showing on the display.
The display should now be showing the ‘SELECT NAME’ menu.
5.
Please use the ‘UP’ and ‘DOWN’ buttons to select the desired description to
follow the ID number.
(The 1142RX receiver has the capacity to allow the use of any of the ten pre-set
descriptions to be used with any PAM, please select any description as required)
6.
Press the ‘ARMED CHECK’ button when the desired description is showing on the
display. The display should now be showing the ‘TRIGGER DEVICE’ menu.
7.
With the receiver in the ‘TRIGGER DEVICE’ menu, switch on the PAM unit via the
top button on the PAM unit. When the new PAM has been detected and
confirmed by the receiver, the PAM and 1142RX should emit a short beep. Once
this step is complete, the receiver display should now be showing ‘NO PAMS
ARMED’.
(The PAM should be kept close to the receiver in this stage. If not, the unit may
be ignored by the 1142RX. The receiver will ignore weak signals to minimize
interference)
8.
The new PAM unit should now be tested in the required final location. Once the
unit has been confirmed working and within range, the PAM unit can now be
used.
Table of contents
Other Call Aid UK Security System manuals
Popular Security System manuals by other brands

KALEAS
KALEAS KlimaDetector operating instructions

Tynetec
Tynetec ZXT812 quick start guide

Texecom
Texecom Premier 412 Programming guide

olympia electronics
olympia electronics BS-468/A manual

Haake
Haake HST-TZ2 Installation and operating manual

Honeywell
Honeywell GKP-S8M Installation instructions and instructions for use