CAMAG Derivatizer User manual

INSTRUCTION MANUAl
deRIvATIzeR

Content
1Introduction.................................................................................................................................... 1
1.1 Precaution................................................................................................................................. 1
1.2 Parts supplied with CAMAG Derivatizer ..................................................................................... 3
1.3 Spare parts for CAMAG Derivatizer ........................................................................................... 4
2Unpacking/Installation .................................................................................................................. 4
2.1 Unpacking ................................................................................................................................ 4
2.2 Installation environment............................................................................................................ 4
2.3 Installation ................................................................................................................................ 5
3Getting started ............................................................................................................................... 5
3.1 Intended use ............................................................................................................................. 5
3.2 Material compatibility ............................................................................................................... 6
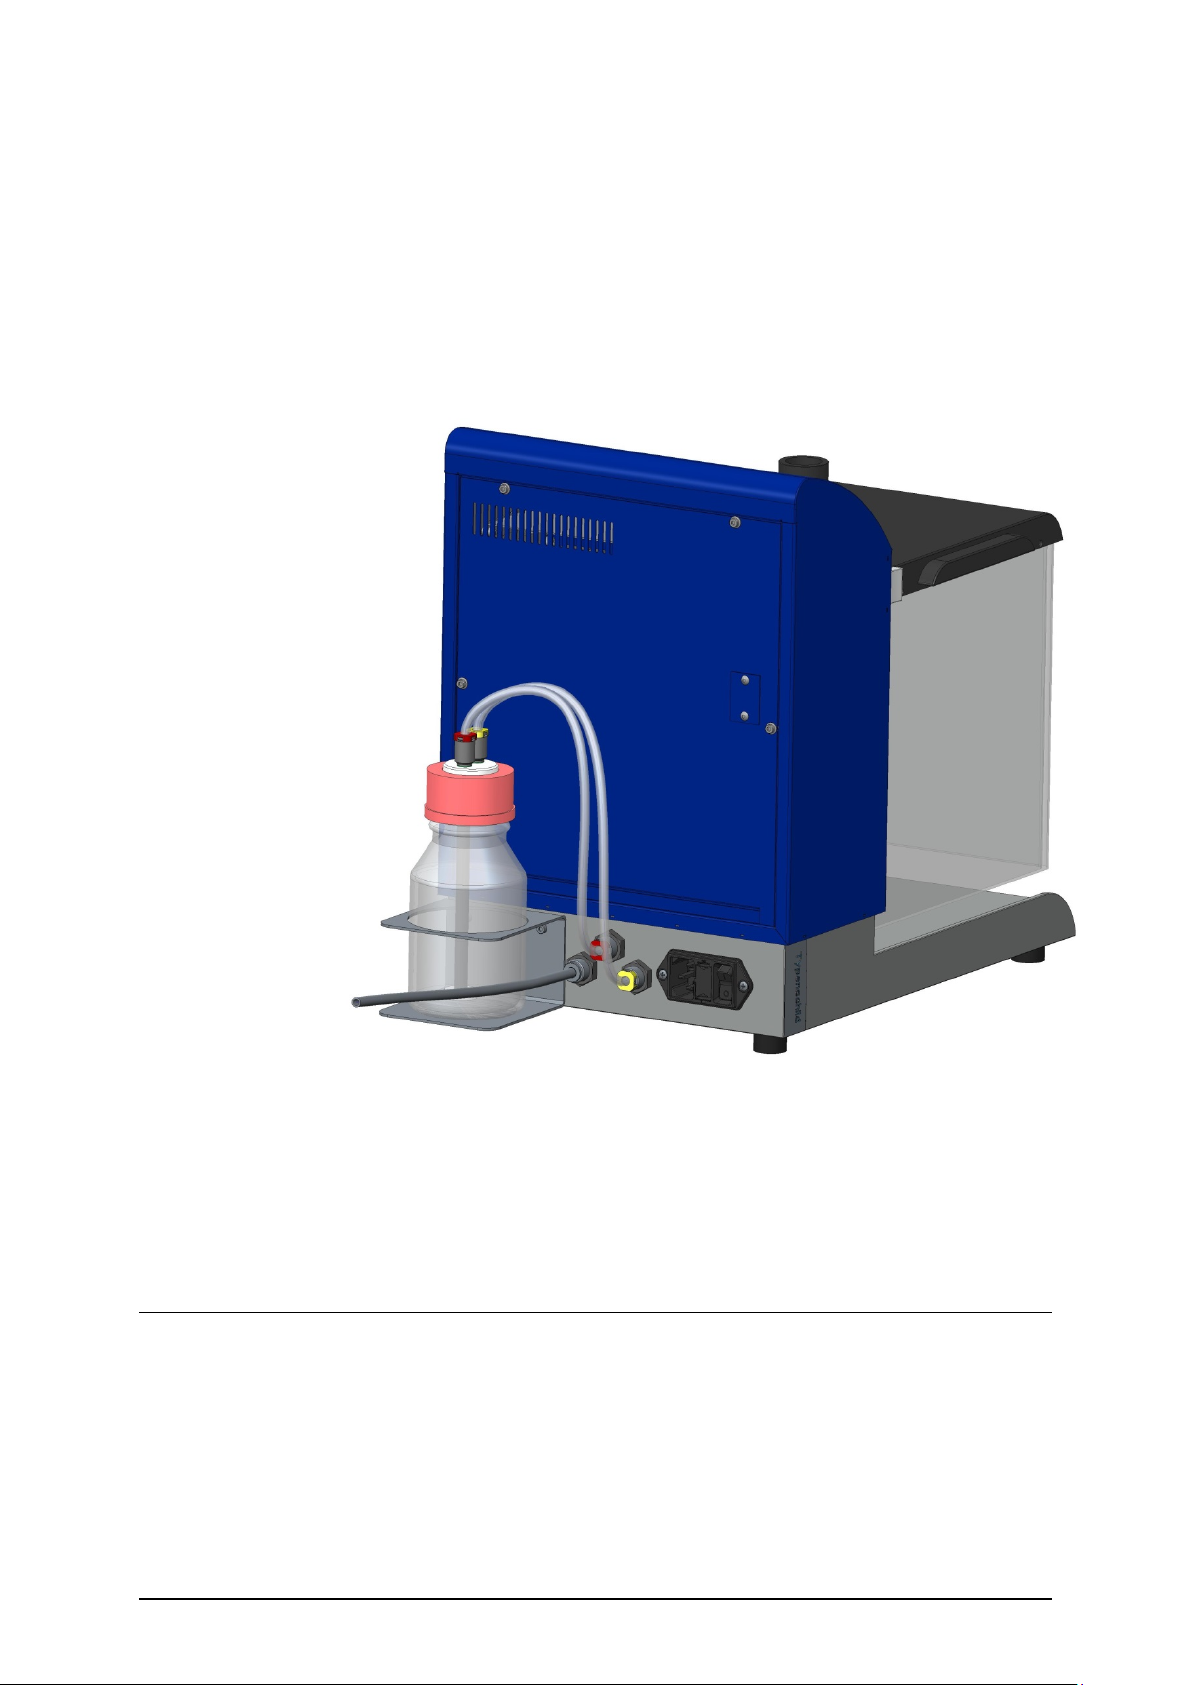
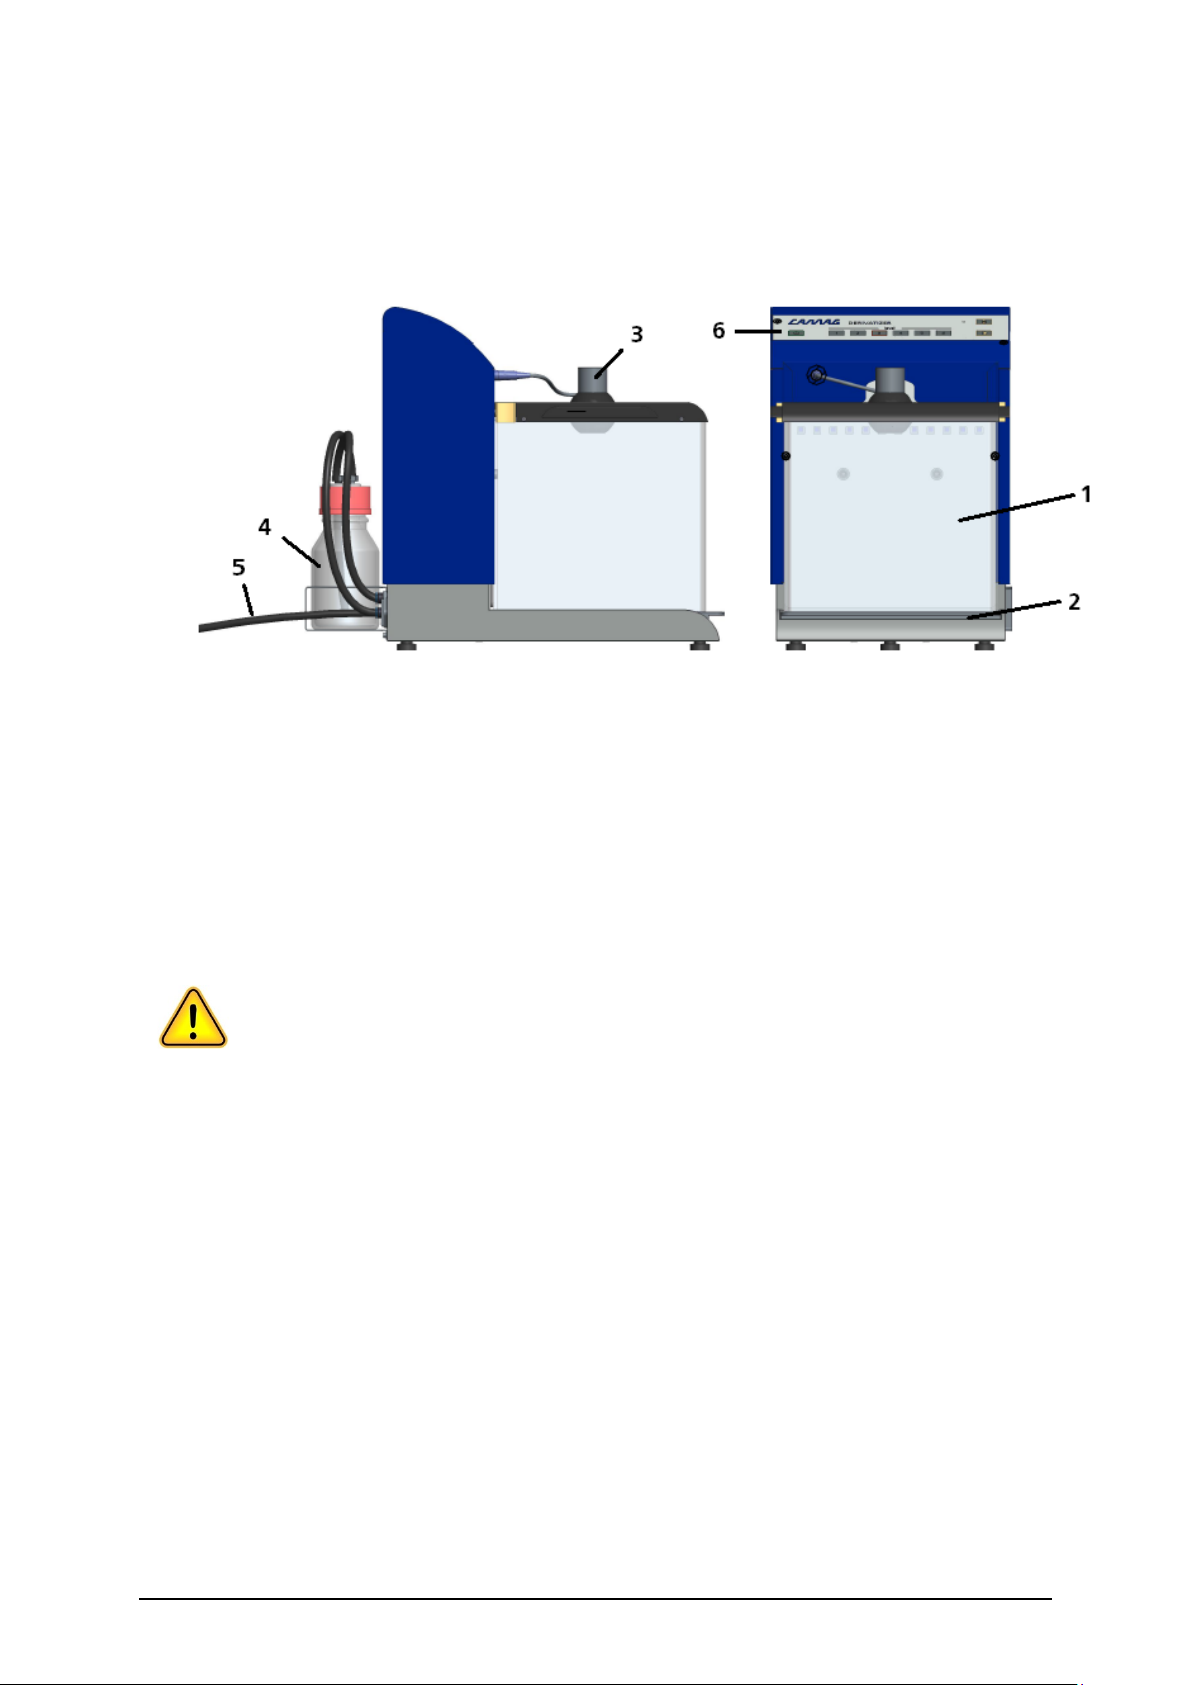
3.3 Instrument ................................................................................................................................ 7
3.4 Control panel ............................................................................................................................ 8
3.5 State diagram ........................................................................................................................... 8
3.6 Nozzles ..................................................................................................................................... 9
3.7 Spraying level............................................................................................................................ 9
3.8 Insert/Remove plate ................................................................................................................ 10
3.9 Derivatization process ............................................................................................................. 11
3.9.1 Preparation of the reagents................................................................................................. 11
Preparation of the cleaning solution................................................................................................ 12
Setting the parameters.................................................................................................................... 12
Cleaning steps ................................................................................................................................ 12
Spraying steps................................................................................................................................. 14
3.10 Method to transfer from manual spraying or immersion to automated spraying ..................... 15
3.11 Recommendations for common derivatization reagents .......................................................... 16
3.11.1 Transfer from manual spraying to automated spraying (20 x 10 cm or 20 x 20 cm hood).... 18
3.11.2 Transfer from immersion to automated spraying (20 x 10 cm hood) ................................... 18
4Maintenance and Service ............................................................................................................ 20
4.1 Cleaning ................................................................................................................................. 20
4.2 Decontamination .................................................................................................................... 20

Introduction
Instruction Manual, Nov-17 2
4.3 User maintenance ................................................................................................................... 20
4.4 Maintenance data sheet.......................................................................................................... 21
4.5 Troubleshooting...................................................................................................................... 22
Replacing the seal of the tray.......................................................................................................... 22
Internal errors ................................................................................................................................. 23
5Technical data............................................................................................................................... 23
6Preparation of Derivatization reagents ..................................................................................... 24
7Declaration of Decontamination (DoD) ..................................................................................... 27
Declaration of Conformity (DoC)

Introduction
Instruction Manual, Nov-17 1
1Introduction
The CAMAG Derivatizer is an automated spraying device which sets a new standard of
reproducibility in the reagent transfer onto TLC plates by employing a unique "micro
droplet" spraying technology. The CAMAG Derivatizer ensures homogeneous and
reproducible application of all common reagents. Moreover, the CAMAG Derivatizer
offers further advantages compared to manual spraying:
•Environmentally friendly and safe handling through a closed system
•Intuitive handling and easy cleaning
•Low reagent consumption through efficient operation (4 mL for 20 x 20 cm plates
and 2 – 3 mL for 20 x 10 cm plates)
•Reproducible and user-independent results
1.1 Precaution
•Please read this operating manual before starting the installation! This manual
contains information and warnings the user has to follow to ensure reliable
operation of the instrument
•If the instrument is used in a manner not specified in this manual, the protection
provided by the equipment may be impaired
•Some interior parts of the instrument are under AC power. Careless and improper
use can cause injury. Unauthorized manipulations can cause damage
•This sign indicates (on instrument and in this manual) that failure to take note of
the accompanying information may result in damage to the instrument
•The instrument is manufactured and tested in accordance with the respective
European safety publications shown on the Declaration of Conformity (DoC). The
instrument complies with safety class 1 and has been designed for indoor use only
(IP 20). Further, this device has passed the CAMAG Quality Assurance tests and
has been delivered in safe operation condition. For detailed instrument data see
chapter ”Technical data”
•Attention: For safety reasons the instrument may only be used for the purposes
described in the operating manual
•To avoid injury use adequate safety equipment (protective goggles, gloves etc. if
applicable) when working with the instrument
•Before first operation, check whether the voltage shown on the instrument
matches your local mains voltage. The power cord may only be connected to a
grounded, fused (not higher than 16 A) outlet. Do not use extension cords
without ground contact

Introduction
Instruction Manual, Nov-17 2
1.0AT, 250VAC
•When working with the fluids of the instrument, be sure to take the appropriate
caution (protect your eyes from direct contact with liquid)
•The instrument may be used only by properly trained laboratory staff
•The instrument may not be used in rooms with danger of explosions
•The instrument contains highly sophisticated electronics. It may be operated only
in a non-condensing atmosphere in the temperature range outlined in the chapter
"Technical data". Before installation and use, the instrument should be acclimated
properly
•Use a damp lint free cloth for cleaning the instrument surface. Do not employ
aggressive detergents
•Protect yourself and the instrument from electrostatic shock which can cause
damage to the electronic parts
•Only authorized personnel may open the instrument. Service and repair is only to
be performed by trained specialists. Use spare parts and consumables supplied by
CAMAG only. The warranty is voided if parts from other sources are used. Check
the service manual before you start service to reduce product-specific risks
•The power cord has to be removed before the instrument is opened. It is not
permitted to work on an instrument that has been opened and is connected to the
power supply
•Spare fuses must be of the type specified by the instrument manufacturer. It is
forbidden to short-circuit or manipulate fuses
•Use only the original power cord type that is delivered with the instrument
•If the instrument is found to be defective, it must be switched off and steps must
be taken to ensure that it cannot be switched on by mistake
•If liquids penetrate the inside of the instrument, the power has to be disconnected
immediately. Small amounts of liquid can be wiped off and/or dried by means of a
hairdryer, with larger amounts of liquid a service technician has to be called. A test
of functionality has to be performed in all cases
•Carry out all safety checks and the preventive maintenance as recommended by
the manufacturer in order to assure your personal safety and the full functionality
of the instrument. Have an authorized service specialist perform any service not
described by this manual
•See original manufacturers' manuals for further safety data on third party
equipment supplied with the system
•Lift/move/transport the system with the necessary care and with sufficient
manpower (install the transport security devices if applicable, transport it only in
the original packaging)

Introduction
Instruction Manual, Nov-17 3
•The safety of any system incorporated with the equipment is the responsibility of
the assembler of the system
•This symbol indicates that this equipment must not be disposed of as unsorted
municipal waste but is to be collected separately as electrical and electronic
equipment (WEEE-Directive 2002/96/EC). To properly recycle the instrument or
parts of it you are requested to send the equipment back to the distributor,
producer or an adequate collection system at the end of its life. This will have
potential effects on the environment and human health
•The use of the instrument without adequate ventilation to outside air may
constitute a health hazard depending on the substances in use
•This equipment is intended to be used in an Industrial Electromagnetic
Environment according IEC 61326-1
1.2 Parts supplied with CAMAG Derivatizer
Part no Description
022.6050
Derivatization hood 20 x 20 cm or *
022.6055
Derivatization hood 20 x 10 cm *
022.6051
Tray with seal 20 x 20 cm or*
022.6056
Tray with seal 20 x 10 cm *
022.6070
Sealing for tray 20 x 20 cm (5 pcs) or*
022.6071
Sealing for tray 20 x 10 cm (5 pcs) *
Power cord
B.022.6000.E
Instruction Manual
B.022.6030.E
Table: Recommendations for common derivatization reagents
960.0055
Washing bottle
735.6015-1
Washing bottle holder
115.6019-1
Lid washing bottle
022.6080
Set of all 4 nozzles (one of each) or
022.6085
Set of 4 nozzles Ultra (one of each)*
735.6021-1
Nozzle holder
672.0067
Teflon tubing from/to washing bottle, o.d. 6 mm
Red – 280 mm
Yellow – 320 mm
672.0067
2 m tubing for the output air pipe to the fume hood
*Depending on ordered configuration

Unpacking/Installation
Instruction Manual, Nov-17 4
1.3 Spare parts for CAMAG Derivatizer
Part no Description
022.6070
Sealing for tray 20 x 20 cm (5 pcs)
022.6071
Sealing for tray 20 x 10 cm (5 pcs)
022.6080
Set of all 4 Nozzles (one of each)
022.6061
Nozzle green
022.6091
Set of 3 green nozzles
022.6062
Nozzle blue
022.6092
Set of 3 blue nozzles
022.6063
Nozzle yellow
022.6093
Set of 3 yellow nozzles
022.6064
Nozzle red
022.6094
Set of 3 red nozzles
022.6066
Nozzle Ultra green
022.6096
Set of 3 green nozzles Ultra
022.6067
Nozzle Ultra blue
022.6097
Set of 3 blue nozzles Ultra
022.6068
Nozzle Ultra yellow
022.6098
Set of 3 yellow nozzles Ultra
022.6069
Nozzle Ultra red
022.6099
Set of 3 red nozzles Ultra
720.6019-1
Nozzle lid
2Unpacking/Installation
2.1 Unpacking
•Carefully unpack all components and accessories listed on the shipping list. Make
sure the shipment is complete
•Carefully remove the instrument from the package and place it on a table
2.2 Installation environment
The place for installation must meet the following requirements:
Connections
•
Grounded AC powerline
•The CAMAG Derivatizer has to be used under the fume
hood, or with the output air pipe connected to it
Bench space
(w x d x h)
300 x 500 x 500 mm
Operating
temperature
The temperature should be within a range of 10 to 40 °C
Humidity
Humidity and temperature conditions must not cause
condensation

Getting started
Instruction Manual, Nov-17 5
2.3 Installation
•Fill the washing bottle with 100 ml solvent able to dissolve the derivatization
reagent (recommendation: a 50% v/v aqueous solution of ethanol), and mount it
with the help of the washing bottle holder
•Mount the respective hood and plate tray
•Connect the power cord to the power inlet at the rear right side of the instrument
•If the instrument is not placed in a fume hood, connect the output air pipe (grey
rear connector) to the fume hood
3Getting started
3.1 Intended use
The primary use of the CAMAG Derivatizer is for derivatization of TLC plates. The
following reagents have been tested and validated by CAMAG.
The exact composition for the above reagents is specified in the chapter 6.
Before using other reagents, check the material compatibility and spray characteristics.

Getting started
Instruction Manual, Nov-17 6
•
10% sulfuric acid reagent
•
p-Anisaldehyde – sulfuric acid reagent
•
NP reagent (Natural product = diphenylborinic acid
aminomethylester)
•
PEG solution (polyethylene glycol 400 = macrocol)
•
Iodine solution
•Dragendorff’s reagent
•
Fast blue salt B reagent
•
Ehrlich's reagent
•
Phosphomolybdic acid reagent
•
Ninhydrin reagent
•
Copper(II) sulfate reagent
•
Aniline – diphenylamine- phosphoric acid reagent
•
Vanillin – sulfuric acid reagent
•
Potassium hydroxide solution*
•Enzymatic assay: Tyrosinase (aqueous solution)
*) recommended for the chemically resistant Ultra nozzle
3.2 Material compatibility
Materials in use:
•Nozzle housing: PET / PEEK for the Ultra nozzle
•Nozzle membrane: Palladium-alloy
•Nozzle sealing ring: EPDM
•Hood, transparent: PETG
•Hood, cover: PET
•Tray: PET
•Tray seal: EPDM
Please consult chapter 6 for tested derivatization reagents. According to standard chemical
resistance charts, reagents like acetone, acetonitrile and methylene chloride may cause
problems. However, in the Derivatizer most parts are not in direct contact with the liquid phase
of the reagents and might be unproblematic if sprayed. For some specific combinations of
reagents, micro-cracks may appear in the transparent hood with continued use. This does not
affect the spraying and derivatization itself, but the service life of the hood is limited in such
cases. Please minimize contact with these reagents and clean and dry directly after the
application.
If possible, change solvents to a methanol-, ethanol- or water-based derivatization reagent.

Getting started
Instruction Manual, Nov-17 7
For potassium hydroxide containing reagents and for potentially aggressive reagents
in general we recommend the chemically resistant Ultra nozzles.
3.3 Instrument
Elements of CAMAG Derivatizer:
1Hood (20 x 20 cm version shown)
2Tray with seal
3Nozzle
4Washing bottle
5Output air pipe
6Control panel
The CAMAG Derivatizer has to be used under the fume hood, or
with the output air pipe connected to a fume hood

Getting started
Instruction Manual, Nov-17 8
3.4 Control panel
1 Power ON/OFF
2 Spraying level (6 levels)
3 Hood UP/DOWN
4 START derivatization
3.5 State diagram
1
3
2
4

Getting started
Instruction Manual, Nov-17 9
3.6 Nozzles
CAMAG provides 4 different types of nozzles. Each of them is coded by a different colour on
the connector. The following types are available:
1. Green
2. Blue
3. Yellow
4. Red
There are the standard type nozzles and the chemically more resistant Ultra nozzles. For
potassium hydroxide containing reagents and for potentially aggressive reagents not listed in
this manual we recommend the chemically resistant Ultra nozzles.
The colours correspond to the porosity of the nozzle which should be adjusted to suit the
general physicochemical properties of the reagents such as the viscosity. The porosity size from
smallest to largest is as follows: green < blue < yellow < red.
Depending on the derivatization reagent and the required homogeneity, the appropriate nozzle
and spraying level should be selected according to CAMAG’s recommendation (chapter 3.10)
To ensure that the correct nozzle is plugged into the CAMAG Derivatizer, the level buttons are
backlighted in the colour of the nozzle connector.
If the derivatization reagent is one of the derivatization reagents described in this manual, refer
to chapter 3.11. For other derivatization reagents refer to chapter 3.10:
Be sure that the operational temperature of the nozzles is at room temperature (20 °C – 25 °C).
3.7 Spraying level
There are 6 different spraying levels available. The selection of the spraying level is dependent on
the desired time for spraying. With a higher spraying level, a stronger reagent flow, and
therefore a shorter spraying time, is achieved. However, the spraying distribution will be less
homogenous. Best homogeneity is usually achieved when the spraying takes 3 -5 min. In any
case, the spraying time has to be adjusted to < 10 min.

Getting started
Instruction Manual, Nov-17 10
If the derivatization reagent is one of the derivatization reagents described in this manual, refer
to chapter 3.11. For other derivatization reagents refer to chapter 3.10:
General remark:
If two different nozzles spray well, it is always advisable to use a lower one (Green < Blue <
Yellow < Red) with a higher spraying level than a higher nozzle with the same or even a lower
spraying level so that the spray is as homogeneous as possible.
3.8 Insert/Remove plate
The hood is lifted up and down when the UP/DOWN button is pressed.
While the hood is in the up position, the tray can be removed from the device for
inserting/removing a plate or cleaning.
Place the plate onto the tray with the application position facing the rear of the instrument and
the solvent front facing the front of the instrument.
Use only the corresponding tray. Ensure that the seal of the tray
is well positioned and not damaged. If the seal is damaged,
please replace it (see chapter 4.5 Replacing the seal of the tray)

Getting started
Instruction Manual, Nov-17 11
3.9 Derivatization process
CAMAG strongly recommends the following procedure:
3.9.1 Preparation of the reagents
Choose the appropriate reagent and prepare it according chapter 6 Preparation of
Derivatization reagents
Be aware that some formulations used for immersion should not
be used directly for spraying.
See chapter 3.2 for material compatibility and chapter 6 for tested derivatization reagents.

Getting started
Instruction Manual, Nov-17 12
Preparation of the cleaning solution
Dissolve half of a spatula (~ 300 mg) of sodium
chloride (NaCl) in 500 mL water.
The concentration does not have to be analytically
accurate.
Dilute 10 mL of the aqueous NaCl solution in 90 ml
ethanol.
This results in a ~1 mmol/L NaCl cleaning solution.
Setting the parameters
Size of the hood:
•CAMAG provides two different types of hoods (20 x 20 cm and 20 x 10 cm). The
size of the hood is related to the size of the plate
Spray nozzle and level:
•Choose the appropriate spray nozzle and spray level according chapter 3.6, 3.7
and 3.10
•Make sure the nozzle is dried and clean outside and inside. Perform the cleaning
procedure when necessary or when changing spraying reagent
Cleaning steps
Perform the cleaning procedure when necessary before / after spraying or when
changing spraying reagent
Unless it can be ensured that a cleaning step has been performed with the nozzles, the
tray and the hood, a pre-cleaning step is required.

Getting started
Instruction Manual, Nov-17 13
Nozzle:
Empty nozzle, if necessary, and insert a
filter paper instead of a TLC / HPTLC plate
and perform a spraying procedure with
2 mL of cleaning solution (level 6).
After spraying the settling time can be
skipped by pressing the start button so
that the process moves forward to the
pumping step.
When necessary or when changing the
reagent rinse the tip of the nozzle and the
inside of the reagent container with (tap)
water, ethanol or cleaning solution.
Do not rinse the entire nozzle as this might
harm the electrical connection.
Make sure that the nozzle has dried
thoroughly before next use.
Make sure the nozzle is dry before next use. Do not
harm the nozzle’s membrane by applying manual
pressure.
Note: Dry the nozzle and lid with e.g. a lab cleaning tissue but be careful not to
scratch or pierce the membrane.
Hood and Tray:
The hood and the tray can be cleaned
manually (e.g. with ethanol 96 %).
When necessary, remove nozzle and tray
seal and wash both parts in the dishwasher
at maximum 55 °C.
Both parts must be dry after cleaning.

Getting started
Instruction Manual, Nov-17 14
Spraying steps
Insert the plate with the solvent front facing the
front of the instrument.
Lower the hood by pressing the “UP/DOWN”
button.
Fill the recommended volume of reagent into
the nozzle and close the nozzle with the lid.
Immediately start the spraying process by
pressing the “START” button.
The spraying step will stop automatically when
no reagent is left in the nozzle.
After filling the nozzle proceed immediately with
spraying. Dripping might occur if the solvent is stored
in the nozzle for too long.
Do not start the process when there is no reagent in
the nozzle and do not continue with the spraying
step after the reagent has been sprayed.
Note: The spraying process can be stopped any time by pressing the Start button
again. To avoid damage to the nozzle the instrument will automatically stop after 10
minutes of spraying.
Wait until reagent has been sprayed and settled
on the plate
This phase automatically starts after the reagent
has completely been sprayed (nozzle is empty).
The device will remain in this phase for 2
minutes. The duration of this phase can be
shortened by pressing the “START” button.
CAMAG recommends using the default settling time
to ensure a homogeneous distribution of the reagent
on the TLC plate.

Getting started
Instruction Manual, Nov-17 15
In the reagent evacuation phase, fumes are
withdrawn from the hood with the internal
pump and absorbed in the washing bottle. This
step lasts for one minute but can be shortened
by pressing the “START” button.
It is not recommended to shorten the reagent
evacuation phase.
Lift the hood and remove plate.
Perform the cleaning procedure when
necessary or when changing spraying
reagent.
3.10Method to transfer from manual spraying or immersion to automated
spraying
Operation parameters for each nozzle are versatile. Any derivatization reagent can be
sprayed with 2 or 3 different nozzles. Parameters should be chosen according to the user’s
need:
•If a very homogeneous derivatization is desired, a nozzle with small porosity
should be chosen. This will lead to smaller droplets but it will take more time to
spray.
•If a rapid derivatization is preferred, a nozzle with a larger porosity should be
selected
A convenient transfer of methods involving manual spraying, immersion and automated
spraying with the CAMAG Derivatizer is illustrated in the flowchart below:

Getting started
Instruction Manual, Nov-17 16
3.11Recommendations for common derivatization reagents
Be aware that the formulation of derivatization reagents should be
adapted for the use in the CAMAG Derivatizer. Material compatibility and
spray characteristics have to be considered. See chapter 6 Preparation of
Derivatization reagents
Tested and validated by CAMAG to obtain comparable results to manual spraying or to
immersion. Recommendations to obtain optimal results with the freshly prepared reagents
are a temperature of 20 °C – 25 °C and a relative humidity of 35 % - 45 %. See chapter 6
Preparation of Derivatization reagents for the composition of the reagents.

Getting started
Instruction Manual, Nov-17 17
Reagent
Use
10% sulfuric acid
reagent
Spray, then heat the plate at 100 °C for 3 min on the CAMAG TLC Plate
Heater, let cool to room temperature. Detection under UV 366 nm and white
light. (Please note that sulfuric acid > 20% in methanol cannot be sprayed.)
p-Anisaldehyde –
sulfuric acid reagent
Spray, then heat the plate at 100 °C for 3 min on the CAMAG Plate Heater,
let cool to room temperature. Detection under UV 366 nm and white light.
NP reagent
Spray, wait 5 min. Detection under UV 366 nm.
PEG solution
Spray, wait 5 min. Detection under UV 366 nm.
Iodine solution
Spray, dry with cold air for 2 min. Detection after background has turned
white again. Detection under UV 254 nm and white light.
Dragendorff’s reagent
Spray, dry with cold air for 10 min. Detection under white light.
Fast blue salt B
reagent
Spray. Detection under white light within the 2 min after spraying (white
background).
Ehrlich's reagent
Spray, heat the plate at 100 °C for 5 min on the CAMAG TLC Plate Heater,
and let cool to room temperature. Detection under white light.
Phosphomolybdic acid
reagent
Spray, heat at 120 °C for 10 min on the CAMAG TLC Plate Heater, and let
cool down to room temperature. Detection under white light.
Ninhydrin reagent
Spray, heat at 105 °C for 3 min on the CAMAG TLC Plate Heater, let cool to
room temperature. Detection under white light.
Copper(II) sulfate
reagent
Spray, heat the plate at 110 °C for 10 min on the CAMAG TLC Plate Heater,
let cool to room temperature. Detection under white light.
Aniline –
diphenylamine-
phosphoric acid
reagent
Spray, heat at 110 °C for 10 min on the CAMAG Plate Heater, let cool to
room temperature. Detection under white light.
Vanillin – sulfuric acid
reagent
Spray, heat at 100 °C for 3 min on the CAMAG Plate Heater, let cool to room
temperature. Examination under UV 366 nm and white light.
Potassium hydroxide
solution
Spray, heat at 100 °C for 2 min on the CAMAG Plate Heater, let cool to room
temperature. Detection under UV 366 nm and white light.
Enzymatic test:
Tyrosinase (enzyme
and substrate in
aqueous solutions)
Spray subsequently the appropriate volume of substrate solution and the
appropriate volume of enzyme solution onto the plate. Incubate the plate for
10 minutes at room temperature in a closed box to prevent from drying (e.g.
inside of the glass covered drawer of the BioLuminizer). Dry the plate to <2%
relative humidity for 5 minutes in a desiccator or in the ADC 2 by using
molecular sieve.
Table of contents
Other CAMAG Laboratory Equipment manuals

CAMAG
CAMAG TLC SPRAY CABINET 2 User manual

CAMAG
CAMAG LINOMAT 5 User manual

CAMAG
CAMAG DBS-MS 500 User manual

CAMAG
CAMAG DBS-MS 500 User manual

CAMAG
CAMAG TLC-MS INTERFACE 2 User manual

CAMAG
CAMAG AMD 2 User manual

CAMAG
CAMAG ADC 2 User manual

CAMAG
CAMAG ADC 2 User manual

CAMAG
CAMAG NANOMAT 4 User manual

CAMAG
CAMAG ATS 4 User manual
Popular Laboratory Equipment manuals by other brands

Neuation
Neuation iROLL DR24 Product user manual

Novus
Novus NV-100PS user manual

Memmert
Memmert SV1524 operating manual

BioLAB
BioLAB BIFL-207 Operation manual

Cascade Sciences
Cascade Sciences CVO-5-EX Series Installation & operation manual

Sartorius Stedim Biotech
Sartorius Stedim Biotech CERTOMAT BS-1 operating manual