manuals.online logo
Brands
  1. Home
  2. •
  3. Brands
  4. •
  5. Canon
  6. •
  7. Printer Accessories
  8. •
  9. Canon imagePROGRAF iPF830 User manual

Canon imagePROGRAF iPF830 User manual

プリンタスタンドセットアップガイド
Printer Stand Setup Guide
Guida all’installazione del supporto della stampante
Guide d’installation du socle de l’imprimante
Guía de conguración del Soporte de la impresora
Руководство по установке подставки для принтера
프린터 스탠드 설치 가이드
打印机支架组装说明书/使用说明书 保留备用
Setup-Handbuch für das Druckergestell
Следуйте инструкциям для выполнения сборки подставки для принтера, блока рулона и приемника бумаги.
Некоторые процедуры для отдельных моделей принтера могут отличаться. Процедуры, для которых указаны пометки, обозначающие модели принтера, необходимы
только для этих моделей.
Обязательно прочтите это руководство перед использованием.
Храните руководство таким образом, чтобы к нему можно было обращаться в дальнейшем в случае необходимости.
프린터 스탠드 , 롤 유닛 , 바스켓을 조립할 때는 이 설명서를 읽으십시오 .
구입하신 기종에 따라 순서가 다를 수 있습니다 . 기종 마크를 표시한 순서는 해당 기종에만 필요한 순서입니다 .
사용 전에 반드시 이 설명서를 읽으십시오 .
장래에 언제든지 사용할 수 있도록 잘 보관하십시오 .
•
Siga estas instrucciones para montar el soporte de la impresora, la unidad del rollo y el apilador de salida.
Algunos procedimientos pueden ser diferentes según el modelo particular de su impresora. Los procedimientos con un marcador de modelo son obligatorios únicamente para
esos modelos.
Asegúrese de leer este manual antes de usarlo. Tenga el manual donde pueda consultarlo posteriormente, según sea necesario.
Folgen Sie diesen Anweisungen, um das Druckergestell, die Rolleneinheit und den Ausgabestapler aufzubauen.
Einige Vorgehensweisen können für Ihr bestimmtes Druckermodell etwas anders sein. Vorgehensweisen mit Modellbezeichnungen sind nur bei diesen Modellen erforderlich.
Lesen Sie dieses Handbuch vor dem Gebrauch.
Bewahren Sie das Handbuch an einem Ort auf, an dem Sie es später bei Bedarf konsultieren können.
Seguire le presenti istruzioni per assemblare il supporto della stampante, l’unità rotolo e l’impilatrice di uscita.
Alcune procedure possono essere diverse per il modello di stampante in uso. Le procedure con un contrassegno di modello sono richieste solo per quei modelli.
Leggere il presente manuale prima dell’uso.
Conservare il manuale in un luogo accessibile per poterlo consultare in caso di necessità.
Suivez les instructions suivantes pour monter le socle, l’unité de rouleau et le réceptacle de sortie de l’imprimante.
Des procédures différentes peuvent s’appliquer à votre modèle d’imprimante en particulier. Les procédures ayant un identicateur de modèle ne sont nécessaires que pour
ces modèles.
Veillez à lire ce manuel avant usage. Conservez ce manuel pour vous y reporter ultérieurement si nécessaire.
•
•
•
•
•
请阅读本步骤说明书进行打印机支架、辊单元、出纸堆叠器的组装。
根据购买的机型,步骤有所不同。带有机型标记的步骤是只限该机型需要的步骤。
在使用前请务必阅读。
请妥善保管以便将来可以随时使用。
•
Follow these instructions to assemble the printer stand, roll unit, and output stacker.
Some procedures may be different for your particular printer model. Procedures which have a model marker are required for those models only.
Be sure to read this manual before use.
Keep the manual where you can refer to it later as needed.
•
プリンタスタンド、ロールユニット、バスケットの組み立ては本手順書をお読みください。
ご購入の機種によって手順が異なる場合があります。機種のマークがついている手順は、その機種のみに必要な手順です。
ご使用前に必ず本書をお読みください。
将来いつでも使用できるように大切に保管してください。
•
Siga essas instruções para montar o suporte da impressora, a unidade de rolo e o empilhador de saída.
Alguns procedimentos podem variar de acordo com o modelo da impressora. Os procedimentos que incluem um marcador de modelo destinam-se somente a esses modelos
especícos.
Não deixe de ler o manual antes de usar o equipamento. Mantenha o manual em um local de fácil acesso para que você possa consultá-lo conforme a necessidade.
•
Guia de conguração de suporte da impressora
iPF830
iPF840
iPF850
iPF831
iPF841
iPF851
1
共同包装部件一览...........................................2
组装支架 .........................................................4
安装辊单元......................................................8
安装出纸堆叠器 ............................................10
Contenuto della confezione ................................... 2
Assemblaggio del Supporto................................... 4
Installazione dell’unità rotolo ................................. 8
Fissaggio dell’Impilàtrice di uscita ....................... 10
동봉품 일람 ..................................................2
스탠드 조립 ..................................................4
롤 유닛 설치 .................................................8
바스켓 설치 ................................................ 10
同梱品一覧............................................................. 2
スタンドを組み立てる........................................... 4
ロールユニットを取り付ける................................ 8
バスケットを取り付ける..................................... 10
Paketinhalt ............................................................. 2
Aufbau des Gestells .............................................. 4
Installieren der Rolleneinheit ................................. 8
Befestigen des Ausgabestaplers ......................... 10
Содержимое упаковки ......................................... 2
Соберите подставку ............................................. 4
Установка блока рулона ...................................... 8
Прикрепите приемник бумаги ........................... 10
Package Contents ................................................. 2
Assemble the Stand .............................................. 4
Install the Roll Unit................................................. 8
Attach the Output Stacker ................................... 10
Contenido de la caja .............................................. 2
Montar el Soporte .................................................. 4
Instalar la Unidad del rollo ..................................... 8
Sujetar el Apilador de salida ................................ 10
Conteúdos da embalagem .................................... 2
Montar o suporte ................................................... 4
Instale a unidade de rolo ....................................... 8
Instalar o empilhador de saída ............................ 10
Contenu du colis .................................................... 2
Assembler le Stand/socle ...................................... 4
Installation de l’unité de rouleau ............................ 8
Attacher le Bac de sortie ..................................... 10
目次
Contents
Contenuti
Sommaire
Inhalt
目录
Contenido
목차
Содержание
Conteúdo
2
A.
B.
C.
同梱品一覧
Package Contents
Contenuto della confezione
Contenu du colis
Paketinhalt
共同包装部件一览
スパナ
六角レンチ
스패너
Wrench
Llave
Schraubenschlüssel
Chiave di manovra
Clef
Гаечный ключ
6 각 렌치
Allen Wrench
Llave Allen
Inbus-Schlüssel
Chiave a brugola
Clef Allen
Универсальный гаечный ключ
D.
スタンド下ステー
스탠드 하단 스테이
Bottom Stand Stay
Pie inferior del soporte
Untere Gestellstütze
Tirante inferiore del Supporto
Support inférieur du socle
Нижний держатель подставки
E.
レッグカバー(× 2)
레그 커버 (x2)
Leg Covers (2)
Cubiertas de las patas (2)
Beinabdeckungen (2)
Protezioni per le gambe (2)
Caches pieds (2)
Крышки ножек (2)
F.
スタンド上ステー
스탠드 상단 스테이
Top Stand Stay
Pie superior del soporte
Obere Gestellstütze
Tirante superiore del supporto
Support supérieur du socle
Верхний держатель подставки
M.
N.
G.
H.
スタンドレッグ L
스탠드 다리 L
Stand Leg L
Pata del suporte L
Gestellbein-L
Braccio del raccoglitore L
Pied L du socle
Ножка подставки L
スタンドレッグ R
스탠드 다리 R
Stand Leg R
Pata del suporte R
Gestellbein-R
Braccio del raccoglitore R
Pied R du socle
Ножка подставки R
J.
リアホルダー(× 2)
리어 홀더 (x2)
Rear Holder (2)
Soporte posterior (2)
Hintere Stütze (2)
Supporto posteriore (2)
Support arrière (2)
Задний держатель (2)
K.
L.
I.
M8 六角ボルト(× 8)
M8 6 각 볼트 (x8)
M8 Hex Bolts (8)
Pernos hexagonales M8 (8)
M8-Sechskantstifte (8)
Dadi esagonali M8 (8)
Boulons hexagonaux M8 (8)
Шестигранные болты M8 (8)
プリンタスタンド
Printer Stand
DruckergestellSocle de l’mprimante
Soporte de la impresoraSupporto della stampante
프린터 스탠드
打印机支架 Подставка для принтера
Contenido de la caja
동봉품 일람
Содержимое упаковки
Conteúdos da embalagem
Suporte da impressora
M4 六角ビス (: ×20、: ×18 )
M4 6 각 나사 ( : × 20、 : × 18)
M4 Hex Screws ( : 20; : 18)
Tornillos hexagonales M4 ( : 20; : 18)
M4-Sechskantschrauben ( : 20; : 18)
Viti esagonali M4 ( : 20; : 18)
Vis hexagonales M4 ( : 20; : 18)
Шестигранные винты M4 ( : 20; : 18)
Parafusos hexagonais M4 ( : 20; : 18)
Chave inglesa
Chave Allen
Apoio do suporte inferior
Tampas da perna (2)
Apoio do suporte superior
Perna do suporte L
Perna do suporte R
Suporte traseiro (2)
バスケットアーム R
바스켓 암 R
Basket Arm R
Brazo del cesto R
Korbarm-R
Braccio del raccoglitore R
Bras de panier R
Ручка лотка R
バスケット布
바스켓 천
Basket Cloth
Tela del cesto
Korbtuch
Tessuto del raccoglitore
Tissu du panier
Полотно лотка
バスケットロッド
바스켓 롯드
Basket Rod
Varilla del cesto
Korbstange
Asta del raccoglitore
Tige du panier
Стержень лотка
バスケットアーム L
바스켓 암 L
Basket Arm L
Brazo del cesto L
Korbarm-L
Braccio del raccoglitore L
Bras de panier L
Ручка лотка L
Braço da cesta R
Tecido da cesta
Haste da cesta
Braço da cesta L
Parafusos hexagonais M8 (8)
AI
C
J
E
BDFGH
K
L
N
M
iPF830 iPF831
iPF840 iPF841 iPF850 iPF851
3
「A」、「B」は同梱品が入っている箱に印字されている記号です。
The boxes containing these parts are labeled A and B.
*
「A」, 「B」는 구성품이 들어 있는 박스에 표시한 기호입니다 .
*
“A”、“B”是印在放入共同包装部件的包装箱上的记号。
*
*
Les boîtes contenant ces pièces sont étiquetées A et B.
*
Le confezioni contenenti questi componenti sono etichettate A e B.
*
Die Schachteln, die diese Teile enthalten, sind mit A und B gekennzeichnet.
*
Las cajas que contienen estas piezas están etiquetadas con las letras A y B.
*
Коробки, в которых находятся эти детали, обозначены буквами A и B.
*
ロールユニット
Roll Unit
RolleneinheitUnité de rouleau
Unidad del rolloUnità rotolo
롤 유닛
辊单元 Блок рулона
Es sind ggf. weitere Dokumentation in der Packung enthalten.
この他にも、各種ご案内が同梱されている場合があります。
Other documentation may also be included in the package.
L’autre documentation pourra aussi être inclue dans le paquet.
È possibile che la confezione includa altre guide.
•
•
•
•
•
El paquete puede también contener otras guías.
•
有时还同时包装了其他各种介绍。
이 외에도 각종 안내서가 동봉되어 있는 경우가 있습니다 .
•
•
В упаковке может быть в наличии и другая документация.
•
M4 6 각 볼트 (x2)
M4 Hex Bolts (2)
Pernos hexagonales M4 (2)
M4-Sechskantstifte (2)
Dadi esagonali M4 (2)
Boulons hexagonaux M4 (2)
Шестигранные болты М4 (2)
M4 6 각 나사 (x8)
M4 Hex Screws (8)
Tornillos hexagonales M4 (8)
M4-Sechskantschrauben (8)
Viti esagonali M4 (8)
Vis hexagonales M4 (8)
Шестигранные винты М4 (8)
O.
P.
レールユニット L
레일 유닛 L
Support Rail L
Raíl del soporte L
Stützschiene-L
Guida del supporto L
Rail de support L
Опорная направляющая L
レールユニット R
레일 유닛 R
Support Rail R
Raíl del soporte R
Stützschiene-R
Guida del supporto R
Rail de support R
Опорная направляющая R
M4 六角ボルト(× 2)
ロールユニット
롤 유닛
Roll Unit
Unidad del rollo
Rolleneinheit
Unità rotolo
Unité de rouleau
Блок рулона
Q.
R.
3インチ紙管アタッチメント 1
3 인치 용지 장착 보조구 1
3-Inch Paper Core Attachment #1
Sujeción de tubo de papel de tres pulgadas 1
Aufhängung #1 für die 3-Zoll-Papierspule
Accessorio 1, attacco per rotolo da 3"
Fixation du tube à papier de 3 pouces n°1
Стержневая насадка для 3-дюймовой бумаги №1
M4 六角ビス(× 8)
U.
롤 유닛 연결 케이블
Roll Unit Cable
Cable de la unidad de rollo
Rolleneinheitkabel
Cavo dell’unità rotolo
Câble de l’unité de rouleau
Кабель блока рулона
S.
T.
ロールユニット接続ケーブル
3インチ紙管アタッチメント 2
3 인치 용지 장착 보조구 2
3-Inch Paper Core Attachment #2
Sujeción de tubo de papel de tres pulgadas 2
Aufhängung #2 für die 3-Zoll-Papierspule
Accessorio 2, attacco per rotolo da 3"
Fixation du tube à papier de 3 pouces n°2
Стержневая насадка для 3-дюймовой бумаги №2
V.
Unidade de rolo
As caixas que contêm essas peças estão rotuladas "A" e "B".
*
Trilho de suporte L
Trilho de suporte R
Unidade de rolo
Anexo do núcleo de papel de 3 polegadas #1
Anexo do núcleo de papel de 3 polegadas #2
Cabo da unidade de rolo
Parafusos hexagonais M4 (2)
Parafusos hexagonais M4 (8)
A embalagem pode também conter outras documentações.
•
A* B*
U
Q
OV
PT
RS
iPF840
iPF841
iPF850
iPF851
4
[スタンドレッグ L]と[スタンドレッグ R]を裏側の刻印が読める向きに置き、[ス
タンド下ステー]の左側を[スタンドレッグ L]の側面の穴(a)に、[スタンド下
ステー]の右側を[スタンドレッグ R]の側面の穴(b)に差し込みます。
将[支架支脚 L]和[支架支脚 R]朝可以看到里侧的刻印的方向放置,将 [支
架下撑条 ]的左侧插入 [支架支脚 L]侧面的孔 (a),将 [支架下撑条 ]的右侧
插入 [支架支脚 R]侧面的孔 (b)。
•
•
•[ 스탠드 레그 L] 과 [ 스탠드 레그 R] 의 뒤쪽에 표시된 글자가 정면을 향하도록 놓
고 , [ 스탠드 하단 스테이 ] 왼쪽을 [ 스탠드 레그 L] 의 측면 구멍 (a) 에 , [ 스탠드
하단 스테이 ] 오른쪽을 [ 스탠드 레그 R] 의 측면 구멍 (b) 에 끼워 넣습니다 .
•Position the Stand Leg L and Stand Leg R so that the markings on the bottom are
right-side up and can be read. Insert the left side of the Bottom Stand Stay into the
side slot (a) of the Stand Leg L, and insert the right side of the Bottom Stand Stay
into the side slot (b) of the Stand Leg R.
Установите ножку подставки L и ножку подставки R таким образом, чтобы
метки на их нижней части были повернуты правильно и их можно было
прочесть. Левую сторону нижнего держателя подставки вставьте в боковое
отверстие (a) ножки подставки L, а правую сторону нижнего держателя
подставки вставьте в боковое отверстие (b) ножки подставки R.
•
スタンドを組み立てる
Assembler le Stand/socle
Assemblaggio del Supporto
•
•
•
•
Coloque la Pata del soporte L y la Pata del soporte R, de modo que las marcas de la
parte inferior estén hacia la derecha y se puedan leer. Inserte el lado izquierdo del Pie
inferior del soporte en la ranura lateral (a) de la Pata del soporte L e introduzca el lateral
derecho del Pie inferior del soporte en la ranura lateral (b) de la Pata del soporte R.
Positionieren Sie das Gestellbein-L und das Gestellbein-R so, dass die Markierungen
unten mit der rechten Seite nach oben zeigen und lesbar sind. Führen Sie die linke Seite
der Untere Gestellstütze in die Seitenführung (a) des Gestellbein-L und die rechte Seite
der Untere Gestellstütze in die Seitenführung (b) des Gestellbein-R.
Posizionare la Gamba del supporto L e la Gamba del supporto R in modo che i
contrassegni nella parte inferiore siano rivolti verso l’alto e siano leggibili. Inserire il lato
sinistro del Tirante inferiore del Supporto nella fessura laterale (a) della Gamba del
supporto L, quindi inserire il lato destro del Tirante inferiore del Supporto nella fessura
laterale (b) della Gamba del supporto R.
Placez la Jambe L du socle et la Jambe R du socle de façon à ce que les marques de la
partie inférieure soient lisibles et orientées vers le haut. Insérez le côté gauche du Support
inférieur du socle dans la fente latérale (a) de la Jambe L du socle, et insérez le côté
droit du Support inférieur du socle dans la fente latérale (b) de la Jambe R du socle.
Assemble the Stand Montar el Soporte
Aufbau des Gestells
스탠드 조립
组装支架
Соберите подставку
Сборка подставки требует участия двух или более человек, работающих на ровном полу. Сборка подставки в одиночку может привести к травме
или случайному изгибу подставки.
•
Внимание
•
주의 [ 스탠드 ] 를 조립할 때는 반드시 2 명 이상이 평평한 장소에 놓고 조립하십시오 . 혼자서 작업할 경우 다치거나 [ 스탠드 ] 가 변형될 우려가 있습니다 .
•AtenciónPara el montaje del Soporte se necesitan dos o más personas trabajando sobre un suelo plano. El montaje del Soporte por una sola persona puede
provocar lesiones o el doblado accidental del soporte.
•Vorsicht Der Aufbau des Gestells erfordert zwei oder mehr Personen, die auf einem achen Boden arbeiten. Wenn das Gestell von einer Person allein aufgebaut
wird, kann Verletzungsgefahr bestehen oder das Aufstellen zu einer versehentlichen Biegung des Gestells führen.
•Attenzione Per l’assemblaggio del Supporto è richiesto l’intervento di almeno due persone che operano su un pavimento in piano. L’assemblaggio del Supporto
eseguito da una sola persona può causare lesioni o il piegamento accidentale del Supporto.
•Attention Deux personnes ou plus sont nécessaires à l’assemblage du Stand/socle. Opérez sur un sol plat. Assembler le Stand/socle tout seul présente un risque
de blessure ou de torsion accidentelle du socle.
•Caution Stand assembly requires two or more people working on a at oor. Assembling the Stand alone may cause injury or accidental bending of the Stand.
•
注意 请务必由 2个人以上在平坦的场所组装 [支架 ]。单人作业的话会成为受伤的原因、[支架 ]歪斜的原因。
[スタンド]は、必ず 2人以上で、平らな場所を利用して組み立ててください。1人で作業すると、けがの原因になったり、[スタンド]の歪みの原因になります。注意 •
•
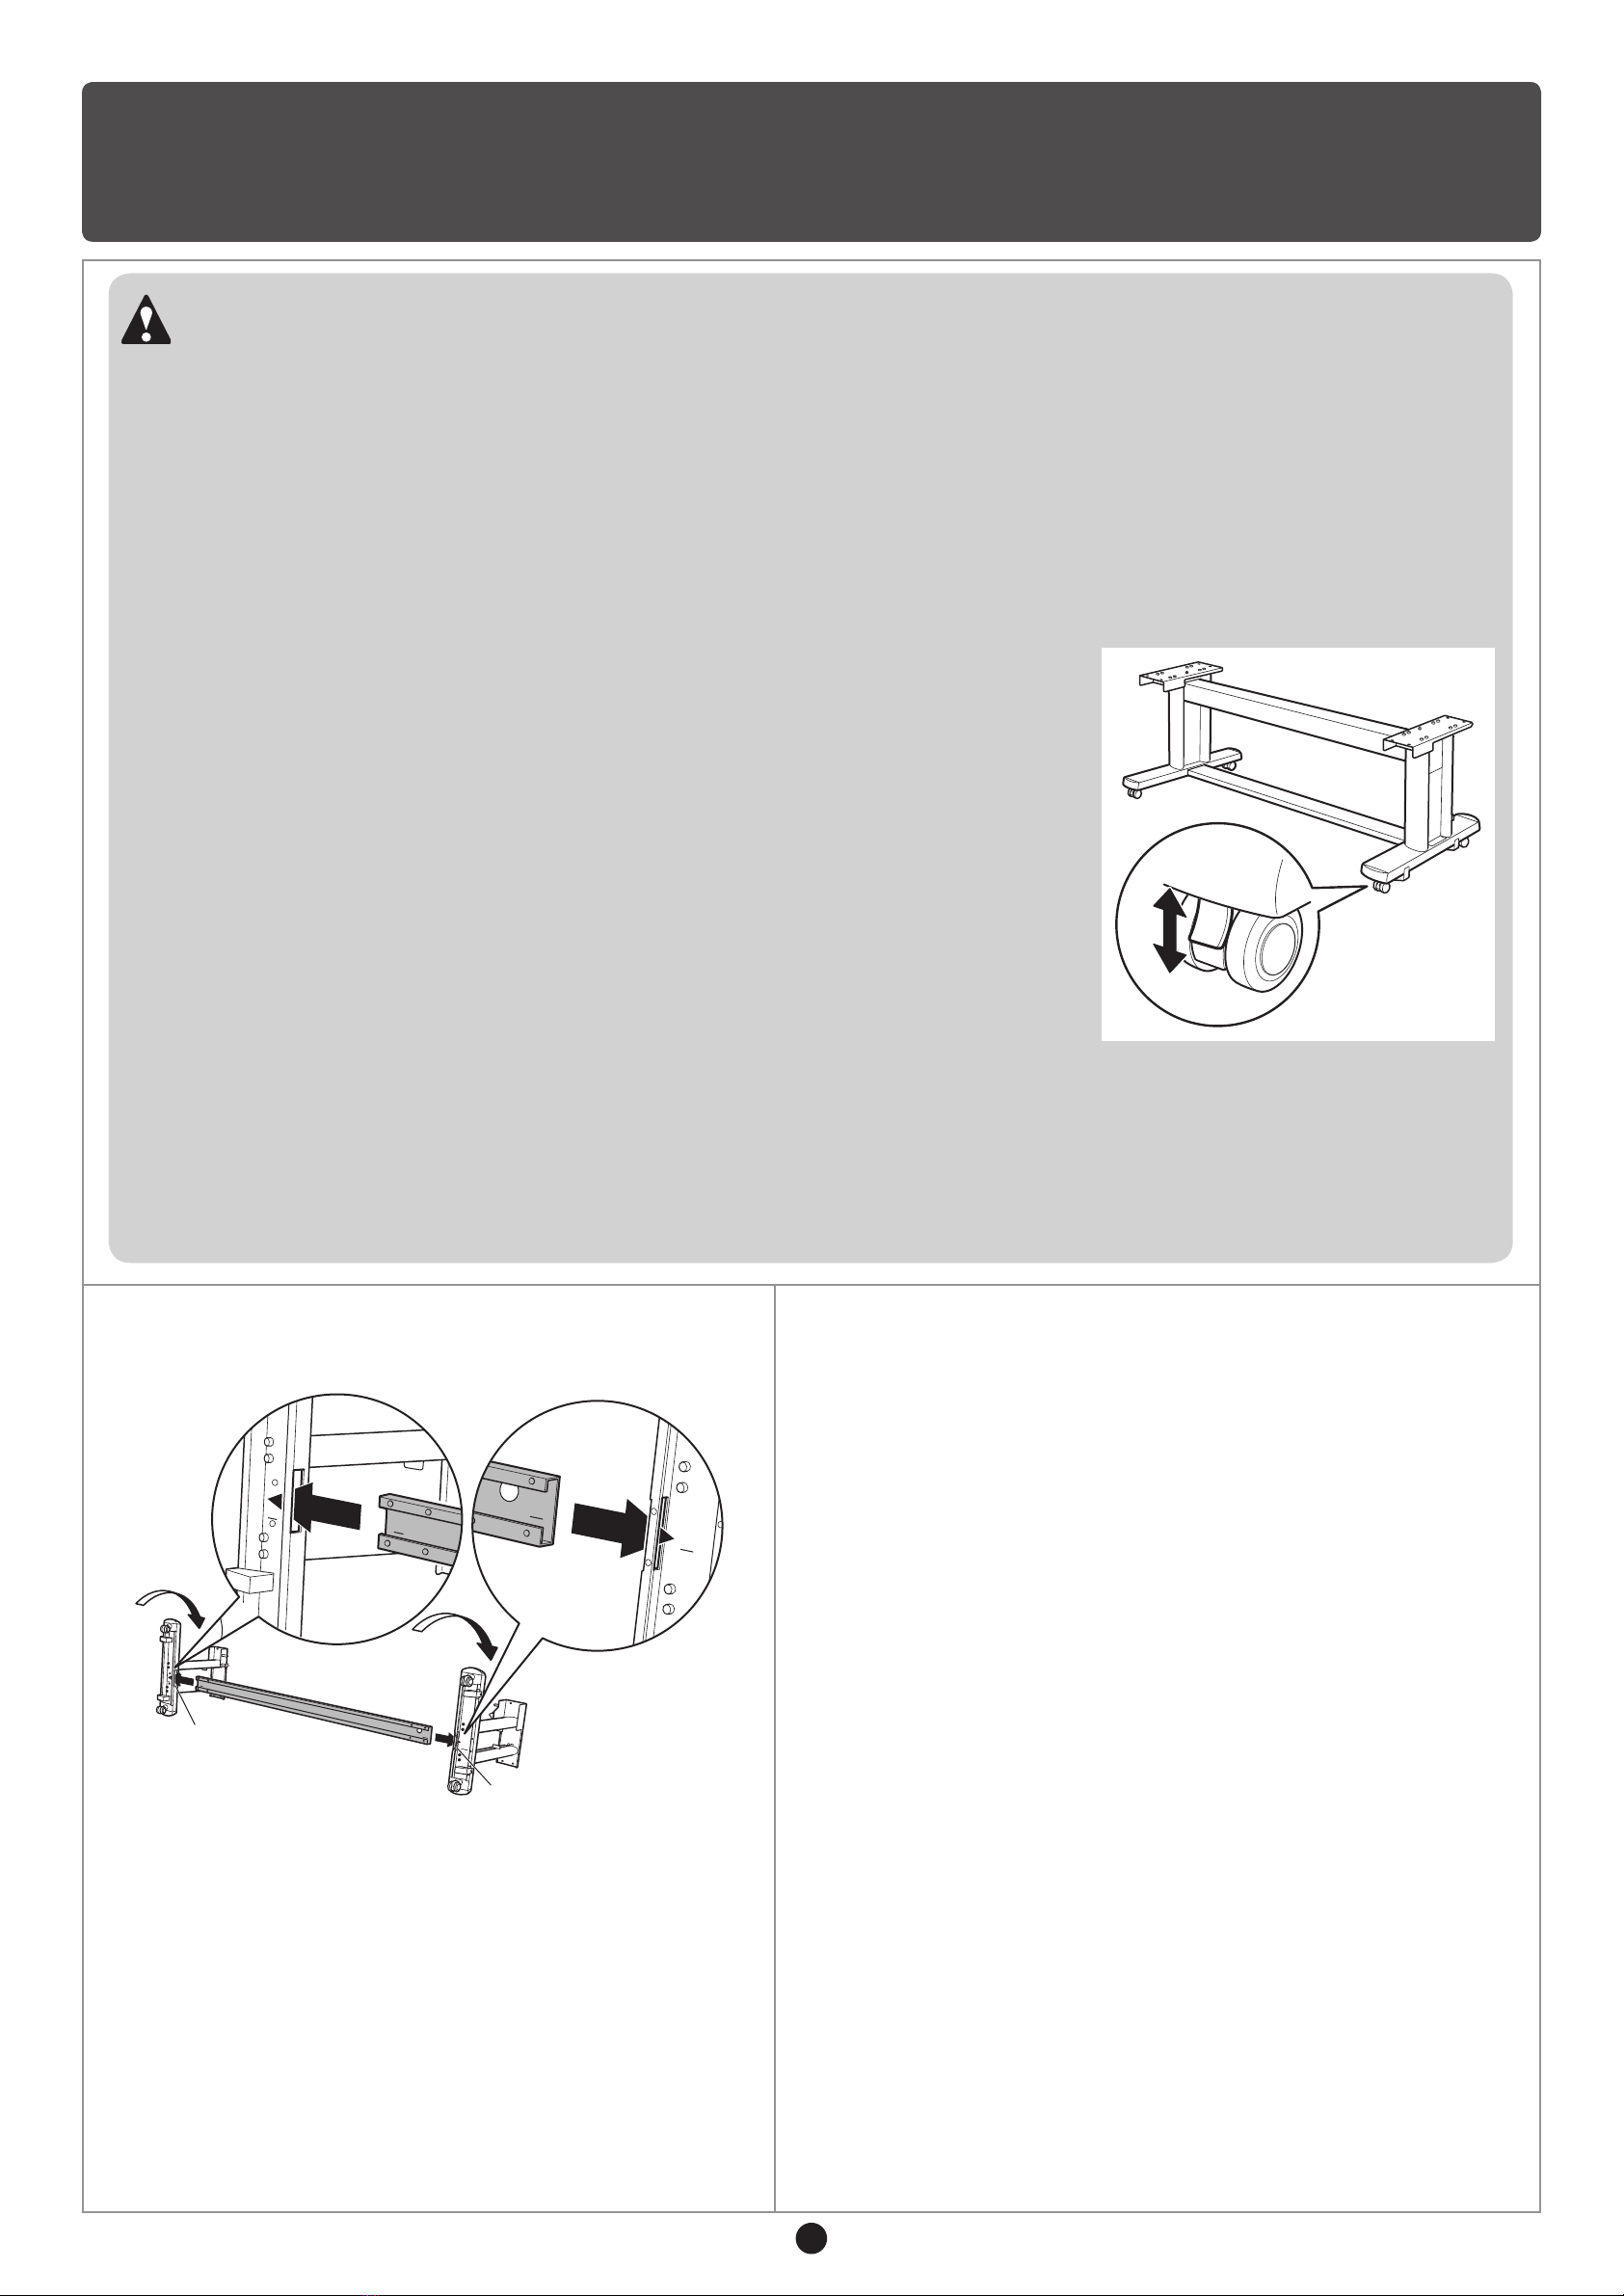
Внимание Ролики подставки находятся в защелкнутом состоянии на момент поставки с завода. Не отпускайте защелку до тех пор, пока подставка не
будет полностью собрана. Отпустите защелку перед тем, как переместить подставку. Перемещение подставки при защелкнутых роликах может
поцарапать пол или привести к травме.
•AtenciónLas ruedas giratorias del Soporte están bloqueadas al salir de fábrica. No libere el bloqueo hasta que
el Soporte se haya montado completamente. Además, libere el bloqueo antes de mover el Soporte. Si
mueve el Soporte mientras están bloqueadas las ruedas puede rayar el suelo o hacerse daño.
•
注意 出厂时 [支架 ]的脚轮处于锁定状态。[支架 ]组装完毕前请不要解除锁定。并且,在
移动组装好的 [支架 ]时,请务必解除锁定。否则会成为损伤设置场所、人员受伤的原因。
•Vorsicht Die Gestell-Rollen sind zum Zeitpunkt der Lieferung ab Werk gesperrt. Lösen Sie die Sperre nicht, bis
das Gestell vollständig aufgebaut wurde. Lösen Sie die Sperre zudem, bevor Sie das Gestell bewegen.
Wenn das Gestell bei gesperrten Rollen transportiert wird, können diese den Boden zerkratzen oder
Verletzungen herbeiführen.
•Attenzione
Le rotelle del Supporto sono bloccate in fabbrica. Non sbloccarle prima di aver completamente
assemblato il Supporto. Inoltre, rilasciare il blocco prima di spostare il Supporto. Se si sposta il
Supporto mentre le rotelle sono bloccate, il pavimento potrebbe grafarsi o potrebbero vericarsi lesioni.
•Attention Les roulettes du Stand/socle sont bloquées au moment de l’expédition depuis l’usine. Ne débloquez
pas le verrouillage des roulettes avant que le socle soit complètement assemblé. Cependant, assurez-
vous de débloquer les roulettes avant de déplacer le Stand/socle. Déplacer le socle avec les roulettes
bloquées risque d’endommager le revêtement du sol et peut provoquer des blessures physiques.
[スタンド]のキャスターは、工場出荷時にロックされています。[スタンド]の組み立てが終わるまでは、
ロックを解除しないでください。また、組み立てた[スタンド]を移動するときは、必ずロックを解
除してください。設置場所に傷が付いたり、けがの原因になります。
注意 •
•
주의 [ 스탠드 ] 의 캐스터는 잠긴 상태로 공장에서 출하됩니다 . [ 스탠드 ] 의 조립이 끝날 때까지는 잠금 상태를 해제하지 마십시오 . 또한 조립한 [ 스탠드 ] 를
이동시킬 때는 반드시 잠금을 해제하십시오 . 그렇지 않으면 설치 장소가 손상되거나 다칠 수 있습니다 .
•Caution Stand casters are locked at the time of factory shipment. Do not release the lock until the Stand has
been fully assembled. In addition, release the lock before moving the Stand. Moving the Stand while
the casters are locked may scratch the oor or cause injury.
Montar o suporte
•Cuidado A montagem do suporte exige que duas ou mais pessoas trabalhem em uma superfície plana. Montar o Suporte sem ajuda pode causar ferimentos ou a
exão acidental Suporte.
•Cuidado Os rodízios do suporte são enviados de fábrica travados. Não libere a trava até que o Suporte esteja totalmente montado. Além disso, libere a trava antes
de mover o Suporte. Mover o Suporte com os rodízios travados pode arranhar o chão ou causar ferimentos.
•Posicione a Perna do suporte L e a Perna do suporte R para que as marcas
localizadas na parte inferior estejam com o lado certo voltado para cima e possam
ser lidas. Insira o lado esquerdo do Apoio do suporte inferior no slot lateral (a) da
Perna do suporte L e o lado direito do Apoio do suporte inferior no slot lateral (b)
da Perna do suporte R.
1
b
a
L
L
L
L
R
R
R
R
ON
OFF
5
[スタンド下ステー]を[スタンドレッグ L]と[スタンドレッグ R]に、[六角レ
ンチ]を使用して、各 4本の M4六角ビスでしっかりと固定します。
•
使用 [内六角扳手 ],各用 4只M4六角螺丝,将 [支架下撑条 ]牢固地固定在 [支
架支脚 L]和[支架支脚 R]上。
•
•Secure the Bottom Stand Stay to the Stand Leg L and Stand Leg R using four
M4 hex screws on each side by the Allen Wrench.
•[ 스탠드 하단 스테이 ] 를 [ 스탠드 레그 L] 과 [ 스탠드 레그 R] 에 [6 각 렌치 ] 를
사용하여 각각 4 개의 M4 6 각 나사로 단단히 고정합니다 .
При помощи четырех шестигранных винтов M4 с каждой стороны прикрепите
ножку подставки L и ножку подставки R к нижнему держателю подставки,
используя универсальный гаечный ключ.
•
•
Fixez le Support inférieur du socle à la Jambe L du socle et à la Jambe R du
socle en serrant quatre vis hexagonales M4 sur chaque côté à l’aide de la Clef Allen.
•
Fissare il Tirante inferiore del Supporto alla Gamba del supporto L e alla Gamba del
supporto R utilizzando quattro viti esagonali M4 su ciascun lato strette con la Chiave a brugola.
•
Sichern Sie die Untere Gestellstütze an dem Gestellbein-L und an dem Gestellbein-R,
indem Sie einen Inbus-schlüssel mit vier M4-Sechskantschrauben auf jeder Seite verwenden.
•Fije el Pie inferior del soporte a la Pata del soporte L y la Pata del soporte R
utilizando la Llave Allen y cuatro tornillos hexagonales M4 a cada lado.
[スタンド上ステー]の左側を[スタンドレッグ L]の側面の穴(a)に差し込み、[ス
タンド上ステー]の右側を[スタンドレッグ R]の側面の穴(b)に突き当たるま
で差し込みます。
•
将[支架上撑条 ]的左侧插入 [支架支脚 L]侧面的孔 (a),将 [支架上撑条 ]的
右侧插入 [支架支脚 R]侧面的孔 (b),插到底。
•
•Insert the left end of the Top Stand Stay into the side hole (a) on the Stand Leg L,
and insert the right end of the Top Stand Stay into the side hole (b) on the Stand
Leg R, pushing the stay in completely.
•[ 스탠드 상단 스테이 ] 왼쪽을 [ 스탠드 레그 L] 의 측면 구멍 (a) 에 끼워 넣고 , [ 스
탠드상단 스테이 ] 오른쪽을 [ 스탠드 레그 R] 의 측면 구멍 (b) 에 닿을 때까지 끼
워 넣습니다 .
Левый конец верхнего держателя подставки вставьте до конца в боковое
отверстие (a) на ножке подставки L, а правый конец верхнего держателя
подставки вставьте до конца в боковое отверстие (b) на ножке подставки R.
•
•Insérez l’extrémité gauche du Support supérieur du socle dans l’orice latéral
(a) de la Jambe L du socle, et insérez l’extrémité droite du Support supérieur du
socle dans l’orice latéral (b) de la Jambe R du socle. Enfoncez complètement le
support.
•Inserire l’estremità sinistra del Tirante superiore del Supporto nel foro laterale
(a) della Gamba del supporto L, quindi inserire l’estremità destra del Tirante
superiore del Supporto nel foro laterale (b) della Gamba del supporto R,
spingendo il tirante no in fondo.
•Führen Sie das linke Ende der Obere Gestellstütze in die Seitenbohrung (a) des
Gestellbein-L und das rechte Ende der Obere Gestellstütze in die Seitenbohrung
(b) des Gestellbein-R, und drücken Sie das Gestell vollständig hinein.
•Inserte el extremo izquierdo del Pie superior del soporte en el oricio lateral (a)
de la Pata del soporte L e introduzca el extremo derecho del Pie superior del
soporte en el oricio lateral (b) de la Pata del soporte R, empujando el pie hacia
dentro completamente.
2人で[スタンド]を左右から持ち、左右同時に[スタンド]を起こします。
•
2人抓着 [支架 ]的左右侧,同时立起 [支架 ]。
•
•Hold one end of the Stand while a partner holds the other end. At the same time,
rotate both ends to stand the Stand upright.
•2 명이 [ 스탠드 ] 의 양쪽을 잡고 동시에 [ 스탠드 ] 를 세웁니다 .
Удерживайте один конец подставки, в то время как ваш помощник удерживает
ее другой конец. Одновременно переверните оба конца, чтобы поставить
подставку в вертикальное положение.
•
•Soutenez une extrémité du Stand/socle pendant que l’un de vos partenaires
soutient l’autre extrémité. Simultanément, faites pivoter le Stand/socle des deux
côtés pour le mettre debout.
•Reggere un’estremità del Supporto mentre un’altra persona regge l’altra estremità.
Contemporaneamente ruotare entrambe le estremità del Supporto per metterlo in
posizione verticale.
•Halten Sie ein Ende des Gestells, während Ihr Partner das andere Ende hält.
Drehen Sie gleichzeitig beide Enden des Gestells, um dieses aufrecht hinzustellen.
•Sujete un extremo del Soporte mientras un compañero sujeta el otro extremo. Al
mismo tiempo, gire ambos extremos del Soporte para ponerlo de pie.
[スタンド上ステー]は、L側から差し込んでください。R側には一定の位置までしか差し込むことができません。
メモ
Remarque
NOTE
메모
NOTA
Hinweis
NOTA
Insert the left end of the Top Stand Stay rst. The right end can only be pushed in to a restricted position.
[ 스탠드 상단 스테이 ] 는 왼쪽 (L) 에서부터 끼우십시오 . 오른쪽 (R) 에서는 일정한 위치까지만 끼울 수 있게 되어 있어 왼쪽을 끼워 넣을 여유가 확보되지 않습니다 .
•
备注 请从 L侧插入 [支架上撑条 ]。R侧只能插入到一定位置。
•
•
Insérez d’abord l’extrémité gauche du Support supérieur du socle. L’extrémité droite ne peut être enfoncée que dans une position restreinte.
•
Inserire per prima l’estremità sinistra del Tirante superiore del Supporto. L’estremità destra può essere spinta solo in una posizione limitata.
•
Führen Sie zuerst das linke Ende der Obere Gestellstütze ein. Das rechte Ende kann nur bis zu einer eingeschränkten Position eingedrückt werden.
•
Inserte el extremo izquierdo del Pie superior del soporte en primer lugar. El extremo derecho sólo puede empujarse en una posición restringida.
•
•
Левый конец верхнего держателя подставки вставляйте в первую очередь. Правый конец может быть установлен лишь в строго определенное
положение.
•
ПРИМЕЧАНИЕ
•Prenda o Apoio do suporte inferior à Perna do suporte L e à Perna do suporte
R usando quatro parafusos hexagonais M4 em cada lado com a Chave Allen.
•Segure uma extremidade do Suporte enquanto um parceiro segura a outra.
Simultaneamente, gire ambas as extremidades até que o Suporte que na posição
vertical.
•Insira a extremidade esquerda do Apoio do suporte superior no orifício lateral
(a) da Perna do suporte L e a extremidade direita do Apoio do suporte superior
no orifício lateral (b) da Perna do suporte R, pressionando o apoio totalmente até
encaixá-lo.
Nota Insira a extremidade esquerda do Apoio do suporte superior primeiro. A extremidade direita só pode ser encaixada em uma posição limitada.
•
2
3
4
a
b
6
[スタンド上ステー]を[スタンドレッグ L]と[スタンドレッグ R]に、[スパ
ナ]を使用して、各 4本の M8六角ボルト(a)でしっかりと固定します。
•
使用 [扳手 ],各用 4 只M8 六角螺栓 (a),将 [支架上撑条 ] 牢固地固定在 [支
架支脚 L] 和[支架支脚 R] 上。
•
•Secure the Top Stand Stay to the Stand Leg L and Stand Leg R using the
four M8 hex bolts (a) on each side by the Wrench.
•[ 스탠드 상단 스테이 ] 를 [ 스탠드 레그 L] 과 [ 스탠드 레그 R] 에 [ 스패너 ] 를 사
용하여 각각 4 개의 M8 6 각 볼트 (a) 로 단단히 고정합니다 .
При помощи четырех шестигранных болтов M8 (a) с каждой стороны
прикрепите ножку подставки L и ножку подставки R к верхнему держателю
подставки, используя гаечный ключ.
•
•Fixez le Support supérieur du socle à la Jambe L du socle et à la Jambe R du
socle en serrant quatre boulons hexagonaux M8 (a) sur chaque côté à l’aide de la
Clef.
•Fissare il Tirante superiore del Supporto alla Gamba del supporto L e alla
Gamba del supporto R utilizzando quattro bulloni esagonali M8 (a) su ciascun lato
stretti con la Chiave a manovra.
•Sichern Sie die Obere Gestellstütze an dem Gestellbein-L und an
dem Gestellbein-R, indem Sie den Schraubenschlüssel mit vier M8-
Sechskantschraubenbolzen (a) auf jeder Seite verwenden.
•Fije el Pie superior del soporte a la Pata del soporte L y la Pata del soporte R
utilizando la Llave y cuatro pernos hexagonales M8 (a) a cada lado.
[レールユニット L]と[レールユニット R]をそれぞれ [スタンドレッグ L]と[ス
タンドレッグ R]に取り付けます。
レールユニットの突起部分(a)を [スタンドレッグ ]の溝(b)に差し込みます。
•
将[导轨单元 L]和[导轨单元 R]分别安装在 [支架支脚 L]和[支架支脚 R]上。
将导轨单元的突起部分(a)插入 [支架支脚 ]的槽 (b)。
•
•Attach the Support Rail L to the Stand Leg L and the Support Rail R to the Stand
Leg R. Insert the protrusions (a) of the support rails into the grooves (b) of the
Stand Legs.
•[ 레일 유닛 L] 과 [ 레일 유닛 R] 을 각각 [ 스탠드 다리 L] 과 [ 스탠드 다리 R] 에
설치합니다 .
레일 유닛의 돌출 부분 (a) 을 [ 스탠드 다리 ] 의 홈 (b) 에 끼워 넣습니다 .
Прикрепите опорную направляющую L к ножке подставки L, а опорную
направляющую R к ножке подставки R. Вставьте выступы (a) опорных
направляющих в пазы (b) ножек подставки.
•
•Fixez le rail de support L sur le pied L du socle et le rail de support R sur le
pied R du socle.
Insérez les protubérances (a) des rails de support dans les guides (b) des pieds du
socle.
•Posizionare la Guida del supporto L alla Gamba del supporto L e la Guida del
supporto R alla Gamba del supporto R. Inserire le sporgenze (a) delle guide nelle
scanalature (b) delle Gambe del supporto.
•Befestigen Sie die Stützschiene-L an dem Gestellbein-L und die Stützschiene-R
an dem Gestellbein-R.
Führen Sie die vorstehenden Teile (a) der Stützschienen in die Nuten (b) der
Gestellbeine ein.
•Coloque el Raíl del soporte L en la Pata del soporte L y el Raíl del soporte R
en la Pata del soporte R. Inserte los salientes (a) de los raíles del soporte en las
ranuras (b) de las Patas del soporte.
[レールユニット L]と[レールユニット R]をそれぞれ [スタンド下ステー ]に、各
2本の M4六角ビス(a)でしっかりと固定します。
•
各使用 2只M4六角螺丝 (a),将 [导轨单元 L]和[导轨单元 R]分别牢固地
固定在 [支架下撑条 ]上。
•
•Afx the Support Rail L and Support Rail R to the Bottom Stand Stay by
tightening two M4 hex screws (a) on either side.
•[ 레일 유닛 L] 과 [ 레일 유닛 R] 을 각각 [ 스탠드 하단 스테이 ] 에 각각 2 개의
M4 6 각 나사 (a) 로 단단히 고정합니다 .
Прикрепите опорную направляющую L и опорную направляющую R к
нижнему держателю подставки, затянув два шестигранных винта M4 (a) с
обеих сторон.
•
•Fixez les rails de support L et les rails de support R sur le support inférieur du
socle en serrant deux vis hexagonales M4 (a) de chaque côté.
•Fissare la Guida del supporto L e la Guida del supporto R al Tirante inferiore
del supporto serrando due viti esagonali M4 (a) su entrambi i lati.
•Befestigen Sie die Stützschiene-L und die Stützschiene-R an der Unteren
Gestellstütze, indem Sie zwei M4-sechskantschrauben (a) auf beiden Seiten
festziehen.
•Fije el Raíl del soporte L y el Raíl del soporte R al Pie inferior del soporte
apretando dos tornillos hexagonales M4 (a) a ambos lados.
•Prenda o Apoio do suporte superior à Perna do suporte L e à Perna do
suporte R usando os quatro parafusos hexagonais M8 (a) em cada lado com a
Chave.
•Conecte o Trilho de suporte L à Perna do suporte L e o Trilho de suporte R
à Perna do suporte R. Insira as partes salientes (a) dos trilhos de suporte nos
sulcos (b) das Pernas do suporte.
•Prenda o Trilho de suporte L e o Trilho de suporte R ao Apoio do suporte
inferior apertando os dois parafusos hexagonais M4 (a) nas laterais.
5
aa
6
7
bab
a
aa
iPF840
iPF841
iPF850
iPF851
iPF840
iPF841
iPF850
iPF851
7
[レールユニット L]と[レールユニット R]をそれぞれ [スタンドレッグ L]と[ス
タンドレッグ R]に、各 2本の M4六角ビス(a)でしっかりと固定します。
•
各使用 2只M4六角螺丝 (a),将 [导轨单元 L]和[导轨单元 R]分别牢固地
固定在 [支架支脚 L]和[支架支脚 R]上。
•
•Afx the Support Rail L to the Stand Leg L by tightening two M4 hex screws (a).
Afx the Support Rail R to the Stand Leg R the same way.
•[ 레일 유닛 L] 과 [ 레일 유닛 R] 을 각각 [ 스탠드 다리 L] 과 [ 스탠드 다리 R] 에
각각 2 개의 M4 6 각 나사 (a) 로 단단히 고정합니다 .
Прикрепите опорную направляющую L к ножке подставки L, затянув два
шестигранных винта M4 (a). Прикрепите опорную направляющую R к ножке
подставки R аналогичным способом.
•
•Fixez le rail de support L sur le pied L du socle et le rail de support R sur le
pied R du socle en serrant deux vis hexagonales M4 (a).
•Fissare la Guida del supporto L alla Gamba del supporto L serrando due viti
esagonali M4 (a). Fissare la Guida del supporto R alla Gamba del supporto R
nello stesso modo.
•Befestigen Sie die Stützschiene-L an dem Gestellbein-L durch Anziehen der
zwei M4-Sechskantschrauben (a). Befestigen Sie die Stützschiene-R an dem
Gestellbein-R auf die gleiche Weise.
•Fije Raíl del soporte L a la Pata del soporte L apretando dos tornillos
hexagonales M4 (a). Fije el Raíl del soporte R a la Pata del soporte R de la
misma forma.
[レッグカバー]を[スタンドレッグ L]と[スタンドレッグ R]に、各 1本の M4
六角ビスでしっかりと固定します。
•
各用 1只M4六角螺丝将 [支脚罩板 ]牢固地固定在 [支架支脚 L]和[支架支
脚R]上。
•
•Secure the Leg Cover to the Stand Leg L and Stand Leg R using one M4
hex screw on each side.
•[ 레그 커버 ] 를 [ 스탠드 레그 L] 과 [ 스탠드 레그 R] 에 각각 1 개의 M4 6 각 나사
로 단단히 고정합니다 .
При помощи одного шестигранного винта М4 с каждой стороны прикрепите
крышку ножки к ножке подставки L и ножке подставки R.
•
•Fixez les caches pieds sur les pieds L du socle et les pieds R du socle en
serrant une vis hexagonale M4 sur chaque côté.
•Fissare la Protezione per gambe alla Gamba del supporto L e alla Gamba del
supporto R utilizzando una vite esagonale M4 su ciascun lato.
•Befestigen Sie die Beinabdeckung an dem Gestellbein-L und an dem
Gestellbein-R, indem Sie eine M4-Sechskantschraube auf jeder Seite verwenden.
•Sujete la Cubierta de las patas a la Pata del soporte L y la Pata del soporte R
utilizando un tornillo hexagonal M4 a cada lado.
[スタンドレッグ L]と[スタンドレッグ R]に[レッグカバー]を取り付けます。
[レッグカバー](a)の突起部分を[スタンド上ステー]の溝に差し込みます。
•
将[支脚罩板 ]安装在 [支架支脚 L]和[支架支脚 R]上。
将[支脚罩板 ]的突起部分 (a)插入 [支架上撑条 ]的槽。
•
•Attach the Leg Covers over the Stand Leg L and Stand Leg R.
Insert the protrusions (a) of the Leg Covers into the slots of the Top Stand Stay.
•[ 스탠드 다리 L] 과 [ 스탠드 다리 R] 에 [ 레그 커버 ] 를 끼웁니다 .
[ 레그 커버 ] 의 돌출 부분 (a) 을 [ 스탠드 상단 스테이 ] 의 홈에 끼워 넣습니다 .
Установите крышки ножек на ножку подставки L и на ножку подставки
R. Вставьте выступы (a) крышек ножек в прорези верхнего держателя
подставки.
•
•Fixez les caches pieds sur les pieds L du socle et les pieds R du socle . Insérez
les protubérances (a) des caches pieds dans les encoches du support supérieur
du socle.
•Posizionare le Protezioni per le gambe sulla Gamba del supporto L e sulla
Gamba del supporto R.
Inserire le sporgenze dei Protezioni per le gambe (a) nelle fessure del Tirante
superiore del supporto.
•Befestigen Sie die Beinabdeckungen auf dem Gestellbein-L und dem
Gestellbein-R.
Schieben Sie die vorstehenden Teile (a) der Beinabdeckungen in die Schlitze der
Oberen Gestellstütze.
•Coloque las Cubiertas de las patas sobre la Pata del soporte L y sobre la Pata
del soporte R.
Inserte los salientes de las Cubiertas de las patas (a) en las ranuras del Pie
superior del soporte.
•Prenda o Trilho de suporte L à Perna do suporte L apertando os dois parafusos
hexagonais M4 (a). Prenda o Trilho de suporte R à Perna do suporte R da
mesma maneira.
•Encaixe as Tampas da perna na Perna do suporte L e na Perna do suporte R.
Insira as partes salientes (a) das Tampas da perna nos slots do Apoio do suporte
superior.
•Prenda a Tampa da perna à Perna do suporte L e à Perna do suporte R usando
um parafuso hexagonal M4 em cada lateral.
8
aa
10
9
aa
iPF840
iPF841
iPF850
iPF851
8
[レールユニット ]のテープ(a)を取り除きます。•
Remove tape (a) from the Support Rails.
•
去掉 [导轨单元 ]的胶带 (a)。
•
[ 레일 유닛 ] 의 테이프 (a) 를 제거합니다 .
•
Удалите ленту (a) с опорных направляющих.
•
•Retire la tapa (a) de los Raíles del soporte.
•Entfernen Sie das Klebeband (a) von den Stützschienen.
•Rimuovere il nastro adesivo (a) dalle Guide del supporto.
•Retirez le ruban adhésif (a) des rails de support.
ロールユニットを取り付ける
Installation de l’unité de rouleau
Installazione dell’unità rotolo
Install the Roll Unit Instalar la Unidad del rollo
Installieren der Rolleneinheit
롤 유닛 설치
安装辊单元
Установка блока рулона
[レールユニット ]をカチッと音がするまで引き出します。
•
Pull out the Support Rails until they click into position.
•
拉出 [导轨单元 ]直到发出咔嚓的声音。
•
[ 레일 유닛 ] 을 딱 소리가 날 때까지 당깁니다 .
•
Вытяните опорные направляющие, пока они не защелкнутся на месте.
•
•Tire de los Raíles del soporte hasta que encajen en su sitio.
•Ziehen Sie die Stützschienen heraus, bis diese hörbar einrasten.
•Tirare le Guide del supporto no ad alloggiarle correttamente.
•Tirez sur les rails de support jusqu’à ce qu’ils s’enclenchent en position.
左右の位置ラベル(a)を確認しながら [ロールユニット ]を[レールユニット ]に
載せます。
•
边确认左右的位置标签 (a)边将 [辊单元 ]放在 [导轨单元 ]上。
•
•Checking the positioning labels (a) on both ends, set the Roll Unit on the Support
Rails.
•좌우의 위치 라벨 (a) 을 확인하면서 [ 롤 유닛 ] 을 [ 레일 유닛 ] 에 올려 놓습니다 .
Проверив установочные метки (a) на обоих концах, установите блок рулона
на опорные направляющие.
•
•Tout en vériant la position des étiquettes (a) à chaque extrémité, placez l’unité de
rouleau sur les rails de support.
•Controllando le etichette di posizione (a) su entrambe le estremità, collocare l’Unità
rotolo sulle Guide del supporto.
•Prüfen Sie die Positionsetiketten (a) an beiden Enden und setzen Sie die
Rolleneinheit auf die Stützschienen.
•Compruebe las etiquetas de posicionamiento (a) en ambos extremos, coloque la
Unidad de rollo en los Raíles del soporte.
•Caution Lifting and carrying the roll unit requires two people. When moving the roll unit, hold it
rmly by the handles on each end (a, b, c, and d). Holding the unit at other positions
is dangerous and poses a risk of injury and damage if the printer is dropped.
•
注意 请 由 2人搬运辊单元。搬运辊单元时请牢牢地把住左右的把手
(a)(b)(c)(d)。把着其它部位的话会不稳定,有掉落而负伤的情况。
•
주의 롤 유닛은 2 명이 운반하십시오 . 롤 유닛을 운반할 때는 좌우 손잡이 (a)(b)(c)(d) 를 단단히 잡으십시오 . 다른 부분을 잡으면 불안정하여 프린터를 떨어뜨
려 다칠 수 있습니다 .
注意 ロールユニットは、2人で持ち運んでください。ロールユニットを持ち運ぶときは、
左右の取っ手 (a)(b)(c)(d)をしっかりと持ってください。他の場所を持つと不安定に
なり、落としてけがをする場合があります。
•
•Attention Deux personnes sont nécessaires pour soulever et transporter l’unité de rouleau.
Pour la déplacez, tenez-la fermement par ses poignées, situées à chaque extrémité
(a, b, c et d). Il est dangereux de la tenir par d’autres emplacements : en cas de
chute, les transporteurs pourraient être blessés et l’imprimante endommagée.
•Attenzione Per sollevare e trasportare l’unità rotolo, è necessario l’intervento di due persone.
Per spostarla, reggerla dalle maniglie poste su entrambe le estremità (a, b, c e d).
Reggerla da altre parti è pericoloso e può implicare rischi di lesioni e danni se la
stampante dovesse cadere.
•Vorsicht Das Hochheben und Tragen der Rolleneinheit erfordert zwei Personen. Halten Sie
die Rolleneinheit beim Transport fest an den Tragegriffen an jedem Ende (a, b, c
und d). Das Halten der Einheit an einer anderen Position ist gefährlich und stellt eine
Verletzungsgefahr und möglichen Schaden dar, wenn der Drucker herunterfällt.
•AtenciónPara levantar y mover la unidad de rollo son necesarias dos personas. Al mover la unidad de rollo, sujétela rmemente por las asas que hay en cada
extremo (a, b, c y d). Sujetar la unidad por otras partes es peligroso y puede provocar lesiones y daños si la impresora se cae.
•
Внимание Для подъема и переноса блока рулона требуется два человека. При переноске блока рулона крепко удерживайте его за ручки на каждом конце (a, b,
c, и d). Переноска блока в другом положении опасна и повышает риск получения травмы и повреждений при падении принтера.
Instale a unidade de rolo
•Remova a ta (a) dos Trilhos de suporte.
•Verique os rótulos de posicionamento (a) em ambas as extremidades e coloque a
Unidade de rolo nos Trilhos de suporte.
•Cuidado Duas pessoas são necessárias para levantar e transportar a unidade de rolo. Ao mover a unidade de rolo, segure-a rmemente pelas alças nas laterais (a, b,
c e d). Segurar a unidade em outras posições é perigoso e oferece risco de ferimentos e danos se a impressora cair.
•Puxe os Trilhos de suporte até que eles se encaixem na posição.
1
a a
2
iPF840
iPF841
3
a
a
a
bcd
iPF850
iPF851
9
[ロールユニット ]と[レールユニット ]の重なり合った穴 (a)を、各1本の M4 六
角ボルトで回らなくなるまで締め付けます。
•
各用 1只M4六角螺栓拧紧 [辊单元 ]和[导轨单元 ]重合在一起的孔 (a),直
到拧不动。
•
•In the overlapping holes (a) of the Roll Unit and Support Rails, tighten one M4
hex bolt on each end rmly.
•[ 롤 유닛 ] 과 [ 레일 유닛 ] 이 겹친 구멍 (a) 을 각각 1 개의 M4 6 각 볼트로 돌아가
지 않을 때까지 조입니다 .
Прочно затяните по одному шестигранному болту M4 на каждом конце в
местах совпадения отверстий (a) блока рулона и опорных направляющих.
•
•Dans les orices superposés (a) de l’unité de rouleau et des rails de support,
serrez fortement un boulon hexagonal M4 à chaque extrémité.
•Nei fori che si sovrappongono (a) dell’Unità rotolo e delle Guide del supporto,
serrare no in fondo una vite esagonale M4 su ciascuna estremità.
•Ziehen Sie die M4-Sechskantbolzen an jedem Ende in den übereinanderliegenden
Löchern (a) der Rolleneinheit und Stützschienen fest an.
•En los oricios superpuestos (a) de la Unidad de rollo y de los Raíles del soporte,
apriete rmemente un perno hexagonal M4 en cada extremo.
[ロールユニット ] からテープや梱包材を取り除きます。
•
Remove tape and packaging material from the Roll Unit.
•
从[辊单元 ]上去掉胶带和包装材料。
•
[ 롤 유닛 ] 에서 테이프와 포장재를 제거합니다 .
•
Удалите ленту и упаковочный материал с блока рулона.
•
•Retire la tapa y el material de embalaje de la Unidad de rollo.
•Entfernen Sie das Klebeband und Verpackungsmaterial von der Rolleneinheit.
•Rimuovere il nastro adesivo e il materiale di imballaggio dell’Unità rotolo.
•Retirez le ruban adhésif et le matériau d’emballage de l’unité de rouleau.
•Nos orifícios sobrepostos (a) da Unidade de rolo e dos Trilhos de suporte, aperte
rmemente um parafuso hexagonal M4 em cada extremidade.
•Remova a ta e o material da embalagem da Unidade de rolo.
4
aa
5
10
キャスター付バスケットを取り付けます。キャスター付バスケットの組み立てや取り付けかたについては、キャスター付バスケットに同梱のセットアップガイド
を参照してください。
•
•Set up the wheeled output stacker. For wheeled output stacker assembly and installation instructions, refer to the setup guide provided with the wheeled output
stacker.
•安装带脚轮出纸堆叠器。带脚轮出纸堆叠器的组装和安装方法请参照带脚轮出纸堆叠器附带的组装说明书。
•캐스터가 달린 바스켓을 설치합니다 . 캐스터가 달린 바스켓의 조립과 설치 방법은 캐스터가 달린 바스켓에 동봉한 설치 가이드를 참조하십시오 .
キャスター付バスケット(BU-03)を取り付ける
Set Up the Wheeled Output Stacker (BU-03)
Installation du réceptacle de sortie sur roulettes (BU-03)
安装带脚轮出纸堆叠器 (BU-03)캐스터 장착 바스켓 (BU-03) 설치
Установка приемника бумаги на роликах (BU-03)
Installazione dell’impilatrice di uscita con ruote (BU-03)
Congurar el Apilador de salida con ruedas (BU-3)
Einrichten des Ausgabestaplers mit Rollen (BU-03)
•Installez le réceptacle de sortie sur roulettes. Pour obtenir des instructions sur le montage et d’installation du réceptacle de sortie sur roulettes, reportez-vous au
guide d’installation joint à ce réceptacle de sortie sur roulettes.
•Installare l’impilatrice di uscita con ruote. Per istruzioni sull’assemblaggio e l’installazione dell’impilatrice di uscita con ruote, fare riferimento alla guida
all’installazione fornita in dotazione con l’impilatrice di uscita con ruote.
•Stellen Sie den Ausgabestapler mit Rollen auf. Den Aufbau und Installationsanweisungen für den Ausgabestapler mit Rollen nden Sie im Setup-Handbuch, das
mit dem Ausgabestapler mit Rollen mitgeliefert wird.
•Conguración del apilador de salida con ruedas. Para el montaje y las instrucciones de instalación del apilador de salida con ruedas, consulte la guía de
conguración proporcionada con el apilador de salida con ruedas.
•Установите приемник бумаги на роликах. Для получения информации о сборке и установке приемника бумаги на роликах, обратитесь к руководству по
установке, прилагаемому к приемнику бумаги на роликах.
Instale o Empilhador de saída com rodas (BU-03)
•Instale o empilhador de saída com rodas. Para obter instruções de montagem e instalação do empilhador de saída com rodas, consulte o guia de conguração
fornecido com o equipamento.
バスケットを取り付ける
Attacher le Bac de sortie
Fissaggio dell’Impilàtrice di uscita
Attach the Output Stacker Sujetar el Apilador de salida
Befestigen des Ausgabestaplers
바스켓 설치
安装出纸堆叠器
Прикрепите приемник бумаги
备注 标准附带支架固定型出纸堆叠器,可以作为选购件购买带脚轮出纸堆叠器。根据购买的地区,有时标准附带带脚轮出纸堆叠器。
标准附带带脚轮出纸堆叠器。
•
메모 스탠드 고정형 바스켓이 기본 제공되며 , 옵션으로 캐스터가 달린 바스켓을 구입할 수 있습니다 . 구입 지역에 따라서는 캐스터가 달린 바
스켓이 기본 제공될 수 있습니다 .
캐스터가 달린 바스켓이 기본 제공됩니다 .
•
Remarque Un réceptacle de sortie immobile est inclus en tant qu’accessoire standard et un réceptacle de sortie sur roulettes peut être acheté en tant
qu’accessoire en option. Selon la région d’achat, le réceptacle de sortie sur roulettes peut être inclus en tant qu’accessoire standard.
Un réceptacle de sortie sur roulettes est inclus en tant qu’accessoire standard.
•
スタンド固定型バスケットが標準で付属し、オプション品としてキャスター付バスケットを購入できます。お買い上げの地域によっては、
キャスター付バスケットが標準で付属する場合があります。
キャスター付バスケットが標準で付属します。
メモ •
Стационарный приемник бумаги в качестве стандартного приспособления входит в комплект принтера, а приемник бумаги на
роликах можно приобрести в качестве дополнительного приспособления. В зависимости от региона, в котором совершена покупка,
приемник бумаги на роликах может быть включен в комплект принтера как стандартное приспособление.
Приемник бумаги на роликах входит в комплект принтера как стандартное приспособление.
•
ПРИМЕЧАНИЕ
NOTE• A stationary output stacker is included as a standard accessory, and a wheeled output stacker can be purchased as an optional accessory.
Depending on the region of purchase, the wheeled output stacker may be included as a standard accessory.
A wheeled output stacker is included as a standard accessory.
NOTA• Un’impilatrice di uscita ssa è inclusa di serie, un’impilatrice di uscita con ruote è disponibile come accessorio opzionale. In base al Paese
di acquisto, è possibile che l’impilatrice di uscita con ruote sia inclusa di serie.
Un’impilatrice di uscita con ruote è inclusa di serie.
Hinweis • Ein stationärer Ausgabestapler ist als Standardzubehör enthalten, und ein Ausgabestapler mit Rollen kann als optionales Zubehör erworben
werden. Je nach Verkaufsgebiet kann der Ausgabestapler mit Rollen als Standardzubehör enthalten sein.
Ein Ausgabestapler mit Rollen ist als Standardzubehör enthalten.
NOTA• Se incluye un apilador de salida inmóvil como accesorio estándar, y es posible adquirir un apilador de salida con ruedas como accesorio
opcional. Dependiendo de la región de adquisición, podría incluirse como accesorio estándar el apilador de salida con ruedas.
Se incluye un apilador de salida con ruedas como accesorio estándar.
Instalar o empilhador de saída
Observação • Um empilhador de saída estacionário é incluído como acessório padrão e é possível comprar um empilhador de saída com rodas como
acessório opcional. Dependendo da região da compra, o empilhador de saída com rodas poderá ser incluído como acessório padrão.
Um empilhador de saída com rodas é incluído como acessório padrão.
iPF830
iPF831
iPF840
iPF841
11
[バスケットアーム R]と[バスケットアーム L]を、それぞれ[スタンド下ステー]
の左右の穴に差し込みます。
•
将[篮子臂 R]和[篮子臂 L]分别插入 [支架下撑条 ]左右的孔。
•
•Insert the Basket Arm R and Basket Arm L into the holes on either side of the
Bottom Stand Stay.
•[ 바스켓 암 R] 과 [ 바스켓 암 L] 을 각각 [ 스탠드 하단 스테이 ] 의 좌우 구멍에 끼
웁니다 .
Вставьте ручку лотка L и ручку лотка R в отверстия с обеих сторон нижнего
держателя подставки.
•
•Insérez les bras de panier R et les bras de panier L dans les orices situés de
chaque côté du support inférieur du socle.
•Inserire il Braccio del raccoglitore R e il Braccio del raccoglitore L nei fori su
entrambi i lati del Tirante inferiore del supporto.
•Schieben Sie den Korbarm-R und den Korbarm-L in die Löcher auf
beiden Seiten der Unteren Gestellstütze.
•Inserte el Brazo del cesto R y el Brazo del cesto L en los oricios en ambos
lados del Pie inferior del soporte.
•Insira o Braço da cesta R e o Braço da cesta L nos orifícios das laterais do
Apoio do suporte inferior.
Install the Stationary Output Stacker
Installation du réceptacle de sortie immobile
Installazione dell’impilatrice di uscita ssa
Instalar el Apilador de salida inmóvil
安装支架固定型出纸堆叠器 스탠드 고정형 바스켓 설치
Установка стационарного приемника бумагиInstallieren des stationären Ausgabestaplers
スタンド固定型バスケットを取り付ける
図のように[リアホルダー](a)を [スタンドレッグ ]の後ろ側の穴に取り付けます。
同様に、もう 1つの[リアホルダー]をもう一方の [スタンドレッグ ]の後ろ側の
穴に取り付けます。
•
如图所示将 [后支架 ](a)安装在 [支架支脚 ]后侧的孔上。
同样将另一个 [后支架 ]安装在另一侧 [支架支脚 ]后侧的孔上。
•
•Insert one Rear Holder (a) into the holes on the back of the Stand Leg, as shown.
Similarly, insert the other Rear Holder into the holes on the back of the other Stand
Leg.
•그림과 같이 [ 리어 홀더 ](a) 를 [ 스탠드 다리 ] 의 뒤쪽 구멍에 끼웁니다 .
같은 방법으로 다른 하나의 [ 리어 홀더 ] 를 또 다른 쪽 [ 스탠드 다리 ] 의 뒤쪽 구
멍에 끼웁니다 .
Вставьте один задний держатель (a) в отверстия с задней стороны ножки
подставки, как показано на рисунке. Аналогичным образом вставьте другой
задний держатель в отверстия с задней стороны другой ножки подставки.
•
•Insérez un support arrière (a) dans les orices situés à l’arrière du pied du socle,
comme illustré. De même, insérez l’autre support arrière dans les orices situés à
l’arrière de l’autre pied du socle.
•Inserire un Supporto posteriore (a) nei fori presenti sul retro della Gamba del
supporto, come mostrato. Allo stesso modo, inserire il secondo Supporto
posteriore nei fori presenti sul retro dell’altra Gamba del supporto.
•Schieben Sie eine Hintere Stütze (a) in die Löcher auf der Rückseite des
Gestellbeins, wie dargestellt. Schieben Sie auf gleiche Weise die andere Hintere
Stütze in die Löcher auf der Rückseite des anderen Gestellbeins.
•Inserte un Soporte posterior (a) en los oricios en la parte posterior de la Pata del
soporte, como se muestra. Del mismo modo, inserte el otro Soporte posterior en
los oricios en la parte posterior de la otra Pata del soporte.
[バスケットロッド]の右側(a)を[バスケットアーム R]の穴(b)に、左側を[バ
スケットアーム L] の穴(c)に差し込みます。
•
将[篮子杆 ]的右侧 (a)插入 [篮子臂 R]的孔 (b)、将左侧插入 [篮子臂 L]的孔 (c)。
•
•Insert the right end of the Basket Rod (a) in the Basket Arm R hole (b), and
insert the left end in the Basket Arm L hole (c).
•[ 바스켓 롯드 ] 의 오른쪽 (a) 을 [ 바스켓 암 R] 의 구멍 (b) 에 , 왼쪽을 [ 바스켓 암
L] 의 구멍 (c) 에 끼웁니다 .
Вставьте правый конец стержня лотка (a) в отверстие ручки лотка R (b), и
вставьте левый конец в отверстие ручки лотка L (c).
•
•Insérez l’extrémité droite de la tige du panier (a) dans l’orice du bras de panier R
(b), puis insérez l’extrémité gauche dans l’ori ce du bras de panier L (c).
•Inserire l’estremità destra dell’Asta del raccoglitore (a) nel foro del Braccio
del raccoglitore R (b) e inserire l’estremità sinistra nel foro del Braccio del
raccoglitore L (c).
•Schieben Sie das rechte Ende der Korbstange (a) in das Loch des Korbarm-R (b)
und schieben Sie das linke Ende in das Loch des Korbarm-L (c).
•Inserte el extremo derecho de la Varilla del cesto (a) en el oricio del Brazo del
cesto R (b) e inserte el extremo izquierdo en el oricio del Brazo del cesto L (c).
Instale o empilhador de saída estacionário
•Insira um Suporte traseiro (a) nos orifícios da parte traseira da Perna do suporte,
conforme é mostrado. Da mesma maneira, insira o outro Suporte traseiro nos
orifícios da parte traseira da outra Perna do suporte.
•Insira a extremidade direita da Haste da cesta (a) no orifício do Braço da cesta R
(b) e a extremidade esquerda no orifício do Braço da cesta L (c).
3
1
aa
a
bc
2
12
[バスケット布]前側の[バスケットロッド]を[バスケットアーム L]と
[バスケットアーム R]の先端部分(a)に取り付けます。
•
将[篮子布 ]前侧的 [篮子杆 ]安装在 [篮子臂 L]和[篮子臂 R]的前端 (a)。
•
•Attach the Basket Rod at the front of the Basket Cloth to the tips (a) of the Basket
Arm L and Basket Arm R.
•[ 바스켓 천 ] 앞쪽의 [ 바스켓 롯드 ] 를 [ 바스켓 암 L] 과 [ 바스켓 암 R] 의 끝부
분 (a) 에 끼웁니다 .
Прикрепите стержень лотка в передней части полотна лотка к наконечникам
(a) ручки лотка L и ручки лотка R.
•
•Fixez la tige du panier, située à l’avant du tissu du panier, sur les extrémités (a)
des bras de panier L et des bras de panier R.
•Posizionare l’Asta del raccoglitore sul davanti del Tessuto del raccoglitore alle
estremità (a) del Braccio del raccoglitore L e del Braccio del raccoglitore R.
•Befestigen Sie die Korbstange an der Vorderseite des Korbtuchs an den Spitzen
(a) des Korbarm-L und des Korbarm-R.
•Acople la Varilla del cesto en la parte frontal de la Tela del cesto a las puntas (a)
del Brazo del cesto L y del Brazo del cesto R.
•Conecte a Haste da cesta localizada na parte dianteira do Tecido da cesta às
pontas (a) do Braço da cesta L e do Braço da cesta R.
左右各 1本の M4 六角ビスでしっかりと固定します。
•
Afx the arms to the stay by tightening one M4 hex screw on either side.
•
左右各用 1只M4六角螺丝牢固地固定。
•
좌우 각각 1 개의 M4 6 각 나사로 단단히 고정합니다 .
•
Прикрепите ручки к держателю, затянув по одному шестигранному винту M4 с
каждой стороны.
•
•Fije los brazos al soporte apretando un tornillo hexagonal M4 en ambos lados.
•Befestigen Sie die Arme an der Stütze durch Anziehen der M4-Sechskantschrauben
auf beiden Seiten.
•Fissare i bracci al tirante serrando una vite esagonale M4 su entrambi i lati.
•Fixez les bras sur le support en serrant une vis hexagonale M4 de chaque côté.
[バスケット布]の白いタグ(a)が右手前側、黒いヒモ(b)が後ろ側になるように、
[バスケット]を広げます。
•
使[篮子布 ]的白色标签 (a)在右前侧,黑绳 (b)在后侧,展开 [出纸堆叠器 ]。
•
•Spread out the Output Stacker so that the white tag (a) of the Basket Cloth is at
the front on the right side and the black straps (b) are in the back.
•[ 바스켓 천 ] 의 흰색 태그 (a) 가 오른쪽 앞에 오고 , 검은색 끈 (b) 이 뒤쪽으로 가
도록 하여 [ 바스켓 ] 을 펼칩니다 .
Разверните приемник бумаги таким образом, чтобы белый ярлык (a) полотна
лотка находился справа с передней стороны, а черные шнурки (b) – с задней
стороны.
•
•Étendez le réceptacle de sortie de sorte que l’étiquette blanche (a) du tissu du
panier se trouve à l’avant, sur le côté droit, et que les bandes noires (b) soient à l’
arrière.
•Stendere l’Impilatrice di uscita in modo che l’etichetta bianca (a) del Tessuto del
raccoglitore si trovi davanti sul lato destro e le fascette nere (b) siano sul retro.
•Breiten Sie den Ausgabestapler aus, sodass der weiße Aufkleber (a) des
Korbtuchs vorn an der rechten Seite ist und die schwarzen Bänder (b) sich an der
Rückseite benden.
•Extienda el Apilador de salida de forma que la etiqueta blanca (a) de la Tela del
cesto se encuentre en el frontal en el lado derecho y que las cintas negras (b) se
encuentren en la parte posterior.
•Prenda os braços ao paio apertando um parafuso hexagonal M4 em cada lateral.
•Estenda o Empilhador de saída para que a etiqueta branca (a) do Tecido da
cesta esteja na parte dianteira da lateral direita e as faixas pretas (b) estejam na
parte traseira.
6
a
a
4
5
a
b
b
13
[バスケット布]中央部の[バスケットロッド](a)を[リアホルダー]下部の穴(b)
に取り付けます。
•
将[篮子布 ]中央的 [篮子杆 ](a)安装在 [后支架 ]下部的孔 (b)。
•
•Insert the Basket Rod (a) in the middle of the Basket Cloth in the slots at the
bottom of the Rear Holders (b).
•[ 바스켓 천 ] 중앙부의 [ 바스켓 롯드 ](a) 를 [ 리어 홀더 ] 아래쪽 구멍 (b) 에 끼웁
니다 .
Вставьте стержень лотка (a) в средней части полотна лотка в прорези в
нижней части задних держателей (b).
•
•Insérez la tige du panier (a) au milieu du tissu du panier, dans les encoches
situées en bas des supports arrière (b).
•Inserire l’Asta del raccoglitore (a) nella parte centrale del Tessuto del
raccoglitore nelle fessure alla base dei Supporti posteriori (b).
•Schieben Sie die Korbstange (a) in die Mitte des Korbtuchs in die Schlitze an der
Unterseite der Hinteren Stützen (b).
•Inserte la Varilla del cesto (a) en medio de la Tela del cesto en las ranuras en la
parte inferior de los Soportes posteriores (b).
後ろ側の黒いヒモを[リアホルダー]上部のフック(a)に通します。•
Pass the black straps in back through the hooks on top of the Rear Holders (a).
•
将后侧的黑绳穿过 [后支架 ]上部的挂钩 (a)。
•
뒤쪽의 검은색 끈을 [ 리어 홀더 ] 위쪽의 고리 (a) 에 끼웁니다 .
•
Проденьте черные шнурки сзади сквозь петли в верхней части задних
держателей (a).
•
•Pase las cintas negras en la parte trasera por los ganchos en la parte superior de
los Soportes posteriores (a).
•Führen Sie die schwarzen Riemen durch die Haken an der Oberseite der Hinteren
Stützen (a).
•Far passare le fascette nere nella parte posteriore attraverso i ganci presenti sulla
parte superiore dei Supporti posteriori (a).
•Faites passer les bandes noires situées à l’arrière par les crochets situés en haut
des supports arrière (a).
[バスケット布 ]の後ろ側を図のようにプリンタの後ろ側に通します。•
Push the back of the Basket Cloth toward the back of the printer, as shown.
•
如图所示将 [篮子布 ]后侧穿到打印机的后侧。
•
[ 바스켓 천 ] 의 뒤쪽을 그림과 같이 프린터의 뒤쪽으로 당깁니다 .
•
Отодвиньте заднюю часть полотна лотка к задней стороне принтера, как
показано на рисунке.
•
•Empuje la parte posterior de la Tela del cesto hacia la parte posterior de la
impresora, como se muestra.
•Drücken Sie die Rückseite des Korbtuchs in Richtung Rückseite des Druckers,
wie dargestellt.
•Spingere la parte posteriore del Tessuto del raccoglitore verso la parte posteriore
della stampante, come mostrato.
•Poussez l’arrière du tissu du panier vers l’arrière de l’imprimante, comme illustré.
•Pressione a parte traseira do Tecido da cesta na direção da parte traseira da
impressora, conforme é mostrado.
•Insira a Haste da cesta (a) localizada no centro do Tecido da cesta nos slots da
parte inferior dos Suportes traseiros (b).
•Passe as faixas pretas pelos ganchos localizados na parte superior dos Suportes
traseiros (a).
8
b
a
b
a
9
aa
7
14
确认 [篮子布 ]的状态。
请拉出 [篮子布 ],使 [篮子布 ]的边缘在外侧。
[篮子布 ]的边缘进入内侧的话,会妨碍排纸。
•
•Check how the Basket Cloth is arranged.
Pull the Basket Cloth so that the edge of the Basket Cloth hangs toward the
outer side. Hanging the edge of the Basket Cloth toward the inner side may
prevent paper from coming out of the printer.
•[ 바스켓 천 ] 의 상태를 확인합니다 .
[ 바스켓 천 ] 의 끝부분이 바깥쪽을 향하도록 [ 바스켓 천 ] 을 빼내십시오 . [ 바
스켓 천 ] 의 끝부분이 안쪽으로 말려 있으면 용지 배출에 문제가 발생할 수 있습
니다 .
Проверьте расположение полотна лотка.
Вытяните полотно лотка таким образом, чтобы край полотна лотка свисал
снаружи. Если край полотна лотка будет свисать с внутренней стороны, это
может помешать выходу бумаги из принтера.
•
•Contrôlez la disposition du tissu du panier.
Tirez le tissu du panier pour que le bord du tissu du panier aille vers l’extérieur.
Si vous accrochez le bord du tissu du panier vers l’intérieur, le papier ne pourra
peut-être pas sortir de l’imprimante.
•Controllare la disposizione del Tessuto del raccoglitore.
Tirare il Tessuto del raccoglitore in modo che il bordo sia rivolto verso
l’esterno. Se il bordo del Tessuto del raccoglitore risulta rivolto verso l’interno,
la carta non fuoriesce dalla stampante.
•Prüfen Sie die Anordnung des Korbtuchs.
Ziehen Sie das Korbtuch so, dass die Kante des Korbtuchs nach außen hängt.
Wenn die Kante des Korbtuchs nach innen hängt, kann das Papier ggf. nicht
aus dem Drucker gegeben werden.
•Compruebe la disposición de la Tela del cesto.
Tire de la Tela del cesto de forma que el borde de la Tela del cesto cuelgue
hacia la parte externa. Si el borde de la Tela del cesto cuelga hacia la parte
interna puede dar lugar a que el papel no salga de la impresora.
[バスケット布]前側の[バスケットロッド](a)を手前にいっぱいに引き出して
から持ち上げて、ロックします。
•
将[篮子布 ]前侧的 [篮子杆 ](a)完全向前拉出后抬起并锁定。
•
•Pull the Basket Rod (a) at the front of the Basket Cloth all the way out and lift it to
lock it in place.
•[ 바스켓 천 ] 앞쪽의 [ 바스켓 롯드 ](a) 를 앞으로 끝까지 당긴 후 들어 올려 고정
합니다 .
Вытяните стержень лотка (a) в передней части полотна лотка полностью
наружу и поднимите, зафиксировав на месте.
•
•Tirez la tige du panier (a), située à l’avant du tissu du panier, sur toute sa
longueur, puis soulevez-la pour la xer.
•Tirare no in fondo l’Asta del raccoglitore (a) sulla parte anteriore del Tessuto del
raccoglitore e sollevarla no a quando non si blocca in posizione.
•Ziehen Sie die Korbstange (a) and er Vorderseite des Korbtuchs ganz heraus
und heben Sie diese an, um sie an der richtigen Position zu blockieren.
•Tire de la Varilla del cesto (a) en la parte frontal de la Tela del cesto por completo
hacia afuera y levántela para que quede bloqueada en su sitio.
[バスケット布]の状態を確認します。•
[バスケット布]の端が外側に来るように[バスケット布]を引き出してください。
[バスケット布]の端が内側に入っていると、排紙を妨げることがあります。
•Verique o posicionamento do Tecido da cesta.
Puxe o Tecido da cesta para que a borda do Tecido da cesta caia sobre a
parte externa. Posicionar a borda do Tecido da cesta sobre a parte interna pode
impedir que o papel saia de impressora.
•Puxe a Haste da cesta (a) localizada na parte dianteira do Tecido da cesta por
completo e levante-a para travá-la na posição.
10
11
a
QT5-7433-V1
PRINTED IN CHINA
IMPRIMÉ EN CHINE
修订日期:2015.01©CANON INC.2015
* Q T 5 7 4 3 3 V 1 *

Other manuals for imagePROGRAF iPF830

1

This manual suits for next models

5

Other Canon Printer Accessories manuals

Canon Two-Knife Booklet Trimmer-A1 User manual

Canon

Canon Two-Knife Booklet Trimmer-A1 User manual

Canon FX-201 Use and care manual

Canon

Canon FX-201 Use and care manual

Canon Inner Finisher-K1 User manual

Canon

Canon Inner Finisher-K1 User manual

Canon Finisher-R1 User manual

Canon

Canon Finisher-R1 User manual

Canon AG1 User manual

Canon

Canon AG1 User manual

Canon DADF-M1 User manual

Canon

Canon DADF-M1 User manual

Canon Duplex Unit-A1 Service manual

Canon

Canon Duplex Unit-A1 Service manual

Canon TU-06 User manual

Canon

Canon TU-06 User manual

Canon Super G3 FAX Board-AS User manual

Canon

Canon Super G3 FAX Board-AS User manual

Canon Color Network Printer Unit-D1 Reference manual

Canon

Canon Color Network Printer Unit-D1 Reference manual

Canon IMAGEPROGRAF 230GSM User manual

Canon

Canon IMAGEPROGRAF 230GSM User manual

Canon Finisher-Q1 User manual

Canon

Canon Finisher-Q1 User manual

Canon 148GSM C2S User manual

Canon

Canon 148GSM C2S User manual

Canon Inner Finisher Additional Tray-A1 Operating and maintenance manual

Canon

Canon Inner Finisher Additional Tray-A1 Operating and maintenance manual

Canon iR1200 Series Operating and maintenance manual

Canon

Canon iR1200 Series Operating and maintenance manual

Canon ZDJ-S01 User manual

Canon

Canon ZDJ-S01 User manual

Canon PIXMA MP980 Instruction Manual

Canon

Canon PIXMA MP980 Instruction Manual

Canon TonerRobot EP-27 User manual

Canon

Canon TonerRobot EP-27 User manual

Canon BH-10 User manual

Canon

Canon BH-10 User manual

Canon Duplex Unit-A1 User manual

Canon

Canon Duplex Unit-A1 User manual

Canon iR Security Kit-A2 Operating and maintenance manual

Canon

Canon iR Security Kit-A2 Operating and maintenance manual

Canon iP4000 - PIXMA Photo Printer User manual

Canon

Canon iP4000 - PIXMA Photo Printer User manual

Canon INNER 2-WAY TRAY-E1 Operating and maintenance manual

Canon

Canon INNER 2-WAY TRAY-E1 Operating and maintenance manual

Canon Cassette Feeding Unit-AP1 User manual

Canon

Canon Cassette Feeding Unit-AP1 User manual

Popular Printer Accessories manuals by other brands

Lexmark N8050 user guide

Lexmark

Lexmark N8050 user guide

Sharp SF-S55N Service manual

Sharp

Sharp SF-S55N Service manual

Intermec PC43d installation instructions

Intermec

Intermec PC43d installation instructions

TROY Group 1320 user guide

TROY Group

TROY Group 1320 user guide

Martin Yale 1601 manual 

Martin Yale

Martin Yale 1601 manual 

Verity Audio Print Field guide

Verity Audio

Verity Audio Print Field guide

DataCard CE870 Quick install guide

DataCard

DataCard CE870 Quick install guide

Intermec PW50 installation guide

Intermec

Intermec PW50 installation guide

Epson C80673 Series Assembly guide

Epson

Epson C80673 Series Assembly guide

Epson OT-BZ20 user manual

Epson

Epson OT-BZ20 user manual

Kyocera PF-430 Service manual

Kyocera

Kyocera PF-430 Service manual

HP Ink Tank 110 series user guide

HP

HP Ink Tank 110 series user guide

HP DesignJet 800PS Brochure & specs

HP

HP DesignJet 800PS Brochure & specs

Utax Utax PF 791 Service manual

Utax

Utax Utax PF 791 Service manual

Xerox WorkCentre 123 installation guide

Xerox

Xerox WorkCentre 123 installation guide

Riso MZ9 Series installation guide

Riso

Riso MZ9 Series installation guide

Symbol 6110 Installation procedures

Symbol

Symbol 6110 Installation procedures

Kodak FC1 CURRENT INFORMATION SUMMARY

Kodak

Kodak FC1 CURRENT INFORMATION SUMMARY

manuals.online logo
manuals.online logoBrands
  • About & Mission
  • Contact us
  • Privacy Policy
  • Terms and Conditions

Copyright 2025 Manuals.Online. All Rights Reserved.