Canyon NavMaster CNR-SW2 User manual

CNR-SW2 Manual v1.0
Canyon NavMaster
Features
Altimeter
zAltitude Measuring Range : -500 to 9000 meter or -1,600 to
29500 feet
zResolution of 0.5 meter or 1 feet
zTotal Altitude Gain
zTrip timer : 9 hr 59 min 59 sec
zCurrent ascending or descending Speed
zAverage ascending or descending Speed
Electronic Compass
z3-mode display showing a compass arrow direction, numeric
and cardinal readouts
zwith highly accuracy of +-5 degree and a resolution of 1
degree
za magnetic distortion alerts “Err” when external magnetic
interference occurs
zautomatic shut-off
Thermo Alarm Clock
zPerpetual calendar with day of week
zSnooze alarm clock
zThermometer (-10 degree
to + 50 degree )
z12/24 hr, selectable
zMax/Min memory for Thermometer
Battery Installation
Computer Watch
Remove the back cover of the computer with a screwdriver, install
the 3.0V-battery with the positive(+) pole facing up and replace the
cover. Remove the battery and reinsert it if the LCD displays
irregular figures. This will clear and restart the computer’s
microprocessor.
3V-Battery CR2032
Display Icons & Keys Illustration
Icons:
HeadingDirection Timemode
Alarm ON / OFF Afternoon
Alarm Snooze Temperature in Celsius
Battery Low Temperature in Fahrenheit
Compass mode Maximum memory
Altimeter mode Minimum memory
To wake Up and set your computer
zPress and hold both button A and C until all segments on.
Meter / Feet Selection
Right after all segments on, the “M” digit will start to flicker.
To select M (Meter) or Ft (Feet), press button C and then press
button A to confirm.
Selection
zRight after Meter/Feet selection, the Celsius digit will then
start to flicker
zTo select
or , press button C and then press button Ato
confirm.
Clock Setting
zRight after selection, the “24H” digits will then start to
flicker, press button C to select 12H or 24H hour format
zPress button A to confirm and then the hour digits will start to
flicker.

zTo set hour, press button C to adjust the hour digits to
desired value and then press button A to confirm. Right after
the confirmation, the minute digits will start to flicker.
zTo set minutes, press button C to adjust the minute digits to
desired value and then press button A to confirm.
zRepeat the process until you get a desire value of the day of
week, month and the date.
12/24 Hour Format Hour digit Minute digit
To turn on and display different mode
Press button D to turn on and press button D again to switch to
different modes.
TIME mode
COMPASS mode ALTIMETER mode
Back Light
zPress button B to turn on.
Snooze Alarm
zTo set alarm time, in Clock mode, press and hold button A until
the alarm hour digit start to flicker.
zPress button C to adjust the hour digit and then press button A
to confirm.
zRight after the confirmation, the alarm minute digit will start to
flicker.
zPress button C to adjust and then button Ato confirm.
zTo a snooze alarm (Z Z), it will alarm for 1 minute and repeat
for 3 times with an interval of 5 minutes each.
zTo read alarm time in Clock mode, Press button A to select the
alarm time display or the date display format.
Alarm Hourdigit
ON/OFF
Minutedigit AlarmDisplay DateDisplay
Temperature Memory Recall and Reset
zTo recall maximum and minimum temperature, in Clock mode,
press button C.
zTo reset the memory, press and hold button A right after the
recalling
Maximum and minimum Maximum and minimum
temperature memory temperature memory reset
The Digital Altimeter
zPress button D to enter the Altimeter mode.
zTo set the altitude, press button C to enter T (trip timer mode)
first. Press button A to stop the timer and then hold buttonA
again until the “ ” symbol start to flicker.
zPress button C to select “ ” for the ascending altitude gain
counting or “ ” for the descending altitude loss counting.
zPress button A to confirm and then the first digit of the altitude
will start to flicker.
zPress button C to adjust the digit and then press button Ato
confirm.
zRepeat the process until you get the desired altitude reading.
zTo reset the altitude to sea level, press and hold button Afor 8
seconds until all digits change to zero.
zTo start a trip, press button C to enter trip timer mode and then
press button A to start counting and press again to stop.
zTo read different trip information, press button C to toggle (Trip
Timer), d (the total altitude displacement for the gain or the
loss) and AS (average ascending or descending speed).
zTo reset trip information, press button C to enter trip timer
mode first. Press button A to stop the timer and then hold
button A again to reset the data.
zTrip timer will be switched off automatically when difference of
altitude is no bigger than 2.5m within 5 minutes.
zOnce the trip timer stops running, the altitude trip
measurement will also stop in order to save battery power.
zThe only way to restart the altitude trip measurement is to
restart the tip timer again manually.
zIn order to save battery power, the trip timer will also
automatically be switched off when the device is switched to
time or compass function.
zUser should then restart the trip timer again manually in order
to minimize error.

Current average
ascending speed or
descending speed
Current
altitude
Trip Timer Average ascending Total altitude
speed or displacement
descending speed {For Ascending ( )
or Descending ( ) }
Height
Time
Spend
From to , (Ascending ) = d3+d4
Average ascending speed (AS ) t1
Total altitude displacement for ascending (d ) = d1+d2+d3
From to , (Descending ) = d3+d4
Average ascending speed (AS ) t2
Total altitude displacement for descending (d ) = d5+d6+d7
The Digital Compass
zPress button D to enter into the Compass mode.
zKeep the compass in horizontal level and pointing the direction
by “ ”.
zThe compass will show the direction by 2 different ways.
(1). Precise direction pointed by “ ” in degree and cardinal
readout, e.g. South East (SE) 135°.
(2). Precise direction of North ( ), South ( ),
East ( ) and West ( ) by the ring.
zFor Power Saving, the compass will automatically stop
measurement around 2 minutes with full direction dots on. To
start the measurement again, press button A.
e.g. Direction pointing by
-SouthEast(SE)135°
East – 90°South-180°
North–0 West–270°
These dots depict
symbolically a
compass needle
Example: Determination of North
You may symbolize the icon as the “TIP” of a needle, which
always points to the north, and the icon as the “TAIL” of
the needle, which always points to the south. No matter what the
current compass’s orientation is, the NORTH and SOUTH can
easily be identified by and .
Compass Calibration and
Environmental Interference
zIt is important to know that all digital compasses work with
Earth’s magnetic field and are very sensitive to different
environments where the earth magnetic field is distorted, such
as interference of closing to heavy metal, home appliance,
computer and high power cable...etc.
zTo keep high accurate heading information, you must calibrate
the compass (1) when the magnetic distort message “Err” is
continuously displayed (2) when the numeric heading
information with an error of more than 10 degrees and (3)
when the unit is used for the first time in a vehicle so as to
separate the earth’s field from the interference.
How to Calibrate the Compass
zPress button D to the Compass mode.
zPress and hold button A to enter calibration mode
“CAL” and then press button C to start. The ring
will then display and turn.
zTurn the unit clockwise for two circles on a level
surface where it is free from unnecessary metal
plate, home appliance, computer and high power
cable...etc. The circles do not need to be perfect
circles, but must be completed in the same
direction. It is also important that each circle takes
a minimum of 20 seconds but less than 1 minute
to complete.
zRight after the calibration, press button C to
confirm

zFailure to do a correct calibration can result in
inaccurate headings. Perform a new calibration
again if a heading is suspected.
Calibration Mode After the ring move, turn the
unit clockwise for two circles
Enter Declination angle for the true North
zDeclination refers to the measured difference between the
magnetic North and the North of the map. The local
declination is given on the map margin either as easterly
plus declination (E) or as westerly minus declination (W).
When orienteering, the map direction is corrected by
subtracting the plus declination and adding the minus
declination.
zTo input the value, press and hold button A to enter
calibration mode “CAL” first and press button A again to
confirm to enter declination setting mode “dEC”.
zRight after entering the declination setting mode, a letter “E”
starts to flicker. Press button C to select the direction East- E
or West- W and then press button A to confirm.
zAn angle digit will then start to flicker. To set the angle to be
offset, press button C to adjust to the desired value and then
press button A to confirm.
zAs the declination setting will affect the direction directly, for
a serious and final confirmation, press button C to turn the
function “on” and then press button Aagain to confirm.
zIn order to understand the declination effect, let us quote an
example, the current direction is N 10 degree, If the
declination angle is set to E 30 degree, the final will change
to NE 40 degree or If the declination angle is set to W 30
degree, the final direction will change to NW 340 degree.
Important notes
Compass
zThe compass must not be used near a metal or magnetic
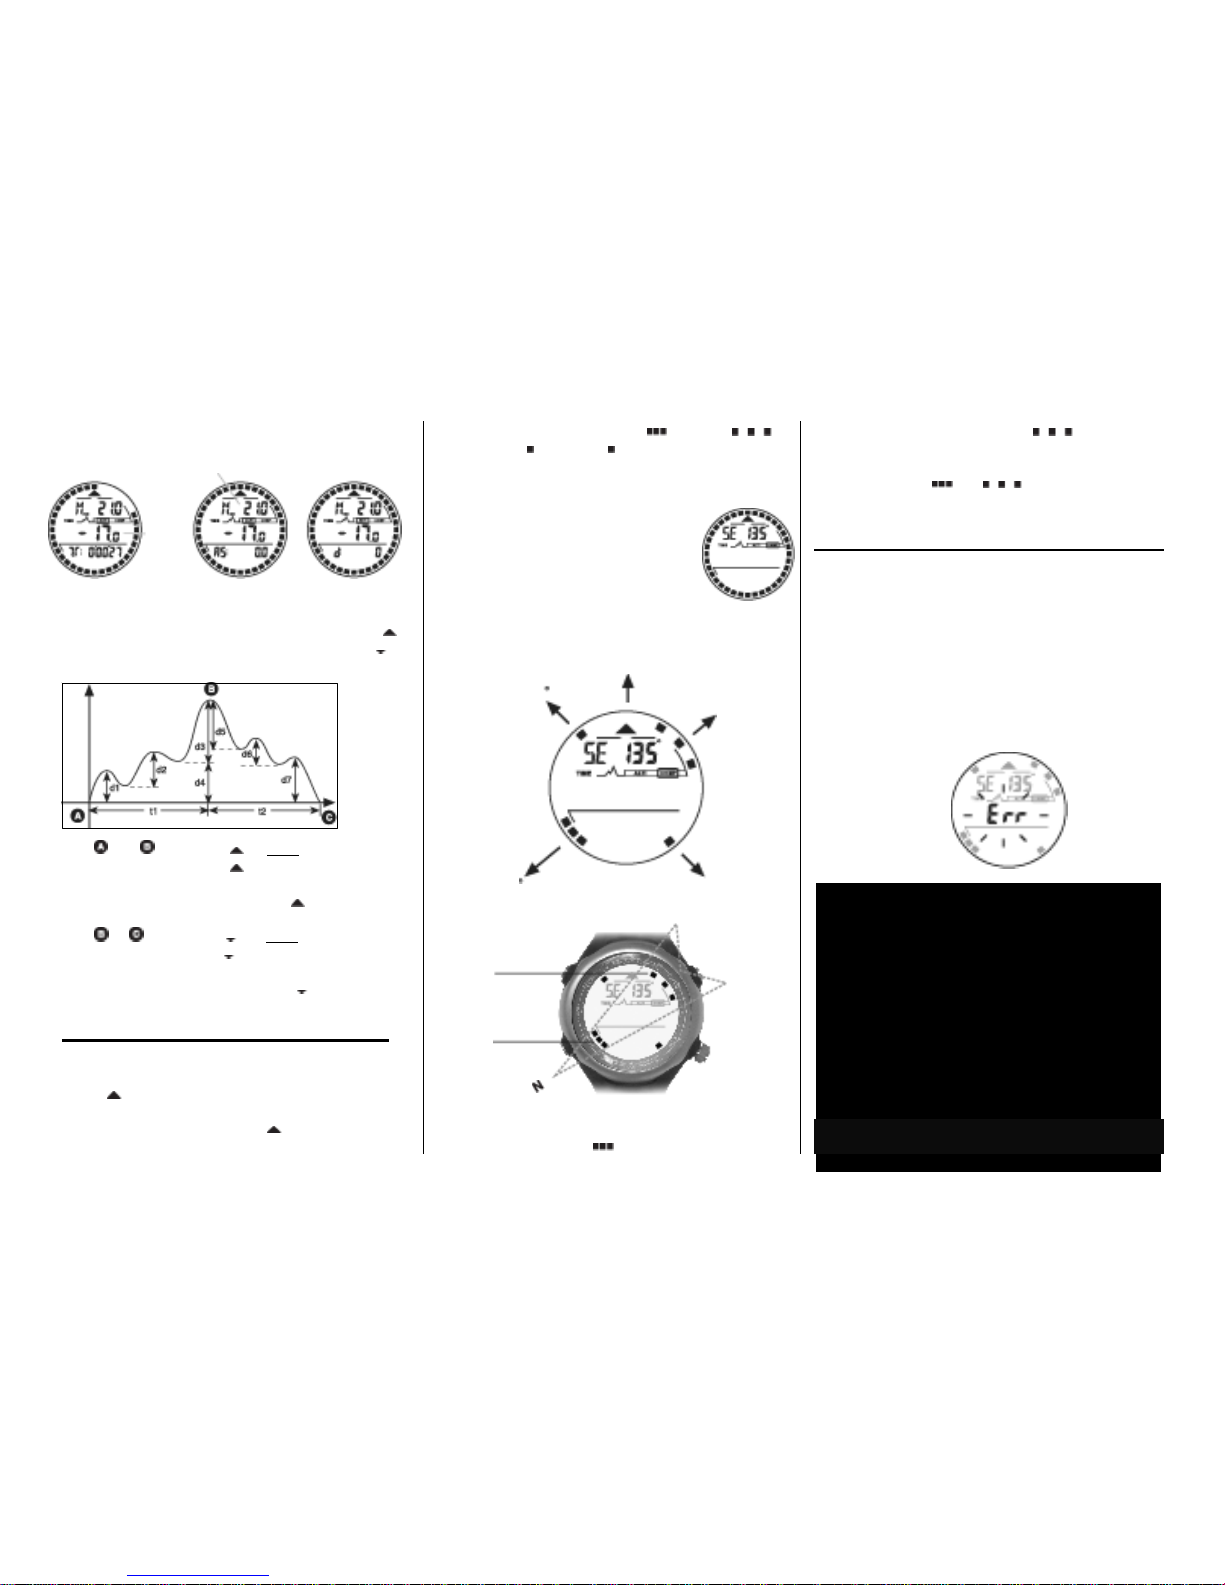
object like any other compass.
zWhenever error message “Err” is continuously
displayed, please calibrate the compass again.
zPlease hold the compass as horizontal as possible to
get a precise direction.
Temperature
zThe temperature displayed is the temperature of the
case inside. Hence, it is influenced by your body
temperature.
zTo display the actual temperature, the watch must be
taken off the hand for about 15 to 30 minutes and must
not be exposed to direct sunlight.
Altimeter
zUnfortunately all altimeter are going to be affected by
barometric pressure (unless they are GPS controlled
or similar) as this is what they use to calculate their
height. To offset this barometric effect on altimeter,
Please keep a check and re-adjust the altimeter when
you are at known heights or re-setting your watch to
zero at sea-level.
And the declination angles for major world cites are listed as
follows:
City Declination Angle City Declination Angle
Anchorage Calgary
Atlanta Chicago
Bombay Denver
Boston Jerusalem
London Rio De Janeiro
LittleRock San Francisco
Livingston, MT Seattle
Munich Shanghai
NewYorkCity Toronto
Orlando Vancouver
Oslo WashingtonDC
Paris Waterbury,CT
Malfunction Problem
Incorrect Compass Wrong Calibration or the environment of
Reading operation is changed.
Do the Calibration again with correct
instruction stated in the user manual.
“Err” display in Compass External Magnetic Interference, such as
Mode heavy metal, home appliance, computer
andhighpowercable,etc...
Escapefromtheinterferenceordothe
re-calibration again.
Incorrect Temperature Interference from direct sunlight, air
Reading conditioner or Heater vent.
Movetheunitawayfromtheinterference.
Display readout fades and Poor battery or bad contacts.
Incorrect readings Take out battery and install again or
Installanewbattery.
Black Display Temperature too hot, or display exposed
todirectsunlighttoolong.
Display shows irregular Take out battery and install again.
figures
Other Canyon Watch manuals

Canyon
Canyon OTTO CNS-SW86 User manual

Canyon
Canyon CNS-SW73 User manual

Canyon
Canyon Lollypop SW-63 User manual

Canyon
Canyon CNS-SW71 User manual

Canyon
Canyon SW-79 User manual

Canyon
Canyon Badian SW68 User manual

Canyon
Canyon CNS-SB41 BG User manual

Canyon
Canyon Marzipan CNS-SW75 User manual

Canyon
Canyon CNS-SW51BB User manual

Canyon
Canyon SB-02 User manual

Canyon
Canyon Polly User manual

Canyon
Canyon Oregano User manual

Canyon
Canyon Jondy CNE-KW44 Series User manual

Canyon
Canyon SW82 User manual

Canyon
Canyon Wasabi User manual

Canyon
Canyon Sandy KW-34 User manual

Canyon
Canyon My Dino KW-33 User manual

Canyon
Canyon Wasabi CNS-SW82 Series User manual

Canyon
Canyon CNS-SW9 User manual

Canyon
Canyon CNS-SW51BB User manual