CAS CL7200 series Owner's manual

CL7200 Series
(English) V3.02.5 (D)


Table of Contents
Features ......................................................................................................... 2
Firmware Update Procedure .............................................................................. 1
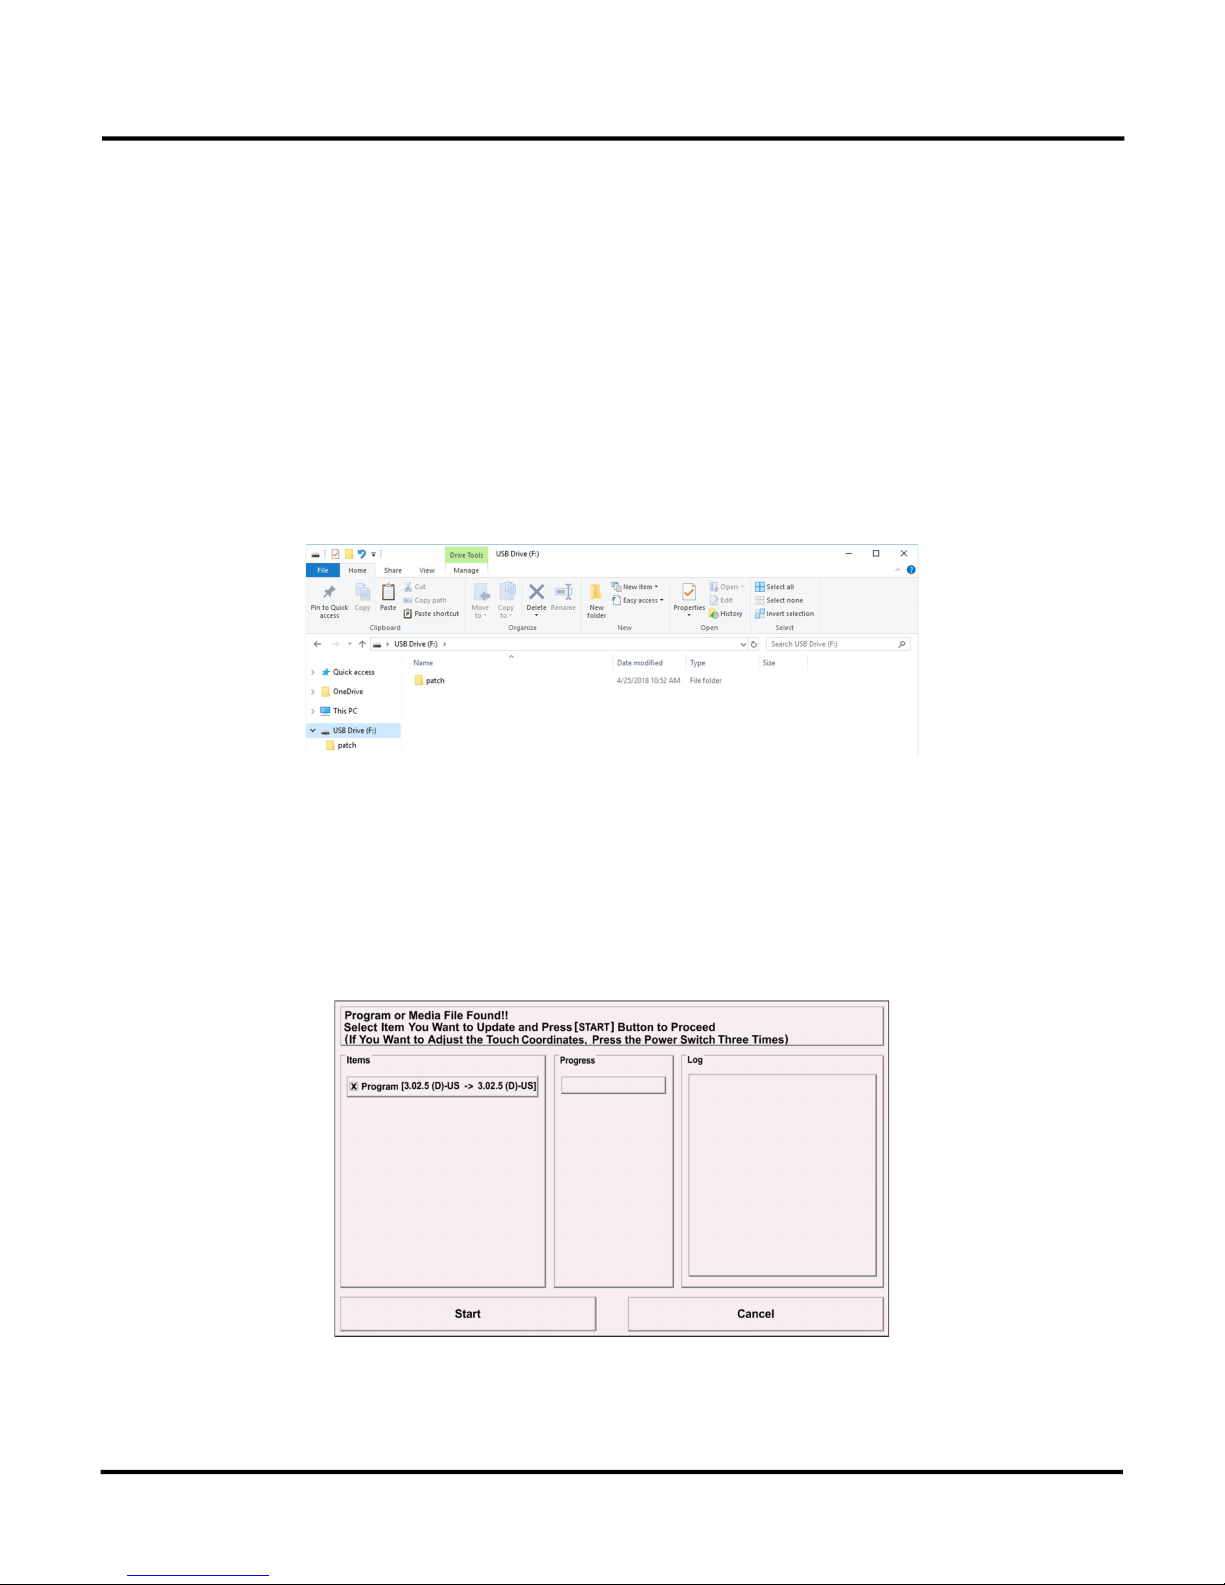
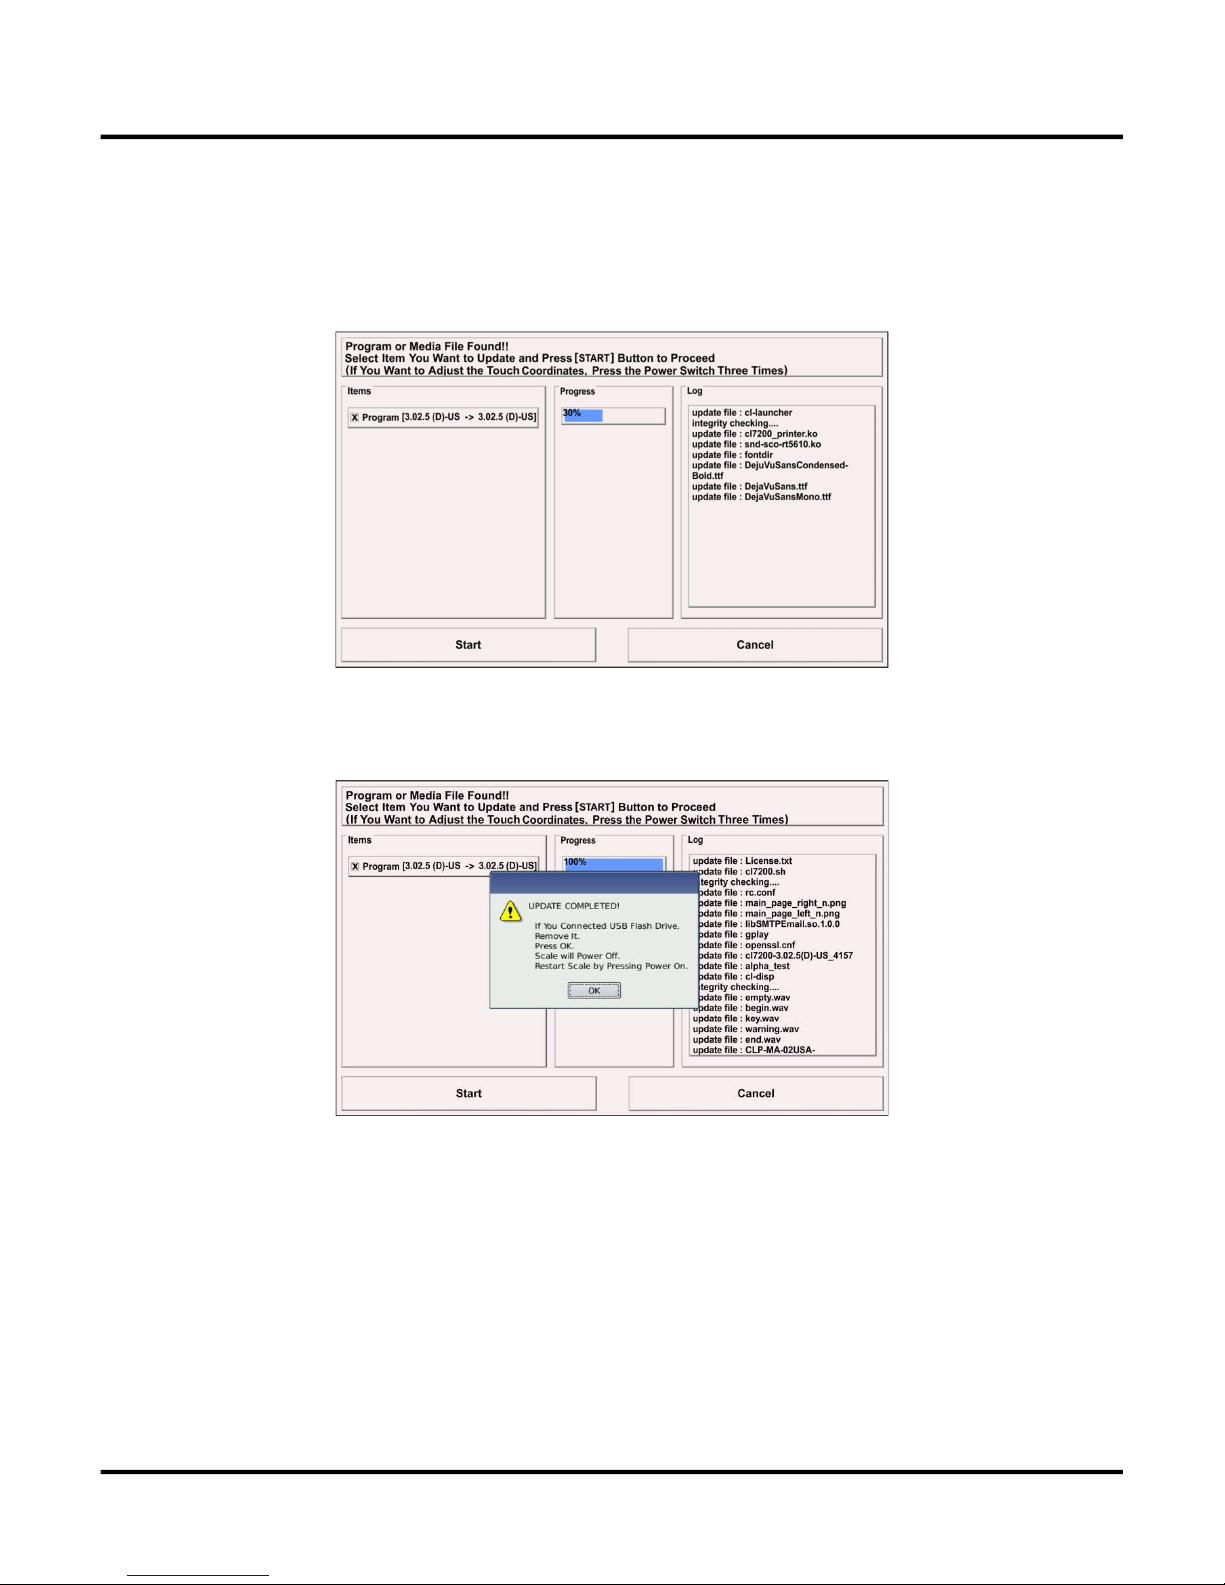
USB Update ......................................................................................................... 1
PC Update ........................................................................................................... 3
Initialize Scale ................................................................................................. 6
Scale Data Backup to USB ................................................................................ 7
Restoring Scale Data from USB ......................................................................... 9
Edit Key Function ........................................................................................... 11
PLU Speed Key ................................................................................................... 11
Function Key ...................................................................................................... 15
Category Key ..................................................................................................... 20
Touch Screen Calibration ................................................................................ 24
Method 1 ........................................................................................................... 24
Method 2 ........................................................................................................... 24
Network Setting ............................................................................................ 25
Wired LAN ......................................................................................................... 25
Menu 1912 DHCP ......................................................................................... 25
Menu 1913 IP .............................................................................................. 27
Menu 1918 Ping Test ..................................................................................... 29
Wireless LAN ...................................................................................................... 31
Menu 1917 WLAN Use ................................................................................... 31
Menu 1916 WLAN Setting .............................................................................. 32
PLU Image Display ......................................................................................... 40
Optimal Image File Sizes ..................................................................................... 40
Image File Types ................................................................................................ 40
Adding PLU Image Files to the Scale (USB method) ................................................ 40
Adding Images to a PLU ...................................................................................... 43
New PLU ..................................................................................................... 43
Existing PLU ................................................................................................ 46

Advertisements ............................................................................................. 50
Movie and Slide Show Image File Types ................................................................. 50
Adding Movie and Slide Show Image Files to the Scale (USB method) ....................... 50
Creating an Advertisement .................................................................................. 53
Video Configuration ...................................................................................... 53
Create Ad Playlist ......................................................................................... 54
Using a Single File ........................................................................................ 55
Using a Playlist............................................................................................. 61
Remote Control Function ................................................................................ 68
Install VNC Viewer (PC) ....................................................................................... 68
Enable Remote Control (CL7200) .......................................................................... 72
Connecting to the CL7200 ................................................................................... 74
Other Tips .................................................................................................... 75
Operations ......................................................................................................... 75
Date Time Key ............................................................................................. 75
Programming ..................................................................................................... 76
List Key ....................................................................................................... 76
Menu 1150 PLU List ...................................................................................... 81
Tare Key ...................................................................................................... 83
Menu 1873 Additional Item ............................................................................. 86
CAS Label Formats ........................................................................................ 87

Features
Built In Ethernet and WLAN communications.
Front touchscreen LCD with a rear LCD display
Store and Display PLU images and Video Advertisements.
Update Firmware using USB memory stick.
File Backup and Restore using USB memory stick.
Enhanced Speed Key programming and design.
Increased Speed Key capacity.
All CAS Standard Label Formats Built In including CAS 8030 and CAS 8040.
PLU Ingredients changed from Indirect (linked) to Direct (part of PLU data).
Maximum number of Ingredient characters increased to 2100.
Label Length increased to 200mm.
Remote access capability.
Menu screen structure and basic operation is the same as CL5000 series


Firmware Update Procedure
USB Update
1
Firmware Update Procedure
The firmware can be updated using a USB Flash Drive or a PC. Both methods are
explained below.
USB Update
Note: USB flash drive format is FAT32.
New firmware files will be located in a folder named “patch”.
1. Copy the patch folder to the USB Flash Drive.
2. Power off Scale.
3. Plug the USB Flash Drive into the scale.
4. Press and hold the power switch to turn the scale on.
5. The update screen will be displayed.
6. Make sure there is an “X” beside the firmware version that is to be loaded.
If not, simply touch the box with the firmware version in it.

Firmware Update Procedure
USB Update
2
7. Press the Start button.
The firmware will begin updating and the progress will be shown.
When the firmware has finished updating you will see a pop up message stating
"Update Completed".
8. Remove the USB Flash Drive
9. Press the OK button. The scale will power off after a few seconds.
10. Press the Power Switch to turn the scale on.
Go to Menu 1867 to verify the updated firmware version.

Firmware Update Procedure
PC Update
3
PC Update
New firmware files will be located in a folder named “patch”.
1. Connect the scale in the same network as the PC.
2. Open the Windows Explorer.
3. In the address bar type: ftp://Scale IP address then press the Enter key.
Ex.) If the scale’s IP Address is 192.168.0.82 you would type in
ftp://192.168.0.82.
4. When ask for User ID and password type in the User ID as “cas” and the
password as “cascl7200” and press the Log On button. (don’t use the
quotation marks)
5. On the PC you will see the scale’s folder structure, copy the Patch folder to
the scale. If prompted, choose replace Patch folder.

Firmware Update Procedure
PC Update
4
6. Press the Power Switch to turn the scale off completely.
7. Press the Power Switch to turn the scale on.
8. The Update screen will be displayed.
9. Make sure there is an “X” beside the firmware version that is to be loaded.
If not, simply touch the box with the firmware version number in it.
10. Press the Start button.
The firmware will begin updating and the progress will be shown.

Firmware Update Procedure
PC Update
5
When the firmware has finished updating you will see a pop up message stating
"Update Completed".
11. Press the OK button. The scale will power off after a few seconds.
12. Press the Power Switch to turn the scale on.
Go to Menu 1867 to verify the updated firmware version.
After the firmware has been successfully updated you may need to initialize the
scale to activate any new program changes. Usually there will be some reference
to having to perform an initialization with the new firmware files that you received.
Refer to the section “Initialize Scale”.

Initalize Scale
6
Initialize Scale
(Menu 1876)
Using Menu 1876 is the same as loading the DATAROM in the CL5000 series.
There will be occasions when the firmware update will require that the scale be
initialized. This initialization is normally not required unless there are major
changes to the firmware. Usually there will be special notification supplied with the
firmware when initialization is required.
When the scale is initialized there are several items that could be changed or
removed. Refer to the list below for an idea of what information may change.
Menu Settings AM, PM Phrases, MONTH Phrases, Date / Time Separator. P865,
Weight Symbol, Price Sign, PCS Sign in Sale, Decimal Sign (, .),
YES/NO Character, Date / Time Format TICKET MESSAGE, M1510
Settings, START PASSWORD (000419), TRANSACTION, Label Issue
Count and whether or not to use DEPT, GROUP, NUTRITION,
DISCOUNT, ORIGIN and TRACEABILITY feature tables.
Parameter Settings All Menu Settings, M1432, All Parameter Settings
Table of Key Speedkey, Category, Right Side Function Keys
Barcode Scanner Format
M1260 Barcode Form, M1460 Scanner Form, M1470 Label/Barcode
Change Setting, M1144 , M1600 REPORT DATA, AD SETTING
(WEIGHT UNIT, INIT ZERO, RE ZERO, INIT ZERO RANGE, REZERO
RANGE). All Report Data, AD Module Setting
Printer Settings M1730
Permissions M1855
Table of Origin M1250
Custom Label Form Copies Label Folder to the Scale
Printing Caption Symbol M1280, Label/Receipt Caption from Caption File
PLU Items Used PLU Item Name, M1144
1. Select the items that you want to initialize by entering a “Y”. (All items are
default “N”). You can select all of the items by pressing the "TEST" key.
2. Press the "SAVE" key to execute the initialization.
Note: PLU data will not be initialized. If you want to clear the product data,
go to menu 1142.
Press the "Zero" key to initialize the factory defaults.

Scale Data Backup to USB
Menu 1877
7
Scale Data Backup to USB
(Menu 1877)
Almost all of the scale’s programmed information can be saved or backed up to a
USB flash drive using Menu 1877.
1. Insert the USB flash drive in one of the two USB slots on the
communications panel located in the scale base.
2. Access Menu 1877.
3. Type in a Folder Name for the backup file.
Notes: 1.) The Folder Name will default to a date_time of the backup if no
description is entered. [ Ex.) 09-27-17_0836 ]
2.) The first time a backup is performed on the USB flash drive, the
scale will create a folder structure to store the backup data.[ Ex.)
CL7200\Data\Folder Name ]
3.) Multiple backups can be stored on the same USB flash drive.
4.) There is no warning if an attempt is made to create a backup with
a folder name that already exists, the existing backup data will just
be overwritten.

Scale Data Backup to USB
Menu 1877
8
4. Select the items for backup by entering a “Y” for the item or items.
Note: Move cursor to Folder Name and press the "TEST" key to select
all “Y”.
5. Press the SAVE button to start the backup.
6. After the data has been backed up the scale will return to Menu 1870.

Restoring Scale Date from USB
Menu 1878
9
Restoring Scale Data from USB
(Menu 1878)
Data that has been backed up to a USB flash drive using the scale can be restored
using Menu 1878.
Caution: When restoring a backup folder that was made on a
different scale please remember that the backup may
contain information such as the Network Settings, Scale
Number, Sales Reports, etc. After the restore is completed
the programmed data should be reviewed in case changes
need to be made to prevent communication issues.
1. Insert the USB flash drive in one of the two USB slots on the
communications panel located in the scale base
2. Access Menu 1878.
3. Select the data folder to be restored by pressing the folder name in the
list.
Note: To delete a backup folder from the list press the Select key then
press the backup folder name and then press Delete. When
prompted press the Confirm button to delete the backup folder.

Restoring Scale Data from USB
Menu 1878
10
4. Select the items to be restored by placing a “Y” beside the item.
Note:1.) Move cursor to PLU,Store Table, Settings and press the
"TEST" key to select all “Y”.
2.) The restore function will only display the items that were
selected during the backup process.
5. Press the Save button to start the Restore process.
After the Restore is completed the scale will automatically reboot and all
information will be available for confirmation and editing.

Edit Key Function
PLU Speed Key
11
Edit Key Function
The Edit Key can be used to directly edit the speed keys on the scale without
entering the programming menu (M1161). This function can be used to add/edit
PLU speed keys, function keys and category keys.
Note: The Edit Key can be password protected using Menu 1855.
PLU Speed Key
1. Navigate to the screen that contains the key to be edited.
2. Press the Edit Key on the right side of the screen.
Note: When the Edit Key function is active the word “KEY” can be seen
at the bottom of the screen.

Edit Key Function
PLU Speed Key
12
3. Press the key to be edited. The edit window will open.
Note: The speed key number will be automatically entered based on
the key that was pressed in this step.
4. The default setting is for a PLU type key (1) already so all we need to do
is enter the PLU number you want to assign to the key.
Example: PLU #1 – Ambrosia.
5. Press the Enter key.

Edit Key Function
PLU Speed Key
13
6. Enter the number for the Background Color for the key.
7. Press the Enter key.
8. Enter the number for the Font Color for the key.
9. Press the Enter key.
10. Enter the Cell Size for the key.
11. Press the Enter key.
Other manuals for CL7200 series
3
Table of contents
Other CAS Scale manuals