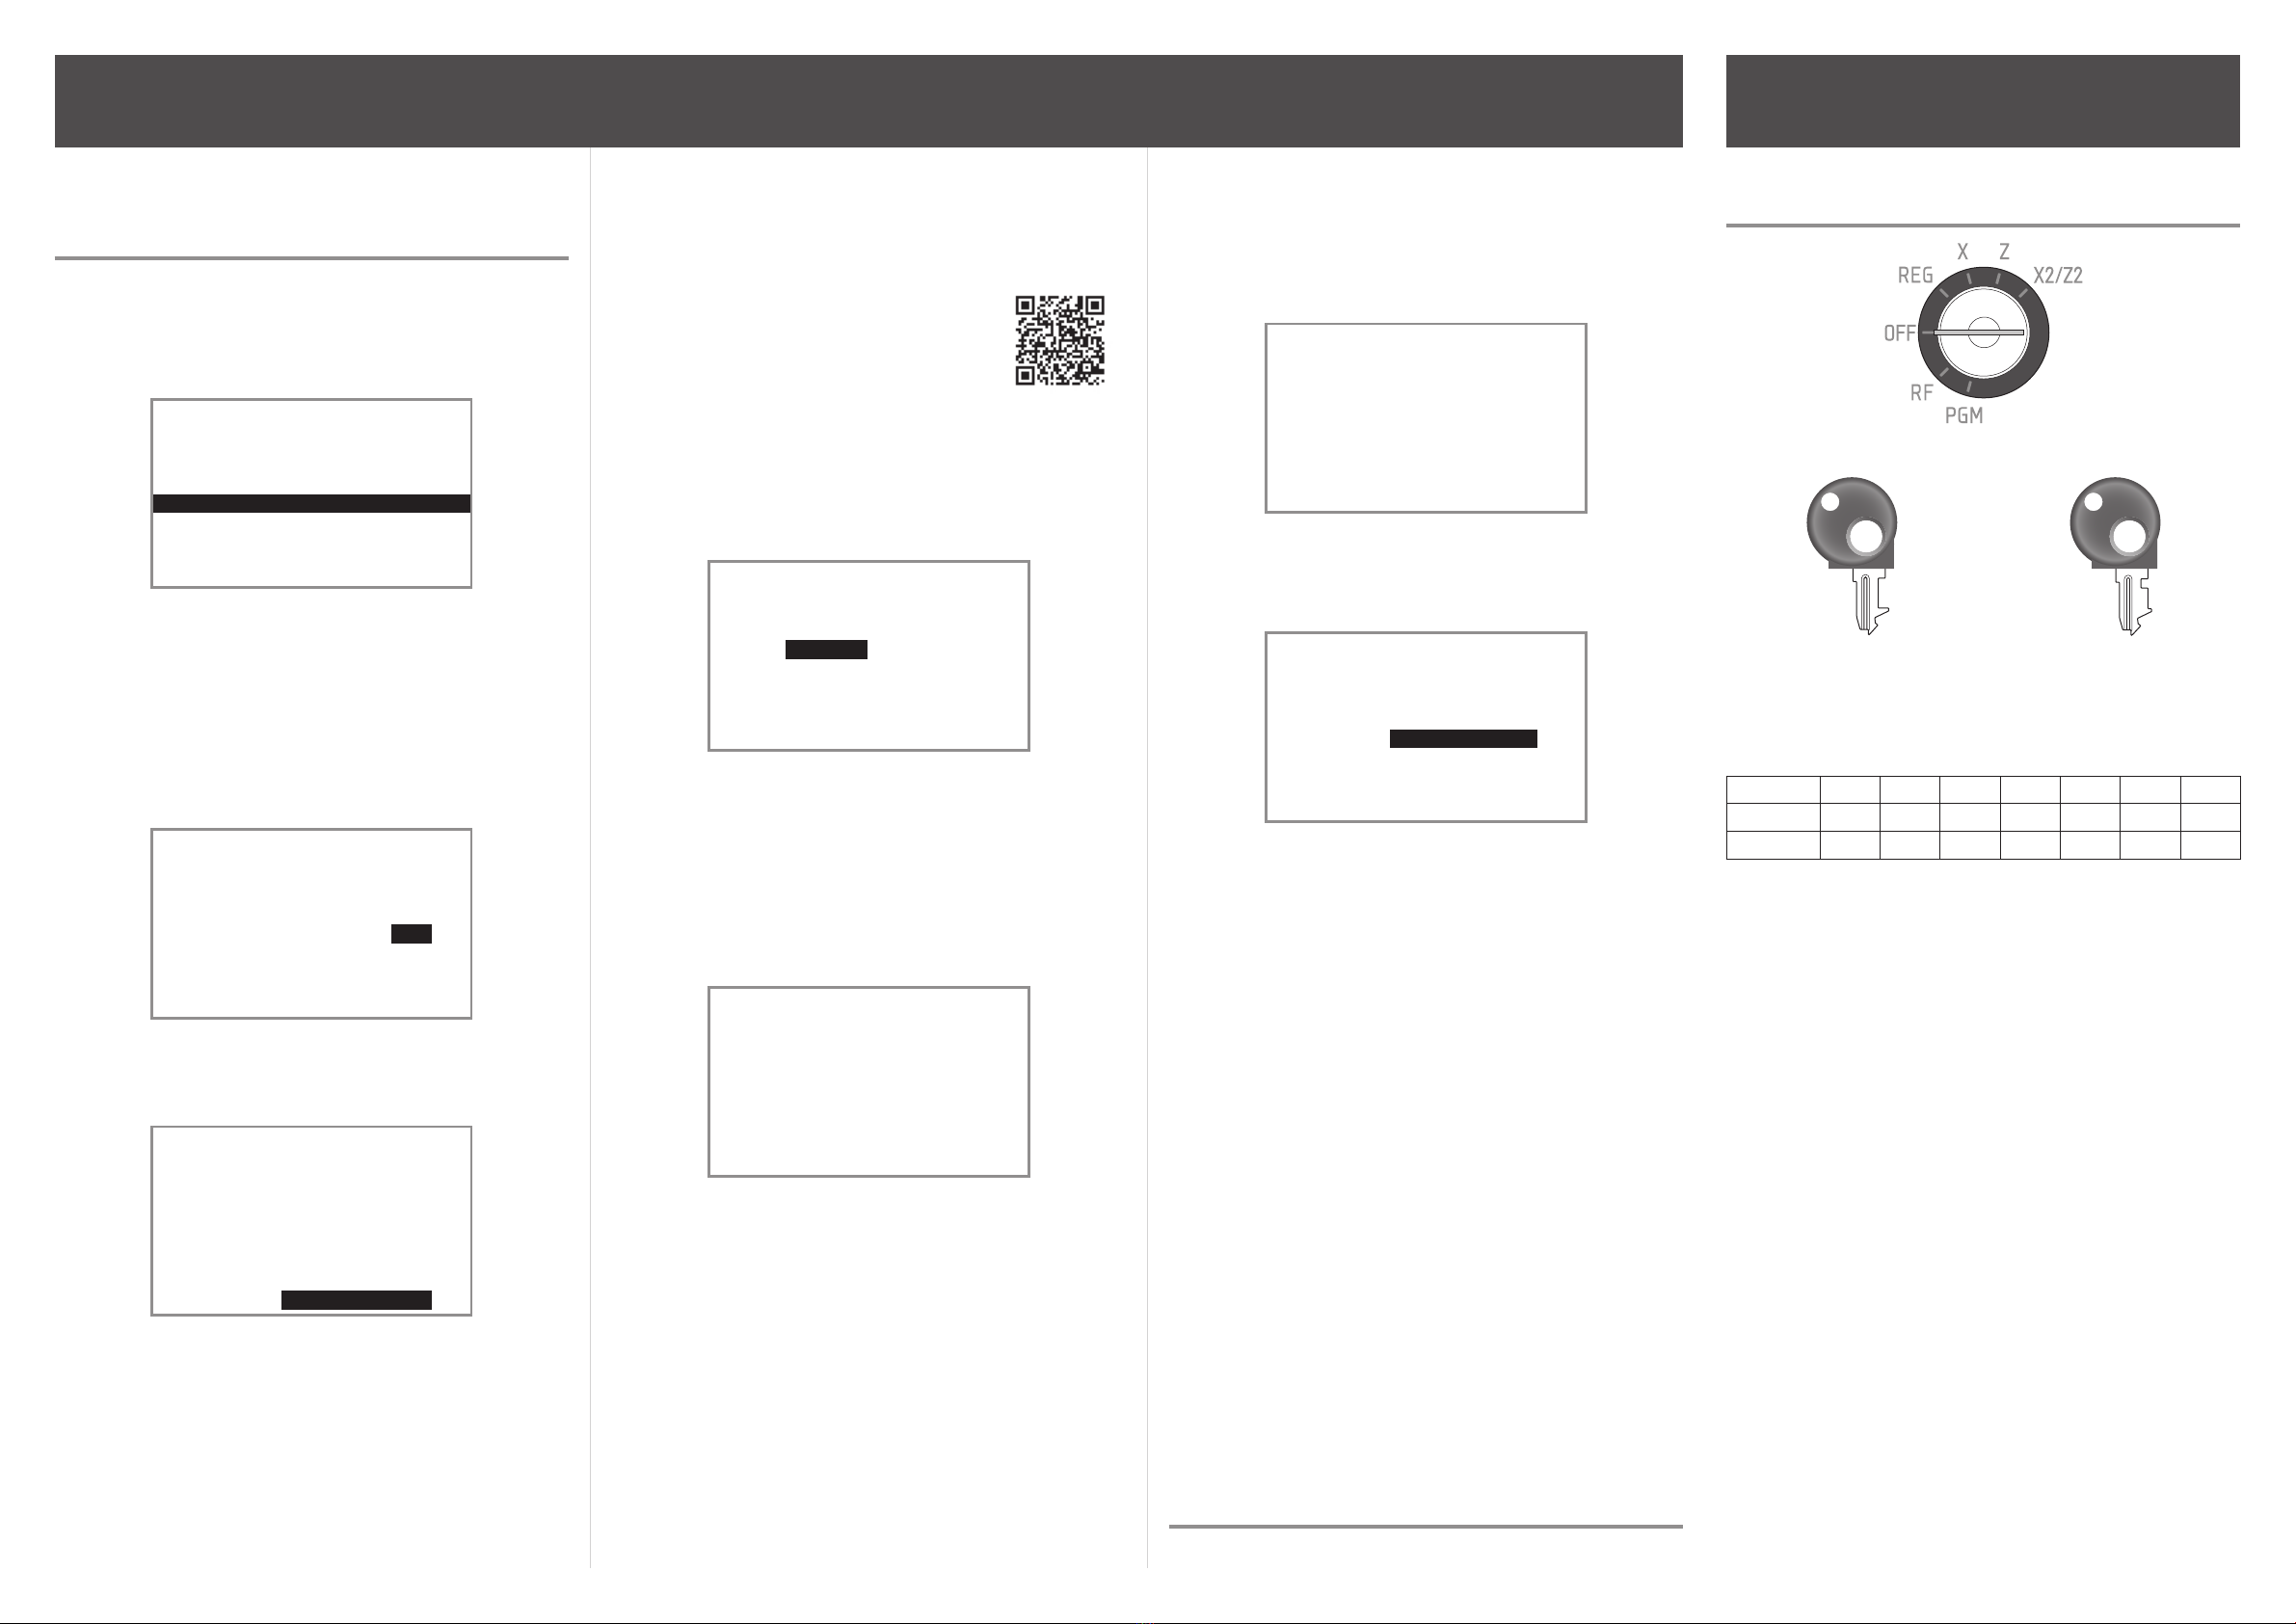
manuals.online logo
Brands
  1. Home
  2. •
  3. Brands
  4. •
  5. Casio
  6. •
  7. Cash Register
  8. •
  9. Casio SR-S820 User manual

Casio SR-S820 User manual

http://web.casio.com/ecr/app/
Quick Start Guide
1. To set memory protection bat-
teries
To prevent losing all your settings and sales data, we
strongly recommend that you set the memory protection
batteries before you use the cash register and replace
them at least once a year.
1. Remove the printer cover by lifting it up.
2. Remove the battery compartment cover.
3. Note the (+) and (–) markings in the battery compart-
ment. Load a set of two new “AA” type alkaline
batteries so that their plus (+) and minus (–) ends are
facing as indicated by the markings.
4. Replace the battery compartment cover.
Important:
These batteries protect information stored in your
cash register’s memory when there is a power
failure or when you unplug the cash register. Be
sure to install these batteries rst.
Warning:
No battery is included in the accessories.
Never try to recharge the batteries.
Do not expose batteries to direct heat, let them
become shorted or try to take them apart.
Keep batteries out of the reach of small children.
If your child should swallow a battery, consult a
physician immediately.
There is a risk of explosion if the batteries are
replaced with improper type.
2. To set a paper roll
The following explains for setting roll paper used as
receipts. If you wish to use the paper roll for journal (sales
record), please see page E-18 of the user’s manual.
1. Open the platen arm by lifting it up.
Preparations
Note: Please follow the steps described below.
Electronic Cash Register PCR-T540/SR-S500/SR-S820
Electronic Cash Register can
be set by Smartphone Try it !
Preparations
Note: Please follow the steps described below.
2. Ensuring the paper is being fed from the bottom of the
roll, lower the roll into the space behind the printer.
3. Put the leading end of the paper over the printer.
4. Close the platen arm slowly until it locks securely.
Please push the position marked [PUSH HERE].
Warning:
Never touch the printer’s thermal head and the
platen.
Avoid the thermal paper from heat, humidity or
direct sunlight.
Keep your hands o󰀨 the paper cutter to avoid injury.
platen arm
platen
paper cutter
thermal head
5. Replace the printer cover, passing the leading end of
the paper through the cutter slot. Tear o󰀨 the excess
paper.
3. To turn the cash register on
1. Insert a Mode key that comes with the cash register in
the Mode switch and turn it to OFF position.
PGM
2. Plug in the power cord into an AC outlet.
QSG240*INC-E2
Mode switch
Mode switch
OP
PGM
Program key Operator key
The program key can be used to set the mode switch to
any position, while the operator key can select the REG
and OFF position.
PGM RF OFF REG X Z X2/Z2
OP key - - ¡ ¡ - - -
PGM key ¡ ¡ ¡ ¡ ¡ ¡ ¡
1 PGM (Programming)
This position is for setting your cash register to suit the
needs of your store.
2 RF (Refund)
Use this position to correct registered items.
3 OFF
The cash register turns o󰀨 in this position.
4 REG (Register)
This position is for normal transactions.
5 X (Read)
This is the position used for issuing daily sales totals
report without clearing the data.
6 Z (Reset)
This position is for issuing reports of daily totals with
clearing the accumulated totals.
7 X2/Z2
This position is used to print periodic sales reports.
Getting to know your cash
register
MA1809-B
4. To set the language, date, time,
tax rates and Bluetooth pairing
1. As soon as the power socket is plugged in, the
display shows the language selection display. Choose
language and country by using ?or >keys then
press Fkey.
English
Español
PLEASE SELECT LANGUAGE.
<CA/AMT TEND> :SELECT
Note:
Actual display shows characters in white on blue
background.
2. Display changes to date and time setting display.
Moving the input area (reversed area) by ?or >
keys, input date, month, year and time from ten key
pad. Input the time by 24 - hour system. For example,
1356 for 1:56 pm. After then press Fkey.
DATE [DD]
MONTH [MM]
YEAR 20[YY]
TIME(24 HOUR) [HHMM]
PLEASE INPUT DATE & TIME.
<CA/AMT TEND> :ENTER
<SUBTOTAL> :RETURN
3. Display then changes to tax table selection display.
Using ten key pad, input tax rates. You can set four
kinds of tax rates.
Rate
Tax1 [ 3]
Tax2 [ 5.25]
Tax3 [ 8.5]
Tax4 [ 15]
PLEASE INPUT TAX RATE.
<CA/AMT TEND> :ENTER
4. Press Fkey.
5. Access the following URL and install “CASIO ECR+”
on a smartphone.
http://web.casio.com/ecr/app/
6. As the cash register and a smartphone are connected
by Bluetooth, select [YES] on cash register display.
If you do not wish to pair, select [NO]. Later, you can
change this setting on Bluetooth setting screen in
PGM mode. If you select [NO], the setting is termi-
nated.
Do you want to connect
mobile via Bluetooth?
<CA/AMT TEND> :ENTER
[YES ]
[NO ]
The following are the procedures when you select [YES].
7. Pair the cash register and a smartphone. Locate a
smartphone within 1 meter from the cash register.
When the cash register display shows 14-digit code
starting “EY”, prepare “CASIO ECR+” installed smart-
phone and turn Bluetooth setting of the smartphone
on. For Bluetooth settings, please refer to smartphone
instruction manual.
Activate Bluetooth on
mobile and select below
device on the mobile.
Cancel <SUBTOTAL>
EY123456789012
8. On the smartphone, nd paired cash register’s device
code. Operations di󰀨er between Android and iPhone.
<Android>
On Android Bluetooth setting, nd and select the
device code of the cash register shown on the dis-
play. In this example, EY123456789012.
<iPhone>
Starting “CASIO ECR+”, smartphone searches
target cash register. In this example, select
EY123456789012.
Note that the device code di󰀨ers depending on each cash
register. Make sure to select the same code shown on the
cash register display.
9. After you select the device code on the smartphone,
the cash register then shows a pass key on the
display. Enter the pass key (in this example, 123456)
on the smartphone. Pass key di󰀨ers depending on
each cash register.
Enter pass key on your
mobile.
123456
If the cash register and a smartphone cannot be paired,
check the cash register display. When the display indicates
that pairing is failed, select [RETRY] and perform the
pairing again.
Failed to pair with
mobile device
[EXIT ]
[RETRY ]
A sound noties that the pairing is completed. Now your
cash register and your smartphone are paired by Bluetooth
connection.
10. Cash register settings are completed. Succes-
sively, set up “CASIO ECR+” on the smartphone.
iPhone users can continue settings by following the
instructions on the screen. For Android users, start
“CASIO ECR+” rst.
• Android is a trade mark and registered trade mark of Google LLC.
• iPhone is a trade mark registered in the USA and other countries.
Preparations
Note: Please follow the steps described below.

This manual suits for next models

2

Other Casio Cash Register manuals

Casio TK-T500 Series User manual

Casio

Casio TK-T500 Series User manual

Casio QT-6600 User manual

Casio

Casio QT-6600 User manual

Casio CE-T300 User manual

Casio

Casio CE-T300 User manual

Casio PCR-260B User manual

Casio

Casio PCR-260B User manual

Casio 110CR User manual

Casio

Casio 110CR User manual

Casio TK-7000 User manual

Casio

Casio TK-7000 User manual

Casio TK-810 Assembly instructions

Casio

Casio TK-810 Assembly instructions

Casio CE-6100 User manual

Casio

Casio CE-6100 User manual

Casio CE-2300 Assembly instructions

Casio

Casio CE-2300 Assembly instructions

Casio PCR-T500 User manual

Casio

Casio PCR-T500 User manual

Casio SE-C300 User manual

Casio

Casio SE-C300 User manual

Casio SE-S10 Operating instructions

Casio

Casio SE-S10 Operating instructions

Casio PCR-204 Assembly instructions

Casio

Casio PCR-204 Assembly instructions

Casio 130CR User manual

Casio

Casio 130CR User manual

Casio SE-S10 User manual

Casio

Casio SE-S10 User manual

Casio CE-300 (EX-247) User manual

Casio

Casio CE-300 (EX-247) User manual

Casio TE-100 User manual

Casio

Casio TE-100 User manual

Casio TE-2400 User manual

Casio

Casio TE-2400 User manual

Casio SE-S10 Operating instructions

Casio

Casio SE-S10 Operating instructions

Casio TE-4000F Series User manual

Casio

Casio TE-4000F Series User manual

Casio PCR 272 - Cabinet Design Cash Register User manual

Casio

Casio PCR 272 - Cabinet Design Cash Register User manual

Casio CE-2350 User manual

Casio

Casio CE-2350 User manual

Casio TE-100 User manual

Casio

Casio TE-100 User manual

Casio CE-280 Assembly instructions

Casio

Casio CE-280 Assembly instructions

Popular Cash Register manuals by other brands

Japan Cach Machine G356E Service manual

Japan Cach Machine

Japan Cach Machine G356E Service manual

Olivetti ECR 300 manual

Olivetti

Olivetti ECR 300 manual

Sam4s ER-900 Series Getting started

Sam4s

Sam4s ER-900 Series Getting started

ELCOM Euro-2500 Series Service manual

ELCOM

ELCOM Euro-2500 Series Service manual

Sharp XE-A201 quick start guide

Sharp

Sharp XE-A201 quick start guide

EcLine EC-CD-200M user manual

EcLine

EcLine EC-CD-200M user manual

Jepower C158 user manual

Jepower

Jepower C158 user manual

Colormetrics V1500 user manual

Colormetrics

Colormetrics V1500 user manual

Sam4s ER-260 SERIES Service manual

Sam4s

Sam4s ER-260 SERIES Service manual

Samsung ER-650 Operation and program manual

Samsung

Samsung ER-650 Operation and program manual

Sharp XE-A404 quick start guide

Sharp

Sharp XE-A404 quick start guide

Sharp CS-4194H Service manual

Sharp

Sharp CS-4194H Service manual

Olivetti ECR 5920 F GUIDE USAGER

Olivetti

Olivetti ECR 5920 F GUIDE USAGER

Sharp ER-A457 Service manual

Sharp

Sharp ER-A457 Service manual

Sharp ER-A247 instruction manual

Sharp

Sharp ER-A247 instruction manual

Samsung ER-150 quick guide

Samsung

Samsung ER-150 quick guide

Sharp XE-A23S instruction manual

Sharp

Sharp XE-A23S instruction manual

ELCOM Euro-2000T Alpha user manual

ELCOM

ELCOM Euro-2000T Alpha user manual

manuals.online logo
manuals.online logoBrands
  • About & Mission
  • Contact us
  • Privacy Policy
  • Terms and Conditions

Copyright 2025 Manuals.Online. All Rights Reserved.