manuals.online logo
Brands
  1. Home
  2. •
  3. Brands
  4. •
  5. Casio
  6. •
  7. Electronic Dictionary
  8. •
  9. Casio E-A10 User manual

Casio E-A10 User manual

1
EN
RJA537168-001V01   MO1706-B   PrintedinChina
© 2017 CASIO COMPUTER CO., LTD.
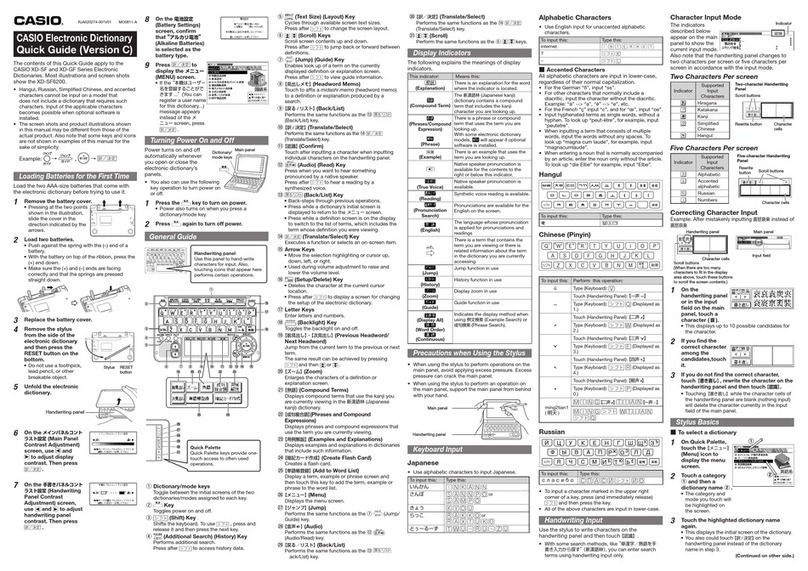
CASIO Japanese
Language Learning Tool
Operation Guide ( )
Before using this product, be sure to read and
observe the separate “Operating Precautions”.
Be sure to keep all user documentation handy for
future reference.
This Operation Guide provides you with general
information you need to start using your Japanese
Language Learning Tool.
• The screen shots and product illustrations shown in
this manual may be different from those of the actual
product. Also note that some keys and screen
indicators are shown in simplified form.
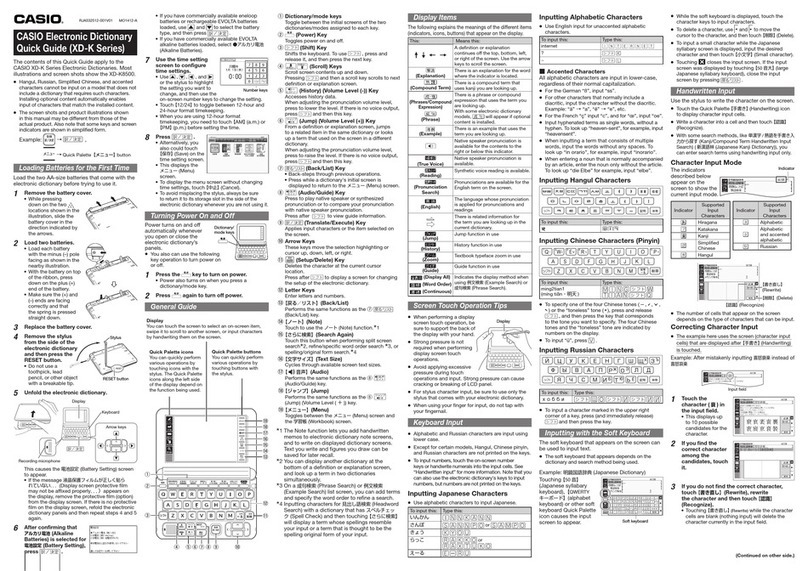
Example: → 、
→Quick Palette 【 】 button
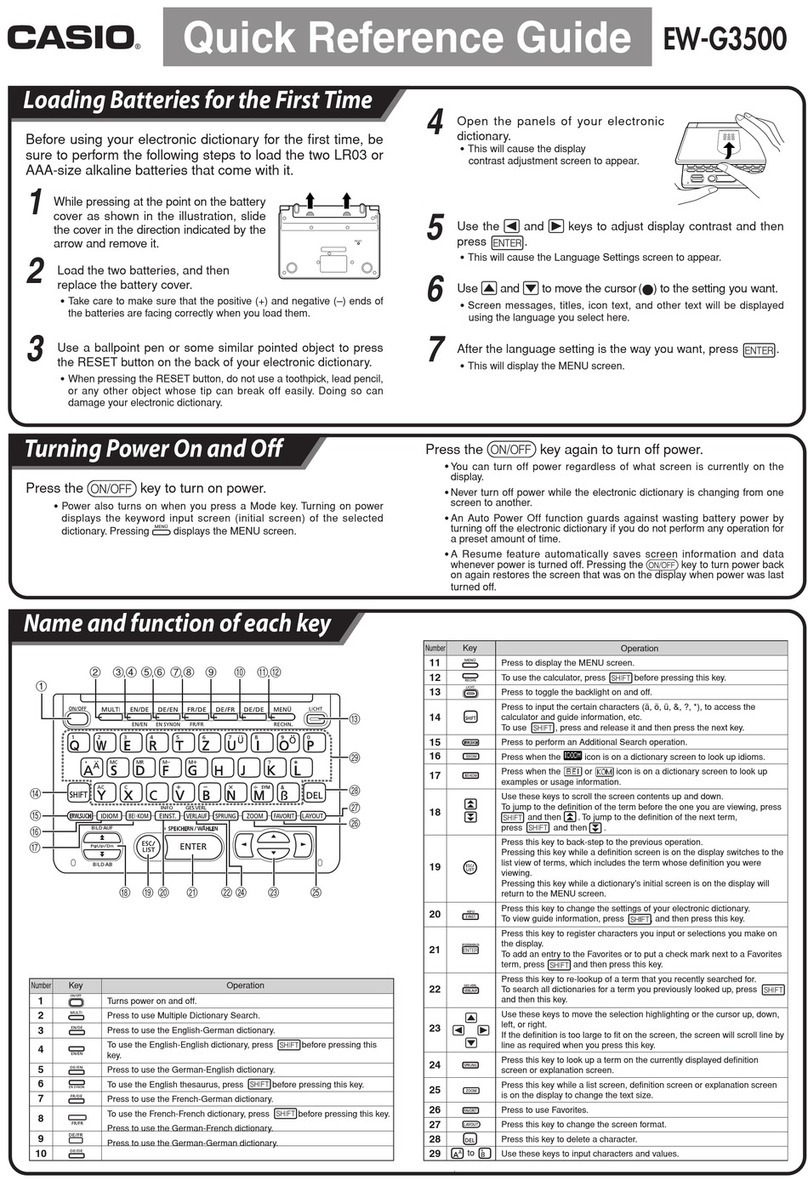
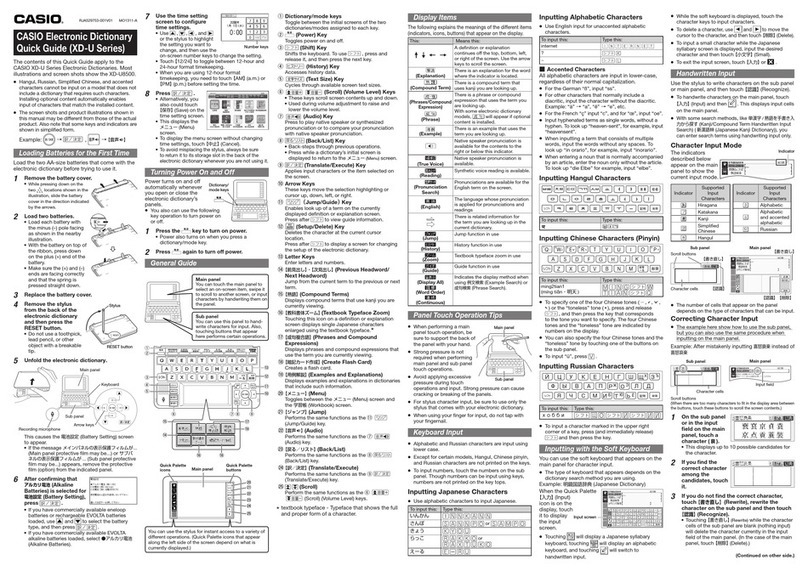
Loading Batteries for the First Time
Load the two AA-size batteries that come with the
Japanese Learning Tool before trying to use it.
1 Remove the battery
cover.
• While pressing down on
the two locations
shown in the illustration,
slide the battery cover in
the direction indicated by
the arrows.
2 Load two batteries.
• Load each battery with
the minus (–) pole facing
as shown in the nearby
illustration.
• With the battery on top of
the ribbon, press down
on the plus (+) end of the
battery.
• Make sure the (+) and (–)
ends are facing correctly
and that the spring is
pressed straight down.
3 Replace the battery cover.
4 Remove the stylus
from the side of the
Japanese Learning
Tool and use it to
press the RESET
button.
• Do not use a
toothpick, lead pencil,
or other object with a
breakable tip.
5 Unfold the Japanese Learning Tool.
①
②
⑲
⑰
⑭
⑮
⑯
⑱
⑩
⑪
⑫
⑬
⑨⑧⑦⑥④ ⑤
③
Display
Recording microphone
Keyboard
Arrow keys
This causes the 言語設定 (language selection) screen
to appear.
6 On the 言語設定 (language
selection) screen, use
and to move ● to 英語
(English) and then press
(Enter).
• This causes the time setting screen to appear.
7 Use the time setting screen
to configure time settings.
• Use , , , and or
the stylus to highlight the
setting you want to change,
and then use the on-screen
number keys to change the
setting.
• Touch 【12/24】 to toggle between 12-hour and
24-hour format timekeeping.
• When you are using 12-hour format timekeeping,
you need to touch
【AM】 (a.m.) or 【PM】 (p.m.)
before setting the time.
• To display the HOME screen without changing time
settings, touch
【中止】 (Cancel).
Stylus
RESET button
Number keys
(Continued on other side.)
8 Press .
• Alternatively, you also
could touch
【保存】
(Save) on the time
setting screen.
• This displays the
HOME screen.
• To avoid misplacing the stylus, always be sure to
return it to its storage slot in the side of the
Japanese Learning Tool whenever you are not
using it.
• You can assign dictionaries you want to the HOME
screen so they are available for selection. For more
information, see “Assigning Often-used
Dictionaries to the HOME Screen” (in the column
to the right).
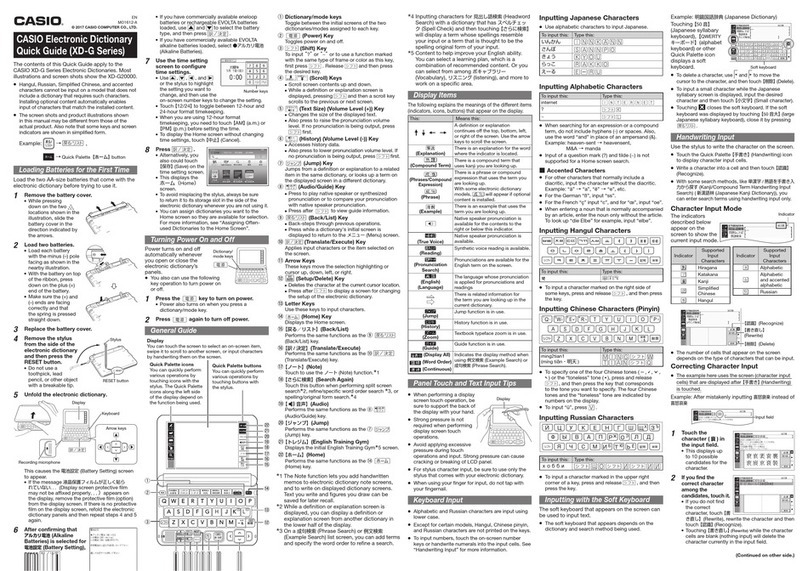
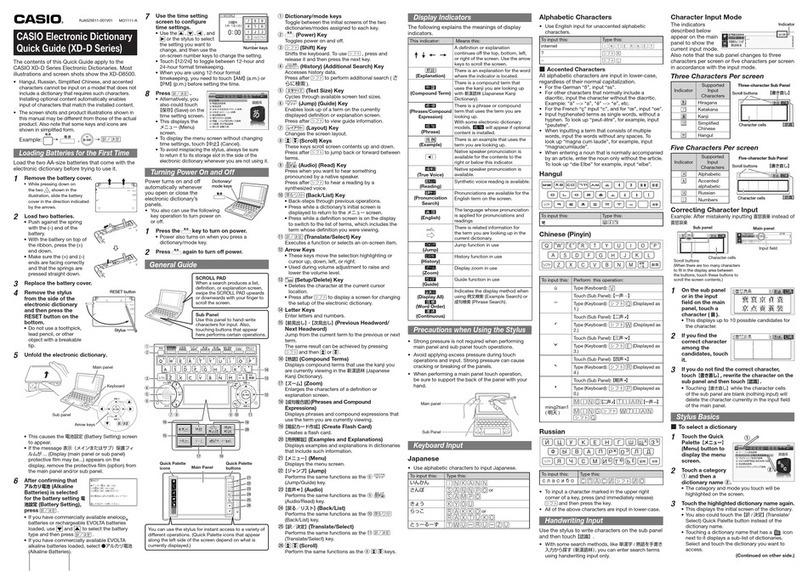
Turning Power On and Off
Power turns on and off
automatically whenever you
open or close the Japanese
Learning Tool panels
• You also can use the
following key operation to
turn power on or off.
1 Press the key to turn on power.
• Power also turns on when you press a dictionary/
mode key.
2 Press again to turn off power.
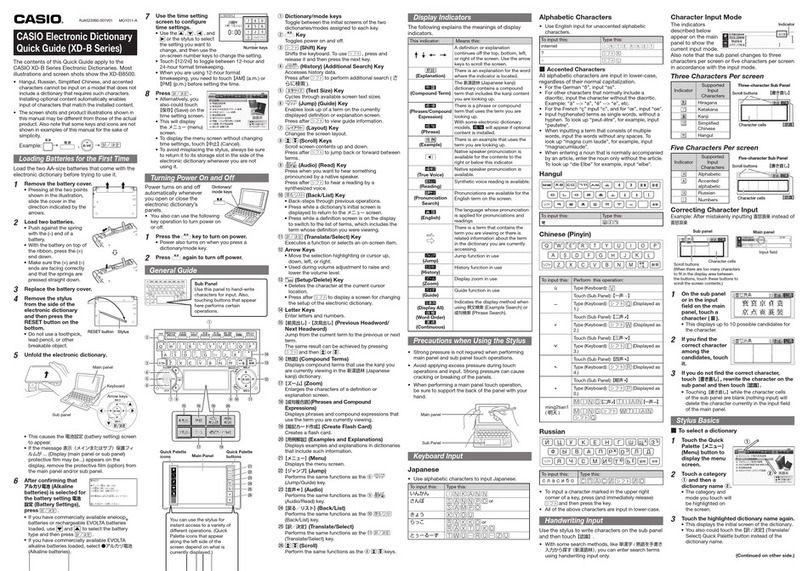
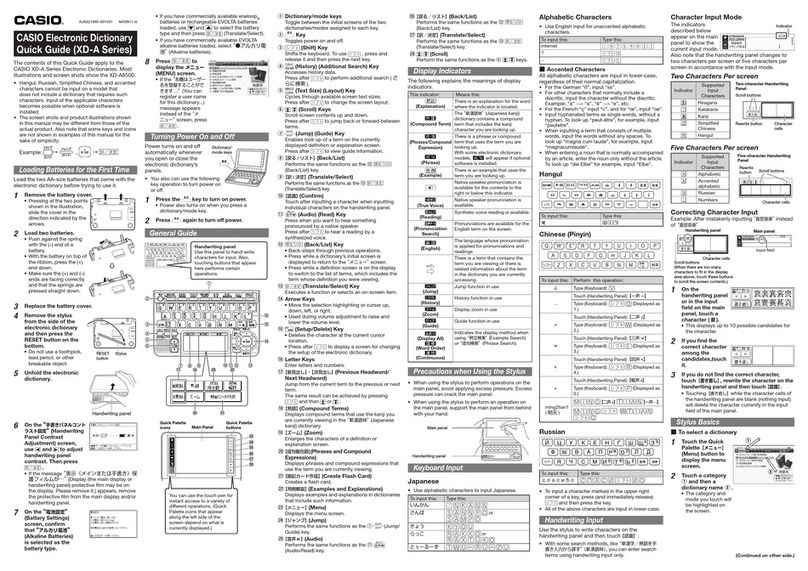
General Guide
Display
You can touch the screen to select an on-screen
item, swipe it to scroll to another screen, or input
characters by handwriting them on the screen.
⑰
①
②
⑤
⑫⑪⑩⑨⑧⑥ ⑦ ⑬
⑭
③
④⑮
⑯
㉓
㉔
㉒
⑳
⑱
⑲
㉑
㉕
Quick Palette buttons
You can quickly perform
various operations by
touching buttons with the
stylus.
Quick Palette icons
You can quickly perform
various operations by
touching icons with the
stylus. The Quick Palette
icons along the left side of
the display depend on the
function being used.
① Dictionary/mode keys
Toggle between the initial screens of the two
dictionaries/modes assigned to each key.
② (Power) Key
Toggles power on and off.
③ Earphones Jack (Side)
Connect commercially available earphones.
④ USB Cable Connector (Side)
You can use a specified USB cable to connect to a
computer for power.
⑤ (Shift) Key
To input (?) or (*) or to use a function marked with the
same type of frame as this key, first press .
Release and then press the desired key.
⑥ (Scroll) Keys
• Scroll screen contents up and down.
• While a definition or explanation screen is displayed,
pressing and then a scroll key scrolls to the
previous or next screen.
⑦ (Text Size) (Volume Level (+)) Key
• Changes the size of the displayed text.
• Also press to raise the pronunciation volume level. If
no pronunciation is being output, press first.
⑧ (History) (Volume Level (-)) Key
• Accesses history data.
• Also press to lower pronunciation volume level. If no
pronunciation is being output, press first.
⑨ (Jump) Key
Jumps from a definition or explanation to a related
item in the same dictionary, or looks up a term on the
displayed screen in a different dictionary.
⑩ (Audio/Guide) Key
• Press to play native speaker or synthesized
pronunciation or to compare your pronunciation with
native speaker pronunciation.
• Press after to view guide information.
⑪ (Back) Key
Back-steps through previous operations.
Dictionary/
mode keys
(Power)
⑫ (Enter) Key
Applies input characters or the item selected on the
screen.
⑬ Arrow Keys
These keys move the selection highlighting or cursor
up, down, left, or right.
⑭ (Setup/Delete) Key
• Deletes the character to the right of the current
cursor location.
• Press after to display a screen for changing
the setup of the Japanese Learning Tool.
⑮ Card Slot (Side)
Use this slot to view photo data.
⑯ Letter Keys
Use these keys to input characters.
⑰ (HOME) Key
Displays the HOME screen.
⑱ 【戻る】 (Back)
Performs the same functions as the ⑪ (Back)
key.
⑲ 【決定】 (Enter)
Performs the same functions as the ⑫ (Enter)
key.
⑳ 【ノート】 (Note)
Touch to use the ノート (Note) function. ( page 2).
󰼼 【さらに検索】 (Search Again)
Touch this button when performing split screen
search*1, refine/specific word order search *2, or
spelling/original form search.*3
󰽇 【 音声】 (Audio)
Performs the same functions as the ⑩ (Audio/
Guide) key.
󰽈 【ジャンプ】 (Jump)
Performs the same functions as the ⑨ (Jump)
key.
󰽉 【トレーニングジム】 (Japanese Training Gym)
Touch to display the initial screen of the Japanese
Training Gym.*4
󰽊 【 】 (HOME)
Performs the same functions as the ⑰ (HOME)
key.
*1 While a definition or explanation screen is
displayed, you can display a definition or
explanation screen from another dictionary in the
lower half of the display.
*2 On a PHRASE (Phrase Search) or EXAMPLE
(Example Search) list screen, you can add terms
and specify the word order to refine a search.
*3 Inputting characters for HEADWORD (Headword
Search) with a dictionary that has FUZZY SEARCH
(Spell Check) and then touching 【さらに検索】
(Search Again) will display a term whose spellings
resemble your input or a term that is thought to be
the spelling original form of your input.
*4 Content to help improve your Japanese ability.
You can select a learning plan, which is a
combination of recommended content. Or you can
select from among Vocabulary/Grammar,
Listening, and more to work on a specific area.
Display Items
The following explains the meanings of the different
items (indicators, icons, buttons) that appear on the
display.
This: Means this:
A definition or explanation continues
off the top, bottom, left, or right of the
screen. Use the arrow keys to scroll
the screen.
(Comment)
There is an explanation for the word
where the indicator is located.
(Phrase)
There is a phrase that uses the term
you are looking up.
(Example)
There is an example that uses the term
you are looking up.
Native speaker pronunciation is
available for the contents to the right
or below this indicator.
(Native Voice)
Native speaker pronunciation is
available.
(Reading)
Synthetic voice reading is available.
(Pronunciation
Search)
Pronunciations are available for the
English term on the screen.
(English)
(Language)
The language whose pronunciation is
applied for pronunciations and
readings.
There is related information for the
term you are looking up in the current
dictionary.
(Jump)
Jump function is in use.
(History)
History function is in use.
(Enlarge)
Zoom function is in use.
(Guide)
Guide function is in use.
(Display All)
(Word Order)
(Continuous)
Indicates the display method when
using Example Search or Phrase
Search.
Panel Touch and Text Input Tips
• When performing a display
screen touch operation, be
sure to support the back of
the display with your hand.
• Strong pressure is not
required when performing
display screen touch
operations.
• Avoid applying excessive pressure during touch
operations and input. Strong pressure can cause
cracking or breaking of LCD panel.
• For stylus input, be sure to use only the stylus that
comes with your Japanese Learning Tool.
• When using your finger for input, do not tap with your
fingernail.
Keyboard Input
• To input numbers, touch the on-screen number keys.
• For information about Thai input (search), see
“Specifying the First Letter of a Thai Term” under
“【Pattern 3】 : Searching step-by-step through a series
of titles” (in the column to the right).
Inputting Japanese Characters
• Use alphabetic characters to input Japanese.
To input this: Type this:
いんかん
さんぽ or
きょう
らっこ or
えーる
Inputting Alphabetic Characters
To input this: Type this:
internet
?
*
• Input of a question mark (?) and asterisk (*) is not
supported for a HOME screen search.
• When entering a noun that is normally accompanied by
an article, enter the noun only without the article. To
look up “the Beatles” for example, input “beatles”.
■Inputting Vietnamese
• Input Vietnamese using characters without tone
symbols and blank spaces.
Example: “bác sĩ” → “bacsi”
• Your Japanese Learning Tool does not support input of
Vietnamese characters (ặ, đ, ể, etc.)
Inputting Chinese Characters (Pinyin)
1 2 3 4 5
• Numbers are not actually printed on the keyboard
keys.
To input this: Perform this operation:
ming2tian1
(明天)
W T I A N
Q
• To input one of the four tone symbols ( , , , ) or
the neutral tone symbol ( ), press , use and
to select the desired symbol, and then press .
• To input “ü”, press
V
.
Inputting with the Japanese
Syllabary Keyboard
When the Quick Palette【Kana Key】 icon is displayed
during text input, touching it displays a Japanese
syllabary keyboard, which makes text input easier.
Example: スーパー大辞林 3.0 (Japanese Dictionary)
Touching the Quick Palette
【Kana Key】 icon displays a
Japanese syllabary
keyboard.
• To delete a character, use and to move the cursor
to the left of the character to be deleted, and then
touch
【Delete】.
• To input a small character while the Japanese syllabary
screen is displayed, input the desired character and
then touch
【Small】 (Small Letter).
• Katakana and hiragana keyboards are both available.
Use 【Kata】/【Hira】 to toggle between them.
• Touching closes the Japanese syllabary screen.
Display
Japanese syllabary
keyboard
Handwriting Input
Use the stylus to write the character on the screen.
• Touch the Quick Palette 【Hand】 (Handwriting) icon to
display character input cells.
• Write a character into a cell and then touch 【Recog.】
(Recognize).
Character Input Mode
The indicators described
below appear on the
screen to show the current
input mode.
Indicator
Supported
Input
Characters
Hiragana
Katakana
Kanji
Indicator
Supported
Input
Characters
Simplified
Chinese
Alphabetic
【Recog.】 (Recognize)
【Delete】
【Rewrite】
• The number of cells that appear on the screen depends
on the type of characters that can be input.
Correcting Character Input
• The example here uses the screen (character input
cells) that are displayed after 【Hand】 (Handwriting) is
touched.
Example: If you write 喜怒哀楽 but it is mistakenly
recognized as 喜怒衰楽
Input field
1 Touch the character
(衰) in the input field.
• This displays up to
10 possible
candidates for the
character.
2 If you find the correct
character among the
candidates, touch it.
• If you do not find the
correct character,
touch
【Rewrite】 ,
rewrite the character
and then touch
【Recog.】 (Recognize).
• Touching 【Rewrite】 while the character cells are
blank (nothing input) will delete the character
currently in the input field.
Touch Screen Operations
■To select a dictionary
1 Touch the Quick Palette 【 】 (HOME) button
to display the HOME screen.
2 Touch .
3 Touch a category.
• Touching a category
selects it.
• The currently selected
category or dictionary
will be indicated by a
green cursor (■ or ).
4 Touch a dictionary
(icon).
• This displays the initial
screen of the
dictionary.
■To select a headword or screen item
1 Enter characters. On the list that appears,
touch the term or screen item you want.
• This highlights the term or item.
2 Touch the highlighted term or item again.
• This displays the definition or explanation in the
case of a term, or the next screen in the case of a
screen item.
■Scrolling the Screen
• If there are pages following the currently displayed
page, you can scroll to them by swiping the panel.
• Swiping quickly will scroll at high speed. Touch the
panel to stop the scrolling.
Indicator
【Pattern 2】: Entering all of the terms
you want to find
Enter the entire term you want to find and then press
.
Example: To find the phrases that use the words “go”
and “to” ( ウィズダム英和辞典 (English-Japanese
Dictionary))
1 Use and to highlight PHRASE (Phrase
Search).
• Highlight EXAMPLE (Example Search) to search for
an example.
2 Enter the term.
• When inputting multiple words, separate them with
a space. Enter a space using the (Space) key.
3 Press .
• This displays a list of
all phrases that
contain the terms.
4 Use and to move the highlighting to a
phrase, and then press .
• This displays the detailed information screen.
【Pattern 3】: Searching step-by-step
through a series of titles
With some dictionaries, you need to perform
successive select and execute (by pressing )
operations until you arrive at the information you
need.
Example: To look up the counter for rabbits ( 例解学習
国語辞典 ) (Japanese Dictionary)
After the initial 例解学習国語
辞典 ( 第十版 ) (Japanese
Dictionary) screen appears,
perform the following
procedure to display the
explanation screen:
「APPENDIX」 → 物(もの )
を数 (かぞ )えることば
(Counters of things) → 生
(い)き物 (もの )・体 (からだ )
(Counters of living things)
→ ウサギ (Rabbits)
■Specifying the First Letter of a Thai Term
After displaying the Thai Soft Keyboard, you can input
characters to recall terms that begin with them.
Example: To look up the meaning of “ 愛情 ” (affection)
(Portable JP-TH-EN)
1 Use and to
select THAI, and
then press .
• This displays the Thai
Soft Keyboard.
2 Touch the key of the
first character of the
term you want.
• This will display a list
of terms that start
with the character
whose key you
touched.
3 Repeat the headword select and execute
operations until the explanation screen of the
term you want to look up is displayed.
• When a selection item has a letter next to it, you
can press the applicable letter key to select that
item.
• If a selection item has next to it, you need to
press before pressing the applicable letter
key.
Assigning Often-used Dictionaries to
the HOME Screen
You can assign up to six often-used dictionaries to
the HOME screen for quick and easy recall whenever
you need them.
■To assign a dictionary to the HOME screen
1 Press to display the HOME screen.
2 Touch .
3 Touch and hold the dictionary you want to
assign for about one second.
• Dictionaries are displayed on the screen in the
order they were assigned, from left to right. To
change the arrangement of dictionaries, delete the
ones currently registered and register them again.
■To select a dictionary
1 While the HOME screen is displayed, touch
the dictionary you assigned to the HOME
screen.
■To remove a dictionary
1 While the HOME screen is displayed, touch
and hold the dictionary you want to remove
for about one second.
2 Use and to select a dictionary removal
option, and then press .
• To remove only the selected dictionary, select
“Delete the selected content (1)”.
• To remove all dictionaries you assigned, select
“Delete all contents”.
Launching a Search from the HOME
Screen
You can input Japanese, alpha characters, or Chinese
to perform a Multi-Dictionary Search from the HOME
Screen.
1 Press .
• This displays the
HOME screen.
2 Touch the search
method you want to
use: JAPANESE,
ALPHABET,
EXAMPLE, PHRASE,
CHINESE.
• This causes the cursor ( l ) to appear in the search
term input box. As long as nothing is contained in
the search term input box, you can touch and
select a different search method, if you want.
• Touching or (Handwriting) displays the
handwriting input cells. For information about
handwriting input, see “Handwriting Input” (in the
column to the left).
• Touching (Japanese syllabary keyboard)
displays the Japanese syllabary keyboard. For
information about Japanese syllabary keyboard
input, see “Inputting with the Japanese Syllabary
Keyboard” (in the column to the left).
3 Enter the term you want.
• Terms starting with the characters you have
entered appear in a list on the display. In the case
of EXAMPLE (Example Search) and PHRASE
(Phrase Search), enter the characters you want and
then press .
• Each term also includes an indicator showing its
dictionary.
4 Use and to move the highlighting to a
dictionary and term combination, and then
press .
• This displays the definition screen.
Launching a Search from a Dictionary
You can use any one of the four patterns shown
below to search for terms and sentences.
【Pattern 1】: Entering the initial
characters of the term you want to find
The displayed list of search results changes as you
enter characters of the term you want to find.
Example: To look up the meaning of “美しい”
(beautiful) ( スーパー大辞林 3.0 (Japanese Dictionary))
1 Use and to highlight HEADWORD
(Headword Search).
2 Enter the term you
want.
• As you enter each
character, the list of
terms is updated
accordingly.
• When entering a
headword, you can
use the following
wildcard characters.
Character Represents
? A single unknown character
*A series of multiple unknown characters of
unknown length
3 Use and to move the highlighting to a
term, and then press .
• This displays the definition screen.
Search
method
Handwriting/
Keyboard
2
【Pattern 4】: Narrowing down the search
using multiple conditions
With this type of search, you can input multiple
keywords, terms, or other conditions.
Example: To look up the kanji 志 in 新漢語林 (Japanese
Kanji Dictionary)
• First enter 心 to specify the radical of 志, and then
specify 7 for the total number of strokes. This
information is used to look up the character.
1 Use , , and to highlight RADICAL
STROKE.
2 In the RADICAL
STROKE column,
enter 4 for the
number of strokes in
the radical 心.
• Use the number keys
that appear on the
screen to input a
number.
3 Press .
• This displays a list of
radicals that satisfy
the radical conditions.
4 Use , , and
to highlight 心,
and then press .
• If a selection item has
a letter at the
beginning, you can
press the
corresponding letter
key to execute the selection directly. In case of the
above, for example, you could simply press
A
.
• If a radical candidate has next to it, you need to
press before pressing applicable letter key.
• This displays the selected radical ( 心 in this case)
for RADICAL STROKE and highlights GROSS
STROKE.
5 Enter 7 for the total number strokes in the
character 志, and then press .
• This displays a list of characters that satisfy the
conditions.
6 Use , , and to highlight 志, and then
press .
• This displays an explanation of the term.
Other Searches
Jump Search
You can use jump search to jump to another location
in the same dictionary or to another dictionary.
■To jump within the same dictionary
1 When search results
show items with a
jump indicator ( ),
press .
• appears and
the first word that is
the jump target is
highlighted.
• The highlighted jump range is one character in the
case of Japanese and Chinese characters, and
one word in the case of English.
2
Use the arrow keys to move the highlighting to
an item to the right of a jump indicator ( ),
and then press to jump.
• Instead of the above procedure, you also can
perform the jump by touching the term to the right
of the jump indicator ( ).
• For some dictionaries, only red text is displayed
without ( ).
■To jump to another dictionary
Example: To look up “話” from the “tale” definition
screen by jumping from ウィズダム英和辞典 (English-
Japanese Dictionary) to スーパー大辞林 3.0 (Japanese
Dictionary)
1 While the results of a search are displayed,
press .
2 Use the arrow keys
to move the
highlighting to the
term you want to
look up, and then
touch the Quick
Palette【Select】
icon.
• This displays a dictionary menu screen.
3 Use and to
highlight a
dictionary, and then
press .
• This displays a list of
candidates.
4 Use and to move the highlighting to the
term you want, and then press .
• After pressing in step 1, tapping a single
character or term or dragging the stylus across
multiple characters or terms will search for the
headwords that match the highlighted character(s)
or word(s). If you highlight multiple English words
for an Example Search or Phrase Search jump,
only the first word you highlight will be searched
for.
• If or an English term is shown on the jump
destination screen, you can play native speaker
pronunciation. For details, see “Native Speaker
Pronunciation” (in the column to the right).
Displaying Detailed Information
Use the operations described here to view detailed
explanations and other information about looked up
words and terms.
Viewing Phrases
If in the upper right
corner of the screen, it
means that there is an
idiom available for the term
you are viewing.
1 Touch the symbol in the upper right corner of
the screen.
• This displays a list of applicable candidates.
2 Touch the item you want to view to highlight it
and then press .
• This displays the applicable details.
Viewing Examples and Explanations
If or is on the
display, it means that
example, illustration,
explanation, or other
information is available.
1 Touch an on-screen icon.
• This displays the applicable details.
Using the Exercise Book (Workbook)
The Exercise Book lets you use handwritten text to
further your language study. It lets you do many of the
same things you can do with the paper version of a
dictionary, such as highlighting important passages
with a marker (Marker Vocabulary List), affix comment
tags (Color Headword Memo), and more.
• The Exercise Book can be accessed from the HOME
screen Tools menu item.
Creating a Vocabulary List by Marking
with a Marker
Vocabulary List lets you
save headwords you want
to remember.
• You can save terms,
examples, or idioms as
headwords.
• You can save items while
Quick Palette
【Marker】 icon or 【Vocab.】 (Vocabulary List)
icon is displayed.
Handwriting a Notebook
You can save screens that
contain handwritten text to
a built-in notebook or
dictionary definition
screen.
• Touching Quick Palette
【ノート】 (Note) button
displays the menu screen.
Affixing a Tag to a Headword
You can affix a handwritten
tag to the definition or
explanation screen of a
headword produced by a
search operation.
• Tags can be affixed to a
headword that is a term,
example sentence, idiom, etc.
• Tags can be affixed while the Quick Palette 【MEMO】
screen is displayed. After a tag is affixed, it can be
viewed by touching Quick Palette
【MEMO】 icon.
Creating a Memorizing Card
(Memorization Card)
While viewing a dictionary definition or explanation
screen, you can create a handwritten memorizing card
and use it for memorizing terms and expressions.
• You can save combinations of terms and
pronunciations for Japanese or English.
• You can also use it for handwritten dictation testing.
• Touching Quick Palette 【M. Card】 (Memorizing Card)
icon displays the memorizing card.
Pronunciation
You can use your Japanese Learning Tool to listen to
readings (using native speaker pronunciations or
synthesized voices) of terms and sentences you look
up, and to record your own reading and compare it
with built-in readings by a native speaker.
• The pronunciation sounds from a built-in speaker.
Native Speaker Pronunciation
When or an English term is on the display, it
means that native speaker pronunciation is available.
1 Press .
2 On the Quick Palette,
touch the 【Listen】
icon.
• If was on the
display when you
performed the above step, it will become
highlighted ( ). If was not displayed, an
English term for which native speaker
pronunciation is available will become highlighted.
• You can specify the number of repeats by pressing
the
【Repeat】 icon on the Quick Palette and then
selecting the number of repeats you want: 1 (once),
3 (three times), 5 (five times).
3 Press .
• This will play the pronunciation of the term or
example sentence next to or under , or of the
currently highlighted English term.
• If there are multiple indicators or English
terms, use the arrow keys to highlight the one you
want and then press .
4 To exit pronunciation, press .
• You also can play a pronunciation by touching .
• Note the following precautions concerning English
terms.
–Proper pronunciation will not be produced for
language other than English.
–The pronunciation produced by your Japanese
Learning Tool may not be correct if there are multiple
pronunciations for a term.
Recording Your Reading to Compare
with Native Speaker Reading
While or an English term is displayed, you can
compare your reading with a native speaker reading.
Using the Recording microphone
Recording
microphone
• You should be about 20 to 30 cm away from the
microphone when recording. Clear recording may
not be possible if you are too close or if you are in a
noisy area.
• Any of the following can cause digital noise while
recording: nearby electronic devices, fluorescent
lighting, cell phones, etc., moving away from the
microphone.
• Do not allow the microphone to be exposed to
strong wind or water.
• Facing the microphone, enunciate clearly.
• After you are finished, immediately press to
end recording.
1 Press .
2 On the Quick Palette, touch the【Compare】
icon.
• This causes or an English term to become
highlighted.
• If there are multiple indicators or available
English terms on the display, use the arrow keys to
move the highlighting to location of the indicator or
term you want to use for pronunciation
comparison.
3 Press to play
the native speaker
reading of the term.
4 After playback is complete and “Recording”
appears on the screen, read the same term or
sentence into the microphone.
• After you finish recording, press .
• Recording time is two minutes. Recording stops
automatically after two minutes.
5 Use and to highlight “Compare with
Native Voice”, and then press .
• The native speaker reading and the reading you
recorded will play back in succession.
• To stop playback, press .
• If you want to play them back again, repeat step 5
of this procedure.
• To re-record pronunciation, select “Speak again”
and perform the procedure from step 3.
6 Use and to highlight “Do not compare”,
and then press .
• Exiting a comparison operation will automatically
delete the reading you recorded.
• Pressing returns to the definition screen.
Synthesized Voice Readings
Synthesized voice readings of terms and examples
are available in six languages: English, Spanish,
German, French, Italian, and Japanese (headwords
only for Japanese).
• Some dictionaries/modes do not support synthetic
voice readings.
1 While a definition or explanation screen is
displayed, press .
2 On the Quick Palette,
touch the 【Listen
TTS】 icon.
• The first term or
example on the
screen for which a
pronunciation is
available will be
highlighted.
3 Use and to highlight the term or example
whose pronunciation you want to hear.
• You can also highlight a term or example by
touching it.
4 Press .
• This will play the pronunciation of the term or
example.
5 To exit pronunciation, press .
Using Speech Training
The Speech Training feature is a great way to practice
for a speech contest, etc. You can select a time limit,
and record and play back speeches accordingly.
• Available time limit settings are from one to five
minutes, settable in one-minute units.
• You can have up to five speeches stored in memory.
• Speech Training can be accessed from the HOME
screen Tools menu item.
• For information about recording precautions, see
“Using the Recording microphone” (in the column to
the left).
To record a speech
1 Display the HOME screen. With the Tools
menu item, select Speech Training and then
press .
• This displays the Speech Training screen.
2 Use and to select Record.
3 Use and to select the time limit you
want, and then press .
4 Select or touch .
• This displays the message “Recording”. Facing
the Japanese Language Tool’s microphone, recite
your speech.
• After finishing the speech, press or touch .
• You can playback or re-record a speech without
saving it.
• To save a recording speech and finish recording,
select “Quit after saving” and then press .
Next, select a storage location and then press
.
• To exit recording without saving, select “Quit” and
then press .
To play back a speech
1 Display the Speech Training screen and then
use and to select Play.
2 Use and to select the speech you want
to play back, and then press .
• This starts playback of the speech.
• To delete a speech, select it and then press .
Next, select the speech delete option, and then
press .
Configuring Settings
There are two ways to configure settings.
• While the HOME screen is displayed, touch “Setup”
(HOME Settings)
• While a menu screen or dictionary screen is displayed,
press and release , and then press
(Dictionary Settings)
HOME setting and dictionary setting items and
procedures are different from each other.
Setting Items
You can configure the setting items described below.
• You can return settings to their initial defaults if
necessary. For information about how to do this, see
“Initialize” (in the column to the right).
• Start from the HOME screen or menu screen to
configure Language Settings and Common Preview
Settings.
• Meanings of setting item marks
: Item can be configured during HOME setting
procedure only.
: Item can be configured during dictionary setting
procedure only.
Use and to select an item and then press
, or press the key that matches the letter to
the left of the setting item.
HOME screen →Setup screen
Use and to change the category.
Settings
• In some cases, the same setting has a different name
in the HOME settings and the dictionary settings. The
tables below show dictionary setting item names.
■Pronunciation Settings
Item Description
Pronunciation Speed Specifies the speed of the native
speaker and synthesized voice
readings.
•Approximate speeds (Normal =
100%): 130%, 120%, 100%, 85%,
75%
Pronunciation
Language Settings
Specifies one of six languages for
the displayed dictionary, or disables
pronunciation.
Volume Use and to adjust the
volume (16 levels: 0 to 15).
•A setting of 0 mutes output.
Microphone
Sensitivity Setting
Specifies one of three input levels for
the microphone to suit voice
loudness and/or the recording
environment.
•As you face the microphone and
speak, select the input level at
which a green bar is displayed.
Finally, press .
Memorizing Card
Pron. Setting
Specifies the language (English Pron.
or Japanese Pron.) of a pronunciation
reading to be registered to a
memorization card.
■Configuration
Item Description
Key Tone Enables or disables the key input
tone.
Auto Power Off Specifies the Auto Power Off trigger
time.
HW Recog. Settings Specifies the handwriting recognition
method.
Language Settings Selects the language used for screen
messages, titles, icons, etc.
Preview Setting Specifies the display position of the
list screen preview.
Layout Setting Specifies the display layout of detail
screens (definition or explanation
screens).
•Only the screen types that can be
displayed by the dictionary whose
settings you are configuring will be
shown.
User Name For changing the user name
displayed on the HOME screen,
menu screen, and OFF screen.
HOME Wallpaper For changing the wallpaper of the
HOME screen.
Date/Time
For details about this item, see the
steps starting from step 7 under
“Loading Batteries for the First Time”
( page 1).
Common Preview
Set.
•Preview
(All History)
•Preview (Phrase)
•Preview (Example)
These items specify the display
position of the all dictionary history,
idiom search, and example sentence
search screen previews.
■LCD Panel Settings
Item Description
Brightness Setting Specifies display brightness (1/5 to
5/5).
Illumination Duration
Setting
Specifies how long the display
remains illuminated (30 seconds,
1 minute, 3 minutes).
•Specifies the time of non-used
before the display dims.
LCD Panel Control Calibrates the stylus with the screen.
•Calibration is necessary when the
location where you touch or write
is different from the resulting
location on the display.
•To calibrate, use the stylus to touch
the center of each of the crosses
that appear in the four corners of
the display. The calibration screen
will disappear automatically after
you touch all four crosses.
■Priority Settings
You can use this setting to specify which dictionary’s
(mode’s) example sentences or idioms should be
given priority when performing a HOME screen
“EXAMPLE” or “PHRASE”, or a “Japanese Example”
of a “Other Searches”.
■Initialize
Except for Language Settings, User Name, and Date/
Time, returns all other HOME settings to their initial
default settings.
1 While the HOME screen is displayed, touch
Setup.
2 Use and to select Initialize.
3 Use and to select Yes and then press
.

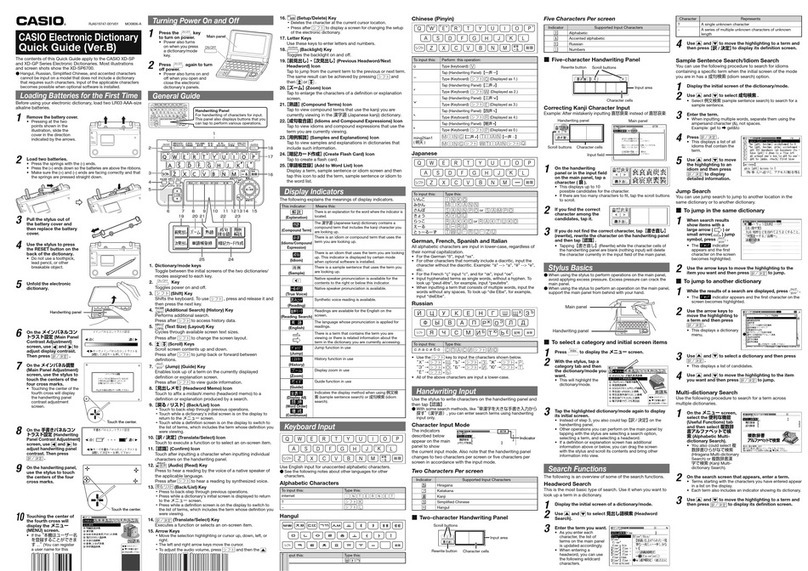
Other Casio Electronic Dictionary manuals

Casio XD-K Series User manual

Casio

Casio XD-K Series User manual

Casio XD-SP6700 User manual

Casio

Casio XD-SP6700 User manual

Casio EW-B2000C User manual

Casio

Casio EW-B2000C User manual

Casio XD-C760 User manual

Casio

Casio XD-C760 User manual

Casio EW-B100C User manual

Casio

Casio EW-B100C User manual

Casio XD-N series User manual

Casio

Casio XD-N series User manual

Casio XD-A8500 User manual

Casio

Casio XD-A8500 User manual

Casio XD-C730 User manual

Casio

Casio XD-C730 User manual

Casio xd-sf series User manual

Casio

Casio xd-sf series User manual

Casio XD-SP6600 User manual

Casio

Casio XD-SP6600 User manual

Casio XD-G Series User manual

Casio

Casio XD-G Series User manual

Casio EW-G3500 User manual

Casio

Casio EW-G3500 User manual

Casio EW-G5500V User manual

Casio

Casio EW-G5500V User manual

Casio EW-G300 User manual

Casio

Casio EW-G300 User manual

Casio EX-Word XD-SW6500 User manual

Casio

Casio EX-Word XD-SW6500 User manual

Casio XD-D Series User manual

Casio

Casio XD-D Series User manual

Casio XD-B Series User manual

Casio

Casio XD-B Series User manual

Casio XD-U Series User manual

Casio

Casio XD-U Series User manual

Popular Electronic Dictionary manuals by other brands

Sharp PW-GC590 Quick reference guide

Sharp

Sharp PW-GC590 Quick reference guide

Intesis 700 Series user manual

Intesis

Intesis 700 Series user manual

Creative Knowledge HansVision PX 2201 user guide

Creative Knowledge

Creative Knowledge HansVision PX 2201 user guide

Cross Technologies 2116-31T21 instruction manual

Cross Technologies

Cross Technologies 2116-31T21 instruction manual

Franklin TMQ-100 user guide

Franklin

Franklin TMQ-100 user guide

Acuity Brands eldoLED SC 4202/L quick start guide

Acuity Brands

Acuity Brands eldoLED SC 4202/L quick start guide

Sharp PW-E350 Operation manual

Sharp

Sharp PW-E350 Operation manual

Ectaco Partner ER-X5 user manual

Ectaco

Ectaco Partner ER-X5 user manual

Franklin BOOKMAN DMQ-440 user guide

Franklin

Franklin BOOKMAN DMQ-440 user guide

Sharp PW-AM700 Quick reference guide

Sharp

Sharp PW-AM700 Quick reference guide

Murata Femtet installation manual

Murata

Murata Femtet installation manual

Franklin TG-470 user guide

Franklin

Franklin TG-470 user guide

Seiko WP5402R Operation manual

Seiko

Seiko WP5402R Operation manual

Ectaco Partner EAl600T user manual

Ectaco

Ectaco Partner EAl600T user manual

Ectaco EHu600T user manual

Ectaco

Ectaco EHu600T user manual

Cross Technologies 2083-0703 instruction manual

Cross Technologies

Cross Technologies 2083-0703 instruction manual

Franklin DMQ-118N user guide

Franklin

Franklin DMQ-118N user guide

Franklin The Official SCRABBLE Players Dictionary user guide

Franklin

Franklin The Official SCRABBLE Players Dictionary user guide

manuals.online logo
manuals.online logoBrands
  • About & Mission
  • Contact us
  • Privacy Policy
  • Terms and Conditions

Copyright 2025 Manuals.Online. All Rights Reserved.