CASPR MOBILE User manual

www.CASPRGROUP.COM
CASPR
MOBILE
Owner’s Manual

2
Welcome
Welcome to CASPR MOBILE.
CASPR MOBILE is designed to provide years of trouble-free service
when it is properly maintained. Even when properly cared for, some
parts of your CASPR MOBILE will need to be replaced periodically.
Replacement parts can be purchased from your authorized
distributor or directly from CASPR Group.
(www.casprgroup.com)

3
Quickstart 4
Warnings 5
Setup & Operation 6
Diagrams 8
Routine Maintenance 12
Troubleshooting 15
Limited Warranty 17
Records/Specications 18
Contents

4
Quickstart
1 Place CASPR MOBILE on a counter top or shelf, not on the
oor. Ensure there is room in front and back of the unit for
air to ow through.
2 Plug the unit in with the included power cable.
3 Insert the 2 x AAA batteries inside the remote control.
4 Power on with the remote or by pressing the display screen
then set the fan to a comfortable sound level. Leave the
CASPR MOBILE in NORMAL Mode - Screen will read PCO
(PhotoCatalytic Oxidation). This is the standard mode for
occupied rooms. HIGH mode, for burst disinfection, should
not be used for more than one hour in occupied space.
2
1
4
3
5
Use the AWAY MODE for a higher level of
disinfection when space is not occupied.
Pressing the Away Mode key will start a
timer (2 to 8 hours). The CASPR Mobile
will go back to Standard Mode when the
timer ends or when you push NORMAL
Mode again.
NEVER USE AWAY MODE
WHEN ROOM IS OCCUPIED
Fan
speed
Purication
level
Size of the room
(only set in HIGH mode)

5
Warnings
Review this list before using or performing any maintenance or cleaning of your unit.
WARNING: Never operate unit near a heat source, open ame or ammable/combustible uids.
WARNING: Do not operate unit unless all parts (including PCO Cell, Purication Plate, Rear Filter Assembly and Rear Cover)
are properly installed.
CAUTION: Directly viewing the lamp inside unit for an extended period (longer than 20 min.) may result in eye damage.
CAUTION: Never adjust setting to exceed square footage of ventilated space being treated.
CAUTION: Do not use AWAY MODE in occupied spaces. Short term exposure to ozone levels exceeding 0.5 ppm can cause
temporary adverse reactions.
CAUTION: Unit should be powered OFF and Power Cord should be disconnected when Cleaning/Disassembling/
Reassembling/Servicing.
WARNING
CAUTION
CAUTION
WARNING
CAUTION
CAUTION

6
Ideal Placement
• Make sure the location you choose is as close to an air
supply duct as possible and as far away from the HVAC air
return duct as possible. This will ensure that the oxidizing
molecules produced by the CASPR MOBILE are optimally
circulated.
• Each CASPR MOBILE can effectively treat 1,500 sq feet of
space as long as there is air circulation in the space. Be sure
doors are open in areas that you wish to treat.
• To ensure the unit works properly, there should be as much
space as possible in front of your CASPR MOBILE so that It
can efciently process the air in the area.
• Place CASPR MOBILE on a shelf or counter top.
Never place an operating unit on the oor.
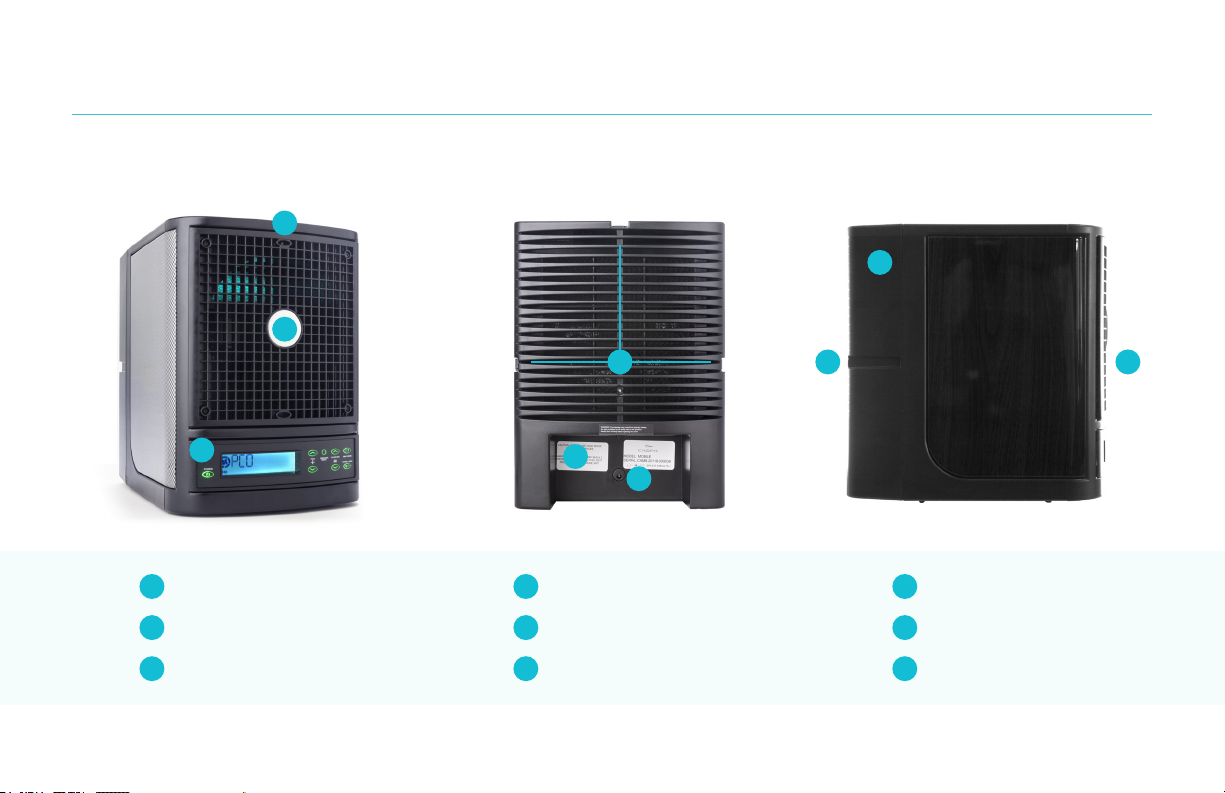
Operating CASPR MOBILE
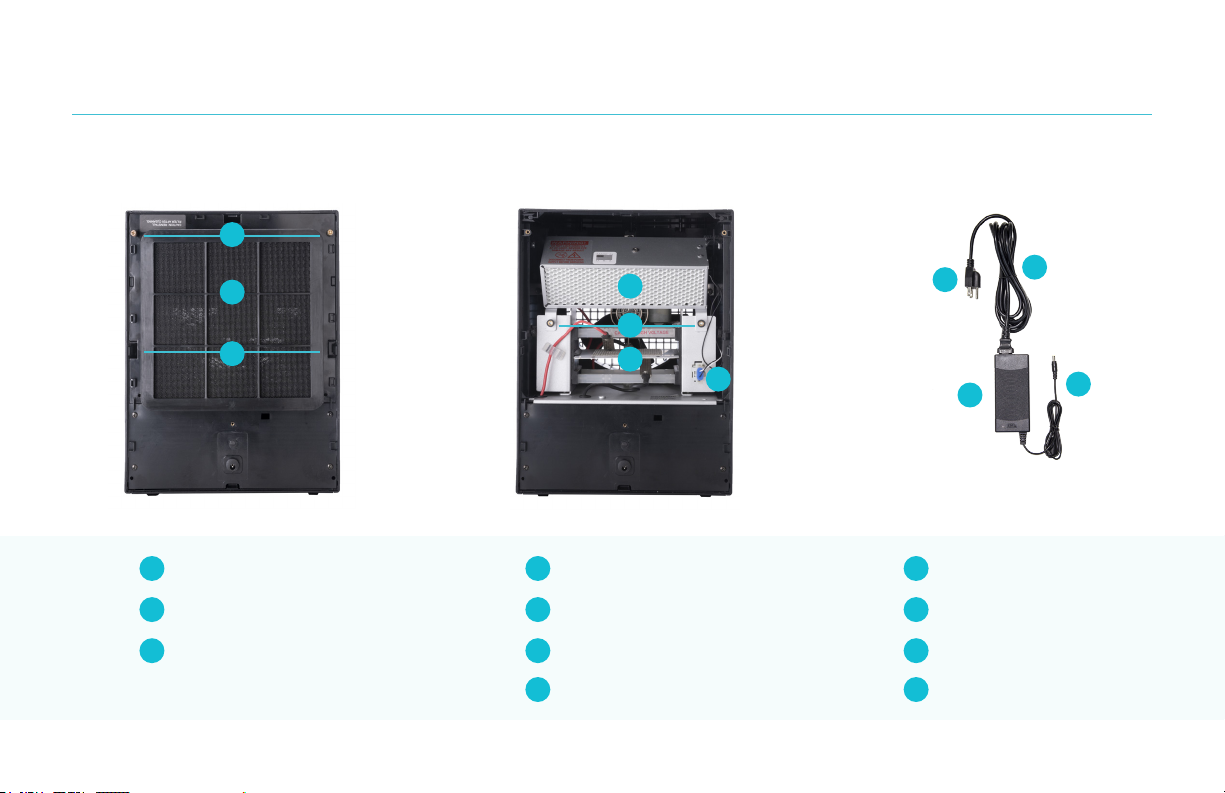
1. Connect the Power Cord to the Power Adapter and the
Power Adapter Plug into the unit. (Check to be sure your
power supply is properly assembled. The Power Cord should
be inserted far enough into the Power Adapter so that a
space of only about 1/8 in. is left between the widest part of
the power cord and the edge of the Power Adapter).
2. Insert the Power Plug into the wall outlet.
3. Turn on the unit by pressing the POWER button and set
it to NORMAL mode. The screen will read PCO (Photo
Catalytic Oxidation). This is the optimal setting for running
CASPR MOBILE continuously in your ofce or home. Adjust
the fan to a comfortable sound level using the up and down
buttons next to the display.
4. CASPR MOBILE comes with a remote control and 2 AAA
batteries for easier operation when the unit is placed on a
high shelf.
Set up and Operation
(Initial Setup)
6

7
When to use NORMAL Mode
• Normal mode should be the default mode for continually
running your CASPR MOBILE in occupied space.
When to use HIGH Mode
• High mode is used for burst purication, removing
pollutants like smoke or other signicant odors. Do not run
HIGH Mode for more than one hour with occupants in the
room.
• When CASPR MOBILE is set to HIGH Mode the display
will ask you to set the square footage. Press the PURIFIER
button up or down to set the square footage of the room
for the most effective treatment.
When to use SLEEP Mode
• Access sleep mode on your remote control. Activating this
setting will dim the display screen settings.
When to use AWAY Mode
• AWAY Mode generates ozone for deep cleaning an area.
This mode can be used for removing smoke, cooking odors,
mold spores, viruses and bacteria. AWAY mode runs on a
timer and once it completes the cycle, it returns to Normal
Mode.
• Set AWAY Mode by pressing the AWAY Mode button. Each
time you press the button it will increase the time of the
cycle from 2:00, 4:00, 6:00 or 8:00 hours.
• If Away Mode is running when you enter the room, push the
Normal/High button once to return to Normal Mode.
NEVER USE AWAY MODE IN OCCUPIED SPACES
Operating Modes
Normal: Continual Usage: 24/7; High: Limit to 1-hour per day;
Away: Limit to unoccupied spaces ONLY

8
Ionization Needle
1
Front Grille2
Control Panel
3
Rear Cover Screw
1
Rear Cover Grooves2
Power Adapter Inlet
3
Rear Cover
1
Unit Rear2
Unit Front
3
1
2 3
Front of Unit Rear of unit Side of Unit
Diagrams (Unit)
1
2
3 1
2
3

9
Brass Thumbscrews
1
Filter Assembly2
Filter Assembly Clasps
3
PCO Cell
1
PCO Cell Nuts2
PCO Cell Connector
3
Power Cord
1
Power Cord Plug2
Power Adapter
3
Power Adapter Plug
4
Purication Plate
4
Rear of Unit
(Rear Cover Removed)
Rear of Unit
(Filter Assembly Removed)
Power Supply
1
2
3 4
1
3
4
2
2
1
3
(Unit)

10
1
2
3
6
5
4
Power Button
1
Purication Level Control
2
Normal/High Mode Control
3
Away Mode Control
4
Fan Level Control
5
Sleep Mode Control
6
Diagrams (Controls)
1
2 45 6
3 7
Remote Control Panel
Power Button
1
Fan Speed Control
2
Infrared Receiver
3
Reminder Reset Button
4
Purier Level Control
5
Away Mode Toggle
6
Normal/High Toggle
6
Power Button
1
Fan Speed Control
2
Infrared Receiver
3
Reminder Reset Button
4
Purier Level Control
5
Away Mode Toggle
6
Normal/High Toggle
6
10

11
Control Panel Screen Mode Specic Display
(Controls)
11
(Controls)
Control Panel Screen
3
Fan Speed Indicator
Mode Specic Display
Mode Indicator
Purication Level Warning
Maintenance Reminders
Away Mode Warning
Mode Specic Display
Normal - Technology Indicator (PCO)
High - Square Footage Indicator
Away - Mode Duration Indicator (hours:minutes)
Mode Specic Display
1
5
4
2
6
3
1
2
3
4
5
6
Fan Speed Indicator
1
Mode Specic Display
2
Mode Indicator
3
Purication Level Warning
4
Maintenance Reminders
5
Away Mode Warning
6
Mode Specic Display
Normal - Technology Indicator (PCO)
High - Square Footage Indicator
Away - Mode Duration Indicator
(hours:minutes)
3
Away Mode High Mode PCO (Normal)

12
Routine Maintenance
To run efciently, your CASPR MOBILE requires cleaning on a
60 to 90 day cycle. Every month the display will remind you to
clean the unit. The best way to tell if the Filter Assembly needs
to be cleaned is to check the front grill for dust. If the front grill
is dusty, you should remove and clean the Filter Assembly. If the
front grill is not dusty, you can press the Reminder Reset button
and you will be reminded again in 30 days.
To remove and clean the Filter Assembly you will need a
#2 Phillips screwdriver.
Removing the Rear Cover
1. Turn off the unit with the Power button.
2. Unplug the unit from the power source and then remove
the power cord from the back of the unit.
3. Unscrew and remove the Rear Cover screw located above
the Power Cord Port.
4. With two hands, squeeze the sides of the unit where the
grooves are located, in the middle of the Rear Cover, until
the tabs release and the back pops open.
5. Tilt the Rear Cover upwards until the top tab releases.
6. Wipe the rear cover with a
damp cloth and set to the side.
Removing and Cleaning the Filter Assembly
1. Unit should be powered OFF and Power Cord should
be disconnected when Cleaning/Disassembling/
Reassembling/Servicing.
2. Remove the two Brass Thumbscrews at the top of the
Filter. The rst time you remove these you will need a
screwdriver.
3. Grasp the top of the Filter, lift slightly and pull it away
from the unit.
4. Thoroughly rinse the lter with warm water. Shake
excess water from the lter and let it dry for an hour
before reattaching it.

13
Reattaching the Filter
1. The larger at side of the Filter Assembly faces the interior
of the CASPR MOBILE. A sticker reading, “Caution: Reinstall
Filter After Cleaning” will be visible.
2. Insert the bottom of the Filter Assembly into the tabs and
press to seat.
3. Screw the two Brass Thumbscrews into the holes located at
the top corners of the Filter Assembly. Tighten them with
your ngers. It is not necessary to use a screwdriver.
Reattaching the Rear Cover
1. Place the tab at the top of the Rear Cover into the hole at
the top of the Filter Assembly. Press the Rear Cover at
against the back of the unit until the tabs on the side of the
Rear Cover click into place.
2. Insert the Rear Cover Screw into the hole about the Power
Cord Port and tighten.
Removing and Cleaning the Front Grille
1. Locate the four Front Grille Screws in the four corners of
the Front Grille.
2. Using your screw driver, carefully remove the four Front
Grille Screws. Place the Front Grille Screws where you will
nd them easily during reassembly.
3. Remove the Front Grille carefully to ensure that the
Ionization Needle (in the top center of the front of the unit)
is not damaged.
4. Clean the Front Grille using (compressed air, vacuum
cleaner, damp cloth or warm soapy water) and set the
Front Grille aside.
5. If the Ionization Needle is visibly dusty, gently clean it with
a cotton swab and clear alcohol-based cleaner or rubbing
alcohol.
Reattaching the Front Grille
1. Align the Front Grille to the front of the unit, being careful
not to damage the Ionization Needle at the top center of
the unit.
2. Insert the screws one at a time and tighten them half way.
After all four screws are in place, tighten them all the way.
13

14
LCD Reminders
When your CASPR MOBILE unit is in need of maintenance, a
message will display on the LCD screen.
• Perform Cleaning – this message will display every 30 days.
Check to see if the front grill of the unit is dusty. If so, you
will need to clean the lter as described in the Routine
Maintenance section on page 12. If the front grill is not
dusty, simply press the Reminder Reset button and CASPR
MOBILE will remind you again in 30 days.
• Replace Plate – This message displays when the
Purication Plate has reached the end of its useful life and
needs to be replaced. To order a replacement, contact your
distributor or CASPR Group (www.casprgroup.com). Follow
the instructions included with your replacement part to
replace your Purication Plate.
• Replace PCO Cell - This message displays when the PCO
Cell has reached the end of its useful life and needs to be
replaced. To order a replacement, contact your distributor
or CASPR Group (www.casprgroup.com). Follow the
instructions included with your replacement part to replace
your Purication Plate.
A message will
display on the LCD
screen when your
CASPR MOBILE units
needs maintenance.

1515
Troubleshooting
The Unit Fails to Turn on
1. Verify that the Power Plug is plugged into an operational
wall outlet.
2. Ensure that the Power Cord is fully inserted (leaving less
than an 1/8”) to the Power Adapter.
3. Ensure that the Power Adapter Plug is fully seated in the
receptacle on the back of the unit.
4. Verify the Power Button has been activated on the Control
Panel.
5. If the Power Button on the Control Panel fails, use the
Power Button on the Remote Control. If the Control Panel
fails, contact your distributor or CASPR Group
(www.casprgroup.com).
The Unit is Operating in High Mode or Away Mode, but
No Noticeable Purication is Being Produced
1. Ensure that the Purication Plate is clean (See Step 4).
2. The Purication Plate may not be working because it needs
to be replaced. Try installing a new Purication Plate.
3. Check the electrical contact arms which touch the plate to
ensure that they are making proper contact with the metal
weave on the Purication Plate.
4. Ensure the electrical contact arms which touch the plate
are clean. Clean them with a soft cloth and rubbing alcohol.
5. Turn the lights off In the room and look through the Front
Grille at the Purication Plate. If It is operating properly, it
will produce a dim purple glow.

16
Removing and Cleaning the Purication Plate
1. Follow the instructions for removing the Rear Cover and
Filter Assembly on Page 12.
2. Grasp the Purication Plate on the ceramic surface and
gently pull it out of the grooves on the sides.
3. Using a 50/50 mix of warm water and clear ammonia, or in
place of the water and ammonia mixture use 100% white
vinegar, soak the Purication Plate for 8 to 10 hours. Do
not exceed 10 hours. Using a soft bristled tooth brush,
scrub the wire mesh to remove debris lodged inside the
mesh. Rinse thoroughly. Allow the Purication Plate to dry
completely before reinstalling.
4. Use a soft cloth and rubbing alcohol to clean the metal
contacts that touch the Purication Plate.
5. Holding the Purication Plate by the ceramic, align it with
the grooves on either side and slowly insert it into the
Purication Plate Slot.
The Purication Plate Generates an Electrical Arc, an
Arcing Noise or a Burning Odor
This means the Purication Plate is damaged and must be
replaced. The unit may or may not display the Replace Plate
LCD reminder. To order a replacement, contact your distributor
or CASPR Group (www.casprgroup.com).
The PCO Cell Does Not Light Up
1. Ensure the PCO Cell Power Connector is properly seated in
the PCO Cell Power Connector Outlet.
a. Follow the instructions for removing the Rear Cover
and Filter Assembly on Page 12.
b. Check to see if the PCO Cell Power Connector is
properly inserted in the PCO Cell Power Connector
Outlet. To ensure the proper connection, gently push
until the tabs at the top and bottom of the PCO Cell
Power Connector snap into place, securing it to the
PCO Cell Power Connector Outlet.
2. If the PCO still fails to operate, it needs to be replaced.
Contact your distributor or CASPR (www.casprgroup.com).

17
Limited Warranty
Your CASPR MOBILE is warranted to be free from all defects
in material and workmanship in normal household use for
a period of (l) year from date of purchase. The warranty is
granted only to the original purchaser and is subject to the
following provisions. This warranty does not cover parts of
the CASPR MOBILE that require replacement under normal
use. This includes the purier plate and rear lter assembly.
Although the PCO cell requires periodic replacement, the cell
is warranted for the same 1 year period as the purier. Any
damages or malfunctions caused by negligence, abuse, or use
not in accordance with the Owner’s Manual are not covered
by this warranty. Likewise, any defects or damages caused
by unauthorized service or the use of other than Genuine
CASPR parts are not covered. CASPR Group will, at its option,
repair or replace a defective CASPR MOBILE or part(s) for the
CASPR MOBILE that is covered by this warranty As a matter of
warranty policy, CASPR Group will not refund the customer’s
purchase price.
To obtain warranty service you must return the defective CASPR
MOBILE unit or parts along with proof of purchase to your
CASPR distributor. All transportation charges on parts, or units,
submitted under this Warranty shall be borne by purchaser.
Unless this Warranty is expressly renewed or extended by
CASPR Group, any repaired or replaced part of unit shall be
warranted to the original purchaser only for the length of the
unexpired portion of the original warranty. For additional service
information, please visit us online at: www.casprgroup.com
Further Limitations And Exclusions Are as Follows
Any warranty that may be implied in connection with your
purchase or use of the CASPR MOBILE, including any warranty
of merchantability or any warranty for Fitness For A Particular
Purpose is limited to the duration of this warranty. Some states
do not allow limitations on how long an implied warranty lasts,
so the above limitations may not apply to you.
Your relief for breach of this warranty is limited to the relief
expressly provided above. In no event shall CASPR Group be
liable for any consequential or incidental damages you may
incur in connection with your purchase or use of the CASPR
MOBILE. Some states do not allow limitations on how long an
implied warranty lasts, so the above limitations may not apply
to you.
This Warranty gives you specic legal rights, and you may also
have other rights which vary from state to state.
17

18
Specications
Unit
Size: 12” high x 9” wide x 12” deep
Weight: 10.2 lb.
Coverage: 1500 ft2
Power Cord
Fuyuang Switching Power Supply
Model: FY3803000
Input: 100-240VAC 50/60Hz 2.5A Output: 38VDC 3A
See the power supply label for certications and warnings.
PCO Cell
Normal Mode Output
Purication Plate
High Mode Output: 25-360mg ozone per hour
Ionization Needle
24 to 30 KV, 20-30 Khz Ion Generation Pulsator
6 KV DC Needle Ion Generator
Records
Purchase Date:
Model Number: CASPR MOBILE
Serial Number:
Distributor Name:
Distributor Phone:
Consumer Information
CASPR Group declines all responsibility for all damages
arising from improper use of the unit or in case of
tampering with the unit.

19
www.CASPRGROUP.COM
Table of contents
Other CASPR Air Cleaner manuals
Popular Air Cleaner manuals by other brands

Oregon Scientific
Oregon Scientific CF-8410 user manual

Dustcontrol
Dustcontrol DC AirCube 2000 Original instructions

BOB-HOME
BOB-HOME 2493 manual

Rowenta
Rowenta Intense Pure Air XL PU6010U0 manual

SecureAire
SecureAire ACS Installation, operating and maintenance guide

Membrane Solutions
Membrane Solutions MS18 Operator and Maintenance Handbook

Smokeeter
Smokeeter SE 50 Installation and operation manual

Honeywell
Honeywell FC40R specification

Ultravation
Ultravation SOLARIS-EUVCat Installation and owner's manual

White Rodgers
White Rodgers Electro-Air 10C27S-010 owner's manual

PUR
PUR SSCB15W-R Operation & maintenance manual

Ivation
Ivation IVAOZAP04 user guide