CHESTER Cobra Mill User manual


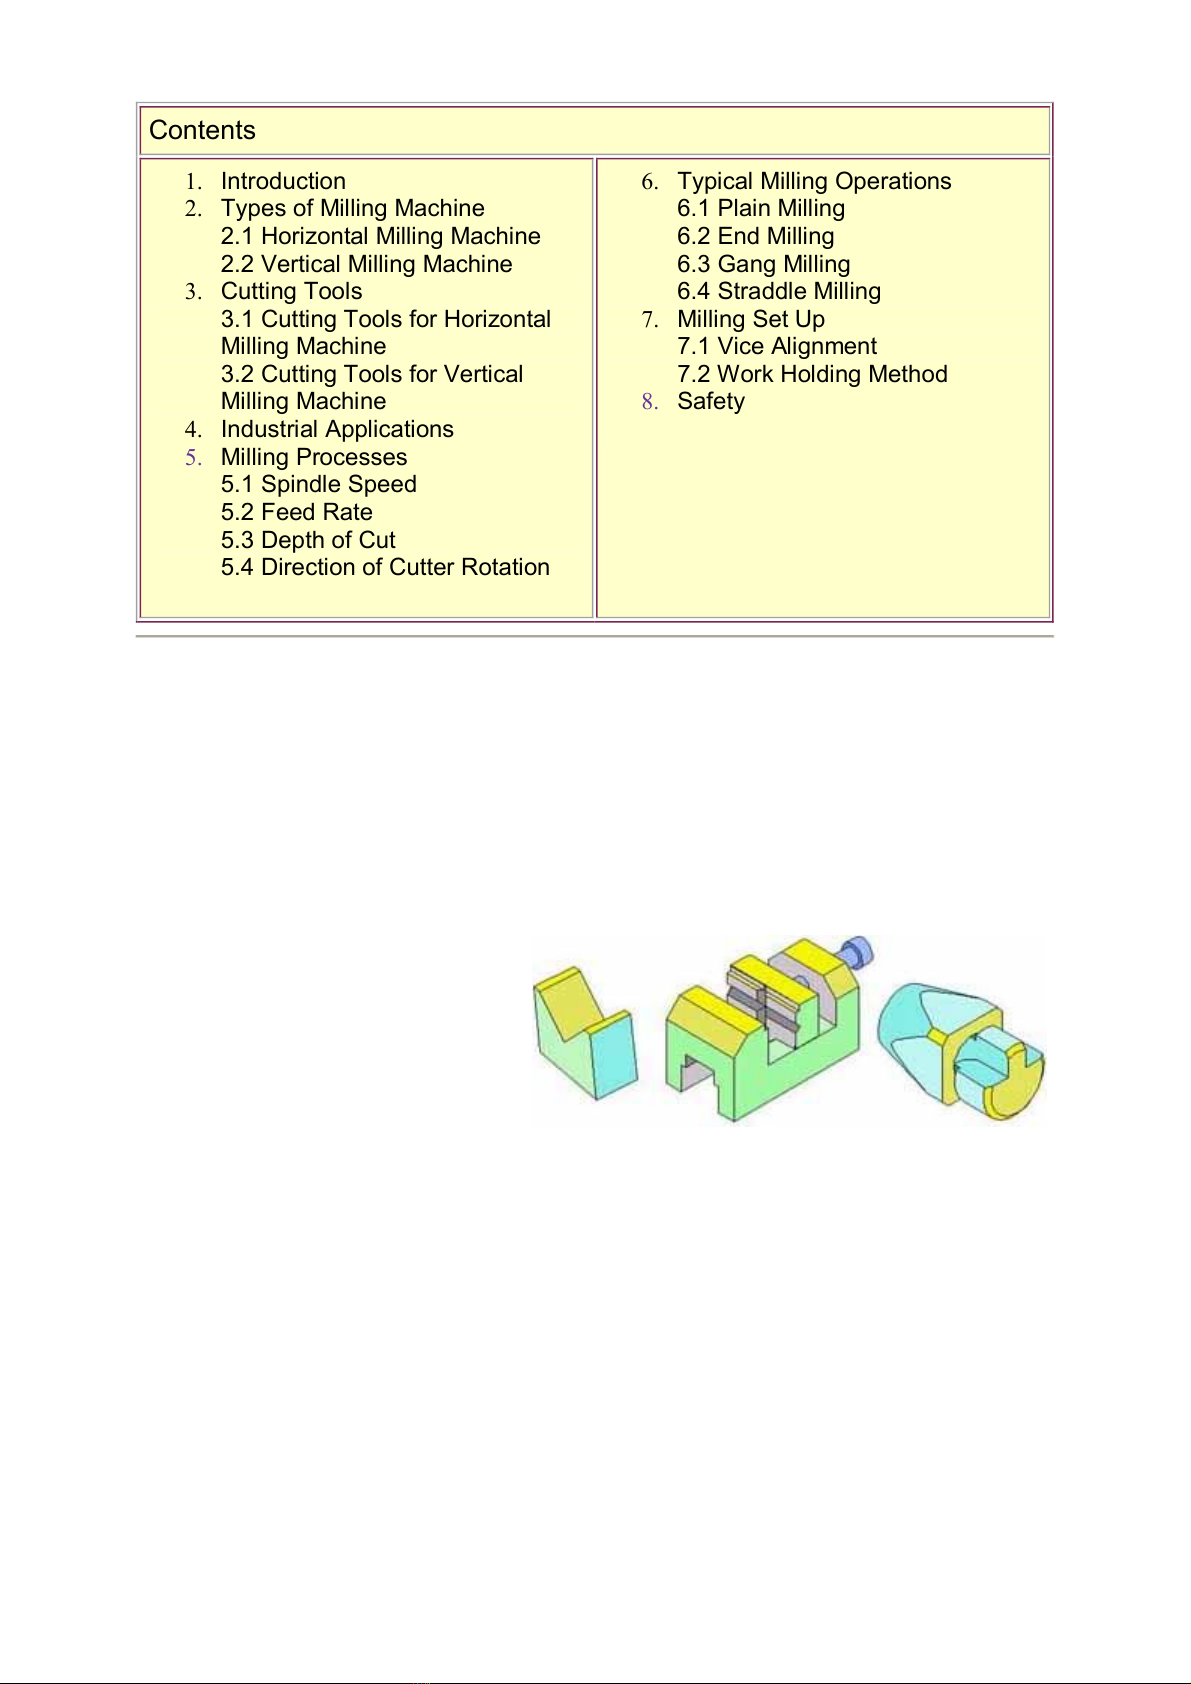
Contents
1. Introduction 2
2. Health&Safety 35
3. MachineSpecification 67
4. Operation 89
5. Controls 10
6. PartDiagrams&Lists 1113
7.CircuitDiagram 1415
8. GuideToMilling 16
ChesterUKCobraMill
1

Introduction
ChesterUKLimitedisaspecialistcompanythathasbeensupplyingthemachinetoolindustryfor
over15years.TheChesterUKHeadOfficecomprisesofa30,500sq.ftfactorycompletewithofficesand
a showroom. Specialisingin conventional machine tools, Chester has built a reputation for quality and
reliability,whichishighlyregardedinthemachinetoolindustryandthemodelengineeringmarket.
Thereareseveral divisionswithinthecompany;Export,Education, ModelEngineering &UKSales,all
withdedicatedsalespersonnelwhoaretrainedtoansweryourquestions.
When buying from Chester you can be assured of a complete backup service with mechanical and
electricalengineersthatareavailabletogiveadviceifrequired.
StockisalargepartofanybusinessandChesterhavealwaysinvestedsubstantiallyinbuildingalarge
quantity of machines and spares, ready to satisfy customer requirements. Chester UK has one of the
largest stocks ofconventionalnew machines andaccessories within Great Britain. Pleasetake time to
visitourwebsite: www.chesteruk.net
ChesterUKCobraMill
2

Health&Safety
Aswithallmachinerytherearecertainhazardsinvolvedwiththeoperationanduseofthelathe.
Using the machine with respect and caution will considerably lessen the possibility of person injury.
However, if normal safety precautions are overlooked or ignored, personal injury to the operator may
result.
Thismachinewasdesignedforcertainapplicationsonly.Westronglyrecommendthatthemachineisnot
modified,and/orusedforanyapplicationotherthanwhichitwasdesigned.Ifyouhaveanyquestions
relativetoitsapplicationdonotusethemachine,untilyouhavefirstbeenincontactwithChester
UK.
The lathe may not arrive with a power socket or plug. In the event of this happening, please inform
ChesterUKonTel:(01244)531631.
Safetyrulesforalltools
User
1. Wearcorrectapparel
Nolooseclothing,gloves,rings,braceletsor otherjewellerytoget caughtinmovingparts.Non
slipfootwearisrecommended.Wearprotectivehaircoveringtocontainlonghair.
2. Alwaysweareyeprotection
Refer to ANSLZ87.1 standard for appropriate recommendations. Also use face and / or a dust
maskifthecuttingoperationisdusty.
3. Don’toverreach
Keepaproperfootingandbalanceatalltimes.
4. Neverstandonatool
Seriousinjurycouldoccurifthetoolistippedorifthecuttingtoolisaccidentallycontacted.
5. Neverleavethetoolrunningunattended
Turnpoweroff.Leavetooluntilitcomestoacompletestop.
6. Drugs,alcoholandmedication
Donotoperatethetoolwhileundertheinfluenceofdrugs,alcoholoranymedication.
7. Makesurethetoolisdisconnectedfromthepowersupply
Whilemotorisbeingmounted,connectedorreconnected.
8. Always
Keephandsandfingersawayfromanymovingparts.
9. Stop
Themachinebeforemovingchips.
10.Shutoff
Powerandcleanthelatheandworkareabeforeleavingthemachine.
Useofthemachine
1. Removeadjustingkeysandwrenches
Form a habit of checking to see that keys and adjusting wrenches are removed from the tool
beforeturningit‘on’.
2. Don’tforcethetool
Itwilldothejobbetterandbesaferattherateforwhichitwasdesigned.
3. Usetherighttool
Don’tforcethetoolorattachmenttodoajobforwhichitwasnotdesigned.
4. Securework
Useclampsoravicetoholdworkwhenpractical.It’ssaferthanusingyourhands,andfreesboth
tooperatethemachine.
ChesterUKCobraMill
3

5. Maintaintoolsintopcondition
Keeptoolssharpandcleanforthebestandsafestperformance.Followinstructionsforlubricating
andchangingaccessories.
6. Userecommendedaccessories
ConsultChesterUKforrecommendedaccessories.Theuseofimproperaccessoriesmaycause
hazards.
7. Avoidaccidentalstarting
Makesuretheswitchisinthe‘OFF’positionbeforeplugginginpowercord.
8. Stop
Themachinebeforeputtingmaterialinthevice.
9. Always
Havestockfirmlyclampedinthevicebeforestartingthecut.
10. Groundalltools
If the tool is equipped with a threeprong plug, it should be plugged into a threehole electrical
receptacle.Ifanadapterisusedtoaccommodateatwoprongreceptacle,theadapterplugmust
beattachedtoaknownground.Neverremovethethirdprong.
Adjustment
Make all adjustments with the power off.When assembling follow the manuals instructions, this
willensurecorrectinstructionandasafestructure.
Workingenvironment
1. Keeptheworkareaclean
Clutteredareasandbenchesinviteaccidents.
2. Don’tuseinadangerousenvironment
Don’tusepowertoolsindamporwetlocations,orexposetorain.Keeptheworkareawelllit.
3. Keepchildrenetcatasafedistance.
Allchildrenetcshouldbekeptatasafedistancefromtheworkarea.
4. Don’t
Install&usethismachineinanexplosivedangerousenvironment.
Maintenance
1. Disconnect
Machinefromthepowersourcewhenmakingrepairs.
2. Checkdamagedparts
Beforefurtheruseofthetool,aguardorotherpartthatisdamagedshouldbecarefullycheckedto
ensure that it would operate properly and perform its intended function check for alignment of
movingparts,bindingofmovingparts,breakageofparts,mountingandanyotherconditionsthat
may affect its operation. A guard or other part that is damaged should be properly repaired or
replaced.
3. Disconnecttools
Beforeservicingandwhenchangingaccessoriessuchasbladesbits,cutters,etc.
4. Toprevent
Thecorrosionofmachinedsurfaceswhenasolubleisusedascoolant,payparticularattentionto
wipingdrythesurfaceswherefluidaccumulatesanddoesnotevaporatequickly,suchasbetween
themachinebedandvice.
ChesterUKCobraMill
4

SafetyDevice
1. Interlockswitchonpulleycover.Assoonasthepulleycoverisopen,themachinewillcometo
a stop with the function of this switch. Do not remove this switch from the machine for any
reason,andcheckit’sfunctionfrequently.
2. Interlockswitchoncuttingarea.Assoonasthepulleycoverisopen,themachinewillcometo
a stop with the function of this switch. Do not remove this switch from the machine for any
reason,andcheckit’sfunctionfrequently.
ChesterUKCobraMill
5

MachineSpecification
DrillingCapacity 10mm
EndMillingCapacity 10mm
FaceMillingCapacity 20mm
SpindleStroke 30mm
Throat 140mm
TableWorkingSurface 145x240mm
LongitudinalTravel 180mm
CrossTravel 90mm
Max.DistanceSpindleToTable 220mm
No.OfSpindleSpeeds Variable
RangeOfSpeeds 1002000rpm
SpindleTaper MT2
Motor 150W
Supply 240V
Weight(nw/gw) 25/38kg
Dimensions(LxWxH) 480x380x680mm
ChesterUKCobraMill
6

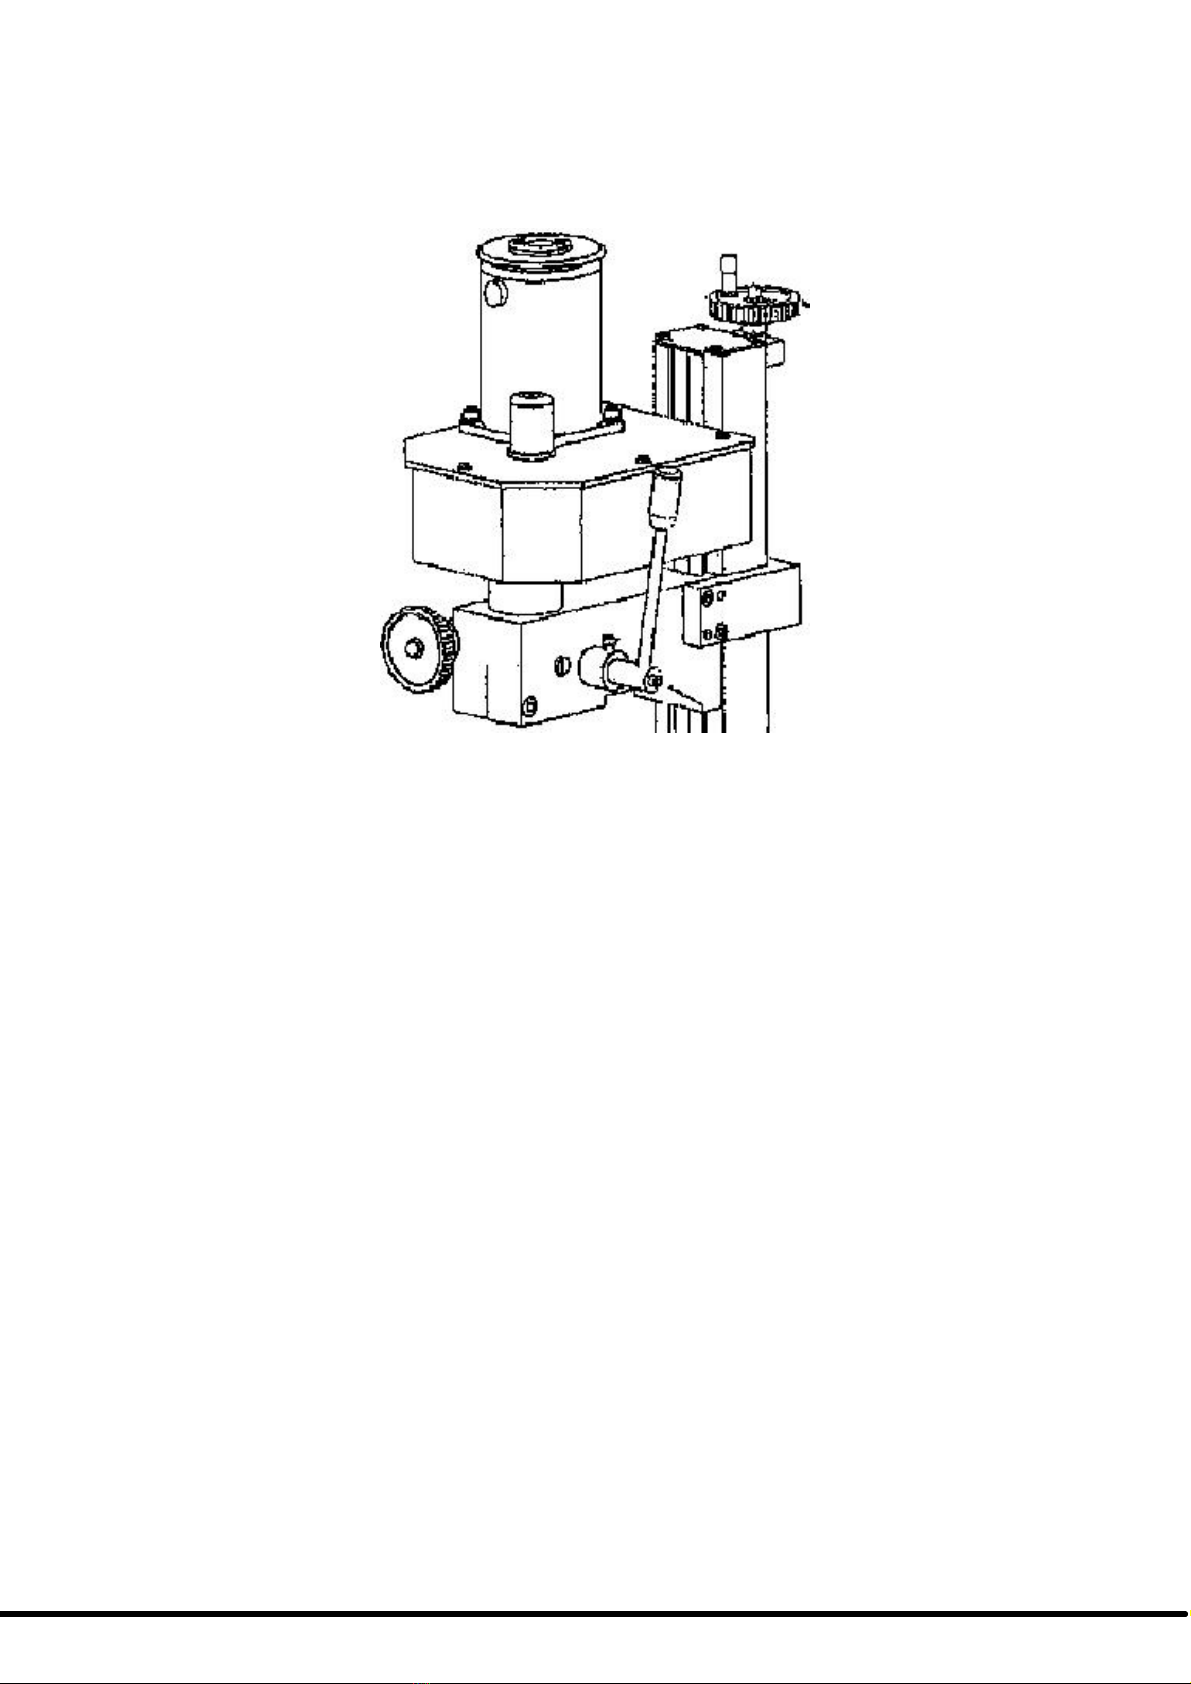
Features
1.Forward/Off/ReverseSwitch 2.VariableSpeedControlKnob 3.FuseBox
4.PowerLight(Green) 5.YellowLight(only110V) 6.HighLowChangeKnob
7. 8.FineFeedingHandwheel 9.
10.WorkTable 11.CrossFeedHandwheel 12.LongitudinalFeedHandwheel
13.Handle 14.LiftingHandwheel 15.DCMotor
ChesterUKCobraMill
7

Operation
InstallationOfTheTaperedShank
1. Disconnectfromthemainpowersupply,beforeyoureplacethecutter.
2. Removetheprotectivecover(a).
3. Wipethespindlesleeveandtapershank.
4. Putthetapershank(i)intothespindlesleeve.Mattthecutterwithanoilcloth.
5. Usea#14openendwrench(c),turningthespindledrawbar(clockwise)(b),inordertosecure
thetaperedshank.
6. Pulloutthefixingpin
7. Installtheprotectivecover(a).
RemovalOfTheTaperedShank
1. Disconnectfromthemainpowersupply,beforeyoureplacethecutter.
2. Removetheprotectivecover(a).
3. Usea#14openendwrench(c),toloosenthespindledrawbar(counterclockwise)(i),inorder
toremovethetaperedshank.
4. Knockthetapershank(i)(gentlywithaplastichammer)toloosenitinthespindlesleeve.
5. Mattthecutterwithanoilcloth.
6. Installtheprotectivecover(a).
ChesterUKCobraMill
8
TravelAdjustment
Theliftinghandlecanbeusedtocontrolthetravellingofthespindlebox.
1. Loosenthescrewinsidethespindlebox.
2. Rotationoftheliftinghandlewillmovethespindleboxupordown.
FineFeeding
Tooperatethefinefeed,pushtheclutchleverin.Thiswillenablethehandwheelforthefinefeed.
MitreWedgeAdjustment
Inthelongtermwearwilloccuronthedovetail.Thiswillcauseinaccuracythatcanbeeliminatedby
adjustingthemitrewedge(adjustingthedovetailgibstrip).Adjustingthescrewslidesthetaperedstripto
reducethegapandrestoreaccuracyofthemill.
Thefollowingadjustmentsarepossible:
1. Base&YAxisCrossSlide.
2. XAxisCrossSlide&WorkTable
3. MillHeadSeat&VerticalColumn.
4. MillHead&Spindle.
TheWayToAdjust
1. Loosenthelockednuts.
2. Adjust the foremost pressure of the mitre wedge by locked nut. If necessary, loosen all the
adjustingscrewstothesame.
3. Tightenand loosen the adjusting screws, also keeping the pressure of each adjusting screw
thesame.
4. Tightenthelockednutuniformly.
5. Whenthenutislocked,pleaseusethe#3interiorhexagonalwrenchtofixtheadjustingscrew
fromrotating(thiswillcauseanunbalanceinthepressure).
6. Please adjust the middle portion first and then go to toward the interior from two sides
uniformlywhileyouareadjustingthescrewinordertoensureuniformpressure.
ChesterUKCobraMill
9

Controls
InitialStart
Set the HIGH / LOW range lever to low. Connect to the power supply. Select FORWARD, using the
FORWARD/OFF/REVERSESwitch(A)onthemaincontrolPanel,thenthepowerlamp(B)lights.
SwitchontheCobraMillbyslowlyturningtheVariableSpeedControlKnob(C)clockwise.
Thespeedwillincreaseprogressivelythefurthertheknobisturned.
Runforatotalof5minutes;graduallyincreasethespindlespeedtoitsmaximum.Runattopspeedforat
least2minutesattopspeedbeforestopping.
Checkthatallcomponentsaresecure,workingfreelyandcorrectly.
CheckthattheCobraMillismountedsecurely.
RepeattheprocedureataHIGHspeedsetting.
Caution
NeverattempttochangefromaHIGHtoaLOWspeedwhilstthemachineisrunning.
StartingUnderNormalConditions
1. Takeallthenecessaryprecautionspreviouslystated,andensuretheworkpieceisfixedfirmly.
2. Selectanappropriatespeedlevel.
3. SelecttheFORWARD/off/REVERSEtoaFORWARDorREVERSEposition.
4. Proceedtostartthemachineasdescribedabove.
5. Whilstnotinuse,switchoffanddisconnectfromthepowersupply.
Notice
When using 100~120v power, the socket will have to have a auto overload protective function. If the
feedistofast,orthedrillingistoodeep,theCobraMillwillstopworkingandayellowlight(behindthe
fuselage)willlightup.ByturningtheVariableSpeedcontrolknob(D)andthenturnonagain,theCobra
willnowworkagainandtheyellowlampwilloffautomatically.
ChesterUKCobraMill
10

PartDiagrams&Lists
ChesterUKCobraMill
11

No. Description Q'ty No. Description Q'ty
1 ScrewM4x12 2 38 Shiftshaft 1
2 Coverforthemotor 1 39 Key4x8 1
3 ScrewM6x12 3 40 Key4x12 1
4 Springwasher6 3 41 Changegear 1
5 Washer6 3 42 Dialfork 1
6 DCmotor 1 43 Flangelining 2
7 Roundkey 1 44 Checkring21 1
8 Checkringforshaft8 2 45 Spacer 1
46 Variablespeedcontrolknob 1
10 Motorgear 1 47 Springpin2x12 1
11 Safetycover 1 48 Wedge 1
12 ScrewM4x6 1 49 ScrewM5x18 4
13 ScrewM4x8 4 50 NutM5 4
14 Washer4 4 51 Handle 1
15 Upcover 1 52 PinA3x12 1
16 Sleevesupportplate 1 53 Jointshaft 1
17 ScrewM6x5 1 54 ScrewM5x18 1
18 Compressionspring 1 55 Jointscrew 1
19 Steelball5 1 56 Wormbase 1
20 Gearbox 1 57 Helicalgear 1
21 Spindlesleeve 1 58 Spacer 1
22 ScrewM6x14 2 59 PinA3x18 1
23 Bearing619052E 2 60 Key2x18 1
24 Spindlebox 1 61 Wormshaft 1
25 Checkringforhole38 2 62 Dial 1
26 Springseatring 1 63 Dampspring 1
27 Compressionspring 1 64 Handwheel 1
28 Roundnutstopgasket 1
29 RoundnutM24x1.5 1
30 Spindlegear 1 67 Washer6 4
31 Spacer 1 68 TopnutM6 4
32 Spindlegear 1 69 ScrewM6x20 1
33 Checkringforshaft20 1
34 Powdermetallurgybearing 2 71 ScrewM4x20 2
35 Gear 1 72 ScrewM4X18 8
36 Checkringforshaft10 1 73 NutM4 8
37 Changegear 1 74A Base 1
ChesterUKCobraMill
12

No. Description Q'ty No. Description Q'ty
75 ScrewM6x20 2 119 Diallabel 1
77 Lockscrew 1 120 Electricitybox 1
78 Spindle 1 121 PCBoard 1
79 Key4x28 1 122 Powerindicatorlight 1
84 ScrewM8x50 1 123 Fusebox 1
85 Fixscrew 1 124 Metachoresisswitch 1
86 Gearshaft 1 125 Forward/reverseswitch 1
87 Handleshaft 1 126 Electricitylabel 1
88 Longhandlesleeve 1 127 ScrewST2.9x6.5 4
89 Springpin3x12 2 128 Powerline 1
90 Markshowsleeve 1 129 Cautionlabel 1
91 ScrewM5x8 2 130 Spindleaxislabel 1
92 ScrewM6x20 4 *131 Technicalparameterlabel 1
93 Pin6x26 2 *132 Drillchuck 1
94 Nutblock 1 *133 InsideSixhomWrenchS:3,6 1
95 Liftingscrew 1 *134 DoubleendWrench:5.5*,8*10 1
96 Screwsupport 1 *135 RoundnutWrenchD=3842 1
97 Handwheel 3 *136 Oilcan 1
98 Handlebolt 3 *137 Fuse 1
99 Handlesleeve 3 *138 Tapershank 1
100 Key3x10 3 *139 Chuckkey 1
101 Coverboard 1 *140 Tnut 4
102A Fuselage 1 141 Crossscrew 1
103 Screw 4 142 Crosswedge 1
105 Worktable 1 143 Connectplatesupport 1
107 Dampspring 2 144 Connectflange 1
108 Dial 2 145 Roundclampplate 1
109 ScrewM6x16 4 146 Scale 1
110 Screwbase 2 147 Finger 1
111 Lengthwaysscrew 2 148 ScrewM6*6 1
112 ScrewM4x8 4 149 ScrewM8*25 4
113 Screwnut 2 150 ScrewM6*25 2
114A Saddle 1 151 Labelrivet2*3 2
115 Wedge 2 152 Pin6*35 2
116 Changespeedlabel 1
117 Jointlabel 1
118 0positionlabel 2
ChesterUKCobraMill
13

CircuitDiagram
220~240V/5060Hz
ChesterUKCobraMill
14
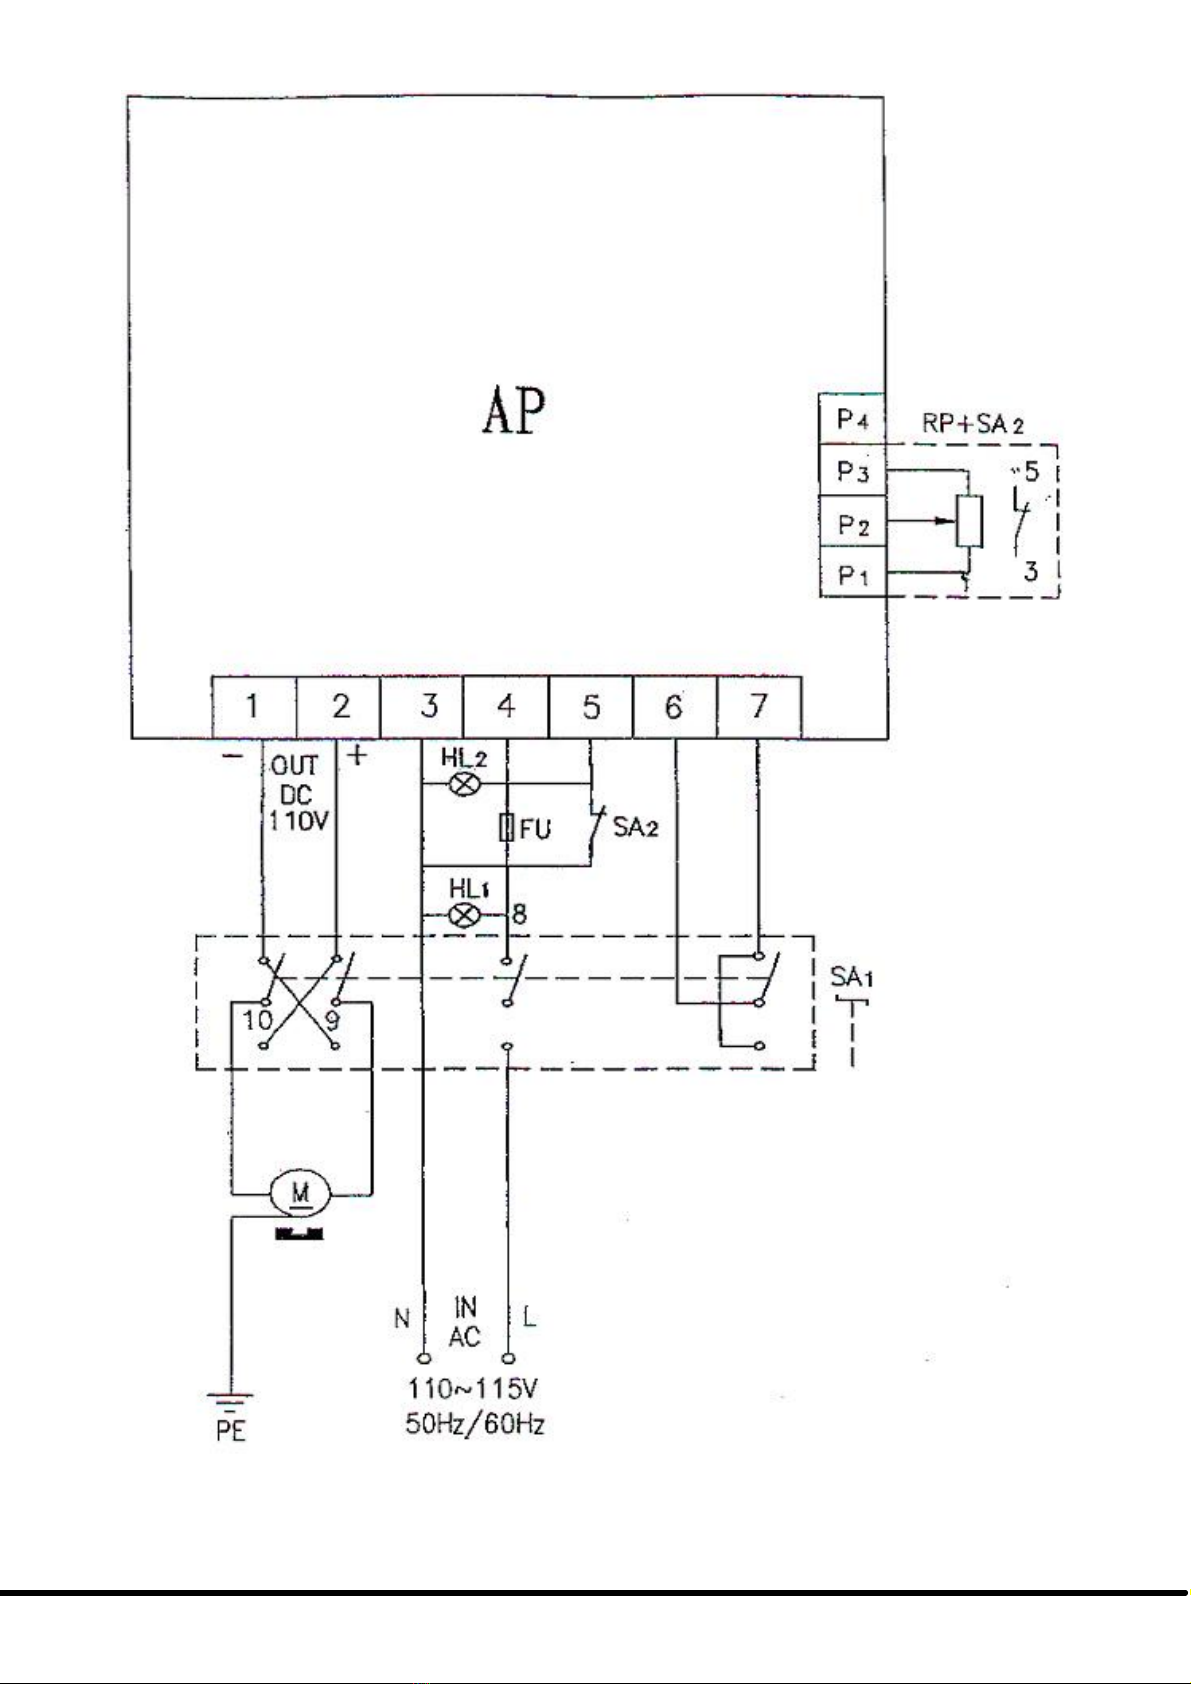
100~120V/5060Hz
ChesterUKCobraMill
15
GuideToMilling
Contents
1. Introduction
2. TypesofMillingMachine
2.1HorizontalMillingMachine
2.2VerticalMillingMachine
3. CuttingTools
3.1CuttingToolsforHorizontal
MillingMachine
3.2CuttingToolsforVertical
MillingMachine
4. IndustrialApplications
5. MillingProcesses
5.1SpindleSpeed
5.2FeedRate
5.3DepthofCut
5.4DirectionofCutterRotation
6. TypicalMillingOperations
6.1PlainMilling
6.2EndMilling
6.3GangMilling
6.4StraddleMilling
7. MillingSetUp
7.1ViceAlignment
7.2WorkHoldingMethod
8. Safety
1.Introduction
Millingmachineisoneofthemostversatileconventionalmachinetoolswithawiderangeofmetal
cuttingcapability.Manycomplicatedoperationssuchasindexing,gangmilling,andstraddlemillingetc.
canbecarriedoutonamillingmachine.
Thistrainingmoduleisintendedtogiveyouagoodappreciationonthetypeofmillingmachinesand
thevarioustypesofmillingprocesses.Emphasisisplacedonitsindustrialapplications,operations,and
theselectionofappropriatecuttingtools.
Oncompletionofthismodule,youwill
acquiresomeofthesetechniquesfromthe
trainingexercisesasillustratedinfigure1.
However,togainmaximumbenefit,you
arestronglyadvisedtomakeyourself
familiarwiththefollowingnotesbefore
undertakingthetrainingactivities,andto
haveagoodinteractionbetweenyourself
andthestaffinchargeofyourtraining.
Assessmentofyourtrainingwillbebased
onacombinationofyourskillandattitude
ingettingtheworkdone.
Figure1.MillingProducts

2.TypesofMillingMachine
Mostofthemillingmachineareconstructedof¡¥columnandknee¡¦structureandtheyareclassified
intotwomaintypesnamelyHorizontalMillingMachineandVerticalMillingMachine.Thename
HorizontalorVerticalisgiventothemachinebyvirtueofitsspindleaxis.Horizontalmachinescanbe
furtherclassifiedintoPlainHorizontalandUniversalMillingMachine.Themaindifferencebetweenthe
twoisthatthetableofanUniversalMillingMachinecanbesetatanangleforhelicalmillingwhilethe
tableofaPlainHorizontalMillingMachineisnot.
2.1.HorizontalMillingMachine
Figure2showsthemainfeaturesofaPlainHorizontalMillingMachine.
Theirfunctionsare:
a.Column
Thecolumnhousesthespindle,thebearings,
thegearbox,theclutches,theshafts,the
pumps,andtheshiftingmechanismsfor
transmittingpowerfromtheelectricmotortothe
spindleataselectedspeed.
b.Knee
Thekneemountedinfrontofthecolumnisfor
supportingthetableandtoprovideanupor
downmotionalongtheZaxis.
c.Saddle
Thesaddleconsistsoftwoslideways,oneonthe
topandoneatthebottomlocatedat90ºtoeach
other,forprovidingmotionsintheXorYaxesby
meansofleadscrews.
d.Table
Thetableismountedontopofthesaddleand
canbemovedalongtheXaxis.Ontopofthe
tablearesomeTslotsforthemountingof
workpieceorclampingfixtures.
e.Arbor
Thearborisanextensionofthespindlefor
mountingcutters.Usually,thethreadendofan
arborisoflefthandhelix.
Figure2.HorizontalMillingMachine

2.2.VerticalMi
llingMachine

Figure6.SlittingSaw
Note:Horizontalmillingcuttersarespecifiedbythename,thematerial,thewidth,thediameter,andthe
hubsizeofthecutter.
Example Sideandfacecutter,
HighSpeedSteel,
Cuttersize:10Xø100
Hubsize:ø25
3.2.CuttingtoolsforVerticalMilling
a.EndMills
Commonlyusedforfacing,slottingandprofilemilling.
Figure7.EndMill
b.RoughCutEndMills
Forrapidmetalremoval.
Figure8.RoughCutEndMill
c.SlotDrills
Forproducingpocketswithoutdrillingaholebeforehand.
Figure9.SlotDrill
d.FaceMillingCutters
Forheavycutting.
Figure10.FaceMillingCutter
Note:Mostverticalmillingcuttersareofendmilltypesandarespecifiedbythematerial,thediameter,
thelength,thehelicalangle,thetypesofshankandtheshankdiameter.Forfacemillingcutter,onlythe
diameterofthecutterandthetypesofcarbideinsertsarerequired.
Table of contents
Other CHESTER Lathe manuals

CHESTER
CHESTER Craftsman User manual

CHESTER
CHESTER Voyager Lathe User manual

CHESTER
CHESTER Crusader User manual

CHESTER
CHESTER DB8VS User manual

CHESTER
CHESTER CONQUEST SUPER LATHE User manual

CHESTER
CHESTER Crusader Deluxe Lathe User manual

CHESTER
CHESTER Crusader VS User manual

CHESTER
CHESTER DB7VS User manual

CHESTER
CHESTER Coventry Pro User manual

CHESTER
CHESTER CONQUEST SUPER User manual


Popular Lathe manuals by other brands


Hurco
Hurco TM6 Getting started

Scheppach
Scheppach DM600VARIO Translation of original instruction manual

WoodFast
WoodFast M305X instruction manual

Baileigh Industrial
Baileigh Industrial SR-5016 Operator's manual

AMMCO
AMMCO 7000 installation instructions

Record Power
Record Power DML36SH-CAM Original instruction manual


