manuals.online logo
Brands
  1. Home
  2. •
  3. Brands
  4. •
  5. Cisco
  6. •
  7. IP Phone
  8. •
  9. Cisco Cisco 7940 User manual

Cisco Cisco 7940 User manual

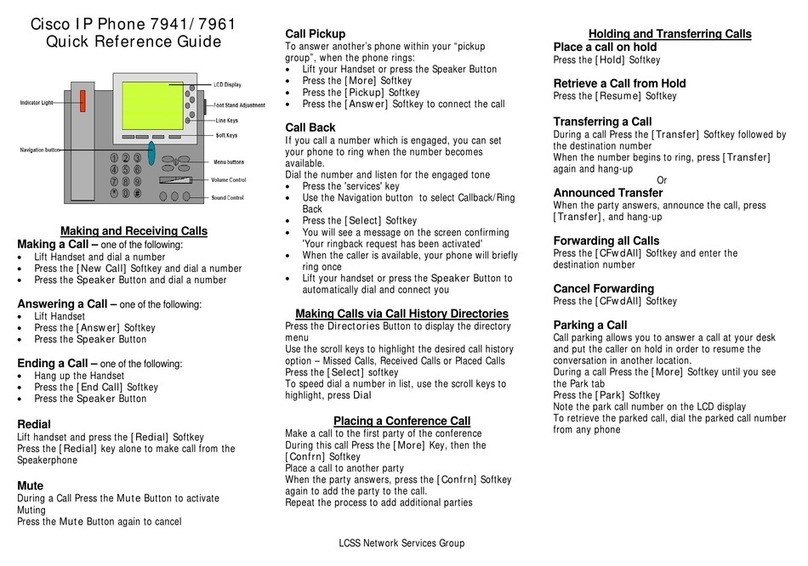
Cisco IP Phone 7940/7960 User Guide
SL10020 (01) 2008 Page 1 of 3
Basic Call Features
HEADSET USERS: you must press the green headset button
to place and answer calls.
5 ways to place a call. Dial 9first for outside calls.
•Lift the handset and dial the number.
•Press a line button and dial the number.
•Press the Speaker button and dial the number.
•Press the NewCall softkey and dial the number.
•Enter the number and press the Dial softkey
4 ways to answer a call:
•Lift the handset.
•Press the line button associated with the incoming
call.
•Press the Answer softkey (appears when call is
incoming).
•Press the Speaker button.
3 ways to end a call:
•Hang up the handset.
•Press the Speaker button.
•Press the EndCall softkey.
Dialing Rules
•Internal Calls –> Dial 4-digit extension
•Local Calls -> Dial 9+ number
•Long Distance Calls -> Dial 91 + number
•International calls -> Dial 9011 + number
•Emergency Calls -> Dial 911 or 9911
Hold / Retrieve
To place a call on and off hold:
•While on a call, press the Hold softkey.
•To return to the call, press the Resume softkey.
Redial
To redial the mostly recently dialed number:
•Lift the handset and press the Redial softkey, or
simply press the Redial softkey to activate the
speaker phone.
Call Transfer
To transfer a call:
1. During a call, press the Transfer softkey. This places
the call on hold.
2. Place a call to another person.
3. When you hear ringing, press Transfer again, or
when the party answers, announce the call and press
Transfer.
4. If the party does not accept the call, press the
EndCall softkey and then the Resume soft key to
return to the original call.
Direct Transfer to Voicemail
To transfer a caller to a person’s voicemail box press the
Transfer softkey, enter * plus the 4-digit extension and press
the Transfer softkey again.
Ad-Hoc Conference Call / 3-Way Calling (up to 10
participants)
To place a conference call:
1. During a call press the More softkey and then the
ConFrn softkey. This will automatically select a new
line and place the other party on hold.
2. Place a call to another person.
3. When the call connects or starts ringing, press
ConFrn again to add this person to the conference
call.
4. Repeat to add additional callers. Only the conference
initiator can add conferences on to call
Conference Call Options*
•Hold: to place a conference call on hold, press the
Hold softkey. The other parties can talk among
themselves but they cannot hear you.
•Speaker: To place a conference call on
speakerphone, press the Speaker button.
•ConfList: List of current conference call participants
oHighlight an active conference call and press
ConfList to view a list of conference
participants.
oParticipants are listed in the order in which
they joined the conference with the most
recent at the top.
oPerson at the bottom of the list with an
asterisk (*) next to the name is who started
the conference call.
•Remove: Drop the last participant added to the
conference call
oYou can remove conference call participants
only if you initiated the conference call.
oHighlight participant’s name at the top of the
conference list and press Remove.
•Update:
Updated list of conference participants
oWhile viewing the conference list, press soft
key Update for an updated list of conference
participants.
7940 has two line appearances
Cisco IP Phone 7940/7960 User Guide
SL10020 (01) 2008 Page 2 of 3
Joining
Join several calls on one line to create a conference call.
1. With two or more calls on a single line, scroll to
highlight the caller on hold and press Join (may
need to press More softkey to see Join).
2. Repeat this process for each call you want to add
to the conference.
DIRTrfr
Transfer two current calls to each other.
•
Scroll to highlight the caller on hold and press DirTrfr
and the two calls are connected to each other.
•
You will drop from the call once the two calls are
connected.
Meet-Me Conference (300)
Up to 10 participants per conference
To establish a meet-me conference:
1. Lift handset and select line, or press the speaker
button
2. Press the More softkey
3. Select the Meet Me softkey
4. Dial the Meet Me Conference number (*see
above note)
To dial-in to a meet-me conference:
•Dial the meet-me conference number from any phone
Forward All Calls
To forward all calls to another extension, phone number or
voice mail:
1. Press the CFwdAll softkey. You will hear two beeps.
2. Enter the number to which you want to forward all
calls (for voice mail press Messages). A flashing
right arrow will appear next to your phone number on
the LCD to indicate that all calls are being forwarded.
To cancel forward all calls:
•Press the CFwdAll softkey. You will hear two beeps.
The flashing arrow will no longer display on your LCD.
Call Park (System will provide a 3 Digit Number)
To park a call:
1. During an active call, press the More soft key until
you see the Park tab, press Park. The display shows
the number where the call is parked.
2. Make a note of the call park number and then
hang up. The call is now parked at that number,
allowing you or someone else to retrieve it from
another phone.
To pickup a parked call:
•From any IP phone, dial the number where the call
was parked.
Call park rollback
•After 120 seconds, if the caller is not picked up the
call will ring back to your phone.
Call Back
To receive call back notification on your IP Phone when a
called party line becomes available: (Note: This is only an
internal feature)
To receive call back notification:
1. Press the CallBack softkey while called party’s phone
is ringing. (Please note: If the call hits the voicemail
greeting CallBack will not work.)
CallBack Display will appear.
2. Click OK.
CallBack Display will appear CallBack has been activated on
(ext.) XXXX.
W
hen called party returns and lifts up the handset and places
it down after a call, the CallBack screen will display that the
user has become available. An Audible chime will also play.
•Press Dial to call.
•Press Cancel to deactivate
•Press Exit to quit this screen
iDivert
The caller will receive the voicemail of the person who diverted
the call.
To iDivert a call:
1. Press the iDivert sofkey.
The caller is transferred to your voicemail box.
Call History (Lists 32 calls)
To view a Missed Call, Received Call, or Placed Call:
1. Press the Directories button.
2. Use the Scroll key up/down to select the appropriate
option on the Directory menu.
3. Press the Select softkey to display the calls list.
4. To dial the number, use the Scroll key up/down to
select the number. Press the Edit Dial softkey and
press 9for outside line. Press the Dial softkey to dial.
5. When you are finished in the Directories area, press
the Exit softkey twice to exit the Directory menu.
Note: If you have line appearances of other phone numbers on
your IP phone, you will see the Missed, Received, and Placed
calls for all of the lines when using the Directories button.
Corporate Directory Search (Anyone with a v/m account)
1. Press Directories button.
2. Press 4 on your keypad or use the Scroll key down to
4.
3. Enter the first letter of person’s first name, last name
or phone extension you are looking for by using the
Scroll key to that category (e.g. for the letter “b” press
2 on your keypad twice).
4. Press the Search softkey.
5. Use the Scroll key to select the name, or press the
number in front of name you wish to call.
6. Press the Dial soft key and you will be connected.
Cisco IP Phone 7940/7960 User Guide
SL10020 (01) 2008 Page 3 of 3
Corporate Directory List (Anyone with a v/m account)
1. Press Directories button
2. Press 5 on your keypad or use the Scroll key down to
5 and press the Select softkey
3. Scroll through the list to find the desired person
4. Press the Dial or EditDial softkey as appropriate.
Services
To use the Services button you must first login to start the
Services.
1. Press the Services button
2. Press the Login softkey
3. For phone number type your 10-digit number
4. Press the Scroll key to move down
5. For E-mail password, enter your Portal password
(default is abcd – for a press 2, for b press 22)
6. Press the Submit softkey
Services Available Include:
•Speed Dials – User must log into the portal first.
•Extension Mobility (Available at an extra fee)
•IP Contact Center (Available at an extra fee)
•Contacts Module
•Check Stock Price
For more information on how to use these services, please
review the SingleLink™ Portal User Guide
“i” Information Button
•Press the ?button and then any other button to gain
information on how to use the button or key.
Ringer Volume Settings
•Press the Volume up and down arrows to desired
level.
•Press the Settings button and then the Save softkey.
Speaker Volume Setting
•Press the Speaker button.
•Press the Volume up or down button to desired level.
•Press the Settings button and the Save softkey.
Handset Volume Setting
•Pick up the handset.
•Press the Volume up or down button to desired level.
•Press the Settings and Save softkey.
Headset Volume Setting
•Put headset on.
•Press the Volume up or down arrow to desired level.
•Press the Settings button and Save softkey.
Contrast
•Press the Settings button
•Press 1 on your keypad, or use the Scroll key to
highlight Contrast and press the Select softkey.
•Use the Up and Down softkeys to change contrast,
then OK, then Save.
Ring Type
•Press the Settings button.
Press 2 for Ring Type or arrow down to Ring type
•Use the Scroll key to select a ring type. Press Play to
hear a sample.
•With new ring type selected, press Select, then OK.
If you are in a Feature Menu (Directories, Services or
Settings) and you loose your place; simply lift your handset to
return to your main display.
NEED HELP?
For questions about your IP phone please visit
our http://portal.singlelink.com - login and click
on the FAQ link.
To report a problem, please dial Enventis
Support at 888-258-5986 or 763-577-3963

Other manuals for Cisco 7940

25

This manual suits for next models

1

Other Cisco IP Phone manuals

Cisco Unified 6921 User manual

Cisco

Cisco Unified 6921 User manual

Cisco 7925G - Unified Wireless IP Phone VoIP User manual

Cisco

Cisco 7925G - Unified Wireless IP Phone VoIP User manual

Cisco CP-7821 User manual

Cisco

Cisco CP-7821 User manual

Cisco 7800 Series User manual

Cisco

Cisco 7800 Series User manual

Cisco 9951 Standard User manual

Cisco

Cisco 9951 Standard User manual

Cisco 7931G - Unified IP Phone VoIP User manual

Cisco

Cisco 7931G - Unified IP Phone VoIP User manual

Cisco 7841 User manual

Cisco

Cisco 7841 User manual

Cisco Cisco Unified IP Phone 7960G User manual

Cisco

Cisco Cisco Unified IP Phone 7960G User manual

Cisco 8945 User manual

Cisco

Cisco 8945 User manual

Cisco 7800 Series User manual

Cisco

Cisco 7800 Series User manual

Cisco IP Phone Instruction Manual

Cisco

Cisco IP Phone Instruction Manual

Cisco 8800 Series User manual

Cisco

Cisco 8800 Series User manual

Cisco 6800 Series User manual

Cisco

Cisco 6800 Series User manual

Cisco 7961G - IP Phone VoIP User manual

Cisco

Cisco 7961G - IP Phone VoIP User manual

Cisco 7961G-GE - IP Phone VoIP User manual

Cisco

Cisco 7961G-GE - IP Phone VoIP User manual

Cisco DATAVOX 7941 User manual

Cisco

Cisco DATAVOX 7941 User manual

Cisco 7911 User manual

Cisco

Cisco 7911 User manual

Cisco SPA302D User manual

Cisco

Cisco SPA302D User manual

Cisco Webex 840 User manual

Cisco

Cisco Webex 840 User manual

Cisco 8800 Series User manual

Cisco

Cisco 8800 Series User manual

Cisco 7961G - IP Phone VoIP User manual

Cisco

Cisco 7961G - IP Phone VoIP User manual

Cisco 8941 User manual

Cisco

Cisco 8941 User manual

Cisco 7911G - IP Phone VoIP User manual

Cisco

Cisco 7911G - IP Phone VoIP User manual

Cisco 7902G - Unified IP Phone VoIP User manual

Cisco

Cisco 7902G - Unified IP Phone VoIP User manual

Popular IP Phone manuals by other brands

BeyondTel WP-01 user manual

BeyondTel

BeyondTel WP-01 user manual

Telecom ZIP 33i Quick reference guide

Telecom

Telecom ZIP 33i Quick reference guide

Grandstream Networks GXV-3140 Technical specifications

Grandstream Networks

Grandstream Networks GXV-3140 Technical specifications

Panasonic KX-DT 333 Series User quick reference guide

Panasonic

Panasonic KX-DT 333 Series User quick reference guide

Viking Electronics K-1705-IP quick start guide

Viking Electronics

Viking Electronics K-1705-IP quick start guide

Karel FT 15 Technical reference and user's guide

Karel

Karel FT 15 Technical reference and user's guide

Yealink T41P-Skype quick start guide

Yealink

Yealink T41P-Skype quick start guide

AudioCodes 405HD user manual

AudioCodes

AudioCodes 405HD user manual

Mitel 5224 Quick reference guide

Mitel

Mitel 5224 Quick reference guide

Siemens GIGASET A58H Mode d'emploi

Siemens

Siemens GIGASET A58H Mode d'emploi

Xorcom XP0100 user manual

Xorcom

Xorcom XP0100 user manual

Snom D345 user manual

Snom

Snom D345 user manual

Polycom SoundPoint IP 450 Quick reference guide

Polycom

Polycom SoundPoint IP 450 Quick reference guide

Aastra 6753I installation guide

Aastra

Aastra 6753I installation guide

Topcom Butler E751 TripleButler E751 Quattro user guide

Topcom

Topcom Butler E751 TripleButler E751 Quattro user guide

Avaya 9630 IP Quick reference guide

Avaya

Avaya 9630 IP Quick reference guide

Mitel MiVoice 6940 Quick reference guide

Mitel

Mitel MiVoice 6940 Quick reference guide

Snom Mass Deployment V7 user manual

Snom

Snom Mass Deployment V7 user manual

manuals.online logo
manuals.online logoBrands
  • About & Mission
  • Contact us
  • Privacy Policy
  • Terms and Conditions

Copyright 2025 Manuals.Online. All Rights Reserved.