Citizen YF20 User manual

1/19
YF20
instruction manual
Thank you for your purchase of this product.
Before using the watch, read this instruction manual carefully to ensure correct use.
ENGLISH
Accessing the latest information (Cal. No.: YF20)
You can access the latest information of this watch using the QR code.
https://www.citizenwatch-global.com/support/html/en/yf20/yf20.html
• Access also here to see notices.
• You can also see how to use enhanced features and
functions such as slide rules and tachymeters on the web
site. It depends on models whether they are equipped with
enhanced features and functions or not.
Safety precautions
“Precautions” provided with the product contains instructions that should be
strictly followed at all times not only for optimal use, but to prevent any injuries to
yourself, other persons or property.
Make sure to read it through before using the product.
Features
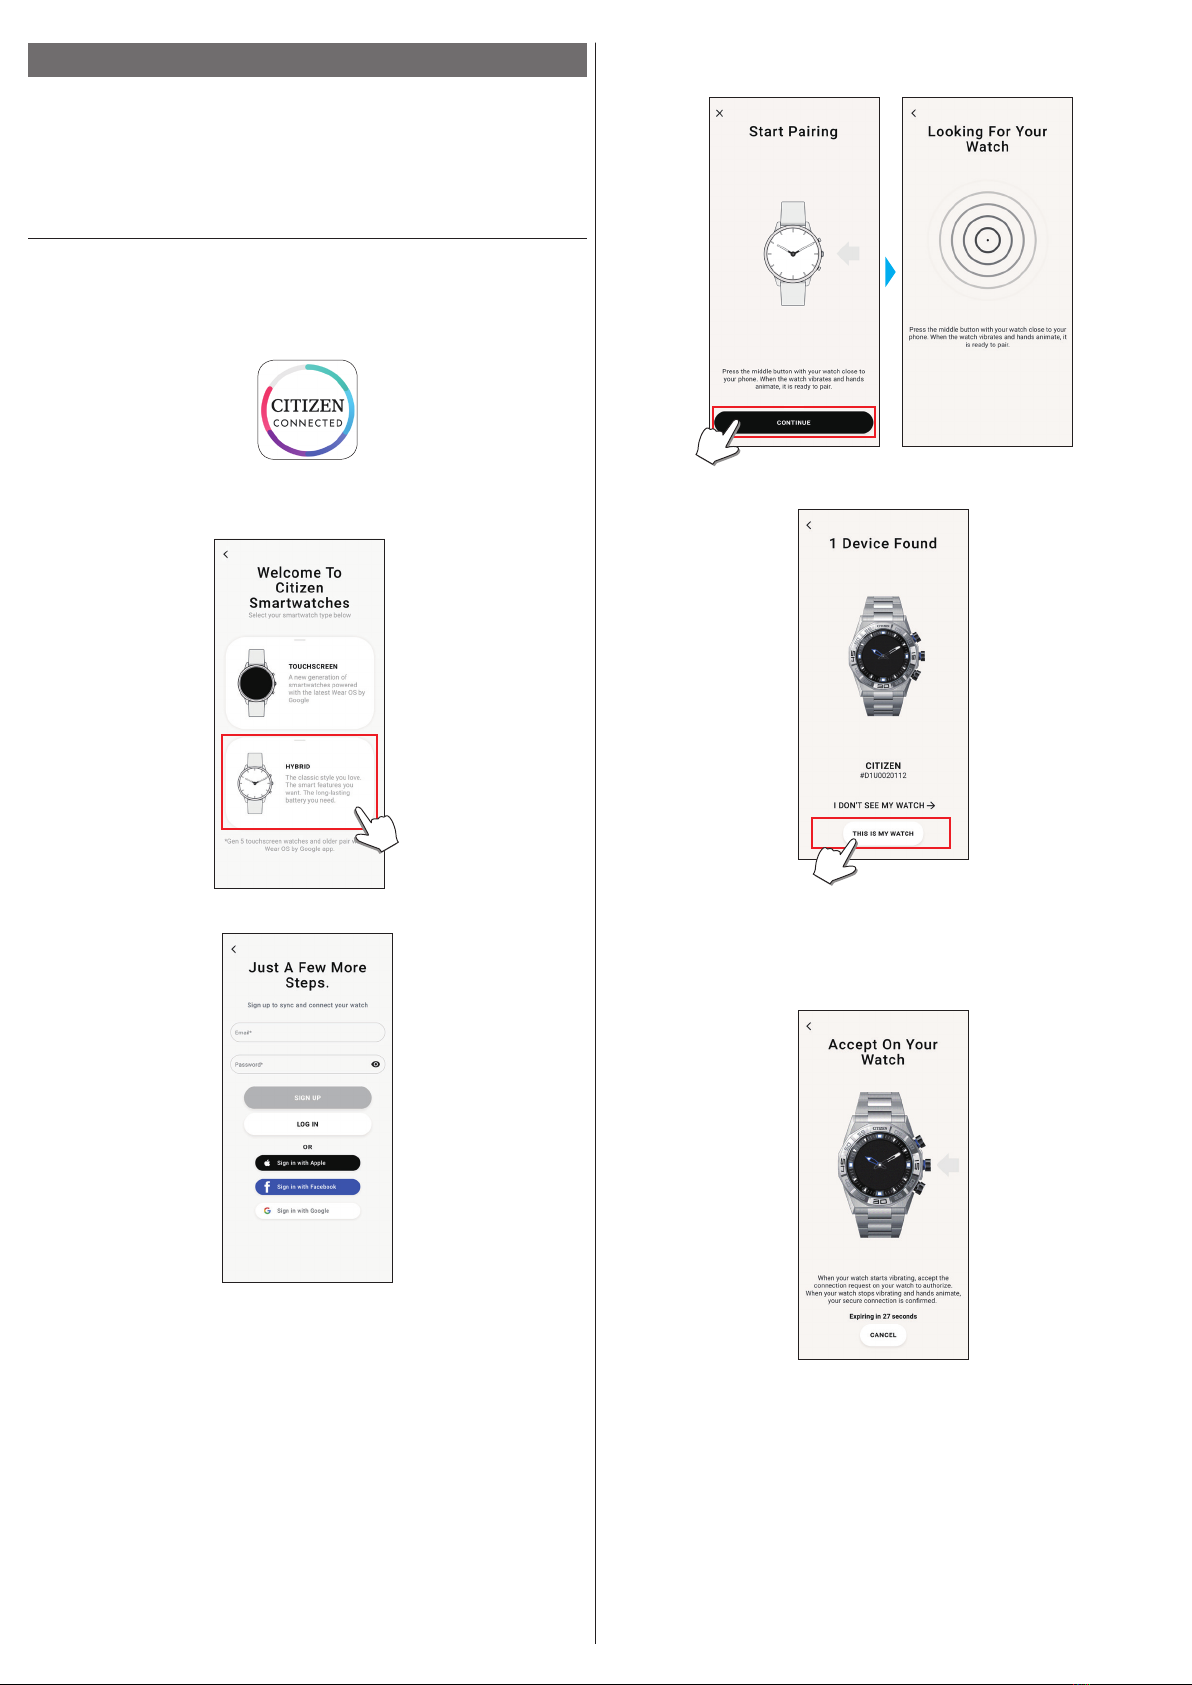
Connection with a smartphone through the dedicated app
Time and calendar are synchronized with those on the smartphone.
To get the dedicated app, access a download site of apps for your
smartphone.
Built-in activity monitor and heart rate sensor
The watch records your activity and heart rate and you can see their
data on the dedicated app.
User-configurable buttons
You can assign two functions to the buttons of the watch as you want
by setting them on the dedicated app.
• [ADD FEATURES]
• [WORKOUT MODE]
• [WELLNESS DASHBOARD]
• [STOPWATCH]
• [NOTIFICATIONS]
• [MUSIC CONTROL]
• [TIMER]
• [WEATHER]
• [RING PHONE]
Permanent indication on the display
The watch is equipped with an electronic paper display. It can always
indicate up to 4 items you choose from the information items below.
• [ADD FEATURES]
• [SECOND TIMEZONE]
• [DAY-DATE]
• [CURRENT TEMPERATURE]
• [STEPS]
• [HEART RATE]
• [CHANCE OF RAIN]
• [ACTIVE MINUTES]
• [CALORIES]
• [BATTERY]
Appearance of the display (watch face) can freely be customized.
Use more functions through Riiiver.
Riiiver is a unique service platform which provides
connection between watches and the Internet through a
special app on your smartphone.
On this watch, you can add prepared functions (called
“iiidea” in the Riiiver service) to the watch by choosing
[ADD FEATURES] when assigning functions to watch
buttons or when choosing display items.
• It is limited that regions where the Riiiver service is
available. It is not available in places where the Riiiver
service is not provided.
CONTENTS
Safety precautions..................................................................
1
Features.................................................................................
1
Before using this watch...........................................................
2
Protective stickers .................................................................................
2
Charging your watch..............................................................................
2
Component identification .......................................................
2
About the display of the watch................................................
2
Renewing indication on the display .......................................................
2
Turning on the light...............................................................................
2
Indicating notifications .........................................................................
2
Hiding information on the display .........................................................
2
Before connecting with a smartphone.....................................
2
Requirements for connection.................................................................
2
Execute pairing with the smartphone......................................
3
Executing pairing ..................................................................................
3
When pairing fails .................................................................................
4
When connection fails after pairing (canceling pairing)..........................
4
Synchronizing your watch and smartphone .............................
5
Adjustment of the time and calendar ......................................
5
Acceleration sensor and heart rate sensor................................
5
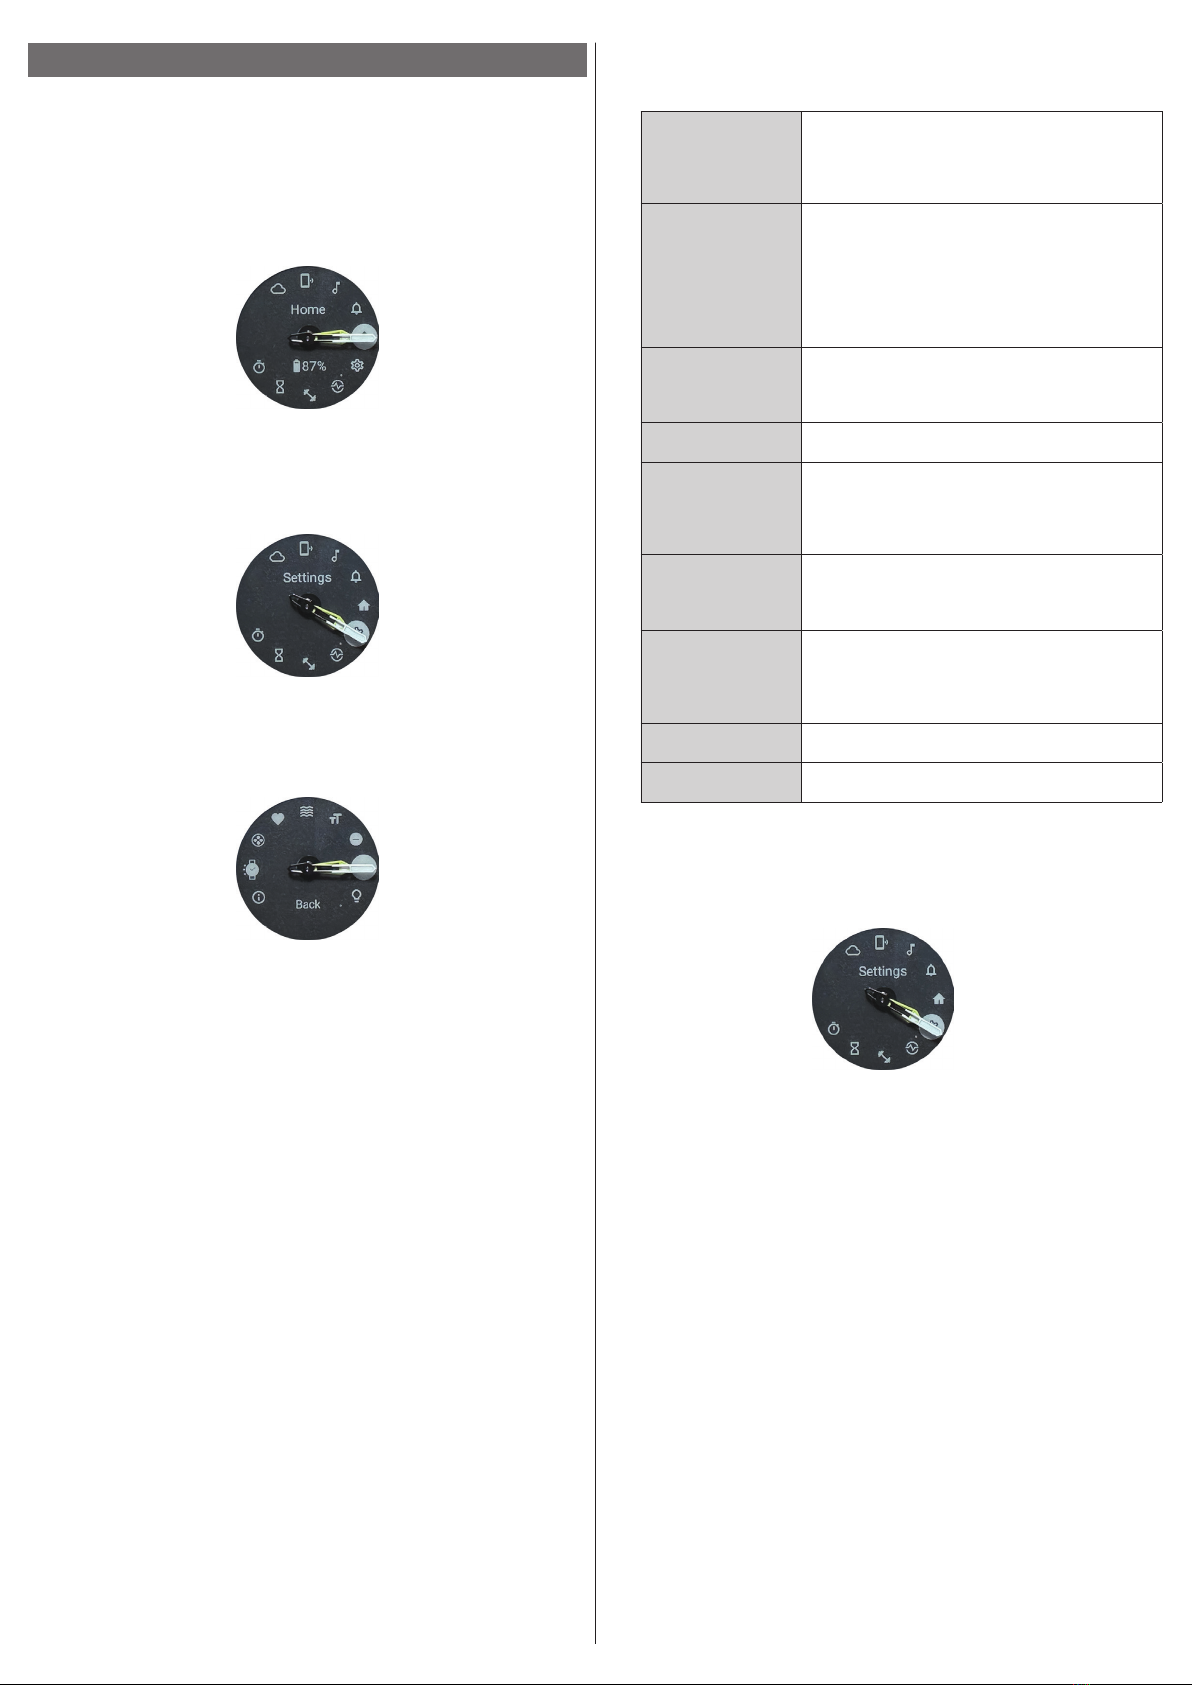
Settings on the watch body.....................................................
6
The screen of the dedicated app..............................................
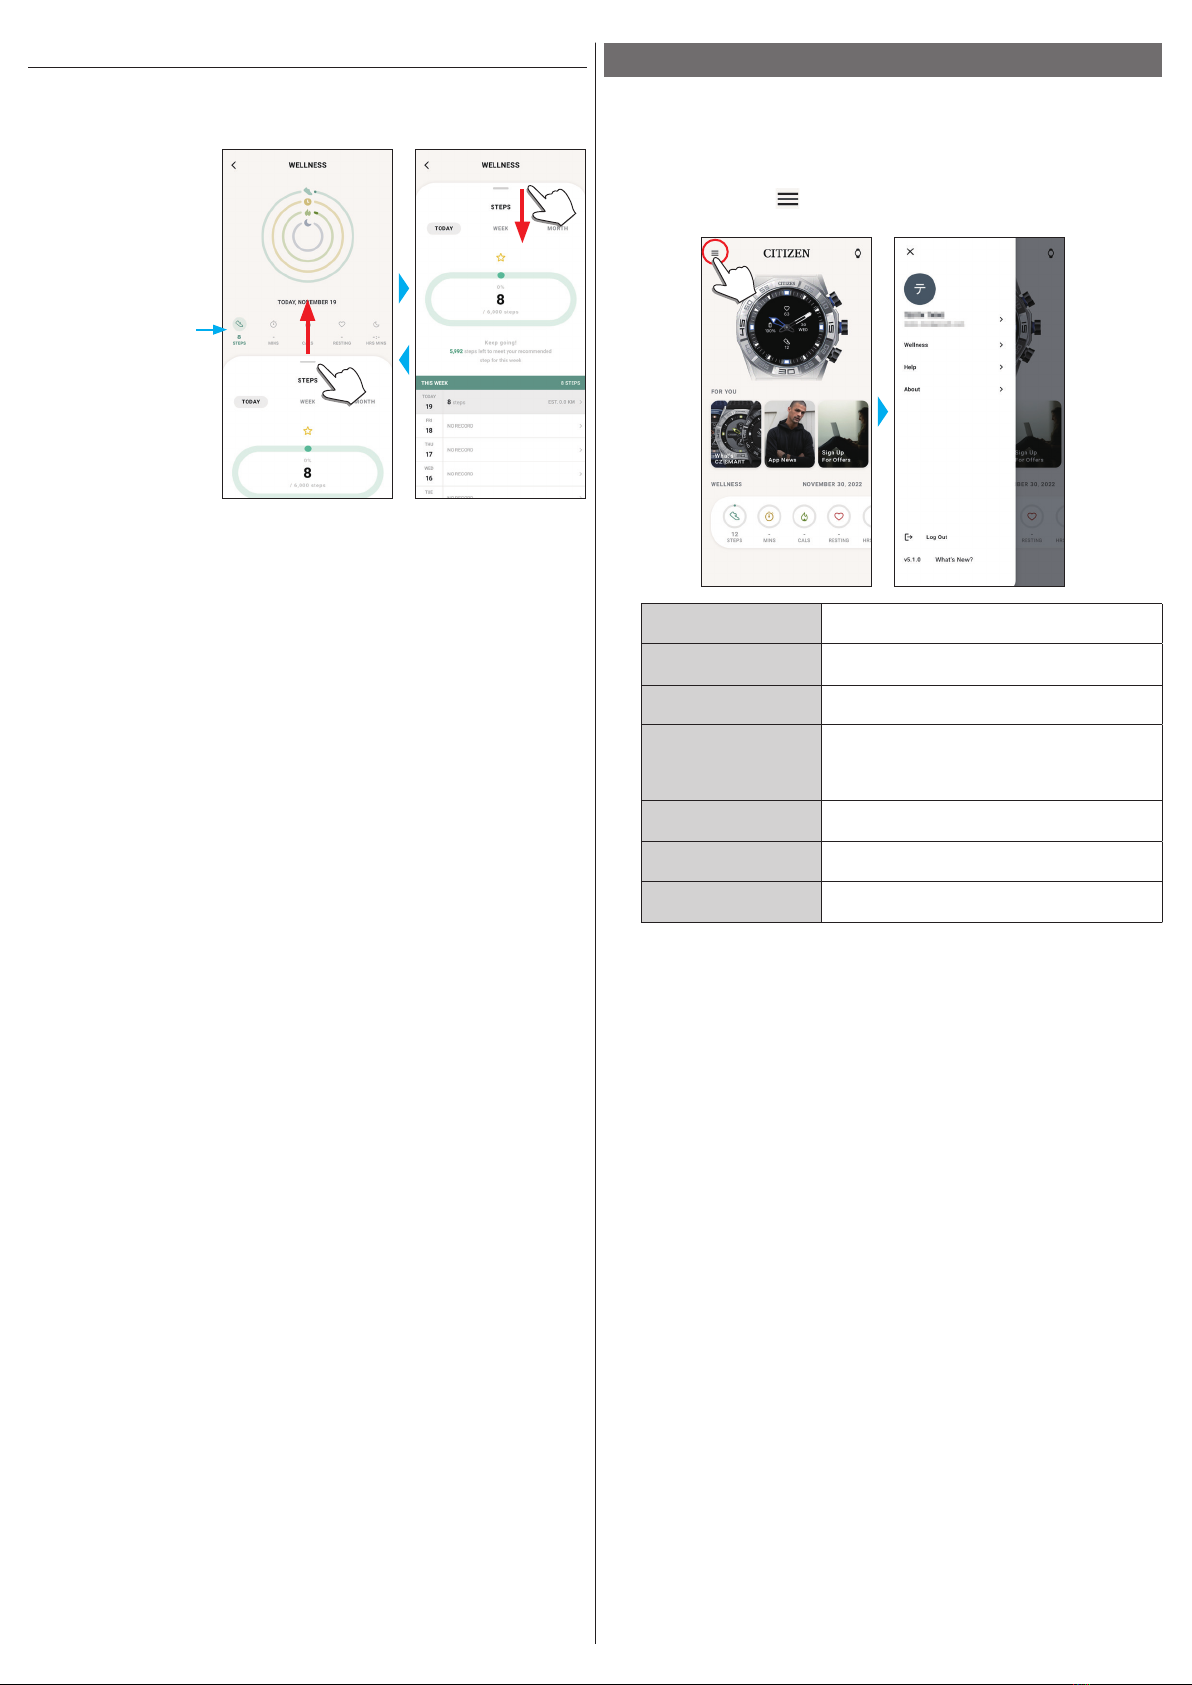
7
Side menu .............................................................................................
7
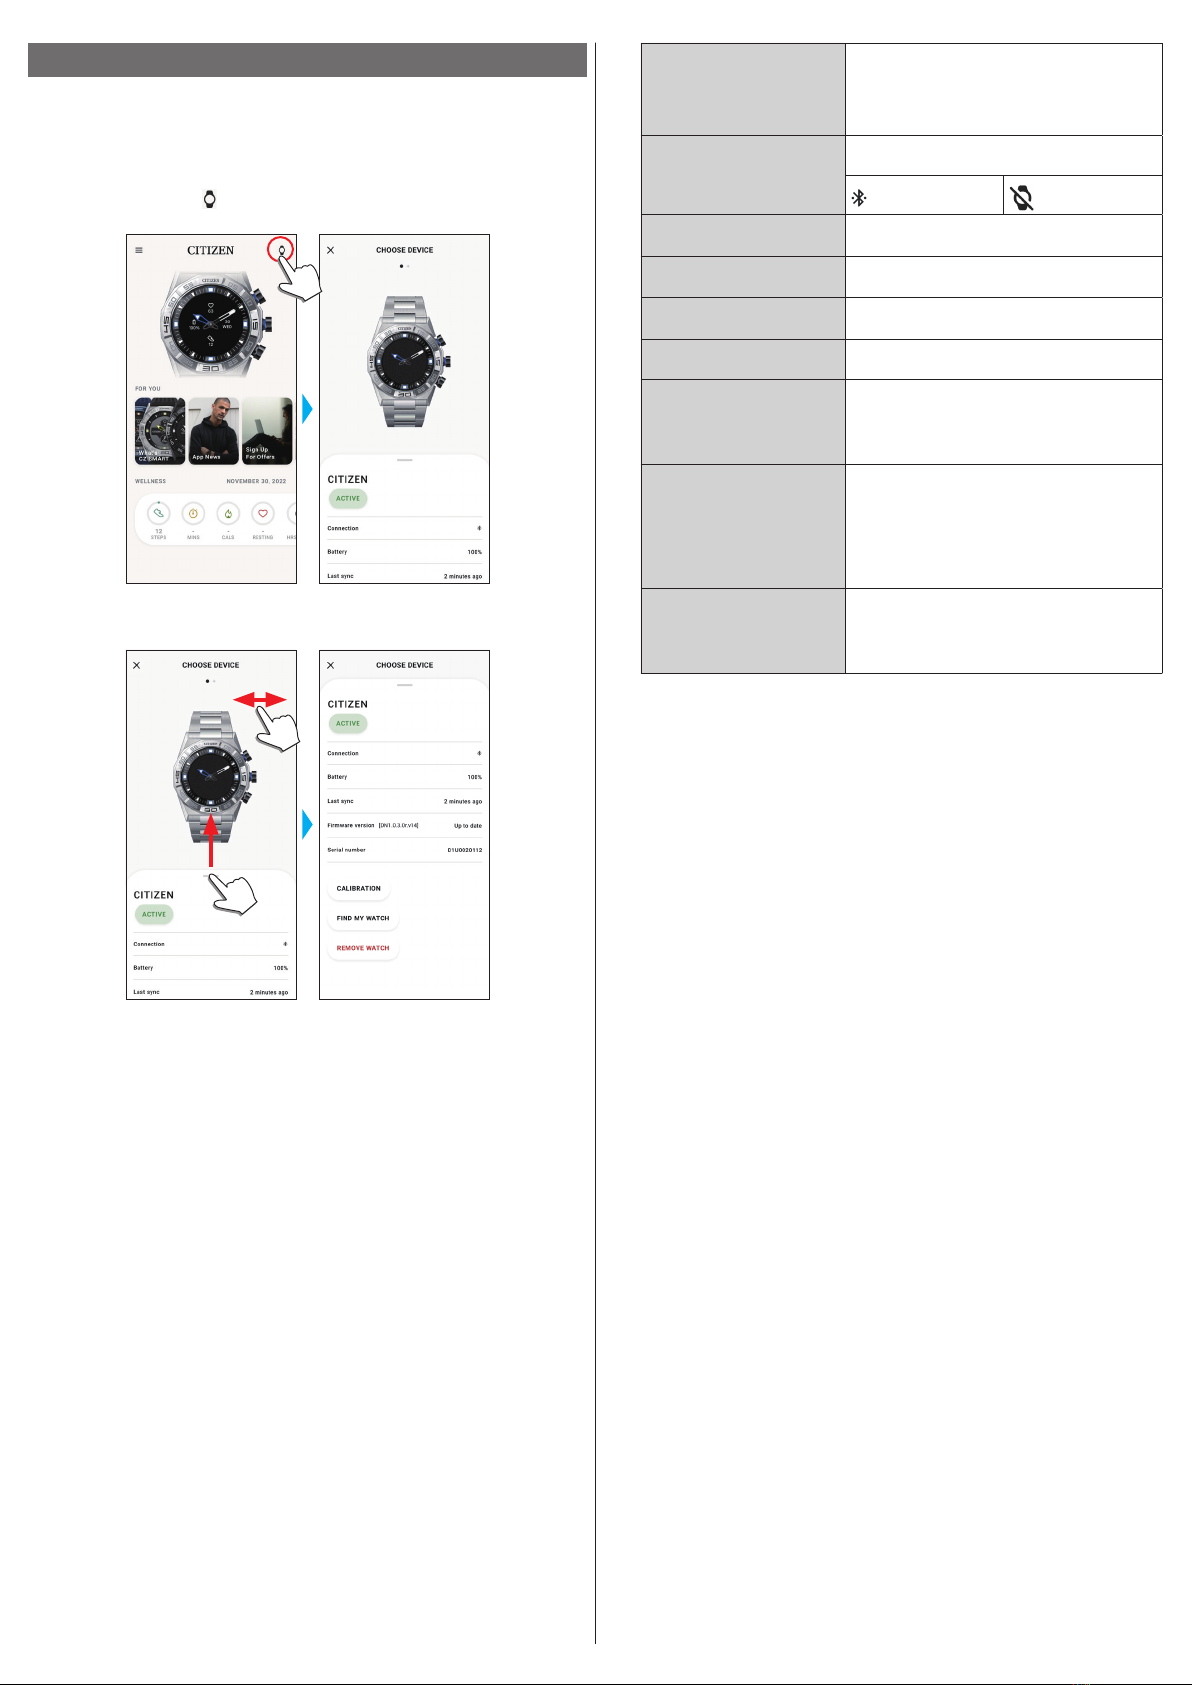
[CHOOSE DEVICE] screen .........................................................................
7
[MY WATCH] screen ................................................................................
7
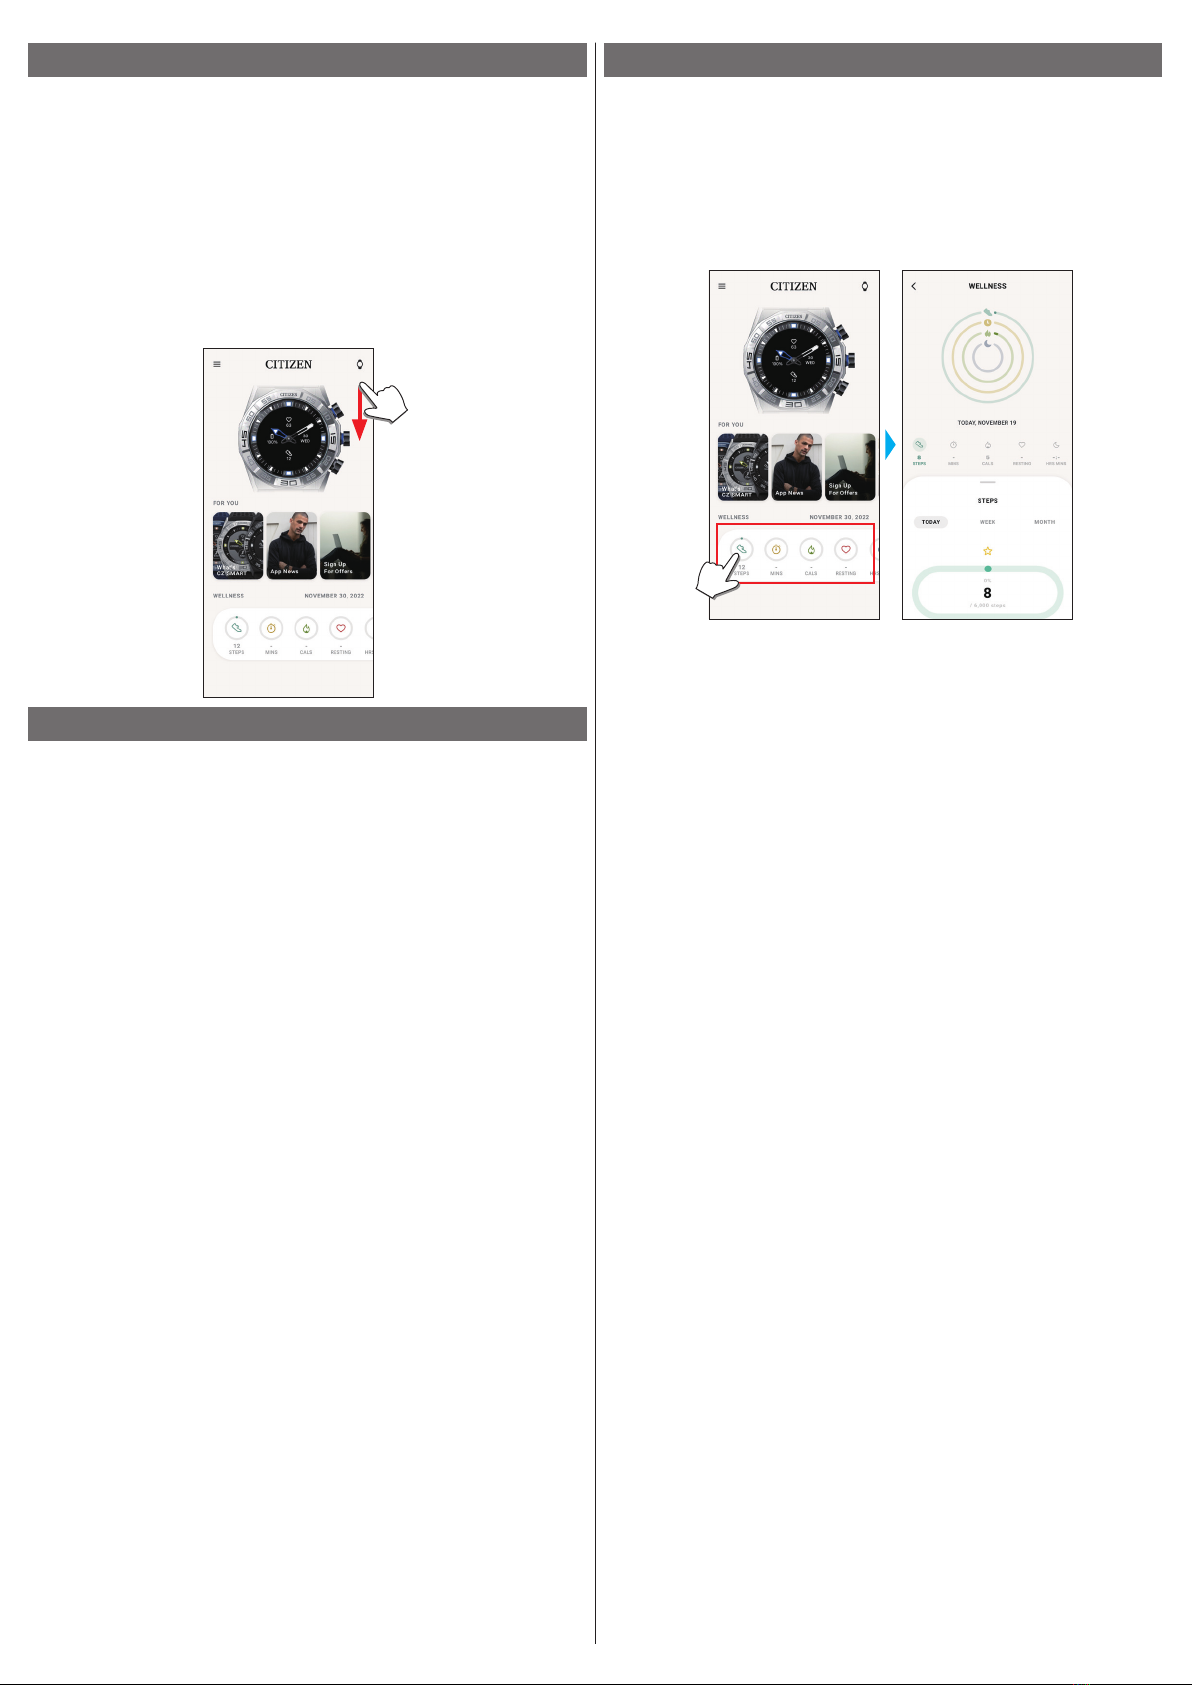
[WELLNESS] screen.................................................................................
8
Changing settings of the dedicated app...................................
8
Changing goal values of activities..........................................................
9
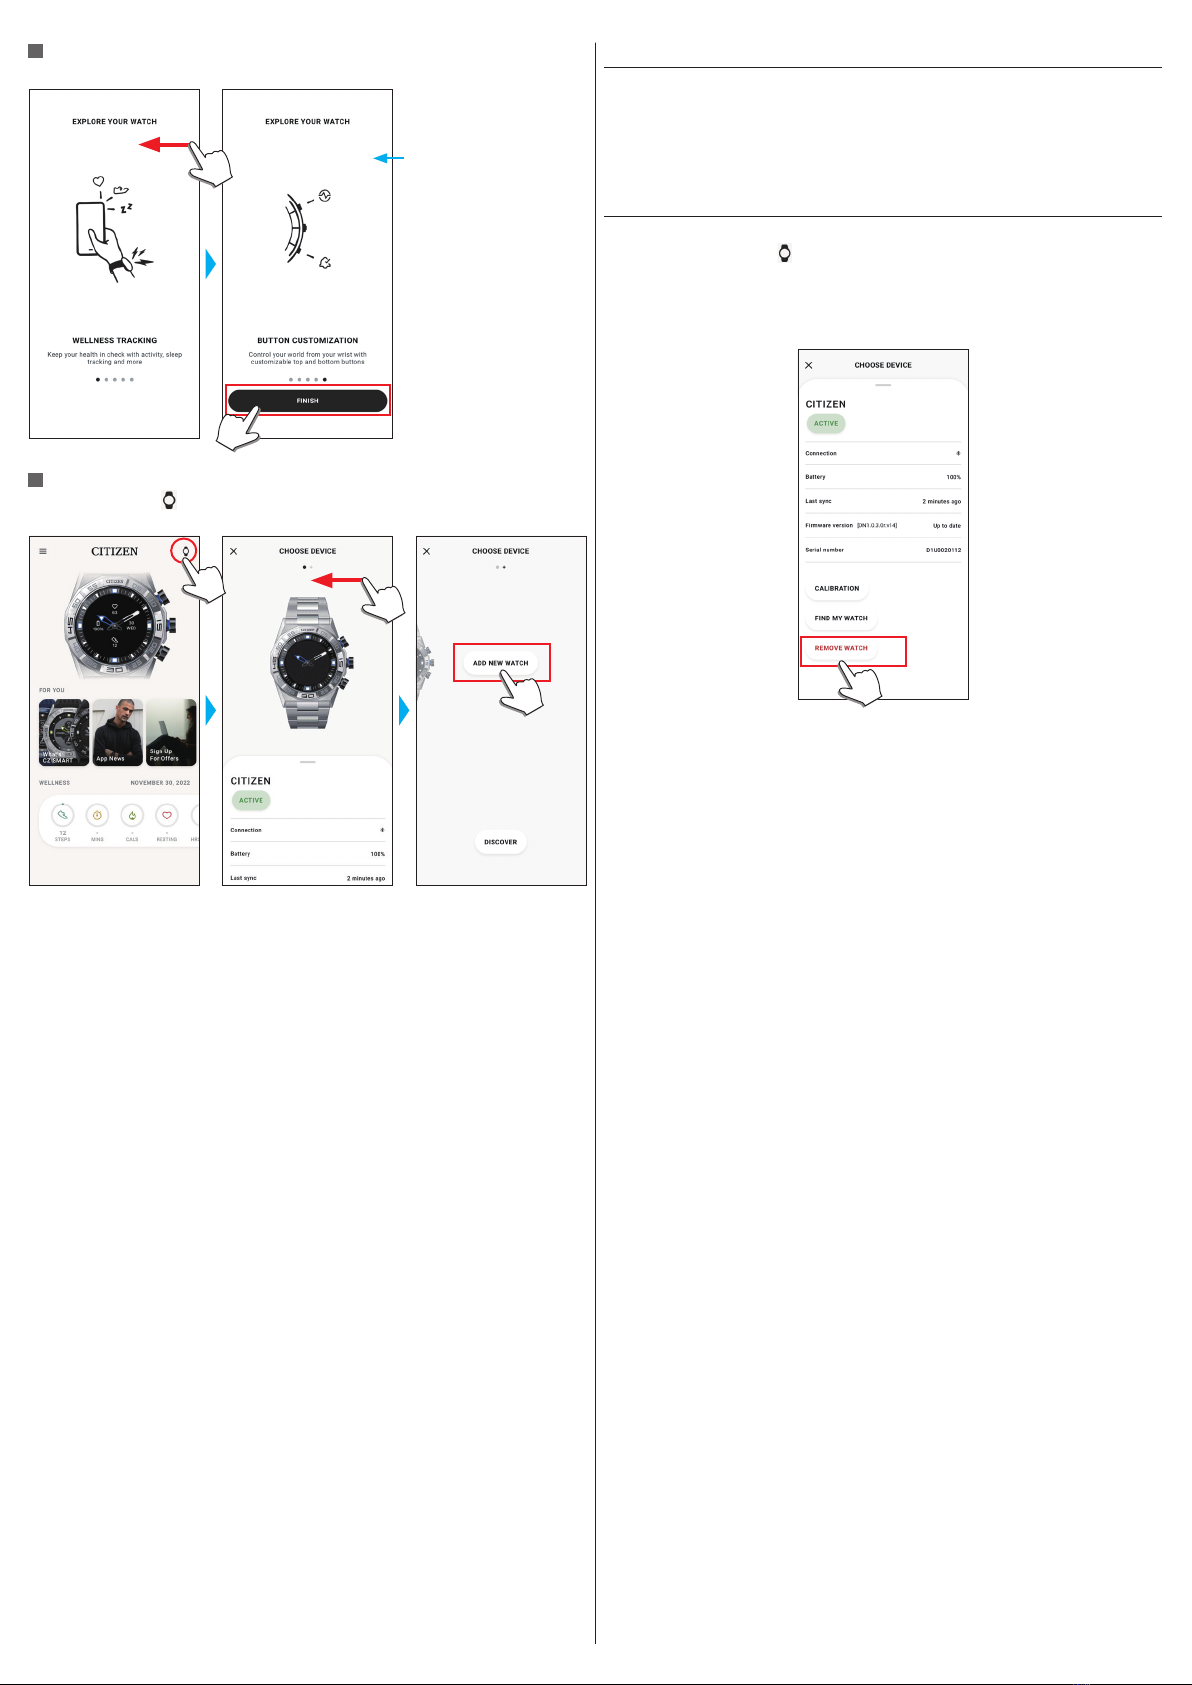
Checking the status of the connected watch ..........................
10
Customizing the watch face...................................................
12
Setting alarm .......................................................................
14
Setting notification ..............................................................
15
Detecting activities automatically.........................................
16
Checking and correcting the reference position.....................
17
About the menu on the watch...............................................
18
Using the timer....................................................................................
18
Bluetooth® wireless technology ............................................
19
Specifications .......................................................................
19

2/19
YF20 instruction manual
Indicating notifications
FRI
20
72°
75
Press and hold the lower right button
A
of the watch to indicate notifications on the
display of the watch.
• For details of notifications, see "Setting notification" (→ page
15
).
Hiding information on the display
FRI
20
72°
75
You can hide information on the display by pressing and holding the upper right
button
C
of the watch.
• You can also hide the information through the settings of the watch. For details,
see "About the menu on the watch" (→ page
18
).
Before connecting with a smartphone
You must install the dedicated app “CITIZEN
CONNECTED” on your smartphone and start it to
make pairing between the phone and the watch to
connect them.
The flow of connection is as follows.
• This watch communicates with smartphones through
Bluetooth® Low Energy power-saving communication
technology.
• The Bluetooth® word mark and logos are registered
trademarks owned by Bluetooth SIG, Inc.
• Google, Wear OS by Google, Google Play and Google
Play logo, Google Fit, Google Assistant, Google
Calendar, Gmail, Android and Android Go Edition,
Android One, Google Pixel, Google Nest Learning
Thermostat are trademarks of Google LLC.
• IOS® is a trademark or registered trademark of Cisco
in the U.S. and other countries and is used under
license.
Install the dedicated app
Sign up/log in
Pairing
Connection
Start up the app
Disconnection
Requirements for connection
Android Android OS 7.0 -
iPhone iOS 15.0 -
Bluetooth® Bluetooth smart compatible/ 4.2 Low Energy
• You cannot install the dedicated app when your smartphone is not compatible
with it.
• The app may not be warranted to work correctly even when your smartphone
fulfills requirements.
• Update of the dedicated app may be ceased after the end of production of the
watch.
Actual screens and/or indication of the dedicated app may differ from those on
this manual depending on your usage conditions and/or changes of specifications
at update of the app.
In that case, follow instructions on the actual screen of the app.
Before using this watch
Protective stickers
Be sure to remove any protective stickers that may be on your watch (case back,
band, clasp, etc.). Otherwise, perspiration or moisture may enter the gaps between
the protective stickers and the parts, which may result in a skin rash and/or
corrosion of the metal parts.
Charging your watch
Charge the built-in secondary battery using the special battery charger to use this
watch.
For details, see “Quick start guide” and “Charging cord” provided with the product.
Component identification
FRI
20
72°
75
Minute hand
Hour hand
Display
Button
C
Button
A
Button
B
• The illustrations in this instruction manual may differ from the actual appearance
of your watch.
About the display of the watch
This watch is equipped with an electronic paper display. Owing to the display, the
watch can always indicate various information with little consumption of power
reserve. On the other hand, unlike an ordinary LCD, indication is not always
renewed.
To see current total steps or other real-time data, you need to renew indication
intentionally.
Renewing indication on the display
Turn your wrist wearing the watch quickly to move the hands and renew indication
on the display.
• Try the twist again if the hands do not move.
Turning on the light
Tap the center of the display twice to turn on the light.
• The light is turned off automatically without any operation.
• You can change the setting not to turn on the light on the watch. For details, see
"Settings on the watch body" (→ page
6
).

3/19
YF20 instruction manual
Execute pairing with the smartphone
Execute pairing at first when connecting the watch and your smartphone.
• Unique pairing information is saved on the watch and smartphone as pairing is
executed.
• Make an account at the startup of the dedicated app. An e-mail address which can
be used for e-mail reception is required for making an account.
• Keep the mail address and password for the account in case they are required.
Executing pairing
• For pairing, you have to operate both the watch and the smartphone.
• Charge the watch and the smartphone sufficiently beforehand.
• Turn on Bluetooth® and function(s) related with location information on your
smartphone.
1
Download the dedicated app “CITIZEN CONNECTED” at an app site and install
it.
2
Start the dedicated app.
• Keep the app screen displayed until pairing is finished.
3
Tap [HYBRID].
4
Make an account.
• Proceed to authentication after making an account. Authentication number is
sent to the mail address you entered here.
• Tap [LOG IN] if you had logged out without executing pairing after making an
account before.
• Once signed up, the status (login status) is kept regardless whether the app is
activated or deactivated.
5
Press the right middle button Band tap [CONTINUE] on the screen of the
app as the [Start Pairing] screen is shown.
6
Tap [THIS IS MY WATCH].
• The watch displayed on the screen may look different from the actual one you use.
• Tap [I DON’T SEE MY WATCH] when not only its color but whole appearance
looks different from yours.
• When update of the watch has started, wait until it is finished.
7
Press the middle right button Bof the watch within time limit.
Pairing starts.

4/19
YF20 instruction manual
When pairing finished successfully
The screen of finish is displayed.
Guides such as ways of use
of the watch are shown.
Swipe left to go to the last
page.
To start pairing on the screen of the app
Tap the watch icon ( ) on the upper right of the home screen, swipe left on the
[CHOOSE DEVICE] screen and tap [ADD NEW WATCH].
When pairing fails
When pairing fails and the target watch does not appear on the dedicated app, try
pairing again following the steps below.
1
Remove “Citizen Connected HR” on Bluetooth® setting of.your smartphone.
2
Turn off the Bluetooth function on your smartphone and turn it on again.
3
execute pairing between the watch and the smartphone again.
When connection fails after pairing (canceling pairing)
Try pairing again following the steps below.
1
Tap the watch icon ( ) on the upper right of the home screen.
2
Swipe left or right on the [CHOOSE DEVICE] screen to display the watch with
which you want to connect your smartphone.
3
Swipe up the bottom tab on the [CHOOSE DEVICE] screen to display the
menu.
4
Tap [REMOVE WATCH].
5
“Citizen Connected HR” on Bluetooth® setting of.your smartphone.
6
Turn off the Bluetooth function on your smartphone and turn it on again.
7
Execute pairing between the watch and the smartphone again.

5/19
YF20 instruction manual
Synchronizing your watch and smartphone
After pairing, the watch and your smartphone are connected and synchronized
automatically as the dedicated app is started up or displayed on the phone.
• All the hands of the watch turn fully around when synchronization starts.
• The time and calendar on the watch are also synchronized with those on the
smartphone.
• It may take a certain period of time for data synchronization.
• Some operations of the app such as change of settings are accompanied with data
synchronization.
• Synchronization does not start when the watch is not charged enough.
• Synchronization does not start when distance between the smartphone and the
watch is 10 m (33 feet) or more or there is any obstacle between them.
Swiping down the home screen also starts data synchronization.
Adjustment of the time and calendar
This watch receives time information from your smartphone at every connection
and adjusts the time and calendar automatically.
• You cannot adjust time and calendar on the watch only by itself.
Acceleration sensor and heart rate sensor
This watch is equipped with a built-in acceleration sensor and a heart rate sensor.
They always execute measurement while you wear the watch.
• The acceleration sensor measures your action such as steps and the heart rate
sensor your heart rate.
• If you hold something in the hand of watch-wearing side, the sensors may measure
wrongly.
You can see the measurement data in real time on the watch. Also, on the
[WELLNESS] screen of the dedicated app, the data are shown in graphs as daily/
weekly/monthly records.
In addition, on the scren of dedicated app, you can check status of your workout
categorized by types of exercise, time spent for exercise, calorie consumption
derived from your height and weight, sleep time, etc.
• Activity data recorded in the watch is transferred to the dedicated app when the
watch and the smartphone are synchronized and it is stored in the app.
• Up to about 40-day data of activity is saved on the watch.
• Data taken through this watch can be sent to the other apps for browsing.
• This watch reads motion of the watch through data from the acceleration sensor
and estimates types and amount of your activities such as walking and sleeping.
The estimation may differ from actual ones.
• You cannot edit their data. Activity data taken with other devices cannot be
indicated on the dedicated app of this watch.

6/19
YF20 instruction manual
Settings on the watch body
You can execute settings for the watch and utilize its various functions only by the
watch itself.
• Some settings and functions are not available without connection between the
watch and the smartphone through the dedicated app.
We introduce settings on the watch body here.
• See "About the menu on the watch" (→ page
18
) for other functions.
1
Press the middle right button Bof the watch.
The hands of the watch point one of the function icons on the display.
• [Home] is pointed immediately after indication.
• The indication automatically returns to normal indication in 3 minutes without
executing any operation.
2
Press the lower right button A.
The hands of the watch point the [Settings] icon.
• In this time, pressing the lower right button
A
of the watch moves the hands
clockwise to point each function icon one by one. Pressing the upper right button
C
of the watch moves the hands counterclockwise.
3
Press the middle right button Bof the watch.
The menu of [Settings] appears on the watch.
• [Back] is chosen when the menu appears.
4
Press and release the lower right button Aor the upper right button C
repeatedly to choose a menu item.
5
Press the middle right button Bof the watch.
The setting of the menu item you chose is changed.
• Each time you press button, the setting is changed.
[About]
Use it to see the serial number and the firmware version
of the watch.
• This item has no setting values.
• Press the lower right button
A
/the upper right
button
C
of the watch to scroll indication up/down.
[Watch Mode]
You can set which wrist you wear the watch on.
Choose [RIGHTIE] or [LEFTIE].
• Each time you change the setting, indication on the
the display rotates upside down.
• When you choose [LEFTIE], read “middle right”,
“upper right” and “lower right” on this manual
as “middle left”, “upper left” and “lower left”
respectively.
[Dial Info]
You can set whether information is indicated on the
display of the watch or not.
• Pressing and holding the upper right button
C
switches its [ON]/[OFF].
[Heart Rate]
You can set whether you use the heart rate sensor.
[Vibration]
You can set vibration strength of the watch.
Choose one of the followings: [OFF], [MILD],
[MEDIUM] or [STRONG].
• Each time you change the setting, the watch actually
vibrates in the new setting.
[Notification Size]
You can set text size of notifications on the display of
the watch.
You can choose one from [SMALL], [MEDIUM] and
[BIG].
[Do Not Disturb]
You can set whether notifications to the watch are stopped
temporarily.
You can choose one from [ON], [MIRROR PHONE] and
[OFF].
• The setting does not affect action of alarm.
[Back]
The [Settings] menu is closed.
[Front Light]
You can set whether you use the light.
6
Repeat steps 4 and 5 to adjust settings of other items.
7
After finishing setting, press and release the lower right button Aor the
upper right button Cof the watch repeatedly to choose [Back].
8
Press the middle right button Bof the watch.
The hands of the watch point the [Settings] icon.
9
Press the upper right button C.
The hands of the watch point the [Home] icon.
10
Press the middle right button Bof the watch to finish the procedure.
The watch returns to normal indication.
• After step 5, press and hold the middle right button
B
of the watch to skip to step
8.

7/19
YF20 instruction manual
[MY WATCH] screen
You can customize watch face indication and assign function to buttons of the watch
here. You can also control settings of notifications and alarm.
Settings icon
It opens the [MY PREFERENCES] screen.
It opens the
[CUSTOMIZATION]
screen.
⿎[MY PREFERENCES] screen
You can control settings of alarm, notifications, unit, etc. here.
⿎[CUSTOMIZATION] screen
You can control display indication of the watch here.
The screen of the dedicated app
We call the screen just below the home screen, which appears immediately after
starting the dedicated app.
Watch icon
It opens the [CHOOSE
DEVICE] screen.
Home screen
Picture of the connected watch
The [MY WATCH] screen
is opened.
The [WELLNESS] screen
is opened. You can swipe it
left and right.
Menu icon
The side menu opens.
Links which show
notices, latest status
of the watch and
other informations
automatically. You can
swipe it left and right.
Side menu
You can control your account, settings of activity goals and those for the dedicated
app here.
[CHOOSE DEVICE] screen
You can add watches, manage connection and adjust the reference position of the
watch hands here.

8/19
YF20 instruction manual
[WELLNESS] screen
It is the screen for indicating the data of the activity monitor on the watch.
The screen has the five following sub menus: [STEPS], [ACTIVE MINUTES
(MINS)], [ACTIVE CALORIES (CALS)], [HEART RATE (RESTING)] and [SLEEP
(HRS MINS)].
Tap to switch to an item
you want to indicate.
• Activity amount is indicated by percentage where the target value set is supposed
100 %. One whole circle means 100 % on a circle graph. For bar graphs, the 100 %
line is indicated in the graph field.
• For details of Target value, see "Changing goal values of activities" (→ page
9
).
Changing settings of the dedicated app
1
Start the dedicated app.
The watch and the smartphone are connected.
• If you have not signed up, sign up.
• If synchronization of the watch and the smartphone starts, wait until it is
finished.
2
Tap the menu icon ( ) on the upper left of the home screen.
The side menu opens.
Account name
Tap to change account name.
[Wellness]
You can change connected apps, hight, weight,
gender and settings of activity goals here.
[Help]
You can access FAQ and contact us here.
[About]
You can control data sharing setting for software
improvement and browse terms of use and privacy
policy here.
You can also remove your account here.
[Log Out]
Use this to log out of the dedicated app. Your
account is not removed.
Version indication
Version of this dedicated app is indicated.
[What’s New?]
You can access the latest information of this
dedicated app and other topics.

9/19
YF20 instruction manual
Changing goal values of activities
1
Start the dedicated app.
The watch and the smartphone are connected.
• If you have not signed up, sign up.
• If synchronization of the watch and the smartphone starts, wait until it is
finished.
2
Tap the menu icon ( ) on the upper left of the home screen, then tap
[Wellness] on the side menu.
The [WELLNESS] screen is opened.
3
Tap [Set Goals] on the [WELLNESS] screen.
The [SET GOALS] screen is opened.
The current setting
values are indicated.
Tap an item whose
setting value you
want to change.
4
choose the item which you want to change goal value on the top of the
screen and tap the value.
The screen keyboard appears.
• When [DYNAMIC GOAL] is active on [STEPS], you cannot change its goal value.
The goal value is automatically set based on your past activity history (at least
records of your 7-day activity is required to activate the function).
5
Tap the check icon ( ) on the upper right of the [SET GOALS] screen to
finish the procedure.

10/19
YF20 instruction manual
[ACTIVE]
[ACTIVE] is indicated for the currently
connected watch.
• When you use two or more watches, you can
switch the watch to be connected by tapping
[MAKE ACTIVE].
[Connection]
The current connection status is indicated.
: Connected : Disconnected
[Battery]
You can check power reserve of the connected
watch here.
[Last sync]
The time elapsed since the last connection is
indicated.
[Firmware version]
The current firmware version of the watch is
indicated.
[Serial number]
The serial number of the watch is indicated.
[CALIBRATION]
Check and correct the reference position of the
hour and minute hands.
For details, see "Checking and correcting the
reference position" (→ page
17
).
[FIND MY WATCH]
Use this to search the watch. A rough-
estimated position of the watch where it lastly
synchronized with the smartwatch can be
indicated on the map.
• Permission for access to the positional
information of your smartphone is needed.
[REMOVE WATCH]
Use this to cancel pairing between the watch and
the smartphone and reset the watch.
• The watch and the smartphone must be in
their connectible range.
Checking the status of the connected watch
1
Start the dedicated app.
The watch and the smartphone are connected.
• If you have not signed up, sign up.
• If synchronization of the watch and the smartphone starts, wait until it is
finished.
2
Tap the watch icon ( ) on the upper right of the home screen.
The [CHOOSE DEVICE] screen is opened.
3
Swipe left or right on the screen to display the connected watch and swipe
up the tab on the bottom of the screen.

11/19
YF20 instruction manual
Executing settings for functions and assigning them to the
buttons of the watch
You can assign various functions to the lower right button
A
and the upper right
button
C
of the watch. Some functions need setting on the dedicated app.
1
Start the dedicated app.
The watch and the smartphone are connected.
• If you have not signed up, sign up.
• If synchronization of the watch and the smartphone starts, wait until it is
finished.
2
Tap the picture of the connected watch on the home screen.
The [MY WATCH] screen is opened.
3
Swipe left on the [MY WATCH] screen to indicate [PUSHER].
The function list is appeared on the tab on the bottom of the screen.
Tap this when you
assign a function
to the upper right
button
C
.
Tap this when you
assign a function
to the lower right
button
A
.
Function list
It can be scrolled up
and down.
• The example above shows when the upper right button
C
is tapped.
4
Tap the button which you want to assign a function to and tap a function
on the bottom of the screen.
• Items shown on the function list may differ depending on status of the watch.
[ADD FEATURES]
Use this to assign an iiidea of Riiiver to a button as a
function.
Function setting: Turn on iiideas on [IIIDEA LIST]
and execute required settings to make iiideas of Riiiver
appear on the bottom of the screen.
• Riiiver and iiideas are not shown on the list in places
where the Riiiver service is not available. Even after
assigning an iiidea, it is not shown in places where
the Riiiver service is not provided.
[WORKOUT MODE]
It measures your exercise and indicates its result for
each exercise type.
Results of your exercise are indicated on the screen of
the app.
[WELLNESS
DASHBOARD]
It indicates [STEPS], [ACTIVE MINUTES (MINS)],
[ACTIVE CALORIES (CALS)], [HEART RATE
(RESTING)] and [SLEEP (HRS MINS)] of a day.
It measures your heart rate.
[STOPWATCH]
It provides stopwatch measurement.
The minute hand overlaps the hour hand and they
moves to indicate seconds.
[NOTIFICATIONS]
It indicates notifications.
Function setting: it is required to execute settings
for notifications on [Notifications] on the [MY
PREFERENCES] screen.
[MUSIC CONTROL]
You can control music playback through the watch
while using the music app: can command play/pause/go
previous/go next.
Play/pause: Press and hold the upper right button
C
of
the watch.
Volume up: press the upper right button
C
once.
Volume down: press the lower right button
A
once.
Back to the previous tune: Press and hold the lower
right button
A
.
[TIMER]
It provides a countdown timer.
The minute hand overlaps the hour hand and they
moves counterclockwise to countdown seconds.
You can set countdown time in 1-minute increments.
The watch vibrates when time is up.
Function setting: countdown time must be changed on
the watch itself.
[WEATHER]
It indicates weather reports of up to two places
including current one.
Function setting: choose places on [ADD LOCATION].
• Permission for access to the positional information
of your smartphone is needed.
[RING PHONE]
It makes your smartphone emit sound to help you when
looking for the phone. To stop emitting sound, press
the middle right button
B
of the watch.

12/19
YF20 instruction manual
Functions added through [ADD FEATURES]
[UV Index]
It indicates UV indexes of three places including the
current one.
[Surf Report]
It indicated special weather reports for surfing.
[Hue Light]
It controls Hue, a smart light of Philips.
• This function is available on iOS only.
[Golf Report]
It indicated special weather reports for golf.
[Golf Course]
It indicates information of each hole of a course such as
length and handicap.
[Flight Information]
You can check information of the flight you registered.
[Delivery Tracking]
You can check delivery tracking information of your
parcel.
[Google Nest
Thermostat]
You can control room temperature management tool.
[Yard to Hole]
You can check distance to a hole on a golf course.
5
Tap the back icon ( ) on the upper right of the [MY WATCH] screen to finish
the procedure.
• Follow instructions on the screen.
The selected function is assigned to the button.
To try to use assigned functions
When you press a button of the watch which a function is assigned to, the screen for
the function is shown on the display of the watch.
• Some functions needs Internet connection through the dedicated app.
After using functions
Press and hold the middle right button
B
to return to normal indication.
• Measurement of functions such as the timer continues after returning to the
normal indication.
Customizing the watch face
1
Start the dedicated app.
The watch and the smartphone are connected.
• If you have not signed up, sign up.
• If synchronization of the watch and the smartphone starts, wait until it is
finished.
2
Tap the picture of the connected watch on the home screen.
The [MY WATCH] screen is opened.
3
Swipe up the tab on the bottom of the screen while [MY FACE] is indicated.
• Swipe right on the screen when [PUSHER] is shown.
• Proceed to step 5 when you want to customize the current watch face.
It can be scrolled up
and down.
4
choose and tap a watch face you like.
The face you chose appears on the display of the watch and the screen of the
smartphone.
Proceed to the next when you want to customize the watch face.

13/19
YF20 instruction manual
5
Tap the picture of the watch on the [MY WATCH] screen.
The [CUSTOMIZATION] screen is opened.
Tap an item to
customize.
Tap a small window
whose indication you
want to change. The
screen switch to the
[DATA] screen.
• Some faces cannot be customized.
You can enter text you want to show on the watch display. Tap [+] to
add text. You can choose text color.
Drag it to change its position; Pinch it in/out to change its size.
Use it when you add one of sticker prepared for watch faces.
Tap the sticker you placed to change its color.
Drag it to change its position; Pinch it in/out to change its size.
Use it to choose a background for the watch face.
Use it when you arrange a photo data stored in your smartphone into a
watch face. The existing watch face is overwritten with the new one.
• Some menu items do not appear for some watch faces.
• To remove text and stickers, select one you want to remove and tap the trash icon.
To change indication of small windows
Tap a window whose indication you want to change.
• On the example below, the watch face has three small windows on its 3, 6 and 9
o'clock positions.
It can be scrolled up
and down.
Small window at the
3 o’clock position
Choose a function you want to indicate from the tab on the bottom of the screen.
• You can add [GOAL RING] to a window when it shows indication with a goal
value such as [STEPS].
[ADD FEATURES]
Use it when you choose an information item from iiideas
of Riiiver.
Turn on iiideas on [IIIDEA LIST] to make information
items of Riiiver appear on the bottom of the screen.
• Riiiver and iiideas are not shown on the list in places
where the Riiiver service is not available. Even after
choosing an iiidea for indication, it is not shown in
places where the Riiiver service is not provided.
[SECOND
TIMEZONE]
It indicates the current tome of the place you chose.
The chosen place is shown on the bottom of the screen.
Tap it to change the place.
[EMPTY]
Choose this when you want to display no indication.
[DAY-DATE]
It indicates date and day of week.
[CURRENT
TEMPERATURE]
It indicates temperature of the current place.
• Permission for access to the positional information of
your smartphone is needed.
[STEPS]
It indicates how many steps you have taken today.
[HEART RATE]
It indicates the heart rate lastly measured.
[CHANCE OF RAIN]
It indicates chance of rain of the current place.
• Permission for access to the positional information of
your smartphone is needed.
[ACTIVE MINUTES]
It indicates time you have spent for exercise today.
[CALORIES]
It indicates calorie you have consumed today.
[BATTERY]
It indicates the current power reserve of the watch.
Functions added through [ADD FEATURES]
[Sports Live]
Flash reports of the sport you chose are indcated.
[UV Index]
It indicates UV index of the current place.
[Stock price]
Stock price condition of a company you assigned is
indicated.
[World Football]
Flash reports of a soccer team you chose are indicated.
6
After finishing customization, tap the check icon ( ) on the upper left of
the [CUSTOMIZATION] screen.
The [APPLY] screen of is displayed.
7
the check icon ( ) on the upper right of the [APPLY] screen to finish the
procedure.
The customized watch face is shown on the display of the watch.

14/19
YF20 instruction manual
Setting alarm
1
Start the dedicated app.
The watch and the smartphone are connected.
• If you have not signed up, sign up.
• If synchronization of the watch and the smartphone starts, wait until it is
finished.
2
Tap the picture of the connected watch on the home screen.
The [MY WATCH] screen is opened.
3
Tap the setting icon ( ) on the [MY WATCH] screen.
The [MY PREFERENCES] screen is opened.
4
Tap [Alarms] on the [MY PREFERENCES] screen.
The [ALARMS] screen is opened.
Tap here when
setting a new alarm
time.
Alarm time
currently activated
5
Tap [+ ADD] on the bottom of the [ALARMS] screen.
The [ADD ALARM] screen is opened.
Scroll up/down to set
hour and minute of
alarm time.
Tap days of week on
which you want to
activate alarm weekly.
Tap here after finishing
setting.
Tap here to give a title to
an alarm setting.
Tap here to give a
comment to an alarm
setting.
• Tap days of week on [REPEAT] on which you want to use alarm repeatedly. On
the example below, days from Monday to Friday are selected.
6
After finishing setting of alarm time, tap the check icon ( ) on the upper
right of the [ADD ALARM] screen to finish the procedure.
The alarm time newly set is indicated in the activated status.
When alarm time comes
The watch vibrates.
• Press any button to stop vibration.
Turning on/off the alarm
Tap the switch of alarm setting to turn on/off on the [ALARMS] screen.
Each time you tap it, the alarm
is turned on/off.
Changing alarm setting
Tap alarm setting on the [ALARMS] screen to open the [EDIT ALARM] screen.
Tap here when removing
the alarm setting.
Tap here after finishing
change of settings.

15/19
YF20 instruction manual
Setting notification
• Notifications may be missed when distance between the smartphone and the
watch is 10 m (33 feet) or more or there is any obstacle between them.
1
Start the dedicated app.
The watch and the smartphone are connected.
• If you have not signed up, sign up.
• If synchronization of the watch and the smartphone starts, wait until it is
finished.
2
Tap the picture of the connected watch on the home screen.
The [MY WATCH] screen is opened.
3
Tap the setting icon ( ) on the [MY WATCH] screen.
The [MY PREFERENCES] screen is opened.
4
Tap [Notifications] on the [MY PREFERENCES] screen.
The [NOTIFICATIONS] screen is opened.
Swipe left or right to
change the screen to
notification of apps
or contacts.
[APPS] [CONTACTS]
Choose apps for receiving notifications.
• You need to enable notification
reception also on the settings of your
smartphone.
• Apps shown may differ depending
the OS of your smartphone.
You can choose notification targets for
phone and each message services.
• For [QUICK RESPONSE] (on the
dedicated app for Android only), see
below.
• You need to control access right on your smartphone to access its address
management app.
On Android OS, you can tap items with “i” and control their access right.
About [QUICK RESPONSE]
When a call comes in from one of notification targets, you can answer it with a
message using [QUICK RESPONSE] (the dedicated app for Android only).
You can make and stock up to two messages beforehand.
When you use [QUICK RESPONSE], as a call comes in, choose a message from the
stocked ones by using the lower right button
A
or the upper right button
C
on the
watch and send it by using the middle right button
B
.

16/19
YF20 instruction manual
Detecting activities automatically
For the four activities,[Run], [Bike], [Walk] and [Row Machine], you can set the
watch to detect them automatically and start measurement. ([Auto Workout
Detection])
In addition, this watch has the notification function to tell you to stand up when it
detect that you have had no action a certain period time while studying or working.
([Move Alerts])
• Notifications may be missed when distance between the smartphone and the
watch is 10 m (33 feet) or more or there is any obstacle between them.
• The [Move Alerts] function works when the acceleration sensor of the watch has
detected no action for a certain period of time.
1
Start the dedicated app.
The watch and the smartphone are connected.
• If you have not signed up, sign up.
• If synchronization of the watch and the smartphone starts, wait until it is
finished.
2
Tap the picture of the connected watch on the home screen.
The [MY WATCH] screen is opened.
3
Tap the setting icon ( ) on the [MY WATCH] screen.
The [MY PREFERENCES] screen is opened.
4
Tap [Wellness Tracking] on the [MY PREFERENCES] screen.
The [WELLNESS TRACKING] screen is opened.
[Auto Workout Detection] [Move Alerts]
Tap switches of activities for which
you want to start measurement
automatically.
• When you check [Ask me first],
a notification comes when
measurememt starts.
Use [Start] and [End] to set the time
period when the function is active. The
notification is not sent while it is out of
the time you set.
Use [Alert me if I’m inactive for] to set
interval between the last detection of
action and sending the notification.

17/19
YF20 instruction manual
Checking and correcting the reference position
Check and adjust the reference position through the dedicated app.
If the time or calendar is not shown correctly even after connecting with the
smartphone, check whether the reference position of the watch hands is correct.
• If the hands do not reflect the correct reference position, the time will not be
indicated accurately.
1
Start the dedicated app.
The watch and the smartphone are connected.
• If you have not signed up, sign up.
• If synchronization of the watch and the smartphone starts, wait until it is
finished.
2
Tap the watch icon ( ) on the upper right of the home screen.
The [CHOOSE DEVICE] screen is opened.
3
Swipe left or right on the screen to display the connected watch and swipe
up the tab on the bottom of the screen.
4
Tap [CALIBRATION].
The reference position of the hour hand becomes adjustable.
Tap the buttons to
adjust the reference
position of each
hand.
Tap here when
finishing adjustment
of reference position
of all hands.
Hour hand Minute hand
5
Correct the reference position of watch hands following instructions on the
screen.
• Use the buttons below the figure of the watch on the screen to move the hand of
the watch.
6
Swipe left after finishing adjustment of the hour hand.
The reference position of the minute hand becomes adjustable.
7
Adjust the reference position of the minute hand of the watch through the
same steps.
8
Tap the check icon ( ) on the upper right of the screen to finish the
procedure.
• The check icon ( ) appears on the screen of adjustment of reference position of
the minute hand.

18/19
YF20 instruction manual
About the menu on the watch
You can choose a function from the menu of the watch and use it.
• Some functions are not available without connection between the watch and the
smartphone through the dedicated app.
1
Press the middle right button Bof the watch.
The hands of the watch point one of the function icons on the display.
• [Home] is pointed immediately after indication.
• The indication automatically returns to normal indication in 3 minutes without
executing any operation.
2
Press and release the lower right button Aor the upper right button Cof
the watch repeatedly to switch the function to use.
The hands of the watch point one of the function icons.
• Press and hold the lower right button
A
or the upper right button
C
of the watch
to move the hands continuously.
• The black icon in a white circle shows the function currently chosen.
• iiideas are not available in places where the Riiiver service is not provided.
[Weather]
It indicates weather reports of up to two places
including current one.
• Settings on the dedicated app are needed to use it.
For details, see "Executing settings for functions and
assigning them to the buttons of the watch" (→ page
11
).
[Ring Phone]
It makes the smartphone connected with the watch emit
sound.
It is useful for searching the smartphone.
To stop emitting sound, press the middle right button
B
of the watch.
[Music Control]
You can control music playback through the watch
while using the music app: can command volume up/
down and play/pause/go previous.
Play/pause: Press and hold the upper right button
C
of
the watch.
Volume up: press the upper right button
C
once.
Volume down: press the lower right button
A
once.
Back to the previous tune: Press and hold the lower
right button
A
.
[Notifications]
It indicates notifications.
• Settings on the dedicated app are needed to use it.
For details, see "Setting notification" (→ page
15
).
[Home]
The watch returns to normal screen.
[Settings]
Use it to execute settings on the watch.
• For details, see "Settings on the watch body" (→ page
6
).
[Wellness]
It indicates [STEPS], [ACTIVE MINUTES (MINS)],
[ACTIVE CALORIES (CALS)], [HEART RATE
(RESTING)] and [SLEEP (HRS MINS)] of a day. It
measures your heart rate.
[Workout]
Use it to choose a type of exercise from 10 categories
and take measurement for it.
For some activities, you can make your exercise course
indicated on a map.
• For [Run], [Bike], [Walk] and [Row Machine], you
can set the watch to detect them automatically
and start measurement. For details, see "Detecting
activities automatically" (→ page
16
).
[Timer]
It provides a countdown timer. For details, see "Using
the timer" (→ page
18
).
[Stopwatch]
It provides stopwatch measurement. The minute hand
overlaps the hour hand and they moves to indicate
seconds.
3
Press the middle right button Bof the watch.
Indication on the display is switched to that for the function you chose.
• Some functions starts working immediately.
To return to normal indication
Press and hold the middle right button
B
of the watch to return to normal
indication.
• When you have returned to the menu from settings of an item, press and hold the
middle right button
B
again.
Using the timer
The timer on this watch can set countdown time in 1-minute increments.
• Countdown time of the timer must be changed on the watch.
1
Press the middle right button Bof the watch.
The hands of the watch point one of the function icons on the display.
• The indication automatically returns to normal indication in 3 minutes without
executing any operation.
2
Press and release the lower right button Aor the upper right button Cof
the watch repeatedly to indicate [Timer].
3
Press the middle right button Bof the watch.
The watch shows the [Timer] display and the previous countdown time is indicated.
Button guide
“+”: upper right button
C
“▶”: middle right button
B
.
“-”: Press and release the
lower right button
A
.
Countdown time
Here we change the countdown time to 25 minutes for example.
4
Press and release the lower right button Arepeatedly to change
countdown time to [25 min].
• Countdown time changes continuously in 10-minute increments while you are
pressing and holding one of the buttons.
5
Press the middle right button Bof the watch.
The hands of the watch start moving from 12 o’clock position and countdown timer
starts.
Remaining time
• Press the middle right button
B
of the watch to return to normal indication.
The timer keeps countdown.
After measurement
The watch vibrates to tell you time is up.

19/19
YF20 instruction manual
To cancel measurement
Measurement of timer and other functions does not stop even when the display is
switched. To cancel measurement, stop it following the steps below.
1
Call the [Timer] display by executing steps 1 - 3 of "Using the timer" (→
page
18
).
2
Press the lower right button Aof the watch.
Countdown of the timer is paused.
• Press the lower right button
A
of the watch again to restart.
3
Press the upper right button C of the watch to reset the timer.
The timer’s remaining time becomes [0 min] and countdown is ended.
4
Press the middle right button Bof the watch to finish the procedure.
The watch returns to normal indication.
• The countdown time set is kept.
• Pressing the upper right button
C
at step 3 above updates countdown time.
Bluetooth® wireless technology
Regulatory concerning to Bluetooth® (Areas where Bluetooth® is available)
Use of the Bluetooth® communication technology is not legally permitted in some
countries or regions.
• Using this watch in a country where it is not permitted may be punished under its
law.
• Communication using Bluetooth® may be monitored intentionally or accidentally.
Do not use this watch for important communication or any communication
involving human lives.
For details of Bluetooth, see the following items.
https://www.citizenwatch-global.com/support/html/en/yf20/bt_info_01_yf20.html
Specifications
Model
YF20
Type
Analog-digital combination smart watch
Display
functions
Analog section Hour, minute
Display section Indicates various functions permanently
Duration
About 2 weeks - 4 weeks (vary depending on conditions of use)
Battery
Rechargeable cell (lithium ion cell), 1pc.
Additional
functions
• Connection function (through the dedicated app on the
smartphone)
• Vibration function (for alarm and so on. setting through the
dedicated app)
• Activity monitoring function
• Heart rate measurement function
• Riiiver function
• Indications based on functions equipped with the watch:
Steps/time and achievement of each type of workout/heart rate/
calorie consumption/hours of sleep
notification of incoming calls/notification from apps/move
alerts
stopwatch/timer
Music control
weather/temperature/chance of rain
second time zone (local time)/date and days-of-week indication
assigning functions to buttons/editing watch faces
Searching the smartphone
Specifications and contents are subject to change without prior notice.
Other manuals for YF20
3
Table of contents
Other Citizen Watch manuals

Citizen
Citizen C900 Manual

Citizen
Citizen Eco-Drive BP1 User manual

Citizen
Citizen D200 Operating manual

Citizen
Citizen miyota User manual

Citizen
Citizen BV1116-12A User manual

Citizen
Citizen G82 User manual

Citizen
Citizen Stiletto AR0010-53E User manual

Citizen
Citizen MOVEMENT CAL. 6P20 User manual

Citizen
Citizen B690 User manual

Citizen
Citizen H486 User manual