Click Medical RevoLock User manual

1
Advisories
Must be installed by a licensed professional.
Lace will wear:
• Routinely check for wear or damage.
• Look for broken fibers around areas of high wear.
• Replace lace if a significant amount of fibers are broken.
• Proactively replace lace every 6 months.
• Loss of suspension can occur if lace fails.
• Keep lace away from open flame and sharp edges.
Secure threaded insert to liner with medium thread lock.
Secure snap to threaded insert before tensioning system.
Weight limit: 300lbs/135kg
See instructions in other languages: clickmedical.co/instructions
Tool Form for fabrication is sold separately;
Click Part Number: RL-310-00-01
RevoLock 4-Hole Kit Contents: Overview of Possible Applications:
Fabricate a New Socket:
1. Determine location of Click Reel.
2. Secure tool form to model.
3. Apply PVA bag.
4. Apply inner fabric layers.
5. Insert tube into the tool form plug and the reel collar.
6. Apply outer fabric layers.
7. Laminate.
8. Remove tool form and install distal housing.
9. Lace device, then attach lace to the Click Reel and the snap.
10. Install Click Reel into the collar.
11. Test for function.
Replace a Problem Pin Lock:
1. Remove old pin lock distal housing.
2. Insert and attach RevoLock distal housing.
3. Route tubing from distal housing slot
through old pin lock hole.
4. Determine Click Reel location and
bond collar to socket frame.
5. Cut tubing to length, insert into collar,
bond tubing to socket.
6. Remove silicone from collar.
7. Feed lace through collar, tubing and distal housing.
8. Attach lace to snap.
9. Attach the other lace end to the Click
Reel and install into collar.
10. Attach threaded insert into liner.
11. Connect threaded insert to snap.
12. Test for function.
Click Reel
Lamination Collar & Dummy
2.0m
HC Lace
0.5m
Lamination Tube
Metal
Lace Feeder
4-Hole Housing
LE Quick
Connect Snap
LE Quick
Connect Insert
To learn more about fabricating RevoLock, enroll in ClickAcademy.co
Reel Tool
Plastic Lace
Feeder x 3
Tool Form
Plug
RevoLock Slider
For more resources visit:
clickmedical.co/knowledge-base
4-Hole Kit with Click®Reel
RL-300-07-01
GUARANTEE
The Click Reel is guaranteed to last the life of the device
into which it is originally installed. Registration of the Click
Reel is required at the time of original device delivery. To
register: clickmedical.co/contact-us/cr-registration/
WARRANTY
For warranty information on all of Click Medical’s
products: clickmedical.co/terms/#warranty
U.S. Customers:
Contact Help@ClickMedical.co
Tel: +1-970-670-7012
International Customers:
Please contact your local distributor.
Click Medical products are patent protected.
For full list see www.clickmedical.co/patents
Visit www.clickacademy.co for important video education on Click Reels and RevoLock operation
2
Install the tubing:
a. Pack tube end with 1cm of clay.
b. Fully insert one end into tool form plug.
c. Measure the distance from
the plug to the collar.
d. Cut tube to length, pack with clay and
insert into collar via Lace Port C. Leave
room proximally on the socket for the
slider that is installed in Step 7.
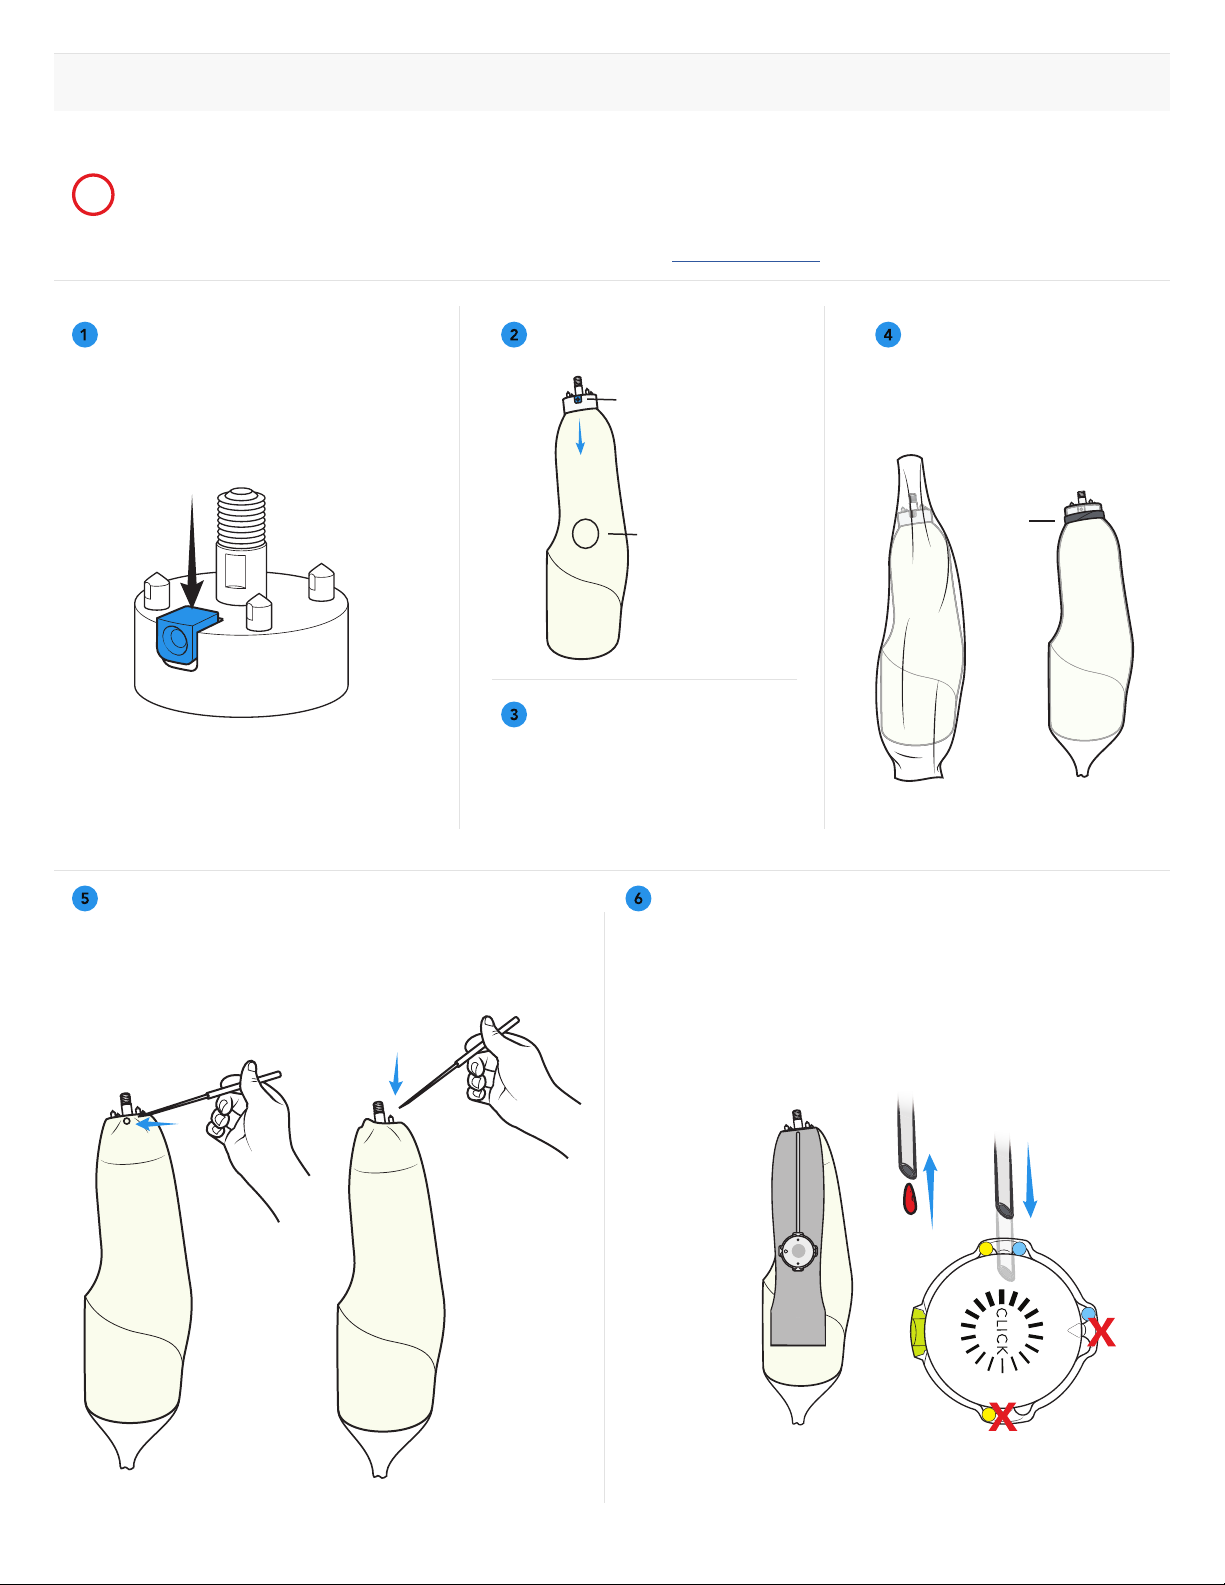
Detailed Fabrication Instructions:
Prepare the inner tool form by
inserting a tool form plug into the
base.
Note: Tool form plugs are found in each
RevoLock Kit.
Apply inner fabric layers:
Use a hot pick to create access holes for the plug and the 4 pins.
Apply inner PVA bag:
a. Tape bag to metal form,
remembering to allow
access to the plug.
b. Trim excess.
Determine desired location of
reel and mark on the model.
RevoLock can be fabricated using a single stage or double stage lamination process:
• For single stage: follow steps 1-10, then skip to step 18
• For double stage: follow steps 1-8, then skip to step 11
For material suggestions and guidelines, please refer to the Material Data Sheet:clickmedical.co/mds
-- DO NOT KINK THE TUBE --
If the tube kinks, you must replace with a new piece.
Tape
Reel Location
Orient the tool form plug with
the collar and secure with
plaster to the model.
!
Tool Form Plug
Pro Tip:
Use hook and loop fastener dots
on the inner form to adhere to
plaster.
A
B
C
1cm
3
Apply outer fabric layers. Apply outer former and nut.
Clay the 2 small holes on top of nut.
Apply outer PVA bag and laminate.
• For single stage: follow steps 1-10, then skip to step 18
• For double stage: follow steps 1-8, then skip to step 11
REMINDER
!
DO NOT EXCEED 15 inHG OF VACUUM PRESSURE DURING LAMINATION
REDUCE VACUUM TO ALLOW INNER LAYERS TO FULLY SATURATE DURING LAMINATION
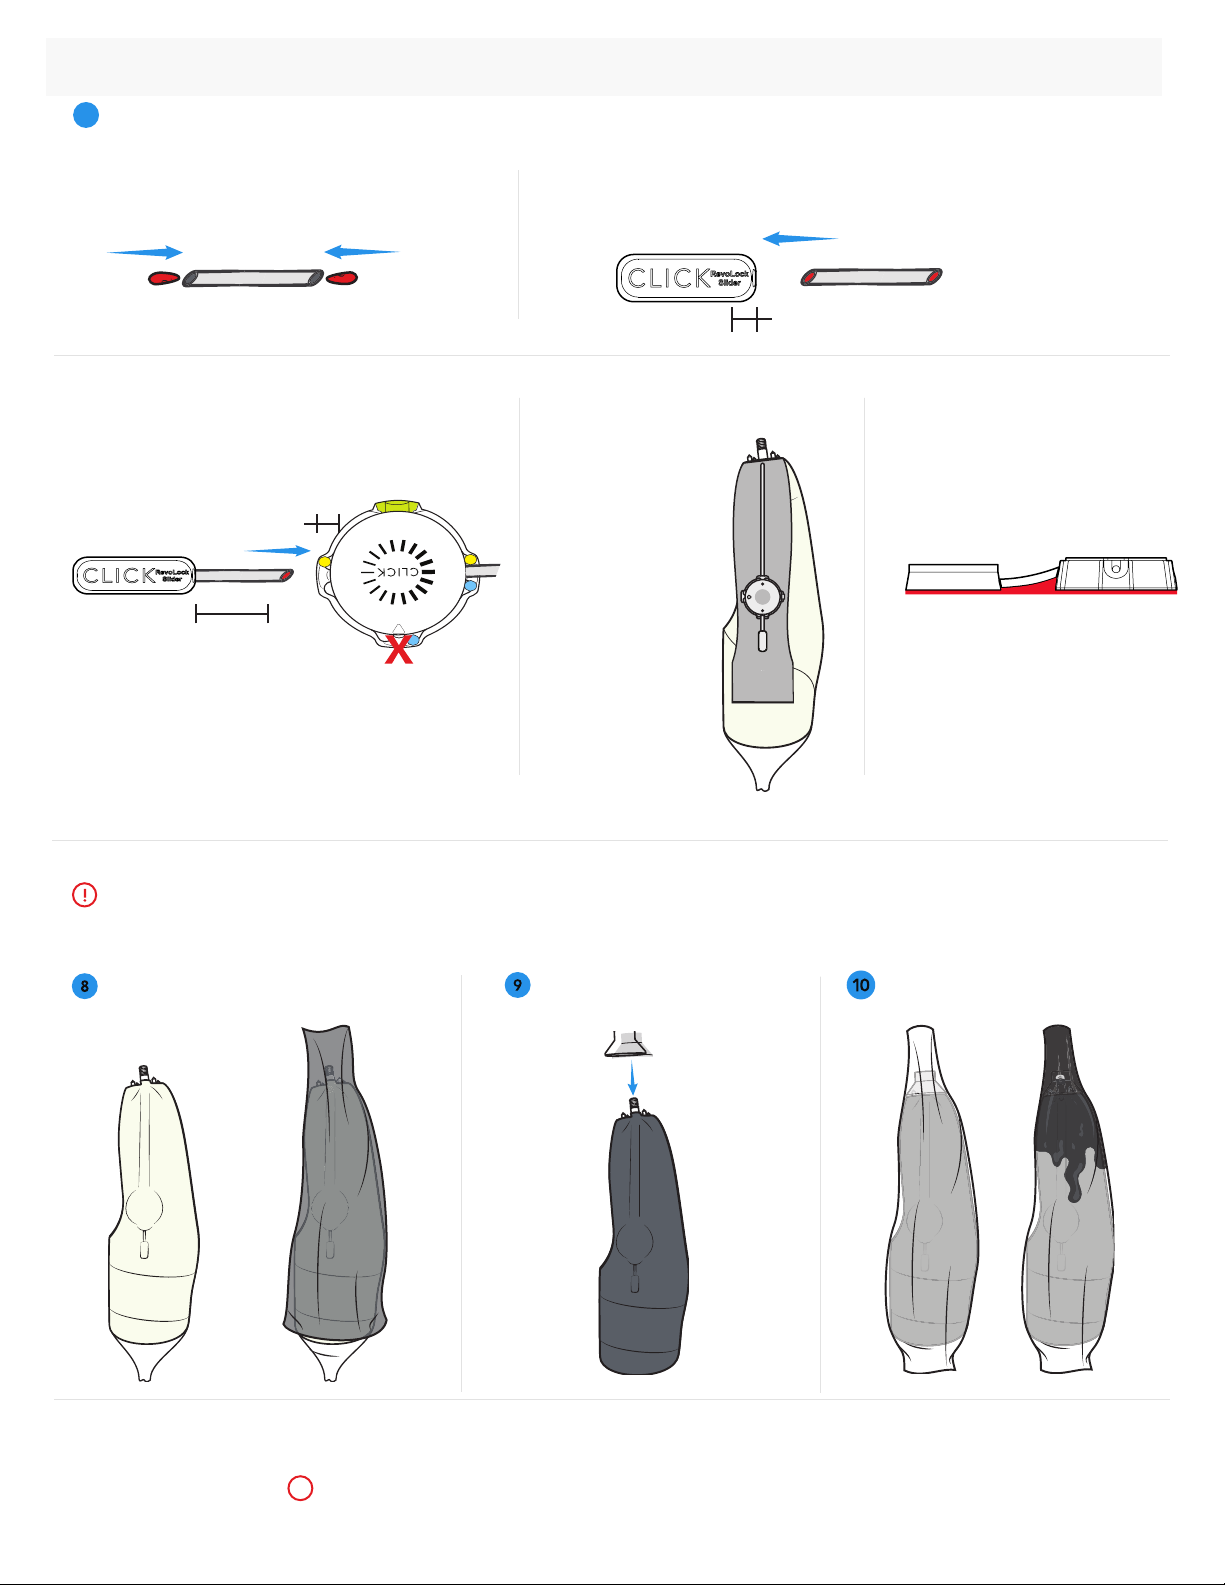
Install RevoLock Slider Base and Tubing:
Purpose: The RevoLock Slider locks the reel into Power Mode and prevents unintentional full release of lace.
a. Plug both ends of Slider Tube with clay.
1cm 1cm
b. Insert tube into Slider Base.
Insert fully - at least 1cm.
1cm
c. Insert free end of tube into Lamination Collar
opposite of the tubing inserted in step 6 (Lace Port A).
Insert fully - at least 1cm.
d. Place Lamination Collar and
Slider Base in desired location.
e. Use additional material
to fill in under tubing for
support.
A
B
C
1cm Pro Tip:
Use light spray
adhesive if necessary.
Detailed Fabrication Instructions (continued):
7
Maximum exposed
tubing length
30mm

4
Add plastic spacer plate to create void for
2nd lamination, then apply outer former and
compression nut.
Clay the 2 small holes on top of nut.
Apply outer PVA bag.
Perform 1st lamination.
Remove compression nut, outer former and spacer plate.
Apply outer fabric layers. Then reapply the outer former and compression nut.
Apply outer PVA bag.
Perform 2nd lamination.
Outer Former
Spacer
Compression Nut
Detailed Fabrication Instructions (continued):
For All Laminations, Complete These Final Steps:
Prepare Collar and Slider Base:
a. Grind to silicone in both
the collar and the slider
dummies and remove.
b. Smooth edges.
c. Trim tube ends in both
Lamination and Slider Collars.
Remove any clay debris.
Gently tap center bolt to
remove inner tool form
and plug.
Note: Be careful not to
damage threads on the bolt.
Drive Bolt
Attachment Bolts x 2
Parting Tool
Tool Form removal:
a. Remove compression nut.
b. Place parting tool onto
the outer former.
c. Screw 2 attachment bolts through
parting tool and into outer former.
d. Screw drive bolt into parting tool
to remove the outer former.
Optional: If also adding RevoFit®adjustability, install those components now.
20

5
Detailed Fabrication Instructions (continued):
Install RevoLock Slider:
b. Insert wire on Slider into the Slider Collar
and into tubing. Push the wire through
the tubing until it exits the reel collar.
c. Push the Switch down into the
Slider Base until it “clicks”.
e. VERY IMPORTANT STEP: Mark the Lock Wire
at the inside diameter of the reel Lamination
Collar with a permanent marker.
f. Move Switch into the locked position,
with the red pill shape showing.
Cut Lock Wire at the mark. Sand/file smooth to remove any burrs.
a. Ensure carbon edge surrounding Lamination
Collar and Slider Collar cavity is smooth
- sand with wet/dry sand paper.
d. VERY IMPORTANT STEP: Ensure that the Switch is in the
unlocked/open position with the red indicator not visible.
Step 1 Step 2
21

6
Detailed Fabrication Instructions (continued):
Install 4-Hole Housing:
a. Insert distal RevoLock
housing into socket.
Note: Align bottom channel
to fit over the tubing.
b. Attach alignment hardware
and torque to spec (12 Nm).
(12 Nm)
Attach lace to the Click Reel.
Step 1
Ensure that the reel is ready for lacing. Both lock plugs
should be in place. The green marks on the spool should
align with the green marks on the washer. If necessary, turn
dial to align green marks. Use Lace Port C.
Step 2
Lock Plug
Lace Port C
Lock Plug
Adjust alignment
by turning dial
Lace Port A
22
23
24
Lace
Feeder
Lace the device.
Use the lace feeder to feed the lace through
tubing starting at the collar.
Pull lace to seat knot in the far lace
pocket, on the opposite side of the
green marker.
Completely push knot into the cavity
with a #1 flathead screwdriver:
Green
Marker
a. b. c.
Lace the reel using the plastic lace
feeder through Lace Port C.
Step 3
Step 5
Step 4
Tie a double overhand knot
for the HC Lace. Trim tail to
<5mm and lightly burn the end
of the tail.
Remove both Red Lock Plugs to
engage the Shift Mode of the reel.
Pro Tip: Keep the Red
Lock Plugs for future use.
Engage Shift Mode.
Pro Tips:
1. Slightly bend the tip
of the lace feeder.
2. Once inserted into
lace hole, twist lace
feeder to help exit
the lace hole.
C

7
27
25
Apply medium thread lock to the insert
threads and attach to the liner. Test the snap connection by attaching and detaching 2-3 times.
Test system for proper function:
Cycle the system 3 times before delivering to verify proper function of the reel.
CLICK!
ATTACHING
DETACHING
Push In
Pull Off
Important.
As a final step of fabrication, attach the patient Instructions For Use hangtag on dial.
Metal Insert
Foot
a. Insert the foot of the reel into collar.
Install the Click Reel. b. Press the reel firmly into the collar (you
should hear a “CLICK” when secure).
CLICK!
Detailed Fabrication Instructions (continued):
28
29
26 Attach Lace to Snap:
a. Determine lace length for the
user to easily connect snap
parts, and mark the lace.
Note: Max lace length from
distal housing = 45 cm.
45 cm
max
b. Connect the lace to the snap:
1. Thread lace up through the center hole
from the bottom of the snap base.
2. Then thread lace down through
the knot chamber.
3. Tie a double overhand knot.
4. Seat the knot into the knot
chamber by pulling on the lace.
5. Seal the hole with a drop of glue.
Center
Hole
Knot
Chamber
**MAKE SURE THE KNOT DOES NOT INTERFERE WITH THE CONNECTION OF THE SNAP**
Top Bottom
Center Hole
Knot Chamber

8
This process is ON LY needed if the Lock Wire is trimmed short and does not engage the Shift Ring.
Replace it with the second Lock Wire included in the kit.
Old Lock Wire
How to replace the Lock Wire:
Put the slider in the locked position with
the red pill shape showing completely.
Place a #1 flathead screwdriver on top
of the base behind the slider and on
top of the red pill shape.
Push the Switch into the unlocked
position, ramping it up the flathead
screwdriver face until the Switch
pops out of the Slider Base.
Push the pin out of the Switch body from one side only.
Once the pin is exposed enough to grab with
pliers, pull the pin almost all of the way out,
but leaving it in one of the side walls.
Remove and discard old Lock Wire & put new Lock Wire in pocket.
Push the pin back through second wall with a flat head
screwdriver, capturing the Lock Wire and fastening it in place.
The Lock Wire should still be able to rotate, but not pull out
of the pocket. Make sure that the pin is not proud of the
wall surface, otherwise it will drag on the inside of
the Slider Base and cause a malfunction.
Reinsert Lock Wire into tubing and Switch into Slider Base (see step 6 above).
*If you lose the pin, use the discarded locking wire as a replacement. Cut the old locking wire
cleanly and insert into side wall pin hole. Push through until it starts to enter the second
wall. Trim old locking wire and push the pin the rest of the way into the first wall.
Step 1
Step 4
Step 5 Step 6
Step 7
Step 8
Step 2 Step 3

9
Unlock
Lock
Red Mark
is Hidden
How to use the Slider:
Push out, Slider is unlocked.
a. Allows for the standard function of
the Reel with full release of the lace.
Pro Tip: If the patient can’t fully seat into the socket, they can still stay
locked into the device. Once the reel is fully shifted into Power Mode,
engage the slider and the user is securely connected to the socket.
Pro Tip: Increased lace tension will cause the reel to
shift faster. The user can achieve this by pulling their
limb away while donning the socket.
How to use the Click Reel
See clickmedical.co/instructions for detailed
instructions for replacing/re-lacing a reel.
How to operate the Snap to connect the liner:
To remove the Click Reel:
a. Locate the metal insert.
b. Insert a small flathead screwdriver between
the metal insert and the reel body.
c. Gently pry the reel upwards.
Metal Insert
Pull Out
Push In
CLICK!
ATTACHING DETACHING
Push In
Pull Off
Reel will operate silently
while taking up lace
Turn reel clockwise to
quickly take up lace.
Micro-adjust by turning
forward or backward.
To fully release lace, unwind
counterclockwise until “clicking”
stops. Lace will then freely
release from the reel.
Once clicking, the reel will hold
lace tension and wind up lace at
a higher power
Continue to turn the dial. It
will automatically shift from
“silent” to “clicking”.
S
H
I
F
T
T
E
C
H
N
O
L
O
G
Y
7
:
1
A
D
V
A
N
T
A
G
E
S
H
I
F
T
T
E
C
H
N
O
L
O
G
Y
7
:
1
A
D
V
A
N
T
A
G
E
S
H
I
F
T
T
E
C
H
N
O
L
O
G
Y
7
:
1
A
D
V
A
N
T
A
G
E
S
H
I
F
T
T
E
C
H
N
O
L
O
G
Y
7
:
1
A
D
V
A
N
T
A
G
E
The reel can operate in either Power Mode or Shift Mode.
If you want to change between modes, see our video on the process here: https://vimeo.com/786989811
a. Turn the dial clockwise until the limb is fully seated and reel
has fully shifted into Power Mode. Insert a small flathead
screwdriver between the metal insert and the reel body.
b. While the reel is fully shifted, engage the Slider by
pushing it towards the reel, until the red mark appears.
c. Once locked, the reel will micro-adjust
in both directions, click by click, but will
not allow for full release of the lace.

10
At delivery of device with patient present, scan Instructions For Use
Hangtag. Please review with your patient how to use the Click Reel
and to care for and maintain their RevoLock system.
This product is waterproof and
submersible. Rinse with fresh
water after use in saltwater,
sand, or mud.
✔
✔
✔
Inspect lace:
Check for wear or damage routinely
Replace at any sign of wear
Replace lace every 6 months
Regularly inspect your RevoLock system.
Click Medical, LLC, 1205 Hilltop Parkway, W101
Steamboat Springs, CO 80487, USA +1-970-670-7012
MDSS GmbH, Schiffgraben 41
30175 Hannover, Germany
CH
UK
MDSS CH GmbH, Laurenzenvorstadt 61
5000 Aarau, Switzerland
MDSS-UK RP LIMITED, 6 Wilmslow Road
Rusholme, M14 5TP Manchester
United Kingdom
Other manuals for RevoLock
3
This manual suits for next models
1
Other Click Medical Medical Equipment manuals

Click Medical
Click Medical Reel+ User manual

Click Medical
Click Medical RL-300-07-01 User manual

Click Medical
Click Medical RevoSurface User manual

Click Medical
Click Medical RevoLock RL-301-07-01 User manual

Click Medical
Click Medical RL-300-07-01 User manual

Click Medical
Click Medical RevoLock User manual

Click Medical
Click Medical QuickFit Lacer User manual

Click Medical
Click Medical QuickFit OK1400-130-05 User manual

Click Medical
Click Medical RevoLock User manual

Click Medical
Click Medical RL-300-07-01 User manual


