manuals.online logo
Brands
  1. Home
  2. •
  3. Brands
  4. •
  5. Click Medical
  6. •
  7. Medical Equipment
  8. •
  9. Click Medical RL-300-07-01 User manual

Click Medical RL-300-07-01 User manual

1
Advisories
Tool Form for fabrication is sold separately;
Click Part Number: RL-310-00-01
Must be installed by a licensed professional.
Lace will wear:
• Routinely check for wear or damage.
• Look for broken black fibers around areas of high wear.
• Replace lace if a significant amount of black fibers are broken.
• Proactively replace lace every 6 months.
• Loss of suspension can occur if lace fails.
• Keep lace away from open flame and sharp edges.
Secure threaded insert to liner with medium thread lock.
Secure snap to threaded insert before tensioning system.
Weight limit: 125 kg
See advisories in other languages: clickmedical.co/advisories
WARRANTY
U.S. Customers:
Contact www.clickmedical.co/terms/#warranty
Help@ClickMedical.co
Tel: +1-970-670-7012
International Customers:
Please contact your local distributor.
MDSS GmbH
Schiffgraben 41
30175 Hannover,
Germany
Click Medical, LLC
1205 Hilltop Parkway, W101
Steamboat Springs, CO,
80487, USA +1-970-670-7012
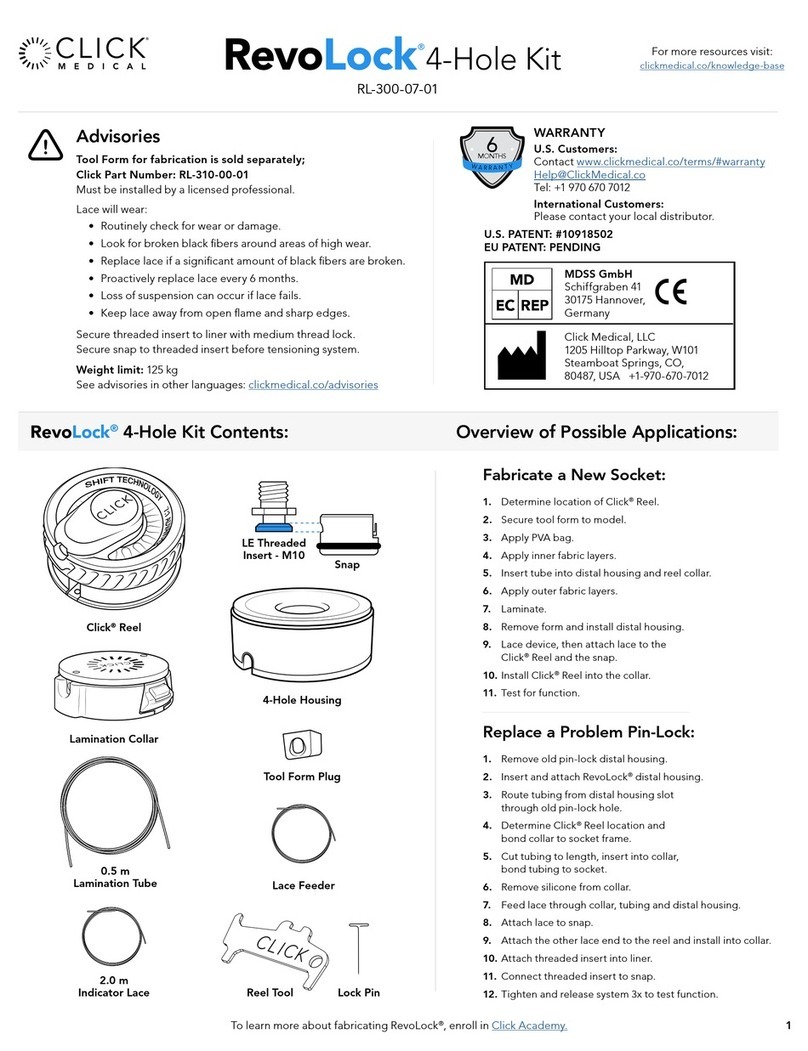
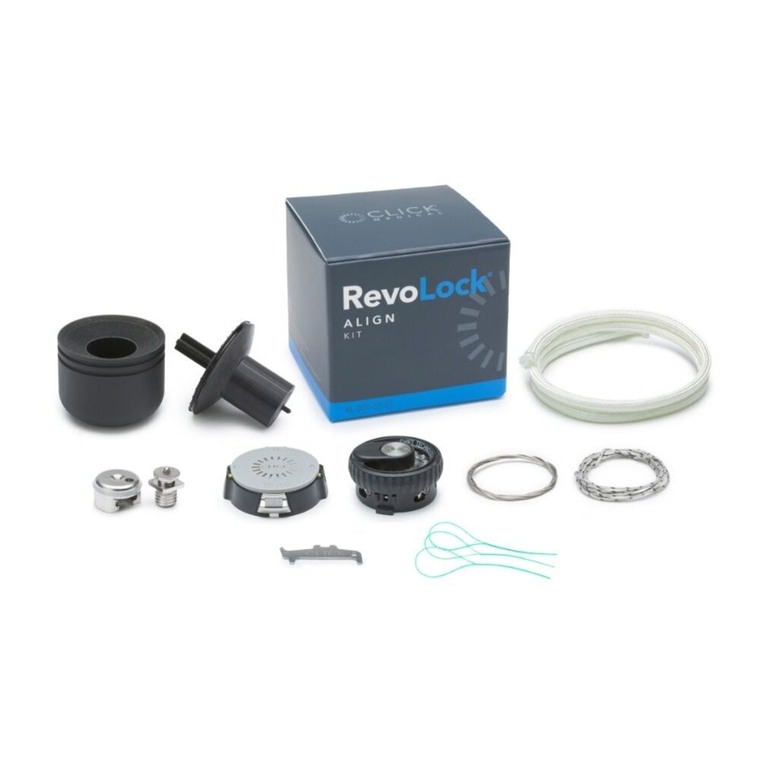
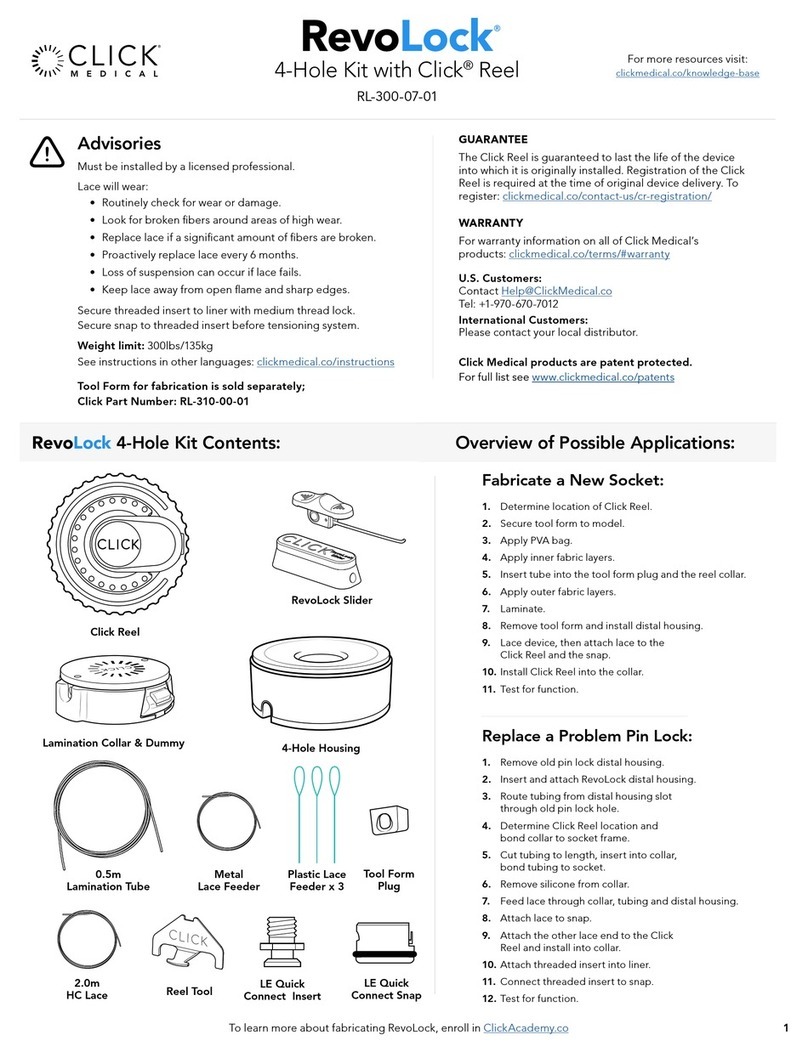
RevoLock®4-Hole Kit Contents: Overview of Possible Applications:
RL-300-07-01
6
W
A
R
R
A
N
T
Y
MONTHS
Fabricate a New Socket:
1. Determine location of Click®Reel.
2. Secure tool form to model.
3. Apply PVA bag.
4. Apply inner fabric layers.
5. Insert tube into distal housing and reel collar.
6. Apply outer fabric layers.
7. Laminate.
8. Remove form and install distal housing.
9. Lace device, then attach lace to the
Click®Reel and the snap.
10. Install Click®Reel into the collar.
11. Test for function.
Replace a Problem Pin Lock:
1. Remove old pin lock distal housing.
2. Insert and attach RevoLock®distal housing.
3. Route tubing from distal housing slot
through old pin lock hole.
4. Determine Click®Reel location and
bond collar to socket frame.
5. Cut tubing to length, insert into collar,
bond tubing to socket.
6. Remove silicone from collar.
7. Feed lace through collar, tubing and distal housing.
8. Attach lace to snap.
9. Attach the other lace end to the reel and install into collar.
10. Attach threaded insert into liner.
11. Connect threaded insert to snap.
12. Tighten and release system 3x to test function.
4-Hole Kit
Click®Reel
Lamination Collar
2.0 m
Indicator Lace
0.5 m
Lamination Tube
Metal
Lace Feeder
4-Hole Housing
U.S. PATENT: #10918502
EU PATENT: PENDING
Snap
LE Threaded
Insert - M10
To learn more about fabricating RevoLock®, enroll in Click Academy.
Reel Tool
EC REP
For more resources visit:
clickmedical.co/knowledge-base
Plastic Lace
Feeder x 3
Tool Form
Plug
2
Install the tubing:
a. Pack tube end with 1 cm of clay.
b. Fully insert one end into tool form plug.
c. Measure the distance from the plug
to the collar, and add 2 cm.
d. Cut tube to length, pack with clay and
insert into collar (Lace Port B).
Detailed Fabrication Instructions:
Prepare the inner tool form by
inserting a tool form plug into the
base.
Note: Tool form plugs are found in each
RevoLock®Kit.
Apply inner fabric layers:
Use a hot knife to create access holes for the plug and the 4 pins.
Apply inner PVA bag:
a. Tape bag to metal form,
remembering to allow
access to the plug.
b. Trim excess.
Determine desired location of
reel and mark on the model.
RevoLock®can be fabricated using a single stage or double stage lamination process:
• For single stage: follow steps 1-9, then skip to step 17
• For double stage: follow steps 1-7, then skip to step 10
For material suggestions and guidelines, please refer to the Material Data Sheet:clickmedical.co/mds
Lace Port B
-- DO NOT KINK THE TUBE --
If the tube kinks, you must replace with a new piece.
Tape
Reel Location
Orient the tool form plug with
the collar and bond the tool
form to the model.
!
2 cm
Tool Form Plug
A
B
C
3
Apply outer fabric layers. Apply outer former and nut.
Clay the 2 small holes on top of nut.
Apply outer PVA bag and laminate.
Add plastic spacer
plate to create void
for 2nd lamination,
then apply outer
former and
compression nut.
Clay the 2 small holes
on top of nut.
Apply outer PVA bag.
Perform 1st lamination.
Remove compression
nut, outer former
and spacer plate.
Apply outer fabric layers.
Then reapply the outer
former and compression nut.
Apply outer PVA bag.
Perform 2nd lamination.
Outer Former
Spacer
Compression Nut
Detailed Fabrication Instructions (continued):
• For single stage: follow steps 1-9, then skip to step 17
• For double stage: follow steps 1-7, then skip to step 10
REMINDER
For All Laminations, Complete These Final Steps:
Prepare collar:
a. Grind to silicone
and remove.
b. Continue grinding
carbon until flat with
top of the collar.
c. Trim tube end and
clear debris.
Gently tap center bolt to
remove inner tool form
and plug.
Note: Be careful not to
damage threads on the bolt.
Drive Bolt
Attachment Bolts x 2
Parting Tool
Tool Form removal:
a. Remove compression nut.
b. Place parting tool onto
the outer former.
c. Screw 2 attachment bolts through
parting tool and into outer former.
d. Screw drive bolt into parting tool
to remove the outer former.
!
DO NOT EXCEED 15 inHG OF VACUUM PRESSURE DURING LAMINATION
4
Detailed Fabrication Instructions (continued):
Attach lace to the Click®Reel.
Foot
Metal Insert
• Use the lace port “B”.
Orient the reel so that the foot of the reel aligns with the void
in the lamination collar opposite of the metal insert.
Step 1
23
Install 4-Hole Housing:
a. Insert distal RevoLock®
housing into socket.
Note: Align bottom channel
to fit over the tubing.
b. Attach alignment hardware
and torque to spec (12 Nm).
Lace the device:
Use the lace feeder to feed the lace through
tubing starting at the collar.
Lace
Feeder
(12 Nm)
Attach lace to the snap.
22
a. Determine lace length for the
user to easily connect snap
parts, and mark the lace.
Note: Max lace length from
distal housing = 45 cm.
45 cm
max
b. Connect the lace to the snap:
1. Thread lace up through the center
hole from the bottom of the snap.
2. Then thread lace down through
the knot chamber.
3. Tie a double overhand knot.
4. Seat the knot into the knot
chamber by pulling on the lace.
5. Seal the hole with a drop of glue.
Top Bottom
Center Hole
Knot Chamber
Center
Hole
Knot
Chamber
1
2
**MAKE SURE THE LACE DOES NOT INTERFERE WITH THE CONNECTION OF THE SNAP**
A
B
C
Note: Crimp end of feeder to help steer it up
and through the housing.
Lock Plug
Aligned Marks
• Ensure lacing windows are aligned.
Adjust position by turning dial.
5
Metal Insert
Foot
a. Insert the foot of the reel into collar.
Install the Click®Reel. b. Press the reel firmly into the collar (you
should hear a “CLICK” when secure).
CLICK!
24
Apply medium thread lock to the insert
threads and attach to the liner.
Test the snap connection by attaching and detaching 2-3 times.
Test system for proper function:
Cycle the system 3 times before delivering to verify proper function of the reel.
CLICK!
ATTACHING
DETACHING
Push In
Pull Off
Lace the reel using the
plastic lace feeder.
Pro Tips:
1. Slightly bend the tip
of the lace feeder.
2. Once inserted into
lace hole, twist lace
feeder to help exit
the lace hole.
Step 2
Pull lace to seat knot on the far
side of the channel midpoint.
Completely push knot
into metal hole with a
flathead screwdriver.
Step 4
Repeat process for
the other end of lace.
Leave ~10 cm of
slack lace in the
system.
Channel Midpoint
Tie an overhand knot at
desired length and trim tail.
Step 3
B
C
A
Step 5 Remove the lock plug to
engage the Shift®feature
of the reel.
a. b. c.
Pro Tip: Keep the lock plug
for possible future use.
6
How to use the Click®Reel
Turn reel to quickly take
up lace.
Micro-adjust by turning
forward or backward.
To fully release, unwind
until “clicking” stops.
Reel will automatically shift
to high power mode as it
tightens.
S
H
I
F
T
T
E
C
H
N
O
L
O
G
Y
7
:
1
A
D
V
A
N
T
A
G
E
S
H
I
F
T
T
E
C
H
N
O
L
O
G
Y
7
:
1
A
D
V
A
N
T
A
G
E
S
H
I
F
T
T
E
C
H
N
O
L
O
G
Y
7
:
1
A
D
V
A
N
T
A
G
E
S
H
I
F
T
T
E
C
H
N
O
L
O
G
Y
7
:
1
A
D
V
A
N
T
A
G
E
See clickmedical.co/instructions for detailed instructions for replacing/re-lacing a reel.
Teach your patients how to operate
the snap to connect the liner:
CLICK!
ATTACHING DETACHING
Push In
Pull Off
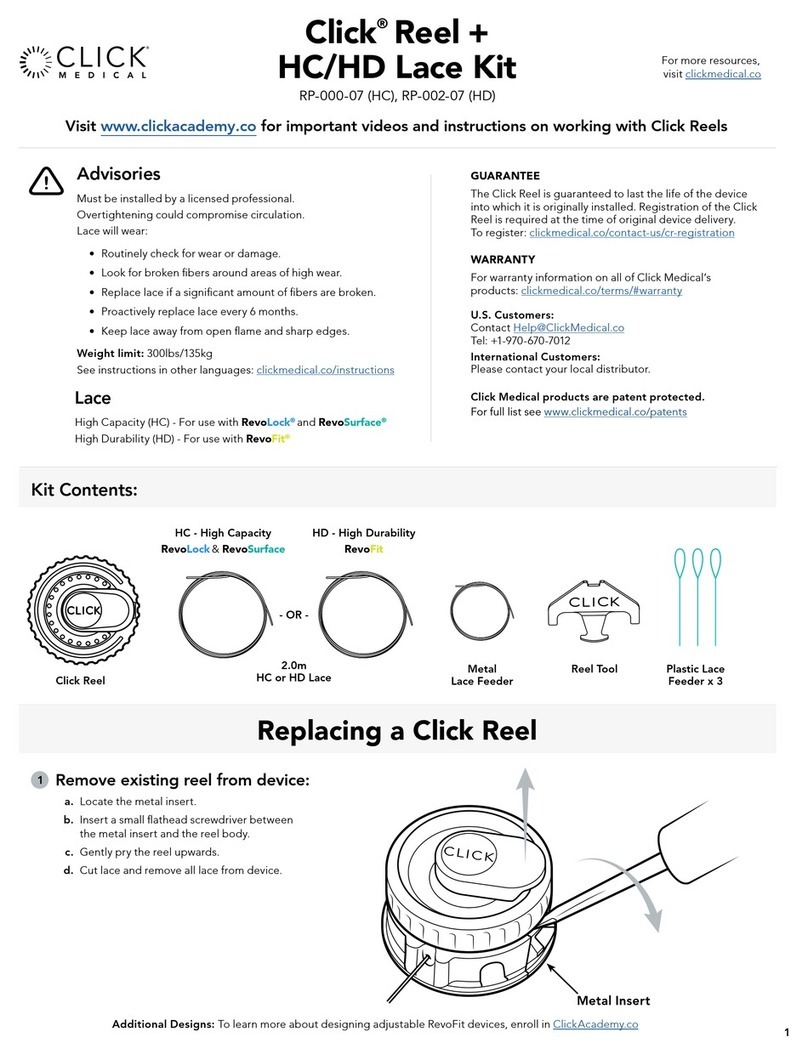
To remove the Click®Reel:
a. Locate the metal insert.
b. Insert a small flathead screw driver between
the metal insert and the reel body.
c. Gently pry the reel upwards.
Metal Insert
Pull Out
Push In
1:1 mode = silent 7:1 mode = “clicking”
7
Teach your patients to care for and
maintain their RevoLock®system:
This product is waterproof and
submersible. Rinse with fresh
water after use in saltwater,
sand, or mud.
✔
✔
✔
Inspect lace:
Check for wear or damage routinely
Replace at any sign of wear
Replace lace every 6 months
Regularly inspect your RevoLock®system. NEW LACE
WORN LACE
Look for broken black fibers for areas of
high wear. If a significant amount of black
fibers are broken, then replace the lace.
Have your patient register their RevoLock®
device: https://clickmedical.co/register/

Other manuals for RL-300-07-01

2

Other Click Medical Medical Equipment manuals

Click Medical QuickFit OK1400-130-05 User manual

Click Medical

Click Medical QuickFit OK1400-130-05 User manual

Click Medical Reel+ User manual

Click Medical

Click Medical Reel+ User manual

Click Medical RevoLock User manual

Click Medical

Click Medical RevoLock User manual

Click Medical QuickFit Lacer User manual

Click Medical

Click Medical QuickFit Lacer User manual

Click Medical RL-300-07-01 User manual

Click Medical

Click Medical RL-300-07-01 User manual

Click Medical RevoLock User manual

Click Medical

Click Medical RevoLock User manual

Click Medical RL-300-07-01 User manual

Click Medical

Click Medical RL-300-07-01 User manual

Click Medical RevoLock User manual

Click Medical

Click Medical RevoLock User manual

Click Medical RevoLock RL-301-07-01 User manual

Click Medical

Click Medical RevoLock RL-301-07-01 User manual

Click Medical RevoLock User manual

Click Medical

Click Medical RevoLock User manual

Click Medical RevoSurface User manual

Click Medical

Click Medical RevoSurface User manual

Click Medical RevoSurface User manual

Click Medical

Click Medical RevoSurface User manual

Popular Medical Equipment manuals by other brands

Fitfaith F380 Series user manual

Fitfaith

Fitfaith F380 Series user manual

Dermlite Foto X instructions

Dermlite

Dermlite Foto X instructions

Pressalit Care R8661 Mounting instruction

Pressalit Care

Pressalit Care R8661 Mounting instruction

Nonin 9570 user guide

Nonin

Nonin 9570 user guide

Villa Insecticide BIOMECTIN 18 EC manual

Villa

Villa Insecticide BIOMECTIN 18 EC manual

Qiagen RT2 First Strand Kit manual

Qiagen

Qiagen RT2 First Strand Kit manual

NDS Radiance Ultra user manual

NDS

NDS Radiance Ultra user manual

Otto Bock 3S80 Instructions for use

Otto Bock

Otto Bock 3S80 Instructions for use

Stryker B3000n Badge Cleaning guide

Stryker

Stryker B3000n Badge Cleaning guide

Ohmeda Giraffe OmniBed Operator's manual

Ohmeda

Ohmeda Giraffe OmniBed Operator's manual

Erbe VIO 300 D Service manual

Erbe

Erbe VIO 300 D Service manual

Gynesonics SONATA2-110 Operator's manual

Gynesonics

Gynesonics SONATA2-110 Operator's manual

Barkey plasmatherm Instructions for use

Barkey

Barkey plasmatherm Instructions for use

ElproSys DiagProg4 instruction manual

ElproSys

ElproSys DiagProg4 instruction manual

Virtuox VPOD Ultra Series User instructions

Virtuox

Virtuox VPOD Ultra Series User instructions

Draeger Infinity Acute Care System Instructions for use

Draeger

Draeger Infinity Acute Care System Instructions for use

human care Levanto user manual

human care

human care Levanto user manual

biodex BioSway Operation manual

biodex

biodex BioSway Operation manual

manuals.online logo
manuals.online logoBrands
  • About & Mission
  • Contact us
  • Privacy Policy
  • Terms and Conditions

Copyright 2025 Manuals.Online. All Rights Reserved.