manuals.online logo
Brands
  1. Home
  2. •
  3. Brands
  4. •
  5. CODELOCKS
  6. •
  7. Door Lock
  8. •
  9. CODELOCKS CODELOCK 300 User manual

CODELOCKS CODELOCK 300 User manual

Mortise Deadbolt
with Key Override
INSTALLATION INSTRUCTIONS
TEMPLATE 2. FIXING THE LOCK 3. FITTING THE KEEP PLATE1. APPLY THE TEMPLATE
The spring-loaded spindle will fit doors between 13/8” and
21/2” (35mm - 65mm) thick. For doors less than 2”(50mm)
thick break off the 5/8” (15mm) section at the end of the
spindle. For doors more than 21/2” (65mm) thick, ring the
Helpline for advice. The spring keeps the spindle firmly
engaged in the outside handle when the lock is assembled
on the door.
Insert the spindle, with the spring on the code side, through
the 21/8” (54mm”) hole in the door, and make sure that it
engages the deadbolt correctly for the hand of the door
Cut the fixing bolts to suit the door thickness, allowing at
least one but not more than two threaded sections to enter
the lock case.
Using the fixing bolts, screw front and back plates together
through the door as per the diagram with gaskets in place.
Before final tightening make sure that the lock is vertical,
and test the mechanism ensure that it is all moving easily.
DO NOT CLOSE THE DOOR UNTIL YOU ARE SURE THAT
THE CODE WORKS. DO NOT over tighten the fixing bolts
as this may cause distortion and lead to poor operation.
II-300MDUS-0912
CODELOCKS INC - US
Tel +1 714 9792900
Fax +1 714 9792902
[email protected]
www.codelocks.us
CODELOCKS LTD - UK
Tel +44 (0)1635 239645
Fax +44 (0)1635 239644
[email protected]
www.codelocks.com
Helpline, service & spares
TOLL FREE 1 877 263 3562
Select the required backset, 23/8” (60mm) or 23/4” (70mm) and
crease along the line marked door edge and tape it to the door.
Mark the holes to be drilled according to your template. Mark the
center line of the door edge on the center line of the deadbolt.
Now apply the template to the other side of the door, aligning it
with your first mark in the middle of the door edge.
Keeping the drill level and square to the door, drill holes from
both sides to avoid splintering of the door face.
Positioning and fixing the deadbolt
Mark a central point on the ‘center line of deadbolt’ on the
door edge.
Mark the depth of 31/2” (90mm) on the drill bit with tape to act as
a visible depth limit. Drill a 1” (25mm) hole, 31/2” (90mm) deep,
keeping the drill level and square to the door.
Put the deadbolt into the hole, and with the edges parallel to the
door, draw around the face plate.
Remove the deadbolt. Score the outline with a Stanley Knife to
avoid splitting prior to chiselling a 1/8” (3mm) deep rebate to fit
the faceplate flush to the door.
Insert deadbolt with arrow pointing up, fix with the wood screws.
1
2
4
3
Position the keep plate on
the frame so that it lines up
with the deadbolt.
Mark the inner and outer
edges of the keep plate
and cut a rebate so that it
fits flush with the surface of
the door frame.
Drill or cut a recess 1”(25mm) deep for the deadbolt.
Fit the keeper plate using only one wood screw at first to
ensure that it is positioned accurately. The deadbolt should
enter the aperture easily. When satisifed secure the keep
with remaining screws.
21/8”
(54mm)
TEMPLATE
51/8”
(107mm)
23/8”
(60mm)
5/16”
(8mm)
23/4”
(70mm)
Center Line of Deadbolt
47/16”
(113mm)
2
3
/
8
”
60mm
2
3
/
4
”
70mm
1
2
3
4
5
X
Y
6
7
8
9
0
Z
C
1. Front plate with key override
2. Back plate
3. Gaskets x 2
4. Spring loaded spindle
5. Deadbolt 23/8” and 23/4” (60mm - 70mm) backset
6. Keep plate
7. Wood screws x 6
Use with latch & strike plate
8. Tweezers (for changing the code)
9. Large fixing bolts 3 supplied (spare x 1)
10. Code tumblers (spare x 2)
11. Code card
12. 2 keys
Tools required for installation
Power drill
1" (25mm) 21/8”(54mm), 5/16” (8mm)
Bradawl
Philips screwdriver size 2
Chisel maximum 1” (25mm)
Hammer/Mallet
Stanley knife
Adhesive tape
Pencil
Tape measure
OUTSIDE KNOB LOCKING ACTIONMORTISE DEADBOLT CONTENTS TEMPLATE
Viewed from outside, a door is right handed if the hinges are
on the right, and left handed if the hinges are on the left.
CHECK THE HAND OF YOUR DOOR
Before commencing installation check that all parts are
working correctly – press the code according to the code
card and then the knob should turn and return easily under
spring pressure. If you have a key override lock try the keys
to ensure that they turn in the knob handle.
If you intend to change the code, you should do it, if it is
convenient, before installing the lock – see the code change
instructions in the separate leaflet.
Check that the deadbolt moves freely by turning the flat
spindle in the cam.
From outside the code is required both to lock and unlock the
bolt. If you would like to be able to lock your door from outside
WITHOUT using the code then refer to Outside Knob Locking
Action instruction.
You are advised to familiarise yourself with the
instructions before starting work.
SPECIAL NOTES
To enable LOCKING of the bolt from the outside,
without entering the code.
NB – Your door is Right Handed if, from outside,
the hinges are on the right.
When installing the
lock make sure that
the driver is in the
correct position
before installing the
spindle.
Press the C button to reset the chamber and place the lock
case on a flat surface with the buttons down.
Remove the code chamber plate held in place with the two
red screws.
With the tweezers remove the right-hand pin for right handed
doors, or the left-hand pin for left handed doors.
Replace the cover plate.
The outside knob will now feel loose and turn freely in one
direction, and will require the code to be used before it will turn
in the other direction.
Leave this pin
for left handed doors
Leave this pin
for right handed doors 21/8”
(54mm)
TEMPLATE
51/8”
(107mm)
23/8”
(60mm)
5/16”
(8mm)
23/4”
(70mm)
Center Line of Deadbolt
47/16”
(113mm)

Other CODELOCKS Door Lock manuals

CODELOCKS CL400 User manual

CODELOCKS

CODELOCKS CL400 User manual

CODELOCKS CL600 User manual

CODELOCKS

CODELOCKS CL600 User manual

CODELOCKS CL500 Administrator guide

CODELOCKS

CODELOCKS CL500 Administrator guide

CODELOCKS 400 mechanical Administrator guide

CODELOCKS

CODELOCKS 400 mechanical Administrator guide

CODELOCKS KL1000 G3 NetCode User manual

CODELOCKS

CODELOCKS KL1000 G3 NetCode User manual

CODELOCKS CL1200 User manual

CODELOCKS

CODELOCKS CL1200 User manual

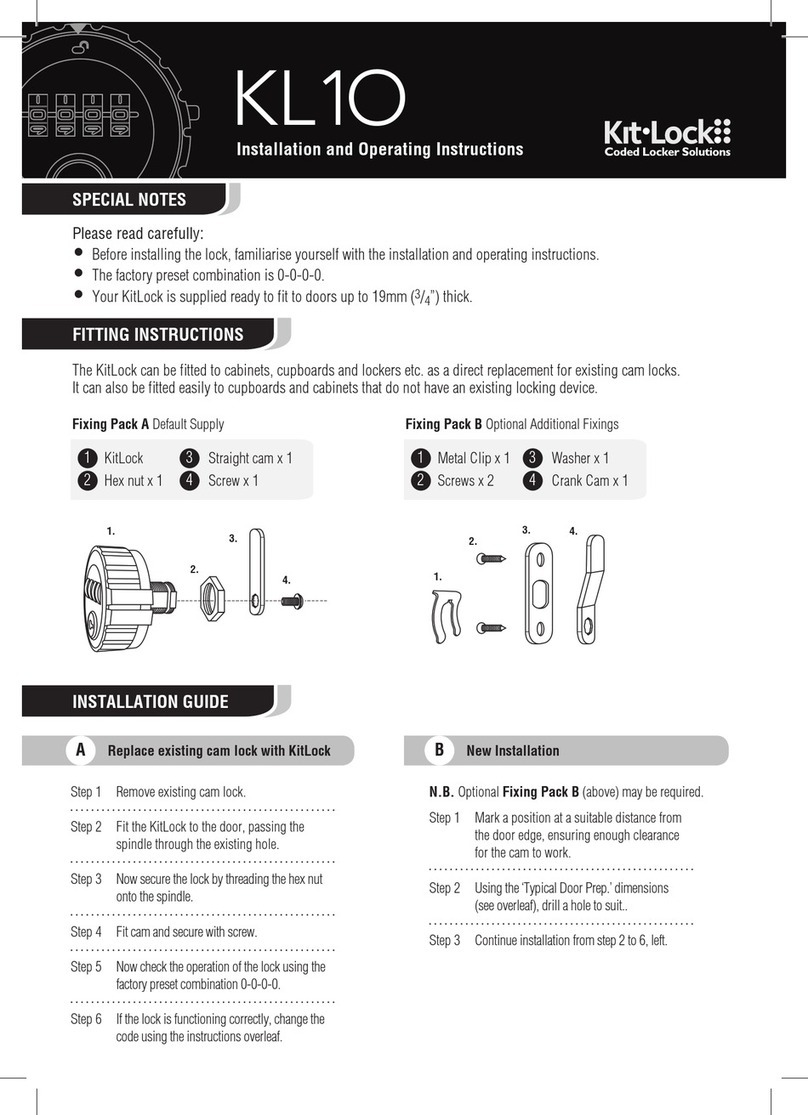
CODELOCKS KitLock KL1O User manual

CODELOCKS

CODELOCKS KitLock KL1O User manual

CODELOCKS CL5510 User manual

CODELOCKS

CODELOCKS CL5510 User manual

CODELOCKS 0460 User manual

CODELOCKS

CODELOCKS 0460 User manual

CODELOCKS CL400 User manual

CODELOCKS

CODELOCKS CL400 User manual

CODELOCKS CL5500 SERIES User manual

CODELOCKS

CODELOCKS CL5500 SERIES User manual

CODELOCKS CL520 User manual

CODELOCKS

CODELOCKS CL520 User manual

CODELOCKS 4010 User manual

CODELOCKS

CODELOCKS 4010 User manual

CODELOCKS Codelock 100 User manual

CODELOCKS

CODELOCKS Codelock 100 User manual

CODELOCKS CL5010BB User manual

CODELOCKS

CODELOCKS CL5010BB User manual

CODELOCKS CL160 User manual

CODELOCKS

CODELOCKS CL160 User manual

CODELOCKS 0460 Administrator guide

CODELOCKS

CODELOCKS 0460 Administrator guide

CODELOCKS CL5510 User manual

CODELOCKS

CODELOCKS CL5510 User manual

CODELOCKS KL1000 User manual

CODELOCKS

CODELOCKS KL1000 User manual

CODELOCKS KL1000 Classic+ User manual

CODELOCKS

CODELOCKS KL1000 Classic+ User manual

CODELOCKS CL410 User manual

CODELOCKS

CODELOCKS CL410 User manual

CODELOCKS 4OOO ELECTRONIC User manual

CODELOCKS

CODELOCKS 4OOO ELECTRONIC User manual

CODELOCKS CL610 User manual

CODELOCKS

CODELOCKS CL610 User manual

CODELOCKS KL1200 User manual

CODELOCKS

CODELOCKS KL1200 User manual

Popular Door Lock manuals by other brands

Perko POWERMATIC R100 user manual

Perko

Perko POWERMATIC R100 user manual

Titon Overture DH Fixing and Operating Instructions

Titon

Titon Overture DH Fixing and Operating Instructions

Schlage VIP 5100 series installation manual

Schlage

Schlage VIP 5100 series installation manual

Ebelco 300-S Installation & user guide

Ebelco

Ebelco 300-S Installation & user guide

SECO-LARM SD-993C-D3Q manual

SECO-LARM

SECO-LARM SD-993C-D3Q manual

Häfele DL6500 user manual

Häfele

Häfele DL6500 user manual

Yale YDR4110 user guide

Yale

Yale YDR4110 user guide

Salto LE8P Series manual

Salto

Salto LE8P Series manual

Iseo 214E Series INSTRUCTIONS FOR THE INSTALLATION, USE AND MAINTENANCE

Iseo

Iseo 214E Series INSTRUCTIONS FOR THE INSTALLATION, USE AND MAINTENANCE

LOCKEY 1100 Series Users installation & information manual

LOCKEY

LOCKEY 1100 Series Users installation & information manual

ABH 6100 Series installation instructions

ABH

ABH 6100 Series installation instructions

Siegenia-AUBI KFV EE99 Series Assembly instructions

Siegenia-AUBI

Siegenia-AUBI KFV EE99 Series Assembly instructions

Yale Keyfree Connected User guide keyfree

Yale

Yale Keyfree Connected User guide keyfree

Turbolock YL-99 user manual

Turbolock

Turbolock YL-99 user manual

Gianni Industries GK320 Series Installation instruction

Gianni Industries

Gianni Industries GK320 Series Installation instruction

Spectrum 49503 / 02 BP Quick installation guide

Spectrum

Spectrum 49503 / 02 BP Quick installation guide

PDQ 93203 manual

PDQ

PDQ 93203 manual

Schlage FE576 installation instructions

Schlage

Schlage FE576 installation instructions

manuals.online logo
manuals.online logoBrands
  • About & Mission
  • Contact us
  • Privacy Policy
  • Terms and Conditions

Copyright 2025 Manuals.Online. All Rights Reserved.