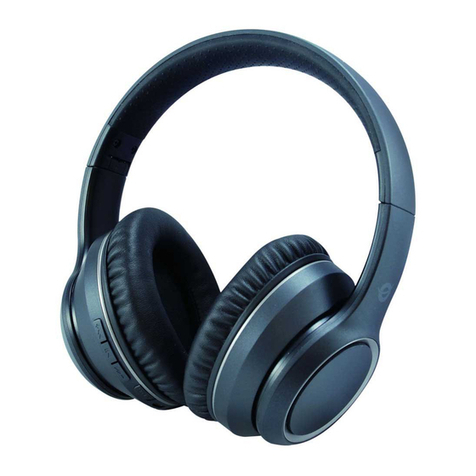
Conceptronic CBTHS3 User manual

NEDERLANDS
1
Conceptronic CBTHS3
Handleiding
Gefeliciteerd met de aanschaf van uw
Conceptronic Bluetooth®Headset.
In deze handleiding wordt stap voor stap uitgelegd hoe u de
Conceptronic Bluetooth®Headset kunt instellen en gebruiken.
In geval van problemen adviseren wij u onze support-site te bezoeken
(ga naar: www.conceptronic.net en klik op ‘Support’). Hier vindt u een
database met veelgestelde vragen waar u hoogstwaarschijnlijk de
oplossing voor uw probleem kunt vinden.
Heeft u andere vragen over uw product die u niet op de website kunt
vinden, neem dan contact met ons op via e-mail:
Voor meer informatie over Conceptronic producten kunt u terecht op
de Conceptronic website: www.conceptronic.net.
1. Inhoud van de verpakking
De volgende onderdelen dienen aanwezig te zijn in de verpakking van
de Conceptronic Bluetooth®Headset:
1x Conceptronic Bluetooth®Headset
1x Oorbeugel voor de Bluetooth®Headset
2x Oorschuimsponsje voor de Bluetooth®Headset
1x Spannings-adapter, 5V DC, 0.2A
1x USB laadkabel
1x Meertalige handleiding

NEDERLANDS
2
2. Uitleg van de Bluetooth®Headset
2.1 Beschrijving van de headset
Nr Beschrijving
1DC aansluiting (voor het opladen van de headset)
2Schakel de headset in of uit / activeer Pairing Mode /
beantwoord, beëindig of weiger een gesprek / Activeer
Spraakbellen *
(De indicatie LED’s bevinden zich achter de knop)
3Microfoon
4 Verlaag het Volume / Herhaal het laatst gekozen nummer *
5Verhoog het Volume
6 Oorbeugel (als losse accessoire in de verpakking aanwezig)
*De werking van deze functie is afhankelijk van de mogelijkheden van
uw GSM. Controleer de handleiding van uw GSM voor informatie over
de ondersteuning van deze functie.
1
2
5 4
3
6

NEDERLANDS
3
2.2 De Bluetooth®Headset mogelijkheden
De volgende opties kunnen gebruikt worden met de knoppen op de
headset:
In Stand-by:
Optie Knop Indruktijd Knop
Inschakelen 2 Lang (2~3 seconden)
Uitschakelen 2 Lang (3~4 seconden)
Pairing Mode inschakelen 2 Lang (+ 4 seconden) *
Gesprek aannemen 2 Kort
Laatst gekozen nr. herhalen 4 Lang (2 seconden)
Activeer spraakbellen 2 Lang (2 seconden)
Gesprek weigeren 2 Lang (3 seconden)
*De PIN Code van de Bluetooth®headset is ‘0000’. Deze kan niet
gewijzigd worden.
Tijdens een gesprek:
Optie Knop Indruktijd Knop
Gesprek naar GSM overzetten 2 + 5 Lang (2 seconden)
2egesprek aannemen 2 Lang (+ 4 seconden)
Conferentiegesprek (3-weg) 5 Lang (2 seconden)
Microfoon uitschakelen 4 + 5 Lang (2 seconden)
Gesprek beëindigen 2 Kort
Volume verhogen 5 Kort (1 seconde)
Volume verlagen 4 Kort (1 seconde)

NEDERLANDS
4
3. De batterij van de headset opladen
De headset heeft een ingebouwde Li-ion battery. Deze batterij moet
eerst volledig worden opgeladen voordat u de headset voor het eerst
kunt gebruiken. Bij de eerste keer opladen duurt de oplaadtijd
ongeveer 4 uur.
Als de Rode LED op de headset tijdens het gebruik knippert, is de
batterij bijna leeg. Het her-opladen van de batterij duurt ongeveer 2
uur.
Opladen met de reislader:
Sluit de lader aan op een vrij stopcontact en op de DC ingang van de
headset. De rode LED zal aangaan. Als de batterij volledig is geladen
zal de rode LED uitgaan. Ontkoppel de lader van de headset.
Opladen met de USB laadkabel:
Sluit de USB laadkabel aan op een vrije USB poort van uw computer en
op de DC ingang van de headset. De rode LED zal aangaan. Als de
batterij volledig is geladen zal de rode LED uitgaan. Ontkoppel de USB
laadkabel van de headset.
Let op: Het oplaadproces via de USB laadkabel kan langer duren dan
met de gewone lader, afhankelijk van het spannings-niveau
van de gebruikte USB poort.

NEDERLANDS
5
4. De Bluetooth®headset koppelen met uw GSM
De headset dient eerst gekoppeld te worden met uw GSM voordat u
deze kunt gebruiken. (De Bluetooth™ Functionaliteit van uw GSM dient
ingeschakeld te zijn)
Let op: Controleer de handleiding van uw GSM voor Bluetooth™
koppelinstructies voordat u begint met het koppelen van de
headset.
A. Controleer of de Headset is uitgeschakeld.
B. Houd knop “2” (Blauw) meer dan 4 seconden ingedrukt. De
headset zal aangaan (Blauwe LED) en vervolgens in Pairing Mode
gaan (De blauwe en rode LED zullen knipperen).
C. Schakel Bluetooth™ in op uw GSM en volg de instructies in de
handleiding van uw GSM om te zoeken naar nieuwe Bluetooth™
apparaten.
D. De headset zal op uw GSM getoond worden als “CBTHS3”.
Selecteer de headset op uw GSM.
E. Uw GSM zal tijdens het koppelen vragen om een pincode. Voer de
code “0000” in om het koppelproces te voltooien.
F. Als het koppelproces is voltooid zal de Blauwe indicatie-LED
knipperen. De headset is nu in stand-by stand en zal automatisch
verbinding maken met uw GSM.
Let op: Als het koppelen tijdens een periode van ongeveer 1 minuut
niet lukt, zal de headset het koppelproces stoppen. U dient de
stappen A & B te herhalen om het koppelproces opnieuw te
activeren.

NEDERLANDS
6
5. De Bluetooth®headset gebruiken
In- en uitschakelen:
Als de headset is uitgeschakeld, kunt u deze inschakelen door knop “2”
(Blauw) 2 seconden ingedrukt te houden.
Als de headset is ingeschakeld, zal deze automatisch een verbinding
maken met uw GSM.
Als de headset is ingeschakeld kunt u deze uitschakelen door knop “2”
(Blauw) 3 seconden ingedrukt te houden.
Een gesprek accepteren, beëindigen of weigeren:
Bij een inkomend gesprek zal er een beltoon via de headset worden
afgespeeld. Om het inkomende gesprek te accepteren drukt u kort op
knop “2” (Blauw).
Let op: Sommige GSM’s verbreken automatisch de verbinding met de
headset als deze niet actief gebruikt wordt. In dit geval zult u
de beltoon niet over de headset horen. Druk op knop “2”
(Blauw) om de verbinding met de GSM te herstellen. Druk
vervolgens nogmaals op knop “2” (Blauw) om het gesprek aan
te accepteren.
Om een gesprek te beëindigen drukt u kort op knop “2” (Blauw).
Om een inkomend gesprek te weigeren drukt u 3 seconden op knop “2”
(Blauw).
Het volume tijdens een gesprek wijzigen:
Om het volume van de headset te verhogen drukt u op knop “5”.
Om het volume van de headset te verlagen drukt u op knop “4”.
U kunt ook het volume op uw GSM wijzigen.

NEDERLANDS
7
Een nummer bellen:
Bel het nummer op uw GSM zoals u normaal gesproken doet. Wanneer
de GSM het gesprek activeert, zal het geluid automatisch overgezet
worden naar de headset.
Om Spraakbellen te activeren drukt u kort op knop “2” (Blauw). Nadat
u een korte toon hoort kunt u de naam van uw contactpersoon noemen.
Let op: Uw GSM dient Spraakbellen te ondersteunen om gebruik te
kunnen maken van deze optie. Zie de handleiding van uw GSM
voor meer informatie over de optie Spraakbellen. Uw GSM
dient voorzien te zijn van Spraaklabels voor uw
contactpersonen.
Laatste nummer opnieuw bellen:
Houdt knop “4” ongeveer 2 seconden ingedrukt om het laatstgekozen
nummer opnieuw te bellen. Uw GSM zal het nummer opnieuw bellen.
Let op: Uw GSM dient het bellen van het laatstgekozen nummer te
ondersteunen. Zie de handleiding van uw GSM voor meer
informatie over deze optie.
Een gesprek overzetten naar uw GSM:
U kunt het actieve gesprek overzetten van de headset naar uw GSM,
bijvoorbeeld als u uw auto verlaat. Om het gesprek over te zetten
houdt u de knoppen “2” (Blauw) en “5” ongeveer 2 seconden
ingedrukt. Na het horen van een korte toon zal het gesprek overgezet
worden naar uw GSM.

NEDERLANDS
8
De microfoon uitschakelen tijdens een gesprek:
Om de microfoon van de headset tijdens een gesprek uit te schakelen
drukt u ongeveer 2 seconden op knop “4” en “5”. U zult korte tonen
horen door de headset zolang de microfoon is uitgeschakeld. Druk
nogmaals op knop “4” en “5” om de microfoon weer in te schakelen.
Een 2egesprek accepteren:
Als er een 2egesprek binnenkomt terwijl u al in een gesprek zit, kunt u
het huidige gesprek in de wacht zetten en het 2egesprek aannemen.
Houdt knop “2” (Blauw) meer dan 4 seconden ingedrukt. Het actieve
gesprek wordt in de wacht gezet en het 2egesprek wordt
geaccepteerd.
Om terug te schakelen naar het 1egesprek drukt u nogmaals meer dan
4 seconden op knop “2” (Blauw). Het 2egesprek zal in de wacht
worden gezet en het 1egesprek zal opnieuw actief worden.
U kunt het actieve gesprek beëindigen door kort op knop “2”(Blauw) te
drukken. Het actieve gesprek wordt beëindigd en het gesprek dat in de
wacht staat zal actief worden.
Conferentiegesprek (3-weg):
Als u 2 gesprekken heeft aangenomen, (1 actief, 1 in de wacht) kunt u
een conferentiegesprek met beide gesprekken starten door knop “5”
ongeveer 2 seconden in gedrukt te houden. Het gesprek in de wacht zal
worden toegevoegd aan het actieve gesprek.
Veel plezier met het gebruik van uw
Conceptronic Bluetooth®Headset !
ENGLISH
9
Conceptronic CBTHS3
User Guide
Congratulations on the purchase of your
Conceptronic Bluetooth®Headset.
The enclosed User Guide gives you a step-by-step explanation of how to
install the Conceptronic Bluetooth®Headset.
When problems occur, we advise you to go to our support-site (go to
www.conceptronic.net and click ‘Support’. Here you will find the
Frequently Asked Questions Database.
When you have other questions about your product and you cannot find
For more information about Conceptronic products, please visit the
Conceptronic Web Site: www.conceptronic.net.
1. Package Contents
The following items are present in the package of the Conceptronic
Bluetooth®Headset:
1x Conceptronic Bluetooth®Headset
1x Ear-hook for Bluetooth®Headset
2x Ear-piece sponge for Bluetooth®Headset
1x Power supply 5V DC, 0.2A
1x USB Charging Cable
1x Multi Language User Guide

ENGLISH
10
2. The Bluetooth®Headset Explained
2.1 Functions of the buttons
Nr Explanation
1DC Input (For charging the Headset)
2Turn the headset on or off / Enter Pairing Mode / Answer, end
or reject a call / Activate Voice Dialing *
(The indication LED’s are behind the button)
3Microphone
4 Decrease Volume / Redial the last call *
5Increase Volume
6 Earhook (included as separate accessory in the package)
*The availability of this function depends on the design of your
mobile phone. Please refer to the manual of your mobile phone for
support on this function.
1
2
5 4
3
6

ENGLISH
11
2.2 The Bluetooth®Headset Button Options
The following features can be accessed with the buttons:
In Standby:
Feature Button Button Press Duration
Power On 2 Long (2~3 seconds)
Power Off 2 Long (3~4 seconds)
Enter Pairing Mode 2 Very Long (+ 4 seconds) *
Answer a call 2 Short
Redial the last call 4 Long (2 seconds)
Activate Voice Dialing 2 Long (2 seconds)
Reject a call 2 Long (3 seconds)
*The PIN Code of the Bluetooth®Headset is ‘0000’. This setting
cannot be changed.
During a call:
Feature Button Button Press Duration
Transfer call to your phone 2 + 5 Long (2 seconds)
Accept Second Call 2 Very Long (+ 4 seconds)
Add waiting call to conference 5 Long (2 seconds)
Mute Microphone 4 + 5 Long (2 seconds)
End a call 2 Short
Volume Up 5 Short (1 second)
Volume Down 4 Short (1 second)

ENGLISH
12
3. Charging the battery of the Headset
Your headset has a built-in Li-ion battery which must be fully charged
before you can use the headset the first time.
It takes up to 4 hours to fully charge the battery the first time.
If the Red LED of the headset blinks during use, the battery is almost
empty. It will take about 2 hours to recharge the battery.
Charge by the travel charger:
Plug the travel charger into a free wall outlet and connect the Power
Plug to the DC input of the headset. The red indicator will light up.
When the battery is full, the red indicator will be off. Remove the
travel charger from your headset.
Charge by the USB charge cable:
Plug the USB charge cable in a free USB port of your computer and
connect the Power Plug to the DC input of the headset. The red
indicator will light up. When the battery is full, the red indicator will
be off. Remove the USB charge cable from your headset.
Note: When you charge your headset through the USB port of your
computer, the charging process can take longer, depending on
the supplied power of your USB port.

ENGLISH
13
4. Pairing the Bluetooth®Headset with your phone
Before you can use the Headset with your mobile phone, you need to
pair the Headset with your mobile phone.
(Your mobile phone needs Bluetooth®Functionality enabled).
Note: Before you start pairing, refer to the manual of your mobile
phone and check how to pair your mobile phone with
Bluetooth®devices.
A. Make sure the Stereo Headset is turned off.
B. Press and hold button “2” (Blue) on the headset for more than 4
seconds. The headset will turn on (Blue LED) and will enter
pairing mode (Blue and Red LED will flash alternatively).
C. Turn on your Bluetooth®mobile phone; follow the manual of your
mobile phone to activate the Bluetooth®device pairing process
and search for new Bluetooth®devices.
D. The headset will be shown as “CBTHS3” on your mobile phone.
Select the headset on your mobile phone.
E. Your mobile phone will prompt for a pin-code during pairing.
Enter “0000” to complete the pairing process.
F. When the pairing process is successfully completed the blue LED
on the headset will flash. The headset is now in standby mode
now and will connect to your mobile phone automatically.
Note: If pairing is not possible during a period of approximate 1
minute the process will be stopped. You will have to repeat
step A& B to initiate the pairing mode again.

ENGLISH
14
5. Using the Bluetooth®Headset
Turning on and off:
If the Headset is turned off, press button “2” (Blue) for 2 seconds to
turn the Headset on.
When the Headset is turned on, it will automatically connect to the
mobile phone.
If the Headset is turned on, press button “2” (Blue) for 3 seconds to
turn the Headset off.
Accept, end and reject calls:
When you receive an incoming call, you will hear a ringtone through
the Headset. To accept an incoming call, press button “2” (Blue)
shortly.
Note: Some mobile phones automatically disconnect the headset if
the connection is not used for a while. In this case, the
headset will not ring when there is an incoming call. Press
button “2” (Blue) to reconnect with the mobile phone. Press
button “2” (Blue) again to accept the incoming call.
To end a call, press button “2” (Blue) shortly.
To reject an incoming call, press button “2” (Blue) for 3 seconds.
Adjust the volume during calls:
To increase the volume of the Headset, press button “5”.
To decrease the volume of the Headset, press button “4”.
You can also adjust the volume on your mobile phone.

ENGLISH
15
Dial calls:
Dial the phone number on your mobile phone like you normally do.
When the phone initiates the call the sound will automatically be
transferred to the Headset.
To activate the Voice Dialing on your mobile phone, press button “2”
(Blue) shortly. After you hear a notification beep, say the name of your
contact.
Note: To use Voice Dialing your mobile phone needs Voice Dialing
support. Refer to the manual of your phone for the Voice
Dialing Function. To use Voice Dialing your mobile phone must
contain Voice Dialing records for your contacts.
Redial calls:
Press and hold the button “4” for about 2 seconds to initiate Redialing.
Your mobile phone will redial the last made call.
Note: To use the Redialing function your mobile phone needs support
for Redialing. Refer to the manual of your mobile phone for
the Redialing Function.
Transfer calls:
You can transfer a call from your headset to your mobile phone, for
example when you are leaving the car.
To transfer the call to your mobile phone, press button “2” (Blue) and
“5” for about 2 seconds. You will hear a beep. The call will be
transferred to your mobile phone.

ENGLISH
16
Mute the Microphone during calls:
To mute the microphone of the headset during calls, press button “4”
and “5” for about 2 seconds. You will hear beep sounds on the headset
during mute. To disable the mute function, press button “4” and “5”
again for about 2 seconds.
Accepting a second call:
If you receive a second call during a conversation, you can put the
current call on hold and accept the second call.
Press and hold button “2” (Blue) for more than 4 seconds. The first call
will be on hold and the second call will be answered.
To switch back to your first call, press and hold button “2” (Blue) for
more than 4 seconds. The second call will be on hold and the first call
will be active again.
You can the active call by pressing button “2” (Blue) shortly. The
active call will be ended and the other call will be activated.
3-Way conversation:
If you have 2 calls (1 active, 1 on hold), you can start a 3-way
conversation by pressing button “5” for about 2 seconds. The call on
hold will be added to the conversation.
Enjoy the use of the Conceptronic
Bluetooth®Headset !
ESPAÑOL
17
CBTHS3 de Conceptronic
Guía del usuario
Felicidades por la compra de su
auricular Bluetooth®de Conceptronic.
Esta guía del usuario adjunta le orientará paso a paso sobre cómo
instalar el auricular Bluetooth®de Conceptronic.
En caso de surgir cualquier problema, visite nuestra página web de
asistencia técnica (haga clic en el apartado “Soporte” de
www.conceptronic.net). En esa sección podrá consultar la base de
datos de Preguntas Frecuentes (F.A.Q).
Si tiene otras preguntas sobre nuestro producto y no las encuentra en
nuestro sitio web, póngase en contacto con nosotros por correo
electrónico: apoyo@conceptronic.net.
Para más información sobre los productos de Conceptronic, visite el
sitio web de Conceptronic: www.conceptronic.net.
1. Contenido del paquete
El paquete del auricular Bluetooth®de Conceptronic incluye los
siguientes componentes:
1x auricular Bluetooth® de Conceptronic
1x gancho de oreja para el auricular Bluetooth®
2x esponjitas para el auricular Bluetooth®
1x fuente de alimentación de 5 V de CC, 0,2 A
1x cable de carga USB
1x guía del usuario multilingüe

ESPAÑOL
18
2. Descripción del auricular Bluetooth®
2.1 Funciones de los botones
N.º Descripción
1Entrada de corriente (para cargar el auricular)
2Encender o apagar el auricular / Introducir el modo de
emparejamiento / Responder, finalizar o rechazar una
llamada / Activar marcación por voz *
(Los LED de indicación están detrás del botón.)
3Micrófono
4 Bajar el volumen / Volver a marcar la última llamada *
5Subir el volumen
6 Gancho de oreja (incluido como accesorio separado en el
paquete)
*La disponibilidad de esta función depende del diseño de su teléfono
móvil. Consulte el manual de su teléfono móvil para saber cómo
utilizar esta función.
1
2
5 4
3
6

ESPAÑOL
19
2.2 Opciones de botón del auricular Bluetooth®
Las funciones siguientes se pueden acceder con los botones:
En standby:
Función Botón Duración de la pulsación
del botón
Encendido 2 Larga (2~3 segundos)
Apagado 2 Larga (3~4 segundos)
Modo de emparejamiento 2 Muy larga (+ 4 segundos) *
Responder una llamada 2 Corta
Volver a marcar la última
llamada 4 Larga (2 segundos)
Activar marcación por voz 2 Larga (2 segundos)
Rechazar una llamada 2 Larga (3 segundos)
*El código PIN del auricular Bluetooth®es “0000”. Esta configuración
no se puede modificar.
Durante una llamada:
Función Botón Duración de la pulsación
del botón
Transferir la llamada al
teléfono 2 + 5 Larga (2 segundos)
Aceptar segunda llamada 2 Muy larga (+ 4 segundos)
Agregar una llamada en espera
a la conferencia 5 Larga (2 segundos)
Silenciar el micrófono 4 + 5 Larga (2 segundos)
Terminar una llamada 2 Corta
Subir el volumen 5 Corta (1 segundo)
Bajar el volumen 4 Corta (1 segundo)

ESPAÑOL
20
3. Carga de la batería del auricular
Su auricular dispone de una batería de iones de litio que debe estar
totalmente cargada antes de utilizar el auricular por primera vez.
La batería tarda 4 horas en cargarse totalmente por primera vez.
Si el LED rojo del auricular parpadea durante su utilización, significa
que la batería está casi vacía. La recarga de la batería tardará unas dos
horas.
Carga mediante el cargador de viaje:
Enchufe el cargador de viaje a una toma de corriente y conecte el
cable de alimentación a la entrada de corriente del auricular. El
indicador rojo se encenderá.
Cuando la batería esté llena, el indicador rojo se apagará. Quite el
cargador de viaje de su auricular.
Carga mediante el cable de carga USB:
Enchufe el cable de carga USB a un puerto USB libre de su ordenador y
conecte el cable de alimentación a la entrada de corriente del
auricular. El indicador rojo se encenderá. Cuando la batería esté llena,
el indicador rojo se apagará. Quite el cable de carga USB de su
auricular.
Nota: Al cargar su auricular mediante el puerto USB del ordenador,
el proceso de carga puede tardar más, en función de la
potencia de alimentación de su puerto USB.
Table of contents
Languages:
Other Conceptronic Headset manuals

Conceptronic
Conceptronic PARRIS02B User manual

Conceptronic
Conceptronic ALVAH01B User manual

Conceptronic
Conceptronic CLLPSOUND User manual

Conceptronic
Conceptronic CCHATSTARU2B User manual

Conceptronic
Conceptronic ALVAH User manual

Conceptronic
Conceptronic PARRIS01 User manual

Conceptronic
Conceptronic CHSPBTSPKBLU User manual

Conceptronic
Conceptronic CHSPBTSPKBLK User manual

Conceptronic
Conceptronic CGAMESTARS User manual

Conceptronic
Conceptronic CBTHS2 User manual