manuals.online logo
Brands
  1. Home
  2. •
  3. Brands
  4. •
  5. Conrad
  6. •
  7. PCI Card
  8. •
  9. Conrad 98 65 60 User manual

Conrad 98 65 60 User manual

Bestimmungsgemäße Verwendung
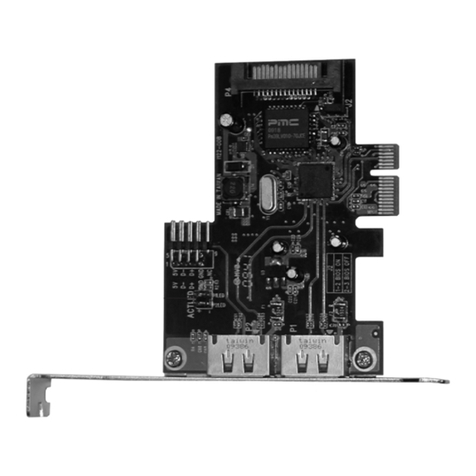
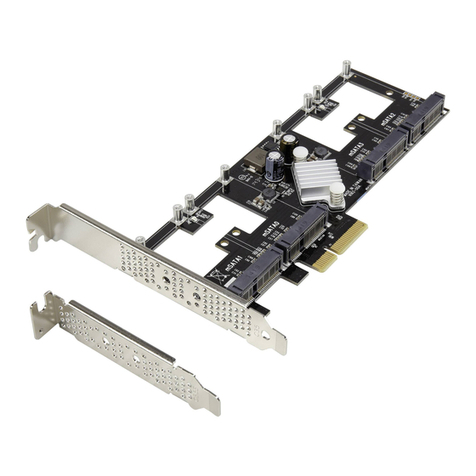
Das Produkt ist zum Einbau in einen Computer vorgesehen und stellt dort über zwei externe SFF-8088-
Anschlüsse insgesamt 8 SAS-/SATA-Schnittstellen zur Verfügung.
Dieses Produkt erfüllt die gesetzlichen, nationalen und europäischen Anforderungen. Alle enthaltenen Fir-
mennamen und Produktbezeichnungen sind Warenzeichen der jeweiligen Inhaber. Alle Rechte vorbehalten.
Lieferumfang
• Steckkarte
• CD mit Treiber
• Kurzes Slotblech (zum Einbau der Steckkarte in flache Computergehäuse oder Server)
• Kurzanleitung
• Bedienungsanleitung des Herstellers (in englischer Sprache); evtl. nur auf CD
Merkmale
• Zwei externe SFF-8088-Ports
• Vorgesehen zum Einstecken in PCIe-x8-Steckplatz eines Mainboards
Einbau
Falls Sie keine Fachkenntnisse für den Einbau besitzen, so lassen Sie den Einbau von
einer Fachkraft oder einer entsprechenden Fachwerkstatt durchführen!
Durch unsachgemäßen Einbau wird sowohl die Steckkarte als auch Ihr Computer und
alle angeschlossenen Geräte beschädigt.
Schalten Sie den Computer, in den die Steckkarte eingebaut werden soll und alle ange-
schlossenen Geräte aus und trennen Sie alle Geräte von der Netzspannung, ziehen Sie
den Netzstecker! Das Ausschalten über den Ein-/Ausschalter genügt nicht!
Falls auf der/den SAS-/SATA-Festplatte(n), die Sie an der Steckkarte betreiben wollen, bereits
Daten vorhanden sind, so führen Sie zuerst ein Backup der Daten durch!
• Öffnen Sie das Gehäuse Ihres Computers und nehmen Sie den Gehäusedeckel vorsichtig ab.
• Für den Einbau der Steckkarte in flache Computergehäuse oder Server liegt ein kurzes Slotblech bei.
Entfernen Sie das lange Slotblech von der Steckkarte und montieren Sie stattdessen das kurze Slotblech.
• Suchen Sie einen freien PCIe-Steckplatz (mindestens x8-Port empfohlen), entfernen Sie das zugehörige
Slotblech und stecken Sie die Steckkarte in den PCIe-Slot ein. Schrauben Sie die Steckkarte fest, kontrol-
lieren Sie den korrekten Sitz im PCIe-Slot!
• Auf der Steckkarte befinden sich diverse Anschlüsse für LEDs. Wenn Sie diese verwenden wollen, so
verbinden Sie die LEDs mit den Stiftleisten (siehe Abbildung in der Bedienungsanleitung des Herstellers).
Achten Sie hier auf die korrekte Polung der LEDs, sonst leuchten diese nicht.
• Verschließen Sie das Gehäuse Ihres Computers bzw. Servers.
• Verbinden Sie die SF-8088-Buchsen der Steckkarte über entsprechende Kabel mit den Festplatten.
• Verbinden Sie alle Geräte mit der Betriebsspannung und schalten Sie sie ein.
• Startet der Computer bzw. Server nicht korrekt, so schalten Sie ihn sofort aus und kontrollieren Sie sämt-
liche Einstellungen und Kabelverbindungen.
Vor dem erneuten Öffnen des Computers/Servers ist dieser von der Netzspannung zu trennen,
siehe oben!
Treiber-Installation
Windows erkennt die Steckkarte automatisch. Legen Sie die mitgelieferte CD in das entsprechende Lauf-
werk Ihres Computers ein und folgen Sie allen Anweisungen.
Der benötigte Treiber war zum Zeitpunkt der Erstellung dieser Bedienungsanleitung auf der CD im Ver-
zeichnis „SAS / Marvell / M9485“ und dort im Unterverzeichnis für das jeweilige Betriebssystem zu finden.
Beachten Sie ggf. die Bedienungsanleitung des Herstellers.
Anschließend ist möglicherweise ein Neustart von Windows nötig, bevor die SAS-/SATA-Geräte einwandfrei
erkannt werden.
Entsorgung
Entsorgen Sie das Produkt am Ende seiner Lebensdauer gemäß den geltenden gesetzlichen
Bestimmungen
Intended use
The product is intended to be installed in a computer where it makes two external SFF 8088 connectons
available; a total of 8 SAS/SATA interfaces.
This product complies with the applicable national and European requirements. All names of companies and
products are the trademarks of the respective owner. All rights reserved.
Package Contents
• Plug-in card
• CD with driver
• Short slot bracket (for installing the plug-in card in a flat computer case or server)
• Quick guide
• The manufacturer’s operating instructions (in English); possibly only on CD
Features
• Two external SFF 8088 ports
• Intended to be plugged into the PCIe-x8 slot of a mainboard
Installation
If you do not have the expertise to install the device correctly, please contact an expert or
a specialist workshop and let them carry out the installation!
Incorrect installation can cause damage to the plug-in card and also to your computer
and all connected devices.
Switch off the computer in which the plug-in card is to be mounted and disconnect all
devices from the mains voltage by removing the plugs from the mains socket! Just turn-
ing off at the on/off switch is not enough!
First, backup any data that you already have stored on the SAS-/SATAhard disk(s) that you wish
to connect to the RAID controller!
• Open your computer’s case and carefully remove the cover.
• There is a short slot bracket for installing the plug-in card in a flat computer case or server. Remove the
long slot bracket from the plug-in card and then install the short, low-profile, slot bracket.
• Locate a free PCIe plug-in slot (a minimum of x8-port is recommended); remove the corresponding slot
cover and insert the card into the PCIe slot. Screw the plug-in card firmly, and make sure it is positioned
correctly in the PCIe slot!
• The plug-in card features several slots for LEDs. If you intend to use these, connect the LEDs to the plug
connectors (see figure in the manufacturer’s operation instructions). Make sure that the LEDs have the
correct polarity; otherwise they will not emit light.
• Close the case of your computer or device.
• Connect the SF 8088 sockets of the plug-in card to the hard disks using suitable cables.
• Connect all devices to the power supply and switch them on.
• If the computer or server does not start correctly, switch it off straight away and check all settings and cable
connections.
Before restarting the PC / server, disconnect the PC from the power supply; see above!
Driver installation
Windows detects the plug-in card automatically. Insert the CD included in delivery into the appropriate drive
of your computer and follow all instructions.
At the time this manual was written, the driver was available on the CD in directory “SAS/Marvell/M9485”, in
the subdirectory for the particular operating system. Please consult the manufacturer’s English instruction
manual.
It might be necessary to restart Windows, before the SAS-/SATA devices are properly recognised by the
system.
Disposal
Please dispose of the device when it is no longer of use, according to the current statutory
requirements!
These operating instructions are a publication by Conrad Electronic SE, Klaus-Conrad-Str. 1,
D-92240 Hirschau (www.conrad.com).
All rights including translation reserved. Reproduction by any method, e.g. photocopy, microfilming,
or the capture in electronic data processing systems require the prior written approval by the editor.
Reprinting, also in part, is prohibited.
These operating instructions represent the technical status at the time of printing. Changes in
technology and equipment reserved.
© Copyright 2012 by Conrad Electronic SE.
Diese Bedienungsanleitung ist eine Publikation der Conrad Electronic SE, Klaus-Conrad-Str. 1,
D-92240 Hirschau (www.conrad.com).
Alle Rechte einschließlich Übersetzung vorbehalten. Reproduktionen jeder Art, z. B. Fotokopie, Mik-
roverfilmung, oder die Erfassung in elektronischen Datenverarbeitungsanlagen, bedürfen der schriftli-
chen Genehmigung des Herausgebers. Nachdruck, auch auszugsweise, verboten.
Diese Bedienungsanleitung entspricht dem technischen Stand bei Drucklegung. Änderung in Technik
und Ausstattung vorbehalten.
© Copyright 2012 by Conrad Electronic SE.
 BEDIENUNGSANLEITUNG www.conrad.com
8-Port-SAS/SATA PCI-Express-
Karte
Best.-Nr. 98 65 60
Version 05/12
 OPERATING INSTRUCTIONS www.conrad.com
8-port SAS/SATA PCI Express
Card
Item no. 98 65 60
Version 05/12
Utilisation conforme
Le produit est conçu pour être installé dans un ordinateur et fournit un total de 8 ports SAS/SATA via deux
connexions SFF-8088 externes.
Cet appareil satisfait aux prescriptions légales nationales et européennes. Tous les noms d’entreprises et
les appellations d’appareils figurant dans ce manuel d’utilisation sont des marques déposées de leurs pro-
priétaires respectifs. Tous droits réservés.
Contenu de la livraison
• Carte d’extension
• CD avec pilote
• Cache-emplacement court (pour le montage de la carte d’extension dans un boîtier d’ordinateur plat ou
dans un serveur)
• Guide rapide
• Instructions du fabricant (en anglais) ; éventuellement uniquement sur CD
Caractéristiques
• Deux ports externes SFF-8088
• Prévus pour être insérés dans l’emplacement PCIe x8 d’une carte mère
Montage
Dans la mesure où vous ne disposez pas des connaissances spécialisées nécessaires
pour le montage, veuillez confier cette opération à un spécialiste ou à un atelier spécia-
lisé !
Un montage incorrect est non seulement susceptible d’endommager la carte d’extension,
mais également l’ordinateur, ainsi que tous les périphériques connectés.
Éteignez l’ordinateur devant accueillir la carte d’extension ainsi que tous les appareils
raccordés puis débranchez-les du réseau en débranchant les fiches d’alimentation ! Il ne
suffit pas d’éteindre à l’aide de l’interrupteur marche/arrêt !
Si des données sont déjà enregistrées sur le (les) disque(s) dur(s) SAS/SATA que vous voulez
utiliser sur la carte d’extension, effectuez d’abord une sauvegarde de ces données !
• Ouvrez le boîtier de votre ordinateur et retirez le couvercle du boîtier avec précaution.
• Un cache-emplacement court est fourni pour permettre le montage de la carte d’extension dans des
boîtiers d’ordinateur ou des serveurs plats. Enlevez le cache-emplacement long de la carte d’extension et
montez le cache-emplacement court à la place.
• Cherchez un emplacement PCIe libre (nous recommandons un port x8 au minimum). Enlevez le cache-
emplacement correspondant et introduisez la carte d’extension dans l’emplacement PCIe. Vissez la carte
d’extension et vérifiez qu’elle est placée correctement dans l’emplacement PCIe !
• La carte d’extension contient différents ports pour le raccordement des voyants LED. Si vous souhaitez
utiliser ces voyants, raccordez-les aux barrettes à broches (voir la figure dans le manuel d’utilisation du
fabricant). Respectez la polarité des voyants LED, sinon ils ne s’allumeront pas.
• Refermez ensuite le boîtier de l’ordinateur ou du serveur.
• Raccordez les douilles SF-8088 de la carte d’extension aux disques durs en vous servant des câbles
appropriés.
• Rebranchez tous les appareils au secteur et rallumez-les.
• Si l’ordinateur ou le serveur ne redémarre pas correctement, éteignez-le immédiatement et vérifiez tous
les réglages et câblages.
Avant d’ouvrir à nouveau le boîtier de l’ordinateur/du serveur, débranchez la fiche de la prise
secteur ; voir le chapitre ci-dessus !
Installation des pilotes
Windows reconnaît automatiquement la carte d’extension. Insérez le CD-ROM fourni dans le lecteur corres-
pondant de votre ordinateur et suivez les instructions de Windows.
Au moment de la rédaction de ce mode d’emploi, les pilotes requis étaient sauvegardés dans le répertoire
« SAS / Marvell / M9485 » du CD, dans le sous-répertoire du système d’exploitation correspondant. Tenez
compte des instructions d’utilisation du fabricant.
Il peut ensuite être nécessaire de redémarrer Windows avant que les périphériques SAS/SATA ne soient
reconnus.
Elimination
Il convient de procéder à l’élimination du produit au terme de sa durée de vie conformément aux
prescriptions légales en vigueur.
Deze gebruiksaanwijzing is een publicatie van de firma Conrad Electronic SE, Klaus-Conrad-Str. 1,
D-92240 Hirschau (www.conrad.com).
Alle rechten, vertaling inbegrepen, voorbehouden. Reproducties van welke aard dan ook, bijvoorbeeld
fotokopie, microverfilming of de registratie in elektronische gegevensverwerkingsapparatuur, vereisen
de schriftelijke toestemming van de uitgever. Nadruk, ook van uittreksels, verboden.
Deze gebruiksaanwijzing voldoet aan de technische stand bij het in druk bezorgen. Wijziging van
techniek en uitrusting voorbehouden.
© Copyright 2012 by Conrad Electronic SE. V1_0512_01/AB
Ce mode d‘emploi est une publication de la société Conrad Electronic SE, Klaus-Conrad-Str. 1,
D-92240 Hirschau (www.conrad.com).
Tous droits réservés, y compris de traduction. Toute reproduction, quelle qu‘elle soit (p. ex. photo-
copie, microfilm, saisie dans des installations de traitement de données) nécessite une autorisation
écrite de l‘éditeur. Il est interdit de le réimprimer, même par extraits.
Ce mode d‘emploi correspond au niveau technique du moment de la mise sous presse. Sous réserve
de modifications techniques et de l‘équipement.
© Copyright 2012 by Conrad Electronic SE.
Beoogd gebruik
Het product is bestemd voor de inbouw in een computer en stelt daar via twee externe SFF-8088-aansluitin-
gen in totaal 8 SAS-/SATA-interfaces ter beschikking.
Dit product voldoet aan de wettelijke, nationale en Europese eisen. Alle voorkomende bedrijfsnamen en
productaanduidingen zijn handelsmerken van de betreffende eigenaren. Alle rechten voorbehouden.
Omvang van de levering
• Insteekkaart
• CD met stuurprogramma
• Kort slotplaatje (voor het inbouwen van de insteekkaart in een vlakke computerbehuizing of server)
• Korte handleiding
• Gebruiksaanwijzing van de fabrikant (in de Engelse taal); eventueel alleen op CD)
Kenmerken
• Twee externe SFF-8088-poorten
• Bedoeld om in de PCIe-x8-slot van een mainboard te steken.
Inbouwen
Indien u geen vakkennis bezit voor de inbouw, laat deze dan over aan een vakman of een
gekwalificeerde computerdienst!
Door een onjuiste inbouw worden zowel de insteekkaart als uw computer en alle aanges-
loten apparatuur beschadigd.
Schakel de computer waarin u de insteekkaart wilt inbouwen uit, evenals alle daarop
aangesloten apparatuur, en koppel deze los van de netspanning, haal de stekker uit de
contactdoos! Uitschakelen via de aan-/uitschakelaar is niet voldoende!
Als zich op de SAS-/SATA-harde schijf/schijven die u op de insteekkaart wilt gebruiken reeds
gegevens bevinden, moet u eerst een back-up van deze gegevens maken!
• Open de behuizing van uw computer en haal het deksel van de behuizing voorzichtig weg.
• Voor de inbouw van de insteekkaart in een vlakke computerbehuizing of server is een kort slotplaatje
bijgesloten. Verwijder het lange slotplaatje van de insteekkaart en monteer daarvoor in de plaats het korte
slotplaatje.
• Zoek een vrij PCIe-slot (ten minste x8-poort aanbevolen), verwijder het bijbehorende slotplaatje en steek
de kaart in het PCIe-slot. Schroef de kaart vast en controleer of deze op de juiste manier in het PCIe-slot
steekt!
• Op de insteekkaart bevinden zich diverse aansluitingen voor LED‘s. Als u deze wilt gebruiken, verbind de
LED‘s dan met de klemmenstrook (zie afbeelding in de gebruiksaanwijzing van de fabrikant). Let hierbij op
de juiste polariteit van de LED‘s, anders gaan ze niet branden.
• Sluit de behuizing van uw computer resp. server weer af.
• Verbind de SF-8088-bussen met de insteekkaart via de passende kabel met de harde schijf.
• Sluit alle apparaten op de bedrijfsspanning aan en schakel ze in.
• Schakel de computer resp. server direct weer uit als hij niet correct opstart en controleer alle instellingen
en kabelverbindingen.
Als u de computer/server opnieuw wilt openen dient u de netspanning los te koppelen, zie
boven!
Installeren van het stuurprogramma
Windows herkent de insteekkaart automatisch. Plaats de meegeleverde CD in het betreffende schijfstation
van uw computer en volg alle aanwijzingen.
Het benodigde stuurprogramma bevond zich op het moment dat deze gebruiksaanwijzing werd opgesteld in
de map „SAS / Marvell / M9485“ van de CD en daar in de sub-map voor het betreffende besturingssysteem.
Neem evt. de gebruiksaanwijzing van de fabrikant in acht.
Daarna is het eventueel nodig om Windows te herstarten voordat de SAS-/SATA-apparaten correct herkend
zullen worden.
Verwijdering
Lever het product aan het einde van zijn levensduur in volgens de geldende wettelijke bepalin-
gen voor afvalverwerking.
 MODE D’EMPLOI www.conrad.com
Carte PCI Express SAS/SATA
8 ports
N° de commande 98 65 60
Version 05/12
 GEBRUIKSAANWIJZING www.conrad.com
8-Poort-SAS/SATA PCI-Expres-
Kaart
Bestelnr. 98 65 60
Versie 05/12
Other Conrad PCI Card manuals

Conrad 46 93 89 User manual

Conrad

Conrad 46 93 89 User manual

Conrad 974488 User manual

Conrad

Conrad 974488 User manual

Conrad 97 37 66 User manual

Conrad

Conrad 97 37 66 User manual

Conrad 51 68 61 User manual

Conrad

Conrad 51 68 61 User manual

Conrad 1333474 User manual

Conrad

Conrad 1333474 User manual

Conrad RF-817730 User manual

Conrad

Conrad RF-817730 User manual

Conrad 98 68 96 User manual

Conrad

Conrad 98 68 96 User manual

Conrad 98 68 23 User manual

Conrad

Conrad 98 68 23 User manual

Conrad 1333419 User manual

Conrad

Conrad 1333419 User manual

Conrad 1000182 User manual

Conrad

Conrad 1000182 User manual

Conrad 97 51 73 User manual

Conrad

Conrad 97 51 73 User manual

Conrad 1333215 User manual

Conrad

Conrad 1333215 User manual

Conrad 98 68 75 User manual

Conrad

Conrad 98 68 75 User manual

Conrad 97 35 35 User manual

Conrad

Conrad 97 35 35 User manual

Conrad 87 39 54 User manual

Conrad

Conrad 87 39 54 User manual

Conrad 46 93 97 User manual

Conrad

Conrad 46 93 97 User manual

Popular PCI Card manuals by other brands

NETGEAR WG311v2 - 54 Mbps Wireless PCI Adapter installation guide

NETGEAR

NETGEAR WG311v2 - 54 Mbps Wireless PCI Adapter installation guide

ICP DAS USA PCI-TMC12A quick start guide

ICP DAS USA

ICP DAS USA PCI-TMC12A quick start guide

D-Link Air DWL-520 Quick installation guide

D-Link

D-Link Air DWL-520 Quick installation guide

SpinCore Technologies PulseBlaster PB24-100-PCI owner's manual

SpinCore Technologies

SpinCore Technologies PulseBlaster PB24-100-PCI owner's manual

Conrad Electronic 43 01 79 operating instructions

Conrad Electronic

Conrad Electronic 43 01 79 operating instructions

Hama 5x PCI Card USB 2.0 Operating	 instruction

Hama

Hama 5x PCI Card USB 2.0 Operating instruction

LIQID Element LQD4500 Hardware guide

LIQID

LIQID Element LQD4500 Hardware guide

Advantech DVP-7020BE user manual

Advantech

Advantech DVP-7020BE user manual

SMART-AVI Mosaic manual

SMART-AVI

SMART-AVI Mosaic manual

NETGEAR WG311 installation guide

NETGEAR

NETGEAR WG311 installation guide

Advantech DVP-7637HE user manual

Advantech

Advantech DVP-7637HE user manual

Advantech MIC-3302 manual

Advantech

Advantech MIC-3302 manual

ICP DAS USA PIO-D56 user manual

ICP DAS USA

ICP DAS USA PIO-D56 user manual

SIIG SC-SA0012-S1 Quick installation guide

SIIG

SIIG SC-SA0012-S1 Quick installation guide

Dialogic Brooktrout TR1034 installation guide

Dialogic

Dialogic Brooktrout TR1034 installation guide

Moxa Technologies CP-132EL Series Quick installation guide

Moxa Technologies

Moxa Technologies CP-132EL Series Quick installation guide

SMC Networks SMC EZ Connect g MIMO Wireless PCI Adapter... Quick installation guide

SMC Networks

SMC Networks SMC EZ Connect g MIMO Wireless PCI Adapter... Quick installation guide

SIIG CyberPro PCI 2S Quick installation guide

SIIG

SIIG CyberPro PCI 2S Quick installation guide

manuals.online logo
manuals.online logoBrands
  • About & Mission
  • Contact us
  • Privacy Policy
  • Terms and Conditions

Copyright 2025 Manuals.Online. All Rights Reserved.