manuals.online logo
Brands
  1. Home
  2. •
  3. Brands
  4. •
  5. Conrad
  6. •
  7. Switch
  8. •
  9. Conrad 986748 User manual

Conrad 986748 User manual

3+1 Port USB 2.0 Hub Version 11/12
Item no. 98 67 48
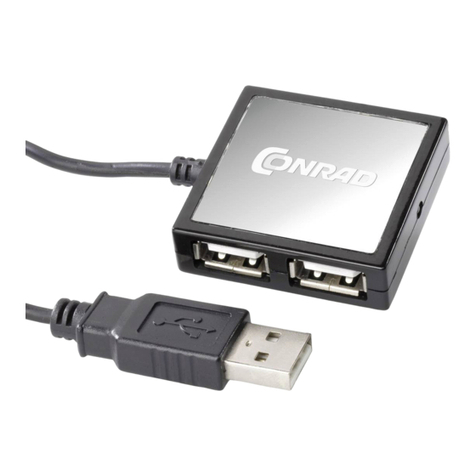
1. Intended use
This product connects up to three additional USB devices. You can also connect a device featuring a Micro USB interface
(such as a smartphone) to the Micro USB plug of the hub. The product is designed for connection to a computer with USB port.
During operation it operates like a bi-directional repeater, which repeats USB signals as required on upstream (computer) and
downstream (peripherals) cables. It is designed for USB 2.0 and backward compatible with USB 1.1. Its operation requires
connection with a computer. Only operate the USB hub in dry indoor room. The product can be powered by an external 5 V/DC
power supply (not included).
For safety and approval purposes (CE), you must not rebuild and/or modify this product. If you use the product for purposes other
than those described above, the product may be damaged. In addition, improper use can cause hazards such as short circuiting,
re, electric shock etc. Read the instructions carefully and keep them. Make this product available to third parties only together
with its operating instructions.
2. Delivery content
• USB hub • Operating instructions
3. Safety instructions
Read the operating instructions carefully and especially observe the safety information. If you do not
follow the safety instructions and information on proper handling in this manual, we assume no liability
for any resulting personal injury or damage to property. Such cases will invalidate the warranty/guarantee.
• The product is not a toy. Keep it out of the reach of children and pets.
• Protect the product from extreme temperatures, direct sunlight, strong jolts, high humidity, moisture, ammable gases,
vapours and solvents.
• Handle the product carefully. Jolts, impacts or a fall even from a low height can damage the product.
• Also observe the safety and operating instructions of any other devices which are connected to the product.
• Maintenance, modications and repairs are to be performed exclusively by an expert or at a qualied shop.
• If you have questions which remain unanswered by these operating instructions, contact our technical support service or
other technical personnel.
4. Operation
1. Connect the USB A-type plug to a vacant USB port of your PC. The hub is now operational.
2. If you want to use the hub as a charging device, connect the Micro-B plug to the corresponding Micro USB interface of your
device. The Micro-USB plug is not mechanically compatible with all mobiles.
The hub functions in ”Bus-Powered-Mode”. This will distribute the current of 500 mA supplied from the computer
via USB to the three USB sockets and the Micro-USB plug. The total current consumption of all devices connected
at any one time must not be higher than this value.
The charging function is not guaranteed for all mobiles with Micro-USB plug that are currently available on the
market, as some mobiles require more than 500 mA for the charging process. In these cases, a separate power
adaptor would be required.
3. Alternatively, you can power the USB hub with an optional power supply. If an optional power supply is used, then each port
could be loaded with 500 mA.
You can connect up to three USB plugs as well as a device with a Micro-USB socket to the hub. The hub supports
Plug & Play and hot-swapping (device drivers are automatically recognized and the devices themselves can be
removed while the OS is running).
5. Tips and hints
• The USB 2.0 is USB 1.1-compatible. That means that traditional USB 1.1 devices can be operated without problems on the
USB 2.0 hub. USB 1.1 devices do not become quicker through this! The USB 2.0 hub can, of course, also be operated on a
USB 1.1 connection, e.g. if your PC has no USB 2.0 connection. An increase in speed in the data transmission is not possible
here either. To be able to exploit the high speed (theoretically 480 MBit/s, i.e. 60 MByte/s), all devices must support USB 2.0
- the USB device (e.g. an external CD burner) itself, the USB hub and the USB controller in the PC. In practical operation,
the 480 MBit/s are not achieved. Hardly any device (e.g. hard disk, burner etc.) is in a position to supply data so quickly.
Other causes also (e.g. simultaneous operation of other USB devices, protocol information etc.) reduce the transmission rate.
• USB operation is not possible in Windows safe mode or under DOS. USB keyboards and a USB mouse do not normally
work. The BIOS/setup of your PC possibly has appropriate support (could be called e.g. “Legacy USB support”). It is possible,
however, that the USB keyboard/mouse is to be connected directly to the motherboard and not on a USB hub.
6. Disposal
Electronic devices are recyclable waste and must not be disposed of in the household waste.
At the end of its service life, dispose of the product according to the relevant statutory regulations.
7. Technical data
Operating voltage: 5 V/DC (USB)
Connections: 3 x USB 2.0 socket / 1 x Micro-USB plug
USB standard: 2.0 / 1.1
System requirements: Windows® 2000 / XP, Vista™, 7 (32 + 64 Bit); Mac OS 10.5.1 or higher
Transfer rate: up to 480 Mbit/s
Cable length: 100 mm x 2
Operating temperature: 0 to +40 ºC
Dimensions (W x H x D): 65 x 19 x 29 mm
Weight: 22 g
Optional power supply (not included)
Output voltage / current: 5 V/DC, 2000 mA
Plug diameter: 1.3 mm (inner) / 3.5 mm (outer)
3+1 Port USB 2.0 Hub Version 11/12
Best.-Nr. 98 67 48
1. Bestimmungsgemäße Verwendung
Dieses Produkt dient zum Anschluss von bis zu drei zusätzlichen USB-Geräten. Außerdem können Sie ein Gerät mit Micro-
USB-Schnittstelle (z.B. Smartphone) an den Micro-USB-Stecker des Hubs anschließen. Das Produkt ist für den Anschluss
an einen Computer mit USB-Schnittstelle vorgesehen. Der USB-Hub arbeitet bidirektional, d.h. er überträgt die Signale vom
Computer und von den Anschlussgeräten (upstream und downstream der Signale). Er entspricht der USB 2.0-Spezikation und
ist abwärtskompatibel zu USB 1.1. Zum Betrieb wird eine Verbindung zu einem Computer mit USB-Anschluss benötigt. Benutzen
Sie den USB-Hub nur in trockenen Innenräumen. Die Stromversorgung des Produkts kann über ein externes 5 V/DC Netzteil
erfolgen (nicht enthalten).
Aus Sicherheits- und Zulassungsgründen (CE) dürfen Sie das Produkt nicht umbauen und/oder verändern. Falls Sie das
Produkt für andere Zwecke verwenden, als zuvor beschrieben, kann das Produkt beschädigt werden. Außerdem kann eine
unsachgemäße Verwendung Gefahren wie zum Beispiel Kurzschluss, Brand, Stromschlag, etc. hervorrufen. Lesen Sie
sich die Bedienungsanleitung genau durch und bewahren Sie diese auf. Reichen Sie das Produkt nur zusammen mit der
Bedienungsanleitung an dritte Personen weiter.
2. Lieferumfang
• USB-Hub • Bedienungsanleitung
3. Sicherheitshinweise
Lesen Sie sich die Bedienungsanleitung aufmerksam durch und beachten Sie insbesondere die
Sicherheitshinweise. Falls Sie die Sicherheitshinweise und die Angaben zur sachgemäßen Handhabung
in dieser Bedienungsanleitung nicht befolgen, übernehmen wir für dadurch resultierende Personen-/
Sachschäden keine Haftung. Außerdem erlischt in solchen Fällen die Gewährleistung/Garantie.
• Das Produkt ist kein Spielzeug. Halten Sie es von Kindern und Haustieren fern.
• Schützen Sie das Produkt vor extremen Temperaturen, direktem Sonnenlicht, starken Erschütterungen, hoher Feuchtigkeit,
Nässe, brennbaren Gasen, Dämpfen und Lösungsmitteln.
• Gehen Sie vorsichtig mit dem Produkt um. Durch Stöße, Schläge oder dem Fall aus bereits geringer Höhe wird es beschädigt.
• Beachten Sie auch die Sicherheitshinweise und Bedienungsanleitungen der übrigen Geräte, an die das Produkt
angeschlossen wird.
• Lassen Sie Wartungs-, Anpassungs- und Reparaturarbeiten ausschließlich von einem Fachmann bzw. einer Fachwerkstatt
durchführen.
• Sollten Sie noch Fragen haben, die in dieser Bedienungsanleitung nicht beantwortet werden, wenden Sie sich an unseren
technischen Kundendienst oder an andere Fachleute.
4. Bedienung
1. Verbinden Sie den USB-A-Stecker mit einer freien USB-Buchse Ihres Computers. Der Hub ist nun betriebsbereit.
2. Wenn Sie den Hub als Ladegerät verwenden möchten,
verbinden Sie
den Micro-B-Stecker mit dem passenden Micro-USB-
Anschluss Ihres Geräts
. Der Micro-USB-Stecker ist mechanisch nicht mit allen Mobiltelefonen kompatibel.
Der Hub arbeitet im „Bus-Powered-Modus“. Das bedeutet, der vom Computer über USB gelieferte Strom von
500 mA wird auf die drei USB-Buchsen und den Micro-USB-Stecker verteilt. Der Gesamtstromverbrauch aller zu
einem Zeitpunkt angeschlossenen Geräte darf diesen Wert auf keinen Fall übersteigen.
Die Ladefunktion kann unter Umständen nicht mit allen auf dem Markt bendlichen Mobiltelefonen mit Micro-
USB-Stecker gewährleistet werden, da manche Telefone mehr als 500mA für den Ladevorgang benötigen. In
diesem Fall ist ein zusätzliches Netzteil nötig.
3. Alternativ können Sie den USB-Hub über ein optionales Netzteil mit Strom versorgen. Wird ein optionales Netzteil verwendet,
kann jede Schnittstelle mit 500 mA belastet werden.
Sie können bis zu drei USB-Stecker sowie ein Gerät mit Micro-USB-Buchse an den Hub anschließen. Der Hub
unterstützt Plug & Play sowie Hot-Swapping (Gerätetreiber werden automatisch erkannt und Geräte können vom
PC abgezogen werden, während das Betriebssystem läuft).
5. Tipps und Hinweise
• Der USB2.0-Hub ist USB 1.1-kompatibel. Das bedeutet, dass herkömmliche USB 1.1-Geräte ohne Probleme am USB 2.0-Hub
betrieben werden können. Schneller werden die USB 1.1-Geräte dabei aber nicht! Natürlich kann der USB 2.0-Hub auch an einem
USB 1.1-Anschluss betrieben werden, z.B. wenn Ihr PC noch keinen USB 2.0-Anschluss hat. Eine Geschwindigkeitssteigerung
bei der Datenübertragung ist hier aber ebenfalls nicht möglich. Um die hohe Geschwindigkeit (theoretisch 480 MBit/s, also
60 MByte/s) ausnutzen zu können, müssen alle Geräte USB 2.0 unterstützen - das USB-Gerät (z.B. ein externer CD-Brenner)
selbst, der USB-Hub und der USB-Controller im PC. Im praktischen Betrieb werden die 480 MBit/s aber nicht erreicht. Kaum
ein Gerät (z.B. Festplatte, Brenner usw.) ist in der Lage, Daten so schnell zu liefern. Auch andere Ursachen (z.B. gleichzeitiger
Betrieb anderer USB Geräte, Protokollinformationen usw.) verringern die Übertragungsrate.
• Unter DOS oder im abgesicherten Modus von Windows ist kein USB-Betrieb möglich. USB-Tastaturen und USB Mäuse
funktionieren deshalb normalerweise nicht. Vielleicht verfügt das BIOS/Setup Ihres PCs über eine entsprechende
Unterstützung (könnte z.B. “Legacy-USB-Support” heißen). Es kann jedoch sein, dass dabei die USB-Tastatur/-Maus direkt
am Mainboard angesteckt sein muss und nicht an einem USB-Hub.
6. Entsorgung
Elektronische Geräte sind Wertstoffe und gehören nicht in den Hausmüll.
Entsorgen Sie das Produkt am Ende seiner Lebensdauer gemäß den geltenden gesetzlichen Bestimmungen.
7. Technische Daten
Betriebsspannung: 5 V/DC (USB)
Anschlüsse: 3 x USB 2.0 Buchse / 1 x Micro-USB-Stecker
USB-Standard: 2.0 / 1.1
Systemvoraussetzungen: Windows® 2000 / XP, Vista™, 7 (32 + 64 Bit); Mac OS 10.5.1 und höher
Übertragungsrate: bis zu 480 Mbit/s
Kabellänge: 100 mm x 2
Betriebstemperatur: 0 bis +40 ºC
Abmessungen (B x H x T): 65 x 19 x 29 mm
Gewicht: 22 g
Optionales Netzteil (nicht enthalten)
Ausgangsspannung/-strom: 5 V/DC, 2000 mA
Steckerdurchmesser: 1,3 mm (innen) / 3,5 mm (außen)
Diese Bedienungsanleitung ist eine Publikation der Conrad Electronic SE,
Klaus-Conrad-Straße 1, D-92240 Hirschau.
Alle Rechte einschließlich Übersetzung vorbehalten. Reproduktionen jeder Art, z. B. Fotokopie,
Mikroverlmung, oder die Erfassung in elektronischen Datenverarbeitungsanlagen, bedürfen der
schriftlichen Genehmigung des Herausgebers. Nachdruck, auch auszugsweise, verboten.
Diese Bedienungsanleitung entspricht dem technischen Stand bei Drucklegung.
Änderungen in Technik und Ausstattung vorbehalten.
© 2012 by Conrad Electronic SE.
V2_1112_02-KV
These operating instructions are published by Conrad Electronic SE,
Klaus-Conrad-Straße 1, D-92240 Hirschau/Germany.
All rights including translation reserved. Reproduction by any method, e.g. photocopy,
microlming, or the capture in electronic data processing systems require the prior written
approval by the editor. Reprinting, also in part, is prohibited.
The operating instructions reect the current technical specications at time of print.
We reserve the right to change the technical or physical specications.
© 2012 by Conrad Electronic SE.
V2_1112_02-KV
Concentrateur 3+1 ports USB 2.0 Version 11/12
Nº de commande 98 67 48
1. Utilisation prévue
Ce produit est est utilisé pour raccorder jusqu’à trois périphériques USB supplémentaires. Vous pouvez également raccorder un
périphérique doté d’une interface micro USB (par ex. un smartphone) à la che micro USB du concentrateur. Ce produit est prévu
pour être connecté au port USB d’un ordinateur. Lors du fonctionnement il fonctionne comme un répéteur bidirectionnel, ce qui
répète des signaux d’USB comme exigés sur câbles en amont (ordinateur) et en aval (de périphériques). Il est conçu pour USB
2.0 et compatible en arrière avec USB 1.1. Son fonctionnement exige le raccordement avec un ordinateur. Actionnez seulement
le moyeu (hub) d’USB dans la pièce d’intérieur sèche. Il peut être alimenté par un adaptateur externe 5 V/DC (non fourni).
Pour des raisons de sécurité et d’homologation (CE), toute transformation et/ou modication du produit est interdite. Si vous
utilisez le produit à d’autres ns que celles décrites précédemment, cela risque d’endommager le produit. Par ailleurs, une
utilisation incorrecte peut être source de dangers tels que court-circuit, incendie, électrocution. Lisez attentivement le mode
d’emploi et conservez le. Ne transmettez le produit à des tiers qu’accompagné de son mode d’emploi.
2. Contenu d’emballage
• Concentrateur USB • Mode d’emploi
3. Consignes de sécurité
Lisez le mode d’emploi avec attention en étant particulièrement attentif aux consignes de sécurité. En cas
de non-respect des consignes de sécurité et des informations données dans le présent mode d’emploi
pour une utilisation correcte de l’appareil, nous déclinons toute responsabilité en cas de dommage
personnel ou matériel consécutif. En outre, la responsabilité/garantie sera alors annulée.
• Ce produit n’est pas un jouet. Gardez-le hors de portée des enfants et des animaux domestiques.
• Gardez le produit à l’abri de températures extrêmes, de la lumière du soleil directe, de secousses intenses, d’humidité
élevée, d’eau, de gaz inammables, de vapeurs et de solvants.
• Maniez le produit avec précaution. À la suite de chocs, de coups ou de chutes, même de faible hauteur, l’appareil peut
être endommagé.
• Respecter également les informations concernant la sécurité et le mode d’emploi pour les autres appareils connectés à
cet appareil.
• Tout entretien, ajustement ou réparation ne doit être effectué que par un spécialiste ou un atelier spécialisé.
• Si vous avez encore des questions auxquelles ce mode d‘emploi n‘a pas su répondre, nous vous prions de vous adresser
à notre service technique ou à un expert.
4. Commande
1. Branchez la prise USB type A à un port USB libre de votre ordinateur. Le hub est à présent opérationnel.
2. Pour utiliser le concentrateur comme chargeur, connectez la che micro B sur le port micro USB de votre périphérique.
La
che micro USB n’est pas compatible mécaniquement avec tous les téléphones mobiles.
Le concentrateur fonctionne en mode « Bus-Powered ». Cela signie que le courant de 500 mA fourni via USB
par l’ordinateur est réparti sur les 3 ports USB et le connecteur micro USB. La consommation de courant totale de
tous les appareils raccordés simultanément ne doit jamais être supérieure à cette valeur totale.
Il se peut, dans certains cas, que le fonction de charge ne soit pas assurée avec la cher micro USB, sur tous
les téléphones mobiles présent sur le marché, car certains d’entre eux ont besoin de plus de 500 mA pour le
processus de charge. Un bloc d’alimentation supplémentaire est alors nécessaire.
3. Vous avez également la possibilité d’alimenter le hub USB au moyen d’un adaptateur optionnel. Si vous l’utilisez, chaque
interface peut être chargée avec 500 mA.
Vous pouvez raccorder au concentrateur jusqu’à trois connecteurs USB et un périphérique doté d’un port
micro USB. Le hub supporte les fonctions Plug & Play et hot-swapping (les gestionnaires de périphériques
sont reconnus automatiquement et les périphériques eux-mêmes peuvent être retirés pendant que le système
d’exploitation tourne).
5. Conseils et astuces
• Le concentrateur USB 2.0 est compatible USB 1.1. C´est-à-dire que les appareils classiques USB 1.1 peuvent fonctionner,
sans problèmes, avec le concentrateur USB 2.0, mais le fonctionnement des appareils USB 1.1 n´est pas plus rapide ! Le
concentrateur USB 2.0 peut aussi être utilisé avec une connexion USB 1.1 lorsque votre ordinateur, par ex., ne dispose pas
encore de connexion USB 2.0. Mais il n´est pas possible non plus d´augmenter la vitesse lors du transfert des données.
An de pouvoir exploiter la vitesse élevée (théoriquement 480 Mbits/s, soit 60 MBytes/s), il faut que tous les appareils
doivent supporter USB 2.0, l´appareil USB lui-même (par ex. un graveur de CD externe), le concentrateur et le contrôleur
USB dans l´ordinateur. Mais, en pratique, les 480 Mbits/s ne sont pas atteints. Presque aucun appareil (disque dur, graveur
etc.) n´est en mesure de transmettre aussi rapidement les informations. Il existe également d´autres causes, telles que
le fonctionnement simultané d´autres appareils USB, informations de protocole, qui réduisent la vitesse de transmission.
• Le mode de fonctionnement USB n’est pas possible sous DOS et dans le mode sécurisé de Windows. C´est pourquoi les
claviers et les souris USB ne fonctionnent normalement pas. Peut-être que le BIOS/Setup de votre ordinateur dispose d´un
support correspondant (qui pourrait s´appeler « Legacy USB Support » par exemple). Il est possible cependant que le clavier
ou la souris USB doivent être directement branchés sur la carte mère et non sur un concentrateur USB.
6. Elimination des déchets
Les appareils électroniques sont des matériaux recyclables et ne doivent pas être éliminés avec les ordures
ménagères.
En n de vie, éliminez l’appareil conformément aux dispositions légales en vigueur.
7. Caractéristiques techniques
Tension de service : 5 V/DC (USB)
Connexions : 3 ports USB 2.0 / 1 connecteur micro USB
Norme USB : 2.0 / 1.1
Exigences du système : Windows® 2000 / XP, Vista™, 7 (32 + 64 Bit); Mac OS 10.5.1 et au-dessus
Taux de transfert : jusqu’à 480 Mbit/s
Longueur du câble : 100 mm x 2
Température de service : 0 à +40 ºC
Dimensions (L x H x P) : 65 x 19 x 29 mm
Poids : 22 g
Adaptateur optionnel (non compris)
Tension / courant de sortie : 5 V/DC, 2000 mA
Diamètre de la che : 1,3 mm (intérieur) / 3,5 mm (extérieur)
3+1 poort USB 2.0 hub Versie 11/12
Bestnr. 98 67 48
1. Bedoeld gebruik
Dit apparaat is bedoeld voor het aansluiten van maximaal drie extra USB-apparaten. Daarnaast kunt u een apparaat met
een micro-USB-aansluiting (zoals een Smartphone) aansluiten op de micro-USB-stekker van de hub. Het apparaat is voor de
aansluiting op de computer met USB-interface geschikt. Tijdens het gebruik werkt het als een tweerichtingen herhaling speler,
om de gevraagd signalen op stroomopwaart (computer) en stroomafwaartse (randapparatuur) te herhalen. Het kan gebruikt voor
USB 2.0 en USB 1.1. Om het gebruikt te maken, moet het op computer aan sluiten te worden. Gebruik die USB hub alleen in een
droge kamer. Het product kan worden gevoed door een externe 5 V/DC voedingsbron (niet inbegrepen).
In verband met veiligheid en normering (CE) zijn geen aanpassingen en/of wijzigingen aan dit product toegestaan. Indien het
product voor andere doeleinden wordt gebruikt dan hiervoor beschreven, kan het product worden beschadigd. Bovendien kan bij
verkeerd gebruik een gevaarlijke situatie ontstaan met als gevolg bijvoorbeeld kortsluiting, brand, elektrische schok enzovoort.
Lees de gebruiksaanwijzing volledig door en gooi hem niet weg. Het product mag alleen samen met de gebruiksaanwijzing aan
derden ter beschikking worden gesteld.
2. Leveringsomvang
• USB-hub Gebruiksaanwijzing
3. Veiligheidsinstructies
Lees de gebruiksaanwijzing zorgvuldig door en let vooral op de veiligheidsinstructies. Indien de
veiligheidsinstructies en de aanwijzingen voor een juiste bediening in deze gebruiksaanwijzing niet
worden opgevolgd, kunnen wij niet aansprakelijk worden gesteld voor de daardoor ontstane schade aan
apparatuur of persoonlijk letsel. Bovendien vervalt in dergelijke gevallen de garantie.
• Het apparaat is geen speelgoed. Houd het buiten bereik van kinderen en huisdieren.
• Bescherm het product tegen extreme temperaturen, direct zonlicht, sterke schokken, hoge luchtvochtigheid, vocht,
ontvlambare gassen, dampen en oplosmiddelen.
• Behandel het apparaat met zorg. Schokken, botsingen of zelfs een val van een beperkte hoogte kan het product beschadigen.
• Neem alstublieft ook de veiligheids- en gebruiksaanwijzingen van alle andere apparaten in acht die met het product zijn
verbonden.
• Onderhoud, aanpassingen en reparaties mogen alleen uitgevoerd worden door een expert of in een daartoe bevoegde
winkel.
• Als u nog vragen hebt die niet door deze gebruiksaanwijzingen zijn beantwoord, neem dan contact op met onze technische
dienst of ander technisch personeel.
4. Bediening
1. Sluit de USB type A connector aan op een vrije USB poort van de PC. De verdeler (hub) werkt.
2. Als u de hub als oplader wilt gebruiken, moet u de micro-B-stekker aansluiten op de betreffende micro-USB-aansluiting van
uw apparaat.
De micro-USB-connector is mechanisch niet compatibel met alle mobiele telefoons.
De hub werkt in “Bus Powered Modus”. Dat houdt in dat de door de computer via USB geleverde stroom van
500 mA over de drie USB-aansluitingen en de micro-USB-stekker verdeeld wordt. De totale stroomopname van
alle op een bepaald moment aangesloten apparaten mag deze waarde in geen geval overschrijden.
De laadfunctie kan onder bepaalde omstandigheden niet voor alle zich op de markt bevindende mobiele telefoons
met micro-USB-connector worden gegarandeerd, omdat veel telefoons meer dan 500 mA nodig hebben voor de
laadprocedure. In dit geval is een extra netvoeding nodig.
3. Als alternatief kan de USB-verdeler (hub) via een als optie verkrijgbare netvoeding van spanning worden voorzien. Wordt een
als optie verkrijgbare netvoeding gebruikt, dan kan elke interface met 500 mA worden belast.
U kunt maximaal drie USB-stekkers en een apparaat met een micro-USB-aansluiting op de hub aansluiten. De
verdeler (hub) ondersteunt Plug & Play en verwisselen tijdens bedrijf (hot-swapping). De stuurprogramma’s (device
drivers) worden automatisch herkend en de aangesloten apparaten zelf mogen worden verwijderd terwijl het
besturingssysteem draait.
5. Tips en trucs
• De USB 2.0-hub is compatibel met USB 1.1. Dit betekent dat traditionele USB 1.1-apparaten probleemloos op de USB 2.0-hub
kunnen worden aangesloten en gebruikt. De USB 1.1-apparaten worden hierdoor echter niet sneller! Natuurlijk kan de USB
2.0-hub ook op een USB 1.1-aansluiting worden gebruikt, bijv. wanneer uw pc niet is voorzien van een USB 2.0-aansluiting.
Een snelheidstoename bij de gegevensoverdracht is hier echter eveneens niet mogelijk. Om gebruik te kunnen maken van de
hogere snelheid (theoretisch 480 MBit/s, dus 60 MByte/s), moeten alle apparaten USB 2.0 ondersteunen - het USB-apparaat
zelf (bijv. een externe cd-brander), de USB-hub en de USB-controller in de pc. In de praktijk worden de 480 MBit/s echter niet
bereikt. Nagenoeg geen enkel apparaat (bijv. Vaste schijf, cd-brander) is in staat gegevens zo snel te leveren. Ook andere
factoren (bijv. Gelijktijdig gebruik van andere USB-apparaten, protocolgegevens, enz.) beperken de transmissiesnelheid.
• Onder DOS of in de veilige modus van Windows is geen USB-gebruik mogelijk. USB-toetsenborden en USB-muizen
functioneren daarom gewoonlijk niet. Misschien beschikt de BIOS/set-up van uw PC over de bijbehorende ondersteuning
(kan bijv. “legacy USB-support” worden genoemd). Het kan echter ook zijn dat daarbij het USB-toetsenbord of de USB-muis
rechtstreeks op het moederbord moet zijn aangesloten en niet op een USB-hub.
6. Verwijdering
Elektronische apparaten zijn recyclebare stoffen en horen niet bij het huisvuil.
Als het product niet meer werkt, moet u het volgens de geldende wettelijke bepalingen voor afvalverwerking inleveren.
7. Technische gegevens
Bedrijfsspanning: 5 V/DC (USB)
Aansluitingen: 3 x USB 2.0-aansluitingen / 1 x Micro-USB-stekker
USB-standaard: 2.0 / 1.1
Systeemeisen: Windows® 2000 / XP, Vista™, 7 (32 + 64 Bit); Mac OS 10.5.1 en hoger
Overdrachtsnelheid: tot 480 Mbit/s
Kabellengte: 100 mm x 2
Bedrijfstemperatuur: 0 tot +40 ºC
Afmetingen (B x H x D): 65 x 19 x 29 mm
Gewicht: 22 g
Als optie verkrijgbare netvoeding (niet meegeleverd)
Uitgangsspanning/-stroom: 5 V/DC, 2000 mA
Connectordoorsnede: 1,3 mm (binnen) / 3,5 mm (buiten)
Deze gebruiksaanwijzing is een publicatie van Conrad Electronic SE,
Klaus-Conrad-Straße 1, D-92240 Hirschau/Duitsland.
Alle rechten, vertaling inbegrepen, voorbehouden. Reproducties van welke aard
dan ook, bijvoorbeeld fotokopie, microverlming of de registratie in elektronische
gegevensverwerkingsapparatuur, vereisen de schriftelijke toestemming van de uitgever. Nadruk,
ook van uittreksels, verboden.
Deze gebruiksaanwijzing voldoet aan de technische eisen bij het ter perse gaan.
Wijzigingen in techniek en uitrusting voorbehouden.
© 2012 bei Conrad Electronic SE.
V2_1112_02-KV
Cette notice est une publication de la société Conrad Electronic SE,
Klaus-Conrad-Straße 1, D-92240 Hirschau/Allemagne.
Tous droits réservés, y compris de traduction. Toute reproduction, quelle qu’elle soit (p. ex.
photocopie, microlm, saisie dans des installations de traitement de données) nécessite une
autorisation écrite de l’éditeur. Il est interdit de le réimprimer, même par extraits.
Cette notice est conforme à la réglementation en vigueur lors de l´impression.
Données techniques et conditionnement soumis à modications sans aucun préalable.
© 2012 par Conrad Electronic SE.
V2_1112_02-KV

Other Conrad Switch manuals

Conrad 986131 User manual

Conrad

Conrad 986131 User manual

Conrad 97 38 13 User manual

Conrad

Conrad 97 38 13 User manual

Conrad 97 52 43 User manual

Conrad

Conrad 97 52 43 User manual

Conrad RSLR3 User manual

Conrad

Conrad RSLR3 User manual

Conrad RSLT4 User manual

Conrad

Conrad RSLT4 User manual

Conrad 42 58 46 User manual

Conrad

Conrad 42 58 46 User manual

Conrad 97 51 00 User manual

Conrad

Conrad 97 51 00 User manual

Conrad 98 61 63 User manual

Conrad

Conrad 98 61 63 User manual

Conrad RSLW2 User manual

Conrad

Conrad RSLW2 User manual

Conrad 97 61 93 User manual

Conrad

Conrad 97 61 93 User manual

Conrad X-OVER User manual

Conrad

Conrad X-OVER User manual

Conrad 97 54 21 User manual

Conrad

Conrad 97 54 21 User manual

Conrad 59 54 56 User manual

Conrad

Conrad 59 54 56 User manual

Conrad 97 60 62 User manual

Conrad

Conrad 97 60 62 User manual

Conrad 55 13 18 User manual

Conrad

Conrad 55 13 18 User manual

Conrad 98 62 94 User manual

Conrad

Conrad 98 62 94 User manual

Conrad 97 49 18 User manual

Conrad

Conrad 97 49 18 User manual

Conrad 30 05 18 User manual

Conrad

Conrad 30 05 18 User manual

Conrad 97 51 23 User manual

Conrad

Conrad 97 51 23 User manual

Conrad 97 49 89 User manual

Conrad

Conrad 97 49 89 User manual

Conrad 1007639 User manual

Conrad

Conrad 1007639 User manual

Conrad RSLR2 User manual

Conrad

Conrad RSLR2 User manual

Conrad FS20 ST User manual

Conrad

Conrad FS20 ST User manual

Conrad FS20 AS4-3 User manual

Conrad

Conrad FS20 AS4-3 User manual

Popular Switch manuals by other brands

Gems ELS-1100 Series Instruction bulletin

Gems

Gems ELS-1100 Series Instruction bulletin

ORiNG IPS-2042 Series user manual

ORiNG

ORiNG IPS-2042 Series user manual

Vega VEGAWAVE 63 operating instructions

Vega

Vega VEGAWAVE 63 operating instructions

JVC JX-S333-J instructions

JVC

JVC JX-S333-J instructions

HARTING Ha-VIS eCon 2050-AA Installation notes for electrical personnel

HARTING

HARTING Ha-VIS eCon 2050-AA Installation notes for electrical personnel

Barksdale UNS1000 operating instructions

Barksdale

Barksdale UNS1000 operating instructions

Cisco Nexus 9504 Hardware installation guide

Cisco

Cisco Nexus 9504 Hardware installation guide

VOLKTEK NSH-2926 user manual

VOLKTEK

VOLKTEK NSH-2926 user manual

Dahua DHI-VTNS1001B-2 user manual

Dahua

Dahua DHI-VTNS1001B-2 user manual

Kramer RC-10TBB user manual

Kramer

Kramer RC-10TBB user manual

D-Link xStack DGS-3620-52P manual

D-Link

D-Link xStack DGS-3620-52P manual

Gefen SW-4007 user manual

Gefen

Gefen SW-4007 user manual

Jabra Link 950 USB-A How do

Jabra

Jabra Link 950 USB-A How do

Avocent switchview 100 Quick installation guide

Avocent

Avocent switchview 100 Quick installation guide

NETGEAR GS408EPP installation guide

NETGEAR

NETGEAR GS408EPP installation guide

Linksys SFE2000 Product data

Linksys

Linksys SFE2000 Product data

MTT MS3744 user manual

MTT

MTT MS3744 user manual

J-Tech Digital JTECH-4KPIP0401 operating instructions

J-Tech Digital

J-Tech Digital JTECH-4KPIP0401 operating instructions

manuals.online logo
manuals.online logoBrands
  • About & Mission
  • Contact us
  • Privacy Policy
  • Terms and Conditions

Copyright 2025 Manuals.Online. All Rights Reserved.