manuals.online logo
Brands
  1. Home
  2. •
  3. Brands
  4. •
  5. Contec
  6. •
  7. Bicycle Accessories
  8. •
  9. Contec DLUX micro power 80 User manual

Contec DLUX micro power 80 User manual

Instruction manual bike
LED battery light set
DLUX micro power 80
DLUX micro power 120
Scope of delivery
Assembly / disassembly Operation
Alignment
Proper use
The product is intended for use on bicycles with pedal assistance and serves the illumination of the road.
This LED front light is approved according to the currently valid RTLR (StVZO). The product is intended for
outdoor use.
Safety instructions
- Do not look into the light.
- Do not point the light directly at people or animals.
- The light beam of the LED front light must point straight in direction and may not blind other road users.
- The light distribution may be obscured by no other attached parts or pieces of luggage, not even partially.
- The LEDs are not interchangeable. If the LED fails, the entire luminaire must be replaced.
WARNING! LIFE AND ACCIDENT HAZARD FOR INFANTS AND CHILDREN!
Never leave children unattended with the packaging material, because of suffocation danger by
swallowing packaging parts. Always keep the device away from children. The device is not a toy! This
device can be used by children of age 8 and over and by persons with reduced physical or mental
capabilities or lack of experience and knowledge if they have been supervised or instructed concerning
the safe use of the device and by understanding resulting hazards. Children are not allowed to play with
the device. Cleaning and user maintenance should not be carried out by children without supervision.
Do not disassemble the device. Improper repairs can cause significant risks for the user. Only have
repairing made by qualified personnel.
•battery front light with
lamp head (changeable)
adapter cable USB-C to USB-A adapter cable micro USB to USB-A
•handlebar bracket
•insert for Ø 25-30mm
•insert for Ø 30-35mm
•battery rear light
•mounting clip
•rubber straps
Manual_DLUX micro power 80/120
General notes
Switch on/off
Assembly Disassembly
Centering Inclination
USB-C socket
100 %
Battery status
75 %
50 %
25 %
Handlebar bracket
Preparation: select suitable insert (Ø 25-30mm or Ø 30-35mm) on
the basis of the given handlebar size and insert into the
handlebar clamp
Place clamp around handlebar and hook in grip nut Tighten the
handle nut
Front Light
1.
1.
2.
2.
1. Put on the front headlight on rear edge of bracket
2. Press down until the front headlight engages in
the clamp bracket
1. Press release button on underside and
remove front headlamp (2.)
The status displays go out automatically after 10 seconds and are
reactivated the next time the key is pressed.
To switch on and off, press and hold the button for 2 seconds each time.
Brightness levels
The front headlight has 4 selectable brightness level. The activation of the next brighter
level is achieved by a short push of the button. The highest brightness level is followed
by the lowest brightness level again.
Display battery status / brightness levels
4
3
2
1
Brightness levels
Version
Level 1
Level 2
Level 3Level 4
80Lux
20 Lux 40 Lux 60 Lux 80 Lux
120Lux
20 Lux 40 Lux 80 Lux
120 Lux
Powerbank function
The front headlight can be used to charge mobile USB devices.
Charging starts automatically as soon as a USB device is plugged into
the USB-C socket. The function is not available in low battery mode.
Low battery mode
From a remaining battery capacity of 4%, the front headlight limits the brightness to level 1. The
lowest LED of the battery status indicator flashes red.
Temperature monitoring
If the lamp head overheats, the front light limits the brightness to level 1 until the normal operating
temperature is reached again.
Charging
The internal battery of the front headlight is charged via a USB voltage
source. The supplied adapter cable is plugged into the USB-C socket.
The current state of charge is displayed during charging.
Attention!
Check regularly the correct setting of your front light.
Align the LED front light so that the light beam reaches the road approx. 10 meters in front of the wheel (see ill.). The
light beam of the LED front light must point straight in direction from 400 up to 1200mm.
Dispose of packaging and devices in an environmentally friendly way!
Warranty conditions
Dear Customer, You will receive a 2-year warranty on this device from the date of purchase. In
the event of defects in this product, you have legal rights against the seller of the product. These
legal rights are not limited by the warranty below.
Guarantee conditions
The warranty period begins with the date of purchase. Please keep the original receipt. This
document is required as a proof of purchase. If a defect in material or workmanship occurs within
2 years from the date of purchase of this product, the product will be repaired or replaced by us at
our discretion free of charge. This warranty requires that within the 2-year period, the defective
device and the proof of purchase (receipt) presented and briefly described in writing, what the
defect is and when it occurred. If the defect is covered by our warranty, you will receive the
repaired or a new product back. Repair or replacement of the product does not commence a new
warranty period. The guarantee time is not extended by the guarantee. This also applies to
replaced and repaired parts. Any damage and defects already existing at the time of purchase
must be reported immediately after unpacking. After the warranty period incurred repairs are
chargeable.
Warranty scope
The device has been carefully produced according to strict quality guidelines and METI-culously
checked before delivery. The warranty applies to material or manufacturing defects. This warranty
does not cover product parts that are subject to normal wear and tear and can be considered as
wearing parts or for damage to fragile components, such as switches, batteries or part made of
glass. This warranty is void if the product has been damaged, improperly used or serviced. For
proper use of the product, all instructions given in the operating instructions must be exactly
followed. Uses and actions that are advised against or warned against in the operating
instructions are to be absolutely avoided. The product is intended for private and non-commercial
use only. Abusive and improper handling, use of force and internal tampering not carried out by
our authorized service branch, the warranty will be void. If malfunctions or other defects occur,
please first contact the service department.
Cleaning
Clean the device only with a slightly damp, lint-free cloth. Never completely immerse the device
under water. Do not use any corrosive or abrasive cleaners. This causes damage to the device.
In the interest of environmental protection, when your product has
reached the end of its life, do not dispose of it in the household
waste but to a professional disposal. You can find out about
collective places and their opening times by your responsible
management.
Product features
Model:
DLUX micro power 80/120
Luminosity:
80 / 120 Lux
SERVICE + SUPPLIER
Hermann Hartje KG
Deichstr. 120-122
27318 Hoya
Tel.: 04251/811-0
www.contec-parts.com
[email protected]
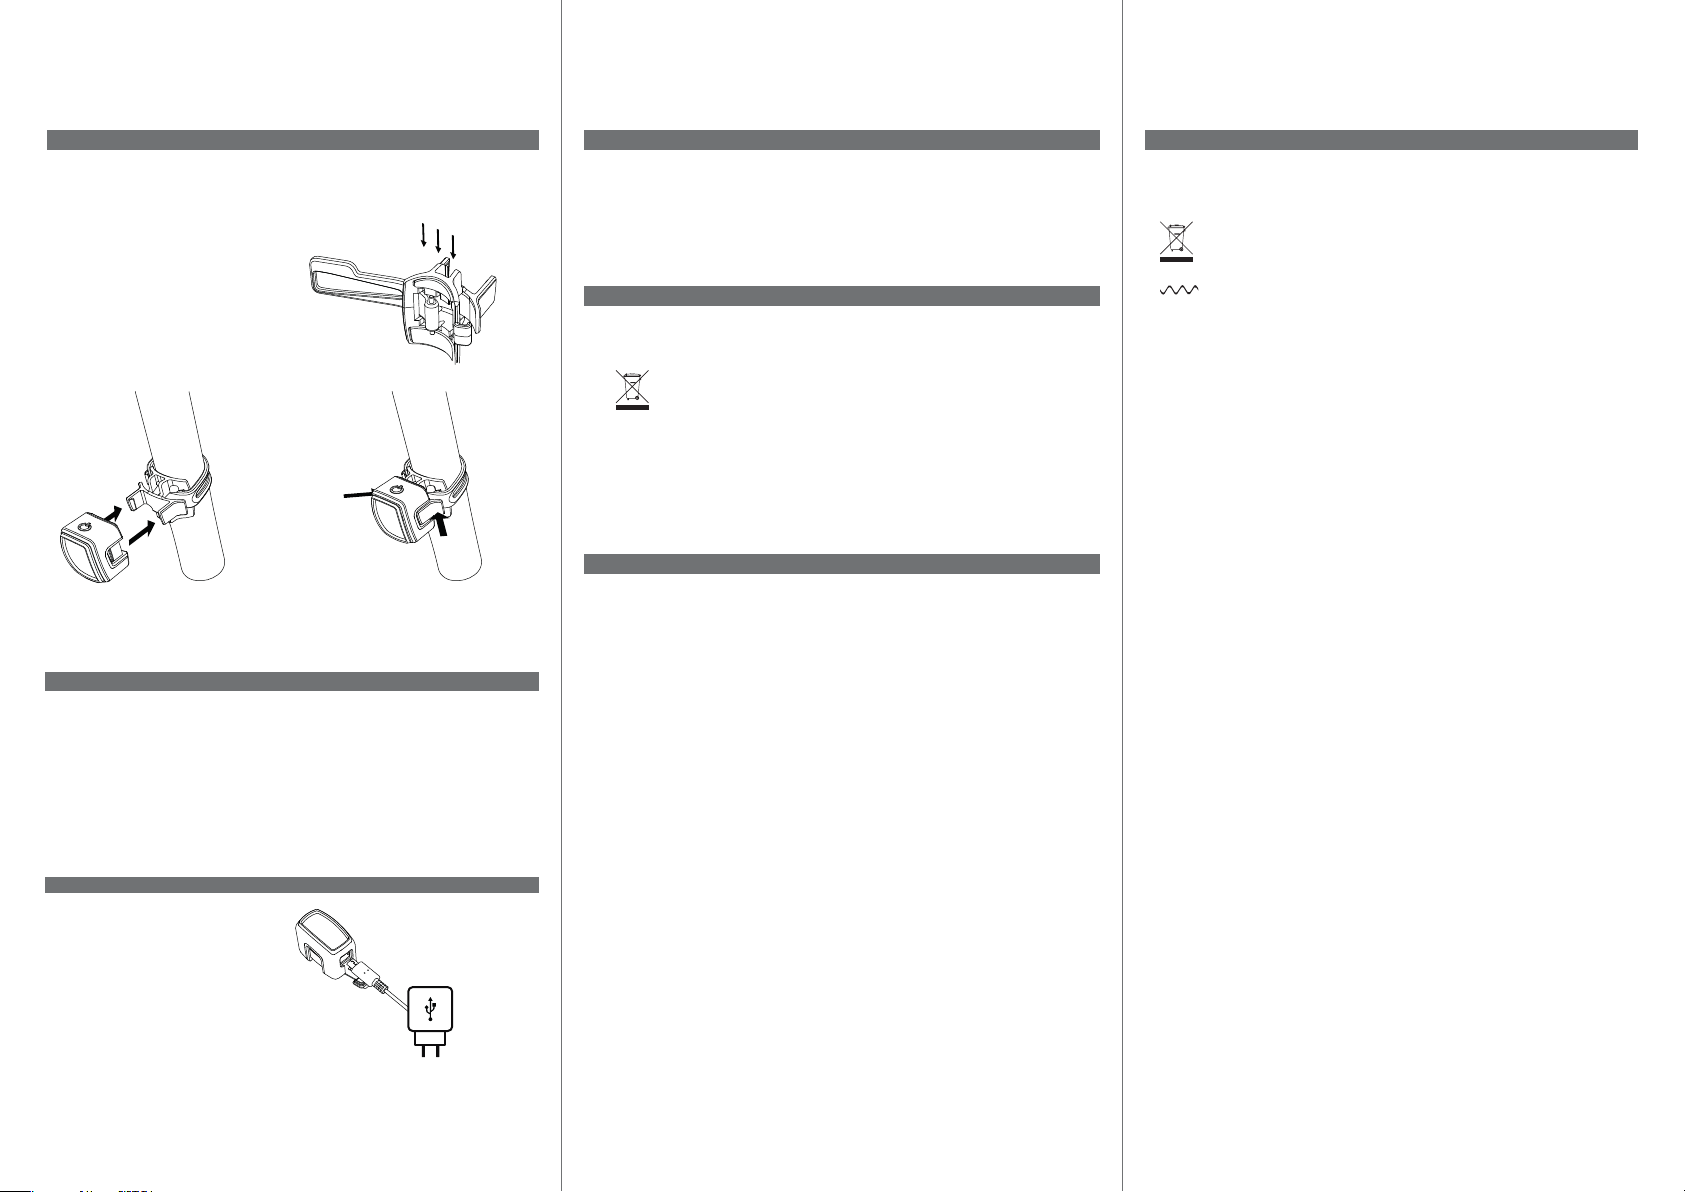
Rear light assembly / disassembly
Mounting clip
Setting up: on the basis of the given saddle
tube diameter, select one of the three positions
on the mounting clip and insert the rubber
strap. Place the fastening clip on the seat tube
and place the strap in the hook on tension.
Rear light
assembly disassembly
Slide the rear light onto the mounting clip until the
rear light clicks into place.
Activate the release lever on both sides
(simultaneously) and remove the rear light.
Øsmal
l
Ømedium
Ølarge
Operation
Cleaning
Switch on/off
To switch on or off, shortly press the power button.
Low battery warning
From a remaining battery capacity of 4%, a separate LED lights up in the light-
emitting light emission surface of the rear light.
Charging
The internal battery of the rear light is charged by
a USB voltage source. The supplied adapter cable
is plugged into the micro-USB socket on the
bottom of the rear light.
Dispose
Guarantee
Test mark of the Federal Motor Transport Authority (K with
the following approval number).
Used symbols
Symbol for the detection of electrical and electronic devices.

This manual suits for next models

1

Other Contec Bicycle Accessories manuals

Contec C-900 User manual

Contec

Contec C-900 User manual

Contec Luna 80 N+ User manual

Contec

Contec Luna 80 N+ User manual

Contec DLUX 30 E+ User manual

Contec

Contec DLUX 30 E+ User manual

Contec 24sevenGold User manual

Contec

Contec 24sevenGold User manual

Contec Luna 40 E+ User manual

Contec

Contec Luna 40 E+ User manual

Contec SP-060 Installation and operation manual

Contec

Contec SP-060 Installation and operation manual

Contec 24sevenStop User manual

Contec

Contec 24sevenStop User manual

Contec DLUX 80 N++ User manual

Contec

Contec DLUX 80 N++ User manual

Contec Nara DropAir DLX User manual

Contec

Contec Nara DropAir DLX User manual

Contec DLUX 30 N++ User manual

Contec

Contec DLUX 30 N++ User manual

Contec Luna 40 N+ User manual

Contec

Contec Luna 40 N+ User manual

Contec C-500 User manual

Contec

Contec C-500 User manual

Contec Luna 120 E+ User manual

Contec

Contec Luna 120 E+ User manual

Contec C-500 User manual

Contec

Contec C-500 User manual

Contec 800 User manual

Contec

Contec 800 User manual

Contec TL-328 E-Stop User manual

Contec

Contec TL-328 E-Stop User manual

Contec DLUX micro 40 User manual

Contec

Contec DLUX micro 40 User manual

Contec Nara Air Link+ User manual

Contec

Contec Nara Air Link+ User manual

Contec C-800 User manual

Contec

Contec C-800 User manual

Contec DLUX micro XS User manual

Contec

Contec DLUX micro XS User manual

Contec C-1200 User manual

Contec

Contec C-1200 User manual

Contec Dynamo CTL-335 E User manual

Contec

Contec Dynamo CTL-335 E User manual

Contec Luna 80 E+ User manual

Contec

Contec Luna 80 E+ User manual

Popular Bicycle Accessories manuals by other brands

DIEFFE BIKEY COOL How to assemble

DIEFFE

DIEFFE BIKEY COOL How to assemble

Crivit SP - 33 owner's manual

Crivit

Crivit SP - 33 owner's manual

Derby cycle BionX user manual

Derby cycle

Derby cycle BionX user manual

Garmin Edge 810 owner's manual

Garmin

Garmin Edge 810 owner's manual

Dynastream Innovations BKM3 manual

Dynastream Innovations

Dynastream Innovations BKM3 manual

DT SWISS 370 Technical manual

DT SWISS

DT SWISS 370 Technical manual

Specialized Transition Carbon-All Models Instruction guide

Specialized

Specialized Transition Carbon-All Models Instruction guide

Sigma ROX 5.0 user guide

Sigma

Sigma ROX 5.0 user guide

King-Meter J-LCD manual

King-Meter

King-Meter J-LCD manual

Shimano NEXUS SG-7C26 Technical service instruction

Shimano

Shimano NEXUS SG-7C26 Technical service instruction

Rose electronics RACE ATTACK RA-1 owner's manual

Rose electronics

Rose electronics RACE ATTACK RA-1 owner's manual

Mcfk Stem quick start guide

Mcfk

Mcfk Stem quick start guide

Derby cycle BionX user manual

Derby cycle

Derby cycle BionX user manual

Ivation BIKE BEACON IVA-SC88T SERIES user manual

Ivation

Ivation BIKE BEACON IVA-SC88T SERIES user manual

Ceramicspeed OSPW X Mounting & Maintenance

Ceramicspeed

Ceramicspeed OSPW X Mounting & Maintenance

Crivit SP - 33 owner's manual

Crivit

Crivit SP - 33 owner's manual

UNLEAZHED UNSPLASH M01 Assembly instructions

UNLEAZHED

UNLEAZHED UNSPLASH M01 Assembly instructions

Tune Schwarzes Stuck manual

Tune

Tune Schwarzes Stuck manual

manuals.online logo
manuals.online logoBrands
  • About & Mission
  • Contact us
  • Privacy Policy
  • Terms and Conditions

Copyright 2025 Manuals.Online. All Rights Reserved.