manuals.online logo
Brands
  1. Home
  2. •
  3. Brands
  4. •
  5. Contec
  6. •
  7. Bicycle Accessories
  8. •
  9. Contec Nara DropAir DLX User manual

Contec Nara DropAir DLX User manual

User manual for CONTEC dropper post
„Nara DropAir DLX“ and„Nara Drop“
ABOUT USER MANUAL:
• Read and follow the instructions.
• Keep the instructions.
• Read and follow the safety instructions.
SAFETY INSTRUCTIONS
Risk of injury through improper assembly!
• Do not assemble the seat post yourself. Do not change defective parts
yourself.
• Have assembly / repairs carried out by a bicycle mechanic only.
Serious injuries from dismantling pressurized parts!
The seat post is high lled.
• Do not disassemble the seat post .
• Do not unscrew the upper protective cap of the seat post.
• Make sure that the protective cap is always rmly tightened.
Risk of accident from improperly attached accessories!
It could impair the function, lead to functional loss and lead to riders falls,
accidents and injuries.
• Do not mount clamps, saddlebags, luggage racks, mudguards or similar items
to the seat post.
DELIVERY CONTENTS
ADropper post DBarrel nut
BCable EM4 Flat screw
CRemote lever
TOOLS REQUIRED:
Allen key 2/3/4/5 mm
Cable cutter Tape
ASSEMBLY:
WARNING!
Serious injuries might caused by improper assembled seat post.
• Do not assemble the seat post yourself.
• Comply with the specications of the bicycle frame manufacturer.
• Never exceed the permitted tightening torques.
Before assembly
The seat post is only designed for the following inside diameter of the seat tube:
30.9; 31.6; 34.9 (mm)
The diameter is indicated on the product with laser engraving.
• Make sure that the seat post is the correct size.
1 - Prepare the bike frame
• Make sure that the inside diameter of the seat tube matches exactly the installation
dimensions of the seat post (see technical data).
• Clean the inside wall of the seat tube. If possible, remove any burrs from the edges
of the seat tube.
• Metal seat tubes (aluminum, steel): use suitable assembly grease.
• Carbon seat tubes: use a suitable assembly paste.
2 − Remote lever installation
• Mount the Remote lever (C) on the left side of the handlebar
• Tighten the lever with an Allen key (4 mm). (Max 3 Nm)
3-1 − Cable installation for RM04 / RM06A / RM07A
• Push the cable (B) through the threaded hole outside of the lever until to the end.
The cable nipple should be xed in the threaded hole on lever (C).
• Lay the outer cable through the frame without kinks.
• Slightly loosen the barrel adjuster (D.1) and the M4 at screw (E.1).
• Insert the open side of the inner cable through the barrel nut. Correct position:
12 mm distance from the end of cable housing (B) to the center of the at
screw(E.1).
• Tighten the screw until the cable is rmly clamped.
• Cut o the excess length of the inner cable.
ASSEMBLY STEPS
• Attach the barrel nut (1 to 2) into the slotted opening of the actuator lever.
• Pull the cable (3) down.
• Pull the outer cable down so far that the cable can slide into the actuator lever
(4 to 5).
3-2 − Assemble instruction for RM04 / RM06B / RM07B
• Slide the cable (B) through the open side of the barrel nut (D.2) to the end.
The nipple of the cable should be xed in the barrel nut (D.2).
• Attache the barrel nut (D.2) into the slotted opening of the actuator lever.
• Pull the cable (B) down.
• Pull the cable down so far that the cable can slide into the actuator lever (6 to 10).
• Lay the outer cable through the frame without kinks.
• Slightly loosen the at screw on the remote lever (C).
• Feed the cable through the lever‘s barrel adjuster until the end of the outer cable
seat in the lever.
• Tighten the at screw until the cable is rmly clamped.
• Cut o the excess length of the inner cable.
• Put the end cap on the cable end and tighten it lightly.
ASSEMBLY STEPS
C
Max 3 Nm B
12 mm
E.1
D.1
B
C
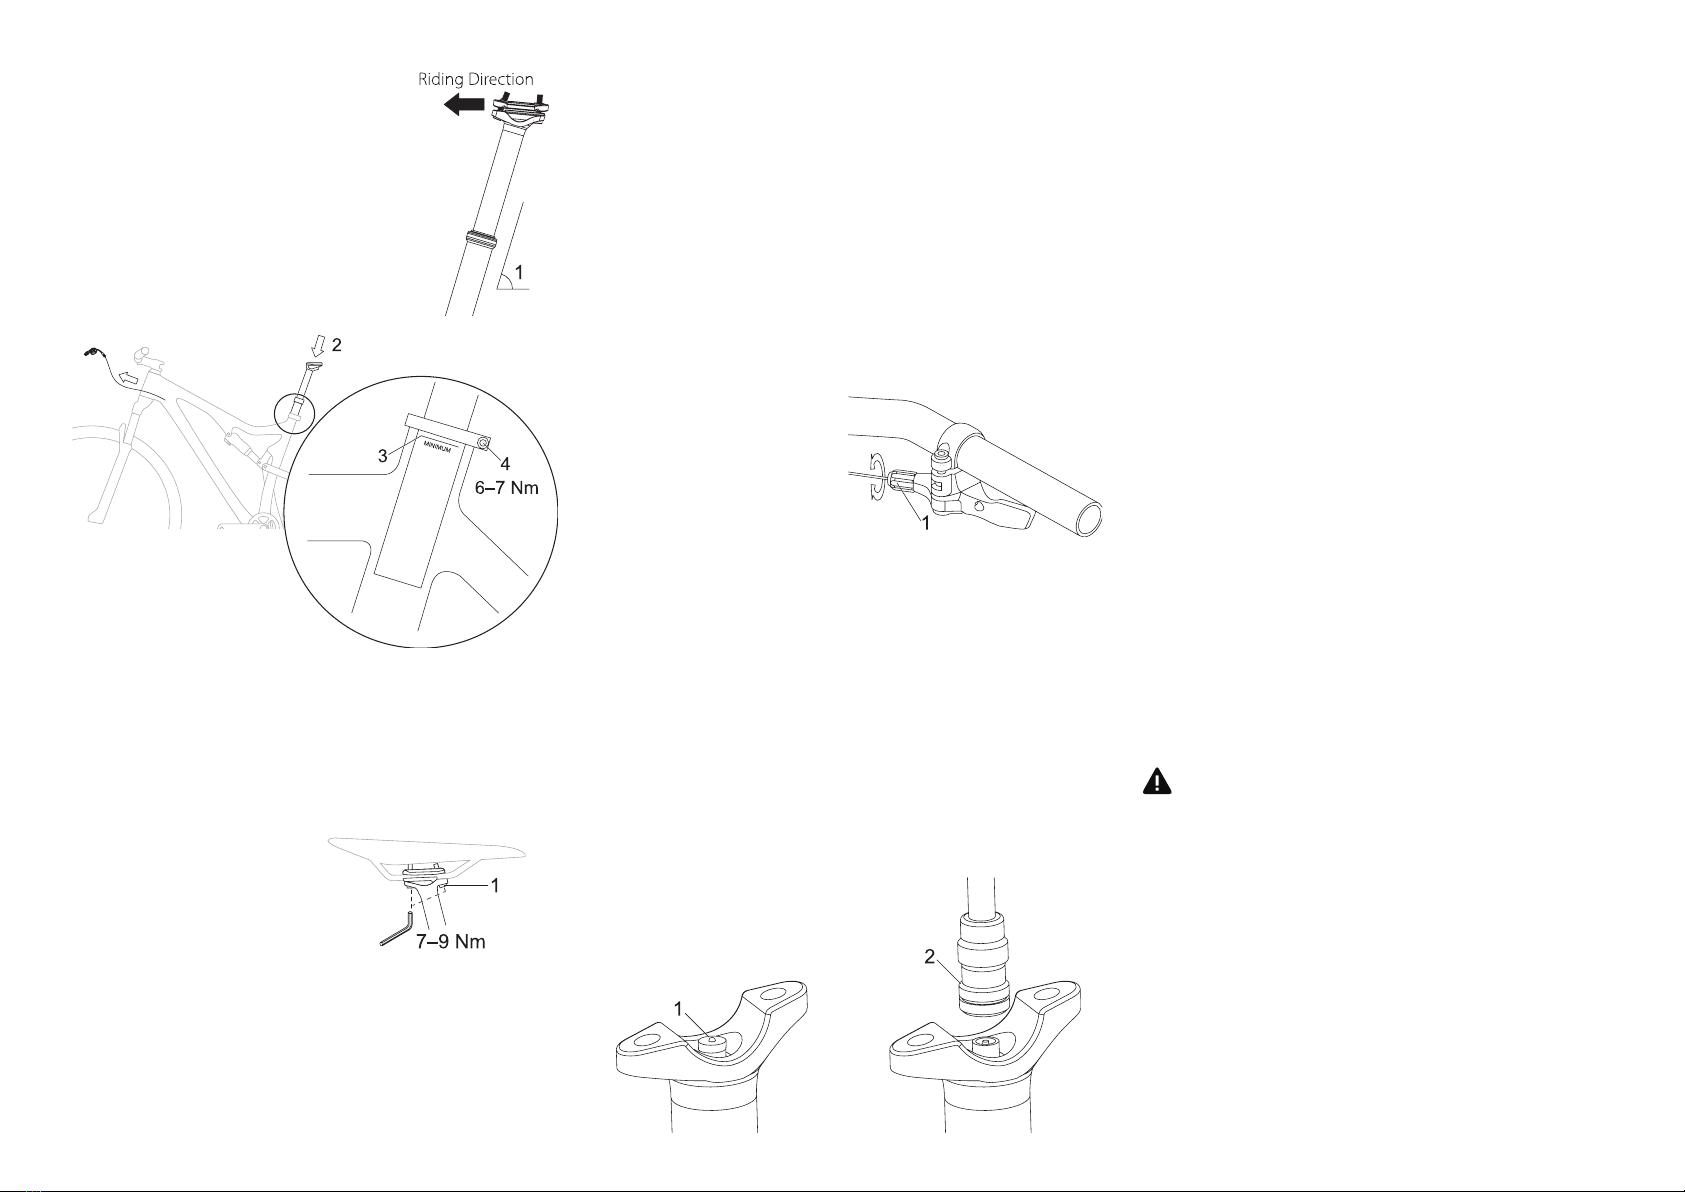
4 − ASSEMBLE SEAT POST
The seat post is designed for a seat angle (1)
from 70 ° to 73 °.
• Insert the seat post (2) into the seat tube until the
minimum insertion line (3) is covered by the seat tube.
Beware of the riding direction.
• Tighten the clamp screw (4). Adhere to the tightening torque.
Use a torque wrench if possible.
5 - Mount the saddle
• Loosen both clamp screws (1) until the gap between
the clamp plates is large enough to insert the saddle rails.
• Install the saddle in the clamp,
adjust it centered with the bike frame
and tighten both clamp screws with
an Allen key (5 mm).
6 - Align the saddle
• Loosen both clamping screws (1).
• Align the saddle.
• Tighten the clamp screws seperately.
ADJUSTMENT AND OPERATION
Adjust the saddle height
Lower the saddle
• Press the remote lever and put strongly on the saddle
(with your hand or by sitting on it).
• Release the remote lever when the desire saddle height is reached.
Raise the saddle
• Press the remote lever to raise the saddle.
• Release the remote lever when the desire saddle height is reached.
If you have problems by saddle raising:
• Make sure that the cable is correctly tightened.
• Possibly. Readjust the cable with the lever adjuster
(1) on the remote control.
• Reduce sensitivity: turn clockwise.
• Increase sensitivity: turn counterclockwise.
Set air pressure
(only for models with adjustable air valve)
Required tools:
- Allen key
- High pressure air pump
• Do not use a common traded bicycle pump for adjustment.
• Press the operating lever on the remote control until the seat post is fully
extended and release.
• Disassemble the saddle. by loosen the clamping screws and remove the saddle
from the clamp (see gure of“5 - Assemble the saddle”).
• Remove the dust cap (1) from the valve.
• Connect the air pump (2). Follow the instructions of the air pump.
• Set the desired pressure. Do not exceed the maximum pressure (350 psi).
- Recommended operating pressure: 140 to 300 psi, depending on the weight
of the rider (50 kg to 130 kg).
• Remove the air pump (2) and close the valve with the dust cap (1).
• Mount the saddle: see “5 - Mount the saddle”
WARNING
ATTENTION! Seat post damage due to improper maintenance.
• Have maintenance only be carried out by a bicycle mechanic .
• Have the seat post be maintained regularly, depending on the frequency and
conditions of use. More maintenance is required by wet and very dusty conditions.
• If the functionality is obviously reduced: Have a maintenance by bicycle mechanic
as soon as possible.
• Check defective parts (control lever, cable, screws, barrel nut) and have a bicycle
mechanic replace them if necessary.
CLEANING, LUBRICATION
• Clean and lubricate the seat post at least once every 6 months. Remove dirt and
dust from the top tube.
• Use only suitable grease for lubrication.
ATTENTION! Corrosion and material damage from water penetrating into the seals.
• Do not use a high pressure water jet or steam jet.
• Be careful by cleaning with a water pipe.
• Only use a damp cloth and a little warm water for cleaning.
TRANSPORT AND STORAGE
• Do not transport the bicycle with a mounted seat post on a bicycle carrier in
which the bicycle is xed to the saddle or the seat post.
• Do not hang the bike with a dropper post directly on the saddle.
• For longer storage time, store the seat post in an upright position.
BEFORE THE FIRST USE
The seal on the seat post may be still on it and prevent the seat post from moving
vertically.
• Press the seat post down rmly by giving pressure on the saddle to active the
seat post mobility.
By the rst time use, some grease may leak out from the seal.
BEFORE RIDING
Warning! Serious injuries by falling!
• Make sure that the seat post and seat tube are correctly mounted and
cannot be twisted.
• Make sure that all screws on the seat clamp and on the seat post clamp
are properly tightened.
• Make sure that the seat post is working properly.
• Make sure and check more times that, the seat post is tight and there are
no traces of oil or mechanical damage on the screws, tube and seals.
• Never ride with the seat post if any damage can be seen, any unusual noises
occur or if there are any doubts about its safety. Have the seat post be checked
in a specialist workshop.

This manual suits for next models

1

Other Contec Bicycle Accessories manuals

Contec DLUX 30 E+ User manual

Contec

Contec DLUX 30 E+ User manual

Contec TL-328 E-Stop User manual

Contec

Contec TL-328 E-Stop User manual

Contec Luna 80 N+ User manual

Contec

Contec Luna 80 N+ User manual

Contec C-500 User manual

Contec

Contec C-500 User manual

Contec DLUX 80 N++ User manual

Contec

Contec DLUX 80 N++ User manual

Contec Luna 120 E+ User manual

Contec

Contec Luna 120 E+ User manual

Contec 24sevenStop User manual

Contec

Contec 24sevenStop User manual

Contec C-800 User manual

Contec

Contec C-800 User manual

Contec DLUX micro XS User manual

Contec

Contec DLUX micro XS User manual

Contec Luna 80 E+ User manual

Contec

Contec Luna 80 E+ User manual

Contec 800 User manual

Contec

Contec 800 User manual

Contec C-500 User manual

Contec

Contec C-500 User manual

Contec SP-060 Installation and operation manual

Contec

Contec SP-060 Installation and operation manual

Contec Nara Air Link+ User manual

Contec

Contec Nara Air Link+ User manual

Contec DLUX micro 40 User manual

Contec

Contec DLUX micro 40 User manual

Contec DLUX 30 N++ User manual

Contec

Contec DLUX 30 N++ User manual

Contec Dynamo CTL-335 E User manual

Contec

Contec Dynamo CTL-335 E User manual

Contec Luna 40 N+ User manual

Contec

Contec Luna 40 N+ User manual

Contec 24sevenGold User manual

Contec

Contec 24sevenGold User manual

Contec DLUX micro power 80 User manual

Contec

Contec DLUX micro power 80 User manual

Contec Luna 40 E+ User manual

Contec

Contec Luna 40 E+ User manual

Contec C-1200 User manual

Contec

Contec C-1200 User manual

Contec C-900 User manual

Contec

Contec C-900 User manual

Popular Bicycle Accessories manuals by other brands

Ascent 4LW manual

Ascent

Ascent 4LW manual

Saris Bones EX 803 Assembly instructions

Saris

Saris Bones EX 803 Assembly instructions

Coaster VENTURE owner's manual

Coaster

Coaster VENTURE owner's manual

Powerfix Profi 96689 Instructions for use

Powerfix Profi

Powerfix Profi 96689 Instructions for use

Beast Road bar instruction manual

Beast

Beast Road bar instruction manual

PACIFIC CYCLE Part instruction manual

PACIFIC CYCLE

PACIFIC CYCLE Part instruction manual

SRAM eTap AXS HRD Bleed manual

SRAM

SRAM eTap AXS HRD Bleed manual

Condor UBL-8000 Urban User instruction manual

Condor

Condor UBL-8000 Urban User instruction manual

Cateye Padrone Smart + CC-SC100B Start guide

Cateye

Cateye Padrone Smart + CC-SC100B Start guide

Bosch Kiox BUI330 Original operating instructions

Bosch

Bosch Kiox BUI330 Original operating instructions

Cateye HL-330 instructions

Cateye

Cateye HL-330 instructions

Shimano E6100 user guide

Shimano

Shimano E6100 user guide

Asaklitt 31-9474 instruction manual

Asaklitt

Asaklitt 31-9474 instruction manual

Babboe HWWX-4481 instruction manual

Babboe

Babboe HWWX-4481 instruction manual

Bosch Nyon operating instructions

Bosch

Bosch Nyon operating instructions

Aim Solo 2 installation guide

Aim

Aim Solo 2 installation guide

Cateye TL-LD170-R manual

Cateye

Cateye TL-LD170-R manual

Thule Yepp 2 Mini instructions

Thule

Thule Yepp 2 Mini instructions

manuals.online logo
manuals.online logoBrands
  • About & Mission
  • Contact us
  • Privacy Policy
  • Terms and Conditions

Copyright 2025 Manuals.Online. All Rights Reserved.