Crane ANS-16-035 User manual

ID: #07177
m
y
h
a
n
s
e
c
o
n
t
r
o
l
.
c
o
m
C
E
R
T
I
F
I
E
D
User-friendly
Manual
User Manual
Manual del usuario
English........06
Español ...... 25
MINI STEPPER WITH
RESISTANCE BANDS
MINI ESCALADORA CON BANDAS
DE RESISTENCIA
ZUR FREIGABE V7

Dok./Rev.-Nr. 94298_20160818
Contents
Overview .............................................................................3
Use........................................................................................4
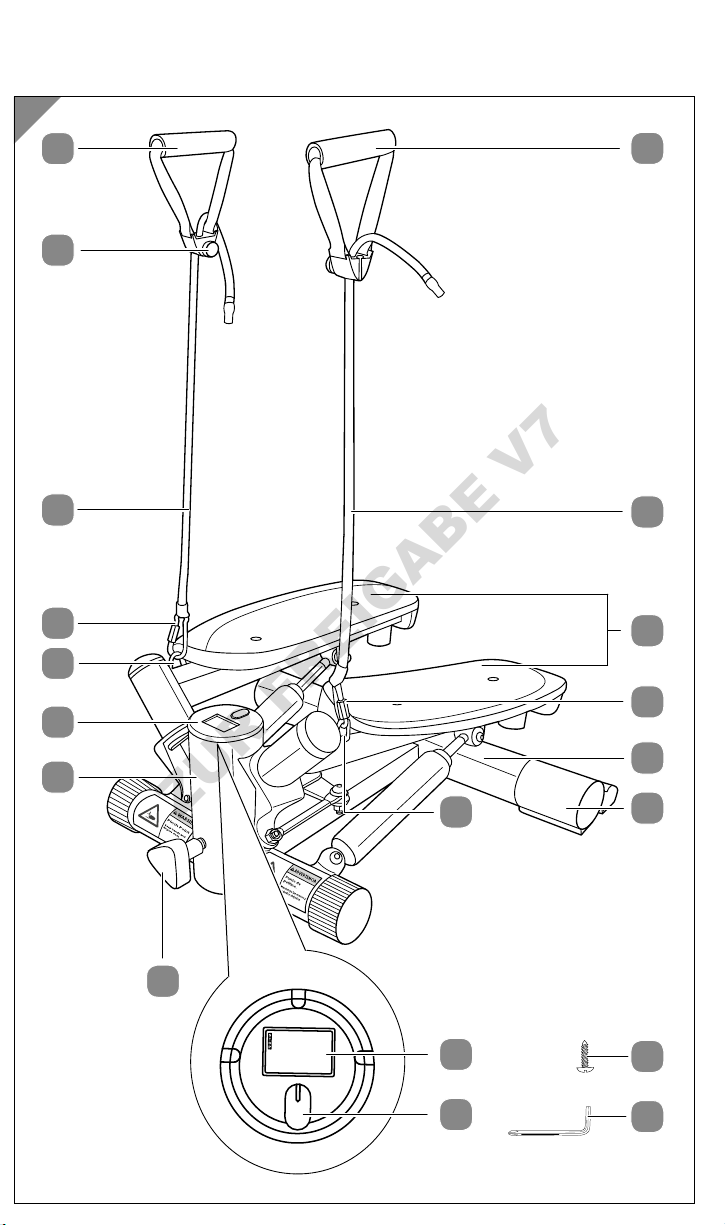
Pack contents/device parts ................................................6
General information............................................................7
Reading and storing the user manual ..................................7
Explanation of symbols ...........................................................7
Safety...................................................................................8
Proper use................................................................................. 8
Safety instructions................................................................... 8
Checking the stepper and pack contents .........................11
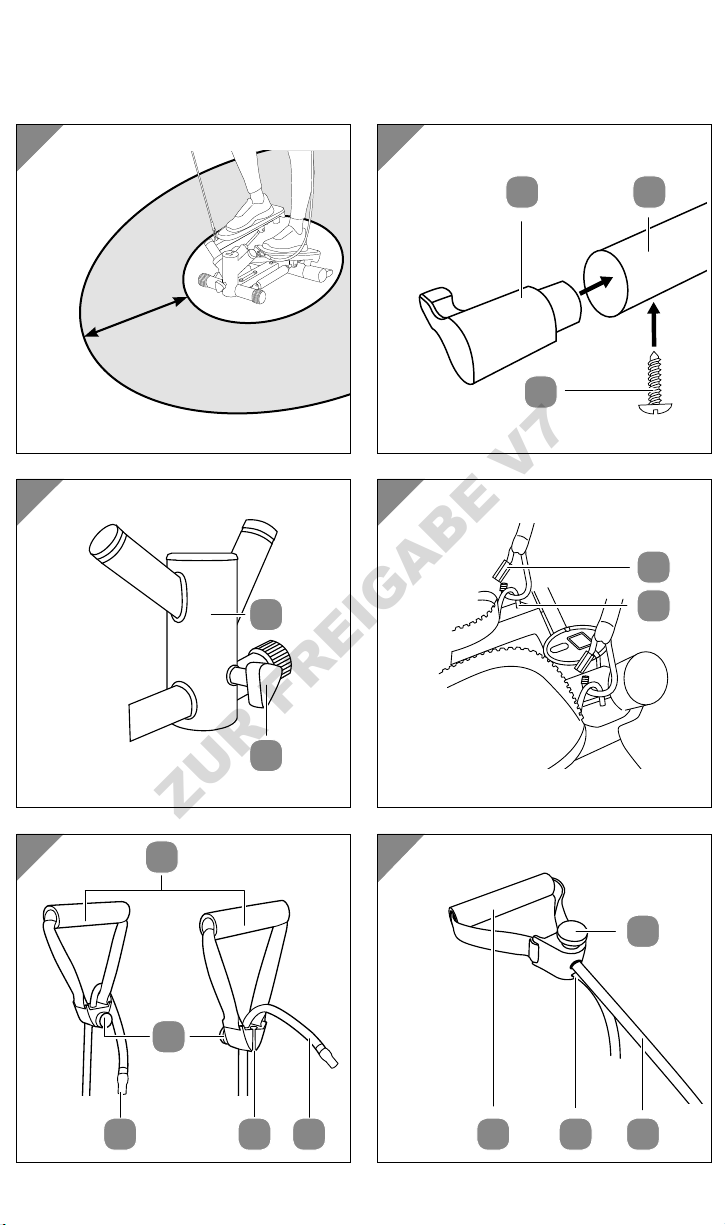
Assembly ............................................................................11
Workout preparation .........................................................11
Attaching the carabiner clip ..................................................11
Setting the step height .......................................................... 12
Adjusting the resistance band ............................................. 12
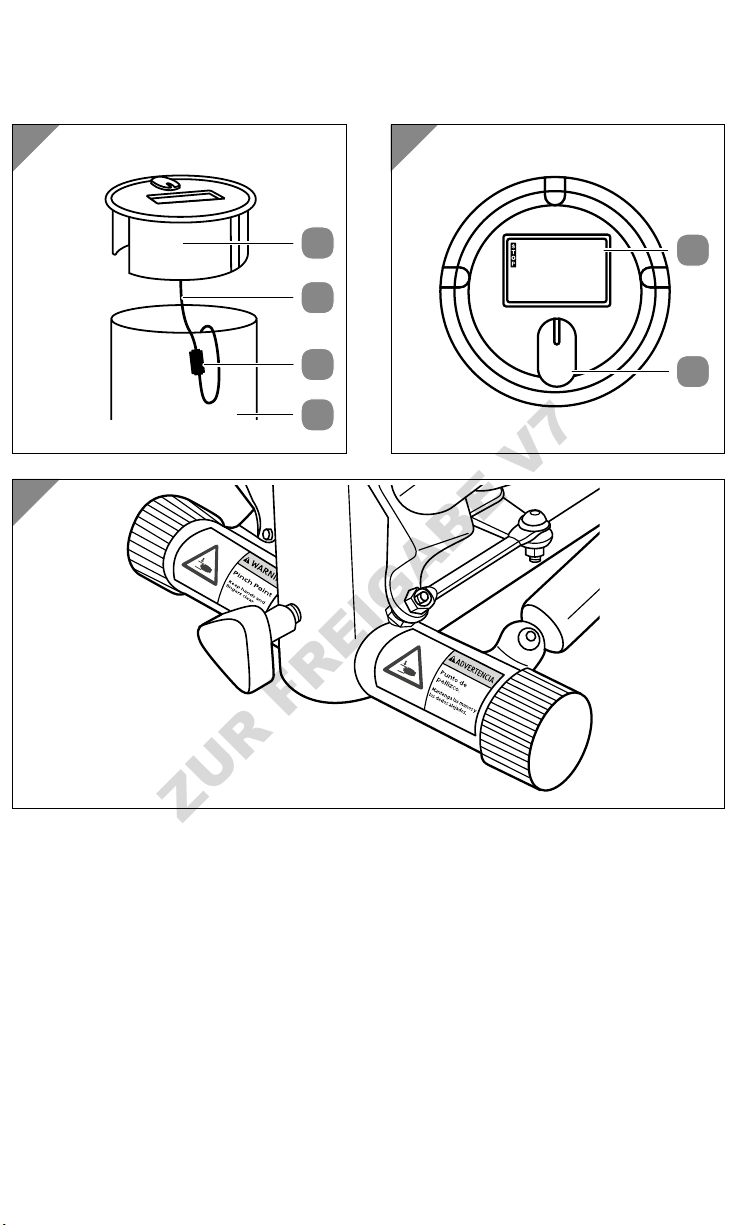
Using the computer............................................................12
Inserting and changing the battery.................................... 12
Switching the computer on and off..................................... 12
Display: Display options ......................................................... 13
Setting the workout goals..................................................... 13
Resetting the display ............................................................. 14
Workout ............................................................................. 14
Getting on the stepper...........................................................16
Getting off the stepper...........................................................16
Holding the resistance band ................................................ 16
Exercise without a resistance band..................................... 17
Exercises with a resistance band ......................................... 17
Cleaning, maintenance and storage................................ 19
Technical data ...................................................................20
Disposal...............................................................................21
Disposing of the packaging .................................................. 21
Disposing of the stepper........................................................ 21
Equipment parts list.......................................................... 22
ZUR FREIGABE V7

A
3
C
1
3
6
2
5
11
4
12
13
14
0:00
0
TMR
MODEPUSH
AND
HOLD TO
RESE T
10
9
2
7
8
4
11
1
15
ZUR FREIGABE V7

4
G
ED
B
min. 0,6 m
B
C
C
F
11
4
6
7
12
2 1 2
13
15
15
5
16 162
1
ZUR FREIGABE V7

5
H I
0:00
0
TMR
MODEPUSH
AND
HOLD TO
RESET
17
18 9
10
14
13
J
ZUR FREIGABE V7

6
Pack contents⁄device parts
1Handle, 2×
2Resistance band, 2×
3Pedal, 2×
4Carabiner clip, 2×
5Frame tube
6Plastic foot (with bearing surface), 2×
7Philips-head screw, 2×
8Philips-head screwdriver
9Mode button
10 Display
11 Loop, 2×
12 Adjustment screw
13 Housing
14 Computer
15 Screw (resistance band), 2×
16 Recess
17 Cable
18 Plug
The pack contents include one type AAA/LR3 1.5V
battery.
ZUR FREIGABE V7

General information
7
General information
Reading and storing the user manual
This user manual accompanies this mini stepper with resistance
bands (referred to below only as the “stepper”). It contains
important information on setup and handling.
Before using the stepper, read the user manual carefully. This
particularly applies to the safety instructions. Failure to heed this user manual
may result in severe injury or damage to the stepper.
Store the user manual for further use. If you pass the stepper on to third parties,
please be absolutely sure to include this user manual.
Explanation of symbols
The following symbols and signal words are used in this user manual, on the
stepper or on the packaging.
WARNING! This signal symbol/word designates a hazard
with moderate degree of risk which may lead
to death or severe injury if not avoided.
CAUTION! This signal symbol/word designates a hazard
with low risk that, if not avoided, may result in
minor or moderate injury.
NOTICE! This signal word warns against potential
damages to property.
This symbol provides you with useful additional information
regarding assembly and use.
Pinch Point. Keep hands and fingers clear. The warning symbol
and the safety instruction are located on the front of the
stepper’s housing (see fig.A and J).
ZUR FREIGABE V7

Safety
8
Safety
Proper use
The stepper is only designed as a training device for indoor use in the home.
It is only intended for private use and not suitable for therapeutic and
commercial purposes. The maximum weight-loading amounts to 220.5 lbs
(100kg).
The stepping motion of the pedals is dependent as the pedals are connected
with one another and move in relation to one another. The stepping function of
the stepper is not dependent on speed.
Only use the stepper as described in this user manual. Using it in any other way is
deemed improper and may result in damage to property or even personal injury.
The stepper is not a children’s toy.
The manufacturer or vendor cannot be held liable for damages incurred through
improper or incorrect use.
Safety instructions
WARNING!
Risk of explosion and chemical burns!
Improper use of the batteries poses a risk of explosions or
chemical burns caused by battery acid.
− Do not expose batteries to intense heat and do not throw
them in an open fire.
− Make sure that the polarity (+ and -) is correct when
inserting the battery.
− Only replace the battery of the stepper with batteries of
the same type.
− Do not short circuit the batteries.
− Never attempt to charge non-rechargeable batteries.
− Charge rechargeable batteries after they have been
removed from the stepper.
− Do not disassemble the batteries.
− Do not allow battery acid to come into contact with skin,
eyes or mucus membranes.
ZUR FREIGABE V7

Safety
9
− Do not remove the battery liquid with bare hands. Wear
protective gloves. In the event of contact with battery
acid, immediately flush the applicable areas with plenty of
clean water and consult a physician.
− If you do not use the stepper for a prolonged period of
time, remove the battery.
− Remove and properly dispose of empty batteries
immediately.
− Keep the batteries away from children and store them out
of the reach of children.
− If batteries are swallowed or otherwise incorporated,
promptly consult a physician.
WARNING!
Danger for children and persons with impaired physical,
sensory or mental capacities (e.g. partially disabled persons,
older persons with reduced physical and mental capacities)
or lack of experience and knowledge (e.g. older children).
− This stepper may be used by persons with impaired
physical, sensory or mental capacities or those lacking
experience and knowledge if they are supervised or have
been instructed in how to safely use the stepper and have
understood the risks associated with using it.
− Do not let children use the stepper if they are not
supervised. Children must not play with the stepper.
Cleaning and user maintenance must not be performed by
unsupervised children.
− Do not leave the stepper unattended while in operation.
− Do not allow children to change the battery of the stepper
if they are not supervised.
− Do not let children play with the packaging wrapper and
small parts and store them out of the reach of children.
They may get caught in it when playing or swallow small
parts and choke.
ZUR FREIGABE V7

Safety
10
CAUTION!
Risk of injury and health!
Improper handling of the stepper can cause injury and you could
harm your health.
− Place the stepper on a flat, level and non-slip surface and
make sure it is stable.
− The stepper is designed for one person. Only one person
may work out on the stepper at a time.
− Before use, check all parts, in particular the pedals, for
wear and make sure they are securely seated.
− Do not use the stepper if it exhibits damages.
− Have defective parts replaced and do not use the stepper
until it has been repaired.
− Before you start your workout, consult a physician in order
to identify any health risks or to prevent them. Pregnant
women should be especially careful.
− Listen to your body while working out. If you experience
pain, tightness in your chest, an irregular heart beat, extreme
shortness of breath, dizziness or drowsiness during your
workout, immediately stop your workout and consult a doctor.
− The maximum user weight amounts to 220.5 lbs (100kg).
− During and after your workout, make sure that no one is
able to injure themselves on protruding parts.
− Keep a safe distance of 2feet (0.6m) around the stepper.
NOTICE!
Risk of damage!
Improper handling of the stepper may damage the stepper.
− The maximum user weight amounts to 220.5 lbs (100kg).
− Before use, check all parts, in particular the pedals, for
wear and make sure they are securely seated.
− Place the stepper on a flat, level and non-slip surface.
ZUR FREIGABE V7

Checking the stepper and pack contents
11
− The loops of the stepper are only designed for upward
tensile load. Do not subject the loops to horizontal stress.
Checking the stepper and pack contents
NOTICE!
Risk of damage!
If you are not cautious when opening the packaging with a sharp
knifeorotherpointedobject, youmayquicklydamagethestepper.
− Be very careful when opening.
1. Take the stepper out of the packaging.
2. Check to make sure that the delivery is complete (see fig. A).
3. Check whether the stepper or the individual parts exhibit damage. If this
is the case, do not use the stepper. Contact the manufacturer at the service
address specified on the warranty card.
Assembly
For the most part, the stepper is preassembled. You will need the enclosed Philips-
head screwdriver 8to complete the last assembly steps.
Make sure there is enough unobstructed room. There should be at
least 2feet (0.6 m) of unobstructed space around the workout area
(see fig. B).
1. Insert the two plastic feet 6in the frame tube 5(see fig.C). The bearing
surface of the plastic feet must be pointing down at the end.
2. Screw each Philips-head screw 7into the predrilled hole on the bottom of
the frame tube.
3. Screw the adjustment screw 12 into the threading on the front housing 13
(see fig.D).
Workout preparation
Attaching the carabiner clip
You can work out on the stepper with or without the resistance band 2.
To work out with the resistance band, proceed as follows:
− Screw the carabiner clip 4of the resistance band loose.
− Attach the carabiner clip to the loop 11 on the stepper and screw the cara-
biner clip back into a closed position (see fig. E).
ZUR FREIGABE V7

Using the computer
12
Setting the step height
You can increase or decrease the step height of the stepper:
− Turn the adjustment screw 12 clockwise to increase the step height
(see fig. D).
− Turn the adjustment screw counterclockwise to reduce the step height.
Adjusting the resistance band
The length of the resistance band 2can be adjusted:
1. Loosen the screw on 15 the handle 1(see fig. F).
Pull the resistance band through the guide on the handle.
Set the length between 2–3feet (60–90cm) (see the marks).
Do not set the resistance band to a length under 2feet (60cm) (see the red mark).
2. Tighten the screw on the handle.
3. Secure the protruding resistance band in the recess 16 on the handle
(see fig.F and G).
Using the computer
You can use the computer 14 to display the calorie consumption, number of steps
or workout time. However, the stepper also works without using the computer.
Inserting and changing the battery
The computer 14 is battery-operated. You must insert or change the batteries
to use the computer:
1. Pull the computer up and out of the housing 13 (see fig. H).
2. Insert the battery in the battery compartment on the bottom of the
computer.
Pay attention to the polarity +/- indicated in the battery compartment and
on the battery.
3. Make sure that the plug 18 has been properly connected.
4. Put the computer back in the housing.
In the process, make sure that the cable 17 is not kinked or clamped in.
Switching the computer on and off
− Push the Mode button 9to manually switch on the computer 14 (see fig.I).
or
− Step onto the step board of the pedals 3to switch on the computer.
The computer will automatically switch off if you don’t use the stepper for
approx. 4minutes.
ZUR FREIGABE V7

Using the computer
13
Display: Display options
The calories consumed shown on the indicator only serve as
a reference value. The value is based on pre-programmed
standard values. The calories consumed through the use of the
resistance bands are not considered in the process.
As soon as the computer 14 has been switched on (see chapter “Switching the
computer on and off”), two lines will appear on the display 10 (see fig.I).
Display: First line
The following will appear on the first line:
• STOP as soon as you interrupt the workout,
• the number of steps per minute as a projection.
Display: Second line
Various workout data are shown consecutively on the second line.
The following workout data will be recorded:
• TMR: Workout duration from 0:00–99:59 minutes.
• REPS: Number of steps for the current workout from 0–9999 steps.
• CAL: Calories consumed from 0 to 9999 calories.
• TTR: Total number of steps since inserting the battery from 0 to 9999 steps.
Displaying the workout data
− Briefly push the Mode button 9to switch between the workout data.
− To display all workout data consecutively, push the Mode button until TMR
flashes on the display 10 .
The display will automatically cycle through the workout data every 5 seconds.
Setting the workout goals
You can specify the duration of the workout (TMR), the number of steps (REPS)
and the calorie consumption (CAL) as training goals:
1. Hold the Mode button 9down for approx. 4 seconds until 0:00 (TMR)
appears on the second line of the display 10 and the first 0 blinks.
2. Push the Mode button until the display shows the desired duration in minutes.
3. Wait a few seconds until the display shows the REPS workout data.
4. Push the Mode button until the display shows the desired number of steps.
The number of steps is set in increments of 10.
5. Wait a few seconds until the display shows the CAL workout data.
ZUR FREIGABE V7

Workout
14
6. Push the Mode button until the display shows the desired calorie
consumption.
The calorie consumption is set in increments of 10.
Once you have set all desired workout goals, you can start your workout (see
chapter “Workout”). The computer 14 will count the preset values down to 0
and show them on the display. Once the workout goals have been reached, the
computer will stop counting for approx. 10 seconds and restart at 0.
Resetting the display
The display 10 is set to 0 before your first workout. With all following workouts,
the computer 14 will continue counting at the point where you stopped your
last workout.
You can reset the display to 0:
− Hold the Mode button 9down until all symbols can be seen at the same time.
The duration of the workout (TMR), the number of steps (REPS) and the
calorie consumption (CAL) have been reset.
− Remove the battery and reinsert it (see chapter “Inserting and changing
the battery”) to reset the total number of workout steps (TTR).
Workout
CAUTION!
Risk of injury and health!
An incorrect or excessive workout can harm your health and
cause injury.
− Place the stepper on a flat, level and non-slip surface and
make sure it is stable.
− Always warm up before your workout.
− Wear anti-slip sneakers and comfortable sports clothing.
− Always perform controlled movements.
− Repeat the exercises depending on your physical fitness
and the intensity of your workout. Divide the exercises into
multiple sets and take a break between the individual sets.
− Be sure to drink enough during your workout.
− Do not overstrain yourself when working out. Breath in a
relaxed manner. Avoid fast, uncontrolled movements.
ZUR FREIGABE V7

Workout
15
− Listen to your body while working out. If you experience
pain, tightness in your chest, an irregular heart beat,
extreme shortness of breath, dizziness or drowsiness
during your workout, immediately stop your workout and
consult a doctor.
− Consult your physician if you suffer from any physical
complaints.
− The workout is not a substitute for medical counsel.
− Carefully get on and off of the device.
− Stretch your muscles before and after your workout.
CAUTION!
Risk of injury!
Improper handling of the resistance bands may result in injury.
− Do not stretch the resistance bands past their maximum
length. The maximum stretching length amounts to 6feet
(185cm) if the band is set to 3feet (90cm).
− Do not set the resistance bands to a length under 2feet
(60cm) (see the red mark on the resistance bands).
Set the length between 2 and 3feet (60 and 90cm) (see
the red and white marks).
− Take hold of the handles.
− Make sure that you correctly handle the resistance bands.
Hold the handles in a horizontal position when pulling on the
resistance bands.
− Do not wind the resistance bands around your wrists.
− Each time before working out with the resistance bands,
check whether the carabiner clips are securely attached to
the loops.
− The loops of the stepper are only designed for upward
tensile load. Do not subject the loops to horizontal stress.
ZUR FREIGABE V7

Workout
16
CAUTION!
Tripping hazard!
You can trip over resistance bands that are lying around and hurt
yourself.
− Remove the resistance bands from the stepper and store
them outside the workout area when not using them for your
workout.
Perform the exercises in 3 sets, each consisting of 6–12
repetitions.
Getting on the stepper
1. Push one of the two pedals 3down with your foot until the pedal stopper
is resting on the frame tube 5(see fig. A).
2. Step onto the bottom pedal with one foot.
3. Carefully place the other foot on the other pedal pointing up in a diagonal
position.
4. Slowly push the pedal down so that you have a stable position.
You can now start stepping. Move in a controlled manner.
Getting off the stepper
1. Push one of the two pedals 3down until the pedal stopper is resting on
the frame tube 5(see fig. A).
2. Carefully take your foot off of the pedal that is facing up and place it on the
ground.
3. Then take your other foot off of the pedal.
Holding the resistance band
− Hold the handles 1in a horizontal position when pulling on the resistance
bands 2.
− Do not bend your wrists as this could strain them.
ZUR FREIGABE V7

Workout
17
Exercise without a resistance band
Buttocks, thighs and calves
− While you step, move your arms back and forth
in alternation as if you were walking.
− Gradually lift your arms.
Variation
− Move your arms back and forth simultaneously.
Exercises with a resistance band
The following applies to all exercises with the resistance band:
• Take hold of the handles 1.
• Perform controlled movements.
• Keep your arms tensed.
• Check that the carabiner clip 4is securely attached to the loops 11 .
• The longer you pull the resistance bands 2, the more effort or strength is
required.
• The shorter you set the resistance bands, the more effort or strength is required.
• Hold the handles in a horizontal position when pulling on the resistance bands.
Shoulders and arms
This exercise can be performed in a standing position and while
stepping.
− Pull the right handle 1up to shoulder height in
front of you and lower the left handle at the same
time.
− Then lift the left handle to shoulder height and
lower the right handle at the same time.
ZUR FREIGABE V7

Workout
18
Shoulders, arms and legs
− Keep your left arm bent in front of your body.
− Lift it up to shoulder height and then push the
right pedal 3down.
− Lower your left arm and push the left pedal down.
At the same time, lift your right arm and keep it
bent in front of your body.
Thighs, arms, legs and buttocks
− Hold your elbows firmly at your side.
Your palms are facing upwards.
− Push the left pedal 3down and at the same
time, pull the resistance band 2up with your
left arm.
− Push the right pedal down and pull your right
arm up.
At the same time, lower your left arm.
Back, shoulders, legs and buttocks
− When stepping, lift your arms up to shoulder
height sideways. Your palms face downwards in
the process.
− Lower your arms again.
Variation
− Perform the exercise with your palms facing up.
ZUR FREIGABE V7

Cleaning, maintenance and storage
19
Upper body and legs
− Hold both resistance bands 2by the
handles 1with your palms facing up at hip
height.
− While stepping, move your upper body from left
to right.
− Keep your upper body tensed while swinging
your arms parallel at the same time.
Cleaning, maintenance and storage
NOTICE!
Risk of damage!
Improper handling may lead to damage.
− Regularly check all parts, in particular the pedals, for wear
and make sure that they are securely seated.
− Have defective parts replaced and do not use the stepper
until it has been repaired.
− Do not use any aggressive cleaners, sharp or metallic
cleaning utensils such as knives, hard scrapers or similar.
They could damage the surfaces.
1. Clean the stepper with a damp cloth and a mild detergent.
2. Use a clean cloth to wipe off the stepper.
3. Check the stepper regularly (approx. every 1–2 months) or after a period of
not being used for wear and that the screwed and plugged connections are
securely seated.
4. Store the stepper and all accessories in a dry location that is not accessible
for children.
ZUR FREIGABE V7

Technical data
20
Technical data
Model: ANS-16-035
Dimensions (W × H × D): approx. 20.5 × 9.3 × 19.7 in (52 × 23.5 × 50cm)
Max. load: 220 lbs (100kg)
Use class: HC (only suitable for use at home)
Weight: approx. 19.8 lbs (9kg)
Battery: 1,5V AAA/LR3 (included in the pack contents)
Length (resistance band):
Max. stretching length:
(resistance band)
2–3feet (60–90cm)
6feet (185cm)
(when the band is set to the maximum length of 3feet
(90cm))
Article number: 93941
ZUR FREIGABE V7
This manual suits for next models
1
Table of contents
Languages:
Other Crane Fitness Equipment manuals

Crane
Crane 44916 User manual

Crane
Crane 44462 User manual

Crane
Crane RB#35304 User manual

Crane
Crane ASP-US-047 User manual

Crane
Crane FOAM ROLLER User manual

Crane
Crane ASP-US-092 User manual

Crane
Crane FLX-ABW-01 User manual

Crane
Crane BALANCE BOARD User manual

Crane
Crane PUNCH AND KICK TRAINER User manual

Crane
Crane 99522 User manual
Popular Fitness Equipment manuals by other brands

Kettler
Kettler MULTIGYM Instructions for using

Sport-thieme
Sport-thieme 119 0902 Operating & assembly instructions

Avari Fitness
Avari Fitness Rower owner's manual

Body Solid
Body Solid GIOT Assembly instructions

ABTronic
ABTronic NARL user manual

FRENCH FITNESS
FRENCH FITNESS Strength Pendulum Squat owner's manual