manuals.online logo
Brands
  1. Home
  2. •
  3. Brands
  4. •
  5. Crivit
  6. •
  7. Fitness Equipment
  8. •
  9. Crivit Z31324A User manual

Crivit Z31324A User manual

ES
ES ES ES
Tubo extensor:
Hombros (ver fig. G)
Ponga el pie derecho y lígeramente avanzado justo en el medio del tubo extensor, el cuerpo está estirado.
Mantenga los mangos a la altura de las caderas.
Estire el tubo extensor vertical hacia arriba con los codos flexionados y los brazos delante del cuerpo, hasta que los mangos
lleguen a la altura del pecho.
Vuelva lentamente a la posición inicial.
Espalda (ver fig. H)
Siéntese en el suelo con las piernas extendidas casi por completo y la espalda recta.
Pase el tubo extensor alrededor de los pies de forma que se apoye en plano en ambos pies y estírelo con las dos manos.
Flexione los brazos y llévelos junto al cuerpo. Doble los codos en un ángulo de aprox. 90°.
Con los brazos pegados al cuerpo, lleve los codos ligeramente hacia atrás hasta que las manos se encuentren a la altura
de las caderas.
Piernas (ver fig. I)
Túmbese boca arriba.
Suba las piernas, como en la figura I, y pase el tubo extensor alrededor de los pies de forma que se apoye en plano en
ambos pies.
Sostenga los mangos en las dos manos, y llévelos hacia abajo. Póngalos a cada lado de los glúteos.
Estire sólo una pierna, como si quisiera levantar un peso.
No estire del todo las piernas.
Vuelva lentamente a la posición inicial.
Limpieza y mantenimiento
No utilice en ningún caso productos de limpieza abrasivos ni corrosivos. El producto se podría dañar.
Para limpiar el producto no utilice más que agua templada y, a continuación, séquelo bien con un paño.
Este producto se debe guardar en estado limpio y seco en un recinto temperado.
Desecho del producto
El embalaje está compuesto por materiales no contaminantes que pueden ser eliminados
en el centro de reciclaje local.
Para más información sobre lugares para el desecho del producto, consulte en la administración de su comunidad o ciudad.
Ejercicios
Aro extensor:
Muslo (ver fig. A)
Estírese sobre un costado y apóyese en los codos.
Sitúe la pierna superior a la altura de la cadera.
Sujete el aro extensor a la altura de los tobillos.
Suba y baje lentamente la pierna superior.
A continuación, repita el ejercicio con la otra pierna.
Abdomen (ver fig. B)
Túmbese boca arriba y flexione el muslo en un ángulo de 90° respecto a su cuerpo.
Agarre los mangos del producto con las dos manos y sitúelo en el muslo.
Extienda su rodilla contra la resistencia del aro extensor en dirección a su cuerpo.
Durante todo el ejercicio, mantenga la cabeza y los brazos en la posición inicial.
Bíceps (ver fig. C)
Póngase de pie, con los pies separados a la anchura de los hombros.
Sujete cada uno de los mangos del aro extensor en una mano y ponga una mano a la altura de las caderas.
La parte superior del brazo tiene que quedar junto al cuerpo.
Extienda la parte inferior del brazo contra la resistencia del aro adaptador hacia arriba y seguidamente vuelva a la
posición inicial.
Durante el ejercicio, intente no estirar la espalda.
Extensor en cruz:
Tríceps (ver fig. D)
Manténgase de pie. Doble un brazo detrás de la espalda y pase el otro brazo por encima de la cabeza.
Aguante un mango en cada mano y mantenga las muñecas rectas.
Con la mano superior, estire el extensor en cruz hacia arriba. La otra mano hace de estabilizador.
A continuación, repita el ejercicio con el otro brazo.
Pecho (ver fig. E)
Abra los pies a la anchura de las caderas.
Ponga el extensor en cruz por debajo del omoplato entorno a la espalda y sostenga los mangos en tensión delante del
pecho.
Mueva los brazos en un movimiento controlado hacia delante.
Bíceps (ver fig. F)
Ponga un mango del extensor en cruz por debajo del pie derecho lígeramente avanzado, el cuerpo está estirado.
Mantenga el otro mango en la mano derecha a la anchura de las caderas. Los codos están junto al cuerpo.
Lleve la mano hasta la altura de los hombros. Durante el movimiento, mantenga los codos pegados al cuerpo.
Vuelva lentamente a la posición inicial.
Durante el ejercicio, intente no estirar la espalda ni la nuca.
Después de unas cuantas repeticiones, proceda a la otra parte del cuerpo.
De mango a
mango Fácil
Verde
(Z31324A)
Medio
Lila
(Z31324B)
Difícil
Rosa
(Z31324C)
Longitud
máxima
Aro extensor 24cm 24cm 24cm 60cm
Extensor en cruz 42cm 42cm 42cm 105cm
Tubo extensor 148cm 160cm 172cm 300cm
Indicaciones de seguridad
¡LEA LAS INSTRUCCIONES DE USO ANTES DE UTILIZAR EL PRODUCTO! ¡CONSERVE CUIDADOSAMENTE LAS
INSTRUCCIONES DE USO!
¡PRECAUCIÓN! ¡PELIGRO DE LESIONES! Este producto no es un juguete; si es utilizado por niños, deben
contar siempre con la supervisión de un adulto.
Si tiene problemas de salud, presenta reacciones alérgicas o se encuentra lesionado, consulte a su médico antes de usar
este producto. Si durante los ejercicios siente náuseas, indisposición o molestias, interrumpa su práctica de inmediato.
No extienda el producto por encima de la longitud máxima (ver el cuadro „Características técnicas“).
¡PRECAUCIÓN! ¡RIESGO DE DAÑOS MATERIALES! Este producto se debe utilizar exclusivamente en espacios en
los que la distancia a otras personas u objetos resulte suficiente para evitar lesiones o daños materiales.
Cada vez que utilice el producto, revíselo previamente para asegurarse de que no están dañado ni desgastado. Únicamente
se debe usar este producto si se encuentra en su correcto estado.
Al estirar las bandas, mantenga las manos en posición recta, como si fueran una prolongación directa del antebrazo, y no
fuerce las muñecas.
Mantenga las bandas siempre en tensión y tenga cuidado de no resbalarse!
Para devolver las bandas a la posición inicial, manténgalas siempre bajo tensión y proceda lentamente.
No se tienen que usar objetos para sujetar las bandas, p. ej., una mesa, una puerta o el descansillo de una escalera.
Prohibido estirar las bandas elásticas en la dirección del rostro, así como enrollarlas entorno a la cabeza, el cuello o el pecho.
Mantenga este producto alejado de objetos afilados, puntiagudos, calientes y/o peligrosos.
Evite su exposición directa a la luz solar y al calor de la calefacción.
Instrucciones para el entrenamiento
Los ejercicios que se presentan a continuación son sólo una selección de todos los ejercicios que se pueden realizar. Consulte
literatura especializada para más información sobre posibles ejercicios.
Vista prendas de deporte o ropa que sea cómoda.
Realice un precalentamiento antes de comenzar con los ejercicios.
Realice los ejercicios a un ritmo regular y con respiración tranquila. Mantenga el movimiento de trabajo previsto y no sobre-
valore sus capacidades. Espire al tensar los músculos e inspire al destensarlos.
Repita cada ejercicio 10–20 veces.
1 2 3
A B C
D E F
HG
I
Juego de extensores
Uso adecuado
Este producto ha sido concebido para la práctica del deporte y no resulta apropiado para el uso industrial. Este producto no es
adecuado para tratamientos médicos ni terapéuticos.
Características técnicas
Longitud 40cm 50cm 60cm
Aro extensor/
* Fuerza de tracción
Verde (Z31324A) 22 N 30 N 39 N
Lila (Z31324B) 23 N 33 N 43 N
Rosa (Z31324C) 38 N 54 N 66 N
Longitud 60cm 80cm 105cm
Extensor en cruz/
* Fuerza de tracción
Verde (Z31324A) 13 N 28 N 40 N
Lila (Z31324B) 19 N 35 N 54 N
Rosa (Z31324C) 20 N 42 N 65 N
Longitud 240cm 270cm 300cm
Tubo extensor/
* Fuerza de tracción
Verde (Z31324A) 14 N 20 N 26 N
Lila (Z31324B) 14 N 22 N 27 N
Rosa (Z31324C) 15 N 24 N 29 N
* Tolerancia a los valores de fuerza mencionados: +/- 20%
EXPANDER-SET
Bedienungs- und Sicherheitshinweise
Z31324A
Z31324B
Z31324C
SET ESTENSORI
Indicazioni per l’uso e per la sicurezza
CONJUNTO DE ELÁSTICOS
Instruções de utilização e de segurança
RESISTANCE TUBE SET
Operation and Safety Notes
JUEGO DE EXTENSORES
Instrucciones de utilización y de seguridad
78299_cri_Fitness_Band_LB5.indd 1 29.08.12 09:04
IT/MT IT/MT IT/MT
IT/MT
CUIDADO! PERIGO DE DANOS MATERIAIS! Utilize o produto apenas em espaços em que possa manter uma distân-
cia suficiente de pessoas/objectos, para evitar feridas/danos materiais.
Antes de cada utilização, verifique o produto quanto a danos ou desgaste. O produto apenas pode ser utilizado se se en-
contrar em perfeitas condições.
Ao esticar o produto, mantenha as mãos em extensão directa dos antebraços e não estique demasiado os pulsos!
Mantenha os elásticos sempre em tensão e preste atenção para não escorregar!
Faça com que o produto volte sempre de forma lenta e em tensão para a sua posição de partida.
O produto nunca pode ser preso a objectos como, por exemplo, a uma mesa, porta ou ao patamar de uma escada.
O produto nunca deve ser puxado em direcção à cara e nunca podem ser enrolados à volta da cabeça, pescoço ou peito.
Mantenha o produto afastado de objectos afiados, pontiagudos, quentes e/ou perigosos.
Evite a luz solar directa e fontes de calor.
Guia de exercícios
Os exercícios seguintes representam apenas uma selecção de exercícios possíveis. Informe-se sobre outros exercícios possíveis
na respectiva documentação.
Use roupa de desporto e de lazer confortável.
Faça um aquecimento antes de começar a realizar os exercícios.
Execute os exercícios a um ritmo regular respirando calmamente. Limite-se às sequências de movimentos fornecidas e não
exagere. Expire ao retesar os músculos, inspire ao relaxar os músculos.
Repita cada exercício 10–20 vezes.
Exercícios
Extensão anelar:
Parte superior do fémur (ver fig. A)
Coloque-se de lado e apoie-se nos cotovelos.
A perna de cima encontra-se ao nível das ancas.
Fixe a argola para a extensão anelar ao nível dos tornozelos.
Levante e baixe a perna que se encontra em cima lentamente.
Repita depois este exercício com a outra perna.
Barriga (v. fig. B)
Deita-se de costas para baixo e coloque a coxa num ângulo de 90° em relação ao seu corpo.
Segure os punhos do produto com as duas mãos e coloque estes à volta da sua coxa.
Puxe os joelhos contra a resistência da extensão anelar em direção ao seu corpo.
Mantenha a sua cabeça e os seus braços durante todo o exercício em posição inicial.
Músculo bíceps (v. fig. C)
Coloque-se em pé, os pés separados da largura dos ombros.
Pegue os punhos da extensão anelar em cada mão e coloque uma mão na sua anca.
Neste caso, o braço superior deve estar encostado no corpo.
Puxe agora o braço inferior contra a resistência do adaptador anelar para cima e coloque-se depois novamente na
posição inicial.
Preste atenção para que tenha as costas direitas durante todo o exercício.
Conjunto de elásticos
Utilização adequada
Este produto foi concebido como equipamento desportivo e não se destina ao uso comercial. O produto não se destina a trata-
mentos terapêuticos ou médicos.
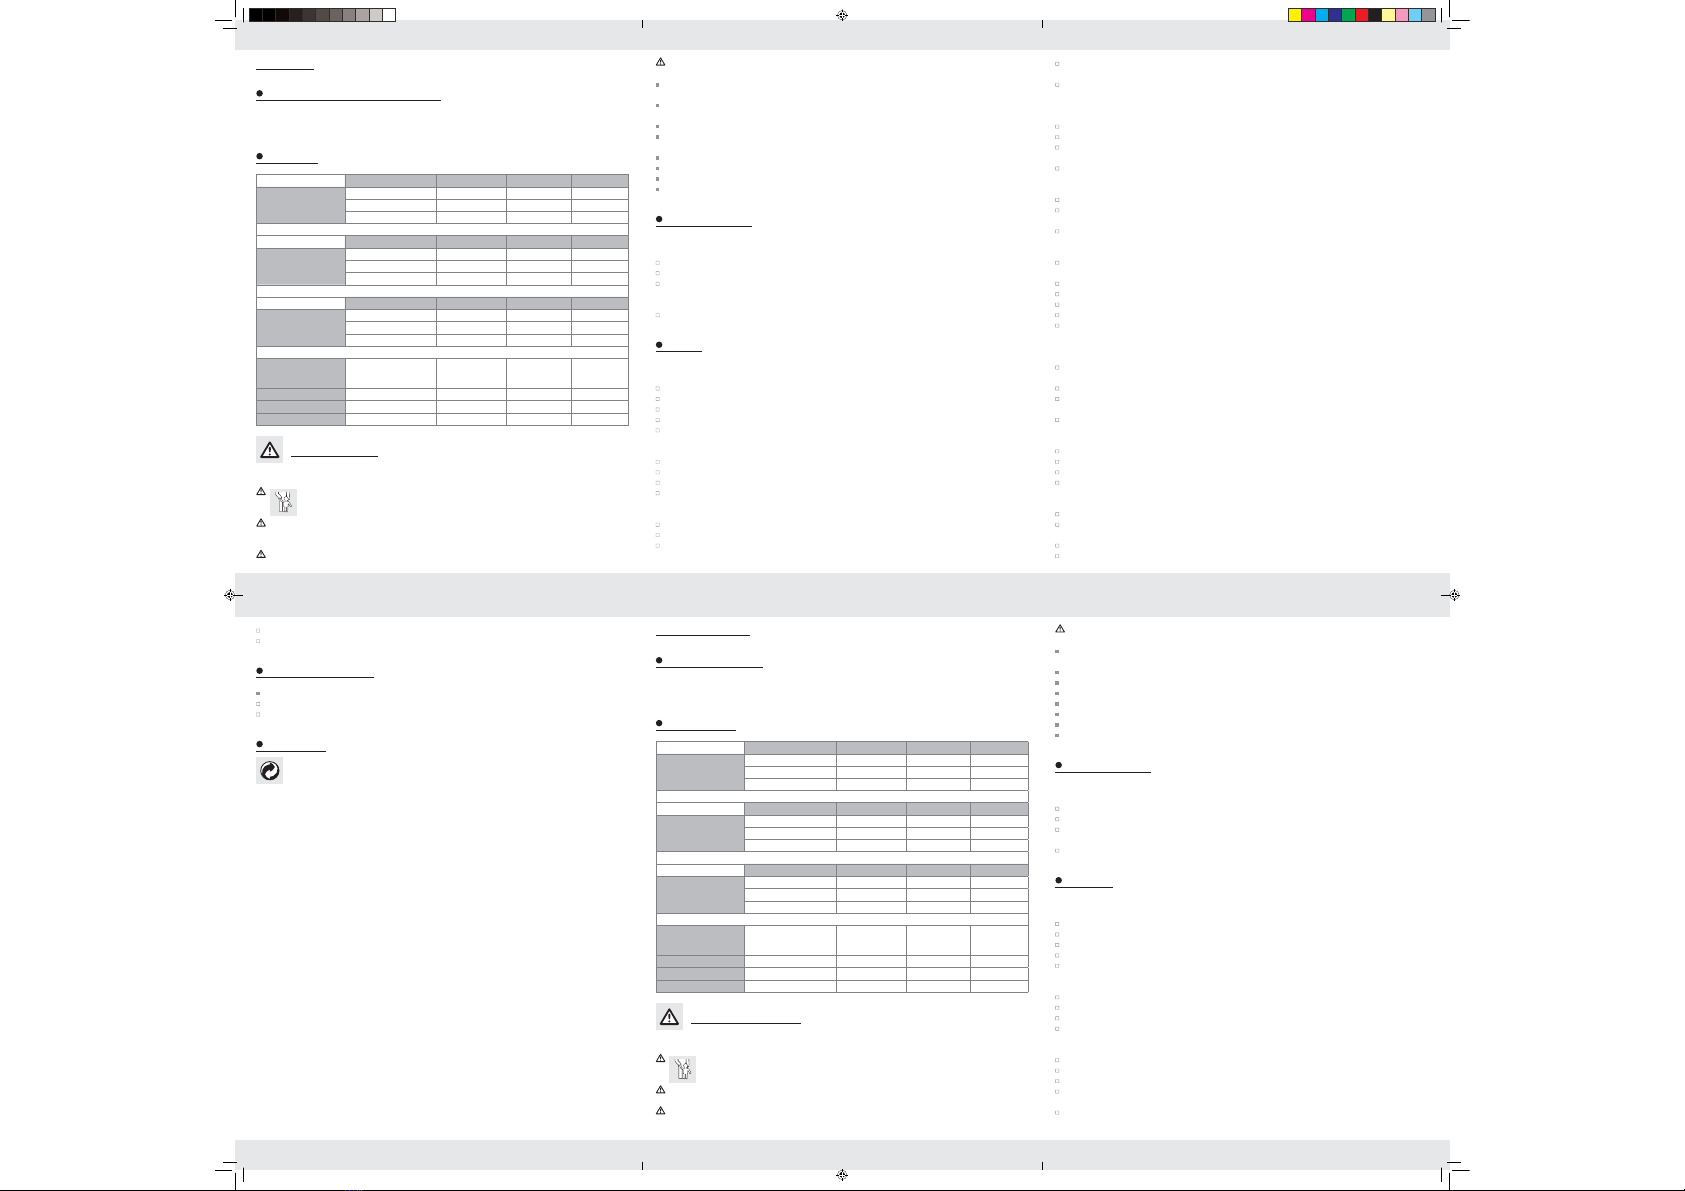
Dados técnicos
Comprimento 40cm 50cm 60cm
Extensão anelar/
* Tração
Verde (Z31324A) 22 N 30 N 39 N
Roxo (Z31324B) 23 N 33 N 43 N
Rosa (Z31324C) 38 N 54 N 66 N
Comprimento 60cm 80cm 105cm
Extensão em cruz/
* Tração
Verde (Z31324A) 13 N 28 N 40 N
Roxo (Z31324B) 19 N 35 N 54 N
Rosa (Z31324C) 20 N 42 N 65 N
Comprimento 240cm 270cm 300cm
Extensão comprida/
* Tração
Verde (Z31324A) 14 N 20 N 26 N
Roxo (Z31324B) 14 N 22 N 27 N
Rosa (Z31324C) 15 N 24 N 29 N
* Tolerância das indicações de força mencionadas antes: +/- 20%
Punho a
punho Leve
Verde
(Z31324A)
Média
Roxo
(Z31324B)
Pesado
Rosa
(Z31324C)
Comprimento
máx.
Extensão anelar 24cm 24cm 24cm 60cm
Extensão em cruz 42cm 42cm 42cm 105cm
Extensão comprida 148cm 160cm 172cm 300cm
Indicações de segurança
ANTES DE UTILIZAR, LEIA O MANUAL DE INSTRUÇÕES! CONSERVE CUIDADOSAMENTE O MANUAL DE INSTRUÇÕES!
CUIDADO! PERIGO DE FERIMENTO! O produto não é um brinquedo e só pode ser utilizado sob
supervisão de adultos.
Consulte o seu médico antes de utilizar o produto, se sofrer de algum problema de saúde, de reacções alérgicas ou se tiver
algum ferimento. Pare os exercícios imediatamente se, durante os exercícios, ocorrerem náuseas, mal-estar ou outras queixas.
Não puxe o produto acima do comprimento máximo (ver tabela em „Dados técnicos“).
PTPT
Piegare leggermente le gambe.
Tornare lentamente alla posizione di partenza.
Pulizia e manutenzione
Non utilizzare in nessun caso detergenti abrasivi o corrosivi. Il prodotto potrebbe venirne danneggiato.
Pulire il prodotto solo con acqua tiepida asciugandolo poi a fondo con un panno.
Conservare sempre il prodotto in un luogo asciutto e pulito, in un ambiente temperato.
Smaltimento
L’imballaggio è composto da materiali ecologici che possono essere smaltiti
presso i siti di riciclaggio locali.
E’ possibile informarsi sulle possibilità di smaltimento del prodotto presso l‘amministrazione comunale e cittadina.
Distendere l‘avambraccio verso l‘alto, facendo forza contro la resistenza dell‘adattatore ad anello, e tornare successivamente
nella posizione di partenza.
Durante tutta la durata dell‘esercizio mantenere la schiena in posizione eretta.
Estensore a croce:
Tricipite (pag. fig. D)
Assumere una posizione eretta. Piegare un braccio dietro la schiena e portare l‘altro sopra la testa.
Stringere sempre un‘impugnatura in ogni mano mantenendo i poli in posizione eretta.
Con la mano che si trova più in lato, stendere l‘estensore a croce verso l‘alto. Durante l‘esercizio l‘altra mano assume una
funzione di stabilizzazione.
Ripetere in seguito l‘esercizio con l‘altro braccio.
Petto (pag. fig. E)
Gambe divaricate con i piedi distanti l‘uno dall‘altro quanto la lunghezza delle spalle.
Posizionare l‘estensore a croce sotto le scapole intorno alla schiena e portare le impugnature davanti al petto mantenendo
l‘estensore in tensione.
Con movimenti controllati, portare le braccia in avanti.
Bicipite (vedi fig. F)
Portare il piede destro leggermente in avanti appoggiando il piede sull‘impugnatura dell‘estensore a croce, sempre mante-
nendo il corpo in posizione eretta.
Con la mano destra, mantenere l‘altra impugnatura all‘altezza dei fianchi. I gomiti aderiscono al corpo.
Portare la mano all‘altezza delle spalle. Durante il movimento mantenere sempre i gomiti aderenti al corpo.
Tornare lentamente alla posizione di partenza.
Durante tutta la durata dell‘esercizio mantenere la schiena e il collo in posizione eretta.
Dopo aver eseguito l‘esercizio alcune volte, ripeterlo cambiando lato del corpo.
Estensore a tubo:
Spalle (vedi fig. G)
Portare il piede destro leggermente i avanti appoggiandolo al centro dell‘estensore a tubo, sempre mantenendo il corpo in
posizione eretta.
Mantenere l‘impugnatura all‘altezza dei fianchi.
Con i gomiti liberi e le braccia davanti al corpo, portare l‘estensore a tubo verso l‘alto mantenendolo in posizione verticale,
fino a che le impugnature non saranno ad altezza del busto.
Tornare lentamente alla posizione di partenza.
Schiena (pag. fig. H)
Sedersi sul pavimento mantenendo le gambe quasi distese e la schiena in posizione eretta.
Poggiare l‘estensore a tubo intorno ad entrambi i piedi e, con entrambe le mani, tirare fino a portarlo in uno stato di tensione.
Flettere le braccia mantenendole vicino al corpo. Flettere i gomiti raggiungendo un‘angolazione di ca. 90°.
Tirare leggermente all‘indietro i gomiti tenendoli vicini al corpo, sino a che le mani vengono a trovarsi all‘altezza delle anche.
Gambe (pag. fig. I)
Distendersi in posizione supina.
Sollevare entrambe le gambe come indicato nella figura I e posizionare l‘estensore a tubo, mantenendolo piatto, intorno ad
entrambi i piedi.
Tenere l‘impugnatura con entrambe le mani e tirandola verso il basso. Distendersi su di un fianco.
Distendere le gambe, come se si volesse con queste sollevare un peso.
ATTENZIONE! PERICOLO DI DANNI MATERIALI! Utilizzare il prodotto solo in ambienti in cui sia possibile mantenere
una distanza sufficiente da persone/oggetti, al fine di evitare lesioni a persone o danni a cose.
Prima di ogni utilizzo controllare che il prodotto non sia né danneggiato, né consumato. Il prodotto deve essere utilizzato
solo in perfetto stato di funzionamento.
Durante gli esercizi di espansione con il prodotto, tenere le mani allineate lungo l‘asse dell‘avambraccio evitando di tendere
troppo i polsi!
Tenere gli elastici a banda sempre sotto trazione facendo attenzione a non scivolare!
Ricondurre il prodotto nella posizione di partenza assicurandosi che questo rimanga sempre sotto tensione e che l‘azione
venga compiuta lentamente.
Il prodotto non deve mai essere fissato ad oggetti quali per es. tavoli, porte o scalini.
Evitare di stendere il prodotto in direzione del viso e di avvolgerlo intorno alla testa, al collo o al petto.
Tenere il prodotto lontano da oggetti taglienti, appuntiti, caldi e/o pericolosi.
Evitare di esporre il prodotto all‘azione diretta dei raggi solari e di fonti di calore artificiale.
Guida agli esercizi
I seguenti esercizi rappresentano solo una selezione fra tutti gli esercizi possibili. Per ulteriori esercizi, consultare la relativa lette-
ratura in merito.
Indossare comodi indumenti sportivi e per il tempo libero.
Prima di iniziare con l‘allenamento, eseguire esercizi di riscaldamento.
Eseguire esercizi ad una velocità regolare respirando naturalmente. Osservare le indicazioni in merito agli esercizi qui pro-
posti ed evitare di sopravvalutare le proprie capacità. Espirare quando i muscoli si trovano in tensione, inspirare durante la
loro distensione.
Ripetere ogni esercizio 10–20 volte.
Esercizi
Estensore ad anello:
Gluteo (vedi fig. A)
Stendersi su di un fianco appoggiandosi sui gomiti.
La gamba superiore si trova all‘altezza dell‘anca.
Fissare l‘estensore ad anello all‘altezza delle caviglie.
Sollevare ed abbassare lentamente la gamba superiore.
Ripetere successivamente l‘esercizio con l‘altra gamba.
Ventre (vedi fig. B)
Mettersi in posizione supina e sollevare le cosce di modo da creare con il corpo un angolo di 90°.
Stringere le impugnature del prodotto con entrambe le mani e appoggiarlo sulle cosce.
Premere le ginocchia contro l‘estensore ad anello in direzione del corpo.
Mantenere la testa e le braccia nella posizione di partenza durante tutta la durata dell‘esercizio.
Bicipite (vedi fig. C)
Mantenersi in posizione eretta, gambe divaricate con i piedi distanti l‘uno dall‘altro quanto la larghezza delle spalle.
Stringere le impugnature dell‘estensore ad anello, una in ogni mani, e portare una mano all‘altezza dei fianchi.
Mantenere la parte superiore del braccio distesa vicino al corpo.
Set estensori
Utilizzo secondo la destinazione d’uso
Questo prodotto è concepito come strumento sportivo e non è idoneo all‘uso commerciale. Il prodotto non deve essere utilizzato
per trattamenti terapeutici o medici.
Dati tecnici
Lunghezza 40cm 50cm 60cm
Estensore ad anello /
* Forza di trazione
Verde (Z31324A) 22 N 30 N 39 N
Lilla (Z31324B) 23 N 33 N 43 N
Rosa (Z31324C) 38 N 54 N 66 N
Lunghezza 60cm 80cm 105cm
Estensore a croce /
* Forza di trazione
Verde (Z31324A) 13 N 28 N 40 N
Lilla (Z31324B) 19 N 35 N 54 N
Rosa (Z31324C) 20 N 42 N 65 N
Lunghezza 240cm 270cm 300cm
Estensore a tubo /
* Forza di trazione
Verde (Z31324A) 14 N 20 N 26 N
Lilla (Z31324B) 14 N 22 N 27 N
Rosa (Z31324C) 15 N 24 N 29 N
* Tolleranza dell'unità di misura sopracitata: +/- 20%
Da impugnatura
a impugnatura Facile
Verde
(Z31324A)
Medio
Lilla
(Z31324B)
Difficile
Rosa
(Z31324C)
Lunghezza
max.
Esensore ad anello 24cm 24cm 24cm 60cm
Estensore a croce 42cm 42cm 42cm 105cm
Estensore a tubo 148cm 160cm 172cm 300cm
Norme di sicurezza
LEGGERE LE ISTRUZIONI PRIMA DELL‘USO! CONSERVARE CON CURA LE ISTRUZIONI PER L‘USO!
ATTENZIONE! PERICOLO DI LESIONE! Il prodotto non è un giocattolo e deve essere utilizzato esclusiva-
mente sotto la supervisione di un adulto.
In caso di problemi di salute, rischio di reazioni allergiche o presenza di lesioni, si consiglia di consultare un medico prima
di utilizzare il prodotto. Interrompere immediatamente gli esercizi se durante il loro svolgimento si dovessero accusare sin-
tomi quali nausea, malessere diffuso o disturbi di altro genere.
Durante l‘utilizzo del prodotto, non tirare oltre la lunghezza massima (vedi tabella sotto „Dati tecnici“).
78299_cri_Fitness_Band_LB5.indd 2 29.08.12 09:04
Disposal
The packaging is made from environmentally friendly materials, which may be disposed through your
local recycling facilities.
Contact your municipality for details on how to dispose of your worn-out product.
Figure 8 resistance tube:
Triceps (see Fig. D)
Stand upright. Bend one arm behind your back, bend the other arm above your head.
Hold the handles with your hands. The wrists should be straight.
Pull the cross tube upwards with the upper hand. The lower hand should be a stabiliser.
Afterwards repeat this exercise with the other arm.
Chest (see Fig. E)
Place your feet at hip width.
Place the figure 8 resistance tube across the back, below the shoulder blades and hold the grips taut in front of the chest.
Move your arms forward using a controlled motion.
Biceps (see Fig. F)
Slight walking stance with the right foot on the grip of the figure 8 resistance band, keeping the body straight.
Hold the other grip in your right hand at hip level. Keep your elbow against the body.
Move your hand to about shoulder level. Keep the elbow against the body throughout this exercise.
Slowly return to the starting position.
Be sure to keep the back and neck straight throughout the exercise.
Switch sides after a few repetitions.
Long resistance tube:
Shoulders (see Fig. G)
Slight walking stance with the right foot on the centre of the long resistance tube, the body straight.
Hold the grips at hip level.
With the elbows bent, keeping the arms in front of the body, pull the long resistance tube straight up until the grips are at
chest level.
Slowly return to the starting position.
Back (see Fig. H)
Sit down on the floor with the legs and back straight.
Place the long resistance tube flat around both feet and tauten with both hands.
Bend the arms alongside your body. Bend the elbows approx. 90°.
Slightly pull both elbows backward keeping them close to the body until the hands are at hip level.
Legs (see Fig. I)
Lie on your back.
Raise your legs as shown in Figure I and place the long resistance tube flat around both feet.
Hold the grips in both hands, moving them down. Place them to the side of your rear.
Now straighten your legs as if attempting to lift a weight.
Do not fully straighten your legs.
Slowly return to the starting position.
Cleaning and storage
Never use abrasive or caustic cleaning agents. The product will otherwise be damaged.
Only clean the product with lukewarm water and dry well with a cloth.
Always store the product dry and clean, in a temperate room.
CAUTION! RISK OF PROPERTY DAMAGE! Only use the product in areas where you can maintain adequate distance
from persons/objects to avoid injuries and property damage.
Check the product for damage and wear before every use. Only use this product in proper condition.
When stretching the product hold your hands directly extending the forearms, do not overextend the wrists!
Always keep the tubes taut and be careful not to slip!
Always slowly return the product to the starting position, keeping it taut.
Never secure the product to objects, e.g. table, door or the landing.
Never extend the product toward the face, and never wrap it around the head, neck or chest.
Keep the product away from sharp, pointed, hot and/or dangerous objects.
Avoid direct sunlight and heating sources.
Exercise instructions
The following instructions are only a sample of possible exercises. Please refer to the respective literature for information about
other exercises.
Wear comfortable sports or leisure clothing.
Always warm up before beginning the exercises.
Perform the exercises at a consistent speed and breathing evenly. Follow the specified motion sequences and do not overesti-
mate yourself. Breath out when contracting the muscles, breath in when releasing them.
Repeat each exercise 10–20 times.
Exercises
Circle resistance tube:
Thigh (see Fig. A)
Lie on your side, supporting yourself on your elbows.
Place the upper leg at hip height.
Secure the circle resistance band ankle high.
Slowly raise and lower the upper leg.
Then repeat this exercise with the other leg.
Abs (see Fig. B)
Lie on your back and bring the thighs 90° to your body.
Firmly hold the grips of the product with both hands and place them around your thighs.
Pull your knees toward your body, moving against the resistance of the circle resistance tube.
The head and arms remain in the starting position throughout the exercise.
Biceps (see Fig. C)
Stand with your feet apart at shoulder width.
Hold the circle resistance tube grips one in each hand and place one hand on your hip.
Keep the upper arm against the body.
Now draw the forearm upward against the resistance of the circle adapter, then return to the starting position.
Be sure to keep the back straight throughout the exercise.
Resistance Tube Set
Intended use
This product is designed as a piece of sports equipment and is not intended for commercial use. This product is not suitable for
therapeutic or medical use.
Technical Data
Stretching length 40cm 50cm 60cm
Circle resistance tube /
* Tension
Green (Z31324A) 22 N 30 N 39 N
Purple (Z31324B) 23 N 33 N 43 N
Pink (Z31324C) 38 N 54 N 66 N
Stretching length 60cm 80cm 105cm
Figure 8 resistance
tube/* Tension
Green (Z31324A) 13 N 28 N 40 N
Purple (Z31324B) 19 N 35 N 54 N
Pink (Z31324C) 20 N 42 N 65 N
Stretching length 240cm 270cm 300cm
Long resistance tube /
* Tension
Green (Z31324A) 14 N 20 N 26 N
Purple (Z31324B) 14 N 22 N 27 N
Pink (Z31324C) 15 N 24 N 29 N
* Tolerance of the above tensions: +/- 20%
Grip to grip Light
Green
(Z31324A)
Medium
Purple
(Z31324B)
Heavy
Pink
(Z31324C)
Max. stretching
length
Circle resistance tube 24 cm 24cm 24cm 60cm
Figure 8 resistance tube 42cm 42cm 42cm 105cm
Long resistance tube 148cm 160 cm 172 cm 300 cm
Safety notes
PLEASE READ THE INSTRUCTIONS FOR USE PRIOR TO USE! PLEASE KEEP THE INSTRUCTIONS FOR USE IN A SAFE PLACE!
CAUTION! RISK OF INJURY! This product is not a toy and should only be used under adult supervision.
Consult your doctor before using this product, if you have health problems, allergic reactions or an injury. Stop the exercises
immediately if you feel sick or unwell whilst exercising or if any other complaints arise.
Do not extend the product beyond its maximum length (see table under “Technical data“).
GB/MTGB/MTGB/MT
GB/MTPTPT
Eliminação
A embalagem é feita de materiais não poluentes que podem ser eliminados
nos contentores de reciclagem locais.
As possibilidades de reciclagem dos artigos utilizados poderão ser averiguadas no seu Município ou Câmara Municipal.
Extensão em cruz:
Músculo tríceps (v. fig. D)
Coloca-se em pé. Cruzar um braço atrás das costas, e colocar o outro por cima da cabeça.
Segure respetivamente um punho em cada mão e as articulações da mão de forma reta.
Puxe a extensão em cruz com a mão superior para cima. A outra mão tem a função de estabilizador.
Repita depois o exercício com o outro braço.
Peito (v. fig. E)
Colocar os dois pés na largura da anca.
Coloque a extensão em cruz por baixo da omoplata à volta das costas e mantenha os punhos em frente do peito em tensão.
Move os braços com um movimento controlado para frente.
Músculo bíceps (v. fig. F)
Ligeira posição de passo com o pé direito para o punho da extensão em cruz, o corpo está estendido.
Mantenha o outro punho em altura da anca na mão direita. O cotovelo está colocado no corpo.
Conduza a mão mais ou menos na altura do ombro. Mantenha durante o movimento o cotovelo ligado ao corpo.
Coloque-se de novo lentamente em posição inicial.
Preste atenção para que as costas e a nuca estejam estendidas durante o exercício.
Após algumas repetições, treine também as outras partes do corpo.
Extensão comprida:
Ombros (v. fig. G)
Ligeira posição de passo com o pé direito para o meio da extensão comprida, o corpo está estendido.
Mantenha os punhos em altura da anca.
Puxe com o cotovelo dobrado e os braços em frente do corpo a extensão comprida verticalmente para cima até que os
punhos se encontrem na altura do peito.
Coloque-se de novo lentamente em posição inicial.
Costas (v. fig. H)
Sente-se no chão com as pernas mais ou menos esticadas e com as costas direitas.
Coloque a extensão comprida de forma plana à volta dos dois pés e retese-o com as duas mãos.
Dobre os braços junto ao corpo. Dobrar os cotovelos num ângulo de aprox. 90°.
Puxe os dois cotovelos junto ao corpo ligeiramente para trás, até que as mãos se encontrem ao nível das ancas.
Pernas (v. fig. I)
Deita-se de costas.
Levante as pernas como apresentado na figura I e coloque a extensão comprida de forma plana à volta dos dois pés.
Segure os punhos nas duas mãos e move estes para baixo. Coloque-os ao lado da anca.
Estende agora as suas pernas, como se queria levantar um peso com elas.
Não estende completamente as pernas.
Coloque-se de novo lentamente em posição inicial.
Limpeza e conservação
Nunca utilize agentes de limpeza abrasivos ou corrosivos. O produto ficaria danificado.
Limpe o produto apenas com água tépida e depois seque-o bem com um pano.
Armazene sempre o produto seco e limpo num local com temperaturas moderadas.
78299_cri_Fitness_Band_LB5.indd 3 29.08.12 09:04
DE/AT/CH DE/AT/CH DE/AT/CH
DE/AT/CH
Reinigung und Lagerung
Verwenden Sie keinesfalls scheuernde oder ätzende Reinigungsmittel. Das Produkt würde hierbei Schaden nehmen.
Reinigen Sie das Produkt nur mit lauwarmem Wasser und trocknen Sie es anschließend gut mit einem Tuch.
Lagern Sie das Produkt immer trocken und sauber in einem temperierten Raum.
Entsorgung
Die Verpackung besteht aus umweltfreundlichen Materialien, die Sie über die örtlichen Recyclingstellen
entsorgen können.
Möglichkeiten zur Entsorgung des ausgedienten Produkts erfahren Sie bei Ihrer Gemeinde- oder Stadtverwaltung.
Ziehen Sie nun den Unterarm gegen den Widerstand des Ring-Adapters nach oben und gehen Sie anschließend wieder in
die Ausgangsposition.
Achten Sie darauf, während der ganzen Übung den Rücken durch zu strecken.
Kreuz-Expander:
Trizeps (s. Abb. D)
Stehen Sie aufrecht. Verschränken Sie einen Arm hinter dem Rücken, den anderen halten Sie über Ihren Kopf.
Halten Sie je einen Handgriff in jeder Hand und die Handgelenke gerade.
Ziehen Sie den Kreuz-Expander mit der oberen Hand nach oben. Die andere Hand fungiert als Stabilisator.
Wiederholen Sie anschließend die Übung mit dem anderen Arm.
Brust (s. Abb. E)
Beide Füße etwa hüftbreit stellen.
Legen Sie den Kreuzexpander unterhalb der Schulterblätter um den Rücken und halten Sie die Handgriffe vor der Brust auf
Spannung.
Bewegen Sie die Arme mit einer kontrollierten Bewegung nach vorne.
Bizeps (s. Abb. F)
Leichte Schrittstellung mit dem rechten Fuß auf dem Handgriff des Kreuzexpanders, der Körper ist gestreckt.
Halten Sie den anderen Handgriff auf Hüfthöhe in der rechten Hand. Der Ellenbogen ist an den Körper angelegt.
Führen Sie die Hand etwa auf Schulterhöhe. Behalten Sie während der Bewegung den Ellenbogen am Körper angelegt.
Gehen Sie langsam wieder in die Ausgangsposition.
Achten Sie darauf, Rücken und Nacken während der Übung durchzustrecken.
Trainieren Sie nach einigen Wiederholungen auch die andere Körperseite.
Schlauch-Expander:
Schultern (s. Abb. G)
Leichte Schrittstellung mit dem rechten Fuß auf der Mitte des Schlauch-Expanders, der Körper ist gestreckt.
Halten Sie die Handgriffe auf Hüfthöhe.
Ziehen Sie mit angewinkelten Ellenbogen und die Arme vor dem Körper belassend den Schlauch-Expander vertikal nach
oben, bis sich die Handgriffe auf Brusthöhe befinden.
Gehen Sie langsam wieder in die Ausgangsposition.
Rücken (s. Abb. H)
Setzen Sie sich mit annähernd gestreckten Beinen und geradem Rücken auf den Boden.
Legen Sie den Schlauch-Expander flächig um beide Füße und bringen Sie ihn mit beiden Händen auf Zugspannung.
Beugen Sie die Arme neben dem Körper. Die Ellenbogen ca. im 90°-Winkel beugen.
Ziehen Sie beide Ellenbogen dicht am Körper leicht nach hinten, bis sich die Hände auf Hüfthöhe befinden.
Beine (s. Abb. I)
Legen Sie sich auf den Rücken.
Heben Sie die Beine an, wie in Abbildung I dargestellt und legen Sie den Schlauch-Expander flächig um beide Füße.
Halten Sie die Handgriffe in beiden Händen und bewegen Sie diese nach unten. Platzieren Sie sie seitlich vom Gesäß.
Strecken Sie nun Ihre Beine durch, als würden Sie ein Gewicht damit stemmen wollen.
Strecken Sie die Beine nicht ganz durch.
Gehen Sie langsam wieder in die Ausgangsposition.
Ziehen Sie das Produkt nicht über die maximale Länge (s. Tabelle unter „Technische Daten“).
VORSICHT! GEFAHR DER SACHBESCHÄDIGUNG! Verwenden Sie das Produkt nur in Räumen, in denen Sie genug
Abstand zu Personen/Gegenständen einhalten können, um Verletzungen/Sachbeschädigungen zu vermeiden.
Überprüfen Sie das Produkt vor jedem Gebrauch auf Beschädigungen oder Abnutzungen. Das Produkt darf nur in einwand-
freiem Zustand verwendet werden.
Halten Sie beim Dehnen des Produkts die Hände in direkter Verlängerung des Unterarms und überstrecken Sie die Handge-
lenke nicht!
Halten Sie die Bänder immer auf Zug und achten Sie darauf, nicht abzurutschen!
Das Produkt immer langsam und unter Spannung in die Ausgangsposition zurückführen.
Das Produkt darf niemals an Gegenständen, wie z. B. Tisch, Tür oder Treppenabsatz, befestigt werden.
Das Produkt darf niemals in Richtung Gesicht gezogen und niemals um Kopf, Hals oder Brust gewickelt werden.
Halten Sie das Produkt fern von scharfen, spitzen, heißen und/oder gefährlichen Gegenständen.
Vermeiden Sie direkte Sonneneinstrahlung und Heizungswärme.
Übungsanleitung
Die folgenden Übungen stellen nur eine Auswahl aus möglichen Übungen dar. Über weitere Übungsmöglichkeiten informieren
Sie sich bitte in der einschlägigen Literatur.
Tragen Sie bequeme Sport- und Freizeitbekleidung.
Wärmen Sie sich auf, bevor Sie mit den Übungen beginnen.
Führen Sie die Übungen in einem gleichmäßigen Tempo bei ruhiger Atmung durch. Halten Sie sich an die vorgegebenen
Bewegungsabläufe und überschätzen Sie sich dabei nicht. Atmen Sie beim Anspannen der Muskeln aus, atmen Sie beim
Entspannen der Muskeln ein.
Wiederholen Sie jede Übung 10–20 Mal.
Übungen
Ring-Expander:
Oberschenkel (s. Abb. A)
Begeben Sie sich in die Seitenlage und stützen Sie sich auf die Ellenbogen.
Das obere Bein befindet sich auf Hüfthöhe.
Fixieren Sie den Ring-Expander auf Höhe der Knöchel.
Heben und senken Sie langsam das obere Bein.
Wiederholen Sie anschließend diese Übung mit dem anderen Bein.
Bauch (s. Abb. B)
Legen Sie sich auf den Rücken und bringen Sie die Oberschenkel in einen 90°-Winkel zu Ihrem Körper.
Halten Sie die Handgriffe des Produkts mit beiden Händen fest und legen Sie dieses um Ihre Oberschenkel.
Ziehen Sie Ihre Knie entgegen des Widerstands des Ring-Expanders in Richtung Ihres Körpers an.
Belassen Sie Ihren Kopf und Ihre Arme während der gesamten Übung in der Ausgangsposition.
Bizeps (s. Abb. C)
Stehen Sie aufrecht, die Füße schulterbreit auseinander.
Nehmen Sie die Handgriffe des Ring-Expanders in je eine Hand und legen Sie eine Hand auf Ihre Hüfte.
Der Oberarm sollte dabei flach am Körper anliegen.
Expander-Set
Bestimmungsgemäße Verwendung
Dieses Produkt ist als Sportgerät konstruiert und nicht für den gewerblichen Gebrauch geeignet. Das Produkt ist nicht für thera-
peutische oder medizinische Behandlungen geeignet.
Technische Daten
Länge 40cm 50cm 60cm
Ring-Expander/
* Zugkraft
Grün (Z31324A) 22 N 30 N 39 N
Lila (Z31324B) 23 N 33 N 43 N
Pink (Z31324C) 38 N 54 N 66 N
Länge 60cm 80cm 105cm
Kreuz-Expander/
* Zugkraft
Grün (Z31324A) 13 N 28 N 40 N
Lila (Z31324B) 19 N 35 N 54 N
Pink (Z31324C) 20 N 42 N 65 N
Länge 240cm 270cm 300cm
Schlauch-Expander /
* Zugkraft
Grün (Z31324A) 14 N 20 N 26 N
Lila (Z31324B) 14 N 22 N 27 N
Pink (Z31324C) 15 N 24 N 29 N
* Toleranz der zuvor genannten Kraftangaben: +/- 20%
Handgriff zu
Handgriff Leicht
Grün
(Z31324A)
Mittel
Lila
(Z31324B)
Schwer
Pink (Z31324C) Max. Länge
Ring-Expander 24cm 24cm 24cm 60cm
Kreuz-Expander 42cm 42cm 42cm 105cm
Schlauch-Expander 148 cm 160 cm 172 cm 300 cm
Sicherheitshinweise
VOR GEBRAUCH BITTE DIE BEDIENUNGSANLEITUNG LESEN! BEDIENUNGSANLEITUNG BITTE SORGFÄLTIG
AUFBEWAHREN!
VORSICHT! VERLETZUNGSGEFAHR! Das Produkt ist kein Spielzeug und darf nur unter Aufsicht von
Erwachsenen verwendet werden.
Konsultieren Sie Ihren Arzt, bevor Sie das Produkt verwenden, wenn Sie gesundheitliche Probleme, allergische Reaktionen
oder eine Verletzung haben. Brechen Sie die Übungen sofort ab, wenn während der Übungen Übelkeit, Unwohlsein oder
sonstige Beschwerden auftreten.
IAN 78299
OWIM GmbH & Co. KG
Stiftsbergstraße 1
D-74167 Neckarsulm
Model no.: Z31324A/Z31324B / Z31324C
Version: 09/2012
© by ORFGEN Marketing
Estado de las informaciones · Versione delle
informazioni · Estado das informações · Last
Information Update · Stand der Informationen:
08/2012 · Ident-Nr.: Z31324A/B / C082012-5
78299_cri_Fitness_Band_LB5.indd 4 29.08.12 09:04

This manual suits for next models

2

Other Crivit Fitness Equipment manuals

Crivit 310298 User manual

Crivit

Crivit 310298 User manual

Crivit 93591 User manual

Crivit

Crivit 93591 User manual

Crivit 323072_1901 User manual

Crivit

Crivit 323072_1901 User manual

Crivit 275454 User manual

Crivit

Crivit 275454 User manual

Crivit 292772 User manual

Crivit

Crivit 292772 User manual

Crivit 292889 User manual

Crivit

Crivit 292889 User manual

Crivit 278448 User manual

Crivit

Crivit 278448 User manual

Crivit 304189 User manual

Crivit

Crivit 304189 User manual

Crivit Powerstick Operation and maintenance manual

Crivit

Crivit Powerstick Operation and maintenance manual

Crivit 271506 User manual

Crivit

Crivit 271506 User manual

Crivit 93674 User manual

Crivit

Crivit 93674 User manual

Crivit GB-2150 User manual

Crivit

Crivit GB-2150 User manual

Crivit 103754 User manual

Crivit

Crivit 103754 User manual

Crivit TB-1443 User manual

Crivit

Crivit TB-1443 User manual

Crivit 396069 2201 User manual

Crivit

Crivit 396069 2201 User manual

Crivit 290933 User manual

Crivit

Crivit 290933 User manual

Crivit DE COMBA CON PESAS User manual

Crivit

Crivit DE COMBA CON PESAS User manual

Crivit 277807 User manual

Crivit

Crivit 277807 User manual

Crivit WEIGHT SET User manual

Crivit

Crivit WEIGHT SET User manual

Crivit 279806 User manual

Crivit

Crivit 279806 User manual

Crivit Swing-Stepper User manual

Crivit

Crivit Swing-Stepper User manual

Crivit 278445 User manual

Crivit

Crivit 278445 User manual

Crivit AT-2154 User manual

Crivit

Crivit AT-2154 User manual

Crivit 93661 User manual

Crivit

Crivit 93661 User manual

Popular Fitness Equipment manuals by other brands

EPIC STRENGTH BARBELL RACK owner's manual

EPIC STRENGTH

EPIC STRENGTH BARBELL RACK owner's manual

Primal PSPR0020 Assembly instructions

Primal

Primal PSPR0020 Assembly instructions

DELTA-SPORT MT-4870 Instructions for use

DELTA-SPORT

DELTA-SPORT MT-4870 Instructions for use

Pure Enrichment PurePulse Duo Operation manual

Pure Enrichment

Pure Enrichment PurePulse Duo Operation manual

SportsArt Fitness DF-102 manual

SportsArt Fitness

SportsArt Fitness DF-102 manual

Airzone 14'SPRING TRAMPOLINE user manual

Airzone

Airzone 14'SPRING TRAMPOLINE user manual

Hama PW10 operating instructions

Hama

Hama PW10 operating instructions

Kogan Fortis MR-300 user guide

Kogan

Kogan Fortis MR-300 user guide

Kettler Ergometer E5 Assembly instructions

Kettler

Kettler Ergometer E5 Assembly instructions

Body Solid DPRS.3 owner's manual

Body Solid

Body Solid DPRS.3 owner's manual

Minivator Simplicity 950 Series user manual

Minivator

Minivator Simplicity 950 Series user manual

Insportline HG1092B owner's manual

Insportline

Insportline HG1092B owner's manual

Matrix AURA Series manual

Matrix

Matrix AURA Series manual

Stairmaster GAUNTLET Series 8 Service manual

Stairmaster

Stairmaster GAUNTLET Series 8 Service manual

CYBEX Plate Loaded Incline Press Owner's and service manual

CYBEX

CYBEX Plate Loaded Incline Press Owner's and service manual

Monark Ergomedic 831 E manual

Monark

Monark Ergomedic 831 E manual

Compex Fit5.0 quick start guide

Compex

Compex Fit5.0 quick start guide

biodex Balance System SD Series Instructions for use

biodex

biodex Balance System SD Series Instructions for use

manuals.online logo
manuals.online logoBrands
  • About & Mission
  • Contact us
  • Privacy Policy
  • Terms and Conditions

Copyright 2025 Manuals.Online. All Rights Reserved.