manuals.online logo
Brands
  1. Home
  2. •
  3. Brands
  4. •
  5. Crosswater
  6. •
  7. Plumbing Product
  8. •
  9. Crosswater Taos Deck-mount Tub Faucet with Handshower Trim... User manual

Crosswater Taos Deck-mount Tub Faucet with Handshower Trim... User manual

15121437-C
17-03-T
Replacement Parts
15121437-C 4
6
5
1
2
3
4
NO. Description Part No.
1
2
Diverter Knob Assembly
9Q1144
3
Set Screw & Allen Key
9Q1350NT
5
Handle Assembly 9Q1143
6
Washer, Key & Aerator
9Q1110PL
Hand Shower 5F0M0174
4 Diverter Rod Extension 9Q257000NT
For ease of installation you will need:
●To read the installation instructions completely before beginning.
●To read all warnings, care, and maintenance information.
Applicable Standards/Codes
Installation Dimensions
IAPMO certified to meet or exceed the following:
• ASME A112.18.1/CSA B125.1
• Uniform Plumbing Code
• National Plumbing Code of Canada
• ADA Compliant
3" 4"
2-1/2"
2-1/4" 2-1/2"
7" 7-1/2"
2-1/8"
5"
9"
3/4"-14 NPT
19" Max 19" Max
1-1/4" - 1-1/2"
1-1/2" - 1-1/2"2-1/8" MAX
59"
19-3/4"
1-1/2"
Taos Deck-mount Tub Faucet with Handshower Trim
17-03-T
Installation Instructions
Before beginning installation, check for any damage
that may have occurred during transport.
Note: Damage claims cannot be made during or
after installation.
Anti-scald protection is the responsibility of the installer and
according to applicable codes.
17-03-T
Installation Instructions
15121437-C 2
1
Turn the water supply off and remove
the mud guards.
5
Pull the diverter rod and knob up and
down to test the connection.
2
Connect the diverter rod extension to
the diverter rod in the diverter spout
nipple.
4
From the back of the spout insert the
diverter knob into the spout and
carefully place it on the diverter rod.
Secure the knob with the setscrew.
7
Pull black nylon or finished hose
through the hand shower nipple
bracket. Slide the hand shower
bracket and hose guide over the
hose. Secure the assembly with the
thread. Note, make sure the hose
does not slip under the deck.
6
Align the handle and place the handle
and escutcheon assembly onto the
valve. Secure the assembly by
turning the escutcheon clockwise.
Repeat for the other valve.
9
8
Remove the aerator with the supplied
key. Turn the water supply on.
15121437-C 3
Rinse away any traces of soap and gently dry with a clean, soft cloth after each use. Rinse completely with water and dry
any overspray. This will maintain the finish and avoid water spotting.
To remove mineral deposits, use a 50/50 solution of white vinegar and water. Do not allow the solution to soak on the
product.
Simichrome Polish® contains a protective film to enhance maintenance and is helpful in preventing water spot buildup.
Follow instructions to ensure optimum results.
Never use an abrasive material such as a brush or scouring pad to clean the surface. The use of abrasive cleaners,
cleansers or disinfectants will alter the surface finish and void the warranty.
Do not allow certain materials such as toothpaste, cologne, shaving cream, nail polish remover, vinegar, wine, drain and
glass cleaners to remain on the surface. Prolonged contact will alter surface finishes and void the warranty.
We DO NOT recommend using any household cleaners as many can cause damage to the finish.
Please see the website for care instructions for specific finishes.
Cleaning Instructions
3
Place the spout “O” ring under the
spout and install spout on spout
nipple-diverter assembly. Be sure the
spout is firmly resting on the deck.
Secure the spout with the setscrew.
9
Make sure the diverter knob is in the
down position. Turn the faucet
handles on full for one minute to
flush debris.
10
Leaving the water on, pull the hose
to its farthest extension and point it
into the tub. Pull the diverter knob to
its top position. Flush the debris for
one minute. Turn off the valves.
11
Attach the hand shower to the black
nylon or finished hose.
12
Re-install the aerator with key.
13
Installation complete.
Warranty - This Crosswater London product is covered by a limited lifetime warranty. For full details, terms and conditions please visit our
website.
For further information contact:Crosswater London, 393 Fortune Blvd., Milford, MA 01757
Toll free number: 844-XWATER-1 (844-992-8371) tel: 508-381-0433 fax: 508-381-6068
www.crosswaterlondon.com
email: technical@crosswaterlondon.com
Issue date: 18112019

Other Crosswater Plumbing Product manuals

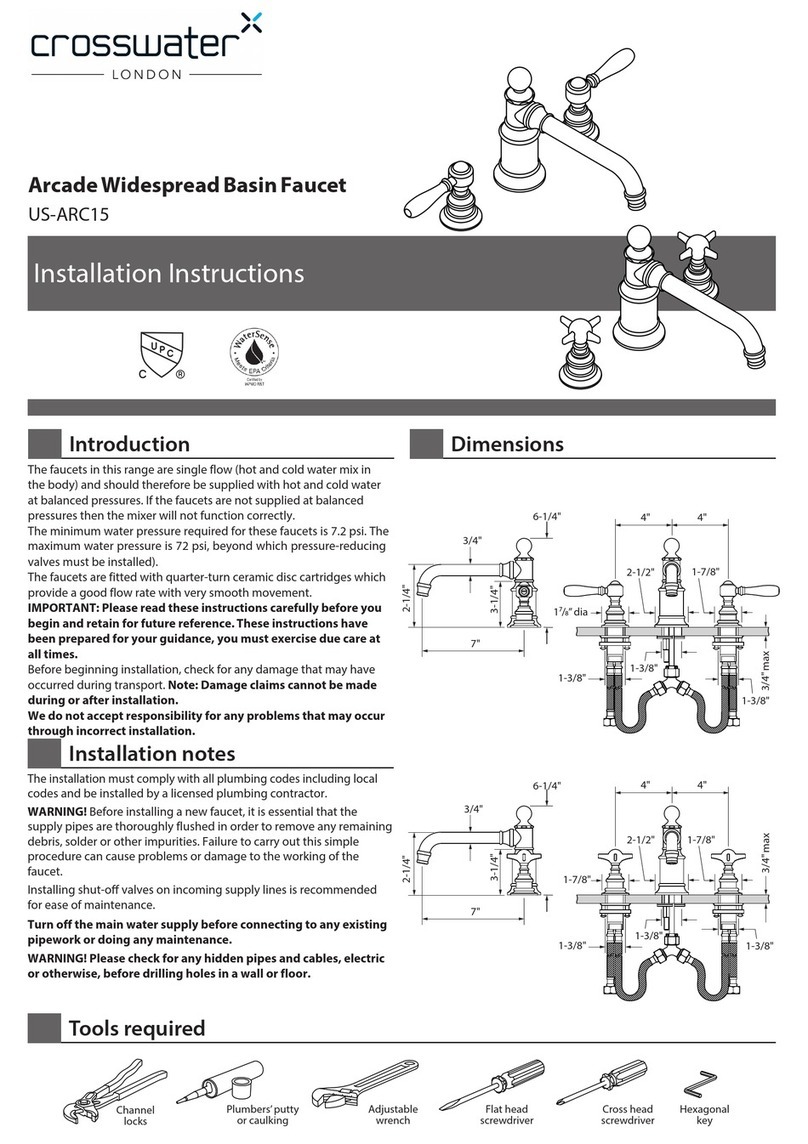
Crosswater Arcade US-ARC14 User manual

Crosswater

Crosswater Arcade US-ARC14 User manual

Crosswater KL322DC User manual

Crosswater

Crosswater KL322DC User manual

Crosswater 1000 Series User manual

Crosswater

Crosswater 1000 Series User manual

Crosswater US-BSW0101 User manual

Crosswater

Crosswater US-BSW0101 User manual

Crosswater Arcade US-ARC15 User manual

Crosswater

Crosswater Arcade US-ARC15 User manual

Crosswater Smith Basin 24 Top SMI-BT24-WH User manual

Crosswater

Crosswater Smith Basin 24 Top SMI-BT24-WH User manual

Crosswater US-ARC953 User manual

Crosswater

Crosswater US-ARC953 User manual

Crosswater Fenmore 28-15P-T User manual

Crosswater

Crosswater Fenmore 28-15P-T User manual

Crosswater ATOLL SQUARE EXPOSED THERMO SHOWER VALVE... User manual

Crosswater

Crosswater ATOLL SQUARE EXPOSED THERMO SHOWER VALVE... User manual

Crosswater Arcade US-ARC600 User manual

Crosswater

Crosswater Arcade US-ARC600 User manual

Crosswater Darby 15-16-T User manual

Crosswater

Crosswater Darby 15-16-T User manual

Crosswater US-SP380 User manual

Crosswater

Crosswater US-SP380 User manual

Crosswater US-AL7005CW User manual

Crosswater

Crosswater US-AL7005CW User manual

Crosswater Leyden 14X-03-T User manual

Crosswater

Crosswater Leyden 14X-03-T User manual

Crosswater Berea 11-02-T User manual

Crosswater

Crosswater Berea 11-02-T User manual

Crosswater Belgravia US-BL440 User manual

Crosswater

Crosswater Belgravia US-BL440 User manual

Crosswater Berea 11-01 User manual

Crosswater

Crosswater Berea 11-01 User manual

Crosswater WS2001RC User manual

Crosswater

Crosswater WS2001RC User manual

Crosswater Waldorf US-WF422175 User manual

Crosswater

Crosswater Waldorf US-WF422175 User manual

Crosswater Solo Product manual

Crosswater

Crosswater Solo Product manual

Crosswater 17-20-T User manual

Crosswater

Crosswater 17-20-T User manual

Crosswater Smith SMI-UM1913-TSQ-WH User manual

Crosswater

Crosswater Smith SMI-UM1913-TSQ-WH User manual

Crosswater PRO125DNJ User manual

Crosswater

Crosswater PRO125DNJ User manual

Crosswater 28-07 User manual

Crosswater

Crosswater 28-07 User manual

Popular Plumbing Product manuals by other brands

Porcher 5339 Series installation instructions

Porcher

Porcher 5339 Series installation instructions

Brizo SOLNA Series manual

Brizo

Brizo SOLNA Series manual

VIGO VG15710 manual

VIGO

VIGO VG15710 manual

Kraus KWT300-32 installation manual

Kraus

Kraus KWT300-32 installation manual

TLV QuickTrap FS21-L instruction manual

TLV

TLV QuickTrap FS21-L instruction manual

Mira Sport Max 1.1746.007 installation guide

Mira

Mira Sport Max 1.1746.007 installation guide

Tylo Round Vision 150 manual

Tylo

Tylo Round Vision 150 manual

American Standard Monterrey 7500.140 Specification sheet

American Standard

American Standard Monterrey 7500.140 Specification sheet

BELLOSTA brunsin 5701/4L Installation instruction

BELLOSTA

BELLOSTA brunsin 5701/4L Installation instruction

Homewerks Worldwide 3220-15-CH-B quick start guide

Homewerks

Homewerks Worldwide 3220-15-CH-B quick start guide

Spectrum Brands Pfister Cassano F-049-CS Quick installation guide

Spectrum Brands

Spectrum Brands Pfister Cassano F-049-CS Quick installation guide

Hans Grohe Mondaro 18001 Series quick start guide

Hans Grohe

Hans Grohe Mondaro 18001 Series quick start guide

Hans Grohe Verso Vario 28779000 manual

Hans Grohe

Hans Grohe Verso Vario 28779000 manual

Hans Grohe Focus M42 150 1jet 71814 Series Assembly instructions

Hans Grohe

Hans Grohe Focus M42 150 1jet 71814 Series Assembly instructions

Hans Grohe Logis 70 71071010 Instructions for use/assembly instructions

Hans Grohe

Hans Grohe Logis 70 71071010 Instructions for use/assembly instructions

American Standard 2175.503 Specification sheet

American Standard

American Standard 2175.503 Specification sheet

Hans Grohe Pontos Base 15886000 Usage instructions / installation manual

Hans Grohe

Hans Grohe Pontos Base 15886000 Usage instructions / installation manual

Axor Starck 40874 1 Series installation instructions

Axor

Axor Starck 40874 1 Series installation instructions

manuals.online logo
manuals.online logoBrands
  • About & Mission
  • Contact us
  • Privacy Policy
  • Terms and Conditions

Copyright 2025 Manuals.Online. All Rights Reserved.