Cyklos GPM 450 User manual

Operating Instructions
Issue no.
2
Sheets
6
Creasing and Perforating Machine
GPM 450
Attention
This document including its appendices is exclusive intellectual property of Cyklos (producer cooperative)
Choltice. Any other use (copying, distribution or sale) is possible only with approval of the chairman of the
cooperative.
Valid from:
7.6.2010

Operating Instructions | GPM 450
2
CONTENTS
1. Safety Risks..............................................................................................................................................2
2. Technical Parameters...............................................................................................................................3
3. Machine Description .................................................................................................................................4
4. Machine Description, Installation and Adjustment.....................................................................................5
4.1 Adjustment of Upper Bar Stroke..........................................................................................................5
5. The Most Common Faults (Troubleshooting)............................................................................................5
6. Machine Disposal .....................................................................................................................................6
1. SAFETY RISKS
a) The operator or the individual appointed for operation cannot use the machine unless they have
been trained.
b) It is forbidden to crease and perforate foils, sheet metal or other similar materials.
c) The machine can be only used in enclosed spaces (e.g. offices, shops). It is forbidden to use the
machine outdoors.
d) It is forbidden to use the machine when the electric cord is damaged.
e) It is forbidden to use the machine if it makes strange sounds.
f) It is forbidden to connect the machine to voltage different from that indicated on the manufacturer’s
identification plate.
g) Read all instructions before using the machine.
h) Keep the children away from the machine.
i) It is forbidden to put fingers or hands into the machine when the electric cord is plugged in.
j) Do not replace faulty electrical components with components of different type or different capacity.
When replacing a component, the electric cord must be unplugged.
l) Covers can be only dismounted by trained personnel when the machine is unplugged.

Operating Instructions | GPM 450
3
2. TECHNICAL PARAMETERS
a)
Max. working width
450 mm
b)
Recommended paper grammage
80 –400 g/m² (creasing, punching)
80 –250 g/m² (perforating)
c)
Crease width*
CITO 1.0 mm –paper thickness < 0.4 mm
(mostly 80 –150 gsm)
CITO 1,4 mm - paper thickness 0,2 - 0,4 mm
(mostly 160 –250 gsm)
iron channel - paper thickness 0,4 - 0,5 mm
(mostly 250 - 400 g/m²)
d)
Machine dimensions
710 x 590 x 300 mm
660 x 650 x 400 mm (transport dimension)
e)
Machine weight
net 39 kg, gross 42 kg
f)
Voltage / frequency
230 V/50 Hz
*Note: Respect the recommended width of creasing channel for different paper thickness. If thick paper is used in
combination with a narrow crease, it will result in the paper being pressed into the creasing channel, and the rollers
starting to slip in an attempt to release the paper. Use wider crease channel in such case.

Operating Instructions | GPM 450
4
3. MACHINE DESCRIPTION
1 –Top cover
2 –Electric switch
3 –Rear table
4 –Front table
5 –Control indicator
6 –Rear stop
7 –Front stop
8 –Lower crease/perf tool
9 –Upper tool locking screws
10 –Upper bar
11 –Clamp
12 –Tool thrust regulating screws
13 –Foot pedal
4
2
3
5
6
7
8
5
1
9
10
12
11
13

Operating Instructions | GPM 450
5
4. MACHINE DESCRIPTION, INSTALLATION AND ADJUSTMENT
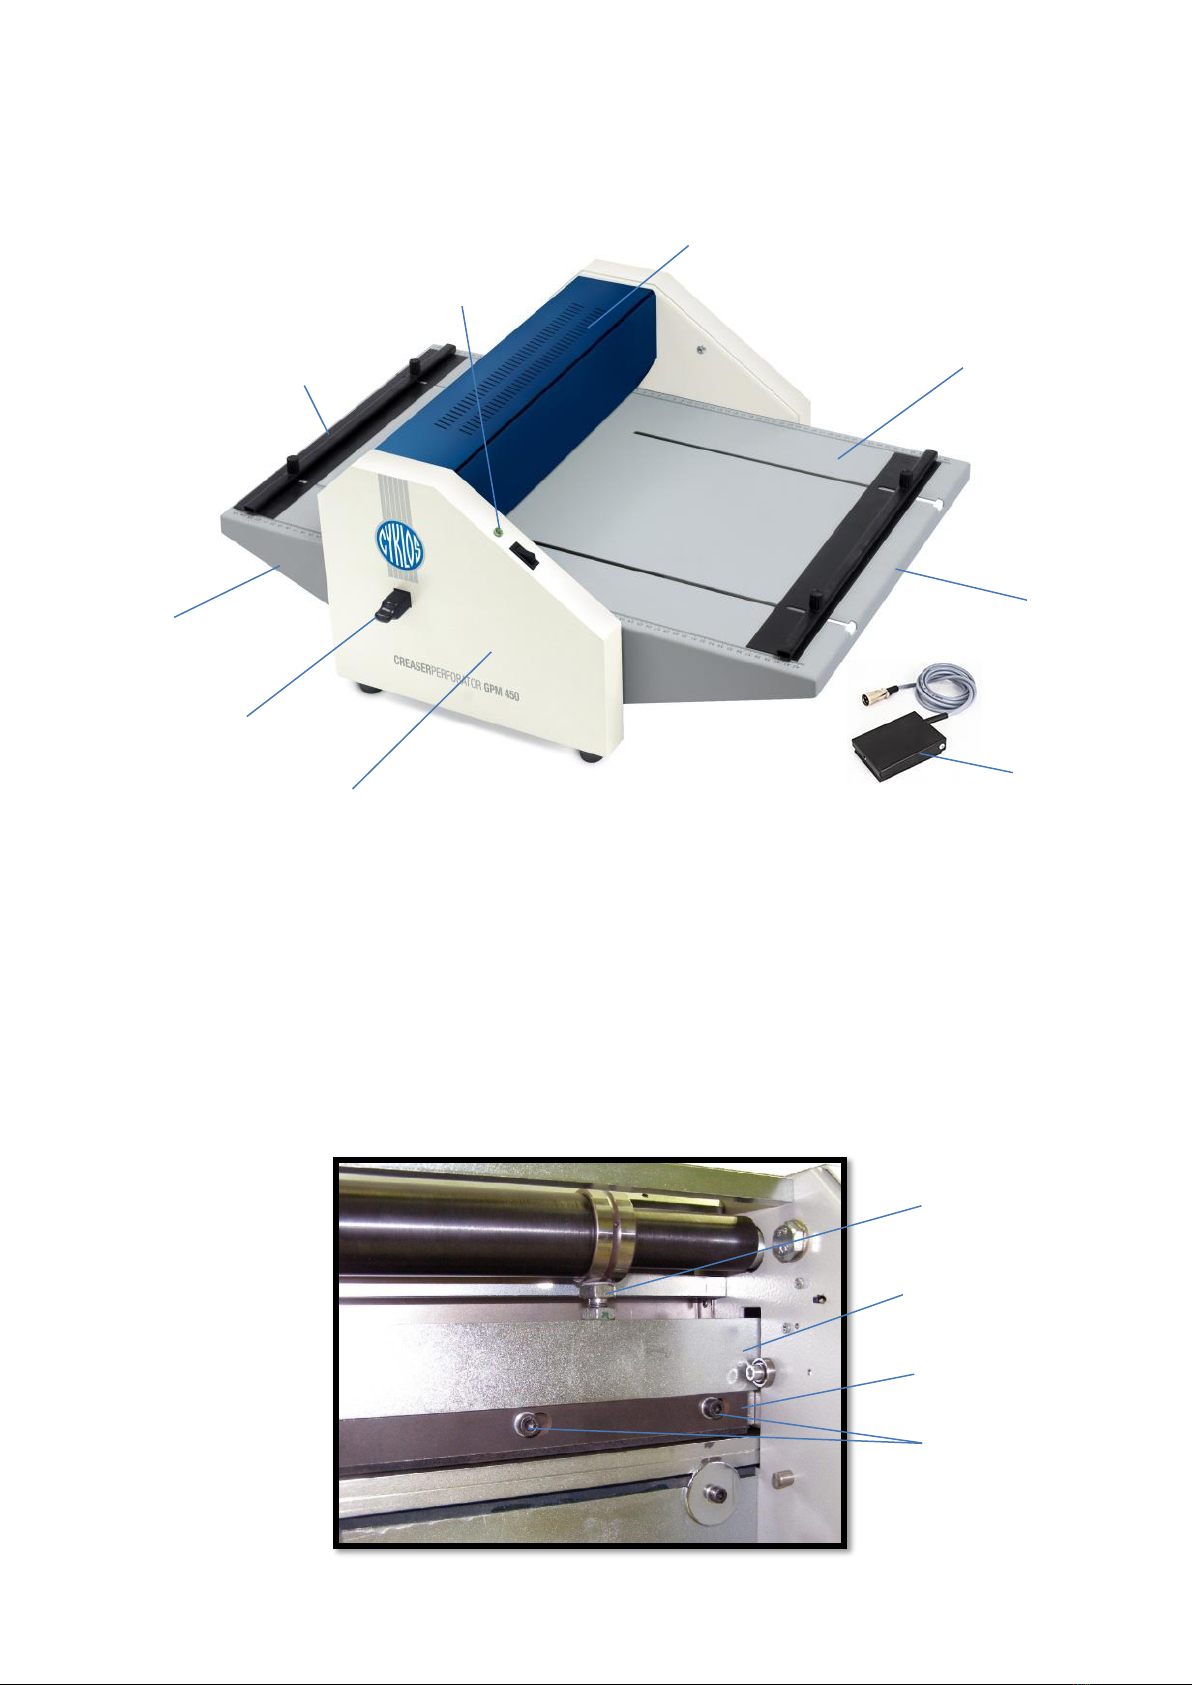
Electrical creasing and perforating machine is suited for final processing of graphical material up to 450 mm
width. Creasing enables to fold paper easily without cracking. Perforation can be done simply by a blade
change, and turning the lower tool (8) without further adjustment. Waste-free perforation allows easy paper
separation. Millimeter scales, which are used to adjust paper stops, are placed on the sides of the both
tables (3, 4). The machine is controlled, either by a hand-operated switch on the cover (2), or by a foot
pedal (13).
When the machine is unpacked, it is placed on a solid flat surface. First the rear table (3) has to be installed
and secured, and also the foot pedal if needed. Then, after the machine has been plugged in, it is set in a
working condition and the control indicator (5) shines constantly.
For perforation the lower tool (8) has to be turned by the smooth (no groove) surface faced upwards and
beside that it is necessary to replace the creasing knife with a perforating knife (separate packing). To
achieve this, the machine has to be unplugged first. Then we tilt up the top cover (1). There are 5 screws
(9) and clamp (11) holding the knife inside the machine. These need to be dismounted. After knife
replacement screws should not be tightened completely until the check test is carried out. Plug the machine
in, press once electric switch. The knife goes down and aligns itself with respect to the bottom tool. Then
plug the machine out again and tighten the screws completely. This way crease/perf knife and lower tool
are parallel.
In case of poor quality of perforating, or while having trouble with separation of the paper after perforating
has been completed, it is necessary to adjust the pressure of upper bar.
4.1 Adjustment of Upper Bar Stroke
Unless the depth of a crease on both sides of the sheet is identical or unless the sheet is torn away evenly
after perforation, the upper bar (10) can be moved down using the tool thrust regulation screws (12). The
screws should be loosened anticlockwise by 1/12 (30°) of the revolution (the bar moves downwards) and
then secure them with a nut. Try the quality of perforation after each turn of the screw by 30° and, if
satisfactory, do not turn the screws any more. When adjustment of perforation is finished, the machine is
also to be adjusted for creasing.
5. THE MOST COMMON FAULTS (TROUBLESHOOTING)
- control indicator flickers approx. 1x /sec: the top cover (1) is open or the rear table (3) is pushed out
- control indicator flickers approx. 2x /sec: the upper bar mechanism has been blocked, it is necessary to
unplug the machine, to loosen locking nuts and then to turn the tool thrust regulating screw (9) clockwise
(approx. 2 turns) and then the upper bar moves up. After the machine has been turned back on, the
unfinished working cycle finish automatically. It is necessary to readjust the upper bar (see Section 4.1).

Operating Instructions | GPM 450
6
6. MACHINE DISPOSAL
After the end of the service life, it is forbidden to dispose of the machine in the municipal waste. The
machine must be disassembled, and metallic, non-metallic, plastic, rubber and electronic parts sorted.
These parts are disposed of at the relevant points of recycling. Some parts of the machine can contain
hazardous substances that are harmful to the environment and health.
Table of contents
Other Cyklos Paper Folding Machine manuals