manuals.online logo
Brands
  1. Home
  2. •
  3. Brands
  4. •
  5. D-Link
  6. •
  7. Wireless Router
  8. •
  9. D-Link DSL 2640B User manual

D-Link DSL 2640B User manual

Setting Up Your
Setting Up Your Setting Up Your
Setting Up Your
D
DD
D-
--
-Link DSL 2640B
Link DSL 2640BLink DSL 2640B
Link DSL 2640B
Wireless Router
Wireless RouterWireless Router
Wireless Router
Read this first
Read this firstRead this first
Read this first
Item code: 048370
2
What’s in the ox:
What’s in the ox:What’s in the ox:
What’s in the ox:
Before you start
Before you startBefore you start
Before you start
Introduction
IntroductionIntroduction
Introduction
Hello, thanks for choosing our wireless router. With
this guide we’ll take ou through the setup. Don’t
let all the wires intimidate ou, putting it together
is a piece of cake.
If at an time ou do get stuck, there’s lots more
help on our website:
Fitting your microfilters
Fitting your microfiltersFitting your microfilters
Fitting your microfilters
1) Plug a microfilter into our
telephone socket. If ou had
to unplug something, ou can
plug it back into the “Phone”
socket of the
microfilter. It’s best to leave
it out until ou’ve got
ever thing working though.
Microfilters look small and
unimportant but the ’re what
keep our phone and Internet
services from interfering with each other.
Follow these golden rules to keep your
broadband fast and reliable.
2) Plug the Power Adapter into the back of our
router and the other end of the adapter into the
nearest wall socket.
Next, screw the wireless aerial into the socket on
the back of the router.
You’ll also find:
•
The wireless aerial
•
A CD that includes the manual.
You don't need the CD and quick install guide to
get started, but the user guide on the CD will help
ou use the router's advanced features.
Service roadband Username
Plusnet your-username@plusdsl.net
Madasafish your-username@madasafish.com
Force9 your-username@f9.co.uk
Free-Online your-username@freeonline.net
•
Put a microfilter on all the telephone
extensions that have something plugged
into them.
•
Avoid using old extension cables, the less
internal wiring involved the better.
•
Don’t plug one microfilter into the socket of
another microfilter.
3) Plug one end of the gre broadband cable into
the DSL socket on the back of the router, plug the
other end into the microfilter (attached to your
phone line in step 1).
4) Make sure power is switched on and watch the
lights on the front of the router.
5) The Power light will first go red and the DSL
light will flash. Wait until the power light turns
green and the DSL light stops flashing before
continuing.
Item code: 048370
http://support.plus.net
Is your broadband ready?
Hold off using this guide until our broadband ser-
vice is read to use. We send ou an email when it
happens.
Got your broadband username and
password?
You’ll need them to get connected. Your broadband
username is the welcome email we sent ou, it
looks like this:
6
Trou leshooting
Trou leshootingTrou leshooting
Trou leshooting
Power State
Off Router not powered, check power cable and power
socket
Red Router is starting up, should turn green after a
short time
Green Router is powered up
Internet State
Off Authentication error - check our username and
password are correct
Solid Green Broadband service connected
Blinking Green Attempting to connect to broadband service
Status Lights
DSL State
Off No DSL cable connected/ Microfilter or phone line
problem
Blinking
Green
Router is attempting to connect to the local telephone
exchange
Solid
Green
Broadband service is connected
LAN (Ethernet ) State
Off No device connected
Solid Green Device connected
Blinking Green Device sending / receiving data
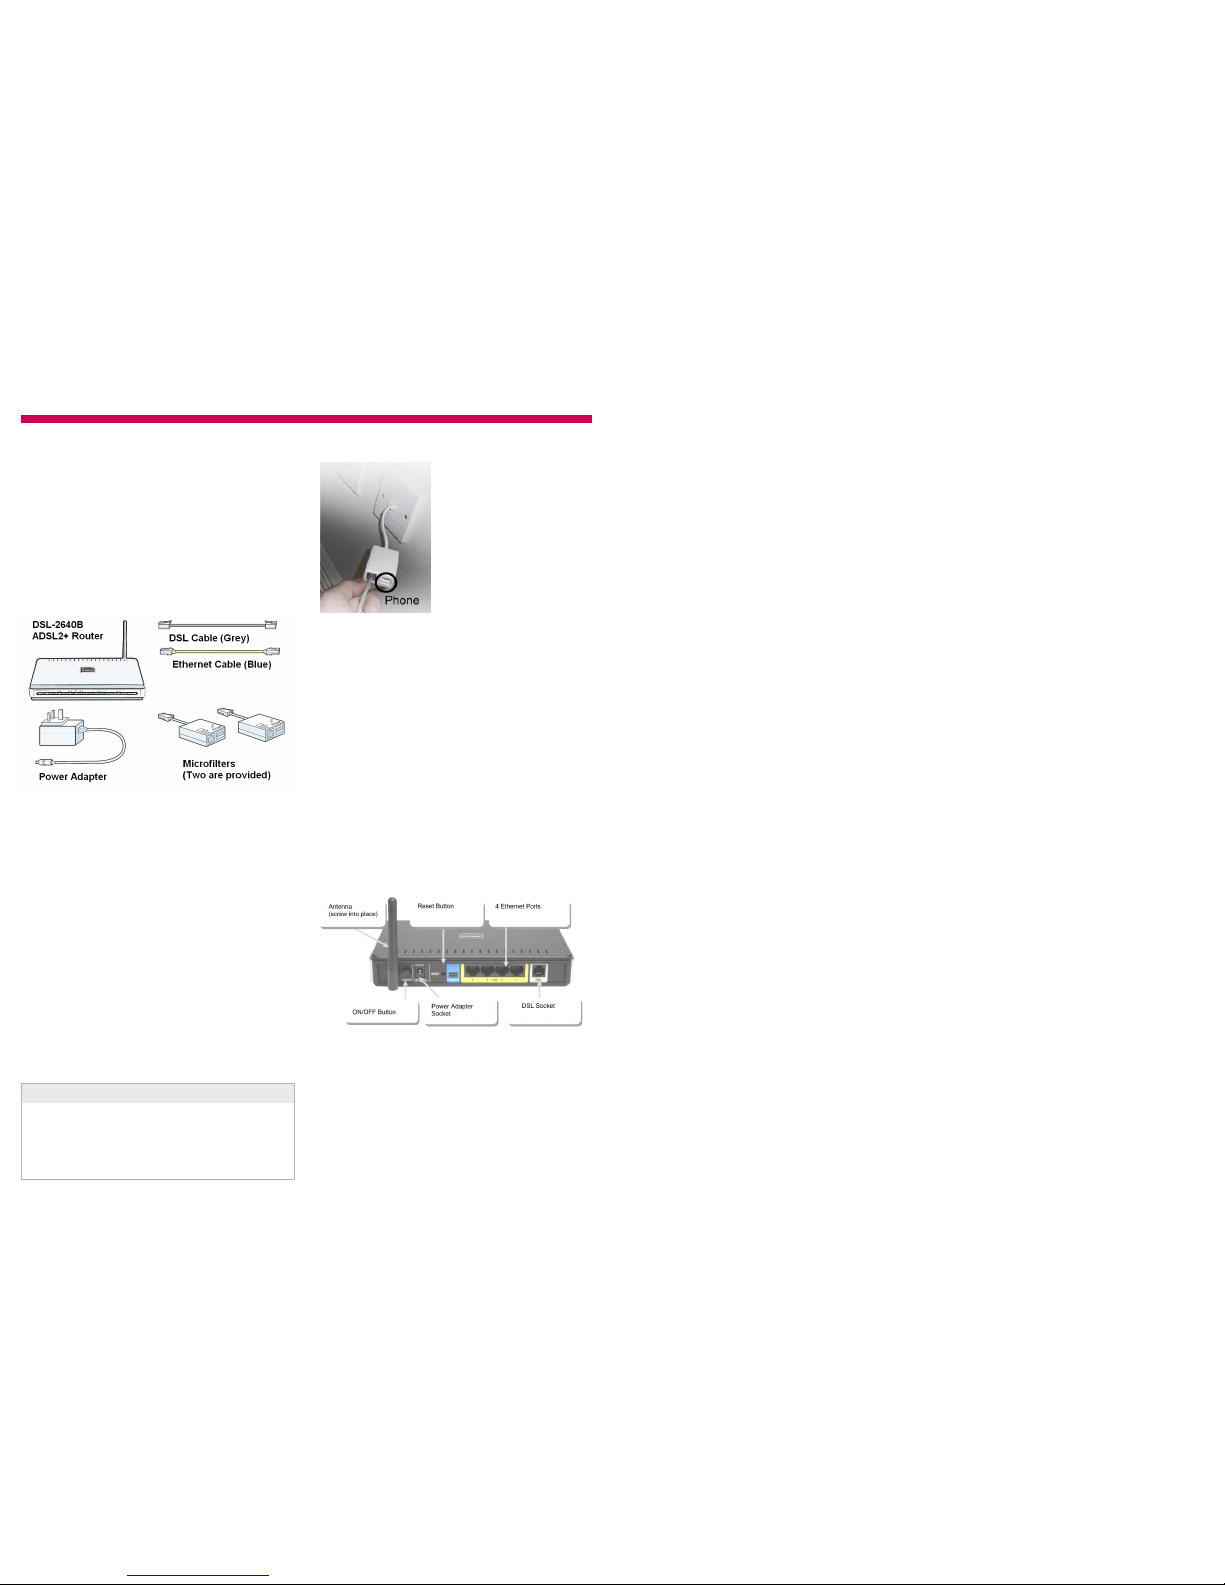
Is the DSL light flashing?
Check our microfilters - there should be one in
each telephone extension on that has something
plugged into it. Remember not to use two
microfilters on the same extension.
If ou are using a telephone extension cable, tr
connecting our router to the main telephone
socket. Telephone extensions are a common cause
of connection problems, we recommend wireless
rather than a telephone extension cable.
Is the Internet light off or red?
T pe our username and password in again.
Double check the email we sent ou to confirm
ou’ve got it right.
If ou’re having problems with our router, ou can
return ever thing to the default setting b using
the reset button.
Make a note of our roadband Username and
Password before ou start
1) Check the router is switched on (power light
green).
2) Use a paperclip, pen or pointed object to press
into the reset pin hole on the back of the router.
3) Keep the reset button pressed for at least 5
seconds. The power light will come back on to
confirm that the reset has completed.
4) You now need to appl our settings again.
Just follow this guide again from the beginning.
Resetting your router
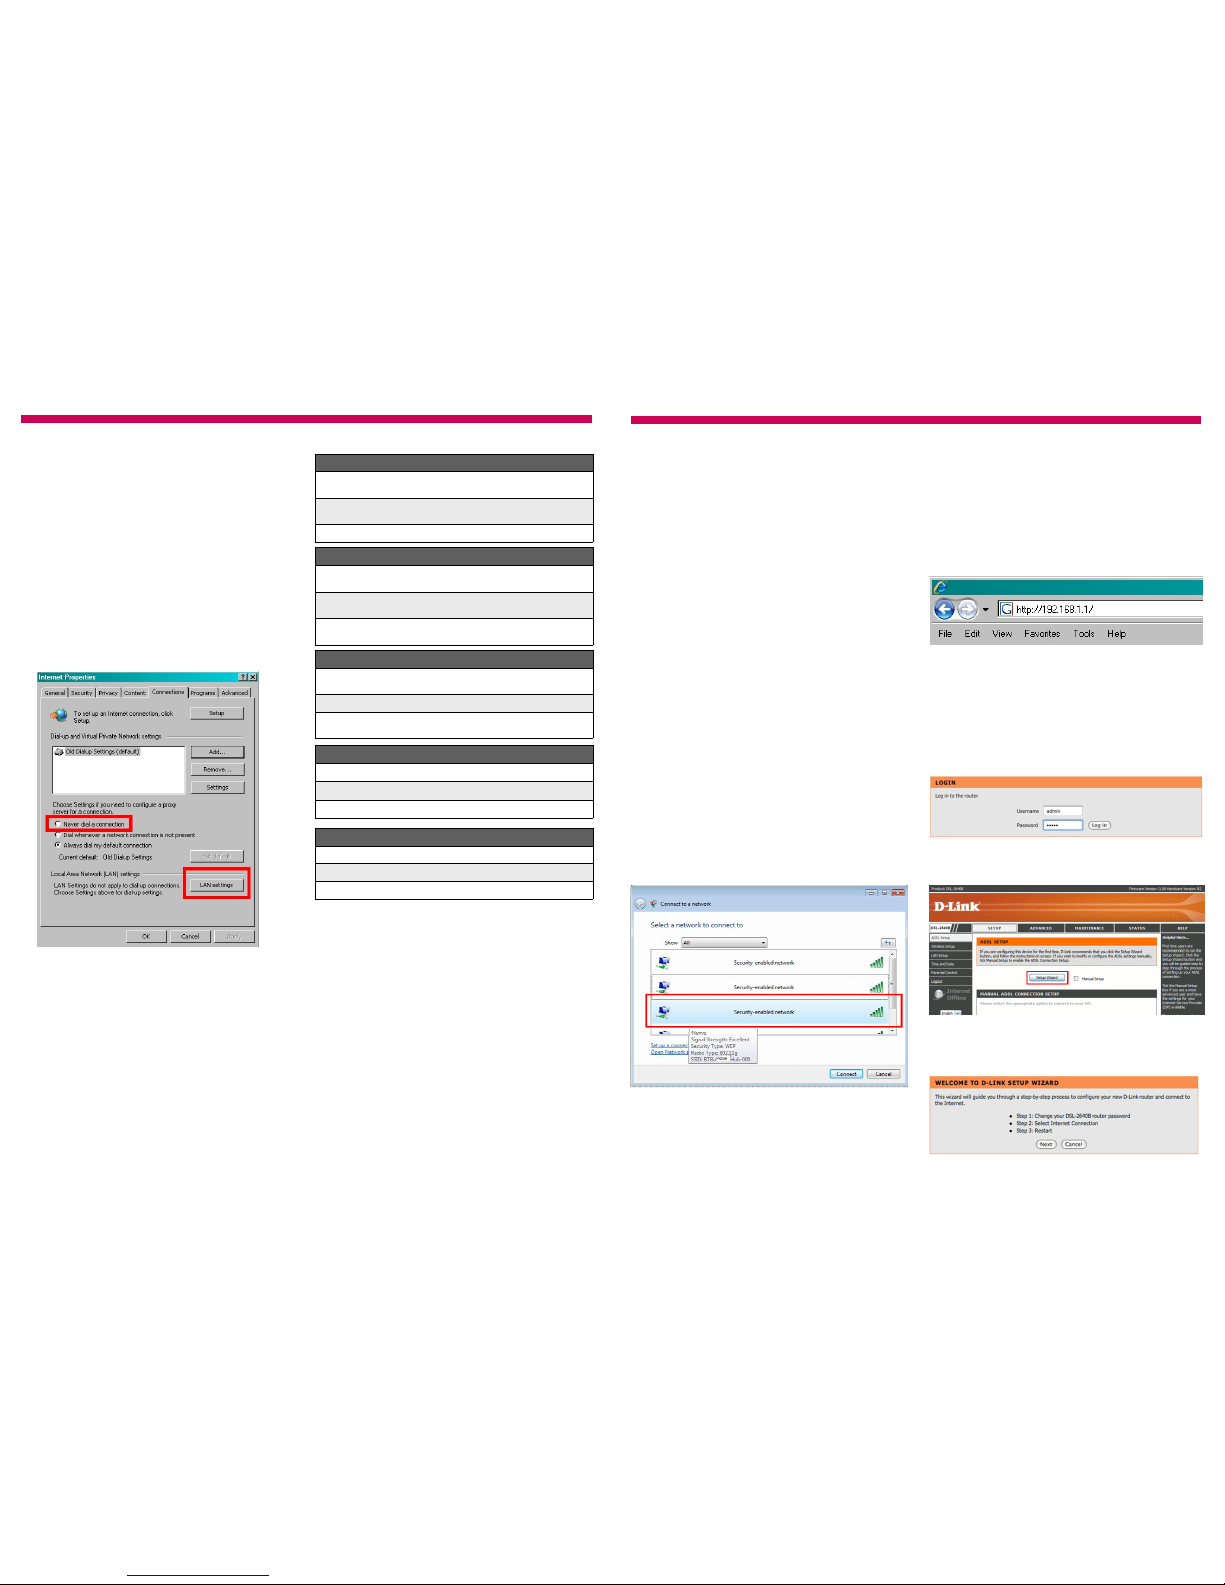
Does a Windows dial-up networking screen
appear when you try to connect to the
Internet?
You need to stop our computer from tr ing to use
the dial-up settings, which are often used b USB
broadband modems.
In most versions of Windows ou would:
1) Click on the Start menu, then Control Panel.
2) Select Internet Options. or Network and
Internet Connections, then Internet Options.
3) Select the Connections tab. Select Never dial
a connection. Click LAN Settings… and select
Automatically detect settings.
WLAN (Wireless) State
Off Wireless not configured
Solid Green Wireless connected
Blinking Green Wireless is operational and sending data
Item code: 048370
3
Connecting to your router
Connecting to your routerConnecting to your router
Connecting to your router
With an Ethernet cable
Follow these steps to use the network cable to
connect the router to our computer. Go to the
next section - With Wireless If ou want to use
our computer’s wireless features instead.
1) Plug the blue Ethernet cable into an of the 4
available Ethernet ports on the router.
2) Plug the other end of the Ethernet cable into
our computer’s Ethernet port.
An Ethernet status light on the front of the router
will now light up.
3) Jump to the section called ‘Connecting to the
Internet’.
With Wireless networking
Follow these steps to connect using wireless. Your
computer will need to have a wireless adapter.
1) Make sure our computer’s wireless adapter
card is installed and working OK.
2) Use our wireless adapter’s connection utilit ,
or, if ou are using Windows, click the Start Button
and go to My Network Places, then select
Connect to a network.
3) Your router will show up as dlink. Click on it
and then click the Connect button. You’re now
connected, it’s time to move on to the next section.
Connecting to the Internet
Connecting to the InternetConnecting to the Internet
Connecting to the Internet
1) The first thing ou’ll need to do is connect to the
D-Link router homepage. Open our web browser
(such as Internet Explorer).
Ignore an error messages ou see such as
“Cannot connect to server”.
4) You’ll see the Setup Wizard welcome page.
Click Next to continue.
3) The next thing ou’ll see is the D-Link home
page. Click Setup Wizard.
2) The router’s login screen will appear. Enter the
username and password and click Log in.
Username: admin
Password: admin
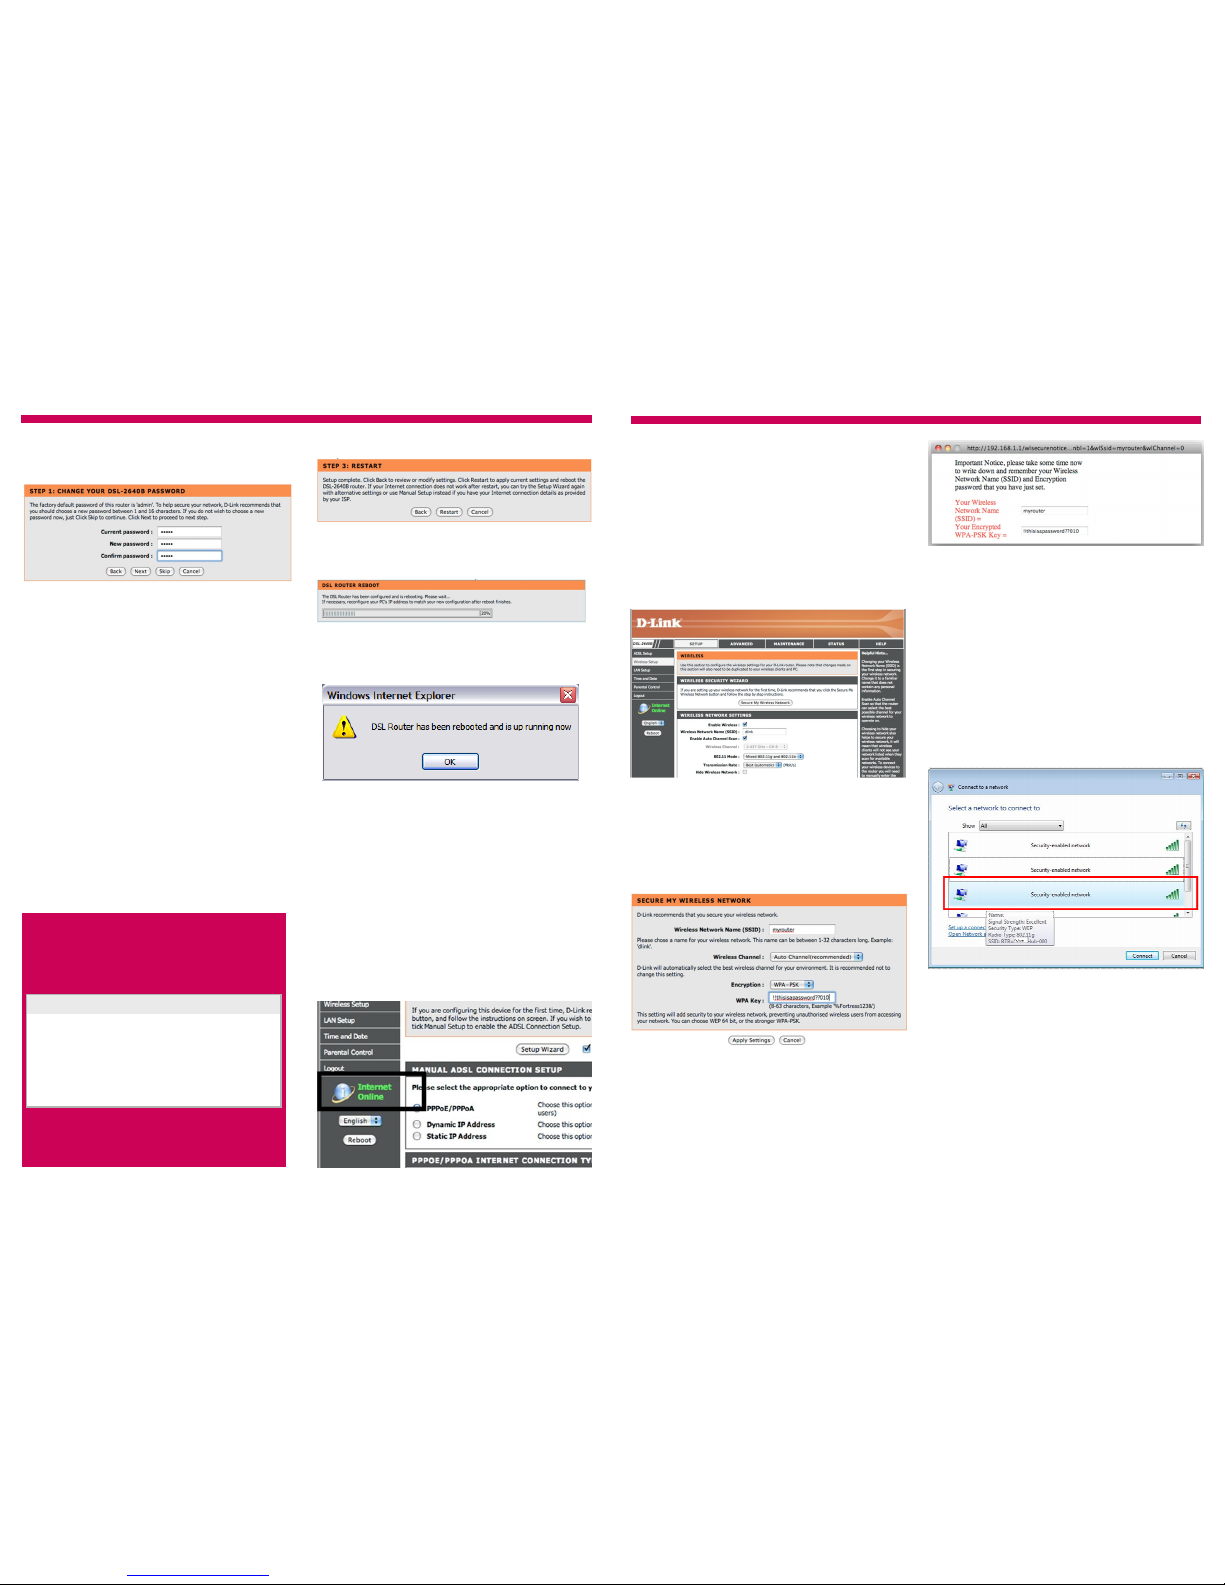
If ou’ve gone through this guide before, ou might
have changed the password during step 5, so bear
this in mind.
Item code: 048370
4
5) First ou’ll be asked to asked to change the
routers password. Make sure ou can remember
this as ou’ll need it each time ou want to log in
to the D-Link homepage.
11) Log back into the router following steps 1
and 2 again, to check the connection status. If
ou’re connected, ou’ll see Internet Online in
green on the left hand side of the D-Link router
homepage.
The Internet light on the front of the router should
also turn green.
That’s it, ou’re online. See, we said it was eas .
The next section will walk ou through the set up
of our wireless securit . This is reall important,
otherwise neighbours or passers b could connect
to our network.
Service roadband Username
Plusnet your-username@plusdsl.net
Madasafish your-username@madasafish.com
Force9 your-username@f9.co.uk
Free-Online your-username@freeonline.net
6) Next, on the Select Internet Connection T pe
screen choose United Kingdom as the Countr
and Others for the ISP Provider.
Doing this should fill in the other details for ou.
Check that the ’re filled in like this:
VPI: 0
VCI: 38
Connection T pe: PPPoA VC-Mux
Click Next to continue.
7) Now enter our roadband Username and
Password. Press Next to continue.
These are not the Username and Password
that you used in step 2.
If ou don’t change the password it will be set as
admin.
Click Skip if ou don’t want to change the router
password.
If ou’re not sure what our roadband
Username is, check the welcome email we
sent after ou signed up.
It should look like this:
8) Finall click Restart.
The password ou need is the one ou chose
when ou signed up. It’s the same one ou
use to login to our website.
9) You’ll see a progress bar that shows ou how
long the reboot takes.
10) When the reboot completes, ou’ll see a
confirmation window, click OK.
Item code: 048370
5
Item code: 048370
1) Open up a web browser (such as Internet
Explorer), in the address line t pe in
“192.168.1.1”, then press Enter.
2) Log in to the router and on the Setup page click
Wireless Setup.
3) Click the Secure My Wireless Network button
and the Secure M Wireless Network page will
appear.
4) At the moment encr ption will be set to None.
We recommend changing this to WPA-PSK as this
offers a good balance between securit and ease of
use. In the WPA Ke box enter a password of our
choice. You’ll will need to enter this on an com-
puter or games console ou want to use with this
router.
You can also change the Wireless Network Name
on this page, this is the name that will appear in
our wireless network settings. If there are a lot of
wireless routers in our area it ma be useful to
change this so ou know which network is ours.
You can also hide the name for increased securit .
There is normall no need to change the wireless
channel. Click Apply Settings and the router will
confirm the details to ou.
Setting Up Wireless Security
Setting Up Wireless Security Setting Up Wireless Security
Setting Up Wireless Security
Make sure ou write down the details so ou can
easil find them again in the future. The DSL
2640B router comes with a sticker to write the
details on which ou can stick on the bottom of the
router.
5) To reconnect, ou will need to enter the new
details in our wireless network settings.
6) Check that our computer’s wireless adapter
card is installed and working properl .
7) Use our wireless adapter’s connection utilit , or
from My Network Places select Connect to a
network.
8) Your DSL 2640B router will show up as the
Wireless Network Name ou entered in step 4 or
dlink if ou left it unchanged.
You’ve now secured our wireless network against
unauthorised access.

Other D-Link Wireless Router manuals

D-Link Express Ethernetwork DI-707P User manual

D-Link

D-Link Express Ethernetwork DI-707P User manual

D-Link DIR-X3260 User manual

D-Link

D-Link DIR-X3260 User manual

D-Link DAP-1350 User manual

D-Link

D-Link DAP-1350 User manual

D-Link AirPlusXtremeG DI-624 User manual

D-Link

D-Link AirPlusXtremeG DI-624 User manual

D-Link DI-724GU - Wireless 108G QoS Gigabit Office... User manual

D-Link

D-Link DI-724GU - Wireless 108G QoS Gigabit Office... User manual

D-Link DSL-2740U User manual

D-Link

D-Link DSL-2740U User manual

D-Link DAP-1350 User manual

D-Link

D-Link DAP-1350 User manual

D-Link Covr User manual

D-Link

D-Link Covr User manual

D-Link DWR-730/TK User manual

D-Link

D-Link DWR-730/TK User manual

D-Link COVR Series User manual

D-Link

D-Link COVR Series User manual

D-Link DWR-330 User manual

D-Link

D-Link DWR-330 User manual

D-Link DIR-826L User manual

D-Link

D-Link DIR-826L User manual

D-Link DSL-2760U User manual

D-Link

D-Link DSL-2760U User manual

D-Link 2Voice + 4SW VoIP Router DVG-1402S User manual

D-Link

D-Link 2Voice + 4SW VoIP Router DVG-1402S User manual

D-Link DIR-615 - Wireless N Router User manual

D-Link

D-Link DIR-615 - Wireless N Router User manual

D-Link DIR-815 User manual

D-Link

D-Link DIR-815 User manual

D-Link DIR-X1550 User manual

D-Link

D-Link DIR-X1550 User manual

D-Link DIR-604 User manual

D-Link

D-Link DIR-604 User manual

D-Link DIR-632 User manual

D-Link

D-Link DIR-632 User manual

D-Link DSR-150 User manual

D-Link

D-Link DSR-150 User manual

D-Link DIR-506L User manual

D-Link

D-Link DIR-506L User manual

D-Link AirPlusXtremeG DI-624 User manual

D-Link

D-Link AirPlusXtremeG DI-624 User manual

D-Link DIR-880L User manual

D-Link

D-Link DIR-880L User manual

D-Link DIR-615 - Wireless N Router User manual

D-Link

D-Link DIR-615 - Wireless N Router User manual

Popular Wireless Router manuals by other brands

Linksys WRT54GL - Wireless-G Broadband Router... Quick installation guide

Linksys

Linksys WRT54GL - Wireless-G Broadband Router... Quick installation guide

ARGtek Power King-Plus ARG-1320 Quick installation guide

ARGtek

ARGtek Power King-Plus ARG-1320 Quick installation guide

Leviton 47611-WG4 Quick installation guide

Leviton

Leviton 47611-WG4 Quick installation guide

SMC Networks WBR14S-N FICHE user guide

SMC Networks

SMC Networks WBR14S-N FICHE user guide

Reyee RG-EW Series Configuration guide

Reyee

Reyee RG-EW Series Configuration guide

Linksys WRT350N - Wireless-N Gigabit Router user guide

Linksys

Linksys WRT350N - Wireless-N Gigabit Router user guide

TP-Link AC750 Archer C2 user guide

TP-Link

TP-Link AC750 Archer C2 user guide

Wieland wienet LR77 v2 user manual

Wieland

Wieland wienet LR77 v2 user manual

Furrion Access FAN17A82 instruction manual

Furrion Access

Furrion Access FAN17A82 instruction manual

ZyXEL Communications Prestige 652 Series user guide

ZyXEL Communications

ZyXEL Communications Prestige 652 Series user guide

Samsung SCH-LC11 user manual

Samsung

Samsung SCH-LC11 user manual

Comcast High-Speed 2go user guide

Comcast

Comcast High-Speed 2go user guide

Sprint PCDH5072HS user guide

Sprint

Sprint PCDH5072HS user guide

Ruijie Networks RG-MTFi-M520 Web configuration guide

Ruijie Networks

Ruijie Networks RG-MTFi-M520 Web configuration guide

Teradek LINK quick start guide

Teradek

Teradek LINK quick start guide

Zoom 4403 Specifications

Zoom

Zoom 4403 Specifications

ZyXEL Communications XTREMEMIMO X-550 user guide

ZyXEL Communications

ZyXEL Communications XTREMEMIMO X-550 user guide

Digitus DN-11007-N user manual

Digitus

Digitus DN-11007-N user manual

manuals.online logo
manuals.online logoBrands
  • About & Mission
  • Contact us
  • Privacy Policy
  • Terms and Conditions

Copyright 2025 Manuals.Online. All Rights Reserved.