Daewoo SDA2488 User manual

1
12L Rotisserie Air Fryer Oven
Model No. SDA2488
User Manual
IMPORTANT –RETAIN THESE INSTRUCTIONS FOR FUTURE REFERENCE

2
12L Rotisserie Air Fryer Oven
Model No. SDA2488
User Manual
IMPORTANT –RETAIN THESE INSTRUCTIONS FOR FUTURE REFERENCE
READING AND STORING THE USER MANUAL
Before using this product, please read through this
manual carefully paying particular attention to the
safety instructions. Failure to do so may result in
personal injury or damage to the product.
Carefully save this instruction manual for future reference.
Ensure the user manual is included when passing the product on
to any third parties.
IMPORTANT SAFETY INSTRUCTIONS FOR PROPER USE
Whilst using electrical appliances, basic safety precautions
should always be followed.
Only use the product as described in this user manual. Any other
use is considered improper and may result in damage to
property or persons.
The manufacturer or vendor cannot be held liable for damages
or injury incurred through improper or incorrect use.
•Read and familiarise yourself with all operating
instructions before using this Rotisserie Air Fryer.
•DO NOT touch hot surfaces. Use the handles provided.
•Always ensure that the voltage on the rating label
corresponds with the voltage in your home.
•Keep the appliance out of the reach of children.
•Keep the mains lead away from the body of the Air Fryer.
•Do not leave the appliance unattended whilst operating.
•Disconnect the appliance from the mains after use.
•To disconnect the appliance grip and pull the mains plug.
•DO NOT pull the power cord.
•DO NOT wrap the power cord around the appliance in
use or during storage.
•Always disconnect the plug from the mains before
cleaning. Wipe clean only, do not immerse the unit, plug
or cord in water or any other liquid.
•Always allow the unit to cool before storage or cleaning.
•Retain the instruction manual for future use and
reference.

3
12L Rotisserie Air Fryer Oven
Model No. SDA2488
User Manual
IMPORTANT –RETAIN THESE INSTRUCTIONS FOR FUTURE REFERENCE
•There are no user serviceable parts, if the unit fails,
consult a qualified electrician, a repair centre or contact
the supplier if the unit is under warranty.
•If the supply cord is damaged, it must be replaced by the
manufacturer, its service agent or similarly qualified
persons inorder to avoid a hazard.
•It is recommended that this appliance should not be
operated in conjunction with an electrical extension lead.
•This appliance is not intended for use by persons
(including children) with reduced physical, sensory or
mental capabilities, or lack of experience or knowledge,
unless they have been given supervision or instruction
concerning use of the appliance by a person responsible
for their safety.
•Children should be supervised to ensure they do not play
with the appliance.
•For indoor use only.
•Keep away from splashes of water or damp conditions.
•For domestic use only.
•DO NOT use accessories with this appliance other than
those recommended by the supplier.
•DO NOT use this product with an external programmer,
timer, separate remote control system or any other
device.
•DO NOT touch hot surfaces. Accessible surfaces are liable
to gethot during use. Always use the handles.
•Oven gloves should be worn when using this appliance.
•Hot steam may be released when opening and closing the
appliance during use –Risk of scalding!
•Never fill any cooking vessel with oil or liquid of any kind.
•Avoid moving the appliance whilst it is still hot or
contains hot food or liquids. Turn the appliance off and
disconnect from the mains and let it cool sufficiently
before moving it.

4
12L Rotisserie Air Fryer Oven
Model No. SDA2488
User Manual
IMPORTANT –RETAIN THESE INSTRUCTIONS FOR FUTURE REFERENCE
•Always carry the appliance with both hands. Always
use ovengloves. Burn hazard!
THIS APPLIANCE MUST BE EARTHED
Additional Safety Information
•PLEASE NOTE: Before use, ensure that the Air Fryer is
used in an open, well ventilated area well away from
other appliances and other obstructions.
•Do not use the Air Fryer in front of, near or below
combustible materials such as plastics, curtains or
cupboards, etc.
•Do not place the appliance against a wall or against other
appliances. Leave at least 230mm minimum free space
on the back and sides and 10cm minimum free space
above the appliance.
•Do not place anything on top of the appliance.
The diagram left shows the rear of the air
fryer and the air vent outlets arrowed.
Keep these areas free and clear from
obstructions and any flammable materials
or materials that may be affected by high
temperatures as directed above.
The vent should be at least 230mm (9
inches) away from any obstruction that
may restrict the free flow of air.
Please note that during normal use hot air
will be expelled from the air vent outlet.

5
12L Rotisserie Air Fryer Oven
Model No. SDA2488
User Manual
IMPORTANT –RETAIN THESE INSTRUCTIONS FOR FUTURE REFERENCE
Explanation of Symbols
The following warning symbols or words are used in this instruction manual:
Products labelled with UK Conformity Assessment identifies
products conforming to UK statutory requirements.
Products labelled with this symbol conform to applicable
provisions of the European Economic Area.
You should now recycle your waste electrical goods and in doing
so help the environment. This symbol means waste electrical
products at the end of their useful life should not be disposed of
with normal household waste. Please ensure it is taken to a
suitable facility for disposal. Check with your Local Authority or
retailer for recycling advice or visit www.recycle-more.co.uk to
find your nearest recycling point.
WARNING!
This symbol provides useful additional information on the
use of this product.
This symbol indicates that the supply uses an alternating current
mains supply.
This symbol indicates that the surface is gets hot and care must
be taken.
This designates a hazard with moderate risk, which may result
in severe injury if not adhered to.

6
12L Rotisserie Air Fryer Oven
Model No. SDA2488
User Manual
IMPORTANT –RETAIN THESE INSTRUCTIONS FOR FUTURE REFERENCE
Description of Parts
Description of Parts –Control Panel
Description of Parts –Accessories
6
2
4
5
3
1
7
1.Air Inlet
2.Control Panel
3.Air Vent Outlet (rear)
4.Air Fryer Door
5.Viewing Window
6.Non-Slip Feet
7.Timer Dial
8.Internal Light Control
9.Heating Indication Light
10.Rotisserie Function
11.Temperature Dial
8
9
10
11
12. Rotisserie Handle
13. Rotisserie Fork
14. Mesh Tray x2
15. Drip Tray
13
14
15
12

7
12L Rotisserie Air Fryer Oven
Model No. SDA2488
User Manual
IMPORTANT –RETAIN THESE INSTRUCTIONS FOR FUTURE REFERENCE
Using the Control Panel
Timer Dial (7) –The timer dial enables you to select exact cooking time to the
minute. The timer can be adjusted from 0 minute to 60 minutes in all modes
except when dehydrating, which uses 30 minute intervals and an operating time
or 2-24hours. To adjust the cooking time rotate the dial clockwise to increase time
or anti-clockwise to decrease the cooking time in 2 minute increments.
Internal Light Control (8) –Selecting this button will help you check the cooking
progress through the Viewing Window (5) at any point during the cooking
process.
Opening the Air Fryer Door (4) during the cooking process will pause the
selection and also switch on the internal light.
Heating Indication Light (9) –This will flash to indicate that the Air Fryer Oven is
reaching set temperature and will stay illuminated solidly when temperature has
been reached.
Rotisserie Function (10) –Selecting this button when the Rotisserie Fork (13) is
fitted will engage rotisserie function, this will flash to indicate function is selected
and you will see the Rotisserie Fork (13) rotate through the Viewing Window (5).
Temperature Dial (11) –The temperature dial enables you to select cooking
temperature from 80°C up to 200°C. To adjust the cooking temperature rotate the
dial clockwise to increase temperature or anti-clockwise to decrease the cooking
temperature accordingly.
Before the First Use of Your Air Fryer
Remove all packing materials and discard responsibly.
Ensure all parts are present see Description of Parts above.
Check that there is no damage to the mains cable or product.
Ensure that you clean your Air Fryer before first and every use with a damp cloth
and dry thoroughly.
Whilst using your Air Fryer for the first time you may notice a little smoke and
odour; this is normal and simply the grease used during manufacture and will
soon pass.

8
12L Rotisserie Air Fryer Oven
Model No. SDA2488
User Manual
IMPORTANT –RETAIN THESE INSTRUCTIONS FOR FUTURE REFERENCE
Instructions for Use
Place the air fryer on a solid, level, heat resistant surface clear of all obstructions
as described above.
1.Insert the mains plug into a suitable socket outlet.
WARNING! Take care whilst handling the Skewer or
Mesh Baskets use of Oven Gloves are recommended.
2.Place the Drip Tray (15) on the base of the interior of the Air
Fryer.
3.Place the ingredients to be cooked on the Mesh Basket (14).
4.Place the Mesh Baskets (14) into the Air Fryer.
1 or both Mesh Baskets (14) can be used at a time.
5.Rotate the Temperature Dial (11) to the desired
temperature from 80°C up to 200°C. To adjust the cooking
temperature rotate the dial clockwise to increase
temperature or anti-clockwise to decrease the cooking
temperature accordingly.
6.Rotate the Timer Dial (7) to the desired time from 0 to 60
minutes. To adjust the cooking time rotate the dial clockwise
to increase time or anti-clockwise to decrease the cooking
time accordingly.
7.The Heating Indication Light (9) will flash to indicate Air Fryer Oven is
reaching set temperature, when set temperature is reached the Heating
Indication Light (9) will stay illuminated solidly.
The Air Fryer Door (4) can be opened at any point in the cooking process to
check the progress and where necessary turn or shake the ingredients.
8.Upon completion of the set cooking time, the Timer Dial (7) will return to the ‘0’
position and the bell will ring.
Placing the Rotisserie Forks
1.Open the Air Fryer Door (4).
2.Place the ingredients to be cooked onto the Rotisserie
Forks (13).
3.Insert the Rotisserie Forks (13) first into the rotisserie
shaft socket located on the left side of the oven cavity.
Lower the Rotisserie Forks (13) down until the rotisserie
shaft is sat on the bracket on the right side of the cavity.
4.Ensure that the rotisserie shaft is in place to engage
rotation.

9
12L Rotisserie Air Fryer Oven
Model No. SDA2488
User Manual
IMPORTANT –RETAIN THESE INSTRUCTIONS FOR FUTURE REFERENCE
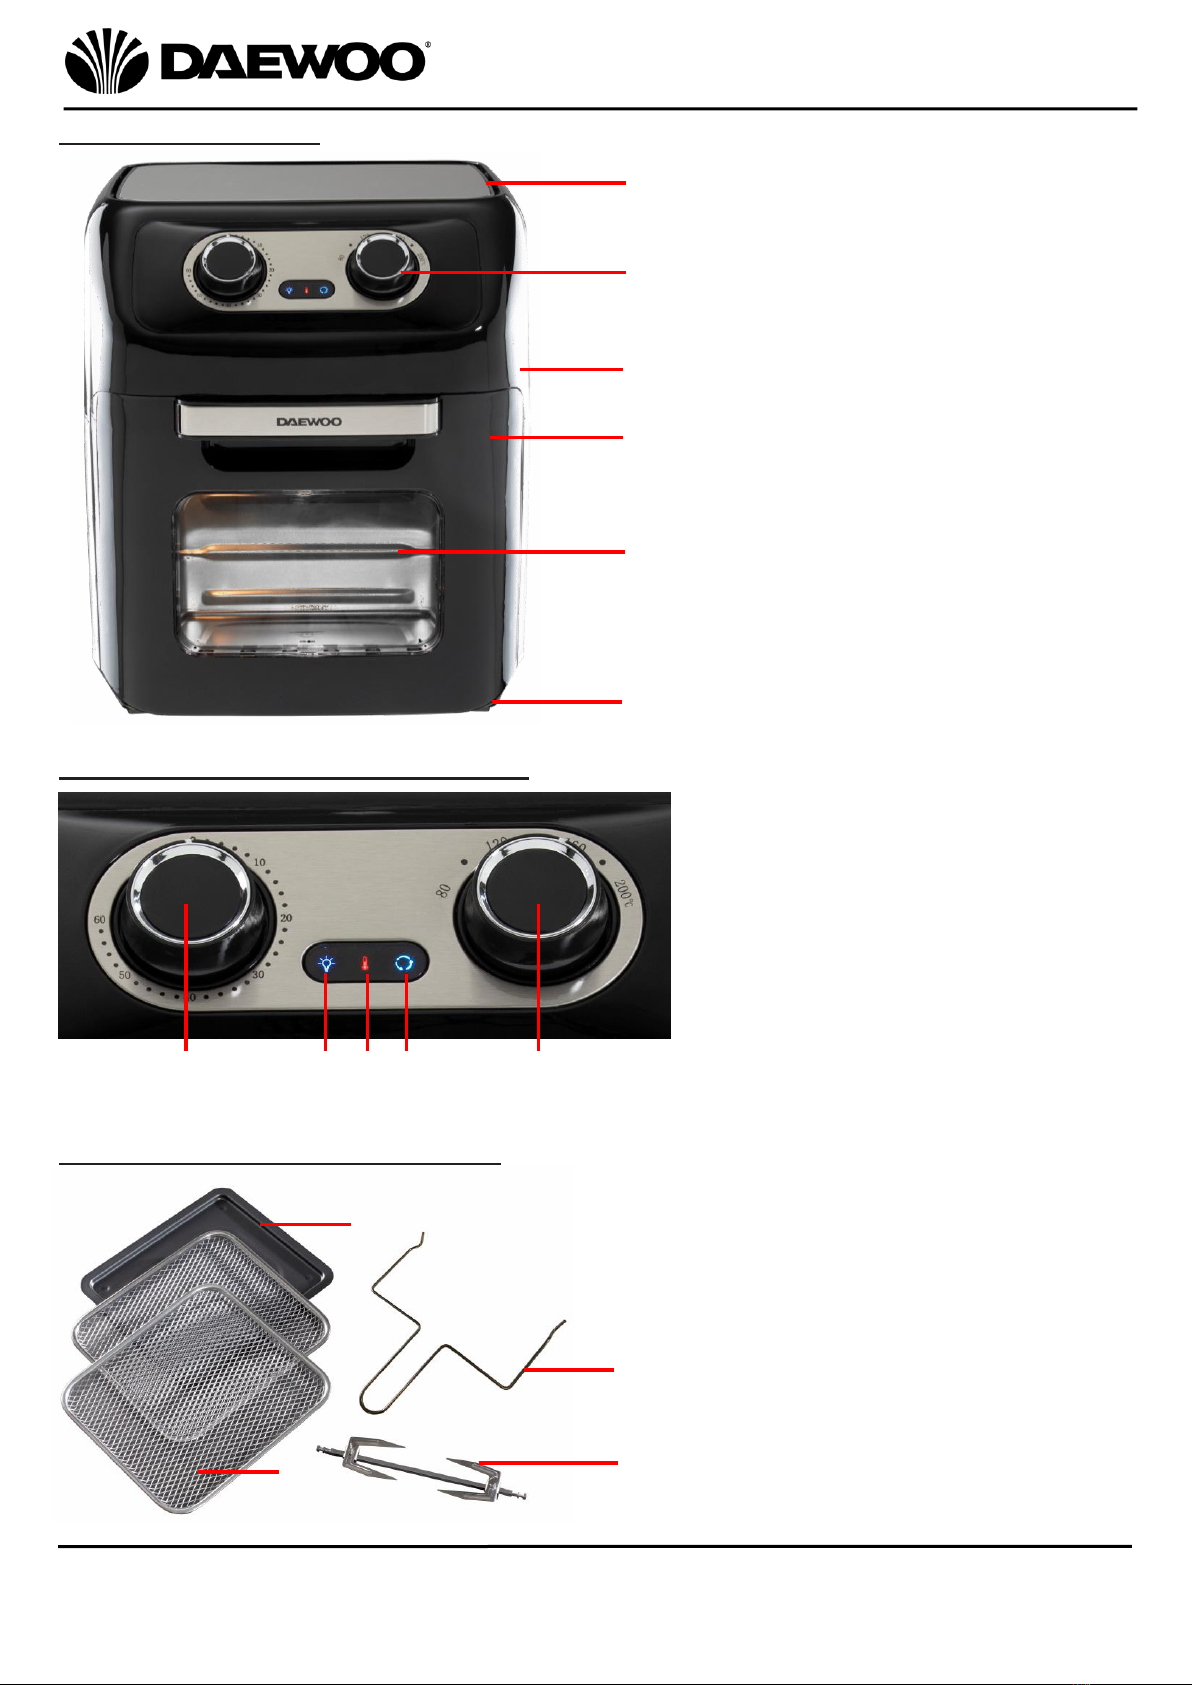
The Rotisserie Forks (13) is not marked with left or right as it can be used in
either orientation.
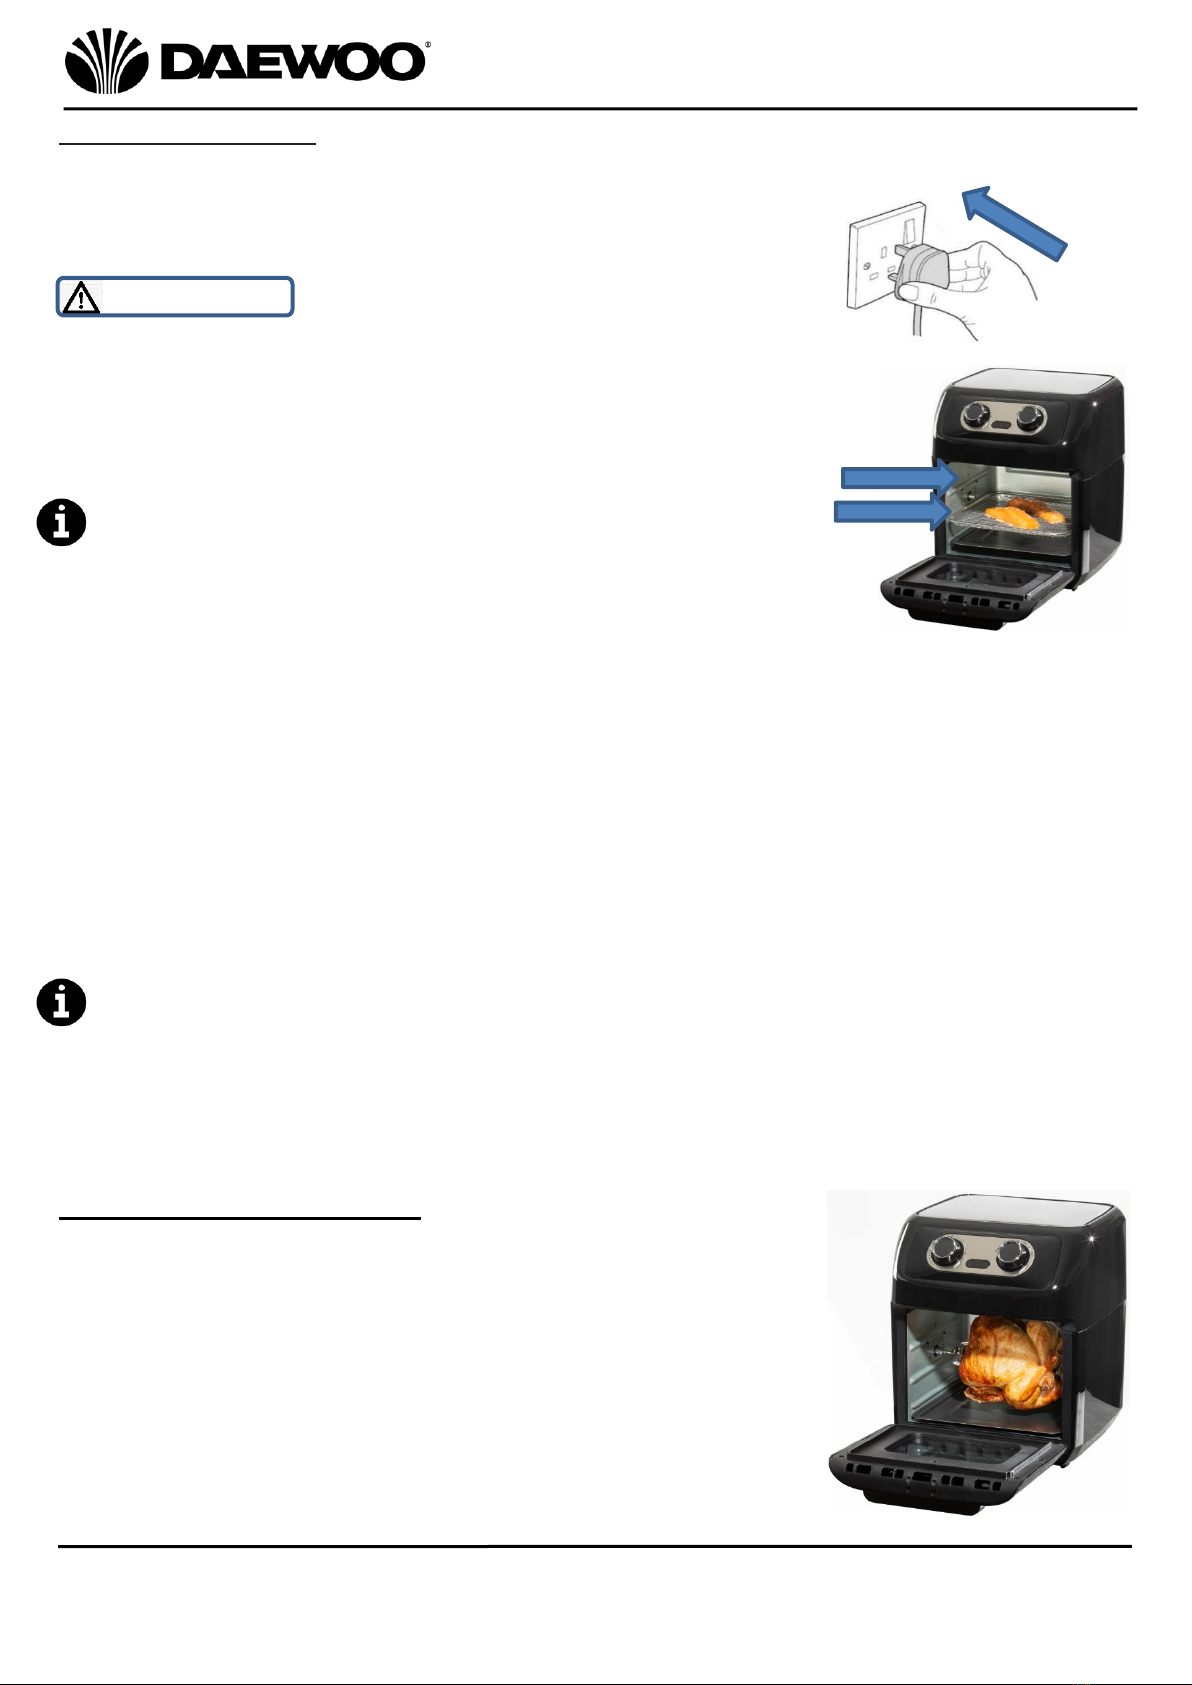
5.Close the Air Fryer Door (4).
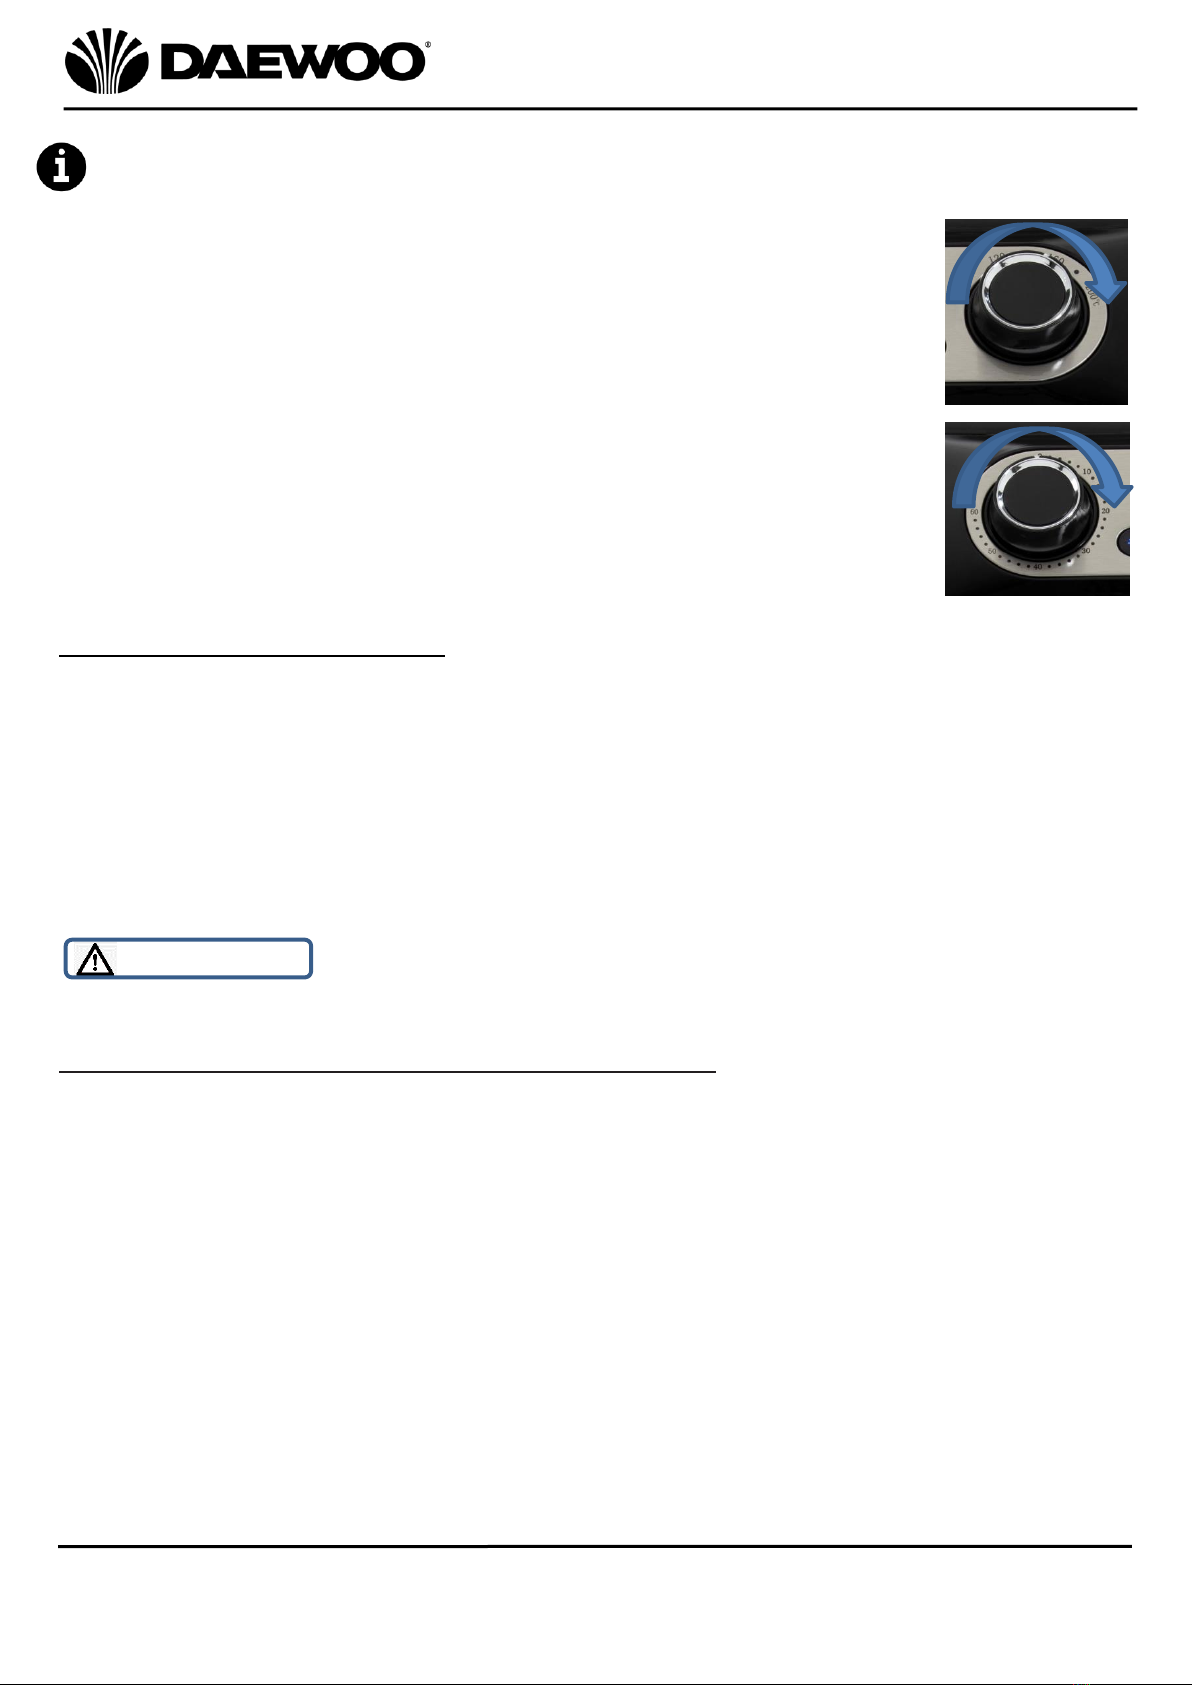
6.Rotate the Temperature Dial (11) to the desired temperature
from 80°C up to 200°C. To adjust the cooking temperature rotate
the dial clockwise to increase temperature or anti-clockwise to
decrease the cooking temperature accordingly.
7.Rotate the Timer Dial (7) to the desired time from 0 to 60
minutes. To adjust the cooking time rotate the dial clockwise to
increase time or anti-clockwise to decrease the cooking time
accordingly.
8.Press the Rotisserie Function (10) and the Rotisserie Forks (13)
will begin to rotate.
Removing the Rotisserie Fork
1.Open the Air Fryer Door (4) to pause the cooking process or turn the air fryer off
by returning both the Timer Dial (7) and Temperature Dial (11) to ‘0’.
2.Insert the Rotisserie Handle (12) beneath the rotisserie shaft of the Rotisserie
Forks (13).
3.Lift the right side of the Rotisserie Handle (13) at a slight angle to clear the
bracket, then shift to the right until the left side of the shaft slides out of the
rotisserie shaft socket.
4.Carefully remove the Rotisserie Forks (13) from the air fryer.
WARNING! Take care whilst handling the Rotisserie Forks or Mesh
Baskets. Place the basket on a heat proof surface.
Cleaning and Maintenance of Your Air Fryer Oven
•Always unplug the Air Fryer Oven from the mains supply and allow to cool
before cleaning.
•DO NOT submerge any part of the main body, the mains cable or mains plug in
water or any other liquids.
•Clean the appliance after each use. The rotisserie basket and other accessories
are made of a durable stainless steel and are dishwasher safe.
•Never clean any part of the Air Fryer Oven with harsh or abrasive cleaners.
•Stubborn food should be soaked in warm soapy water, rinse and dry thoroughly.
•Wipe the main body of the Air Fryer Oven clean using a soft, damp cloth.
•Clean the inside of the appliance with hot water, a mild detergent and a non-
abrasive sponge.
•If necessary remove any unwanted food residue from the Viewing Window
using a cleaning brush.
•After cleaning, allow the product to thoroughly dry before re-use.

10
12L Rotisserie Air Fryer Oven
Model No. SDA2488
User Manual
IMPORTANT –RETAIN THESE INSTRUCTIONS FOR FUTURE REFERENCE
Troubleshooting Guide
Problem
Possible Cause
Possible Fix
Food is Overcooked/Burnt
Cooking Temperature is set
too high.
Check cooking temperature
and lower the Thermostat
accordingly.
Cooking time is too long.
Check cooking time and reduce
the cooking time on the Timer
accordingly.
Food is not evenly cooked
Certain foods require turning or
shaking part way through
cooking
See ‘Instructions for use’ above.
Food is undercooked.
Cooking Temperature is set
too low.
Check cooking temperature
and increase the Temperature
accordingly.
Cooking time is too short.
Check cooking time and
increase the cooking time on
the Timer accordingly.
Unit does not power up
Power Start/Stop (11)
button has not been
selected.
Press the Power Start/Stop (11)
button.
No power to the Air Fryer.
Check that the mains plug is
inserted into the socket and
the socket is switched on (if
applicable).
The accessory is not inserted
or not pushed fully home
Ensure the accessory is
inserted and pushed fully
home.
Burning smell from unit
Previous food remains on
Rotisserie Basket, Mesh
Baskets or other accessories
Ensure all cooking accessories
are cleaned after each use.
Technical Specification
Rated Voltage
220-240V ~ AC 50/60Hz
Rated Power
1800W
Model Number
SDA2488
Protection Class
I (This appliance must be earthed)
Non-Rewireable Mains Plug
If your appliance is supplied with a non-rewireable plug fitted to the mains lead
and should the fuse need replacing, you must use an ASTA approved one
(conforming to BS 1362 of the same rating). If in doubt, consult a qualified
electrician who will be pleased to do this for you. If you need to remove the plug
–DISCONNECT FROM THE MAINS –and then cut it off the mains lead and
immediately dispose of it safely. Never attempt to reuse the plug or insert it into
a socket outlet as there is a danger of electric shock.

11
12L Rotisserie Air Fryer Oven
Model No. SDA2488
User Manual
IMPORTANT –RETAIN THESE INSTRUCTIONS FOR FUTURE REFERENCE
Recycling Information
Disposal of the Packaging
Dispose of paper and cardboard in appropriate paper re-cycling
facilities.
Dispose of recyclable plastics in appropriate plastic re-cycling
facilities.
Dispose of non-recyclable plastics in the appropriate plastics
collection service.
Disposal of the Product
You should now recycle your waste electrical goods and in doing
so help the environment. This symbol means waste electrical
products at the end of their useful life should not be disposed of
with normal household waste and not sent to landfill. Please
ensure it is taken to a suitable facility for disposal. Check with
your Local Authority or retailer for recycling advice or visit
www.recycle-more.co.uk to find your nearest recycling point.

12
12L Rotisserie Air Fryer Oven
Model No. SDA2488
User Manual
IMPORTANT –RETAIN THESE INSTRUCTIONS FOR FUTURE REFERENCE
WARRANTY
Thank you for purchasing your Daewoo product.
As part of our commitment to quality, we are offering you an extra 2 years warranty in
addition to your 1 year guarantee
Your Daewoo product is guaranteed for 1 year from the date of original purchase, with proof
of purchase or receipt. If any defect should occur due to faulty workmanship or material, your
faulty product should be returned to the place of purchase, replacement or refund is at the
discretion of the retailer.
The guarantee is subject to the following provisions:
•
The product must be correctly installed and operated in accordance with the
requirements contained in the instruction manual.
•
Theproduct must be used solely for domestic purposes.
•
It does not cover general wear and tear, damage, misuse or any consumable parts.
•
The guarantee will be rendered invalid if the product is re-sold or has been damaged through
inexpert repair.
•
The guarantee is only valid within the UK and Eire.
Your standard 1 year guarantee will only be extended to the maximum available for your
individual product upon registration. (Note: products must be registered individually and
covers the main body and housing). If you do not register your product within 28 days of the
original purchase date, your product will only be guaranteed for 1 year.
To validate your extended 2 year warranty*please register your purchase online within 28
days of the original purchase date by registering at
https://help.daewooelectricals.com
or
Contact Us (daewooelectricals.com)
*Your extended warranty is only valid with proof of purchase receipt and subject to the
conditions outlined above.
Daewoo® is a registered trademark.
Produced and imported under licence by
ESG Ltd. Manchester M3 1JS
EU Rep: Euromagppie Ireland Ltd. DO5 X006
www.esgltd.com
Table of contents
Other Daewoo Fryer manuals

Daewoo
Daewoo SDA2310 User manual

Daewoo
Daewoo DK2FRYER User manual

Daewoo
Daewoo SDA2314 User manual

Daewoo
Daewoo SDA2518 User manual

Daewoo
Daewoo SDA1551 User manual

Daewoo
Daewoo SDA1601 User manual

Daewoo
Daewoo SDA2310 User manual

Daewoo
Daewoo HEALTHY LIVING SDA1599 User manual

Daewoo
Daewoo ACTUATE SDA2622 User manual

Daewoo
Daewoo SDA2324 User manual

Daewoo
Daewoo SDA1861 User manual

Daewoo
Daewoo SDA2616 User manual

Daewoo
Daewoo SDA1553 User manual

Daewoo
Daewoo SDA2310 User manual

Daewoo
Daewoo SDA2519 User manual

Daewoo
Daewoo HEA1032 User manual

Daewoo
Daewoo SDA2609 User manual

Daewoo
Daewoo SDA1032 User manual

Daewoo
Daewoo SDA1032 User manual

Daewoo
Daewoo SDA1551 User manual