Daub DR User manual

DR (FLEX)
Date: 01-01-2016
Version: 06
USERS MANUAL
ENGLISH

DR (FLEX)
Date: 01-01-2016
Version: 06
USERS MANUAL
Page 2
GENERAL
We thank you for choosing a DAUB product. We trust you are satisfied with your purchase.
For correct use and prolong lifespan it is important to read our manual and to comply with the
suggestions, recommendations and / or regulations when unpacking, installing, using and maintaining
the machine. If the machine is sold on, this manual should be handed over to the new owner.
Only employees who have been instructed concerning the use of this machine and who have read this
manual may operate this machine.
Daub Bakery Machinery B.V. will accept no liability for defects which have occurred because of the
incorrect use of the machine. Neither will Daub Bakery Machinery B.V. be held responsible for any
damage or injuries to operators or to third persons if deemed to be caused by the incorrect use of the
machine.
No part of this publication may be reproduced, duplicated or distributed without the prior written
permission of the manufacturer.
Daub Bakery Machinery B.V. can not be held responsible for mistakes and/or misprints in this manual.
It is recommended that you keep this manual close to, or with the, machine at all times.

DR (FLEX)
Date: 01-01-2016
Version: 06
USERS MANUAL
Page 3
TABLE OF CONTENTS
GENERAL .........................................................................................................................................................2
TABLE OF CONTENTS......................................................................................................................................3
1 PRODUCT INFORMATION ......................................................................................................................4
2 DEFINITIONS ...........................................................................................................................................5
2.1 Warnings ........................................................................................................................................5
2.2 Qualified employees......................................................................................................................5
2.3 Decription of parts of the machine ...............................................................................................6
3 SAFETY ....................................................................................................................................................7
3.1 Safety regulations ..........................................................................................................................7
3.2 Dangers because of mechanical components ..............................................................................7
3.3 Dangers because of electrical components..................................................................................7
3.4 Dangers because of lack of hygiene..............................................................................................7
4 TRANSPORT AND UNPACKING ..............................................................................................................8
4.1 Transport........................................................................................................................................8
4.2 Unpacking.......................................................................................................................................8
5 INSTALLATION ........................................................................................................................................9
5.1 Placing and maintenance ..............................................................................................................9
5.2 Conditions ......................................................................................................................................9
5.3 Electrical connection......................................................................................................................9
5.4 Carrying off materials ..................................................................................................................10
5.5 Taking out of operation ...............................................................................................................10
6 PRODUCT DESCRIPTION.......................................................................................................................11
6.1 Purpose of the machine ..............................................................................................................11
6.2 Inadmissible use of the machine.................................................................................................11
7 WORKING OF THE MACHINE ...............................................................................................................12
7.1 Taking use of the machine...........................................................................................................12
7.2 Working with the machine ..........................................................................................................13
8 EXCHANGING DIVIDING DISCS (ONLY MODEL DR-FLEX) ....................................................................15
9 JUDGMENT OF THE RESULT.................................................................................................................17
10 MAINTENANCE.....................................................................................................................................18
10.1 Cleaning........................................................................................................................................18
10.2 Cleaning of the dividing head and knife crown ..........................................................................19
10.3 Cleaning of the area below the rounding table..........................................................................20
10.4 Adjusting of the knife crown .......................................................................................................21
11 FAULT FINDING.....................................................................................................................................22

DR (FLEX)
Date: 01-01-2016
Version: 06
USERS MANUAL
Page 4
1PRODUCT INFORMATION
After sales service: Your supplier
Machine naming: DR
Machine number: See machine plate
Date of manufacturing: See machine plate
Power: See machine plate
Voltage: See machine plate
Current: See machine plate
Weight: 350 kg (775 lbs)
Sound: <65 dB(A)
Possible executions:
Voltage: 3*400V/50Hz+N, 3*230V/50Hz, 3*440V/60Hz+N, 3*220V/60Hz
Other voltages on request
Technical information:
Rounding plates: Plastic Trovidur
Dividing disc: Aluminium anodised
Dividing knife: Stainless steel
Press ring: Iron casted Teflon coated
Rounding table: Aluminium
N.B. All parts, which could come in contact with the dough, are approved for the foods industry.
Available separate dividing disc:
Dividing disc Divisions Max. dough weight Weight range
DR2-90-2/30-F 30-parts 2,5 kg (4,4 lbs) 25-85 gr (0,9-3,0 oz)*
DR2-90-3/30-F 30-parts 3 kg (6,6 lbs) 30-100 gr (1,1-3,5 oz)*
DR2-90-3/36-F 36-parts 3 kg (6,6 lbs) 25-85 gr (0,9-3,0 oz)*
DR2-90-3/52-F 52-parts 3 kg (6,6 lbs) 18-50 gr (0,6-1,6 oz)*
DR2-90-4/14-F 14-parts 4 kg (8,8 lbs) 130-250 gr (4,6-8,8 oz)*
DR2-90-4/30-F 30-parts 4 kg (8,8 lbs) 40-130 gr (1,4-4,6 oz)*
DR2-90-4/36-F 36-parts 4 kg (8,8 lbs) 30-110 gr (1,1-3,9 oz)*
* The weight range depends on the dough consistency

DR (FLEX)
Date: 01-01-2016
Version: 06
USERS MANUAL
Page 5
2DEFINITIONS
2.1 Warnings
The following signs warns the operator for a possible danger.
Figure 2-1 Figure 2-2
Figure 2.1 is a sticker which is used on the machine indicating the position where caution must be
taken to avoid stucking into the machine.
Figure 2.2 is a sticker which is used on the machine indicating where electrical power is present.
Before taking in use the machine, you should carefully read this manual and follow the instructions.
Make sure that the warning stickers stay in good condition and, if necessary, replace them.
When you use the machine for the first time, follow the instructions in this manual carefully so that
you will not be surprised.
Do not allow unqualified employees to operate the machine.
Only qualified employees may operate the machine.
Make sure the machine is switched off during cleaning, maintenance and lubrication.
After maintenance of the machine, do not forget to replace the safety guards and close the door at
the backside.
All repairs, mechanical as well as electrical, may only be done by qualified employees.
2.2 Qualified employees
We herewith mean: persons who are familiar with the installation, mounting, taking in use and
working of the machine and who have the right qualifications.

DR (FLEX)
Date: 01-01-2016
Version: 06
USERS MANUAL
Page 6
2.3 Decription of parts of the machine
Figure 2-3
Pressing handle
Volume bar
Locking pin
Bolt for v-belt tension
Roundingplate
Knife release
voor mes
Rounding handle
Power switch
Front cover
Rear cover

DR (FLEX)
Date: 01-01-2016
Version: 06
USERS MANUAL
Page 7
Figure 3-2
3SAFETY
3.1 Safety regulations
Remove plug from the power supply when cleaning and/or maintaining the machine.
Only qualified or well instructed employees can do repairs of mechanical or electrical
nature.
Never put your hands in its working area when using the
machine (see figure 3-1).
Only one person may use the machine.
Keep guards placed when operating the machine.
3.2 Dangers because of mechanical components
Safety guards protect all parts. Because of the manual operating order, the operator can
stops his actions at all time.
When maintaining the machine and especially when removing parts without
respecting standard safety regulations, you might get injured when not
carefull.
Do not keep your hands at the back of the dividing disc. You might
get stuck when rotating the dividing disc back (see figure 3-2)
when you are ready cleaning.
By proper use of the machine as described in chapter 7 no dangers will occur.
3.3 Dangers because of electrical components
These dangers will not occur because the electrical parts are not direct accessible.
Broken or damaged cables and electrical componements should be replaced immediately by an
electricien.
3.4 Dangers because of lack of hygiene
These dangers can occur if the measures such as described in chapter 9 (“Maintenance”) are not
followed up.
Figure 3-1

DR (FLEX)
Date: 01-01-2016
Version: 06
USERS MANUAL
Page 8
4TRANSPORT AND UNPACKING
4.1 Transport
The machine must be transported in its original packing. In the means of transport the packing must
be secured against shoving. The machine should be moved with the right lift equipment.
Transport damage caused by not having followed above-mentioned regulations, can not be claimed.
Moreover the transport of goods is always at the buyers risk, unless explicitly agreed otherwise.
Do not load anything on top of the packing.
The machine should always be transported upright.
4.2 Unpacking
Leave the packing upright and remove the box vertically.
Unpack the machine carefully and check if there are signs of transportation damages. Should you find
any, please inform your transport agent immediately. We advise you to take photographs of the
damage.
Remove the machine from the pallet by means of a lift truck or other lift equipment.
By shoving the arms of a lift truck under the foot of the machine, it can be taken from the pallet.
The weight of the machine is approximately 350 kg (775 lbs).
Out of safety considerations it is advisable to keep enough distance when lifting the machine.
DR (FLEX)
Date: 01-01-2016
Version: 06
USERS MANUAL
Page 9
A
B
5INSTALLATION
5.1 Placing and maintenance
Only qualified employees are allowed to install the machine.
The machine can only be used for its purpose: to divide and round dough.
Guarantee can not be claimed if changes have been made to the machine without the
manufacturers permission and/or if not-original spare parts are used. The use of not-
original spare parts can damage the machine and/or harm the operator.
The machine should be placed on a solid and flat floor. The machine is very stable. In case of a very
slippery floor, you can block the wheels by using wedges.
Check if the rounding plates which are delivered with the
machine fit well. The hole in the plate should fall easily over the
locking pin (see figure 5-1, B) of the rounding table.
If not, plane the back of the plate until it does fall easily over it.
Figure 5-1
5.2 Conditions
Temperature: 15C to 40C
Relative humidity: 20% to 95%
5.3 Electrical connection
A qualified engineer must carry out the installation and an electrician
should connect the machine to the power supply. Always check first if
the voltage and the phases of the electrical connection are in
accordance with those of the machine (see machine plate). If this is not
the case, please contact your supplier.
Check the direction of rotation of the machine. Turn the power switch
(see figure 2-3) to position 1 and press the rounding handle (see figure
5-2, B). The rounding table will make a rotation movement
counterclockwise. If this is not the case, an electrician should change
the two phases in the plug in order to change the direction of rotation
of the motor.
Figure 5-2
B

DR (FLEX)
Date: 01-01-2016
Version: 06
USERS MANUAL
Page 10
5.4 Carrying off materials
When carrying off a complete machine, parts or only the packing, you should comply with the legal
regulations. Specifications concerning the material of the parts can be asked for at the
manufacturers.
5.5 Taking out of operation
Switch off the machine by turning the power switch. Then clean it and check the lubrication points as
described in chapter 9 “Maintenance”. Protect the machine for influences from outside and store it
in a closed and dry room.

DR (FLEX)
Date: 01-01-2016
Version: 06
USERS MANUAL
Page 11
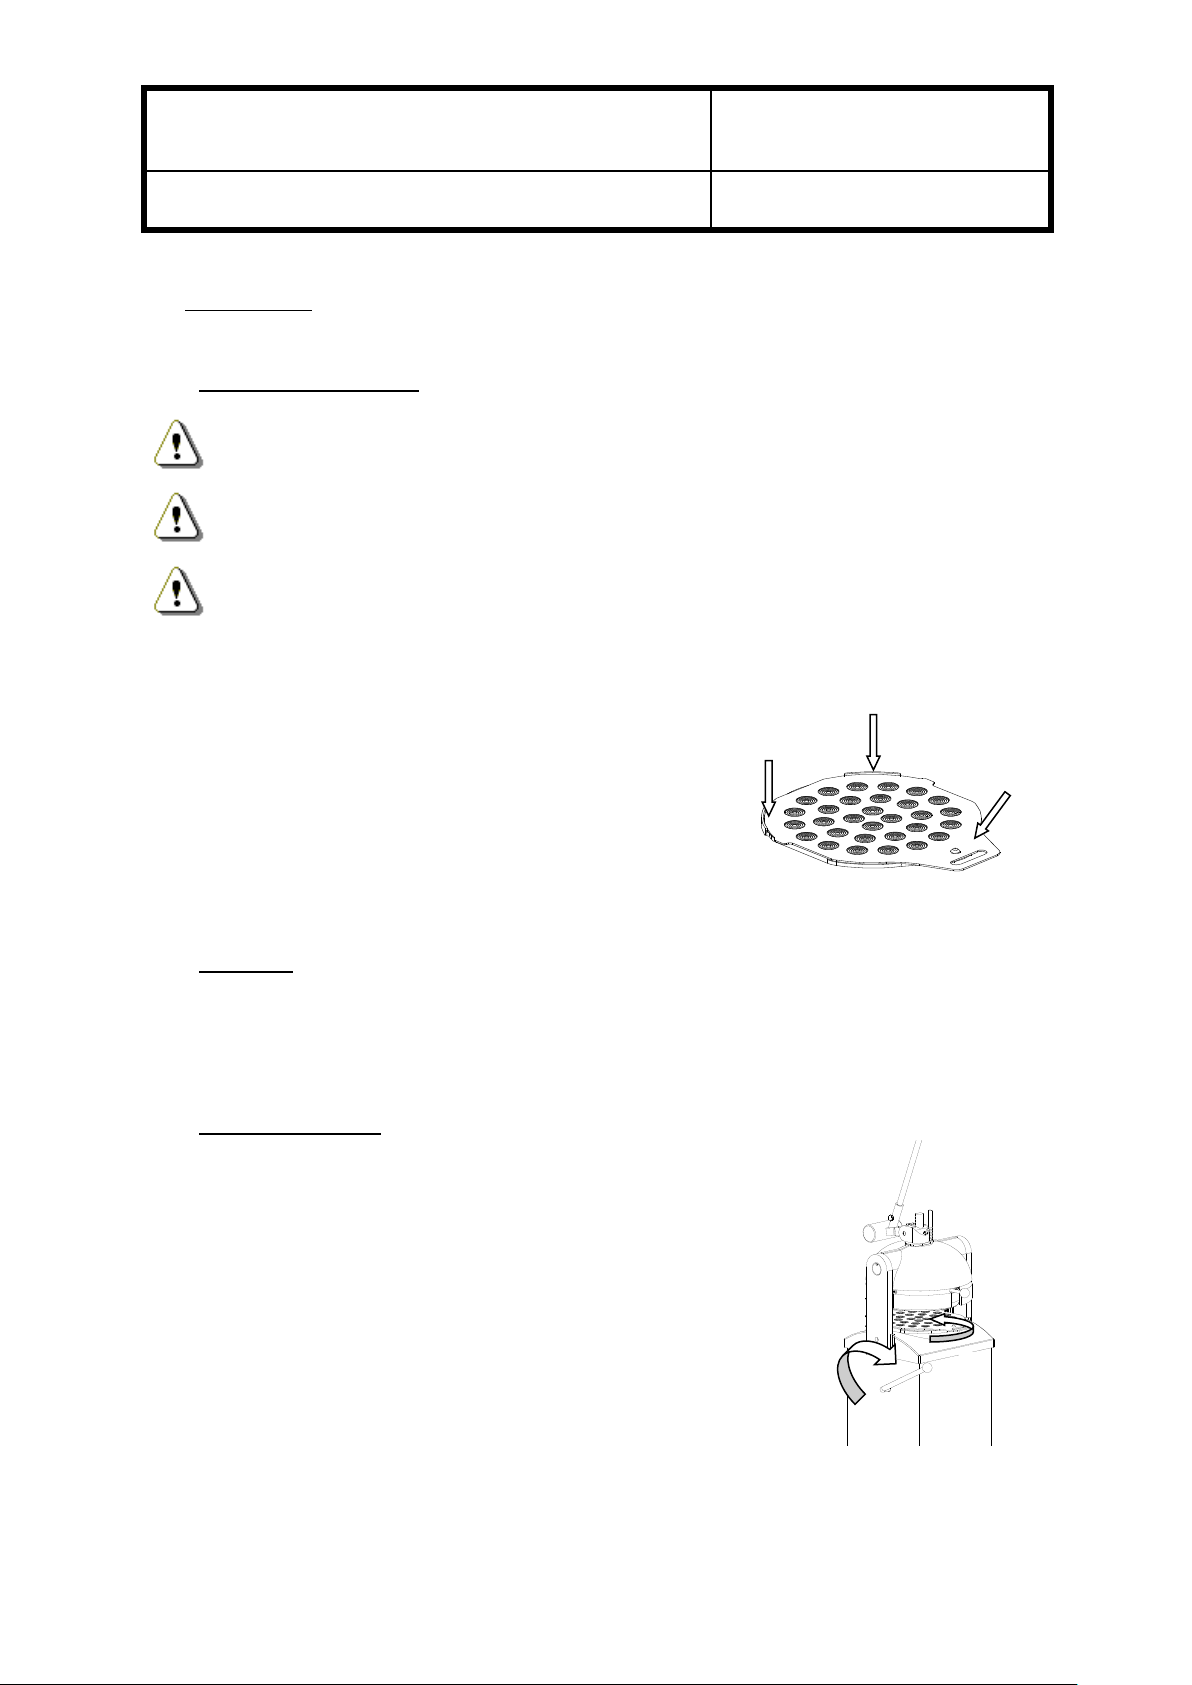
6PRODUCT DESCRIPTION
6.1 Purpose of the machine
The machine (dependent on the type) is meant to divide and round dough pieces of 2, 3 or 4 kg (4.4,
6.6 or 8.8 lbs), which have already been pre-proofed lightly. Put the undivided dough piece on the
plate and flatten it by hand. In case of a sticky dough, use some flour to get a better rounding result.
All parts of the machine, which come in contact with dough, are Teflon coated, stainless steel or
made of plastic which is approved for use in the foods industry.
6.2 Inadmissible use of the machine
The divider rounder is only meant for activities such as described in chapter 6.1.
The machine can only be cleaned with cleaning products, which are approved for use in the foods
industry. Never use corrosive products!
Be sure the machine is placed on a flat floor.
The machine can only be used when the safety guards are placed.
Never put your hands in its working area when using the machine (see
figure 6-2).
Only use original spare parts.
Do not use dough with metals, stones or other peculiar objects inside.
Figure 6-2

DR (FLEX)
Date: 01-01-2016
Version: 06
USERS MANUAL
Page 12
7WORKING OF THE MACHINE
7.1 Taking use of the machine
Check if the machine is placed correctly as described in chapter 6 “Installation”.
Check if it is necessary to clean the machine because of possible transport dirt.
In the factory, the dividing disc is lightly greased. Clean the dividing disc before you start working with
dough and then oil it with a little bit of edible oil (see chapter 9 “Maintenance”).
Also check if the voltage on the machine plate is in accordance with that of your main supply.
Make sure the machine is placed on a solid and flat floor.
Check the direction of rotation of the machine. Turn the power switch to position 1 and press the
rounding handle. The rounding table will make a rotation movement counterclockwise. If this is not
the case, an electrician should change the two phases in the plug in order to change the direction of
rotation of the motor.
You can now proceed with the first test.

DR (FLEX)
Date: 01-01-2016
Version: 06
USERS MANUAL
Page 13
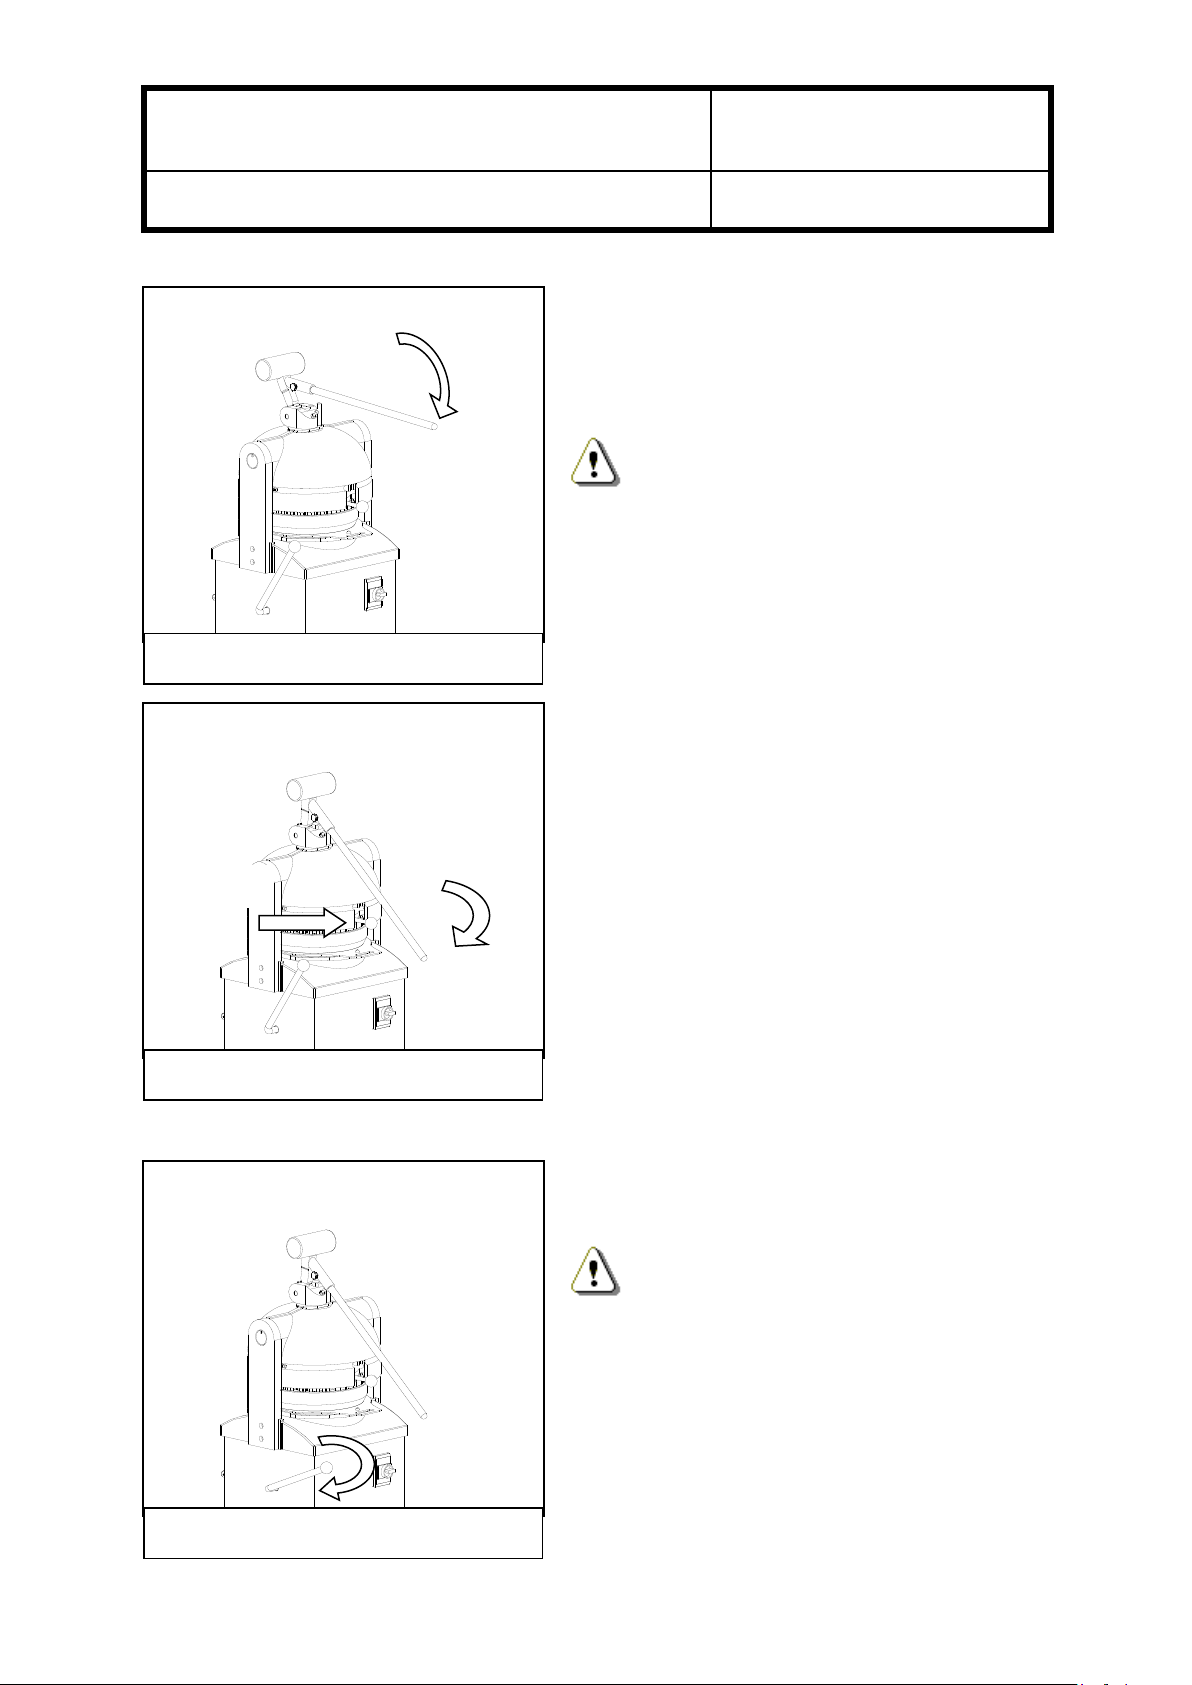
7.2 Working with the machine
Qualified persons older than 16 years may only operate the divider rounder.
•Turn the power on
•Adjust volume control bar (Indications shown in
table 1) to the position to the weight of dough
•Place the dough piece in the middle of the
rounding plate and flatten it by hand.
If the dough is very stiff it is usefull to
flatten the dough by a dough roller.
In case of sticky dough it is advisable to
flour the dough and rounding plate lightly.
•Place the plate correct onto the moulding table
(see chapter 5.1)
Inserting the rounding plate improperly
can cause damage to the machine.
The following table gives a rough indication of the correct position of the volume control bar, for the
model up to 2, 3 as well 4 kg (4.4, 6.6 and 8,8 lbs) dough (see chapter 1 “Product information”).
Position
Weight type 2/XX
Weight type 3/XX
Weight type 4/XX
0
750 gr (26 oz)
900 gr (32 oz)
1200 gr (42 oz)
1
1110 gr (39 oz)
1320 gr (47 oz)
1550 gr (55 oz)
2
1470 gr (52 oz)
1740 gr (61 oz)
1900 gr (67 oz)
3
1830 gr (65 oz)
2160 gr (76 oz)
2250 gr (79 oz)
4
2190 gr (77 oz)
2580 gr (91 oz)
2600 gr (92 oz)
5
Max.
Max.
2950 gr (104 oz)
6
3300 gr (116 oz)
7
3650 gr (129 oz)
8
Max.
Table 1
Remarks:
The position of this bar determines how far the dividing head jumps back before rounding. In this way the volume of the
rounding chambers can be determined. Therefore this position is related to the weight of the dough piece that should be
divided.
As the correct setting depends on the dough consistency, it is a question of experience.
When the volume of the rounding chambers is too small, the dough pieces will be damaged. When the volume is too big,
they will not be sufficiently rounded.
B
C
A
Figure 7-2-1
DR (FLEX)
Date: 01-01-2016
Version: 06
USERS MANUAL
Page 14
•Press the dough by rotating the press handle. The
pressing ring will come down and the dough will
be pressed.
In order to obtain dough pieces with equal
weights, it is necessary to press as long
untill you see dough coming out of the ring
•Release the cutting lever to the right (see position
A)
•Press the press handle further to cut the dough
(see position B) to its end position
•Press the rounding handle to round the dough
Keep the press handle in its position
•After rounding you can return the rounding
handle and the the press handle to its starting
position to take out the dough
The next chapter will give more information about the
result and how to optimize.
Figure 7-2-2
Figure 7-2-3
A
B
Figure 7-2-4

DR (FLEX)
Date: 01-01-2016
Version: 06
USERS MANUAL
Page 15
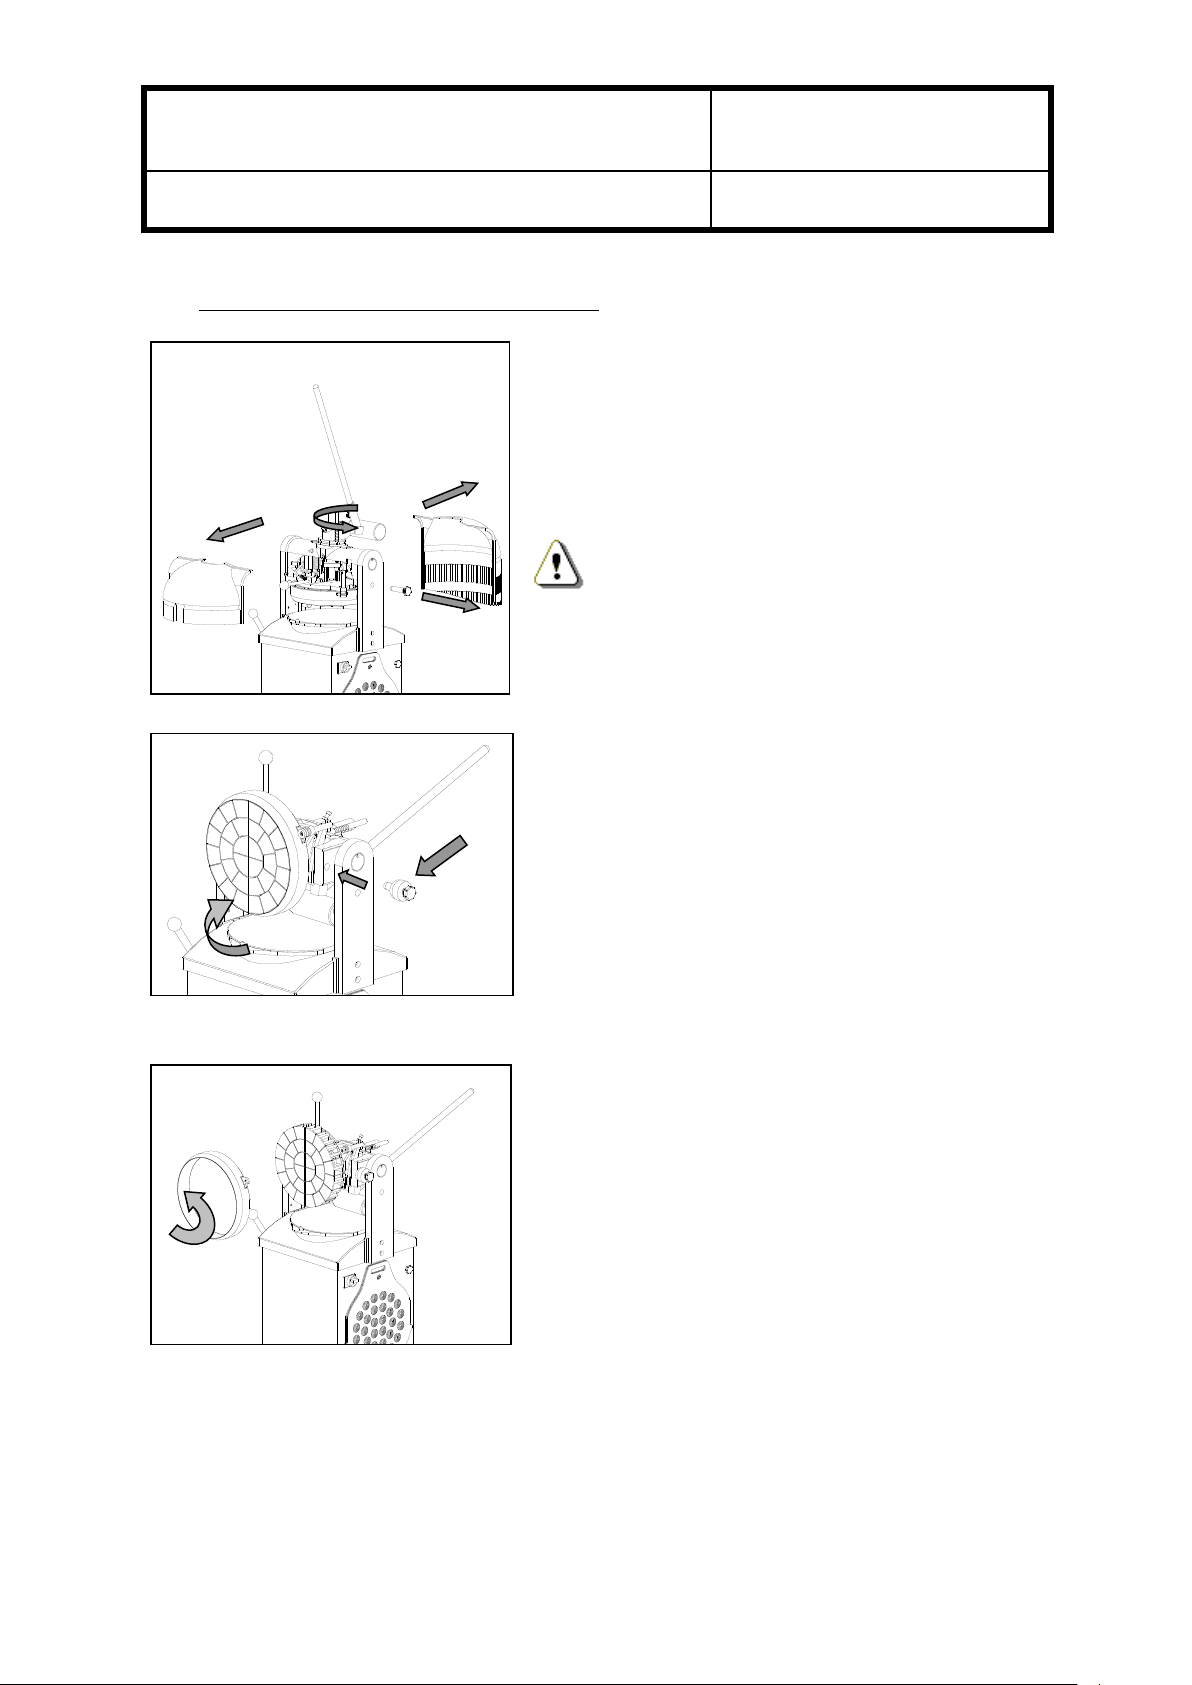
8EXCHANGING DIVIDING DISCS (ONLY MODEL DR-FLEX)
Always turn the main switch to “0” (=off)
before.
•Remove front cover and rear cover
•Pull locking pin
•Turn de dividing disc up by pulling up the knife
release lever (see position 1)
•Put locking pin together with extra supplied rubber
ring into the hole of the rotated part to keep the
disc up.
•Remove the pressing ring by rotating it
counter clockwise
•Remove the two locking pins on top of the
disc.
2
3
1
1
2

DR (FLEX)
Date: 01-01-2016
Version: 06
USERS MANUAL
Page 16
•Rotate the two grips to the outside of the
disc
•Lock the grips by pushing it into the disc
•Rotate disc counter clockwise
Weight of disc is approx. 13 kg (29 lbs)
•Pull disc towards you
•Place disc with other divisions in opposite
direction as well the other press ring
Do not forget to use other rounding
plates as well

DR (FLEX)
Date: 01-01-2016
Version: 06
USERS MANUAL
Page 17
9JUDGMENT OF THE RESULT
The following information will help you to obtain the best possible result. When operating the
machine, always observe the following adjustment options: volume, pressing time and rounding
time.
A) The dough pieces do not have the same weight.
-Make sure the dough piece is put exactly in the middle of the plate and flatten it a little
by hand. The dough should stay inside the circles on the plate. If this is not the case, then
you will see when the pressing ring comes down. The pressing ring is not flat on the
rounding plate and the dough outside the circles will not be pressed and rounded.
-Be sure that the dough has had the right pre-proofing time (dependent of the
consistency of the dough, but usually 15 minutes).
-Press the dough by pressing the handle longer in the press position. As soon as the dough
appears under the pressing ring, it has been pressed long enough.
B) The dough pieces have not been rounded enough.
-Turn the volume bar (figure 2-3) to a lower setting.
-Round the dough more by keeping the handle longer in the rounding position.
-Try a combination of both.
The dough will now be rounded more intensively.
C) The dough pieces have a dot on top.
-Turn the volume bar (figure 2-3) to a higher setting.
-Check if the weight of the dough piece is in accordance with the capacity of the machine.
D) The dough pieces have a damaged skin.
-The dough pieces have been rounded too long. Round shorter.
E) The machine presses the dough through the gap between the pressing ring and the rounding
plate.
-The dough piece has been pressed too long. Press shorter
For a good result observe the weight range of the machine. Eventually check the machine
plate. The table in chapter 1 “Product information” mentions the weight ranges of the
different types of machines.

DR (FLEX)
Date: 01-01-2016
Version: 06
USERS MANUAL
Page 18
10 MAINTENANCE
In below section there are reference to specific position numbers, which can be found in the
technical manual. If you do not have a technical manual, please ask your dealer.
10.1 Cleaning
Always turn the power switch to “0” and unplug the power connector before starting any
kind of maintenance.
Never clean the machine with water. The use of water will cause oxidation and electrical
problems.
Only qualified employees may clean the machine. Other persons should keep some
distance.
Daily:
-Clean all used rounding plates (do not forget to clean the bottom as well!) with cold to
lukewarm water.
-Do not store the rounding plates in the machine, but hang them on the bracket at the side of
the machine.
-Clean the topside of the rounding table.
Make sure that there are no dough rests between the rounding table and the plate,
because this will cause damage to the knife crown and the rounding plate while working.
Weekly:
-Clean the working area of the dividing disc, the dividing knife and the pressing ring (see
chapter 9.2)
Monthly:
-Grease all moving parts of the head. Pay special attention to the two support shafts (figure
D1, 46) , the knife release lever (figure D1, 23) and the two brass guide blocks (figure D1, 9).
-After having cleaned the area below the rounding table (figure DA, 1) (see also chapter 9.3)
also grease all moving parts. Pay special attention to the running surface of the rounding
table, the plastic sliding ring (figure DA, 2) and the bearing of the cross bearing (figure DA,
10).
-Check the tension of the V-belt and if necessary tighten it with help of the bolt (figure 2-3) at
the right side of the machine.
DR (FLEX)
Date: 01-01-2016
Version: 06
USERS MANUAL
Page 19
10.2 Cleaning of the dividing head and knife crown
•Remove covers (see position 1)
•Turn the weight control bar to its maximum
(see figure position 2)
•Remove locking pin (see position 3)
Be aware the pressing handle will rotate
backwards if the dividing disc will tilt towards.
•Turn de dividing disc up by pulling up the knife
release lever (see position 1)
•Put locking pin together with extra supplied rubber
ring into the hole of the rotated part to keep the disc
up.
•Remove the pressing ring (see position 1)
2
3
1
1
2
1

DR (FLEX)
Date: 01-01-2016
Version: 06
USERS MANUAL
Page 20
•Take position at the back of the machine
•Keep knife release with left hand and pressing handle
with the right hand
•Move knife release to the left (see position 1) to end
position
•Move pressing handle up (see position 2) to end
position
Knife will came out for cleaning
•Put supplied grey bush between knifeholder and top to
keep te knife out (see position 1)
•Clean the knife with a soft brush and plastic scraper
•Lubricate knife with oil base on parrafine
Never use vegetable oil which will get hard
After cleaning you can place the machine back in opposite
direction.
10.3 Cleaning of the area below the rounding table
Remove the rounding table by giving a firm push to the bottom of
the protruding post (see figure).
Clean the area of dough and flour remains (clean without water).
Replace the rounding table and make sure that the round cavity in
the middle of the rounding table fits correctly on the bearing
(figure DA-10) of the cross bearing.
Press the rounding table firmly downwards and check if it is lying
flat.
The rounding table must lie flat!
1
2
1
This manual suits for next models
1
Table of contents
Other Daub Commercial Food Equipment manuals


Popular Commercial Food Equipment manuals by other brands


JAC
JAC Integra IMP 800 manual

Diamond
Diamond Minicold ISO 100 Plus C3.1B/10PM Assembly Diagram

DOCRILUC
DOCRILUC VIS-90 User and maintenance manual

Univex
Univex MT975 Operator's manual

Salvajor
Salvajor ScrapMaster 300-SM Installation & operating instructions

Henny Penny
Henny Penny LOV Gas 200 Series quick start guide

Moduline
Moduline CSC 031E INSTALLATION AND USE BOOKLET

Atwood
Atwood SCALE-O-MATIC S302 Operation and safety manual

FRICON
FRICON Upperdeck MAINTENANCE and Operation manual

Unic
Unic Stella di Caffe Technical notes

Rational
Rational iCombi Pro Original installation manual

Frigomat
Frigomat GX2 Installation, use and maintenance guide