DeFelsko PosiTector SST User manual
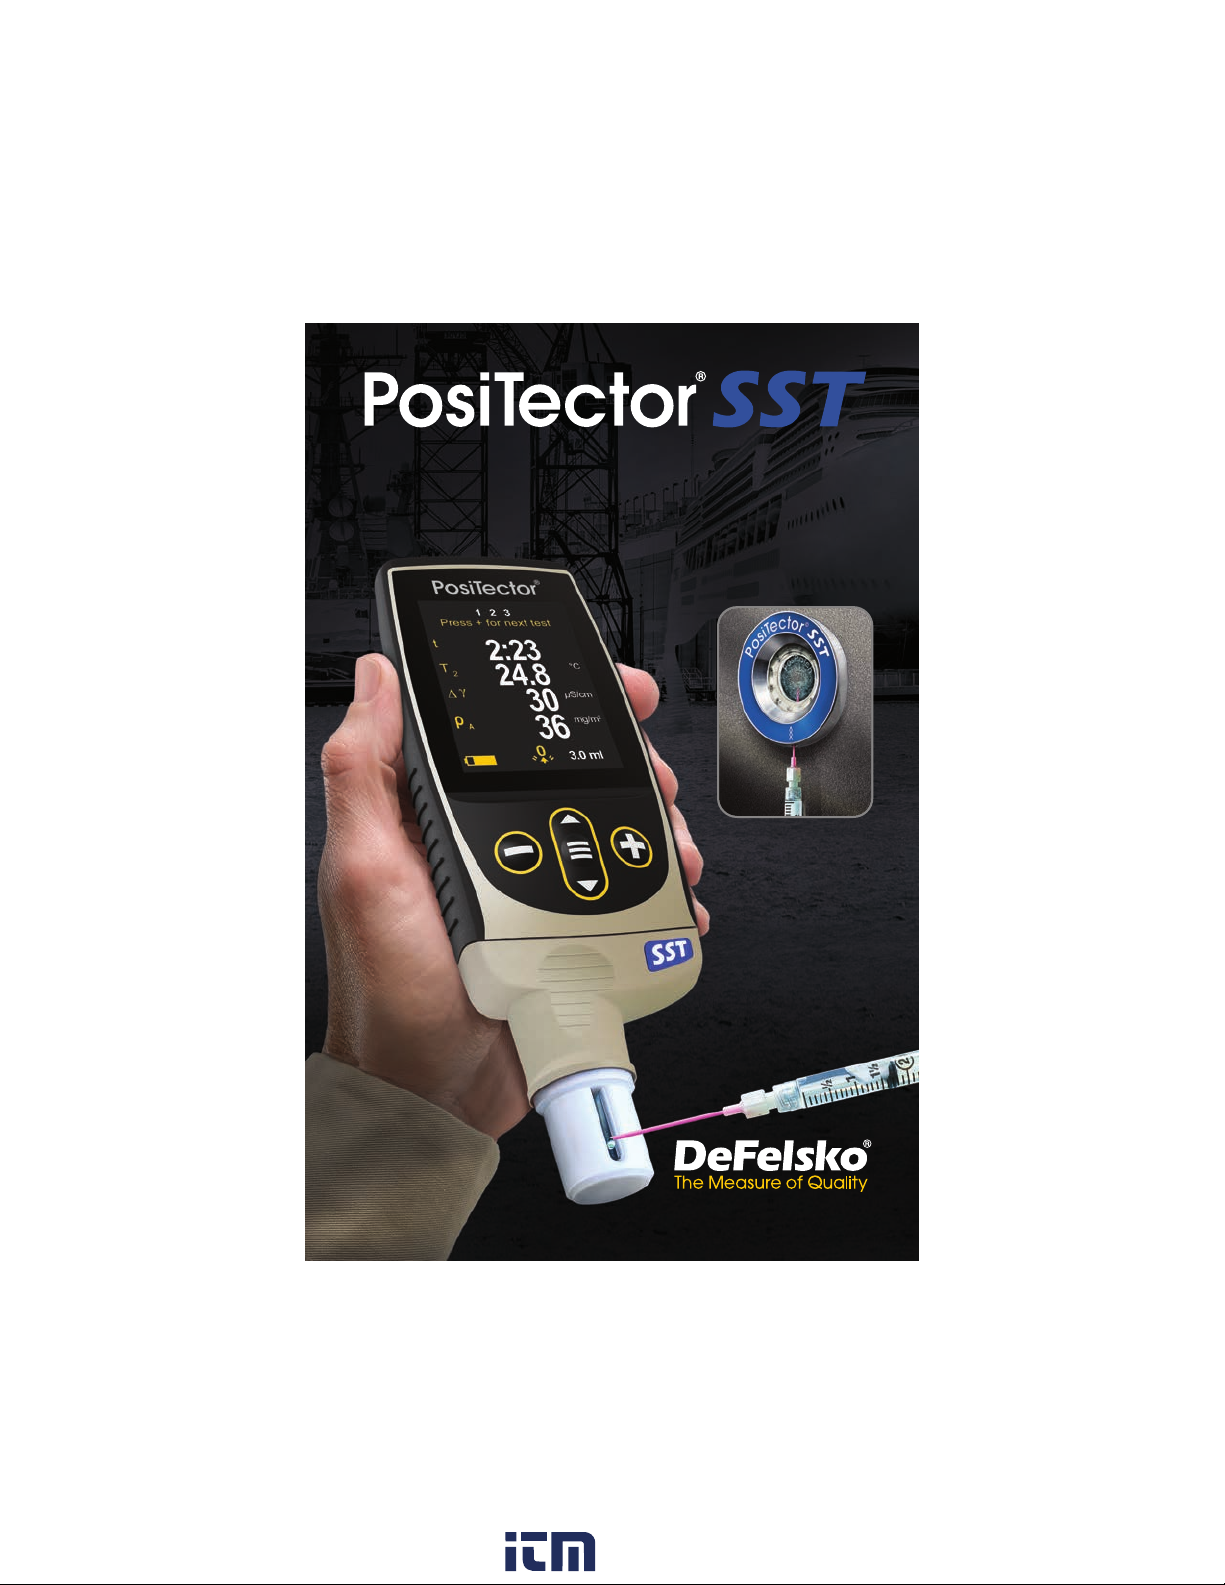
Soluble Salt Tester
Innovative
PosiPatchTM
For use with all
Bresle patch types
including the
Instruction Manual
www. .com information@itm.com1.800.561.8187

The Bresle ethod DeFelsko Patch is low cost,
latex-free, and works on nearly any surface
geometry or material. It features a low-tack
adhesive which creates a tight seal while
remaining easy to remove without leaving behind
any foam residue.
The Bresle ethod DeFelsko PosiPatch further
simplifies the Bresle method. It requires no
adhesive, as it is held to a steel surface by a
magnetic holding ring. It has a built-in port which
allows deionized (DI) water to be injected using a
dull polypropylene dispensing tube, eliminating sharp needles
from the test. It features a patented air-permeable membrane,
which automatically releases trapped air as DI water is injected,
then allows air bubbles to return and agitate the surface as
solution is withdrawn. It is also reusable, and a single PosiPatch
can be used for multiple tests.
The PosiTector SST can be used as a conventional conductivity
meter making it ideal for testing abrasive materials in accordance
with ISO 11127-6 and AST D4940-15. See Bresle Mode (pg.
10).
Introduction
The PosiTector Soluble Salt Tester (SST) is a hand-held
electronic instrument that measures the conductivity of a solution
and calculates the concentration of water-soluble salts on metal
surfaces in accordance with ISO 8502-6 (the Bresle ethod) and
ISO 8502-9. It consists of a PosiTector body (Standard or
Advanced) and an interchangeable probe.
The PosiTector SST is compatible with all Bresle ethod-type
patches including the Bresle ethod DeFelsko PosiPatch, Bresle
ethod DeFelsko Patch and other adhesive patches. While
compatible with any test patch, there are numerous advantages to
the DeFelsko patch solutions.
1
www. .com information@itm.com1.800.561.8187
2
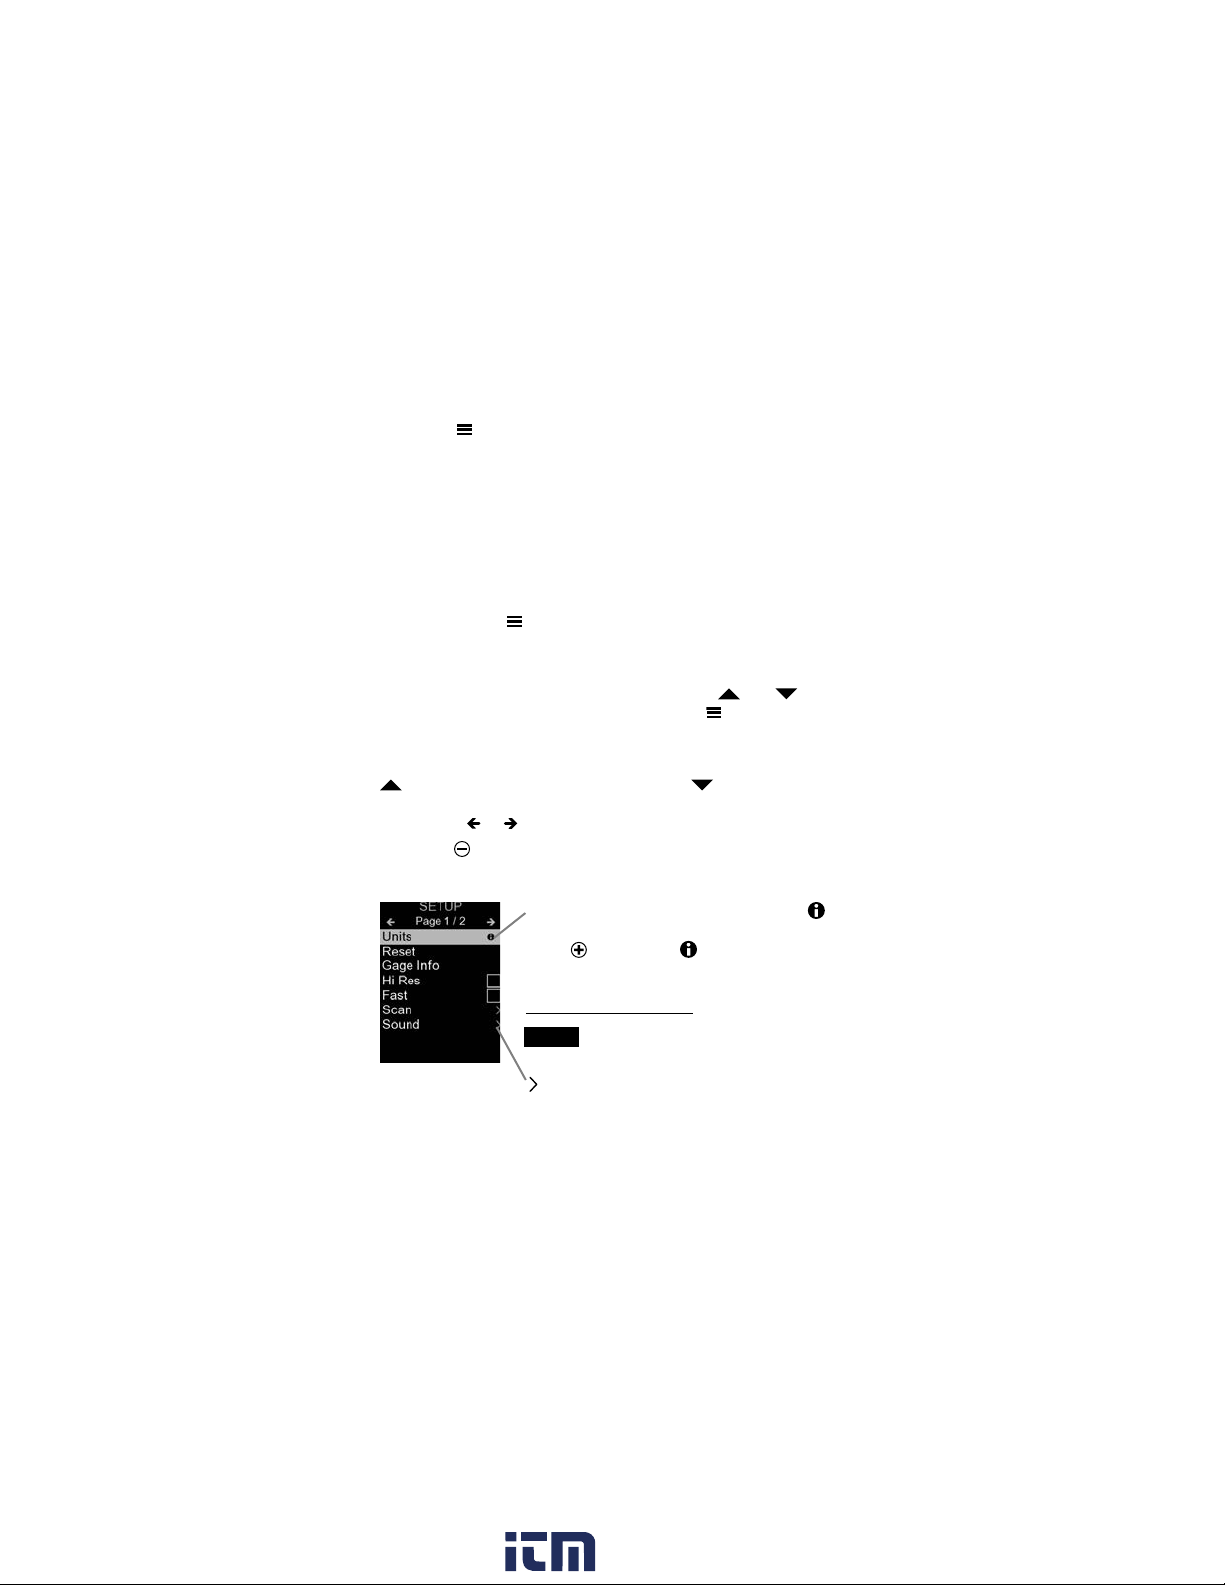
Menu Operation
To access the enu, power-up the gage, then press the center
navigation button . Either the keypad or touch screen can be
used to navigate the menu. If desired, touch screen functionality
can be disabled within the Setup menu (See Touch, pg. 10).
Select a menu option by touching it, or use the and but-
tons to highlight the desired option and press to select it.
On menus longer than one page, the current page number is
displayed below the menu name. Navigate between pages using
when the first menu item is selected, or when the last
menu item is selected. If using touch, navigate between pages
by touching or , or by swiping up or down.
Press the button to power up the Gage. To conserve battery
life, the gage will automatically go to sleep after 5 minutes of
inactivity (15 minutes while in Bresle Mode, pg. 10). While in
Sleep Mode, the gage powers up significantly faster— convenient
when moving between parts or locations. The gage will completely
power off after 4 hours of inactivity. Alternatively, select Power Off
from the main menu. All settings are retained.
Quick Start
When a enu option is highlighted, the
icon indicates on-gage help is available.
Press or touch the icon to display the
help.
indicates that a sub-menu exists for the
enu option. Select the option to display its
sub menu.
Update your gage to ensure that you
have the latest on-gage help information.
NOTE:
Press the button or swipe right to return to a previous screen.
Select Exit to close the enu.
www. .com information@itm.com1.800.561.8187

When powered-up, the PosiTector automatically
determines which probe is attached and does a self-
check. To disconnect a probe from a body, slide the
plastic probe connector horizontally (in the direction of
the arrow) away from the body. Reverse these steps to
attach a different probe. It is not necessary to power-
down the Gage when switching probes.
Additionally, the PosiTector gage body accepts a wide variety of
probe types including magnetic, eddy-current and ultrasonic
coating thickness, surface profile, environmental, hardness, salt
contamination, and ultrasonic wall thickness probes.
PosiTector SST probes consist of a purpose-
built test cell, optimized for the range, resolution
and test volume of the Bresle ethod.
Conductivity measurements are compensated
to 25°C (77°F) using a built-in temperature
sensor, and the sample temperature is recorded
for each measurement. The probe can be used
as a conventional conductivity meter by
unchecking Bresle Mode (pg. 10).
3
Test
Cell
How To Measure
Test Preparation:
Use deionized (DI) water to thoroughly clean the PosiTector
SST test cell, test cup, syringe and PosiPatch (if used in test).
All test materials should be handled in a manner that minimizes
the potential for contamination. The PosiTector SST operator
may choose to wear nitrile or other non-contaminating gloves
when performing the test.
Remove the protective cap from the probe. Power-up the Gage
by pressing the button. In the default Bresle Mode, the Gage
guides you through three simple steps - 1, 2 and 3.
Probes
www. .com information@itm.com1.800.561.8187

4
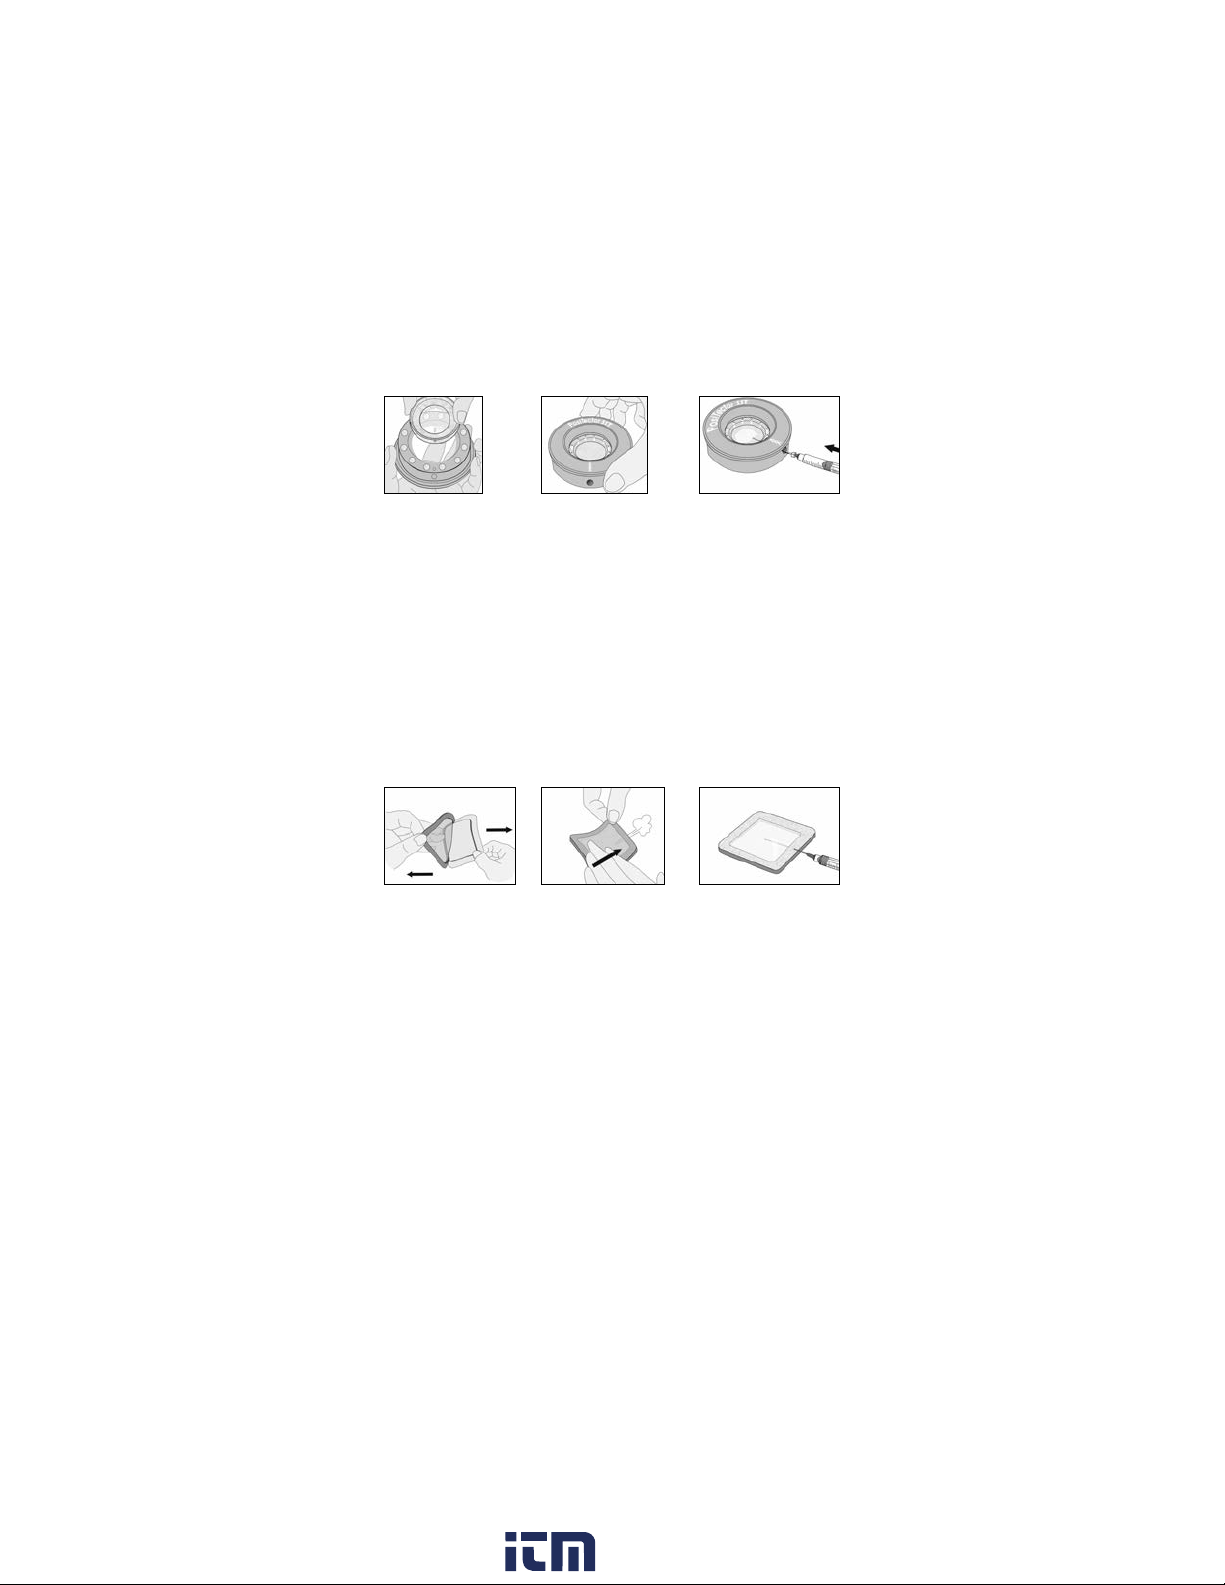
Step 2: Prepare Bresle Method Patch
Option A: DeFelsko PosiPatch
a) Turn the PosiPatch and magnetic ring upside down. Place the
PosiPatch into the magnetic ring ensuring the arrows align
with the injection port. Do not touch the PosiPatch’s interior.
b) Carefully place the magnetic ring on the steel surface. When
used on vertical surfaces, position the injection port between
the 4 o’clock and 8 o’clock points before attaching the
magnetic ring to the surface.
c) Slowly inject 3.0 ml of DI water into the port using the plastic
dispensing tip. The air within the PosiPatch automatically
escapes through the air-permeable membrane.
Step 1: Obtain Background (Blank) Conductivity
Measurement (γ1)
The Gage automatically displays the previous
background measurement, if any. This measurement can be
reused and step (c) to step (e) can be skipped by pressing the
button.
a) Pour at least 4 ml (milliliters) of deionized (DI) water into the
supplied cup (to prevent contamination of the water source).
b) Fill the syringe completely with DI water from the cup (slightly
more than 3 ml).
c) Completely fill the PosiTector SST probe’s test cell with water
from the syringe (approximately 1 ml).
d) Wait until the measurement stabilizes (up to 5 seconds), then
press the button to save a new background conductivity
measurement (γ1) and the water temperature (T1).
e) Use the syringe to draw all of the water from the test cell.
Shake any remaining water out of the test cell.
f) With the syringe pointing up, expel the air and excess solution
from the syringe until there is 3.0 ml of DI water remaining.
NOTE:
www. .com information@itm.com1.800.561.8187
5
When used on horizontal surfaces, fully insert the dispensing tip
into the PosiPatch. On vertical surfaces, insert the dispensing tip
only as far as is needed to see the tip inside the PosiPatch.
a)
a)
b) c)
b) c)
Option B: Bresle Method DeFelsko Patch (or equivalent)
a) Remove the backing and foam center from the patch, taking
care not to touch the interior surface.
b) Press the patch firmly onto the surface making sure most of
the air escapes.
c) Pierce the top of the patch at the foam perimeter, allowing the
needle to penetrate into the center of the patch.
d) Inject half of the water into the patch. Then, use the syringe to
withdraw trapped air.
e) Remove the needle, point it upwards and expel the air.
f) Re-insert the needle and inject the remaining water into the
patch.
www. .com information@itm.com1.800.561.8187

t= test duration
T2= sample temperature
Δγ= The change in conductivity. The
initial background measurement (γ1)
is automatically subtracted from the
final measurement (γ2). Test results
are displayed in units of
microsiemens per centimeter
(conductivity).
ρA=The surface density of soluble
salt expressed as sodium chloride.
Test results are displayed in units of
milligrams per square meter, or
micrograms per square centimeter.
6
Step 3: Begin Test (applies to both patch styles)
a) Once the water is injected into either patch, press the but-
ton to start the test timer.
After starting the test timer, the operator can select Power
Off from the Gage menu to conserve battery life. The test timer
will continue to run and the elapsed test time will be displayed
when the Gage is powered-up.
b) Without removing the needle/dispensing tip from the patch,
use the syringe to repeatedly withdraw and inject the water.
ISO 8502-6 recommends this process be completed at least
four times and that the test time be agreed between interested
parties. DeFelsko recommends a test time of two minutes or
longer.
c) After the desired amount of time has elapsed, withdraw the
water from the patch.
d) To complete the measurement, completely fill the PosiTector
SST probe’s test cell with the water from the patch. Wait
until the measurement stabilizes (up to 5 seconds), then press
the button to save the temperature (T2)and conductivity
(γ2) of the solution. Δγ, the difference between the γ2soluble
salt reading and the γ1background reading, is displayed.
TIP:
www. .com information@itm.com1.800.561.8187
If a memory batch is open, the measurement result will be stored
in memory (pg. 11).
e) Press the button to begin a new test.
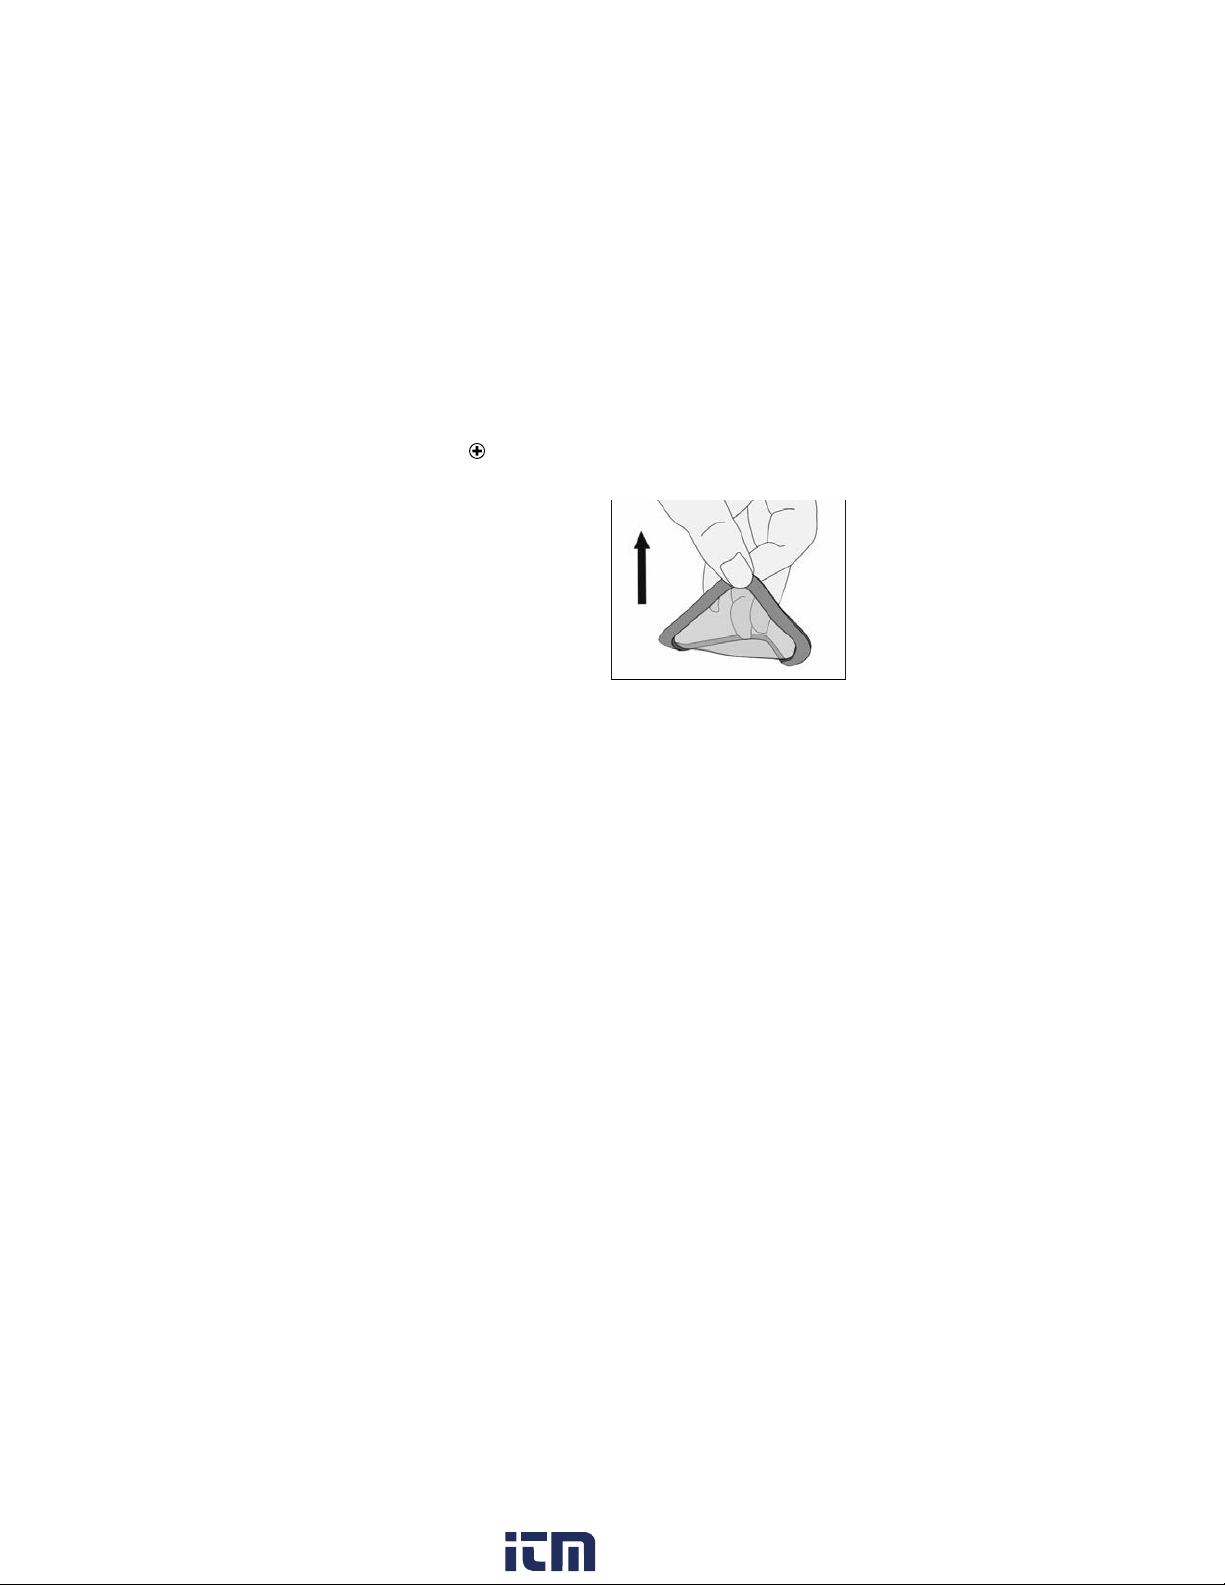
Patch Removal
The Bresle Method DeFelsko
Patch peels off the surface
easier and with less residue
than conventional Bresle
patches. Remove it immediately
after the test and dispose.
The Bresle Method PosiPatch
lifts cleanly off the surface, with
absolutely no residue. The user
may choose to discard the PosiPatch and begin the next test with
a new one, or simply rinse it with DI water and reuse for several
more tests until worn.
Rinsing the Test Cell
Rinse the test cell with unused DI water several times after each
measurement, shaking the water out after each rinse.
7
www. .com information@itm.com1.800.561.8187

8
Calibration and Verification
Two steps ensure best accuracy…
1. Calibration: typically performed by the manufacturer. All probes
include a Certificate of Calibration.
2. Verification of Accuracy: typically performed by the user by
measuring known reference standards such as the supplied
conductivity standard.
Calibration - Calibration is the high-level, controlled and
documented process of measuring traceable calibration standards
over the full operating range of the probe, and verifying that the
results are within the stated accuracy of the probe. Calibrations are
performed by the manufacturer, their authorized agent, or by an
accredited calibration laboratory in a controlled environment using
a documented process
Verification of Accuracy - Verification is an accuracy check
performed by the user with a solution of known conductivity. To
perform a verification, ensure that the conductivity standard and
instrument are at the same temperature. Remove any remaining
DI water in the test cell by filling it with the conductivity standard,
then inverting the test cell to empty it. Fill the test cell with the
conductivity standard again. If the reading is not within the
combined tolerance of the gage and conductivity standard,
proceed to Cleaning the Test Cell, below.
Cleaning the Test Cell - If the Verification reading is outside the
combined accuracy of the conductivity standard and gage, the
probe may need to be cleaned by filling it with DI water and
rubbing the walls of the cell with a supplied foam tip swab. Rinse
with DI water several times before using the cell.
Verify accuracy at the beginning and the end of each work shift.
During the work shift, if the Gage is dropped or suspected of giving
erroneous readings, its accuracy should be re-verified.
www. .com information@itm.com1.800.561.8187

Reset (menu Reset) restores factory settings and returns the
Gage to a known condition. The following occurs:
- All batches, stored measurements, batch names and screen
captures are erased.
- Calibration adjustments are returned to factory settings.
- The last stored background measurement (γ1) is erased.
- enu settings are returned to the following:
1. Power down the Gage and wait 5 seconds.
2. Simultaneously press and hold the and buttons until
the Reset symbol appears.
This returns the Gage to a known, “out-of-the-box” condition.
It
performs the same function as a menu Reset with the addition of:
9
- Date, Time and WiFi settings are not affected by either Reset.
Reset
Setup Menu
Memory = OFF
Bresle Mode = ON
Auto Dim = ON
Display = None
Patch Volume = 3.0 ml
Hi Res = OFF
Bluetooth & Stream = OFF
iFi & Access Point = OFF
USB Keyboard & Stream = OFF
BLE Keyboard = OFF
Surface Density units = mg/m2
Temperature units = °C
Units
Perform a more thorough Hard Reset as follows:
Flip Lock = OFF
Backlight = Normal
Auto Sync .net = ON
Sound = edium
Touch = ON
Language = English
Battery Type = Alkaline
Bluetooth Smart = OFF
USB Drive = ON
- Bluetooth Pairing info is cleared.
- enu settings are returned to the following status:
NOTE:
Allows the operator to change the displayed units for both
Temperature (°C or °F) and Surface Density (mg/m2or µg/cm2).
www. .com information@itm.com1.800.561.8187
10
Set the volume of water being used for the test (3.0 ml default).
Use the and buttons to decrease/increase the displayed
value. The patch volume is used to calculate surface density.
Patch Volume
The PosiTector SST can be adjusted to a known conductivity
standard. Use the and buttons to decrease/increase the
displayed value to match the known conductivity of the standard.
In typical use, a calibration adjustment should not be
required. Before performing the adjustment, ensure that the
PosiTector SST test cell has been thoroughly cleaned with DI
water. Ensure that the conductivity standard and PosiTector
SST test cell are at the same temperature.
Cal Adjust
NOTE:
(Calibration Adjustment)
Increases the displayed Gage resolution as follows:
0.1 µS, 0 – 200 µS
1.0 µS, over 200 µS
Gage accuracy is not affected.
Hi Res
NOTE:
When checked (default), the Gage guides the user through a 3-
step test process in accordance with ISO 8502-6. Uncheck
Bresle Mode to use the PosiTector SST as a regular
conductivity meter such as when testing abrasive materials in
accordance with ISO 11127-6 and AST D4940-15.
Bresle Mode
Adjusts the volume of built-in speaker (Off, Low, edium, High).
Sound
Disables the Auto Rotate feature by locking the display in its
current orientation.
Flip Lock
Allows the touch screen functionality to be disabled. All gage
functions can also be controlled using the navigation buttons.
Touch
www. .com information@itm.com1.800.561.8187

The PosiTector SST has internal memory storage for recording
measurement data. Stored measurements can be reviewed on-
screen or accessed via computers, tablets and smart phones. All
stored measurements are date and time-stamped.
The symbol appears when the Gage is set to store
measurement data.
Memory Management
11
Selects the type of batteries used in the Gage from a choice of
“Alkaline”, “Lithium” or “Ni H” (nickel-metal hydride rechargeable).
The battery state indicator symbol is calibrated for the selected
battery type. No damage will occur if the battery type used in the
Gage does not match the selected battery type.
Battery Type
All measurements are date and time stamped (24-hour format)
when stored into memory. It is therefore important to set the
correct date and time. Use the and buttons to select a
value, and the and buttons to adjust it. The current date
and time setting can also be viewed at the top of the main menu.
Set Clock
Advanced models store 250,000 readings in up to 1,000
batches. “New Batch” closes any currently opened batch and
creates a new batch name using the lowest available number.
New batch names are date-stamped when they are created.
Standard models store up to 1,000 readings in one batch.
Store a reading
into memory
Scroll through display
modes (Advanced only)
Restore brightness
after dimming
Access the enu
Screen Capture
Press both and buttons simultaneously to save an image of
the current display. The last 100 screen captures are stored in
memory and can be accessed when connected to a computer
(see PosiSoft USB Drive pg. 12).
www. .com information@itm.com1.800.561.8187

12
Accessing Stored Measurement Data
DeFelsko offers the following free solutions for viewing, analyzing
and reporting data:
PosiSoft USB Drive - Connect the Gage to a PC/ ac using the
supplied USB-C cable. View and print readings and graphs using
universal PC/ ac web browsers or file explorers. No software or
internet connection required.
PosiSoft Desktop - Powerful desktop software (PC/ ac) for
downloading, viewing, printing and storing measurement data.
Includes a customizable, templated PDF Report Generator. No
internet connection required.
PosiSoft.net - Web-based application offering secure, centralized
storage of measurement data. Access your data from any web-
connected device.
PosiTector App - (Advanced models only) App for compatible iOS
and Android smart devices. Permits users to create, save and
share professional PDF reports. Add images and notes using the
smart device’s camera and keyboard.
Connect Menu
Allows connection to your local wireless network or mobile
hot spot. Ideal for using your network’s internet connection for
synchronizing stored measurements with PosiSoft.net (above).
iFi (Advanced models only)
When USB Drive is enabled , the PosiTector uses a USB
mass storage device class which provides users with a simple
interface to retrieve stored data in a manner similar to USB flash
drives and digital cameras. USB Drive is also required to import
stored measurements into PosiSoft Desktop software (above).
USB
www. .com information@itm.com1.800.561.8187
13
The above iFi and USB menus contain a Sync .net Now
option. When selected, the Gage immediately synchronizes
stored measurement data via its respective communication
method (internet connection required). Alternatively, select Auto
Sync .net from within the USB connect menu to automatically
synchroniz e upon connection to a PC. Additional measurements
added to memory while connected are synchronized only when
the USB cable is disconnected and reconnected, or when the
Sync.net Now option is selected. iFi connected gages
automatically attempt synchronization upon power-up.
Sync .net Now
When connected, power is supplied through the
USB-C cable. The batteries are not used and the body will not
automatically power down.
NOTE:
When enabled and connected to a computer, the PosiTector will
be recognized as a Keyboard. Readings are sent to the computer
as they are taken, emulating keystrokes, followed by a carriage
return.
Keyboard
Stream
NOTE:
(Advanced models only)
Stream individual readings to a USB connected computer via a
serial protocol. Ideal for use with serial compatible SPC data
collection software.
(Advanced models only)
PosiSoft Desktop is required when using USB to
synchronize measurements with PosiSoft.net.
Bluetooth (Advanced models only)
www. .com information@itm.com1.800.561.8187
14
The Gage will perform a Hard Reset after an
update (see pg. 9 ).
WARNING:
BLE Keyboard
When enabled and connected to a computer, the PosiTector will
be recognized as a wireless Keyboard. Readings are sent to the
computer as they are taken, emulating keystrokes, followed by a
carriage return.
(Advanced models only)
Allows communication with a smart device running the
PosiTector App (pg. 12) via auto-pairing Bluetooth Smart
(BLE) wireless technology.
Bluetooth Smart
(Advanced models only)
Sync Batches
Select batches to flag them for synchronization to the PosiTector
App. Sync Batches is useful when connecting a new device to a
gage with pre-existing batches, since only batches created while
Bluetooth Smart is enabled are automatically selected.
Selected batches are synchronized when the next reading is
taken in a batch flagged for synchronization, or when the Sync
Batches option is selected at the bottom of the list of selected
batches.
Send Batches
Transfers selected batches to the PosiTector App. Send Batches
is useful when switching between devices, as only readings and
batches that have yet to be synchronized with any smart device
are synchronized automatically.
The Send Batches option is visible in the menu when the Gage
is connected to a smart device running the PosiTector App.
If Bluetooth Smart is disabled or disconnected, data
from batches selected in the Sync Batches menu are held in a
queue until communication with the PosiTector App is re-
established.
NOTE:
www. .com information@itm.com1.800.561.8187

Returning for Service
Before returning the instrument for service…
1. Install new or newly recharged batteries in the proper
alignment as shown within battery compartment.
2. Examine the probe for damage. Use the supplied cleaning
tool to clear dirt or debris from the test cell.
3. Perform a Hard Reset (pg. 9).
4. If issue is not resolved, Update (pg. 14) your PosiTector
gage body and re-attempt measurements.
Limited arranty, Sole Remedy
and Limited Liability
www. .com information@itm.com1.800.561.8187
Other manuals for PosiTector SST
3
Table of contents
Other DeFelsko Test Equipment manuals

DeFelsko
DeFelsko PosiTector 6000 FNDS Installation and operating instructions

DeFelsko
DeFelsko PosiTest AIR User manual

DeFelsko
DeFelsko PosiTest AIR User manual

DeFelsko
DeFelsko PosiTector UTG User manual

DeFelsko
DeFelsko PosiTector SST User manual

DeFelsko
DeFelsko PosiTector 200 User manual

DeFelsko
DeFelsko PosiTector SHD Verifier User manual

DeFelsko
DeFelsko PosiTest AT-A User manual

DeFelsko
DeFelsko PosiTest AT User manual

DeFelsko
DeFelsko PosiTector SPG User manual


