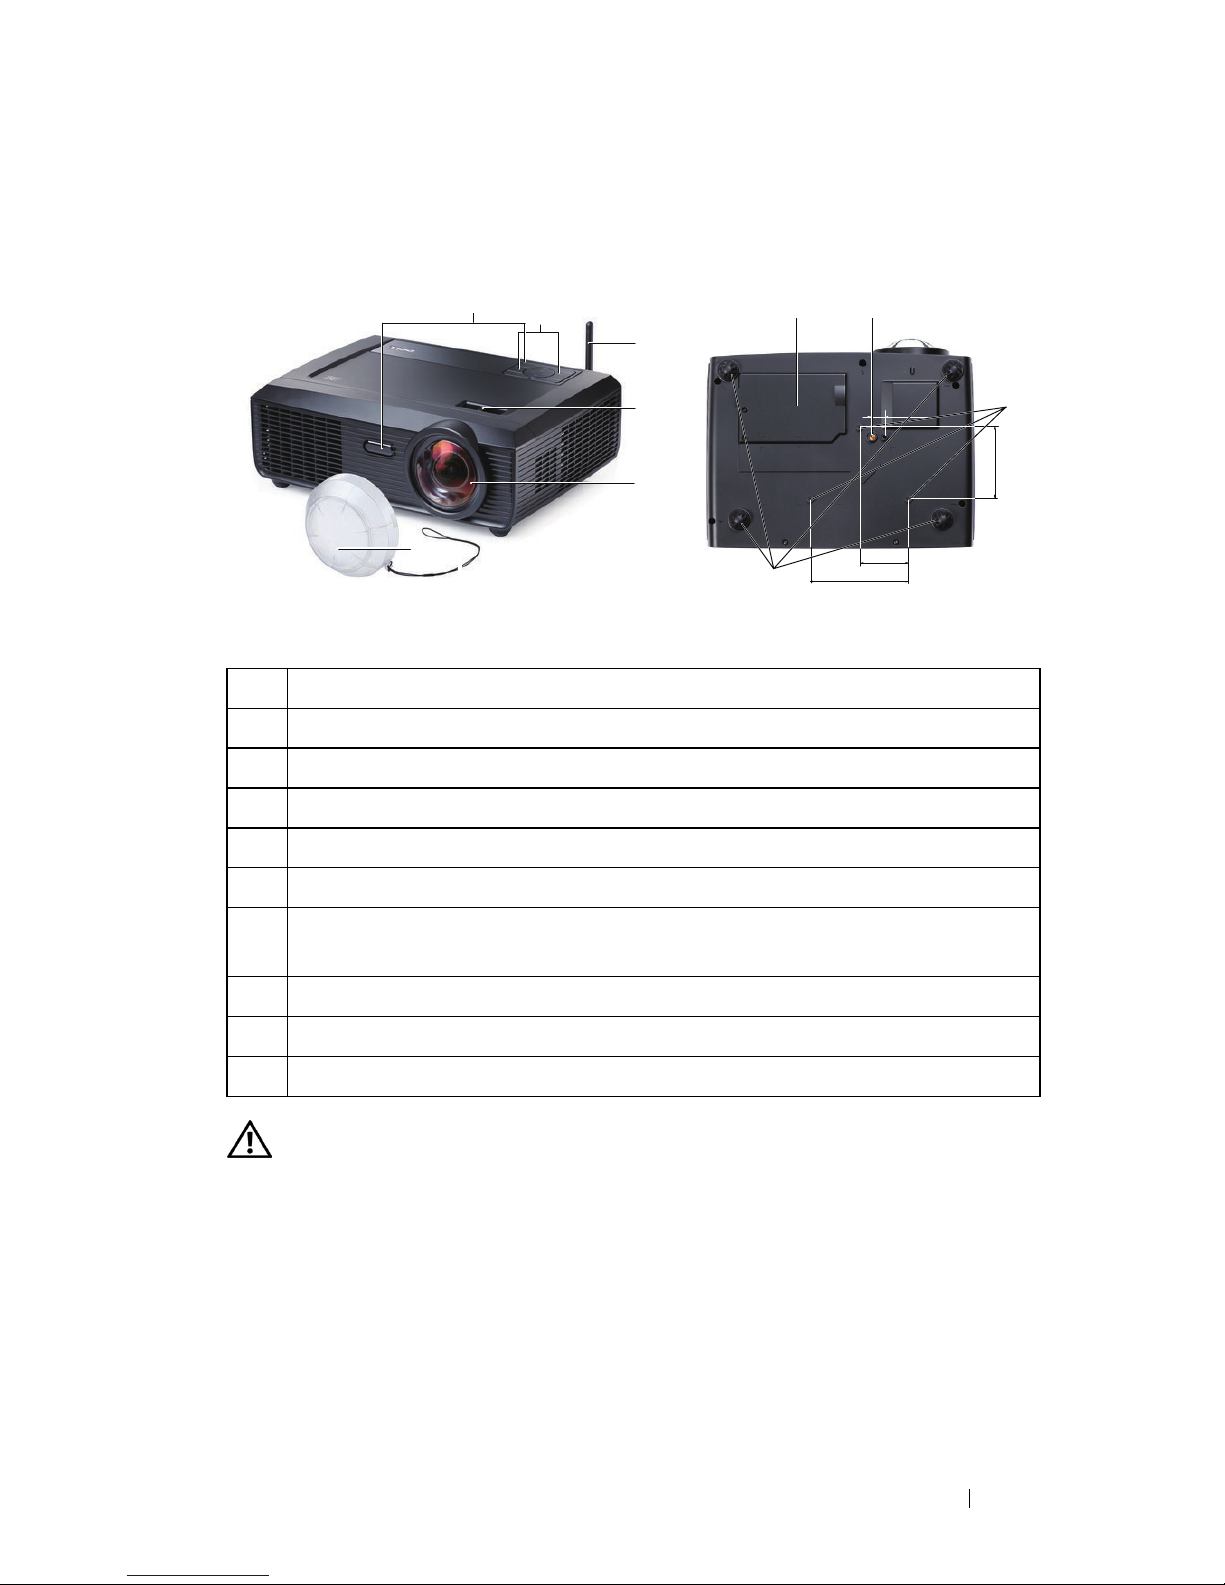
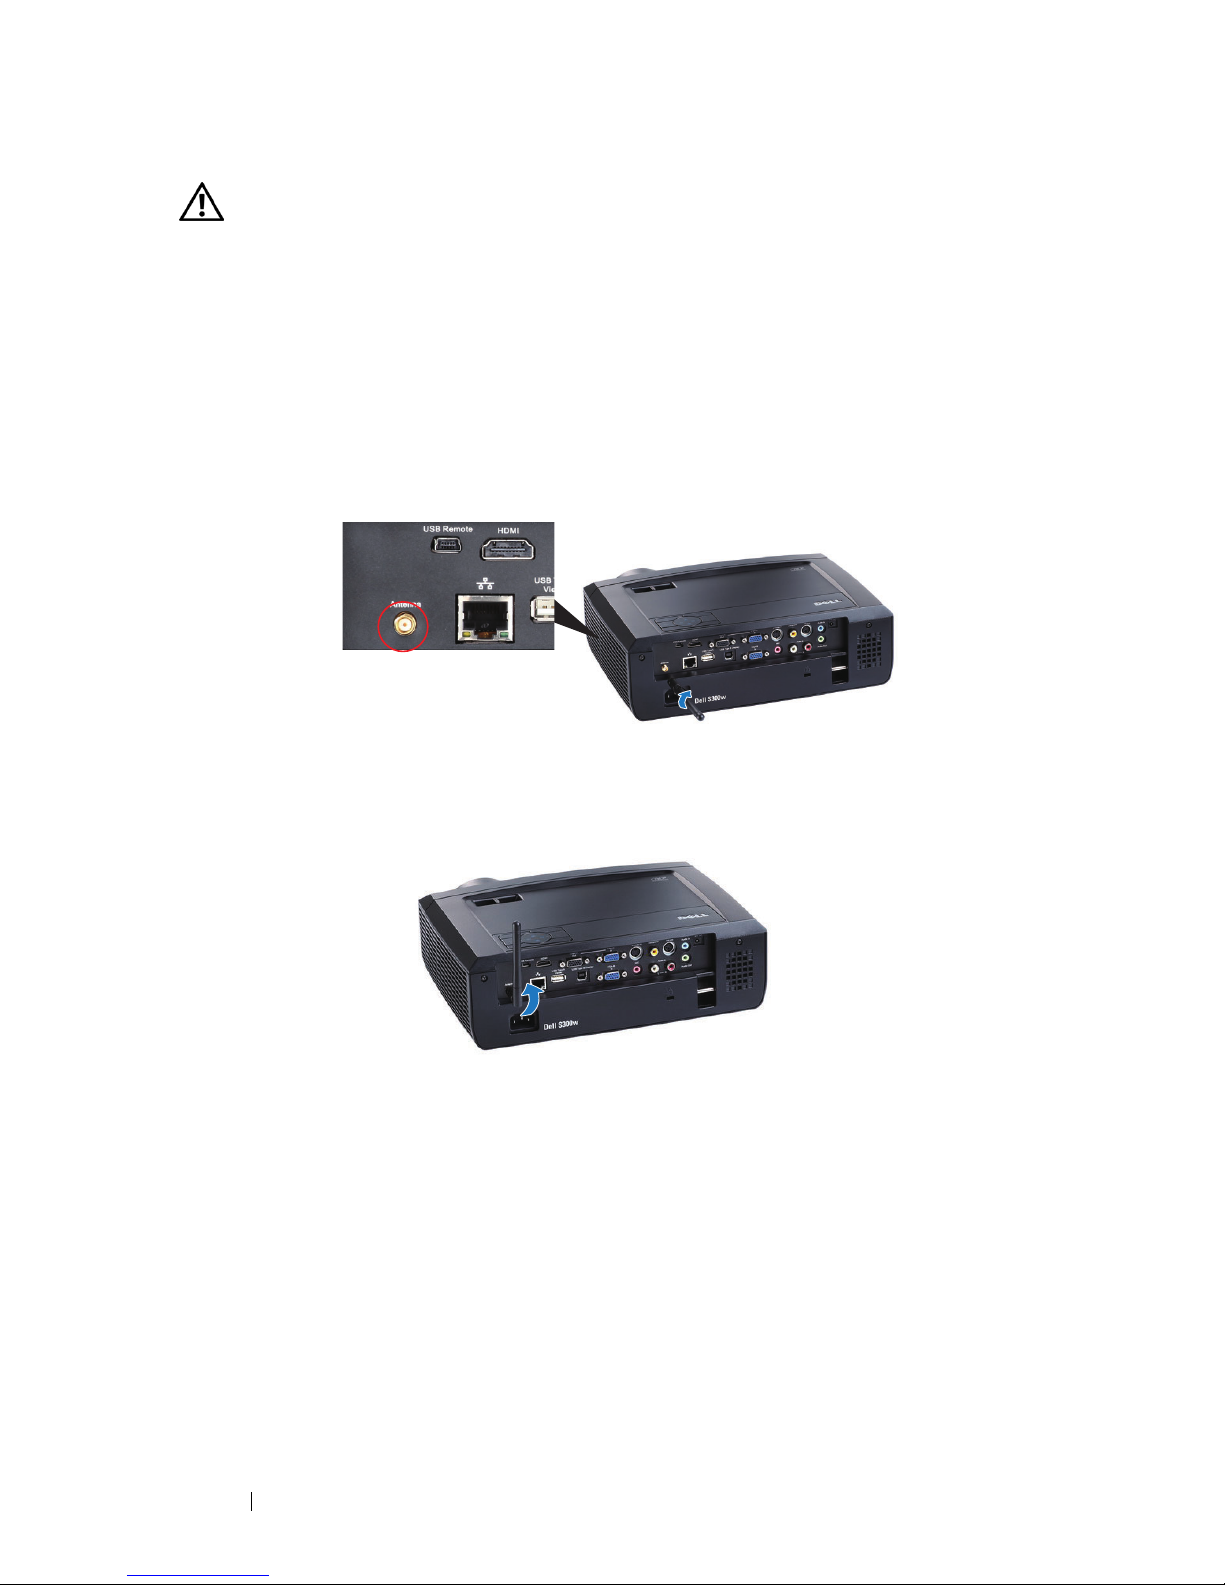
Dell S300W User manual

Dell™ S300w Projector
User’s Guide

Notes, Notices, and Cautions
NOTE: A NOTE indicates important information that helps you
make better use of your projector.
NOTICE: A NOTICE indicates either potential damage to
hardware or loss of data and tells you how to avoid the problem.
CAUTION: A CAUTION indicates a potential for property
damage, personal injury, or death.
____________________
Information in this document is subject to change without notice.
© 2010 Dell Inc. All rights reserved.
Reproduction of these materials in any manner whatsoever without the written
permission of Dell Inc. is strictly forbidden.
Trademarks used in this text: Dell and the DELL logo are trademarks of Dell
Inc.; DLP and DLP logo are trademarks of TEXAS INSTRUMENTS INCORPORATED;
Microsoft and Windows are either trademarks or registered trademarks of
Microsoft Corporation in the United States and/or other countries.
Other trademarks and trade names may be used in this document to refer to either
the entities claiming the marks and names or their products. Dell Inc. disclaims
any proprietary interest in trademarks and trade names other than its own.
Model S300w
March 2010 Rev. A01

Contents 3
Contents
1 Your Dell Projector . . . . . . . . . . . . . . . . . . 6
About Your Projector . . . . . . . . . . . . . . . . . 7
2 Connecting Your Projector . . . . . . . . . . . . 9
Installing the Antenna . . . . . . . . . . . . . . . 10
Connecting to a Computer . . . . . . . . . . . . . . . . 11
Connecting a Computer Using a VGA Cable . . . . 11
Monitor Loop-Through Connection Using VGA
Cables . . . . . . . . . . . . . . . . . . . . . . . . 12
Connecting a Computer Using an RS232 cable . . . 13
Connecting a Computer Using an USB Display . . . 14
Connecting a Computer Using Wireless . . . . . . 15
Connecting a DVD Player . . . . . . . . . . . . . . . . 16
Connecting a DVD Player Using an S-Video Cable . 16
Connecting a DVD Player Using a Composite Video
Cable . . . . . . . . . . . . . . . . . . . . . . . . 17
Connecting a DVD Player Using a Component Video
Cable . . . . . . . . . . . . . . . . . . . . . . . . 18
Connecting a DVD Player Using an HDMI Cable . . 19
Connecting to Local Area Network . . . . . . . . . . . 20
To project an image and control the projector that is
connected to a network through an RJ45 cable. . . 20
Professional Installation Options: Installation for
Driving Automatic Screen . . . . . . . . . . . . . 21
Connection With Commercial RS232 Control Box . 22

4Contents
3 Using Your Projector . . . . . . . . . . . . . . . . 23
Turning Your Projector On . . . . . . . . . . . . . . . . 23
Turning Your Projector Off . . . . . . . . . . . . . . . . 23
Adjusting the Projected Image . . . . . . . . . . . . . 24
Raising the Projector Height . . . . . . . . . . . . 24
Lowering the Projector Height . . . . . . . . . . . 24
Adjusting the Projector Focus . . . . . . . . . . . . . . 25
Adjusting Projection Image Size . . . . . . . . . . . . 26
Using the Control Panel . . . . . . . . . . . . . . . . . 28
Using the Remote Control . . . . . . . . . . . . . . . . 30
Installing the Remote Control Batteries . . . . . . . . 33
Operating Range With Remote Control . . . . . . . . . 34
Using the On-Screen Display . . . . . . . . . . . . . . 35
Main Menu . . . . . . . . . . . . . . . . . . . . . 35
AUTO-ADJUST . . . . . . . . . . . . . . . . . . . 35
INPUT SELECT . . . . . . . . . . . . . . . . . . . 36
PICTURE (in PC Mode) . . . . . . . . . . . . . . . 37
PICTURE (in Video Mode) . . . . . . . . . . . . . 38
DISPLAY (in PC Mode) . . . . . . . . . . . . . . . 40
DISPLAY (in Video Mode) . . . . . . . . . . . . . 42
LAMP . . . . . . . . . . . . . . . . . . . . . . . . 43
SET UP . . . . . . . . . . . . . . . . . . . . . . . 43
OTHERS . . . . . . . . . . . . . . . . . . . . . . . 48
Wireless Networking Installation . . . . . . . . . . . 55
S300w Wireless Application Software . . . . . . . 59

Contents 5
USB Display Driver Installation . . . . . . . . . . . . . 63
Presentation to Go (PtG) Installation . . . . . . . . . . 64
PtG Viewer . . . . . . . . . . . . . . . . . . . . . 65
Photo Viewer . . . . . . . . . . . . . . . . . . . . 65
PtG/Photo Function Introduction . . . . . . . . . . 65
PtG Overview . . . . . . . . . . . . . . . . . . . . 67
Photo Overview . . . . . . . . . . . . . . . . . . . 67
Buttons Introduction . . . . . . . . . . . . . . . . 68
Setup PtG Converter - Lite . . . . . . . . . . . . . 68
PtG Converter - Lite Application Software . . . . . 69
Managing the Projector From Web Management . . . . 70
Configuring the Network Setting . . . . . . . . . . 70
Accessing Web Management . . . . . . . . . . . 70
Make Application Token . . . . . . . . . . . . . . . . . 89
4 Troubleshooting Your Projector . . . . . . . . 90
Guiding Signals . . . . . . . . . . . . . . . . . . . . . 94
Changing the Lamp . . . . . . . . . . . . . . . . . . . . 96
5 Specifications . . . . . . . . . . . . . . . . . . . . . 98
6 Contacting Dell . . . . . . . . . . . . . . . . . . . 103
7 Appendix: Glossary . . . . . . . . . . . . . . . . 104

6Your Dell Projector
1
Your Dell Projector
Your projector comes with all the items shown below. Ensure that you have all the
items, and contact Dell™ if anything is missing.
Package Contents
Power cable 1.8m VGA cable (VGA to VGA)
Antenna Remote control
CD User’s Guide & Documentation AAA Batteries (2)
USB cable

Your Dell Projector 7
About Your Projector
CAUTION: Safety Instructions
1
Do not use the projector near appliances that generate a lot of heat.
2
Do not use the projector in areas where there is an excessive amount of dust. The
dust may cause the system to fail and the projector will automatically shutdown.
3
Ensure that the projector is mounted in a well-ventilated area.
4
Do not block the ventilation slots and openings on the projector.
5
Ensure the projector operates between ambient temperatures (5ºC to 35ºC).
6
Do not try to touch the ventilation outlet as it can become very hot after the
projector has been turned on or immediately after it is turned off.
1Control panel
2Focus tab
3Lens
4IR receivers
5Lens cap
6Antenna
7Mounting holes for wall mount: Screw hole M3 x 6.5mm depth.
Recommended torque <8 kgf-cm
8Mounting hole for tripod: Insert nut 1/4"*20 UNC
9Lamp cover
10 Tilt adjustment wheel
1
2
6
3
4
5
Top View Bottom View
110.00±0.15
55.00±0.10
14.00±0.10
7
10
8
9
110.00±0.15
55.00±0.10
82.15±0.15

8Your Dell Projector
7
Do not look into the lens while the projector is on as it may cause injury to your
eyes.
8
Do not place any objects near or in front of the projector or cover its lens while the
projector is on as the heat may cause the object to melt or burn.
9
Do not use the wireless projector near cardiac pacemakers.
10
Do not use the wireless projector near medical equipment.
11
Do not use the wireless projector near microwave ovens.
NOTE:
• Do not attempt to wall mount the projector yourself. It should be installed
by a qualified technician.
• Recommended Projector Wall Mount Kit (P/N: 4TVT8/V3RTH). For more
information, see the Dell Support website at
support.dell.com
.
• For more information, see the
Safety Information
that shipped with your
projector.
• S300w projector only can use in indoor.

Connecting Your Projector 9
2
Connecting Your Projector
1Mini USB connector for remote
mouse and firmware upgrade
12 Audio-B right-channel input
connector
2HDMI connector 13 Security cable slot
3VGA-A output (monitor loop-
through)
14 Audio-B left-channel input
connector
4VGA-A input (D-sub) connector 15 Microphone connector
5S-Video connector 16 VGA-B input (D-sub) connector
6Composite Video connector 17 USB Type B Display connector
7RS232 connector 18 USB Type A Viewer connector
8Audio-A input connector
connector
19 RJ45 connector
9+12V DC out connector 20 Power code connector
10 Security bar 21 Antenna connector
11 Audio output connector
3 4 5 6 7 8
14 12
12
13
9
10
1920 1521 161718 11

10 Connecting Your Projector
CAUTION: Before you begin any of the procedures in this section, follow the
Safety Instructions as described on page 7.
Installing the Antenna
Your projector comes with a wireless antenna for wireless networking. Refer
to "Wireless Networking Installation" on page 55.
1
Screw the antenna to the antenna connector at the back of your
projector.
2
Raise the antenna to position as shown.

Connecting Your Projector 11
Connecting to a Computer
Connecting a Computer Using a VGA Cable
NOTE: The Mini USB cable is not provided with your projector.
NOTE: The Mini USB cable must be connected if you want to use the Page Up
and Page Down features on the remote control.
1Power cord
2VGA to VGA cable
3USB-A to Mini USB-B cable
1
2
3

12 Connecting Your Projector
Monitor Loop-Through Connection Using VGA Cables
NOTE: Only one VGA cable is shipped with your projector. An additional VGA
cable can be purchased on the Dell website at support.dell.com.
1Power cord
2VGA to VGA cable
1
22

Connecting Your Projector 13
Connecting a Computer Using an RS232 cable
NOTE: The RS232 cable is not shipped with your projector. Consult a
professional installer for the cable and RS232 remote control software.
1Powercord
2 RS232 cable
2
1

14 Connecting Your Projector
Connecting a Computer Using an USB Display
NOTE: Need to install USB Driver, see "USB Display Driver Installation" on
page 63.
1PowerCode
2 USB-A to USB-B cable
2
1

Connecting Your Projector 15
Connecting a Computer Using Wireless
NOTE: Your computer must have wireless function and should be configured
properly to detect the wireless connection. Refer to your computer’s
documentation on how to configure wireless connection.

16 Connecting Your Projector
Connecting a DVD Player
Connecting a DVD Player Using an S-Video Cable
NOTE: The S-Video cable is not shipped with your projector. You can purchase
the S-Video extension (50 ft/100 ft) cable on the Dell website at
support.dell.com.
1Power cord
2S-Video cable
2
1

Connecting Your Projector 17
Connecting a DVD Player Using a Composite Video Cable
NOTE: The Composite Video cable is not shipped with your projector. You can
purchase the Composite Video Extension (50 ft/100 ft) cable on the Dell website
at support.dell.com.
1Power cord
2Composite Video cable
2
1

18 Connecting Your Projector
Connecting a DVD Player Using a Component Video Cable
NOTE: The VGA to Component Video cable is not shipped with your projector.
You can purchase the VGA to Component Video Extension (50 ft/100 ft) cable on
the Dell website at support.dell.com.
1Power cord
2VGA to Component Video cable
1
2

Connecting Your Projector 19
Connecting a DVD Player Using an HDMI Cable
NOTE: The HDMI cable is not shipped with your projector.
1Power cord
2HDMI cable
2
1

20 Connecting Your Projector
Connecting to Local Area Network
To project an image and control the projector that is connected to a
network through an RJ45 cable.
NOTE: The RJ45 cable is not shipped with your projector.
1Power cord
2RJ45 cable
2
1
Local Area Network (LAN)
This manual suits for next models
1
Table of contents
Other Dell Projector manuals

Dell
Dell 4310WX - DLP Multimedia Projector User manual

Dell
Dell S510 User manual

Dell
Dell S520 Quick start guide

Dell
Dell PowerEdge RAID Controller S300 User manual

Dell
Dell S300WI User manual

Dell
Dell 2100MP User manual

Dell
Dell 4310WX User manual

Dell
Dell M210X User manual

Dell
Dell M209X User manual

Dell
Dell Mobile M900HD User manual

Dell
Dell S560T User manual

Dell
Dell 3300MP User manual

Dell
Dell S320 User manual

Dell
Dell Mobile M900HD User manual

Dell
Dell Mobile M900HD User manual

Dell
Dell 1100MP User manual

Dell
Dell Mobile M115HD User manual

Dell
Dell S518WL User manual

Dell
Dell 1800MP User manual

Dell
Dell 4210X - XGA DLP Projector User manual