manuals.online logo
Brands
  1. Home
  2. •
  3. Brands
  4. •
  5. DeLOCK
  6. •
  7. PCI Card
  8. •
  9. DeLOCK 90061 User manual

DeLOCK 90061 User manual

Declaration of conformity
Products with a CE symbol fulll the EMC directive (2014/30/EU) and
RoHS directive (2011/65/EU+2015/863+2017/2102), which were released by the
EU-comission.
The declaration of conformity can be downloaded here:
https://www.delock.de/produkte/G_90061/merkmale.html
WEEE-notice
The WEEE (Waste Electrical and Electronic Equipment)-directive, which became
e󰀨ective as European law on February 13th 2003, resulted in an all out change
in the disposal of disused electro devices. The primarily purpose of this directive
is the avoidance of electrical waste (WEEE) and at the same time the support of
recycling and other forms of recycling in order to reduce waste. The WEEE-logo
on the device and the package indicates that the device should not be disposed
in the normal household garbage. You are responsible for taking the disused
electrical and electronical devices to a respective collecting point. A separated
collection and reasonable recycling of your electrical waste helps handling the
natural resources more economical. Furthermore recycling of electrical waste is
a contribution to keep the environment and thus also the health of men. Further
information about disposal of electrical and electronical waste, recycling and
the collection points are available in local organizations, waste management
enterprises, in specialized trade and the producer of the device.
EU Import: Tragant Handels- und Beteiligungs GmbH
Beeskowdamm 13/15, 14167 Berlin, Germany
Support Delock
If you have further questions, please contact our customer support
[email protected]
You can nd current product information on our homepage: www.delock.com
Final clause
Information and data contained in this manual are subject to change without notice
in advance. Errors and misprints excepted.
Copyright
No part of this user's manual may be reproduced, or transmitted for any purpose,
regardless in which way or by which means, electronically or mechanically, without
explicit written approval of Delock.
Edition: 11/2021
SATA PCI Express x8 Card
8 x SATA 6 Gb/s
User manual
Mode d’emploi
Uživatelská příručka
Manuale utente
Manual de utilizare
Korisnički priručnik
Bedienungsanleitung
Manual del usuario
Instrukcja obsługi
Bruksanvisning
Használati utasítás
Εγχειρίδιο χρήστη
Product-No:90061
User manual no:90061-a
www.delock.com
English
Description
The PCI Express card by Delock expands a PC by eight internal SATA ports.
Di󰀨erent devices such as SSDs, hard drives, DVD-drives etc. can be connected to
the card.
Specication
• Connectors:
PCIe card:
1 x PCI Express x8, V2.0
2 x SFF-8087 female
2 x 2 pin LED pin header male
Connection cables:
1 x SFF-8087 male
4 x SATA 6 Gb/s 7 pin receptacle
• Chipset: LSI SAS2008
• 12 x LED indicator
• Supports Native Command Queuing (NCQ)
• Supports S.M.A.R.T.
• Supports TRIM
• Supports DevSleep
• Hot Swap
• Bootable
LED indicator
CR1: Activity status for J7
CR2: Activity status for J8
CR3: System LED (light green when PCIe card is connected)
CR4 – CR11: Activity status for each SATA port
CR12: Power LED
System requirements
• Linux Kernel 5.4 or above
• Windows 8.1/8.1-64/10/10-64
• Windows Server 2019
• PC with one free PCI Express x8 / x16 / x32 slot
Package content
• PCI Express card
• Low prole bracket
• 2 x Cable SFF-8087 male to 4 x SATA receptacle, length ca. 80 cm
• User manual
Safety instructions
• Protect the product against moisture
• Avoid anti-static electricity when installing the card
Hardware Installation
1. Turn o󰀨 your PC and unplug the power cord.
2. Open the housing.
3. Remove the slot holder from the available PCI Express slot.
4. Insert the card straight and carefully into the free PCI Express slot, until it is
well seated.
5. Use a screw to attach the card to the housing.
6. Optionally, you can connect LEDs to the pin header.
7. Reattach the housing and connect the power cord to the AC adapter.
Driver Installation
When the installation of the device is nished, the driver will be automatically
installed after you restart the computer.
LED indicator
There is a two pin LED connector for each SFF-8087 port on the PCB. An LED
can be connected to this connector.
Conguration système requise
• Linux Kernel 5.4 ou version ultérieure
• Windows 8.1/8.1-64/10/10-64
• Windows Server 2019
• PC avec un slot PCI Express x8 / x16 / x32 libre
Contenu de l’emballage
• PCI Express Carte
• Low prole slot arrière
• 2 x Câble SFF-8087 mâle vers 4 x SATA femelle, longueur env. 80 cm
• Mode d’emploi
Instructions de sécurité
• Protéger le produit contre l’humidité
• Éviter l’électricité statique lors de l’installation de la carte
Installation matérielle
1. Eteignez votre PC et débranchez le cordon d'alimentation.
2. Ouvrez le boîtier.
3. Enlevez le cache du slot PCI Express disponible.
4. Insérez la carte tout droit et avec précaution dans le slot PCI Express libre
jusqu'à ce qu'elle soit bien en place.
5. Utilisez une vis pour attacher la carte au boîtier.
6. Facultativement, vous pouvez connecter des LED à l'embase à broches.
7. Remontez le boîtier et branchez le cordon d'alimentation et l'adaptateur AC.
Installation du pilote
Lorsque l'installation du périphérique est terminée, le pilote est installé
automatiquement après redémarrage de l'ordinateur.
Indicateur LED
Il y a un connecteur deux broches à LED pour chaque port SFF-8087 sur le PCB.
Une LED peut être branchée à ce connecteur.
English
Deutsch
Français
Español
Systemvoraussetzungen
• Linux Kernel 5.4 oder höher
• Windows 8.1/8.1-64/10/10-64
• Windows Server 2019
• PC mit einem freien PCI Express x8 / x16 / x32 Steckplatz
Packungsinhalt
• PCI Express Karte
• Low Prole Blende
• 2 x Kabel SFF-8087 Stecker zu 4 x SATA Buchse, Länge ca. 80 cm
• Bedienungsanleitung
Sicherheitshinweise
• Produkt vor Feuchtigkeit schützen
• Vermeiden Sie antistatische Auadung beim Einbau der Karte
Hardwareinstallation
1. Schalten Sie Ihren PC aus, ziehen Sie das Netzkabel.
2. Ö󰀨nen Sie das Gehäuse.
3. Entfernen Sie das Slotblech vom gewünschten freien PCI Express Steckplatz.
4. Stecken Sie die Karte gerade und vorsichtig in den freien PCI Express Slot,
bis sie fest sitzt.
5. Befestigen Sie die Karte mit einer Schraube am Gehäuse.
6. Optional können Sie an die Pfostenstecker LEDs anschließen.
7. Schließen Sie das Gehäuse wieder und verbinden Sie das Netzkabel mit dem
Netzteil.
Treiberinstallation
Nach dem Einbau des Gerätes wird nach dem Neustart der Treiber automatisch
installiert.
LED Anzeige
Auf der Leiterplatte bendet sich je ein zweipoliger LED Anschluss für jeden SFF-
8087 Port. An diesen Anschluss kann eine LED angeschlossen werden.
Requisitos del sistema
• Linux Kernel 5.4 o superior
• Windows 8.1/8.1-64/10/10-64
• Windows Server 2019
• PC con una ranura PCI Express x8 / x16 / x32 libre
Contenido del paquete
• Tarjeta PCI Express
• Low prole soporte posterior
• 2 x Cable SFF-8087 macho a 4 x SATA hembra, longitud aprox. 80 cm
• Manual del usuario
Instrucciones de seguridad
• Proteja el producto contra el polvo
• Evite la electricidad estática cuando instale la tarjeta
Hardware Instalación
1. Apague su equipo y desconecte el cable de alimentación.
2. Abra la carcasa.
3. Retire el soporte de la ranura de la ranura PCI Express disponible.
4. Inserte la tarjeta en posición recta y con cuidado en la ranura PCI Express
libre hasta que quede correctamente asentada.
5. Utilice un tornillo para jar la tarjeta a la carcasa.
6. Opcionalmente, puede conectar LED a la base de conexiones.
7. Vuelva a colocar la carcasa y conecte el adaptador de CA del cable de
alimentación.
Instalación del controlador
Cuando la instalación del dispositivo haya terminado, el controlador se instalará
automáticamente después de reiniciar el equipo.
Indicador LED
Hay un conector LED de dos pines para cada puerto SFF-8087 en el PCB. Se
puede conectar un LED a este conector.
České
Polsku
Italiano
Svenska
Systémové požadavky
• Linux Kernel 5.4 nebo vyšší
• Windows 8.1/8.1-64/10/10-64
• Windows Server 2019
• PC s jedním volným PCI Express x8 / x16 / x32 slotem
Obsah balení
• Karta PCI Express
• Záslepka do slotu
• 2 x Kabel SFF-8087 samec na 4 x SATA samice, délka cca. 80 cm
• Uživatelská příručka
Bezpečnostní pokyny
• Chraňte produkt před vlhkostí
• Při instalaci karty se vyvarujte působení antistatické elektřiny
Instalace hardware
1. Vypněte PC a odpojte přívodní šňůru napájení.
2. Otevřte kryt PC.
3. Vyndejte záslepku z volného PCI Express slotu.
4. Vložte kartu opatrně do volného PCI Express slotu až zcela dosedne.
5. Přišroubujte pomocí šroubováku kartu ke skříni.
6. Volitelně můžete připojit LED do pin konektoru.
7. Nasaďte zpět kryt a připojte napájecí šňůru.
Instalace ovladače
Po dokončení instalace hardwaru se driver nainstaluje automaticky. Poté
restartujte počítač.
Kontrolka LED
Pro každý port SFF-8087 na desce tištěných spojů je jeden konektor LED. K
tomuto konektoru lze připojit diodu LED.
Requisiti di sistema
• Linux Kernel 5.4 o superiore
• Windows 8.1/8.1-64/10/10-64
• Windows Server 2019
• PC con uno slot PCI Express x8 / x16 / x32 libero
Contenuto della confezione
• Scheda PCI Express
• Sta󰀨a a basso prolo
• 2 x Cavo SFF-8087 maschio - 4 x SATA femmina, lunghezza ca. 80 cm
• Manuale utente
Istruzioni per la sicurezza
• Proteggere il prodotto dall'umidità
• Evitare l'elettricità antistatica durante l'installazione della scheda
Installazione dell'hardware
1. Spegnere il PC e scollegare il cavo di alimentazione.
2. Aprire l'alloggiamento.
3. Rimuovere il supporto dallo slot PCI Express disponibile.
4. Inserire la scheda in linea retta e con cura nello slot PCI Express libero nché
non si trova in sede.
5. Utilizzare una vite per ssare la scheda nell'alloggiamento.
6. Alternativamente, è possibile collegare i LED al connettore.
7. Reinserire l'alloggiamento e collegare il cavo di alimentazione all'adattatore
CA.
Installazione del driver
Al termine dell'installazione del dispositivo, il driver viene automaticamente
installato al riavvio del computer.
Indicatore LED
C'è un connettore LED a due pin per ogni porta SFF-8087 sul PCB. A questo
connettore può essere collegato un LED.
Wymagania systemowe
• Linux Kernel 5.4 lub nowszy
• Windows 8.1/8.1-64/10/10-64
• Windows Server 2019
• PC z jednym wolnym gniazdem PCI Express x8 / x16 / x32
Zawartość opakowania
• Karta PCI Express
• Low Prole śledz
• 2 x Przewód SFF-8087 męski na 4 x SATA żeński, długości ok. 80 cm
• Instrukcja obsługi
Instrukcje bezpieczeństwa
• Produkt należy zabezpieczyć przed wilgocią
• Podczas instalacji karty należy się zabezpieczyć przed elektrycznością statyczną
Instalacja sprzętu
1. Wyłącz komputer i odłącz kabel zasilania.
2. Otwórz obudowę.
3. Usuń blokadę z wolnego slotu PCI Express.
4. Wsuwaj kartę prosto i ostrożnie do wolnego slotu PCI Express, aż zostanie
dobrze umocowana.
5. Przykręć śrubką kartę do obudowy.
6. Opcjonalnie możesz podłączyć diody LED do listwy pinowej.
7. Zamknij z powrotem obudowę i podłącz kabel do zasilacza.
Instalacja sterownika
Po zainstalowaniu urządzenia, sterownik zainstaluje się automatycznie po
restarcie komputera.
Wskaźnik LED
Dwupinowe złącze LED do każdego porty SFF-8087 na PCB. Do złącza można
podłączyć diodę.
Systemkrav
• Linux Kernel 5.4 eller högre
• Windows 8.1/8.1-64/10/10-64
• Windows Server 2019
• PC med en ledig PCI Express x8 / x16 / x32 -plats
Paketets innehåll
• PCI Express-kort
• Fäste med låg prol
• 2 x Kabeln SFF-8087 hane till 4 x SATA hona, längd ca 80 cm
• Bruksanvisning
Säkerhetsinstruktioner
• Skydda produkten mot fukt
• Undvik antistatisk elektricitet när du installerar kortet
Hårdvaruinstallation
1. Stäng av datorn och koppla ifrån strömsladden.
2. Öppna höljet.
3. Ta bort platshållaren från den lediga PCI Express-platsen.
4. Sätt försiktigt in kortet rakt i den lediga PCI Express-platsen, tills det sitter
ordentligt på plats.
5. Använd en skruv för att fästa kortet till höljet.
6. Dessutom kan du ansluta LED-lampor till stifthuvudet.
7. Sätt tillbaka höljet och anslut strömsladden till eluttaget.
Installation av drivrutiner
När installationen an enheten är klar kommer drivrutinen att automatiskt installeras
när du startar om datorn.
LED-indikator
Det nns två LED-stiftanslutningar för varje SFF-8087-port på det tryckta
kretskortet. En lysdiod kan anslutas till den här anslutningen.
Preduvjeti sustava
• Linux Kernel 5.4 ili noviji
• Windows 8.1/8.1-64/10/10-64
• Windows Server 2019
• Računalo s jednim slobodnim PCI Express x8 / x16 / x32 utorom
Sadržaj pakiranja
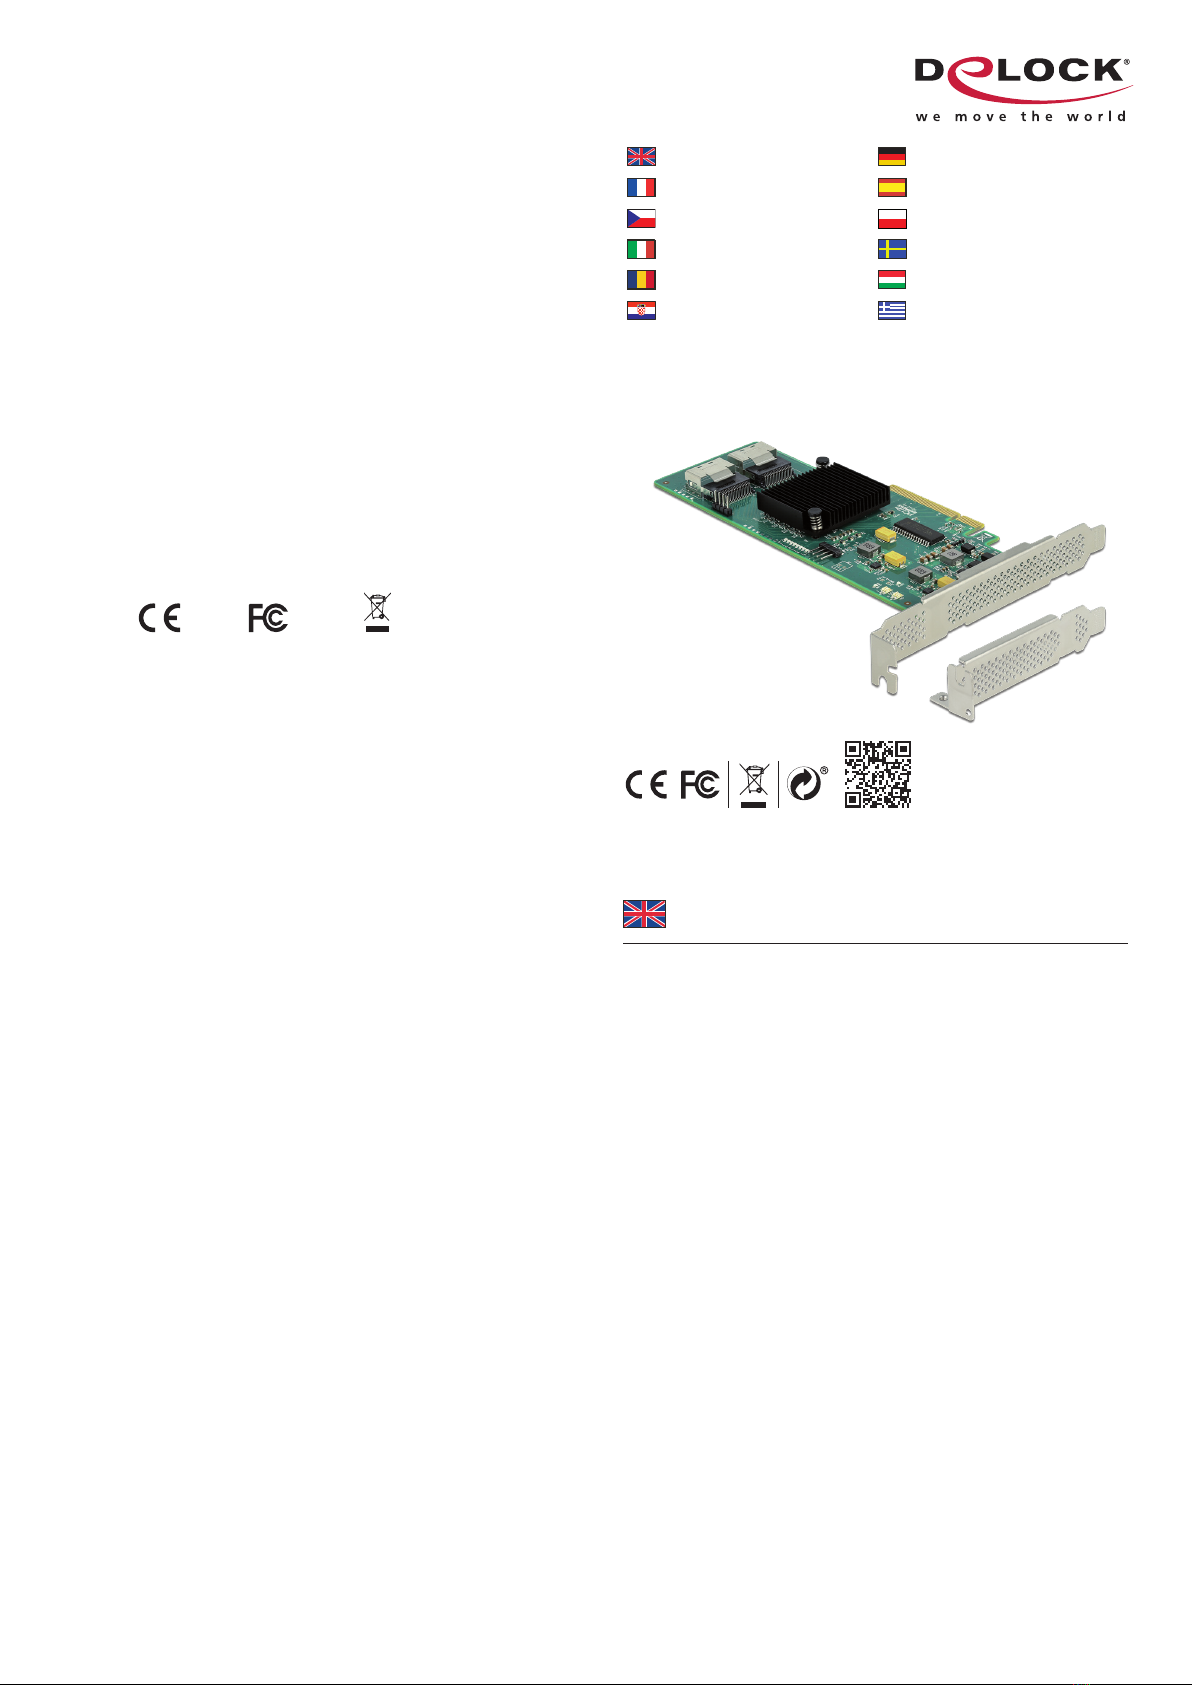
• PCI Express kartica
• Nosač niskog prola
• 2 x Kabel SFF-8087 muški na 4 x SATA ženski, duljina oko 80 cm
• Korisnički priručnik
Sigurnosne upute
• Zaštitite proizvod od vlage
• Izbjegavajte antistatički elektricitet prilikom umetanja kartice
Ugradnja hardvera
1. Isključite računalo i odvojite kabel za napajanje.
2. Otvorite kućište.
3. Izvadite držač utora iz raspoloživog PCI Express utora.
4. Ravno i pažljivo umetnite karticu u slobodan PCI Express utor dok potpuno
ne sjedne na mjesto.
5. Vijkom pričvrstite karticu za kućište.
6. Dodatno, možete povezati LED indikatore na priključnicu.
7. Vratit kućište i ponovno priključite kabel za napajanje u AC adapter.
Instalacija upravljačkog programa
Po dovršetku instalacije uređaja, upravljački program će se automatski instalirati
nakon ponovnog pokretanja računala.
LED lampica
Postoje dva zatična LED priključka za svaki SFF-8087 ulaz na PCB. LED se može
spojiti na ovaj spojnik.
Română
Magyar
Hrvatski
ελληνικά
Cerinte de sistem
• Linux Kernel 5.4 sau superior
• Windows 8.1/8.1-64/10/10-64
• Windows Server 2019
• PC cu slot PCI Express x8 / x16 / x32 liber
Pachetul contine
• Placă PCI Express
• Consolă minimalistă
• 2 x Cablu SFF-8087 tată la 4 x SATA mamă, lungime aprox. 80 cm
• Manual de utilizare
Instrucţiuni de siguranţă
• Protejaţi produsul împotriva umidităţii
• Evitaţi electricitatea antistatică atunci când instalaţi cardul
Instalarea componentelor hardware
1. Închideţi PC-ul şi deconectaţi cablul de alimentare.
2. Deschideţi carcasa.
3. Scoateţi suportul de slot din slotul PCI Express disponibil.
4. Introduceţi cardul drept şi cu atenţie în slotul PCI Express liber până când
acesta se aă în poziţie.
5. Folosiţi un şurub pentru a ataşa cardul la carcasă.
6. Opţional, puteţi să conectaţi LED-uri la conectorul cu pini.
7. Reataşaţi carcasa şi conectaţi cablul de alimentare la adaptorul de c.a.
Instalarea driverului
Atunci când instalarea dispozitivului este nalizată, driverul va  instalat automat
după ce reporniţi computerul.
Indicator LED
Există un conector cu doi pin LED pentru ecare port SFF-8087 de pe PCB. Un
LED poate  conectat la acest conector.
Rendszerkövetelmények
• Linux Kernel 5.4 vagy újabb
• Windows 8.1/8.1-64/10/10-64
• Windows Server 2019
• PC egy szabad PCI Express x8 / x16 / x32 illesztőhellyel
A csomag tartalma
• PCI Express kártya
• Kisméretű konzol
• 2 x Kábel SFF-8087 dugó és 4 x SATA hüvely, hossza kb. 80 cm
• Használati utasítás
Biztonsági óvintézkedések
• Óvja a terméket a nedvességtől.
• Kerülje az elektrosztatikus kisüléseket a kártya telepítése közben.
Hardvertelepítés
1. Kapcsolja ki a PC-t és húzza ki a hálózati tápkábelt.
2. Nyissa ki a számítógépházat.
3. Távolítsa el az illesztőhely tartóját a szabad PCI Express illesztőhelyről.
4. Egyenes helyzetben és óvatosan helyezze be a kártyát a szabad PCI Express
illesztőhelyre, majd nyomja le a kártyát, amíg a helyére nem illeszkedik.
5. Rögzítse egy csavarral a számítógép vázához.
6. Opcionálisan LED-eket is csatlakoztathat a csatlakozósorhoz.
7. Szerelje vissza a ház fedelét és csatlakoztassa a tápkábelt a tápegységhez.
Illesztőprogram telepítése
Az eszköz telepítése végén automatikusan megtörténik az illesztőprogram
telepítése a számítógép újraindítása után.
LED jelzés
A PCB-n van egy két-tűs LED konnektor minden egyes SFF-8087 porthoz. Egy
LED csatlakoztatható ehhez az konnektorhoz.
Απαιτήσεις συστήματος
• Linux Kernel 5.4 ή νεότερο
• Windows 8.1/8.1-64/10/10-64
• Windows Server 2019
• PC με μια ελεύθερη υποδοχή PCI Express x8 / x16 / x32
Περιεχόμενα συσκευασίας
• Κάρτα PCI Express
• Βραχίονας χαμηλού προφίλ
• 2 x Καλώδιο SFF-8087 αρσενικό σε 4 x SATA θηλυκό, μήκους περ. 80 cm
• Εγχειρίδιο χρήστη
Οδηγίες ασφάλειας
• Προστατεύστε το προϊόν από την υγρασία
• Αποφύγετε αντιστατικό ηλεκτρισμό όταν εγκαθιστάτε την κάρτα
Εγκατάσταση υλικού
1. Σβήστε τον Η/Υ σας και βγάλτε το καλώδιο τροφοδοσίας από την πρίζα.
2. Ανοίξτε το περίβλημα.
3. Αφαιρέστε τον συγκρατητήρα υποδοχής από τη διαθέσιμη υποδοχή PCI
Express.
4. Εισάγετε την κάρτα απευθείας και προσεκτικά στην ελεύθερη υποδοχή PCI
Express, μέχρι να κάτσει καλά.
5. Χρησιμοποιήστε μία βίδα για να προσαρτήσετε την κάρτα στο περίβλημα.
6. Προαιρετικά, μπορείτε να συνδέσετε λυχνίες LED στην κεφαλίδα ακίδων.
7. Συνδέστε ξανά το περίβλημα και συνδέστε το καλώδιο τροφοδοσίας στην
πρίζα ρεύματος.
Εγκατάσταση προγράμματος οδήγησης
Όταν ολοκληρωθεί η εγκατάσταση της συσκευής, η μονάδα θα εγκατασταθεί
αυτόματα μετά την επανεκκίνηση του υπολογιστή.
Ένδειξη LED
Υπάρχει ένας σύνδεσμος LED των 2 pin για κάθε θύρα SFF-8087 στο PCB. Μια
ένδειξη LED μπορεί να συνδεθεί σε αυτό τον σύνδεσμο.

Other DeLOCK PCI Card manuals

DeLOCK 88606 User manual

DeLOCK

DeLOCK 88606 User manual

DeLOCK 90155 User manual

DeLOCK

DeLOCK 90155 User manual

DeLOCK 88615 User manual

DeLOCK

DeLOCK 88615 User manual

DeLOCK 89641 User manual

DeLOCK

DeLOCK 89641 User manual

DeLOCK 89219 User manual

DeLOCK

DeLOCK 89219 User manual

DeLOCK 89046 User manual

DeLOCK

DeLOCK 89046 User manual

DeLOCK 90413 User manual

DeLOCK

DeLOCK 90413 User manual

DeLOCK 89125 User manual

DeLOCK

DeLOCK 89125 User manual

DeLOCK 89382 User manual

DeLOCK

DeLOCK 89382 User manual

DeLOCK 89004 User manual

DeLOCK

DeLOCK 89004 User manual

DeLOCK 90048 User manual

DeLOCK

DeLOCK 90048 User manual

DeLOCK 88084 User manual

DeLOCK

DeLOCK 88084 User manual

DeLOCK 89015 User manual

DeLOCK

DeLOCK 89015 User manual

DeLOCK 90090 User manual

DeLOCK

DeLOCK 90090 User manual

DeLOCK 88204 User manual

DeLOCK

DeLOCK 88204 User manual

DeLOCK 90105 User manual

DeLOCK

DeLOCK 90105 User manual

DeLOCK 89889 User manual

DeLOCK

DeLOCK 89889 User manual

DeLOCK 90100 User manual

DeLOCK

DeLOCK 90100 User manual

DeLOCK 81260 User manual

DeLOCK

DeLOCK 81260 User manual

DeLOCK 88206 User manual

DeLOCK

DeLOCK 88206 User manual

DeLOCK 89592 User manual

DeLOCK

DeLOCK 89592 User manual

DeLOCK 89379 User manual

DeLOCK

DeLOCK 89379 User manual

DeLOCK 89040 User manual

DeLOCK

DeLOCK 89040 User manual

DeLOCK 90106 User manual

DeLOCK

DeLOCK 90106 User manual

Popular PCI Card manuals by other brands

StarTech.com PEXUSB312C3 quick start guide

StarTech.com

StarTech.com PEXUSB312C3 quick start guide

Multitech MultiConnect MTPCIE-H5 Developer's guide

Multitech

Multitech MultiConnect MTPCIE-H5 Developer's guide

IOGear GIC1394 installation guide

IOGear

IOGear GIC1394 installation guide

Kontron 0-0096-4514 user guide

Kontron

Kontron 0-0096-4514 user guide

Encore ENLWI-PN datasheet

Encore

Encore ENLWI-PN datasheet

DDC BU-65572iX Hardware manual

DDC

DDC BU-65572iX Hardware manual

Gigabyte GN-FE605(M) user guide

Gigabyte

Gigabyte GN-FE605(M) user guide

National Instruments IMAQ PCI-1422 user manual

National Instruments

National Instruments IMAQ PCI-1422 user manual

Abocom 802.11a/b/g Wireless MiniPCI Card WCM6002 Specification sheet

Abocom

Abocom 802.11a/b/g Wireless MiniPCI Card WCM6002 Specification sheet

Exsys EX-48052 manual

Exsys

Exsys EX-48052 manual

ICP DAS USA PISO-DNS100-D/T user manual

ICP DAS USA

ICP DAS USA PISO-DNS100-D/T user manual

DIGITNOW! U601 user manual

DIGITNOW!

DIGITNOW! U601 user manual

Advantech MIC-3950 user manual

Advantech

Advantech MIC-3950 user manual

Supermicro AOC-S100G-b2C user guide

Supermicro

Supermicro AOC-S100G-b2C user guide

Sonnet ALLEGRO FW800 quick start guide

Sonnet

Sonnet ALLEGRO FW800 quick start guide

Moxa Technologies CP-134N Series user manual

Moxa Technologies

Moxa Technologies CP-134N Series user manual

Quanta Computer BCM94306MP user manual

Quanta Computer

Quanta Computer BCM94306MP user manual

TRENDnet TEW-443PI user guide

TRENDnet

TRENDnet TEW-443PI user guide

manuals.online logo
manuals.online logoBrands
  • About & Mission
  • Contact us
  • Privacy Policy
  • Terms and Conditions

Copyright 2025 Manuals.Online. All Rights Reserved.