Denver MCR-50 User manual

USER MANUAL
MCR-50
WWW.DENVER-ELECTRONICS.COM
Please read this user manual carefully before start using the product.

CLEANING THE CABINET
If the wooden cabinet becomes dusty please wipe it with a soft, non-abrasive dust cloth. Also
don’t use water or spray cleaners as this can damage the cabinet and the plastic/metal parts of the
unit.

TECHNICAL SPECIFICATION
Turntable speed: 33/45/78 RPM (Disc size 17.5/25/30cm)
CD can play CD/CD-R/CD-RW/MP3
USB can play MP3
Cassette: C60 & C90 (C120 cassette is not recommended)
Output power: 2x2.5W
PREPARATION FOR USE
IMPORTANT: RAISING AN LOWERING THE TURNTABLE LID
To open the lid. Raise it as far as it can go until the lid support bracket locks in the position.
To close the lid. Pull forward the lid support bracket to release and then gently lower the lid.
TO AVOID DAMAGING THE CABINET OR THE LID, NEVER FORCE THE LID CLOSED. ALWAYS RAISE
THE LID TO RELEASE THE LID SUPPORT BRACKET.
Carefully remove the unit from the carton and remove all
packing material from the unit.
Unwind the AC power cord and extend it to its full length.
Unwind the FM Antenna wire and extend to it to its full length.
Raise the lid to expose the turntable. The turntable has been
secured for shipment with a transit screw. Use a coin or a
screwdriver to turn the transit screw clockwise. This will allow
the turntable to “float”.
Remove the opaque white plastic stylus cover from the
phonograph stylus by sliding it in the direction of the arrow.
Please pay attention to the stylus during operation because
stylus damage is not covered by the warranty.
Remove the the twist-tie that was used to secure the tone arm
during shipment.
Release the tone arm lock lever.
Connect the power plug to your AC 220V, 50HZ outlet.

LOCATIONS OF CONTROLS AND INDICATORS
1. TURNTABLE LID
2. TURNTABLE LID SUPPORT BRACKET
3. SPEAKERS
4. USB
5. POWER BUTTON
6. RECORD BUTTON
7. FUNCTION BUTTON
8. VOLUME CONTROL
9. TUNER BACKLIGHT
10. LCD DISPLAY
11. REMOTE CONTROL SENSOR
12. POWER INDICATOR
13. FM ST./REC INDICATOR
14. FM DIAL SCALE
15. AM DIAL SCALE
16. TUNING POINTER
17. AM BUTTON (MW)
18. FM BUTON (UKW)
19. CD/USB BUTTON
20. TAPE BUTTON
21. PHONO/AUX IN BUTTON
22. CD DRAWER
23. TUNING CONTROL
24. PLAY/PAUSE BUTTON ( )
25. STOP BUTTON ( )
26. DN/F.R BUTTON ( )
27. UP/F.F BUTTON ( )
28. PLAY MODE BUTTON ( )
29. OP/CL BUTTON ( )
(CD OPEN/CLOSE BUTTON)
30. CASSETTE EJ/F.F BUTTON
(EJECT/FAST FORWARD)
31. CASSETTE PLAYER SLOT
32. TRACK+10
33. TRACK-10
34. DELETE
35. REPEAT
36. DN/FB (Skip Reverse)
37. UP/FF (Skip Forward)
38. RANDOM
39. PROGRAM

Note 1: All buttons on the remote control have the same function as the buttons on the unit. Thie
remote control is just used for CD/MP3 and USB mode.
Note 2: Long pressing PLAY/PAUSE on remote control for 2 seconds will change between CD and
USB.
Note 3: Long pressing DELETE on remote control for 2 seconds will delete file in USB mode.
40. FM antenna
41. AC power cord
42. LINE OUT (L/R)
43. AUX IN
INFORMATION
The AM antenna is inside the cabinet. IF AM reception is unsatisfactory try repositioning the
cabinet slightly until the internal antenna is picking up the strongest signal.
The FM wire is located back of the cabinet. If necessary adjust the position and direction of this
antenna until you find the position that provides the best reception.

44. Turntable
45. 45 rpm adapter
46. Cue lever
47. Auto Stop control
48. Speed selctor (33/45/78 rpm)
49. Tone arm lock
50. Tone arm with stylus
POWER ON/OFF
1. Press POWER to turn the system on. The power indicator lights up.
2. Press the function selector buttons (AM/FM/CD/USB/TAPE/PHONO/AUX IN) to select the
desired function.
3. Start to adjust the volume by using the volume control button.
4. When finished listening press POWER again to turn off the system. The power indicator
goes off.
RADIO OPERATION
1. Press POWER to turn the system on.
2. Make sure you connected the FM antenna cable on the rear side of the unit.
3. Press MW button for AM or UKW button for FM radio.
4. Rotate the TUNING control to tune the desired radio station, the FM ST/REC indicator will
light.

CD OPERATION
1. Press the CD/USB button to enter CD mode, the “---“ and ‘DISC’ icon will be shown on the
screen. The unit can play CD, CD-R and CD-RW.
2. Press the OP/CL button top open the CD drawer.
3. Place your disc in the CD drawer with the label side facing up.
4. Press the OP/CL button again to close the CD drawer. Playback will automatically start from
the first track.
5. MP3 icon will be shown if MP3 file is detected in the disc.
PLAYING CASSETTE
Note: Before inserting the tape in the player be sure that there is no excess slack in the cassette
that could jam the mechanism.
1. Press POWER to turn the system on.
2. Press TAPE button to enter TAPE mode.
3. Insert your cassette into the slot loacated on the right side of the cabinet, as shown in the
illustration, with the side you wish to play facing up and the open end on the right side.

4. Cassette playback begins as soon as the tape is inserted. Adjust the VOLUME control to the
desired level.
5. To advance the tape rapidly, depress the button approximately half way. The
tape will move forward rapidly as long as the button is depressed. Normal playback will
resume when the button is released.
6. When the tape ends, the player stops automatically. Depress the button
completely to remove the tape from the player. You may depress button to stop playing
the tape at any time.
7. Press POWER again to turn the system off.
PLAYING VINYLS RECORDS
The system includes a full-size, 3 speed, belt-drive turntable. You can play 33, 45 and 78rpm
records.
1. Press POWER to turn the system on.
2. Press the PHONO button to enter the PHONO mode.
3. Make sure you have removed the stylus cover from the stylus and have released the tone
arm lock that secured the tone arm to the tone arm rest.

4. Set the turntable speed selector to appropriate speed 33, 45 or 78rpm. If you are playing
45 rpm singles, place the 45rpm adapter on the centre spindle.
5. Place your record on the the centre spindle.
6. Raise the cue lever to lift the tone arm of its rest. Move the tone arm to the edge of the
record. The turntable starts automatically. Use the cue lever to gently lower the tone arm
onto the record.
7. Adjust the volume control to the desired level.
8. When the tone arm reaches the end of the record it automatically returns to the tone arm
rest and the record player stops.
9. Press POWER again to turn the system off. The POWER indicator goes OFF.
Note: Do not turn or stop the turntable manually. Moving or jarring the turntable without securing
the tone arm clamp could result in damage to the tone arm.
AUX IN OPERATION
Conenct the audio system into the AUX IN jack on the rear panel, Press the PHONO/AUX IN
button. Start playing from the connected device.
USB OPERATION
1. Press the CD/USB button first and the FUNCTION button to enter USB mode. The ‘---‘ and
USB icon will be shown.
2. Insert a USB flash device into the USB socket.
3. PLAY/PAUSE, DN/UP and stop functions are the same as CD functions.
Note: You may press the FUNCTION on the panel or long press PLAY/PAUSE button on the remote
control for 2 seconds to change the playing mode between CD and USB.
PLAYING IN MP3 MODE (CD/USB)
1. Press PLAY/PAUSE button to start or pause playback selected track.
2. While playing the song, the song number and folder number of the slected track will be
shown in the display.
3. You can stop the playback at any time by pressing the STOP button.

TRACK SKIP AND HIGH SPEED TRACK SEARCH IN CD/USB MODE
During CD/USB playback press UP/F.F ( ) or DN/F.R ( ) button on the unit front panel or on the
remote control repeatedly to change track. To rapidly search forward or backwards within a track
press and hold UP/F.F ( ) or DN/F.R ( ) button. To skip 10 tracks back or forth then press
TRACK-10 or TRACK+10 on the remote control.
USB RECORDING
1. CD recording
Insert USB flash drive into the USB socket. Then press CD/USB button. Place CD into the CD
drawer and play the track which will be recorded. Press RECORD button twice to start
recording. If all CD is played, Then all tracks will be recorded.
NOTE: Recording will fail if pressing STOP button during recording
2. MP3 DISC recording
Insert USB flash drive into the USB socket. Then press CD/USB button. Place CD with MP3
files into the CD drawer and play the MP3 track which will be recorded. Press RECORD
button twice to start recording. If all MP3 files is played, Then all tracks will be recorded.
NOTE: Recording will fail if pressing STOP button during recording
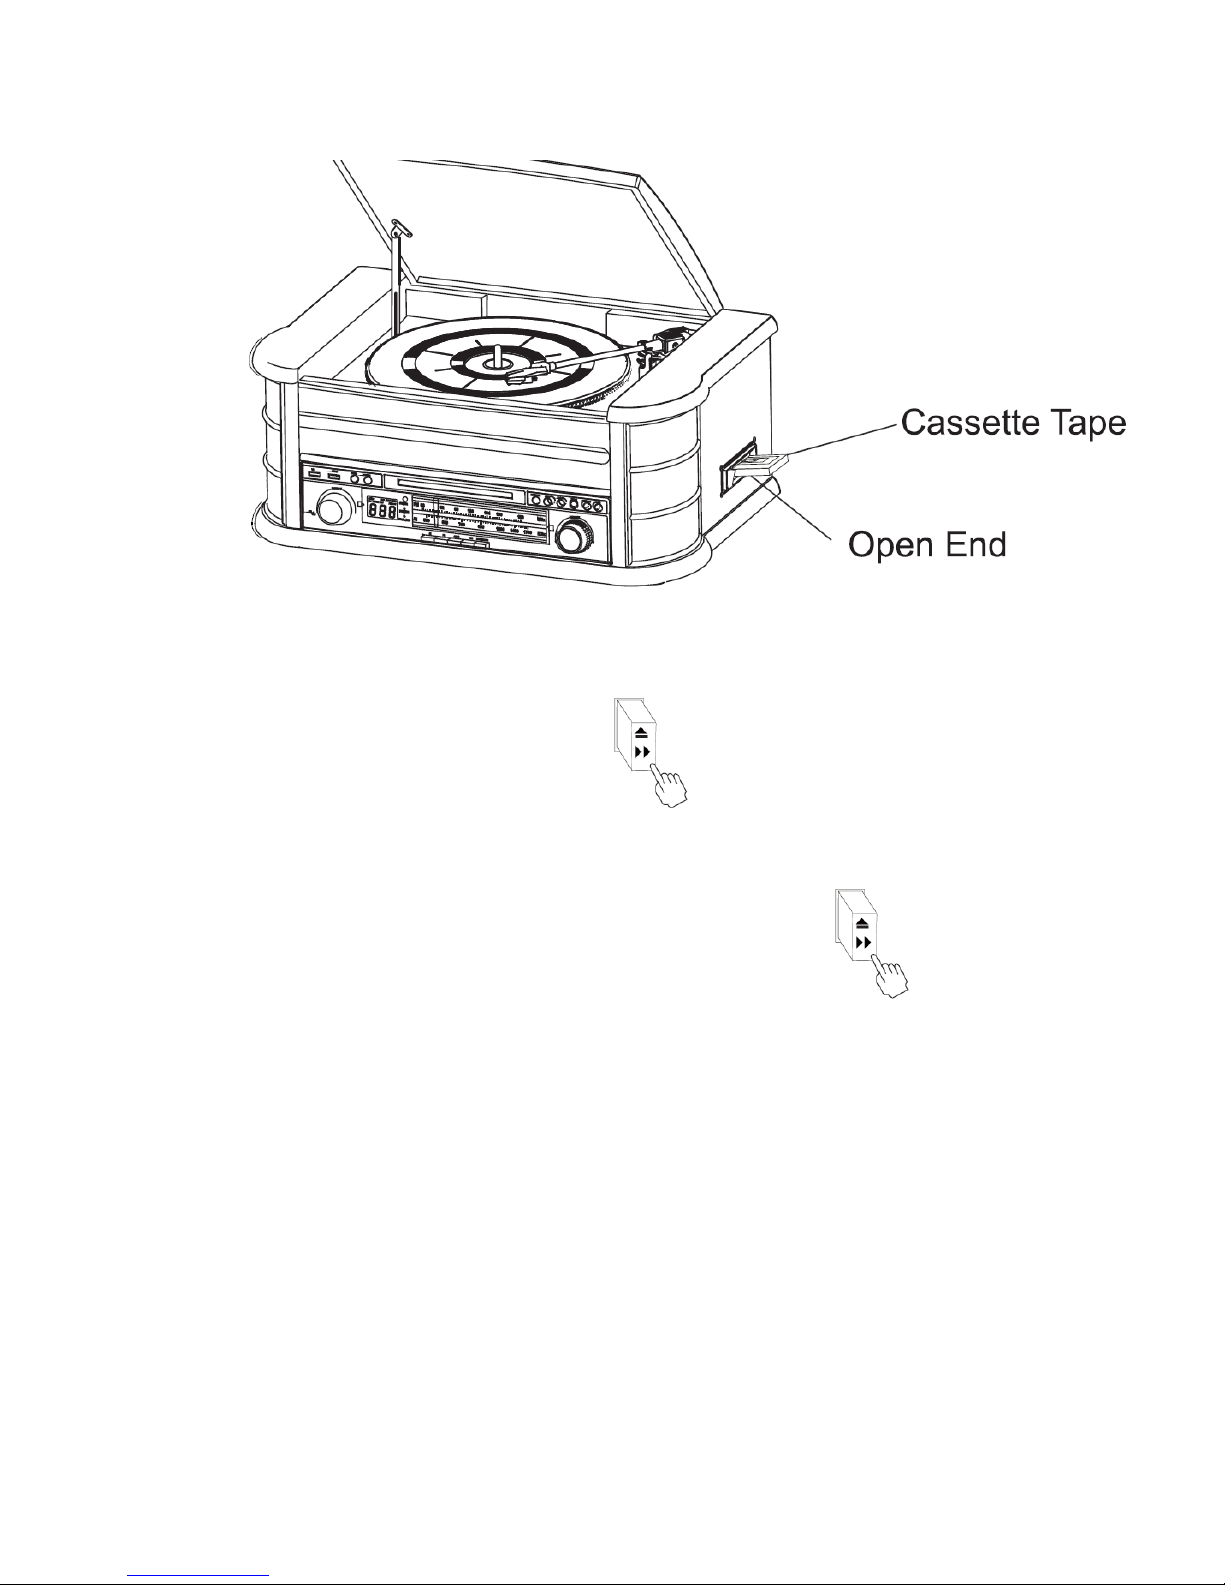
3. Cassette recording
Insert USB flash drive into the USB socket. Then press TAPE button. Place the cassette into
the socket. Play cassette. Press RECORD button twice to start recording. Press STOP button
to stop recording.
4. Vinyl recording
Insert USB flash drive into the USB socket. Then press PHONO/AUX IN button. Play the vinyl
and press RECORD button twice to start recording. Press STOP button to stop recording.
5. AUX IN recording
Insert USB flash drive into the USB socket. Connect the external audio device into the AUX
jack on the rear panel. Then press PHONO/AUX IN button and play audio and press
RECORD button twice to start recording.
DELETE TRACKS FROM USB DISC
Press CD/USB button on the front panel or long press PLAY/PAUSE on remote control to select USB
mode. Select the track and press delete for 2 seconds and the track is deleted.

ALL RIGHTS RESERVED, COPYRIGHT DENVER ELECTRONICS A/S
Electric and electronic equipment and included batteries contains materials, components and
substances that can be hazardous to your health and the environment, if the waste material
(discarded electric and electronic equipment and batteries) is not handled correctly.
Electric and electronic equipment and batteries is marked with the crossed out trash can symbol,
seen below. This symbol signifies that electric and electronic equipment and batteries should not
be disposed of with other household waste, but should be disposed of separately.
As the end user it is important that you submit your used batteries to the approriate and designated
facility. In this manner you make sure that the batteries are recycled in accordance with legislature
and will not harm the environment.
All cities have established collection points, where electric and electronic equipment and batteries
can either be submitted free of charge at recycling stations and other collection sites, or be
collected from the households. Additional information is available at the technical department of
your city.
Imported by:
DENVER ELECTRONICS A/S
Stavneagervej 22
DK-8250 Egaa
Denmark
www.facebook.com/denverelectronics
Table of contents
Other Denver Radio manuals

Denver
Denver DAB-33 User manual

Denver
Denver MIR-260 User manual

Denver
Denver MCI-100 User manual

Denver
Denver IR-135B User manual

Denver
Denver DAB-33 User manual

Denver
Denver IR-135 User manual

Denver
Denver DAB-23 User manual

Denver
Denver TR-54 User manual

Denver
Denver DAB-43 PLUS User manual

Denver
Denver DAH-126 User manual

Denver
Denver IR-140 User manual

Denver
Denver MIR-260 User manual

Denver
Denver TR-61 User manual

Denver
Denver DAB-37 User manual

Denver
Denver MIR-260 User manual

Denver
Denver DAB-35 User manual

Denver
Denver DAB-42 User manual

Denver
Denver DAB-60 User manual

Denver
Denver WRD-50 User manual

Denver
Denver TWR-818 User manual