7
EN
Specications
Aircraft (M200)
Dimensions Unfolded, 887×880×378 mm, Folded, 716×220×236 mm
Weight Approx. 3.8 kg (with two standard batteries), Approx. 4.53 kg (with two optional batteries)
Diagonal Wheelbase 643 mm
Max Takeoff Weight 6.14 kg
Max Payload 2.34 kg (with two standard batteries), 1.61 kg (with two optional batteries)
Hovering Accuracy (P-mode with GPS) Vertical: ±1.64 feet (0.5 m) or ±0.33 feet (0.1 m, Downward Vision System enabled)
Horizontal: ±4.92 feet (1.5 m) or ±0.98 feet (0.3 m, Downward Vision System enabled)
Max Angular Velocity Pitch: 300°/s, Yaw: 150°/s
Max Pitch Angle 35° (25° if both P-mode and Forward Vision System are enabled)
Max Ascent Speed 16.4 ft/s (5 m/s)
Max Descent Speed (vertical) 9.8 ft/s (3 m/s)
Max Speed P-mode: 61 kph (17 m/s); S-mode/A-mode: 83 kph (23 m/s)
Max Service Ceiling Above Sea Level 9842 feet (3000 m, with 1760S propellers)
Max Wind Resistance 32.8 ft/s (10 m/s)
Max Flight Time (with standard batteries) 27 min (no payload), 13 min (takeoff weight: 6.14 kg)
Max Flight Time (with optional batteries) 38 min (no payload), 24 min (takeoff weight: 6.14 kg)
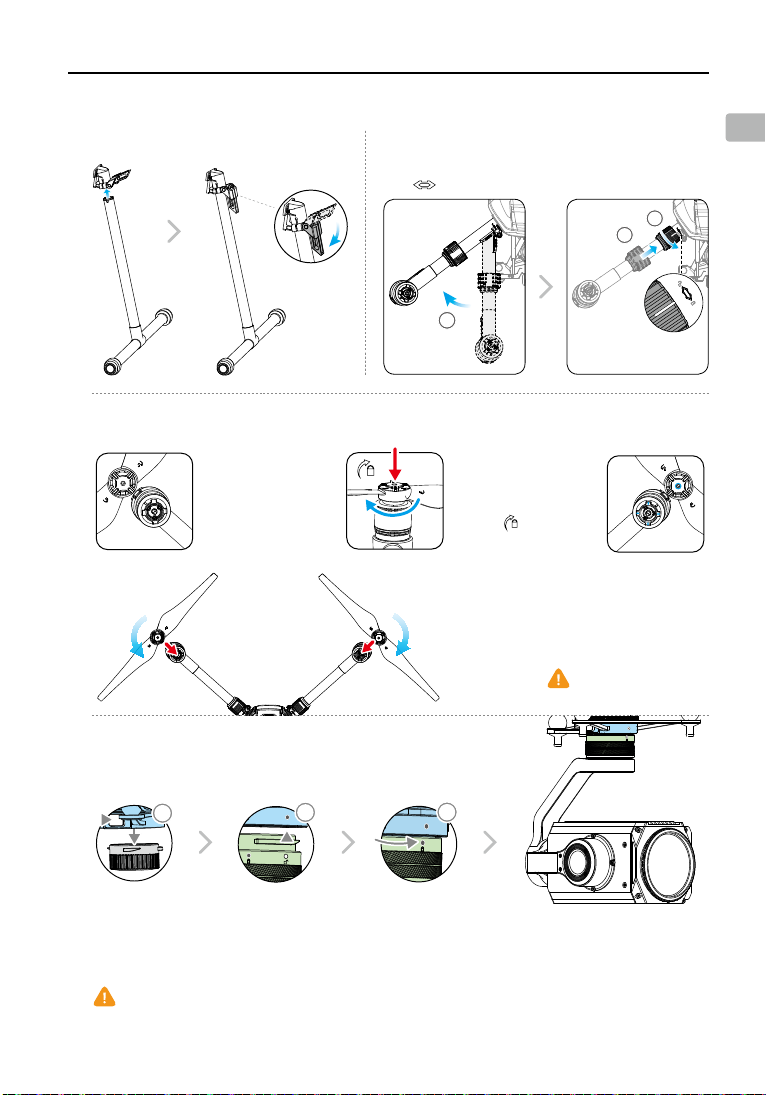
Supported DJI Gimbals Zenmuse X4S/X5S/XT/Z30
Supported Gimbal Mounting Single Gimbal, Downward
Ingress Protection Rating IP43
GNSS GPS+GLONASS
Operating Temperature -4° to 113° F (-20° to 45° C)
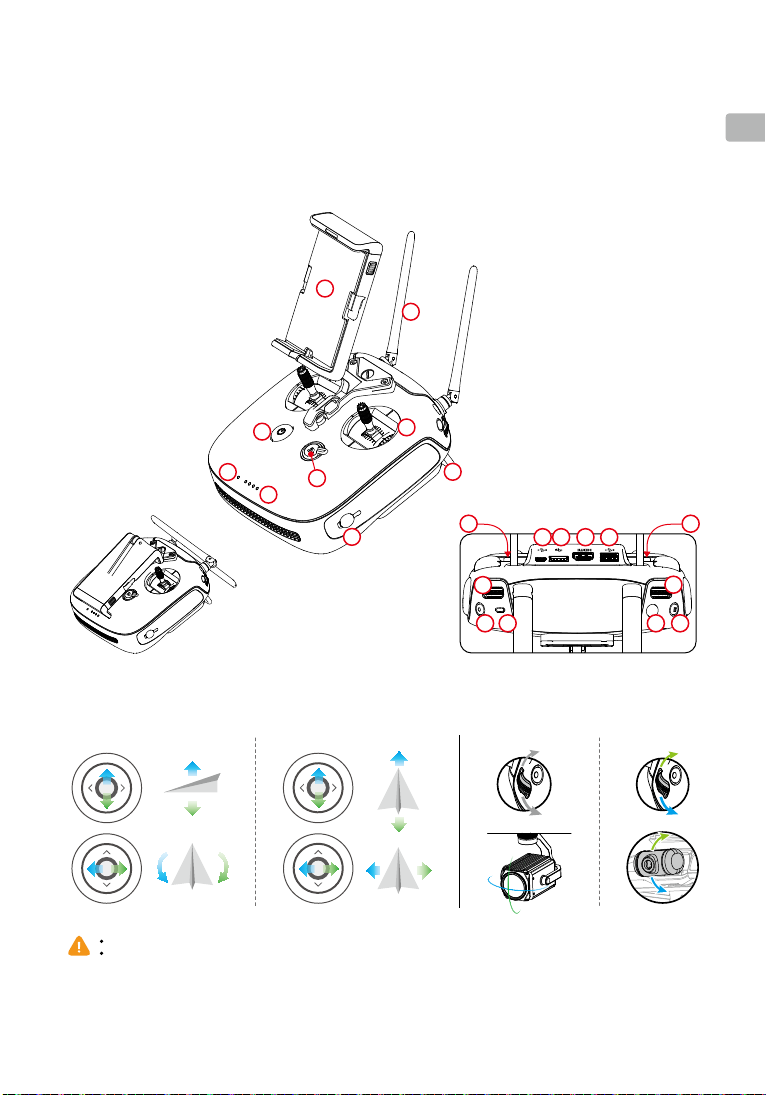
Remote Controller
Operating Frequency 2.400-2.483 GHz; 5.725-5.825 GHz
Max Transmitting Distance 2.4 GHz: 4.3 miles (7 km, FCC); 2.2 miles (3.5 km, CE); 2.5 miles (4 km, SRRC)
(unobstructed, free of interference) 5.8 GHz: 4.3 miles (7 km, FCC); 1.2 miles (2 km, CE); 3.1 miles (5 km, SRRC)
EIRP 2.4 GHz: 26 dBm (FCC); 17 dBm (CE); 20 dBm (SRRC)
5.8 GHz: 28 dBm (FCC); 14 dBm (CE); 20 dBm (SRRC)
Built-in Battery 6000 mAh 2S LiPo
Output Power 9 W (Without supplying power to smart device)
USB Power Supply iOS: 1 A 5.2 V (max); Android: 1.5 A 5.2 V (max)
Operating Temperature -4° to 104° F (-20° to 40° C)
Downward Vision System
Velocity Range <32.8 ft/s (10 m/s) at the height of 6.56 feet (2 m)
Altitude Range <32.8 feet (10 m)
Operating Range <32.8 feet (10 m)
Operating Environment Surfaces with clear patterns and adequate lighting (> 15 lux)
Ultrasonic Sensor Operating Range 0.33-16.4 feet (10-500 cm)
Ultrasonic Sensor Operating Environment Non-absorbing material, rigid surface (thick indoor carpeting will reduce performance)
Forward Vision System
Obstacle Sensing Range 2.3-98.4 feet (0.7-30 m)
FOV Horizontal: 60°; Vertical: 54°
Operating Environment Surfaces with clear patterns and adequate lighting (> 15 lux)
Upward Infrared Sensing System
Obstacle Sensing Range 0-16.4 feet (0-5 m)
FOV ±5°
Operating Environment Large, diffuse and reective obstacles (reectivity >10%)
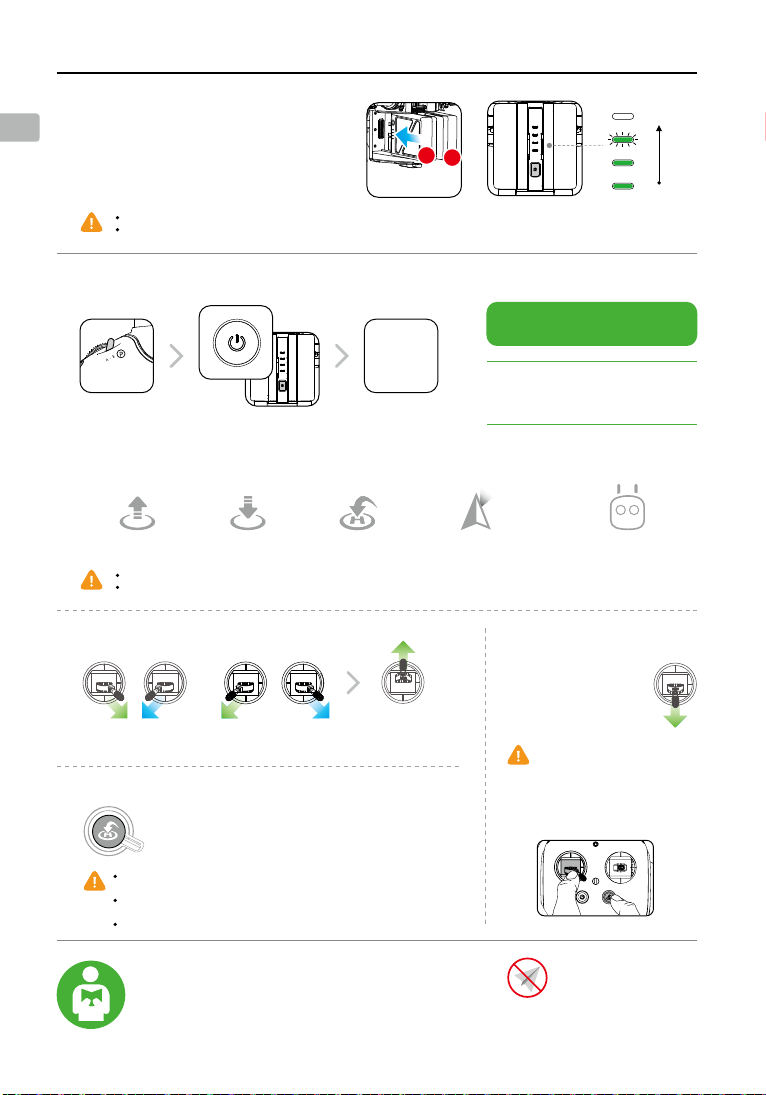
Intelligent Flight Battery (Standard, Model: TB50-4280mAh-22.8V)
Capacity 4280 mAh
Voltage 22.8 V
Battery Type LiPo 6S
Energy 97.58 Wh
Net Weight (Single one) Approx. 520 g
Operating Temperature -4° to 113° F (-20° to 45° C)
Charging Temperature 41° to 104° F (5° to 40° C)
Max Charging Power 180 W
Charger (Model: IN2C180)
Voltage 26.1 V
Rated Power 180 W
Charging Hub (Model: IN2CH)
Input Voltage 26.1 V
Input Current 6.9 A
Download the latest version from
http://www.dji.com/matrice-200-series
※This content is subject to change without prior notice.
MATRICE and DJI are trademarks of DJI.
Copyright © 2017 DJI All Rights Reserved.
Designed by DJI. Printed in China.
DJI incorporates HDMITM technology.
The terms HDMI and HDMI High-Definition Multimedia
Interface, and the HDMI Logo are trademarks or registered
trademarks of HDMI Licensing LLC in the United States and
other countries.


 user manual")