dji mavic User manual

MAVIC AIR
v1.0
2018.01
User Manual

2
©2018 DJI All Rights Reserved.
Using This Manual
Legend
Warning Important Hints and Tips Reference
Read Before the First Flight
Read the following documents before using the MAVICTM Air:
1. Mavic Air In the Box
2. Mavic Air User Manual
3. Mavic Air Quick Start Guide
4. Mavic Air Disclaimer and Safety Guidelines
5. Mavic Air Intelligent Flight Battery Safety Guidelines
We recommend that you watch all tutorial videos on the ocial DJITM website and read the Mavic Air
Disclaimer and Safety Guidelines before you y. Prepare for your rst ight by reviewing the Mavic Air
Quick Start Guide and refer to this Mavic Air User Manual for more details.
Video Tutorials
Go to the address below or scan the QR code on the right to watch the Mavic Air tutorial
videos, which demonstrate how to use the Mavic Air safely:
http://www.dji.com/mavic-air/info#video
Download the DJI GO 4 App
Be sure to use the DJI GOTM 4 app during ight*. Scan the QR code on the right to
download the latest version. The Android version of DJI GO 4 is compatible with Android
v4.4 and later. The iOS version of DJI GO 4 is compatible with iOS v9.0 and later.
Download DJI Assistant 2
Download the DJI Assistant 2 at http://www.dji.com/mavic-air/download
* For increased safety, ight is restricted to a height of 98.4 ft (30 m) and range of 164 ft (50 m) when not connected
or logged into the app during ight. This applies to DJI GO 4 and all apps compatible with DJI aircraft.
Searching for Keywords
Search for keywords such as “battery” and “install” to find a topic. If you are using Adobe Acrobat
Reader to read this document, press Ctrl+F on Windows or Command+F on Mac to begin a search.
Navigating to a Topic
View a complete list of topics in the table of contents. Click on a topic to navigate to that section.
Printing this Document
This document supports high resolution printing.

©2018 DJI All Rights Reserved.
3
Contents
Using This Manual 2
Legend 2
Read Before the First Flight 2
Video Tutorials 2
Download the DJI GO 4 App 2
Download DJI Assistant 2 2
Product Prole 6
Introduction 6
Feature Highlights 6
Preparing the Mavic Air 6
Aircraft Diagram 8
Remote Controller Diagram 8
Activation 9
Aircraft 11
Flight Modes 11
Aircraft LEDs and Status Indicator 12
Return to Home 13
Vision Systems 16
Intelligent Flight Modes 19
Advanced Pilot Assistance Systems 27
Attaching and Detaching the Propellers 27
Intelligent Flight Battery 28
Gimbal and Camera 32
Remote Controller 35
Using the Remote Controller 35
Optimal Transmission Zone 38
Linking the Remote Controller 39
DJI GO 4 App 41
Equipment 41
Editor 43
SkyPixel 43
Me 43
Controlling the Aircraft with a Mobile Device 44

4
©2018 DJI All Rights Reserved.
Flight 47
Flight Environment Requirements 47
Flight Limits and GEO Zones 47
Preight Checklist 48
Auto Takeoff and Auto Landing 49
Starting/Stopping the Motors 49
Flight Test 50
Appendix 53
Specications 53
Calibrating the Compass 55
Firmware Updates 57
After-Sales Information 57

©2018 DJI All Rights Reserved.
5
Product Prole
This section introduces the Mavic Air
and lists the components of the aircraft
and remote controller.

6
©2018 DJI All Rights Reserved.
Product Profile
Introduction
The DJI Mavic Air features a new folding design and a fully stabilized 3-axis gimbal camera capable of
shooting 4K video and 12 megapixel photos. DJI signature technologies such as Obstacle Avoidance
and Intelligent Flight Modes like SmartCapture, 8K Panorama, Advanced Pilot Assistance Systems,
QuickShots, ActiveTrackTM, and TapFlyTM, make capturing complex shots easy. The Mavic Air boasts a
maximum ight speed of 42.5 mph (68.4 kph) and a maximum ight time of 21 minutes*.
Feature Highlights
Camera and Gimbal: With the Mavic Air, you are able to shoot 4K video at up to 30 frames per second
and capture 12 megapixel photos that look crisp and clear, all stabilized by the onboard 3-axis gimbal.
Flight Controller: The next-generation ight controller has been updated to provide a safer, more reliable
ight experience. The aircraft is able to automatically return to its Home Point when the remote control
signal is lost or the battery level is low. As well as being able to hover indoors at low altitudes, the aircraft
can sense and avoid obstacles on its route, enhancing safety.
HD Video Downlink: DJI’s enhanced Wi-Fi technology is built into the remote controller, offering a
transmission range of up to 2.49 mi (4 km)** and making it possible stream 720p video to your mobile
device.
Preparing the Mavic Air
Preparing the Aircraft
1. Remove the gimbal protector from the camera.
2. All aircraft arms are folded before the aircraft is packaged at the factory. First, unfold the rear arms,
then unfold the front arms and the front landing gear.
4
5
2
3
11
* Maximum ight time was tested in windless conditions ying at a consistent 15.5 mph (25 kph). This value should be
taken for reference only.
** The remote controller is able to reach its maximum transmission distance (FCC) in a wide open area with no electro-
magnetic interference and at an altitude of about 400 ft (120 m).

©2018 DJI All Rights Reserved.
7
Mavic Air User Manual
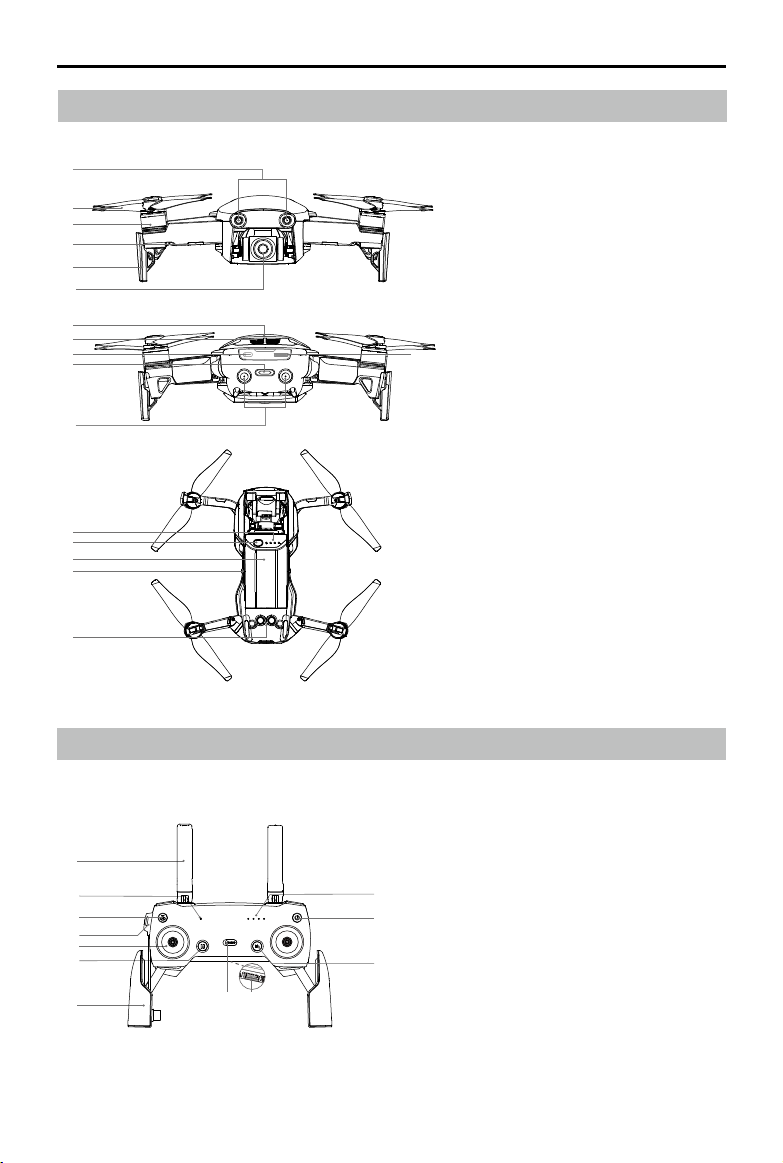
It is recommended that the gimbal protector be attached
when the aircraft is not in use. Make sure the gimbal is
horizontal when mounting or removing the gimbal protector.
Ensure the landing gear is properly unfolded before use.
Otherwise, the built-in antennas may be affected causing
serious problems to the video link.
When putting the aircraft away after use, be sure to fold the
landing gear rst before folding the aircraft arms.
Preparing the Remote Controller (RC)
1. Unfold the antennas and mobile device clamps.
2. Remove the control sticks from their storage slots on the remote controller and screw them into
place.
3. Choose an appropriate RC cable based on the type of mobile device being used. A cable with
a Lightning connector is connected by default, and Micro USB and USB-C cables are included
in the packaging. Move the cable slider to the end of the slot in the left clamp and connect the
end of the cable to your mobile device. Secure your mobile device by pushing both clamps
inward.
When using a tablet, use the USB port on the remote controller.
Do not use the Micro USB and USB ports simultaneously for video linking. Disconnect all
devices from one port before connecting a device to the other port for video linking.
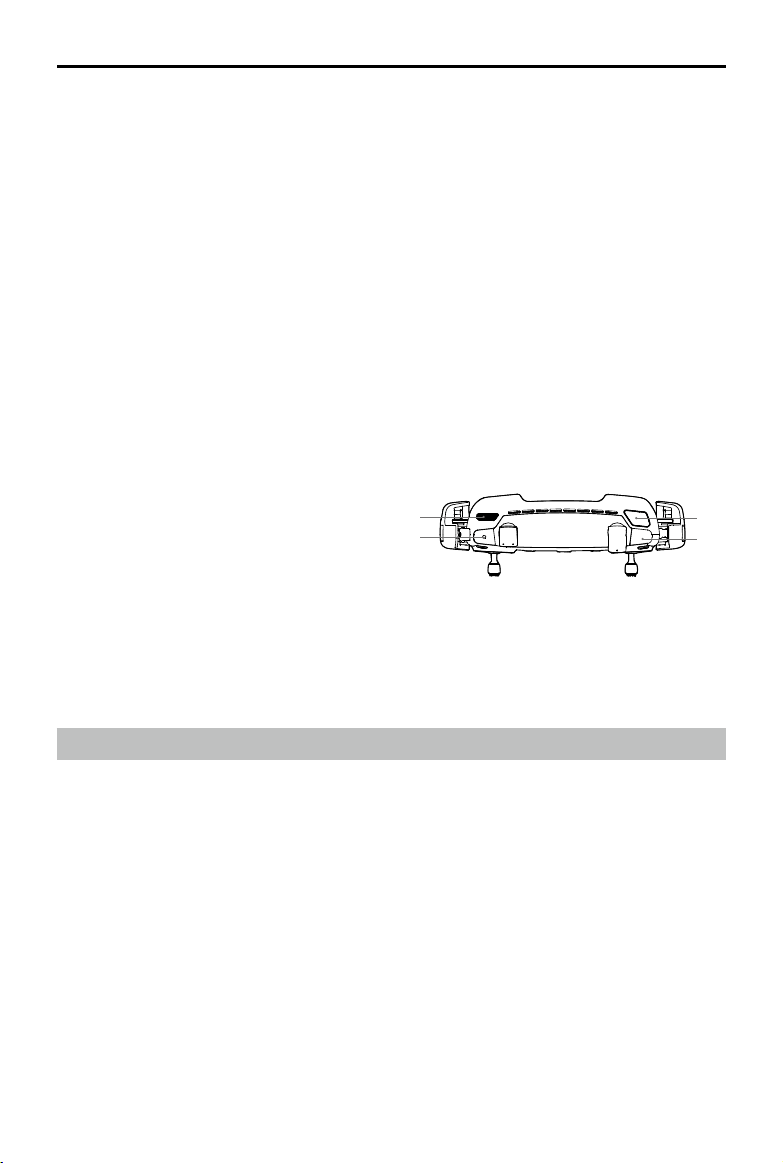
3. For safety reasons it is recommended that the propeller guards are
mounted when flying in Beginner Mode or indoors. Refer to the
Mavic Air Propeller Guards User Guide to learn more.
A
A
Power Outlet
100~240 V
1
234
5
67
4. All Intelligent Flight Batteries are in Hibernation mode before shipment to ensure safety. Use the
provided AC power adapter to charge and activate Intelligent Flight Batteries for the first time.
Charging the Intelligent Flight Battery fully before each ight is recommended. To charge an Intelligent
Flight Battery after ight, remove it from the aircraft and attach it to the AC power adapter.

8
©2018 DJI All Rights Reserved.
Mavic Air User Manual
Aircraft Diagram
Remote Controller Diagram
1. Forward Vision System
2. Propellers
3. Motors
4. Front LEDs
5. Landing Gear (with built-in antennas)
6. Gimbal and Camera
7. GPS Antennas
8. Vents
9. USB-C Port
10. Camera microSD Card Slot
11. Aircraft Status Indicator / Function
Button
12. Backward Vision System
13. Battery Level LEDs
14. Power Button
15. Intelligent Flight Battery
16. Battery Latches
17. Downward Vision System
1
11
12
5
4
2
3
78 9
6
1. Antennas
Relay aircraft control and video signals.
2. Status LED
Displays the remote controller's
system status.
3. Return to Home (RTH) Button
Press and hold the button to initiate
RTH. Press again to cancel RTH.
4. Charging / Main Video Link Port
(Micro USB)
Connect to the AC Power Adapter to
charge the remote controller battery;
connect to a mobile device for video
linking via RC cable.
1
2
3
5
14
8
9
15
16
17
13
7
11
12
10
4
6
10

©2018 DJI All Rights Reserved.
9
Mavic Air User Manual
5. Control Sticks
Control the orientation and movement of the
aircraft.
6. Flight Pause Button
Press once for emergency braking (when
GPS or Vision System are available).
7. Mobile Device Clamps
Securely mount your mobile device onto the
remote controller.
8. Flight Mode Switch
Switch between P-mode and S-mode.
9. USB / Assistant Video Link Port
Connect to a mobile device for video
downlink via a standard USB cable.
10. Function Button
Performs various functions based on
settings in the DJI GO 4 app.
11. Power Button
Press once to check the current battery
level. Press once, then again and hold to
turn on/o the remote controller.
12. Battery Level LEDs
Display the remote controller’s battery level.
13 15
16
14
Activation
The Mavic Air requires activation before rst time use. Follow the steps below to activate the Mavic Air
using the DJI GO 4 app:
1. Connect your mobile device to the remote controller and then launch DJI GO 4.
2. Log in to the app using your DJI account or register a new DJI account.
3. Power on the aircraft and remote controller.
4. Select “Mavic Air”, select “Connect to the Aircraft’s Wi-Fi” and “Wired Connection”, and then follow
the prompts to establish connection.
5. Tap “Activating Device” after connection is complete, and then follow the prompts to activate your
Mavic Air.
13. Gimbal Dial
Controls the camera's tilt.
14. Record Button
Press to start recording video. Press again to
stop recording.
15. Customizable Button
Performs various functions based on settings
in the DJI GO 4 app.
16. Shutter Button
Press to take a photo. If Burst shooting mode
is selected, a pre-set number of photos will
be taken.

10
©2018 DJI All Rights Reserved.
Aircraft
This section introduces the ight
controller, Forward, Backward and
Downward Vision Systems, and the
Intelligent Flight Battery.

©2018 DJI All Rights Reserved.
11
Aircraft
The Mavic Air contains a ight controller, video downlink system, propulsion system, and an Intelligent
Flight Battery. Refer to the aircraft diagram in the Product Prole section.
Flight Modes
The Mavic Air has two ight modes that users can select, plus a third ight mode that the aircraft falls
back to in certain circumstances:
P-mode (Positioning): P-mode works best when the GPS signal is strong. The aircraft utilizes GPS and
the Vision Systems to locate itself, stabilize, and navigate between obstacles. Intelligent Flight Modes
such as SmartCapture, QuickShots, TapFly and ActiveTrack are enabled in this mode.
When the Forward and Backward Vision Systems are enabled and lighting conditions are sucient, the
maximum ight attitude angle is 15° and the maximum ight speed is 17.9 mph (28.8 kph).
Note: P-mode requires larger stick movements to achieve high speeds.
S-mode (Sport): In S-mode the aircraft uses GPS only for positioning and the Forward and Backward
Vision Systems are disabled. As such, the aircraft is not able to sense and avoid obstacles and
Intelligent Flight Modes are not available.
Note: In S-mode aircraft responses are optimized for agility and speed making it more responsive to
stick movements.
ATTI mode: The aircraft automatically changes to Attitude mode (ATTI mode) when the Vision Systems
are unavailable and either the GPS signal is weak or the compass is experiencing interference. When the
Vision Systems are unavailable the aircraft is not able to position itself or auto-brake, so potential ight
hazards exist when ying in ATTI mode. In ATTI mode, the aircraft is easily aected by its surroundings.
Environmental factors such as wind can result in horizontal shifting, which may present hazards,
especially when ying in conned spaces.
It is strongly recommended that you nd a safe place to land as soon as possible if the aircraft
enters ATTI mode. To reduce the likelihood of the aircraft entering ATTI mode and minimize
hazards if it does enter ATTI mode, avoid ying in areas where the GPS signal is weak and
avoid ying in conned spaces.
The Forward and Backward Vision Systems are disabled in S-mode, which means the aircraft
will not be able to automatically sense obstacles on its route.
The aircraft’s maximum speed and braking distance are signicantly increased in S-mode. A
minimum braking distance of 98.4 ft (30 m) is required in windless conditions.
Descent speed is signicantly increased in S-mode.
The aircraft’s responsiveness is signicantly increased in S-mode, which means a small stick
movement on the remote controller will translate into a large travel distance of the aircraft. Be
vigilant and maintain adequate maneuvering space during ight.
Enable “Multiple Flight Modes” in the DJI GO 4 app to allow switching between S-mode and
P-mode.
Use the Flight Mode switch on the remote controller to switch between Flight Modes.
S-mode is only available with a Mavic Air remote controller. S-mode is disabled when ying
with a mobile device.

12
©2018 DJI All Rights Reserved.
Mavic Air User Manual
The Front LEDs show the orientation of the aircraft and the status of some of the functions (refer to
the function sections for more details). The Front LEDs glow solid red when the aircraft is turned on to
indicate the front of the aircraft.
The Aircraft Status Indicator communicates the statuses of the aircraft’s flight control system and
Intelligent Flight Battery. Refer to the table below for more information about the aircraft states indicated
by the Aircraft Status Indicator. The Aircraft Status Indicator also ashes when the Home Point is being
recorded, as described in the Return to Home section.
Aircraft LEDs and Status Indicator
The Mavic Air has Front LEDs and an Aircraft Status Indicator. The positions of these LEDs are shown in
the gure below:
Aircraft Status Indicator
Front LEDFront LED
Aircraft Status Indicator States
Color Blinking/Solid Description of aircraft state
Normal States
Alternating red,
green, and yellow Blinking Turning on and performing self-diagnostic
tests
Yellow Blinks four times Warming up
Green Blinking slowly P-mode with GPS
Green Periodically blinks
twice
P-mode with Forward and Downward Vision
Systems
Yellow Blinking slowly No GPS, Forward Vision System or
Downward Vision System
Green Blinking quickly Braking
Warning States
Yellow Blinking quickly Remote controller signal lost
Red Blinking slowly Low battery
Red Blinking quickly Critically low battery
Red Blinking IMU error
Red Solid Critical error
Alternating red
and yellow Blinking quickly Compass calibration required

©2018 DJI All Rights Reserved.
13
Mavic Air User Manual
Smart RTH
If the GPS signal is suciently strong, Smart RTH can be used to bring the aircraft back to the Home
Point. Smart RTH is initiated either by tapping in the DJI GO 4 app (and following the on-screen
instructions) or by pressing and holding the RTH button on the remote controller.
Smart RTH can be exited by tapping in the DJI GO 4 app or by pressing the RTH button on the
remote controller.
Low Battery RTH
Low Battery RTH is triggered when the Intelligent Flight Battery is depleted to a point that may aect the
safe return of the aircraft. Return home immediately or land the aircraft promptly when prompted. DJI GO
4 will display a warning when a low battery level warning is triggered. The aircraft will automatically return
to the Home Point if no action is taken after a ten-second countdown. The user can cancel the RTH
procedure by pressing the RTH button or Flight Pause button on the remote controller. The thresholds
for the battery level warnings are automatically determined based on the aircraft’s current altitude and
distance from the Home Point. Low Battery RTH will only be triggered one time during each ight.
Return to Home
The Return to Home (RTH) function brings the aircraft back to the last recorded Home Point. There are
three types of RTH: Smart RTH, Low Battery RTH, and Failsafe RTH. This section describes these three
scenarios in detail.
GPS Description
Home Point
If a strong GPS signal was acquired before takeoff, the Home Point is
the location from which the aircraft launched. The GPS signal strength is
indicated by the GPS icon ( ). The Aircraft Status Indicator will blink
green quickly when the Home Point is recorded.
The colored zones and markers on the DJI GO 4 battery level indicator bar reflect the
estimated remaining flight time. They are automatically adjusted according to the aircraft’s
current location and status.
If the current battery level can only support the aircraft long enough to descend from its
current altitude a critically low battery level warning will be triggered and the aircraft will
descend and land automatically. This procedure cannot be cancelled. If there is danger of
collision occurring, push the throttle up and try to navigate away.
If the battery level is sucient the battery level indicator bar in the DJI GO 4 app displays the
estimated remaining ight time based on current battery level.
Critically low battery level warning
(Red)
Low battery level warning
(Yellow)
Battery level is
sufficient (green)
Remaining flight time
Charge required to
return to Home Point
12:29
DJI GO 4 Battery level Indicator Bar

14
©2018 DJI All Rights Reserved.
Mavic Air User Manual
Warning Aircraft Status
Indicator DJI GO 4 App Remote
Controller Remarks/Instructions
Low Battery
Level
Blinks red slowly
Tap “Go-home” to have
the aircraft return to the
Home Point automatically
or “Cancel” to resume
normal ight. If no action
is taken, the aircraft will
automatically y home after
10 seconds.
Alarm sounds
continuously
Battery level is low. Fly
the aircraft back and land
promptly, then stop the
motors and replace the
battery.
Critically Low
Battery Level
Blinks red quickly Display ashes red Alarm sounds
continuously
The aircraft will descend
and land automatically.
This procedure cannot be
cancelled. If there is danger
of collision occurring, push
the throttle up and try to
navigate away.
Failsafe RTH
The Forward Vision System allows the aircraft to create a real-time map of its ight route as it ies. If the
Home Point was successfully recorded and the compass is functioning normally, Failsafe RTH will be
automatically activated if the remote control signal is lost for a specied amount of time (three seconds
when using the remote controller and 20 seconds when ying with a mobile device). When Failsafe RTH
is activated, the aircraft will retrace its original ight route home.
If the wireless control signal is re-established during the Failsafe RTH procedure, the aircraft will hover at
its present location for 10 seconds and wait for pilot commands. The user may pull the control sticks to
cancel Failsafe RTH and retake control. If no pilot command is given the aircraft will resume its ight home.
1 Record Home Point 2 Conrming Home Point
4 Signal Lost for Extended Time
×
5
RTH (adjustable altitude)
Height over HP > Failsafe Altitude
Elevate to Failsafe Altitude
Height over HP<=Failsafe Altitude
Failsafe Altitude
×
6 Landing
×
3 Remote Controller Signal Lost
×
RTH and Battery Level Warnings
If a battery level warning appears, take action as described in the table below.

©2018 DJI All Rights Reserved.
15
Mavic Air User Manual
RTH Procedure
Smart RTH, Low Battery RTH, and Failsafe RTH follow this procedure:
1. The aircraft adjusts its orientation.
2. a. If the aircraft is further than 20 m from the Home Point it ascends to the pre-set RTH attitude and
then ies to the Home Point.
b. If the aircraft is between 5 m and 20 m from the Home Point:
i. If the RTH at Current Altitude option is enabled (the default setting in DJI GO 4) the aircraft ies
to the Home Point at the current altitude, unless the current altitude is less than 2.5 m, in which
case the aircraft ascends to 2.5 m and then ies to the Home Point.
ii. If the RTH at Current Altitude option is disabled, the aircraft lands immediately.
c. If the aircraft is less than 5 m from the Home Point it lands immediately.
5. The aircraft lands and stops its motors once it reaches the Home Point.
Obstacle Avoidance During RTH
The Mavic Air senses and actively attempts to avoid obstacles during RTH, provided that lighting
conditions are sufficient for the Forward and Backward Vision Systems to operate. The obstacle
avoidance procedure is as follows:
1. The aircraft decelerates when an obstacle is sensed.
2. The aircraft stops and hovers then starts ying backward and ascends vertically until no obstacle is
sensed.
3. The RTH procedure resumes. The aircraft ies to the Home Point at the new altitude.
The aircraft will not be able to return to the Home Point if the GPS signal is weak or if GPS is
unavailable.
In Smart RTH and Low Battery RTH, during the aircraft’s ascent to its RTH altitude, the ascent
is automatic until an altitude of 65 ft (20 m) is reached. Once the altitude is 65ft (20 m) or
higher, moving the throttle stick commands the aircraft to stop ascending and to y to the
Home Point at its current altitude.
The aircraft will not be able to avoid obstacles during Failsafe RTH if the Forward and
Backward Vision Systems are unavailable. It is important to set a suitable RTH Altitude before
each ight. Launch the DJI GO 4 app, tap and then set the RTH Altitude.
The aircraft cannot avoid obstacles above or beside the aircraft.
During the RTH procedure the aircraft’s speed and altitude can be controlled using the remote
controller or the DJI GO 4 app, but its orientation and direction of ight are controlled by the
ight controller.

16
©2018 DJI All Rights Reserved.
Mavic Air User Manual
Vision Systems
The Mavic Air is equipped with Forward, Backward, and Downward Vision Systems that constantly
scan for obstacles in front of and behind the aircraft, allowing it to avoid collisions by going around or
hovering (if lighting conditions are adequate).
The main components of the Forward and Backward Vision Systems are four cameras located on the
nose and the rear side of the aircraft.
The Downward Vision System helps the aircraft maintain its current position. With the help of the
Downward Vision System, the Mavic Air can hover in place more precisely and y indoors or in other
environments where a GPS signal is unavailable. The main components of the Downward Vision System
are two cameras and one 3D infrared module located on the underside of the aircraft.
Forward Vision System Backward Vision Systems
Downward Vision System
Precision Landing performance is subject to the following conditions:
a. The Home Point must be recorded upon takeo and must not be changed during ight,
otherwise the aircraft will have no record of the Home Point’s terrain features.
b. During takeo the aircraft must ascend vertically 7 m before moving horizontally.
c. The Home Point terrain features must remain largely unchanged.
d. The Home Point terrain features must be suciently distinctive.
e. The lighting conditions must not be too light or too dark.
The following actions are available during Precision Landing:
a. Throttle down to accelerate landing.
b. Move the control sticks in any other direction to stop Precision Landing. The Mavic Air will
descend vertically after the control sticks are released.
Landing Protection
Landing Protection will activate during Smart RTH.
1. When Landing Protection determines that the ground is suitable for landing, the Mavic Air will land
gently.
2. If Landing Protection determines that the ground is not suitable for landing, the Mavic Air will hover
and wait for pilot conrmation.
3. If Landing Protection is not operational, the DJI GO 4 app will display a landing prompt when the
Mavic Air descends below 0.5 meters. Pull down on the throttle or use the auto landing slider to
land.
Precision Landing
The Mavic Air automatically scans and attempts to match the terrain features underneath during Return
to Home. When the current terrain matches Home Point terrain, the Mavic Air will start landing. The DJI
GO 4 app will show a terrain feature mismatch prompt if matching fails.

©2018 DJI All Rights Reserved.
17
Mavic Air User Manual
Detection Fields
The detection elds of the Forward, Backward and Downward Vision Systems is depicted below. Note
that the aircraft cannot sense or avoid obstacles that are not within the detection elds.
53°
53° 53°
50°
50° 50°
50°
50° 50°
67°
5°
38°
5° 38°
01
Point the aircraft toward the screen
02
Align the boxes
03
Pan and tilt the aircraft
Calibrating Vision System Cameras
The Forward, Backward, and Downward Vision System cameras installed on the aircraft are factory-
calibrated, but may require calibration via DJI Assistant 2 or the DJI GO 4 app if the aircraft is subjected
to an impact.
The most accurate way to calibrate the vision systems is by using DJI Assistant 2. Follow the steps
below to calibrate the Forward Vision System cameras, then repeat the steps to calibrate the Backward
and Downward Vision System cameras.
1. Point the aircraft toward the screen.
2. Move the aircraft to align the boxes shown on the screen.
3. Pan and tilt the aircraft as prompted.
When the DJI GO 4 app noties that a vision system calibration is required but a computer is not nearby
a quick calibration can be performed within the app. Tap through “Aircraft Status” > “Vision Sensors” to
start quick calibration.
Quick calibration is a quick x to vision system issues. When possible, connecting the aircraft
to a computer to carry out a full calibration using DJI Assistant 2 is recommended. Only
calibrate when lighting conditions are adequate and on textured surfaces such as grass.
Do not calibrate the aircraft on highly reective surfaces such as marble or ceramic tiles.
Camera
Centerline

18
©2018 DJI All Rights Reserved.
Mavic Air User Manual
Using the Forward and Backward Vision Systems, the aircraft is able to actively brake when obstacles
are detected in front. The Forward and Backward Vision Systems work best when lighting is adequate
and obstacles are clearly marked or textured. The aircraft must y at no more than 17.9 mph (22.8 kph)
to allow for sucient braking distance.
Using the Vision Systems
The Downward Vision System is activated automatically when the aircraft is turned on. No further action
is required. Using the Downward Vision System, the aircraft can hover precisely even without GPS.
The Downward Vision System is typically used in indoor environments where GPS is unavailable. The
Downward Vision System works best when the aircraft is at altitudes of 1.6 to 26 ft (0.5 to 8 m). If
the aircraft’s altitude is above 8 m the Vision Positioning function may be aected, so extra caution is
required.
Follow the steps below to use the Downward Vision System:
1. Ensure the aircraft is in P-mode and place the aircraft on a at surface. Note that the Downward
Vision System cannot work properly on surfaces without clear pattern variations.
2. Turn on the aircraft. The aircraft will hover in place after takeo. The Aircraft Status Indicator will ash
green twice, which indicates the Downward Vision System is working.
The performance of the Vision Systems are aected by the surface being own over. The
aircraft automatically switches from P-mode to ATTI mode when the Vision Systems are
unavailable and either the GPS signal is weak or the compass is experiencing interference.
Operate the aircraft with great caution in the following situations:
a. Flying at high speeds below 1.6 ft (0.5 m).
b. Flying over monochrome surfaces (e.g. pure black, pure white, pure red, pure green).
c. Flying over highly reective surfaces.
d. Flying over water or transparent surfaces.
e. Flying over moving surfaces or objects.
f. Flying in an area where the lighting changes frequently or drastically.
g. Flying over extremely dark (< 10 lux) or bright (> 100,000 lux) surfaces or towards bright
sources of light (e.g. towards sunlight).
h. Flying over surfaces without clear patterns or texture.
i. Flying over surfaces with identical repeating patterns or textures (e.g. tiling).
j. Flying over small and ne objects (e.g. tree branches or power lines).
k. Flying at high speeds of over 11.2 mph (18 kph) at 3.3 ft (1 m).

©2018 DJI All Rights Reserved.
19
Mavic Air User Manual
Keep the cameras and sensors clean at all times. Dirt or other debris may adversely aect
their eectiveness.
The Forward, Backward, and Downward Vision Systems may not be able to recognize patterns
on the ground in very dark (< 100 lux) environments.
Intelligent Flight Modes
The Mavic Air supports Intelligent Flight Modes including QuickShots, ActiveTrack, SmartCapture, Tripod
mode, Cinematic mode, TapFly, and Point of Interest. Tap in DJI GO 4 to select an Intelligent Flight
Mode.
QuickShots
QuickShots shooting modes include Dronie, Circle, Helix, Rocket, Boomerang, and Asteroid. The
Mavic Air records a video according to the selected shooting mode and then automatically generates a
10-second video. The video can then be viewed, edited, or shared to social media from the playback
menu.
Dronie: The aircraft ies backward and upward, with the camera locked on your subject.
Circle: The aircraft circles around your subject.
Helix: The aircraft ies upward, spiraling around your subject.
Rocket: The aircraft ascends with the camera pointing downward.
Boomerang: The aircraft flies backward around the subject in an oval path.
Asteroid: The aircraft ies backward and upward and then takes several photos, then ies back
to its starting point. The video generated starts with a panorama of the highest position and then
shows the descent.
Using QuickShots
Ensure that the aircraft is in P-mode and that the Intelligent Flight Battery is suciently charged.
Follow the steps below to use QuickShots:
1. Take o and hover at least 6.6 ft (2 m) above the ground.
2 m
2. In DJI GO 4, tap , then select QuickShots and follow the prompts.

20
©2018 DJI All Rights Reserved.
Mavic Air User Manual
3. Select your target subject in Camera View (tap the circle on the subject or drag a box around the
subject) and choose a shooting mode. Tap “GO” to begin recording. The aircraft will y back to its
original position once shooting is nished.
61%
2.4G
QuickShot 12
09:29
ISO
SHUTTER
EV
WB
1600 0.31/8000
CAPACITY
1080P/2420GB
In flight (GPS)
AsteroidDronie HelixCircle Rocket Boomerang
4. Tap to access the video.
QuickShots are only available when the GPS signal is strong.
When using QuickShots, the aircraft cannot avoid obstacles automatically. Only use QuickShots
in wide open areas.
2. In DJI GO 4, tap , then select ActiveTrack.
2 m
ActiveTrack
ActiveTrack allows you to mark and track several moving objects on your mobile device’s screen. No
external tracking device is required. Mavic Air can automatically identify and track people, vehicles and
boats, and use dierent tracking strategies for each.
Using ActiveTrack
Ensure that the aircraft is in P-mode and that the Intelligent Flight Battery is suciently charged. Follow
the steps below to use ActiveTrack:
1. Take o and hover at least 6.6 ft (2 m) above the ground.
Exiting QuickShots
Tap in DJI GO 4 or toggle the Flight Mode switch to S-mode to exit QuickShots anytime during
shooting. Press the Flight Pause button on the remote controller for emergency breaking.
Other manuals for mavic
12
This manual suits for next models
1
Table of contents
Other dji Drone manuals

dji
dji Inspire 1 Pro User manual

dji
dji Inspire 2 ProRes User manual

dji
dji M1S User manual

dji
dji Matrice 600 Pro User manual

dji
dji MAVIC 3 PRO User manual

dji
dji Agras MG-1P User manual

dji
dji mavic Installation and operating manual

dji
dji RM220 User manual

dji
dji AGRAS T10 User manual

dji
dji CP.MA.00000660.01 User manual

dji
dji AGRAS T50 User manual

dji
dji WIND-4 User manual

dji
dji M100-ZENMUSE X5 Series User manual

dji
dji Phantom 2 Vision + User manual

dji
dji MATRICE 600 User manual

dji
dji MATRICE 200 User manual

dji
dji AGRAS T50 User manual

dji
dji MAVIC 3E User manual

dji
dji MINI 3 PRO User manual

dji
dji MATRICE 600 User manual