Doro 5045 User manual

5035/5045
English
User Guide
Cordless Telephone with Hands Free Speaker
(Model 5045 includes answering machine)

1 Phonebook 2
2 Phonebook 1
3 Talk/Call end button
4 Number and Menu buttons
(Scroll – buttons 1 & 3, Delete –
button 6)
5 Menu/Recall button
6 Volume (5035)/Hands Free
Speaker (5045) button
7 Caller Identication (CID) button
8 OK/Intercom button
9 Redial/Erase button
Picture shows 5045.

English
www.doro.com 3
Index
Installation 4
Unpacking........................... 4
Connection ......................... 4
Batteries ............................ 5
Battery Charge Indicator .... 5
Range ................................. 6
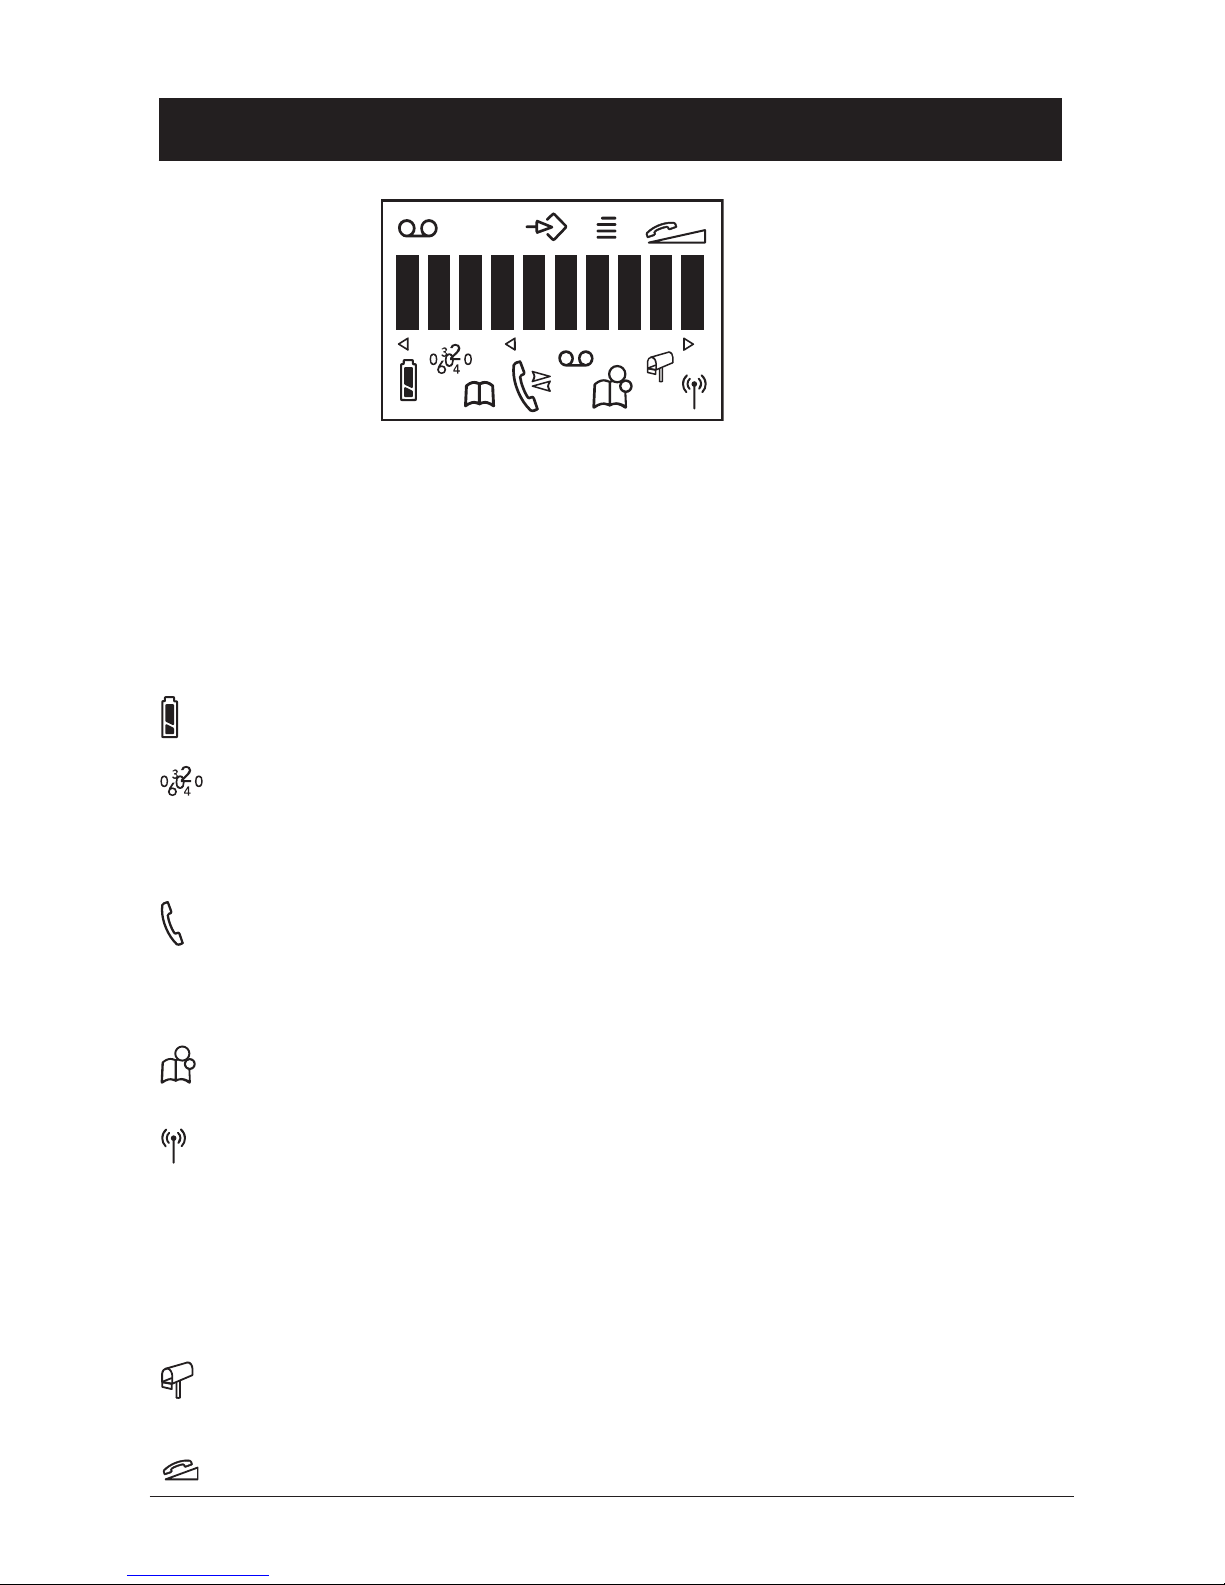
The Display......................... 7
Operation 8
Making a Call...................... 8
Receiving a Call.................. 8
Redial Button ...................... 8
Volume Control ................... 8
Optional Network Services. 8
Handset Paging .................. 9
Timer................................... 9
Hands Free Function .......... 9
Phone Book 10
Caller Identication 12
Settings 13
The Handset ringer............. 13
Register a New Handset or
Base Unit ............................ 14
De-register a Handset ........ 14
De-register all Other
Handsets ............................ 15
Type of Caller ID (CID) ....... 15
Tone / Pulse Dialling.............15
Line Adaptation................... 16
Recall Button Timing .......... 16
PBX Function...................... 17
Handset Volume Control
(5045 only) ......................... 17
Expanded System 18
General Information............ 18
Multiple Base Units............. 18
Multiple Handsets ............... 19
Base Unit Placement .......... 19
Intercom Function............... 19
Transferring Calls Between
Handsets ............................ 19
The Answering Machine
(5045 only) 20
Switching the Answering
Machine On / Off…............. 20
Outgoing Message (OGM) . 20
Using the Answering
Machine .............................. 21
Personal Message - MEMO 22
Call Screening .................... 22
Day / Time Stamp............... 22
Number of Rings................. 23
Remote Code ..................... 23
Recording Quality / Time.... 24
Voice Control ...................... 24
Announcement only (ANN) 24
Out of Memory.................... 25
Remote Activation of the
Answering Machine ............ 25
Remote Control 26
Other 27
Troubleshooting .................. 27
UK....................................... 28
Guarantee........................... 28
Australia and New Zealand 29
Guarantee........................... 29
REN (RN for New Zealand) 30

English
4 www.doro.com
Installation
Unpacking
The package should include the following items:
- Handset - Mains adapter
- Base unit - Line cord
- 2 batteries
Models 5035+1/5045+1 are also supplied with an extra handset including batteries, base unit
and mains adapter.
Connection
1. Connect the mains adapter to the Y socket of the base unit and to an electrical
wall socket.
2. Remove the battery cover from the back of the handset. Insert the batteries into the
handset ensuring correct battery polarity is observed. Replace the battery cover.
3. Place the handset in the base unit, with the keypad facing outwards. Once the
handset is correctly placed in the base unit, a beep will be heard and the battery
charge indicator in the display will begin to ash.
4. Charge the handset batteries without interruption for 24 hours initially (thereafter
fully discharged handset batteries will take up to 14 hours to recharge).
5. ONCE CHARGED, connect the telephone line cord to the socket marked T on
the underside of the base unit and then to a telephone network wall socket.
6. A click will be heard when the modular plug is correctly connected.
7. To setup the answering machine (5045) please refer to pages 20-26.
Only for models with an extra handset (5045+1/5035+1):
8. Connect the mains adapter* to the Y socket of the charger pod and to an
electrical wall socket.
9. Remove the battery cover from the back of the handset. Insert the batteries into the
handset ensuring correct battery polarity is observed. Replace the battery cover.
10. Place the handset in the charger pod and charge the handset batteries without
interruption for 24 hours initially (thereafter fully discharged handset batteries will
take up to 14 hours to recharge).
11. Once charged if the range symbol in the display continually ashes please refer to
page 14, Register a New Handset or Base Unit.
IMPORTANT!
Under power failure conditions, this telephone will not operate. Please ensure that a separate telephone,
not dependent on local power, is available for emergency use. The earpiece of the handset may attract
small ferromagnetic objects such as staples and pins, care should be taken when placing the handset
near these items. Do not place the base unit in areas of high humidity or where it will be exposed to
direct sunlight or other major heat sources.
*Only use the supplied power adapter: UK: 3513-0609-4AC or 0650100DB
AUS: 3513-0609-3AC or 0650100DA.

English
www.doro.com 5
Installation
Batteries
The telephone is supplied with environmentally friendly nickel metal hydride (NiMH)
batteries, 2 x AAA 1.2V. As with all batteries performance may degrade over time,
should you notice that the standby time has reduced considerably or there are signs of
leakage, both batteries should be replaced.
Fully charged batteries will last for approx 170 hours in standby or approx 10 hours
call time. The stated times apply under normal room temperatures and when using
fully charged batteries.
Completely discharged batteries will take about 14 hours to fully recharge (24 hours
from new).
Please note that the battery charge indicator in the display ashes while charging.
The ashing will stop when the battery is fully charged.
The base unit has an automatic charging mechanism that prevents the batteries from
being overcharged or damaged due to prolonged charging.
Please note!
When the telephone is installed for the rst time, the batteries must be charged for 24 hours before
using the telephone. Use DORO original batteries only. The guarantee does not cover any damage
caused by incorrect batteries. The handset is charged with the keypad facing outwards. Please dispose
of any batteries in a responsible and environmentally friendly manner.
Battery Charge Indicator
The symbol in the display indicates when its is time to recharge the battery. The
symbol has two segments which disappear as the battery charge decreases. When the
battery is running low, the symbol will appear in the display and a warning tone
will be heard. If the handset is not recharged at this time, the phone will cease to
function until it is recharged.

English
6 www.doro.com
Installation
Range
The range of the telephone varies depending on different factors in the surrounding
enviroment. The radio waves transmitting the call may be hindered by obstructions,
reducing the range.
Specied ranges require unobstructed transmission between the handset and the base
unit. In such ideal conditions, the telephone range can be up to 300 metres. In a
densely populated area, house, apartment, etc. the range of the telephone will be
reduced. Try to get the best range by relocating the base unit. The ideal location for
the base unit is a high and unobstructed place.
Out of range warning
If during a call the handset is carried too far from the base unit, the sound quality
deteriorates. Unless the handset is moved closer to the base unit within a few seconds,
the call will be lost.
IMPORTANT!
To reduce the risk of possible interference please do not locate the base unit near any electrical
equipment e.g. TV’s, computers, fridges, telecom equipment etc or close to radiators, metal pipes or
window frames. Also ensure the base unit is not exposed to direct sunlight, excessive heat, damp
or high humidity locations.

English
www.doro.com 7
Installation
The Display
Indicator Function
% Handset Ringer
p Programme.
= Menu.
Battery charge indicator.
Numbers in Caller ID log (CID).
b Phonebook 1.
Indicates that a call is connected. Flashes when the
phone rings.
i Intercom call.
Phonebook 2.
Shown within range of the base unit. Flashes
when out of range.
5045 only:
a Upper row: Answering machine settings.
Lower row: The indicator is lit when the
answering machine is activated.
New incoming messages (ICM) on the
answering machine.
Handset volume control.

English
8 www.doro.com
Operation
Making a Call
1. Enter the required telephone number. Mistakes can be erased using x.
2. Press o, the telephone number will now be dialled.
3. Press o again to terminate the call.
Receiving a Call
1. Wait for the handset to ring.
2. Press o to answer the call.
3. Press o again to terminate the call.
Please note!
The telephone’s ringing signal does not follow the line signal, ie it may continue to ring for up to 7
seconds after answering a call. If the telephone cannot connect to a line, a warning tone will be heard.
The problem may be due to the batteries running low, the handset being too far from the base unit or
all of the transmission channels being engaged.
Redial Button
The ve most recently dialled numbers can easily be redialled using r:
1. Press r and scroll to the required telephone number using < </> >.
2. Press o to dial the telephone number.
Volume Control
5035: The earpiece volume may be adjusted during a call by pressing .
5045: The volume is adjusted by accessing the menu, please refer to page 17.
The display will show the selected volume: +=low, ++=medium, +++=high, and
++++=maximum.
Optional Network Services
Access to additional network services can be gained by using the recall button R, *
and # keys. Contact your network operator for more information.
Press the recall button R followed by the extension number to transfer calls when
connected to a PBX (TBR only).

English
www.doro.com 9
Operation
Handset Paging
Pressing j on the base unit will activate the paging signal of the handset.
This function is used to help locate the handset or to page the person carrying the
handset. The signal will continue until the i on the handset is pressed.
The page can also be cancelled by pressing j on the base again.
Timer
Within approximately 5 seconds after the connection of a call, a timer will be shown
on the display. The timer helps you keep track of how long the call lasts.
Hands Free Function
The hands free button s is located on the back of the handset (5035), and on the
front of the handset (5045).
If you wish, you can switch between handset and hands free during a call.
1. Enter the required telephone number.
2. Press o. When the call has been connected press s. The hands free feature
will be activated and the conversation can be heard through the speaker.
3. Place the handset vertically on an even surface, e.g. a table.
4. Speak towards the microphone located on the front edge of the handset, ensuring
that you are not further than 1 meter (3 feet) away from the handset during
the call.
5. If you want to adjust the speaker volume repeatedly press s the display
will cycle through +=low, ++=high and off settings. To reactivate hands free
press s again.
6. Press o to terminate the call.
Please note!
Please remember that in hands free speaker mode, it is only possible for only one person at a time to
talk. The switch over between speaker and microphone is automatic and dependant on the sound level
of the incoming call and the microphone respectively.
It is therefore essential that there are no loud noises in the immediate surroundings of the telephone,
as this will disrupt the speaker function.

English
10 www.doro.com
Phone Book
Using the Phone Book
There are two Phone Books which will store a total of 20 (10+10) telephone numbers
(25 digits maximum) and names (10 characters maximum), this allows a stored phone
number to be dialled using fewer button presses than if dialled manually. The Phone
Books are arranged alphabetically.
If you subscribe to a Caller ID service, the telephone number (and for those numbers
stored in the Phone book) the name of a caller will be shown upon receiving an
incoming call.
Letters
Each number key has been allocated certain letters.
Button Letters/symbols
1.......................................... [Space character] --1
2.......................................... A B C 2
3.......................................... D E F 3
4.......................................... G H I 4
5.......................................... J K L 5
6.......................................... M N O 6
7.......................................... P Q R S 7
8.......................................... T U V 8
9.......................................... W X Y Z 9
0.......................................... 0

English
www.doro.com 11
Phone Book
Storing Telephone Numbers/Names
1. Do Not press o. Enter the telephone number, including the area code.
2. Select a Phone book by either pressing b or .
3. Enter a name by pressing the corresponding number button until the required
letter is displayed, please refer to the table on the previous page. Press x to delete
or make changes. Once the rst letter has been entered wait a second or two and
repeat this procedure until all you have entered the entire name required.
4. When the entire name has been entered, press 0
.
If you want to enter a Pause in the telephone number, press and hold # until the
display shows --.
Dialling from the Phone book
1. Select a Phone book by pressing the corresponding button b or .
2. Scroll through the entries using < </> >.
3. Press o, the displayed telephone number will now be dialled.
Changing Numbers
1. Select the phonebook into which you wish to save the entry by pressing the
corresponding button: b or .
2. Scroll to the desired memory by pressing < </> >. Press 0
.
3. Press x to delete, use the number buttons to enter the new numbers.
4. Press 0 to conrm the settings.
Erasing a Phone Book Entry
1. Select the phonebook from which you wish to delete the entry by pressing the
corresponding button: b or .
2. Scroll to the desired memory by pressing < </> >.
3. Press c.
4. Press 0 to conrm the settings.
5. Press the relevant Phone book button b or to return to standby mode.

English
12 www.doro.com
Caller Identication
Explanation of Caller ID
Caller ID allows you to see who is calling before you answer a call, and see who has called in your
absence. If a name is attached to the telephone number and stored in the phone book, the name
will be shown while the phone is ringing. The call log will store up to 10 telephone numbers, which
can easily be retrieved for viewing and dialling. If you are checking incoming calls on the call log,
only the telephone number will be shown.
New calls are indicated in standby mode by in the display. If a voicemail message (Optional
Network Services Required) has been received will ash. While scrolling through the list two
short beeps will indicate that you have reached the rst or the last call.
When the log is full, the oldest number will be deleted automatically, as the new call is logged.
Please note!
In order for numbers to be shown, the Caller ID service must be provided by your network operator and
a current subscription in place. Contact your network operator for more information. In some countries the
network operator will transmit a call description (e.g. MOBILE) as a name, the number will not be shown
while ringing, only when scrolling through the call list.
Retrieving and Dialling CID Numbers.
1. Press .
2. Scroll to the required telephone number by using < </> >. Press 0
, the time and date
the call was logged will now be displayed.
3. Press o to dial, or press to return to the standby mode.
Messages
Besides showing telephone numbers, the display may also show a message.
No information was received, e.g. when receiving an international call,
voicemail (Optional Network Services required), secret or blocked numbers.
Removing a Number
1. Press .
2. Scroll to the required telephone number by using < </> >.
3. Press C.
Transferring Numbers to the Phone Book
1. Press .
2. Scroll to the required telephone number by using < </> >.
3. Select the phonebook into which you wish to save the entry by pressing the
corresponding button: b or .
4. Enter a name by pressing the corresponding number button until the required letter is
displayed, please refer to the table on page 10. Press x to delete or make changes.
5. When the entire name has been entered, press 0
. The telephone will return to the
standby mode.
******

English
www.doro.com 13
Settings
Description of the menu system
The telephone has a menu system, controlled by the following buttons:
w Activates and deactivates the menu system.
0 Move one step forward and/or conrm selected option.
x Used to erase/correct.
< </> > Scroll through the menu alternatives.
The Handset ringer
There are three different ringer tunes.
- One for regular incoming calls,
- One for incoming calls from numbers stored in Phone book 1 b,
- One for incoming calls from numbers stored in Phone book 2 .
The display also shows the attached symbol during ringing and only applies if you
subscribe to Caller ID services. There is NO ringer in the base unit.
1. Press w.
2. Scroll using < </> > until % ashes in the display. Press 0
.
3. Display shows 1/4 and current ringer volume (+=low, ++=medium, +++=high
and ++++=maximum).
4. Scroll using < </> > to the desired setting. Press 0
.
5. Display shows 2/4 and current ringer tune for regular incoming calls.
6. Scroll using < </> > to the desired setting. Press 0
.
7. Display shows 3/4 and current tune for numbers stored in Phone book 1.
8. Scroll using < </> > to the desired setting. Press 0
.
9. Display shows 4/4 and current tune for numbers stored in Phone book 2.
10. Scroll using < </> > to the desired setting. Press 0 to conrm.
11. Press w to exit the Menu system.
Please note!
If a number stored in the Phonebook is Secret the regular ringer signal will be heard.
Although the caller may be stored in one of the phone books, the rst ringer signal may still be the
regular signal until the number has been identied.
The telephone’s ringing signal does not follow the line signal, ie it may continue to ring for up to 7
seconds after answering a call.

English
14 www.doro.com
Settings
Register a New Handset or Base Unit
To enable the use of more than one handset a registration has to be performed. Every
new handset must be registered in order to use a base unit. A maximum number
of 2 base units can be registered with each handset, and each base unit can handle
up to 4 handsets.
Additional base units and handsets can be purchased from your local retailer.
Please also refer to page 18 for more information on Expanded Systems.
1. Disconnect the main base unit electrical adapter for a few seconds, and then
reconnect.
2. Press w .
3. Scroll using < </> > until P starts ashing in the display. Press0
.
4. Enter the PIN code (1111 for this model). Press 0
.
5. The handset will now search for the base unit.
6. If the registration is successful the handset will return to standby mode in a few
seconds (max 90 seconds). If registration is unsuccessful repeat this procedure.
De-register a Handset
Handsets can easily be de-registered from a base.
1. Press w.
2. Press the keypad digits 9 4.
3. Enter the PIN code (1111 for this model).
4. Press 0
.
WARNING!
DO NOT deregister the main handset.

English
www.doro.com 15
Settings
De-register All other Handsets
All other handsets except the one on which you perform the operation below, can easily
be de-registered from a base.
1. Press w.
2. Press the keypad digits 9 5.
3. Enter the PIN code (1111 for this model).
4. Press 0
.
Type of Caller ID (CID)
Dependant on your network sytem requirements the Caller ID settings may need to
be adjusted.
If the phone has been purchased in Australia this setting will be displayed as 1/4.
1. Press w.
2. Scroll using < </> > until w ashes in the display. Press 0
.
3. Press 0 repeatedly until the display shows 1/5 - UK (1/4 - Australia).
4. Scroll using < </> > to the desired setting:
1=BT for UK/Normal for Australia
2=CCA for UK/Polarity reversal for Australia.
5. Press 0 to conrm setting and move to the next programming sequence,
alternatively.
6. Press w to exit the Menu system.
Tone/Pulse Dialling (UK only)
Select dialling type (tone or pulse). The default setting is tone dialling, dependant on
your network system requirements this may not require changing.
This setting only applies to models purchased in the UK.
1. Press w.
2. Scroll using < </> > until w ashes in the display. Press 0
.
3. Press 0 repeatedly until the display shows 2/5.
4. Scroll using < </> > to the desired setting (TONE/PULSE). Press 0 to conrm
setting and move to the next programming sequence, alternatively.
5. Press w to exit the Menu system.

English
16 www.doro.com
Settings
Line Adaptation
In some PBX systems, it may be necessary to adjust the microphone level.
If the phone has been purchased in Australia this setting will be displayed as 2/4.
1. Press w.
2. Scroll using < </> > until w ashes in the display. Press 0
.
3. Press 0 repeatedly until the display shows 3/5. - UK (2/4 - Australia).
4. Scroll using < </> > to the desired setting (A/B=normal, C=medium, D=low).
5. Press 0 to conrm setting and move to the next programming sequence,
alternatively.
6. Press w to exit the Menu system.
Recall Button Timing
In some PBX installations, the timing of the Recall button may need to be adjusted.
For normal domestic use, this setting should not require changing.
If the phone has been purchased in Australia this setting will be displayed as 3/4.
1. Press w.
2. Scroll using < </> > until w ashes in the display. Press 0
.
3. Press 0 repeatedly until the display shows 4/5. - UK (3/4 - Australia).
4. Scroll using < </> > to the desired setting ( =normal,
=270-600ms). Press 0 to conrm setting and move to the next programming
sequence, alternatively.
5. Press w to exit the Menu system.

English
www.doro.com 17
Settings
PBX Function
This telephone has a PBX function that will automatically insert a pause between the
rst and second digits of the telephone number before dialling.
For example:
When the function is activated (see below), dialling a phone number ie: ”0123456”,
the phone will dial: “0” followed by a pause, and then the remaining part of the
number: “123456”.
If the phone has been purchased in Australia this setting will be displayed as 4/4.
1. Press w.
2. Scroll using < </> > until w ashes in the display. Press 0
.
3. Press 0 repeatedly until the display shows 5/5. - UK (4/4 - Australia).
4. Scroll using < </> > to the desired setting (YES=on, NO=off). Press 0 to
conrm.
5. Press w to exit the Menu system.
Handset Volume Control (5045 only)
1. Press w.
2. Scroll using < </> > until ashes in the display. Press 0
.
3. Scroll using < </> > to the desired setting (+=low, ++=medium, +++=high,
and ++++=maximum). Press 0 to conrm.
4. Press w to exit the Menu system.

English
18 www.doro.com
Expanded System
General Information
DECT (Digital Enhanced Cordless Telephone) technology offers superior perfor-
mance, clarity and security using its completely digital method of transmission.
You can:
- Use (register) up to 4 handsets with the same base unit.
- Use (register) up to 2 base units with the same handset.
- Make internal calls (intercom) and transfer calls between handsets using the same
base unit.
Additional base units and handsets can be purchased from your local retailer.
This model is GAP (Generic Access Prole) compatible, which means that the
handset and the base unit can both be used with most GAP compatible units
irrespective of manufacturer.
Multiple Base Units
By connecting several base units to the system, the useful range for the handset can
be expanded.. Registering multiple base units with the handset will cause the handset
to automatically connect to another base if and when it loses contact with the current
base unit Another practical application could be to have one base station at home and
one at work. Then the same handset can be used in both places.
The handset remains in contact with its base unit until it goes out of range. When this
happens, the handset will begin to search for another base from its list of registered
base units. It is essential that the range of the base units overlap, in order to achieve
uninterrupted coverage. The transfer from one base unit to another will then be
automatic, however, this will not occur while a call is in progress. If not, there may
be reduced communication in certain areas where the handsets have no signal from
the base units.
More about placement of the base units on the next page.
IMPORTANT!
Automatic switching between base units (handset handover) will not occur while a call is in progress.

English
www.doro.com 19
Expanded System
Multiple Handsets
The combination of multiple base units and multiple handsets provides for many
useful applications. So long as all handsets are programmed to the same base unit.
- Any handset can answer incoming calls, and make outgoing calls.
- External calls can be transferred between handsets.
- Internal handset to handset communication (intercom).
Base Units Placement
If you wish to use several handsets with one base unit, you should make sure that
the base unit is placed “in the middle”, to evenly divide the base unit range among
the handsets.
If you wish to use several base units to achieve an extended coverage within a specic
area, eg a large home or ofce, a storage area, etc, then it is important that the range
of the base stations overlap. If not there may be a reduced communication in certain
areas where a handset has no signal from the base units.
Intercom Function
When using several handsets with the same base unit, calls can be made internally
between the handsets, this is referred to as an internal call. Internal calls can only be
made between handsets operating on the same base unit.
1. Press i.
2. All other handsets will now ring.
3. Answer the call by pressing o on one of the other handsets.
If an external call is received while an intercom call is in progress, a tone will be
heard. You will then have to terminate the intercom call to answer.
Transferring Calls Between Handsets
An external call can be transferred from one handset to another (so long as both
handsets are operating on the same base unit).
1. While an external call is connected on line.
2. Make an internal call according to the description above. A tune will be played
to the incoming caller.
3. Transfer the call by pressing o. Answer the call by pressing o on one of
the other handsets.
If you decide not to transfer the call, press i on your handset to return to the
external caller.

English
20 www.doro.com
The Answering Machine (5045)
About the Answering Machine
The answering machine has to be turned on in order to receive messages. On incoming
calls the telephone will be answered after the selected number of rings (please refer
to page 23).
When the answering machine answers an incoming call, the caller will hear your
outgoing message (OGM) followed by a short beep, at which point they can leave an
incoming message (ICM) of up to 2 minutes in length. Should the caller exceed this
limit, the call will be disconnected.
The answering machine can record between 5 and 7 minutes of incoming messages
(ICM’s) depending on the selected sound quality (high or standard). Please refer to
page 24.
Switching the Answering Machine On/Off
1. Press a located on the back of the handset, the button will illuminate (for
upto 40 seconds) and the number of new ICM’s will be announced. All answering
machine features can only be accessed while a is illuminated.
2. To switch the answering machine on, press keypad digit 7. a will be on in
the display.
3. To switch the answering machine off, press keypad digit 9. a will be off in
the display.
Outgoing Message (OGM)
The OGM is your announcement to the caller and may be up to 2 minute in length. If
you choose not to record your own OGM, the caller will hear a prerecorded OGM. Use
your OGM to advise the caller to begin talking after a beep is heard. For example:
“Hello, we are unable to take your call right now, please leave a message after the beep,
and we’ll return your call as soon as possible. Thank you for calling.”
Recording your OGM
1. Ensure the a symbol is visible within the display, and the a button located on
the back of the handset is illuminated.
2. The total number of (new) recorded ICM’s will now be announced.
3. Press 8 to stop playback.
4. Press 4 5.
5. Record your OGM.
6. Press 8 to stop recording.
7. Your OGM will be repeated after a few seconds. Repeat the same procedure above
if you wish to change the OGM. Any old OGM will automatically be erased when
a new one is recorded.
This manual suits for next models
1
Table of contents
Other Doro Cordless Telephone manuals