Doro ARC 3 User manual

Arc 3

1 Up / missed call
2 Left menu button/OK
3 Talk button
4 Down/Redial
5 *and keypad lock
6 Redial
7 Phone book
8 Recall button (PBX features)
9 #and ring signal off/on
10 End call and on / off button
11 Right menu button/Back/Internal call
English
9
10
11
6
4
3
2
1
5
8
7

1
English
Connection
1. Connect mains adapter/phone cable to wall sockets.
2. Insert batteries (1.2V NiMH AAA) in accordance with the markings.
3. Chargewiththekeypadfacingoutwards(24hoursthersttime).
4. Press (left menu button).
5. Scroll {/}to HS SETTINGS.
6. Press OK (left menu button).
7. Scroll to LANGUAGE. Press OK.
8. Scroll to desired setting. Press OK.
9. Press Lor several times to exit the menu screens.
IMPORTANT: Use the telephone line cord supplied, an existing line cord from a previous phone may not be compatible.
Date/Time
10.Press (left menu button).
11.Scroll {/}to HS SETTINGS. Press OK.
12.Scroll to HS DISPLAY. Press OK.
13.Scroll to TIME. Press OK.
14.Scroll to DATE & TIME. Press OK.
15.Scroll to SET TIME. Press OK.
16.Enter time of day (HH-MM). Press OK.
17.Scroll to SET DATE. Press OK.
18.Enter date (DD MM YY). Press OK.
19.Press Lor several times to exit the menu screens.
The format of date/time can also be adjusted.
Battery
When the batteries are relatively new and fully-charged (10 hours) they will last for approx. 100 hours’ standby time or
approx. 10 hours’ call time. These times apply at normal room temperature. �ull battery capacity will not be reachedThese times apply at normal room temperature. �ull battery capacity will not be reachedThese times apply at normal room temperature. �ull battery capacity will not be reached�ull battery capacity will not be reached�ull battery capacity will not be reached
until the batteries have been charged 4-5 times. It is not possible to overcharge or damage the batteries by chargingIt is not possible to overcharge or damage the batteries by chargingIt is not possible to overcharge or damage the batteries by charging
them for ”too long”. It may take up to 5 minutes charging before display wakes up, if batteries are totally empty.
Please note!
When the battery is low or when there is too great a distance to the base unit the telephone will be unable to connect to a
line. Do not place the base unit close to other electrical equipment, in direct sunlight or other strong heat sources! This is to
minimize the risk of any interference. It is normal for the device to become warm during charging and this is not dangerous. Use
only original batteries. The guarantee does not cover any damage caused by using the wrong batteries.
Battery LED
When the batteries are running low, willashandawarningtonewillbeheardwhenacallisinprogress.
Pleasenotethatthecompletebatteryindicatorinthedisplaywillashaslongasthehandsetischarging,andwhenthe
batteryisfullychargedonlytheinnersegmentwillash.
Paging
The handset will ring when J(on the base unit) is pressed. The signal will stop automatically after a while or if the
Lbutton on the handset or the Jbutton on the base unit are pressed.

English
2
Range
The telephone’s range depends on whether or not the radio waves carrying the call are restricted by obstacles in their
path, and is usually between 50 and 300 metres. Coverage can be improved by turning one’s head so that the handset is
alignedwiththebaseunit.Soundqualitydeclinesasthelimitisreacheduntilthecallisnallyinterrupted.
The 6symbolisshownwhenthephoneiswithinrangeandgoesout/asheswhenitisoutofrange.
Making a call
1. Enter the required number. Delete if necessary with right menu button C.
2. Press qto make the call. Press Lto end the call.
Receiving a call
1. Wait for the handset to ring.Wait for the handset to ring.
2. Press qto answer. Press Lto end the call.
Volume control
The volume may be adjusted during a call with {/}.
Redial
Press r. Scroll among the 5 most recently dialled numbers with {/}. Press q.
Mute button
The microphone can be switched off/on during a call with C (right menu button).
Temporary silent mode
When someone calls, you can press C(right menu button) to turn off the handset ring signal.
Softkeys
Note the top two keys are “softkeys”. Their function is shown in the Display directly above them.
Phonebook
You can save 20 numbers/names. If you subscribe to a caller ID service, the name allocated to the caller in the
phonebook will be shown for incoming calls. It is possible to choose between various ringers for the numbers saved
in the Phonebook (only functions if you subscribe to a caller ID service).
Letters
Each number key has been allocated certain letters.
1.....................[Space]
Save name/number in handset
1. Press b. Press .
2. Scroll to ADD. Press OK.
3. Press equivalent digit key several times for desired name. Press OK.
4. Enter the telephone number, including the area code Delete if necessary with right menu button C. Press OK.
5. Scroll to required ringer. Press OK.
Managing the phonebook
1. Press b. Scroll between entries with {/}. You can quick search the phonebook by pressing the corresponding
numberkeyfortherstletter.
2. Press qto make a call or press for various options.

English
3
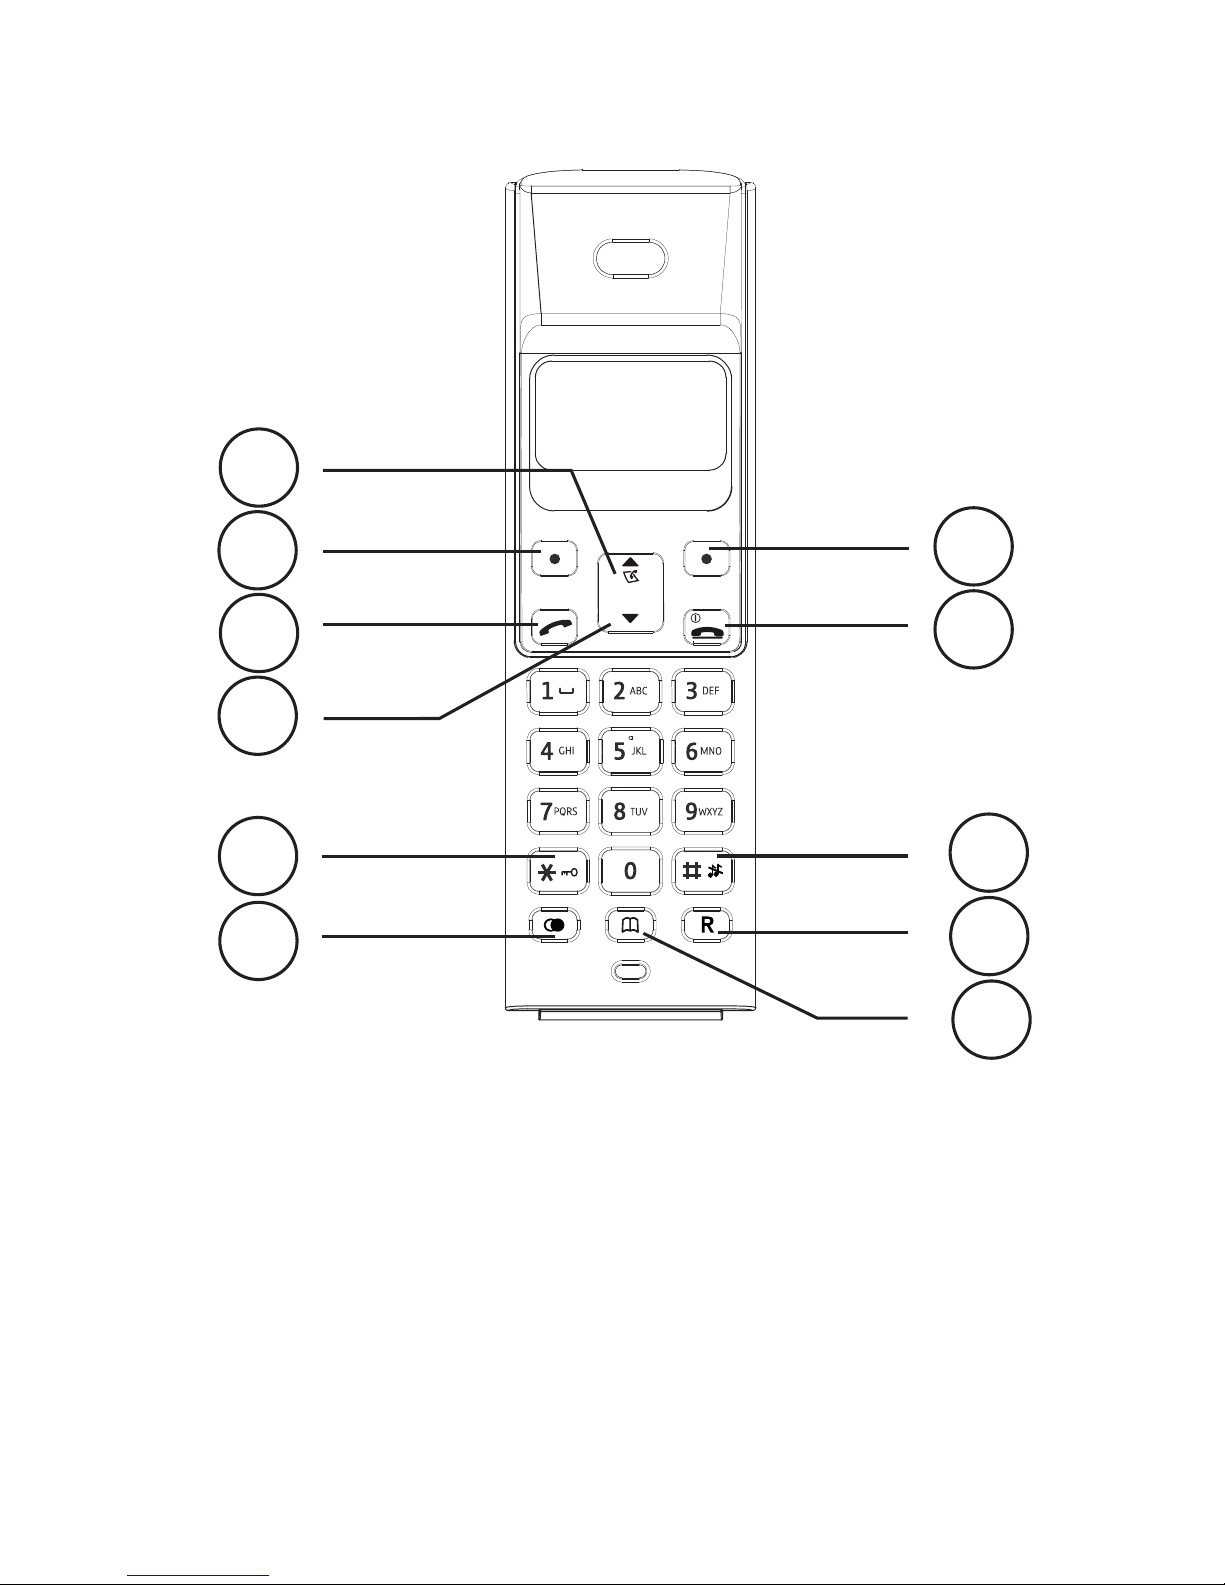
Incoming numbers/Caller ID
The display shows you who is calling and the 10 most recent missed calls. NEW CALLS will be shown in standby mode
and in the list indicates a missed call. This function requires a subscription from your service provider!
Retrieving and dialling
1. Press {. Scroll to the desired entry with }.
2. Press qto call or press for various options
( = back).
Caller identication messages
In addition to number display, the following messages will be shown occasionally:
OUT OF AREA Unknown number, e.g. international call.
WITHHELD Information about the number is blocked. Number cannot be shown.
aMSGindicationfromyournetworkoperator*
*To remove the message indicator press: Press {and then hold down 4.
Functions
1. Press . Scroll to HS SETTINGS. Press OK.
2. Scroll to desired function e.g. LANGUAGE. Press OK.
3. Scroll to desired setting. Press OK.
ALARM When the alarm is activated will be shown in standby mode. When the alarm goes off, a signal
will be heard for 45 seconds. The signal can be turned off with any button. If SNOOZE is activated
the alarm will go off again approx. 7 minutes later. Turn the alarm off permanently via the menu or
by holding Ldown for a few seconds. The volume is determined by the set ringer level.
RING SETUP The handset’s ringer signal.
INT/EXT=internal/external melody.
RING VOLUME=set the ringer level.
Melodies 2,3,4... can continue for up to 8 seconds if the call is answered in another phone.
TONE SETUP Any of the following warning tones can be disbled, Keytone, low battery and range.
LANGUAGE The language of the display texts.
RENAME HS The text shown in standby mode.
HS DISPLAY Show name or time in standby mode.
AUTO ANSWER The call is answered when the handset is lifted from the base.
DATE & TIME Setting the date/time. The format of date/time can also be adjusted.
Base settings
System PIN is 0000 on delivery.
1. Press . Scroll to BS SETTINGS. Press OK.
2. Scroll to desired function. Press OK.
3. Enter the desired setting. Press OK.
DELETE HS Warning: To de-register a handset: WARNING, A deregistered handset can not be used with the system.
FLASH TIME RECALL TIME. LONG=New Zealand. MEDIUM=�rance/Portugal. SHORT=others incl. UK/AUS.
CHANGE PIN The code (e.g. 0000) can be changed.

4
English
Expanded system (Two or more handsets e.g +1...)
The call number for internal calls will be shown in the display in standby mode. The base unit should be positioned
centrally so that the coverage area is roughly equal for all handsets.
Intercom / internal call
1. Press (right menu button).
2. If using more than 2 handsets: Enter call number 1-6for the desired handset or press 9for all.
A tone will be heard if an external call comes in while an internal call is in progress. End the internal call with L
and then answer the external call with q.
Transferring calls/Conference between handsets
When an external call is connected;
1. Press . Scroll to INTERCOM. Press OK.
2. If using more than 2 handsets: Enter call number 1-6for the desired handset or press 9for all.
3. To transfer: press L, �or conference: hold *pressed down.
Register a new handset
All handsets included in the package are already registered to the base unit.
Only for separate handsets/service measures.
You can register up to 6 handsets to one base unit.
This model is GAP (Generic Access Prole) compatible, which means that the handset and the base unit can both be used with most other GAP
compatible units irrespective of manufacturer. However the GAP protocol cannot guarantee that all functions may be accessed. Extra handsets will
not be available as accessories.
1. Hold down Jon the base for around 6 seconds.
2. Press . Scroll to REGISTRATION. Press OK.
3. Enter the base unit’s PIN code (e.g. 0000). Press OK.
4. If the registration is successful the unit will return to standby mode within one minute.

5
English
Troubleshooting
Check that the telephone cord is undamaged and properly plugged in. Disconnect any additional equipment, extension
cords and other phones. If the problem is resolved, the fault is with some other equipment.
Test the equipment on a known working line (e.g. at a neighbour’s house). If the equipment works there the fault is
probably with your telephone line. Please report this to your network operator.
No number shown when ringing
- This function requires a Caller ID subscription from your service provider.
Warning tone/Not possible to make calls
- The batteries may be running low (charge the handset).
- The hand unit may be nearly out of range. Move closer to a base unit.
Telephone does not work
- Check that the adapter/phone cord is connected correctly.
- Check the charge status of the handset batteries.
- Connect another functioning telephone to the network wall socket.
The telephone continues to ring
- Some of the telephone’s ringers do not follow the line signal, which means that the signal may continue for up to 8
seconds after answering a call.
If the telephone still does not work, contact the place of purchase for service. Don’t forget the receipt or a copy of the
invoice.
Specic Absorption Rate (SAR)
This device meets applicable international safety requirements for exposure to radio waves. This telephone measures
0,05 W/kg (per 10g tissue). The max. limit according to WHO is 2W/kg (per 10g tissue).
Declaration of conformity
Doro hereby declares that the product Doro Arc 5r conforms to the essential requirements and other regulations contained
in the directives 1999/5/EC (R&TTE), 2002/95/EC (ROHS). A copy of the manufacturer’s declaration is available at www.
doro.com/dofc
Guarantee
This product is guaranteed for a period of 24 months from the date of purchase. If you experience any problems
please contact the place of purchase. Proof of purchase is required for any service or support needed during the
guarantee period. This guarantee will not apply to a fault caused by an accident or a similar incident or damage, liquid
ingress, negligence, abnormal usage, non-maintenance or any other circumstances on the user’s part. �urthermore,
thisguaranteewillnotapplytoanyfaultcausedbyathunderstormoranyothervoltageuctuations.Asamatterof
precaution, we recommend disconnecting the device during a thunderstorm. Batteries are consumables and are not
included in any guarantee. This guarantee does not apply if other batteries than DORO original batteries have been
used.

English
Version 2.0
Table of contents
Other Doro Cordless Telephone manuals