Doro 840 User manual

doro 840
Manual

English
www.doro.com 3
v
v
�
9
7
8
1
2
3
5
46
1 Mute/Erase button
2 CID and Scroll (down) button
3 Talk button
4 Recall (R) and Off/On button
5 Redial button
6 Intercom
7 Phone book/Back button
8 CID and Scroll (UP) button
9 OK/Menu button

English
www.doro.com 3
Index
Installation 4
Unpacking........................... 4
Connection ......................... 4
Belt clip ............................... 6
Wall Mounting ..................... 6
Battery ................................ 6
Turning the Handset
On/Off................................. 6
Battery charge indicator ..... 7
Range ................................. 7
Headset .............................. 7
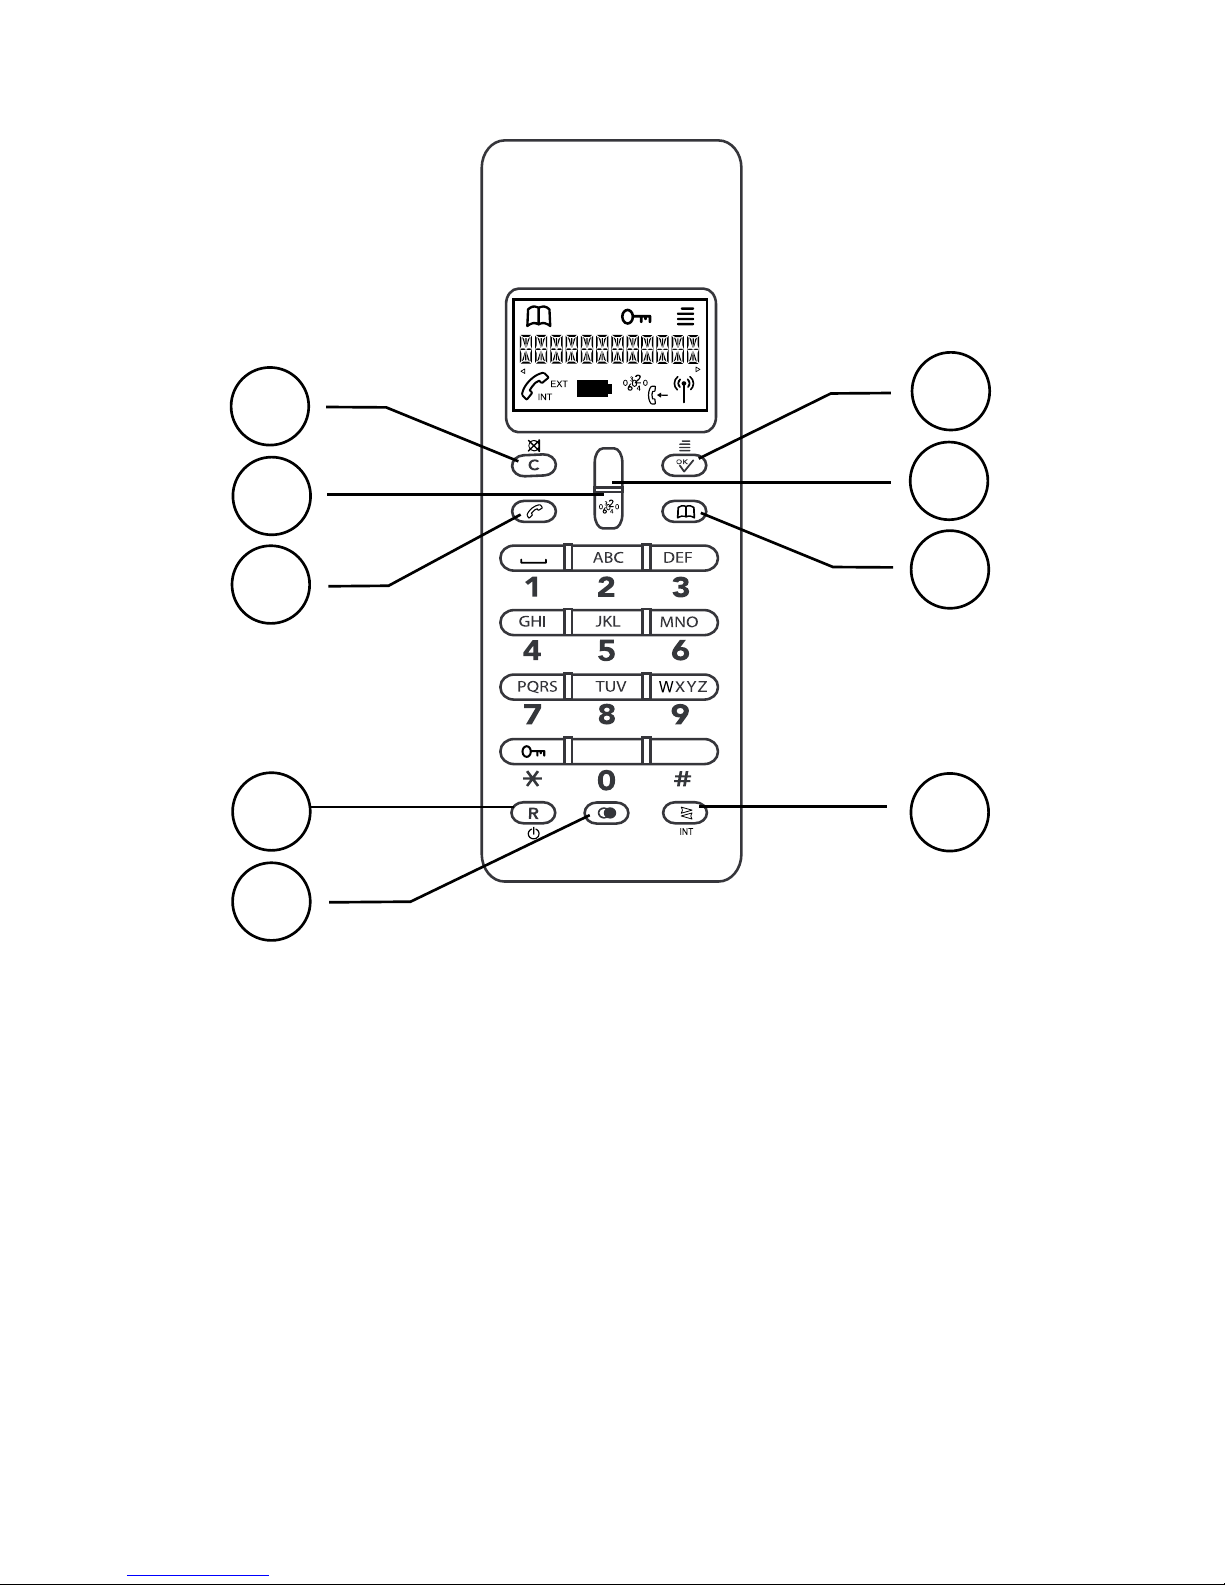
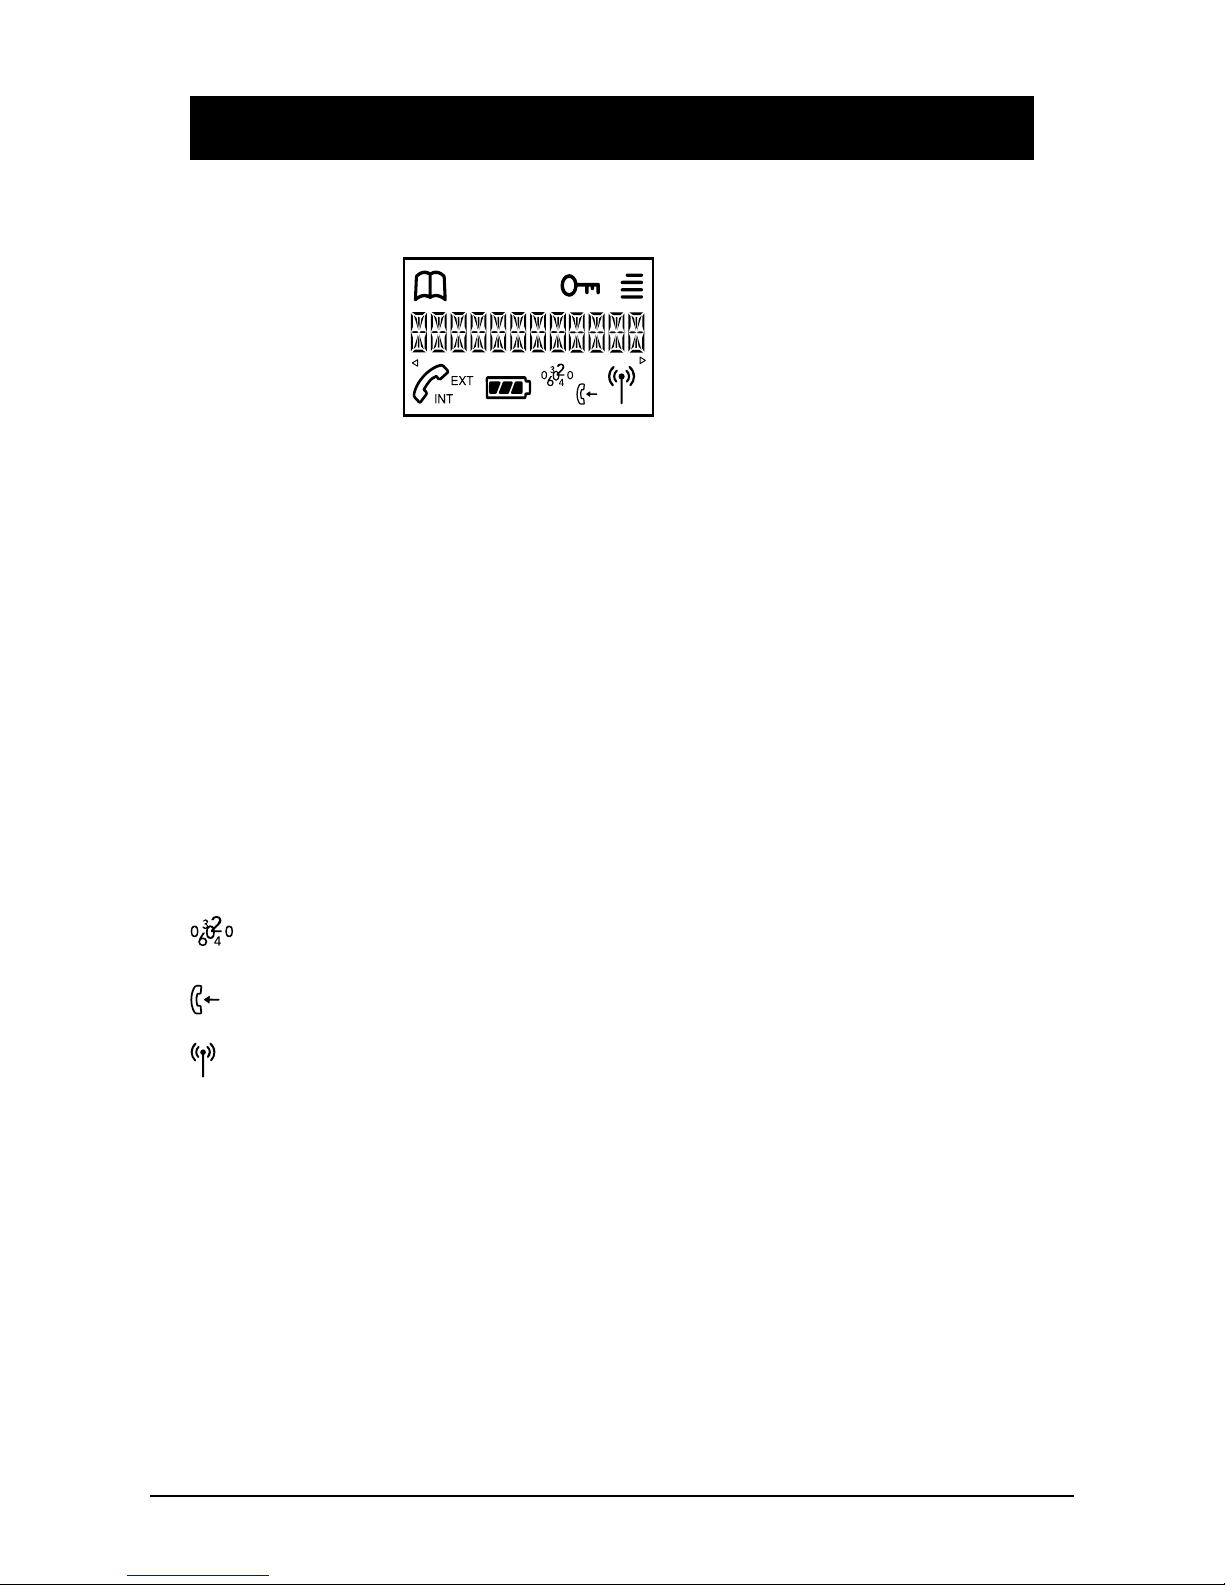
The Display......................... 8
Operation 9
Making a call....................... 9
Receiving a call .................. 9
Redial function.................... 9
Volume control.................... 9
Timer................................... 9
Mute button......................... 10
Paging................................. 10
Key lock .............................. 10
Optional network services.. 10
Caller Identication 11
Menu 13
Phone Book 14
Handset settings 16
Warning tones .................... 16
Handset ringer signal.......... 16
Auto - Answer ..................... 16
User Name ......................... 17
Language............................ 17
Key lock .............................. 17
System Settings 18
Base unit ringer signal........ 18
De-registering another
handset ............................... 18
PIN number......................... 18
Dialling method................... 19
R Button Time..................... 19
Reset Handset Defaults...... 19
Registration 20
Select Base Unit ................. 20
Register a New Handset..... 20
Expanded System 21
General Information............ 21
Multiple Handsets............... 21
Intercom.............................. 22
Transferring calls between
handsets ............................. 22
Other 23
Troubleshooting
functions ............................. 23
Guarantee........................... 24

English
4 www.doro.com
English
www.doro.com 5
Installation
Unpacking
The package contains:
- Handset - Mains adapter
- Base unit - Line cord
- 2 NiMH rechargeable batteries - Guarantee Card (AU & NZ only)
Models with extra handset (+1) also include an additional handset, batteries, charger
and adapter.
IMPORTANT!
Only use with the supplied power adapter/s. Connect correct adapter according to indication.
Connection
1. Connect the mains adapter to the y socket on the base unit and to an
electrical wall socket.
2. Carefully remove the battery cover from the back of the handset by inserting
a small item into the hole in the bottom of the handset. Insert the batteries
ensuring correct battery polarity is observed. Replace the battery cover.
3. Place the handset in the base unit, with the keypad facing outwards. Once the
handset is correctly positioned in the base unit, a beep will be heard.
4. Charge the handset batteries for 24 hours initially (thereafter fully discharged
batteries will take 10 hours to recharge).
5. ONCE CHARGED, connect the line cord to the socket marked T on the base
unit and then to a telephone network wall socket.
6. A click will be heard when the modular plug is correctly connected.
New Zealand Purchasers
Before use please change the Recall (R) button timing to setting 2 (600ms) as
described on page 19. This will ensure correct operation of additional network
services such as ”Call Waiting”.

English
4 www.doro.com
English
www.doro.com 5
Installation
Only for models with an extra handset (+1):
7. Connect the mains adapter to the y socket on the charger unit and to an
electrical wall socket.
8. Carefully remove the battery cover from the back of the handset by inserting
a small item into the hole in the bottom of the handset. Insert the batteries
ensuring correct battery polarity is observed. Replace the battery cover.
9. Place the additional handset in the charger pod with the keypad facing out and
charge the handset battery without interruption for 24 hours initially (thereafter
fully discharged batteries will take 10 hours to recharge).
Please note!
Under power failure conditions this telephone will not operate. Please ensure that a separate
telephone not dependant on local power is available for emergency use. Do not place the base unit
close to other electrical equipment such as TV sets, computer screens, telecom equipment, fans etc.
This will minimize the risk of interference. Do not place the base unit in areas where it will be
exposed to direct sunlight or other major heat sources. Only use with the supplied power adapter/s.
Connect correct adapter according to indication.

English
6 www.doro.com
English
www.doro.com 7
Installation
Belt clip
A belt clip is permanently tted to the back of the handset allowing the handset to
be attached to a belt, waistband or similar.
Wall Mounting
The base unit can be wall mounted by tting the enclosed wall bracket to the
underside of the base unit. A click will be heard as it locks into place.
The wall bracket can be removed by pressing the lock tab located on the underside
of the base.
Battery
The telephone is supplied with environmentally friendly nickel metal hydride
(NiMH) batteries – 2 x AAA 1.2V. As with all batteries, performance may degrade
over time; should you notice that the standby time has reduced considerably or there
are signs of leakage, the batteries should be replaced.
Fully charged batteries will last for approx. 100 hours in standby or approx. 10 hours
call time. These operation times apply at normal room temperature.
Completely discharged batteries will take about 10 hours to fully recharge (24 hours
from new).
Please note that the battery charge indicator | in the handset display ashes
while the handset is charging and will stop when the battery is fully charged.
The base unit has an automatic charging mechanism that prevents the batteries
from being overcharged or damaged by prolonged charging.
Please note!
To ensure and maintain good charging of the handset battery/s we recommend that the base and
handset charge contacts are cleaned regularly, ie monthly, with a pencil eraser and/or a soft dry cloth.
The recharging system used in this model may result in the handset and the batteries warming up.
This is normal and will not harm the equipment.
When the telephone is installed for the rst time, the batteries must be charged for 24 hours before
use. Use DORO original batteries only. The guarantee does not cover any damage caused by incorrect
use of batteries. Please dispose of any batteries in a responsible and environmentally friendly manner.
Turning the Handset On/Off
Press and hold the ! button for a few seconds to turn the handset off or on.
When the handset is turned off, no calls can be made or received. The handset
is designed to be always turned on, i.e. it is not necessary to turn it off overnight.
However, we recommend turning the handset off if it is not to be used for a
prolonged period of time, e.g. during a holiday. If the batteries run low, the handset
will turn off.

English
6 www.doro.com
English
www.doro.com 7
Installation
Battery charge indicator
The symbol | in the display indicates when it is time to recharge the
batteries. The indicator has three segments, which disappear as the battery
charge decreases. When the batteries are running low, a warning tone will
be heard. If the handset is not recharged at this time, the phone will cease to
function until it is recharged.
Range
The range of the telephone varies depending on different factors in the
surrounding environment. The radio waves transmitting the call may be
hindered by obstructions or signal reections that can reduce the range.
Specied ranges require unobstructed transmission between the handset and the
base unit. In such ideal conditions the telephones range can be up to 300 metres.
In a densely populated area, house, apartment, etc. the range of the telephone
will be reduced. Try to get the best range by relocating the base unit. The ideal
location for the base unit is a high and unobstructed place.
Out of range warning
If during a call the handset is carried too far from the base unit a warning tone
will be heard. Unless the handset is moved closer to the base unit within a few
seconds the call will be lost. For information on how range warning is switched
on, see page 16.
Headset
When using an optional headset, there is no change in the way a call is received
or made. When a headset is connected, the microphone and earpiece of the
handset are automatically disconnected. This telephone supports the use of a
mute button on the headset cable.
Please note
Immediately reduce the earpiece volume on the handset when connecting an optional headset.
The performance of a non-original DORO headset cannot be guaranteed.

English
8 www.doro.com
English
www.doro.com 9
Installation
The Display
Indicator Function
b Phone Book.
N Key Lock.
w Menu.
Q Indicates that a call is connected.
EXT External call.
INT Intercom Function.
| Battery charge indicator.
Numbers in Caller ID log (CID).
Answered call in number memory.
Shown within reception range. Flashes when out of range.

English
8 www.doro.com
English
www.doro.com 9
Operation
IMPORTANT
Please note when programming all references to press = to press and then immediately release
the button.
Making a call
1. Enter the required telephone number. Mistakes can be erased using C.
2. Press q the telephone number will now be dialled.
3. Press q again to terminate the call.
Receiving a call
1. Wait for the handset to ring.
2. Press q to answer the call.
3. Press q again to terminate the call.
Please note!
If the telephone cannot connect to a line, a warning tone will be heard. The problem may be
due to the batteries running low, the handset being too far from the base unit or all of the
transmission channels being engaged.
Redial button
The ve most recently dialled numbers can easily be redialled using r.
1. Press r and scroll {/} to the required telephone number.
2. Press q the displayed telephone number will now be dialled.
Volume control
The earpiece volume may be adjusted during a call by pressing {/}.
Timer
Within approximately 15 seconds after the connection of a call, a timer will be
shown on the display. The timer helps you keep track of how long the call lasts.

English
10 www.doro.com
English
www.doro.com 11
Operation
Mute button
The microphone can be muted during a call by pressing z. Press z again to re-
activate the microphone.
MUTE will be displayed for as long as the function is active.
Paging
Pressing j on the base unit will activate the paging signal on the handset. This
function is used to help locate the handset or to page the person carrying the
handset. Press j again on the base unit to cancel the signal
Key lock
This function locks the push buttons on the handset to prevent unintentional
usage.
1. Press and hold * until the display shows N.
2. Deactivate the key lock by pressing any button followed by the * button.
Calls can still be received even if the key lock is active. When the call is nished
the handset returns to locked mode.
Recall
Access to additional network services can be gained by using the recall button
R. For example Call Waiting: when the call waiting tones are heard press R,
listen for dial tone then press 2. Please note some networks require only the R
button to be pressed, please contact your network provider for further service
information.
If this product is connected to a business PBX system, to transfer a call press
the recall button R followed by the extension number.

English
10 www.doro.com
English
www.doro.com 11
Caller Identication
Explanation of Caller ID
Caller ID allows you to see who is calling before you answer a call, and see who
has called in your absence. If a name is attached to the telephone number and
stored in the phone book, the name will be displayed.
The call log will store up to 30 telephone numbers. When the log is full the
oldest number will be deleted automatically, as the new call is logged.
In standby new calls are highlighted with a ashing in the display, when
scrolling answered calls are indicated by . While scrolling through the Caller
ID log the start/end of the list will be indicated be a long beep.
Please note!
In order for numbers to be shown, you must subscribe to the Caller ID service provided by
your network operator and a current subscription in place. Contact your operator for more
information.
CID on Call Waiting
While on a call and another call comes in the display will show only the second callers name
(if stored in the phone book or sent by the network operator). If the callers name is not stored
in the phone book or sent by the net work the display will show . In some countries the
network operator sends the name MOBILE when the call is from a mobile network, in this
case it will be necessary to press the 0 to see the number of the second caller.
Retrieving and Dialling Incoming Numbers.
1. Press
2. Scroll {/} to the required telephone number. Press 0 the time and date
the call was logged will now be displayed.
3. Press q to dial the displayed number, or press and hold x to return to
standby mode.
Messages
Besides showing telephone numbers, the display may also show a number of
messages.
UNAVAILABLE It is an International call or a call from a PBX (no
information received)
WITHHELD Information on the number is blocked. The call could
also be from a PBX.
MOBILE. Transmitted by the network operator instead of the
caller name.

English
12 www.doro.com
English
www.doro.com 13
Caller Identication
Erase number
1. Press .
2. Scroll {/} to the required telephone number.
3. Press C to erase the individual selected entry, alternatively press and hold C
until DELETE ALL? is displayed.
4. Press 0 to conrm
Transferring Numbers to the Phone Book
1. Press .
2. Scroll {/} to the required telephone number.
3. Press w until the display shows ADD?
4. Press 0. The display will now show NAME?
5. Enter a name by pressing the corresponding number button until the
required letter is displayed, see the table on page 13. Press C to delete or
make changes.
6. When the entire name has been entered press 0.
7. The display will show the number to be stored. Press 0 if correct.
8. The display will show MELODY 1. Scroll {/} to the desired ringer signal
1-3.
9. Press 0 to save.
Refer to pages 14 and 15 for more information on the Phone Book.

English
12 www.doro.com
English
www.doro.com 13
Menu
Description of the menu system
The telephone has a menu system, controlled by the following buttons:
w/0 Access to the menu system. Move one step forward and/or
conrm selected option.
{/} Scroll through the menu alternatives.
x Used to go back one step or to exit the menu system
C Used to erase.
The menu contains the following main headings:
PHONE BOOK Under this setting you can store or change entries in the phone
book.
HANDSET Setting the handset ringer, melody, language etc.
SETUP Setting the base unit ringer, melody, PIN code etc.
REGISTER Used to register extra handsets.

English
14 www.doro.com
English
www.doro.com 15
Phone Book
Using the Phone Book
Use the phone book to store telephone numbers and names. A stored telephone
number can be dialled using fewer keystrokes than if dialled manually. If you
subscribe to a Caller ID service, the name/number of the caller will be shown
while receiving an incoming call (for those numbers stored in the Phone book).
The phone book will store 30 names/phone numbers. Entries in the phone book
are arranged alphabetically. Every name can be up to 12 characters in length, and
telephone numbers can be up to 20 digits in length.
There are three different ringer tunes, depending on who has rung (only functions
if you subscribe to the caller identication service).
Letters
Each number key has been allocated certain letters.
Button Letters/symbols
1.......................................... [Space character] --1
2.......................................... A B C 2
3.......................................... D E F 3
4.......................................... G H I 4
5.......................................... J K L 5
6.......................................... M N O 6
7.......................................... P Q R S 7
8.......................................... T U V 8
9.......................................... W X Y Z 9
0.......................................... 0
Storing Names/Numbers
1. Press w.
2. Scroll {/} to PHONE BOOK. Press 0.
3. Scroll {/} to ADD ENTRY. Press 0.
4. Enter name. Press the corresponding number button one or more times for
the rst letter, see the table above. Use C to make changes.
5. Press 0
6. Enter the telephone number, including the area code. Press 0.
7. Scroll {/} to the desired ringer signal for the number. Press 0.
8. If you want to store more numbers, press 0 or hold x down to conclude.
Press r if you need to insert a pause in the telephone number.

English
14 www.doro.com
English
www.doro.com 15
Phone Book
Dialling from the Phone book
1. Press b.
2. Scroll {/} through the phone book. It is also possible to perform a quick-
search, press the number button corresponding to the rst letter of the name
required one or more times, see the table on page 14.
3. Press q the displayed number will now be dialled.
Changing Phone Numbers/Names
1. Press w.
2. Scroll {/} to PHONE BOOK. Press 0.
3. Scroll {/} to MODIFY ENTRY. Press 0.
4. Scroll {/} to the name/number you wish to modify. Press 0.
5. Use C to make changes, press the number button corresponding to the rst
letter of the name required one or more times, see the table on page 14. Press
0.
6. Delete the number using C, enter the new telephone number. Press 0.
7. Scroll {/} to the desired melody. Press 0.
8. Press and hold x to return to standby.
Erasing a Phone Book Entry
1. Press w.
2. Scroll {/} to PHONE BOOK. Press 0.
3. Scroll {/} to DELETE ENTRY. Press 0.
4. Scroll {/} to the name/number you wish to delete. Press 0.
5. Press 0 again to conrm.
6. Press and hold x to return to standby.

English
16 www.doro.com
English
www.doro.com 17
Handset settings
Warning tones
You can switch on or off the unit’s various warning signals.
KEYTONE Heard when the buttons are pressed.
LOW BATTERY Heard when the battery is running low.
OUT RANGE Heard if the headset is taken out of range.
1. Press w.
2. Scroll {/} to HANDSET. Press 0.
3. Scroll {/} to BEEP. Press 0.
4. Scroll {/} to the desired function (see above). Press 0.
5. Scroll {/} to either On or Off. Press 0 to save.
Handset ringer signal
The handsets ringer volume and melody type can be selected for both external
(EXT) and internal (INT) calls.
1. Press w.
2. Scroll {/} to HANDSET. Press 0.
3. Scroll {/} to either EXT MELODY, INT MELODY, EXT RING VOL,
INT RING VOL. Press 0.
4. Scroll {/} to the required setting. Press 0 to save.
Auto - Answer
When activated this feature allows incoming calls to be connected immediately
the handset is lifted from the base unit.
1. Press w.
2. Scroll {/} to HANDSET. Press 0.
3. Scroll {/} to AUTO-ANSWER. Press 0.
4. Scroll {/} to either On or Off. Press 0 to save.

English
16 www.doro.com
English
www.doro.com 17
Handset settings
User Name
The text displayed in standby mode can be customised. Maximum 10 characters.
1. Press w.
2. Scroll {/} to HANDSET. Press 0.
3. Scroll {/} to NAME. Press 0.
4. Delete the name using C, press the number button corresponding to the rst
letter of the name required one or more times, see the table on page 14.
5. Press 0 to save.
Language
Display texts can be shown in 5 different languages, English, Scandinavian
(DK/NOR/SVE), Italian, German and French.
1. Press w.
2. Scroll {/} to HANDSET. Press 0.
3. Scroll {/} to LANGUAGE. Press 0.
4. Scroll {/} to required language. Press 0 to save.
Key lock
The keypad buttons can be locked to prevent unintentional usage. Calls will still
be received with key lock active, when the call is nished the handset will return
to the locked mode.
1. Press w.
2. Scroll {/} to HANDSET. Press 0.
3. Scroll {/} to KEY LOCK. Press 0.
To remove the key lock.
4. Press any button on the handset.
5. Press * .

English
18 www.doro.com
English
www.doro.com 19
System Settings
Base unit ringer signal
You can select an alternate ringer volume and melody type for the base unit.
1. Press w.
2. Scroll {/} to SETUP. Press 0.
3. Scroll {/} to BASE VOLUME or BASE MELODY. Press 0.
4. Scroll {/} to the required setting. Press 0 to save.
De-registering additional handsets
Any additional handsets can easily be de-registered from a base unit.
1. Press w.
2. Scroll {/} to SETUP. Press 0.
3. Scroll {/} to DEL HANDSET. Press 0.
4. Enter PIN number (0000 when supplied). Press 0.
5. Select the handset number for the handset to be erased. Press 0.
PIN number
The PIN number is a four-digit code that you can select to protect against
unauthorised use of certain functions.
1. Press w.
2. Scroll {/} to SETUP. Press 0.
3. Scroll {/} to PIN. Press 0.
4. Enter the current PIN number (0000 when supplied). Press 0.
5. Enter your new PIN number. Press 0.
6. Enter your new PIN number again. Press 0.

English
18 www.doro.com
English
www.doro.com 19
System Settings
Dialling method (UK only)
You can select either tone or pulse dialling, the standard setting is tone.
In normal domestic use, this setting should not require changing.
1. Press w.
2. Scroll {/} to SETUP. Press 0.
3. Scroll {/} to DIAL MODE. Press 0.
4. Scroll {/} to either TONE or PULSE. Press 0 to save.
Recall Button Time
In some advanced PBX systems the recall timing may require adjustment. In
normal domestic use, this setting should not require changing.
R-TIME 1=100 ms (normal), R-TIME 2=270(600 ms Australia/New Zealand).
1. Press w.
2. Scroll {/} to SETUP. Press 0.
3. Scroll {/} to RECALL. Press 0.
4. Scroll {/} to the required setting. Press 0 to save.
Reset Handset Defaults
Resetting handset defaults will return most functions back to the factory
defaults. Registrations are not affected.
1. Press w.
2. Scroll {/} to SETUP. Press 0.
3. Scroll {/} to DEFAULT. Press 0.
4. Enter PIN number (0000 when supplied). Press 0.
5. Press 0 to conrm.

English
20 www.doro.com
English
www.doro.com 21
Registration
Select Base Unit
You can manually select which base unit you wish the handset to communicate
with, alternatively the unit can automatically select which base unit to
communicate with (AUTO).
1. Press w.
2. Scroll {/} to REGISTER. Press 0.
3. Scroll {/} to SELECT BASE. Press 0.
4. Press the corresponding number button (1-4) for the required base unit,
alternatively scroll {/} to AUTO.
5. Press 0 to save.
Registering a New Handset
To enable the use of more than one handset a registration has to be performed.
Every new handset must be registered in order to use the current base unit.
Each base unit can handle up to 2 hand units.
On registration the handset is allocated a handset number for use on the new
base unit. The handset numbers are 1-2.
Additional handsets can be purchased from your local retailer. See also the
General Information chapter for more information.
1. Press and hold j on the base unit until it beeps twice. Registration mode
will remain active for approximately 90 seconds.
2. Press w.
3. Scroll {/} to REGISTER. Press 0.
4. Scroll {/} to REG BASE. Press 0.
5. Select the base unit you wish to register to by pressing the corresponding
number button 1-4. Previously registered base unit numbers will ash.
6. Enter PIN number (0000 when supplied). Press 0.
7. If the registration is successful the handset will return to standby mode after
a few seconds (max 90 secs).
Table of contents
Other Doro Cordless Telephone manuals