Dragino N95S31B User manual

www.dragino.com
N95S31 NB-IoT Node User Manual 1/ 27
N95S31B NB-IoT Temperature & Humidity Sensor Manual
Document Version: 1.0.0
Image Version: N95S31-v110
Version
Description
Date
1.0
Release
2021-Jun-26

www.dragino.com
N95S31 NB-IoT Node User Manual 2/ 27
1. Introduction 4
1.1 What is N95S31 NB-IoT Sensor Node 4
1.2 Specifications 5
1.3 Features 5
1.4 Applications 5
1.5 Pin Definitions & Switch 6
1.5.1 Jumper JP2 6
1.5.2 BOOT MODE / SW1 6
1.5.3 Reset Button 6
1.5.4 LED 6
2. Use N95S31 to communicate with IoT Server 7
2.1 How it works 7
2.2 Configure the N95S31 8
2.2.1 Power On N95S31 8
2.2.2 Test Requirement 8
2.2.3 Insert SIM card 9
2.2.4 Connect USB –TTL to N95S31 to configure it 9
2.2.5 Use CoAP protocol to uplink data 10
2.2.6 Use UDP protocol to uplink data(Default protocol) 12
2.2.7 Use MQTT protocol to uplink data 15
2.2.8 Use TCP protocol to uplink data 16
2.2.9 Change Update Interval 17
2.3 Uplink Payload 18
2.3.1 Payload Analyze 19
2.3.2 Device ID 20
2.3.3 Version Info 20
2.3.4 Battery Info 20
2.3.5 Signal Strength 20
2.3.6 Temperature & Humidity 20
2.4 Downlink Payload 21
2.5 Battery Analysis 22
2.5.1 Battery Type 22
2.5.2 Power consumption Analyze 22
2.5.3 Battery Note 22
2.5.4 Replace the battery 22
3. Access NB-IoT Module 23
4. Using the AT Commands 24
4.1 Access AT Commands 24
5. FAQ 25
5.1 How to Upgrade Firmware 25
6. Trouble Shooting 26
6.1 Connection problem when uploading firmware. 26
6.2 AT Command input doesn’t work 26
7. Order Info 27
8. Packing Info 27
9. Support 27

www.dragino.com
N95S31 NB-IoT Node User Manual 3/ 27

www.dragino.com
N95S31 NB-IoT Node User Manual 4/ 27
1. Introduction
1.1 What is N95S31 NB-IoT Sensor Node
The Dragino N95S31 is a NB-IoT Temperature and Humidity Sensor for Internet of Things
solution. It is used to measure the surrounding environment temperature and relative air
humidity precisely, and then upload to IoT server via NB-IoT network*.
The temperature & humidity sensor used in N95S31 is SHT31, which is fully calibrated, linearized,
and temperature compensated digital output from Sensirion, it provides a strong reliability and
long-term stability. The SHT31 is fixed in a waterproof anti-condensation casing for long term
use.
N95S31B supports different uplink methods include TCP, MQTT, UDP and CoAP for different
application requirement.
N95S31 is powered by 8500mAh Li-SOCI2 battery, It is designed for long term use up to several
years. (Real-world battery life depends on the use environment, update period. Please check
related Power Analyze report).
*make sure you have NB-IoT coverage locally

www.dragino.com
N95S31 NB-IoT Node User Manual 5/ 27
1.2 Specifications
Common DC Characteristics:
●Supply Voltage: 2.1v ~ 3.6v
●Operating Temperature: -40 ~ 85°C
NB-IoT Spec:
●- B1 @H-FDD: 2100MHz
●- B3 @H-FDD: 1800MHz
●- B8 @H-FDD: 900MHz
●- B5 @H-FDD: 850MHz
●- B20 @H-FDD: 800MHz
●- B28 @H-FDD: 700MHz
Battery:
●Li/SOCI2 un-chargeable battery
●Capacity: 8500mAh
●Self Discharge: <1% / Year @ 25°C
●Max continuously current: 130mA
●Max boost current: 2A, 1 second
1.3 Features
●NB-IoT Bands: B1/B3/B8/B5/B20/B28 @H-FDD
●Monitor Temperature & Humidity via SHT31
●AT Commands to change parameters
●Uplink on periodically
●Downlink to change configure
●IP66 Waterproof Enclosure
●Ultra-Low Power consumption
●AT Commands to change parameters
●Micro SIM card slot for NB-IoT SIM
●8500mAh Battery for long term use
1.4 Applications
●Smart Buildings & Home Automation
●Logistics and Supply Chain Management
●Smart Metering
●Smart Agriculture
●Smart Cities
●Smart Factory

www.dragino.com
N95S31 NB-IoT Node User Manual 6/ 27
1.5 Pin Definitions & Switch
N95S31B use the mother board from NBSN95 which as below.
1.5.1 Jumper JP2
Power on Device when put this jumper.
1.5.2 BOOT MODE / SW1
1) ISP: upgrade mode, device won't have any signal in this mode. but ready for upgrade firmware.
LED won't work. Firmware won’t run.
2) Flash: work mode, device starts to work and send out console output for further debug
1.5.3 Reset Button
Press to reboot the device.
1.5.4 LED
It will flash:
1) When boot the device in flash mode
2) Send an uplink packet

www.dragino.com
N95S31 NB-IoT Node User Manual 7/ 27
2. Use N95S31 to communicate with IoT Server
2.1 How it works
The N95S31 is equipped with a NB-IoT module, the pre-loaded firmware in N95S31 will get
environment data from sensors and send the value to local NB-IoT network via the NB-IoT
module. The NB-IoT network will forward this value to IoT server via the protocol defined by
N95S31.
The diagram below shows the working flow in default firmware of N95S31:

www.dragino.com
N95S31 NB-IoT Node User Manual 8/ 27
2.2 Configure the N95S31
2.2.1 Power On N95S31
2.2.2 Test Requirement
To use N95S31 in your city, make sure meet below requirements:
✓Your local operator has already distributed a NB-IoT Network there.
✓The local NB-IoT network used the band that N95S31 supports.
✓Your operator is able to distribute the data received in their NB-IoT network to your IoT
server.
Below figure shows our testing structure. Here we have NB-IoT network coverage by China
Mobile, the band they use is B8.
N95S31 supports different communication protocol such as :
➢CoAP(120.24.4.116:5683)
➢raw UDP(120.24.4.116:5601)
➢MQTT(120.24.4.116:1883)
➢TCP(120.24.4.116:5600)
We will show how to use with each protocol. The IP addresses above are our test server.
User need to change to point their corresponding server.

www.dragino.com
N95S31 NB-IoT Node User Manual 9/ 27
2.2.3 Insert SIM card
Insert the NB-IoT Card get from your provider.
User need to take out the NB-IoT module and insert the SIM card like below:
2.2.4 Connect USB –TTL to N95S31 to configure it
User need to configure N95S31 via serial port to set the Server Address / Uplink Topic to
define where and how-to uplink packets. N95S31 support AT Commands, user can use a USB
to TTL adapter to connect to N95S31 and use AT Commands to configure it, as below.
In the PC, use below serial tool settings:
✓Baud: 9600
✓Data bits: 8
✓Stop bits: 1
✓Parity: None
✓Flow Control: None

www.dragino.com
N95S31 NB-IoT Node User Manual 10 / 27
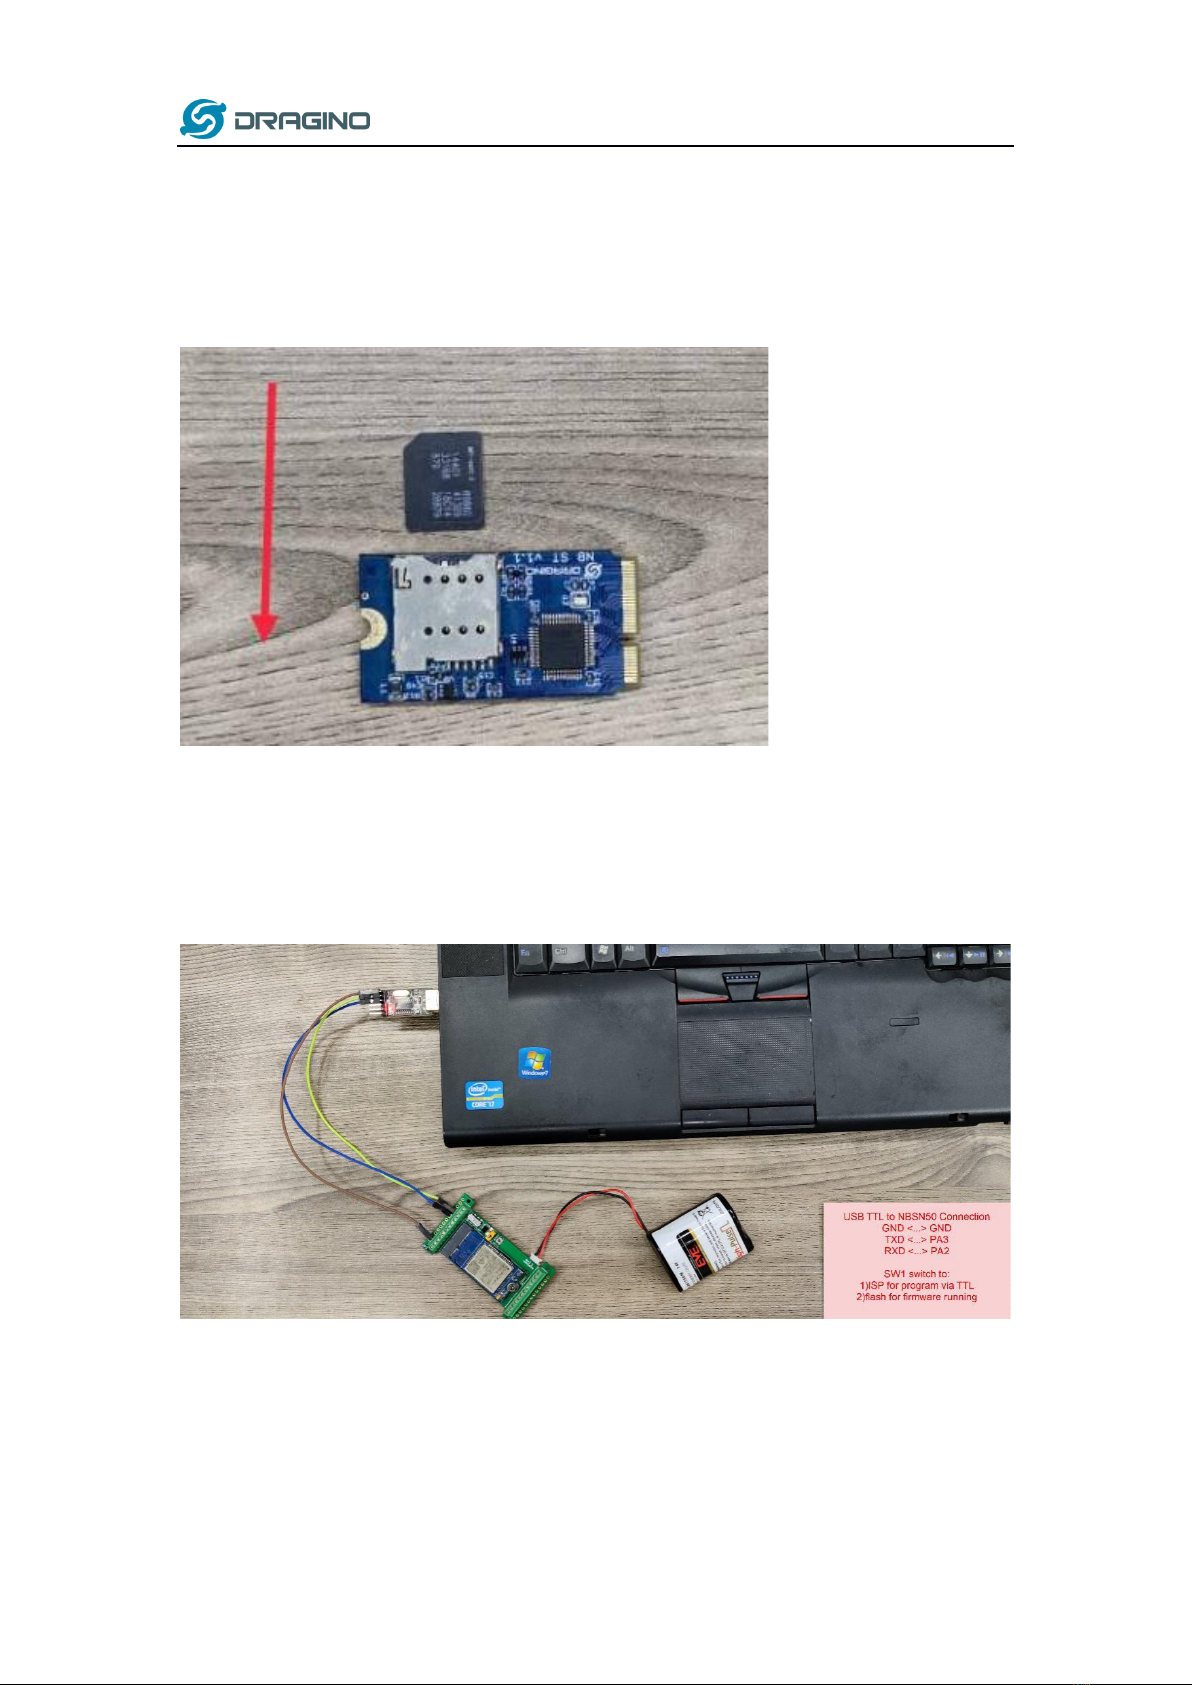
Make sure the switch is in FLASH position, then power on device by connecting the jumper
on N95S31. N95S31 will output system info once power on as below, we can enter the
password: 12345678 to access AT Command input. Note( If 12345678 doesn’t work, please
try to enter 0 for the password)
Note: the valid AT Commands can be found at:
http://www.dragino.com/downloads/index.php?dir=NB-IoT/N95S31/
2.2.5 Use CoAP protocol to uplink data
Note: if you don’t have CoAP server, you can refer this link to set up one:
http://wiki.dragino.com/index.php?title=Set_up_CoAP_Server
Use below commands:
➢AT+PRO=1 // Set to use CoAP protocol to uplink
➢AT+SERVADDR=120.24.4.116,5683 // to set CoAP server address and port
➢AT+URI=5,11,"mqtt",11,"coap",12,"0",15,"c=text1",23,"0" //Set COAP resource path
For parameter description, please refer to AT command set

www.dragino.com
N95S31 NB-IoT Node User Manual 11 / 27
After configure the server address and reset the device (via AT+ATZ ), N95S31 will start to uplink
sensor values to CoAP server.

www.dragino.com
N95S31 NB-IoT Node User Manual 12 / 27
2.2.6 Use UDP protocol to uplink data(Default protocol)
➢AT+PRO=2 // Set to use UDP protocol to uplink
➢AT+SERVADDR=120.24.4.116,5601 // to set UDP server address and port
➢AT+CFM=1 //If the server does not respond, this command is unnecessary

www.dragino.com
N95S31 NB-IoT Node User Manual 13 / 27

www.dragino.com
N95S31 NB-IoT Node User Manual 14 / 27

www.dragino.com
N95S31 NB-IoT Node User Manual 15 / 27
2.2.7 Use MQTT protocol to uplink data
N95S31B supports only plain MQTT now it doesn’t support TLS and other related encryption.
➢AT+PRO=3 // Set to use MQTT protocol to uplink
➢AT+SERVADDR=120.24.4.116,1883 // to set MQTT server address and port
➢AT+CLIENT=CLIENT //Set up the CLIENT of MQTT
➢AT+UNAME=UNAME //Set the username of MQTT
➢AT+PWD=PWD //Set the password of MQTT
➢AT+PUBTOPIC=f9527 //Set the sending topic of MQTT
➢AT+SUBTOPIC=s9527 //Set the subscription topic of MQTT

www.dragino.com
N95S31 NB-IoT Node User Manual 16 / 27
To save battery life, N95S31 will establish a subscription before each uplink and close the
subscription 3 seconds after uplink successful. Any downlink commands from server will only
arrive during the subscription period.
MQTT protocol has a much high-power consumption compare vs UDP / CoAP protocol. Please
check the power analyze document and adjust the uplink period to a suitable interval.
2.2.8 Use TCP protocol to uplink data
This feature is supported since firmware version v110
➢AT+PRO=4 // Set to use TCP protocol to uplink
➢AT+SERVADDR=120.24.4.116,5600 // to set TCP server address and port

www.dragino.com
N95S31 NB-IoT Node User Manual 17 / 27
2.2.9 Change Update Interval
User can use below command to change the uplink interval.
AT+TDC=600 // Set Update Interval to 600s

www.dragino.com
N95S31 NB-IoT Node User Manual 18 / 27
2.3 Uplink Payload
NBSN95 has different working mode for the connections of different type of sensors. This
section describes these modes. User can use the AT Command AT+MOD to set NBSN95 to
different working modes.
For example:
AT+CFGMOD=2 // will set the NBSN95 to work in MOD=2 distance mode which target to
measure distance via Ultrasonic Sensor.
The uplink payloads are composed in ASCII String. For example:
0a cd 00 ed 0a cc 00 00 ef 02 d2 1d (total 24 ASCII Chars) . Representative the actually
payload:
0x 0a cd 00 ed 0a cc 00 00 ef 02 d2 1d Total 12 bytes
NOTE:
1. All modes share the same Payload Explanation from HERE.
2. By default, the device will send an uplink message every 1 hour.

www.dragino.com
N95S31 NB-IoT Node User Manual 19 / 27
2.3.1 Payload Analyze
N95S31 uplink payload includes in total 21 bytes
If we use the MQTT client to subscribe to this MQTT topic, we can see the following
information when the NB sensor uplink data.
The payload is ASCII string, representative same HEX:
0x724031607457006e0ccd1b0100dc000ccc00e10186 where:
➢Device ID: 0x724031607457 = 724031607457
➢Version: 0x006e=110=1.1.0
➢BAT: 0x0ccd = 3277 mV = 3.277V
➢Signal: 0x1b = 27
➢Model: 0x01 = 1
➢0x00dc000ccc= reserve, ignore in N95S31
➢Temperature by SHT31: 0x00e1 = 225 = 22.5 °C
➢Humidity by SHT31: 0x0186 = 390 = 39.0 %rh
Size
(bytes)
6
2
2
1
1
5
2
2
Value
Device
ID
Ver
BAT
Signal
Strength
MOD
0x01
Reserve/ Same as NBSN95
CFGMOD=1
No function here.
Temperature
By SHT31
Humidity
By SHT31

www.dragino.com
N95S31 NB-IoT Node User Manual 20 / 27
2.3.2 Device ID
By default, the Device ID equal to the last 6 bytes of IMEI.
User can use AT+DEUI to set Device ID
Example:
AT+DEUI=A84041F15612
The Device ID is stored in a none-erase area, Upgrade the firmware or run AT+FDR won’t
erase Device ID.
2.3.3 Version Info
These bytes include the hardware and software version.
Higher byte: Specify hardware version: always 0x00 for N95S31
Lower byte: Specify the software version: 0x6E=110, means firmware version 110
For example: 0x00 6E: this device is N95S31 with firmware version 110.
2.3.4 Battery Info
Ex1: 0x0B45 = 2885mV
Ex2: 0x0B49 = 2889mV
2.3.5 Signal Strength
NB-IoT Network signal Strength.
Ex1: 0x1d = 29
0-113dBm or less
1-111dBm
2...30 -109dBm... -53dBm
31 -51dBm or greater
99 Not known or not detectable
2.3.6 Temperature & Humidity
The device will be able to get the SHT31 temperature and humidity data now and upload to
IoT Server.
Table of contents
Other Dragino Accessories manuals

Dragino
Dragino LDS01 User manual

Dragino
Dragino D20-LB User manual

Dragino
Dragino LHT65 User manual

Dragino
Dragino LHT65 User manual

Dragino
Dragino LoRaWAN LDS02 User manual

Dragino
Dragino LDDS04 User manual

Dragino
Dragino LSN50v2-D20 User manual

Dragino
Dragino LHT52 User manual

Dragino
Dragino LWL01 User manual

Dragino
Dragino SW3L User manual
Popular Accessories manuals by other brands

SMC Networks
SMC Networks PFM5 Series Operation manual

Suunto
Suunto SS022477000 quick guide

Azoteq
Azoteq IQ Switch - ProxSense Series Programming and GUI Guide

Radica Games
Radica Games 74001 instruction manual

PRECITEC
PRECITEC CHRocodile CLS0.2 Operation manual

Hyundai
Hyundai WS SENZOR 823 instruction manual