manuals.online logo
Brands
  1. Home
  2. •
  3. Brands
  4. •
  5. Draper
  6. •
  7. Projection Screen
  8. •
  9. Draper Access MultiView Manual

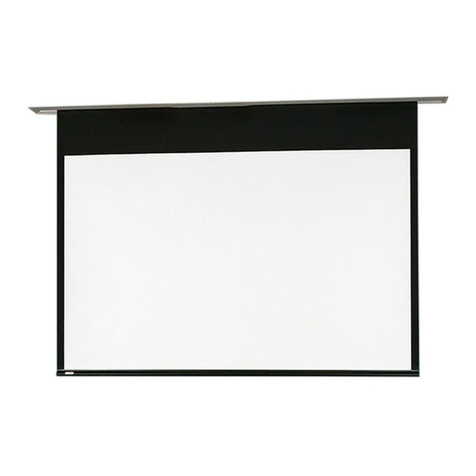
Draper Access MultiView Manual

Bottom flange of Access housing
Bottom access panel pushup
points for panel removal
Installation/Operating Instructions
Access/MultiView Electric Projection Screen & Masking System by Draper
Hanging Screen
When locating viewing surface and checking clearance for screen operation,
remember surface is centered in the length of the case. Regardless of mount-
ing method used, the following points apply:
➀Mounting brackets are packed separately in carton. Engage each bracket
with top of housing as shown below and tighten set screws. A bracket
should be within 18" of each end of screen case. Brackets can be
removed and case mounted with lag screws through top of case (holes
drilled on site).
➁ Screen should be positively and securely supported so that vibration or
even abusive pulling on viewing surface or masking will not weaken
installation.
➂Installer must insure that fasteners used are of adequate strength and
suitable for the mounting surface chosen. Supporting hardware (chains,
cables, rods, etc.) must be essentially vertical.
➃Entire bottom of case must be readily accessible after installation is
complete.
➄Front, back and top of case must be straight—not forced to warp or bow.
➅If case is painted on location, removal of roller/fabric assembly is recom-
mended prior to painting. If not removed, slot on bottom of case should be
shielded to protect viewing surface from paint splatters or overspray.
➆Do not seal unit in ceiling until electrical connections have been made
and screen has been operated successfully.
Electrical Connections
Screen and masking each operate on 110-120v, 60 Hz. current.
All connections are made in the junction box located just above the bottom
access panel at left end of screen. Remove the bottom access panel for ac-
cess to the junction box cover (see Bottom Access Panel Removal instruc-
tions below).
Remove four (4) hex head screws that secure the cover to the junction box to
expose two sets of red, black, and white pigtail leads and the green ground
wire per wiring diagram on page 4.
If optional low voltage control or video interface control is specified and factory
installed for either motor, please refer to wiring diagram on page 3.
Screen is shipped with internal wiring complete and control switch(es) fully
boxed. Wire to connect screen to switch(es) and switch(es) to power supply
should be furnished by installer. Connections should be made in accordance
with attached wiring diagram, and wiring should comply with national and
local electrical codes.
All operating switches should be “off” before power is connected.
Copyright ©2005 Draper Inc. Form AccessMultiView_Inst05 Printed in U.S.A.
Bottom Access Panel Installation/Removal
Bottom access panel hooks over the lower inside edge of the screen housing
and then is pivoted downward until the engagement brackets on each end of
the bottom panel click into place with the ball detents on each endcap. Make
sure bottom access panel clicks in place at each end of its length.
Caution
➀ Read instructions through completely before proceeding.
➁ Follow instructions carefully. Installation contrary to instructions invali-
dates warranty.
➂ Entire bottom of screen case should be unobstructed to permit access
to bottom panel for making electrical connections or servicing.
➃ Screen should be installed level (using a carpenter’s level).
➄ Nothing should be fastened to screen dowel, viewing surface or masking.
➅ Operating switches packed separately in screen carton. Do not discard
with packing material.
➆ Screen operates on 110-120v, 60 Hz. current.
NOTE: Screen has been thoroughly inspected and tested at factory and
found to be operating properly prior to shipment.
With bottom access panel
angled up approx. 20 degrees,
engage hook on the panel
with lip of the housing
Using the hook and lip as a pivot,
pull the panel downward until the
engagement brackets click into
place with the ball detent
on each endcap
Engagement bracket
(one on each end of the
bottom access panel)
Remove bottom access panel by pushing up at each corner of panel
adjacent to slot in bottom of the housing. With bottom access panel angled
up approximately at 20° it can be lifted off of the lip of the housing and then
lowered out of the housing completely.
Access case as seen from below
6
5
/
8
"
7
7
/
16
"
8"
7
/
8
" electrical
connection hole
standard on
top of case.
1"
¾"
3
7
/
16
"
1
3
/
16
"
Threaded rod
by others
Suitable for use in environmental air space in accordance with Section
300-22(c) of the National Electrical Code, and Sections 2-128, 12-010(3)
and 12-100 of the Canadian Electrical Code, Part 1, CSA C22.1.
If you encounter any difficulties installing or servicing your
Access MultiView screen, call your dealer or Draper, Inc.,
Spiceland, Ind., (765) 987-7999; fax (765) 987-7142; or e-mail
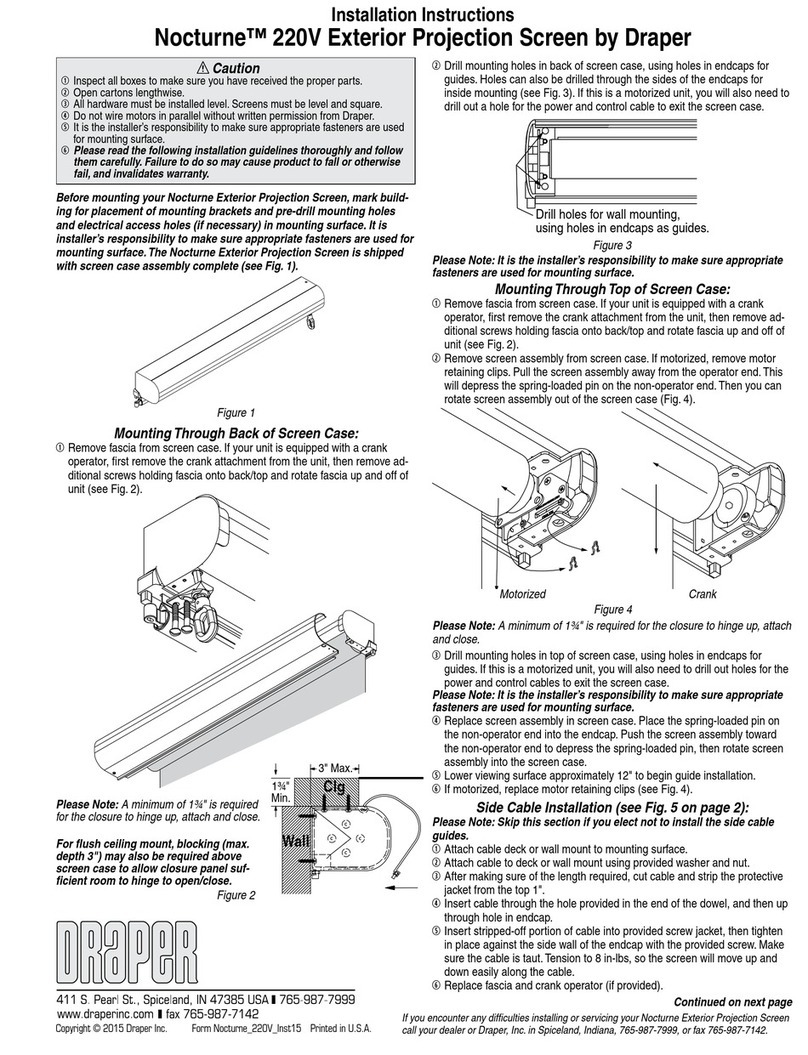
[email protected].
Motorized Roller/Fabric Installation
The bottom access panel must be removed first. The Access/MultiView has
two roller/fabric assemblies. The one equipped with a complete projection
screen fabric is installed first, higher in the brackets, and connects to the
left-hand junction box. The second roller has black masking strips at the sides
and no fabric in the middle: it installs lower in the brackets and connects to the
right-hand junction box.
The motor end mounting brackets have steel mounting rings with prongs that
engage with motor head.
To engage the motor end bracket flange above the two channels in the top of
the screen housing, rotate the bracket approximately 45° counterclockwise
to allow the top surface of the motor bracket to rest flat against the top inside
of the housing. Rotating the bracket clockwise until it is engaged with the
channels, slide it along the length of the housing toward the electrical junction
box at left end of case.
Engage the idler end bracket (rectangular mounting pad) in the same manner
as the motor end bracket and slide it toward the opposite end of the screen
housing. Do not tighten the set screws on this bracket until the roller/fabric
assembly is installed.
Locate the viewing surface roller/fabric assembly and remove the retaining
clip and flat steel washer from the idler end pin.
Raise the viewing surface roller/fabric assembly up into the screen housing
and engage the head of the motor completely into the motor mounting
bracket. The steel clip on the motor mounting ring must snap into the
groove on the motor. Once this is done the clip must be manually pulled down
away from the mounting ring to disengage motor. Make sure the limit switch
adjustment knobs are visible from bottom of housing. (This will require two
people to perform safely.)
While supporting the idler end of the roller, slide the idler end mounting
bracket toward the roller. Insert the roller pin into the nylon bushing on the
idler end mounting bracket.
The roller idler pin needs to go through the idler bracket far enough to allow
the steel washer and retaining clip to be reinstalled on the pin. Failure to
replace the washer and retaining clip as shown could result in the separation
of the roller from the brackets.
The fabric/roller assembly and brackets will need to be moved left or right
until centered in case. Tighten two set screws on each roller mounting bracket
using
1
/
8
" hex key.
Locate the masking roller assembly and remove the retaining clip from motor
stud and remove retaining clip and washer from idler pin.
Raise masking roller up into screen housing making sure motor is on the
right (as viewed by audience). Engage the motor stud inside square bushing.
Engage the idler pin all the way through the round bushing on left roller
Access MultiView Installation/Operating Instructions page 2 of 4
Motorized Roller/Fabric Removal
Reverse the instructions above under “Motorized Roller/Fabric Installation”
for removal of the unit.
Operation
When screen and masking are first operated, be cautious! Cycle unit down
and up several times to confirm satisfactory operation. Factory adjusted limit
switches should automatically stop screen or masking when fully down or
fully up. Separate controls operate screen and masking motors, unless the
Access/MultiView Control is used.
110-120v SINGLE STATION CONTROL (2 standard)—3-position UP-OFF-
DOWN switches permit operation to be stopped at any point.
110-120v MULTIPLE STATION CONTROL—Switches are similar in appear-
ance to 110-120vSingle Station Control. Screen or masking stops when
switch is released and may be restarted in either direction.
ACCESS/MULTIVIEW CONTROL—This 24vcontrol permits both motors to
be operated from a single switch, which is equipped with two sets of UP-OFF-
DOWN buttons.
24v MULTIPLE STATION CONTROL—Separate three-button UP-STOP-
DOWN switches for each motor, stop at any point desired, operate in any
sequence.
KEY OPERATED SWITCHING—Two kinds of key-operated switches are
optionally available with this unit.
➀ The key-operated power supply switch controls power to the screen or
masking and switches. When it is “off”, the switches will not operate
screen. Key may be removed from the switch in either “on” or “off”
position.
➁The three-position key switch permits the screen or masking to be
operated directly by key. In this case, the screen’s operator must always
have a key.
Motor roller
assembly
Retaining
clip
Washer
Idler end roller
mounting bracket
mounting bracket. Place washer over pin and fasten retaining clip in the
groove of idler pin.
Connect the electrical plugs from the motors to the mating sockets on the
junction boxes.
Reinstall the bottom access panel as previously described.
www.draperinc.com (765) 987-799
9
Access MultiView Installation/Operating Instructions page 3 of 4
Wiring Diagrams for Optional Built-in Controls
Adjustments (Screen Motor)
Screen has been factory set and should not normally require further adjust-
ment. However, if youdesire to change the “up” and “down” stopping positions,
proceed as follows:
CAUTION: Be sure all switches are in “off” position before adjusting limit
switches. Always be prepared to shut screen off manually when new adjust-
ment is being tested. Screen may be severely damaged if surface is allowed
to run too far up or too far down.
“DOWN” LIMIT SWITCH—Down stopping position can be adjusted by turn-
ing the white socket (located on the motor end of screen roller). Turning the
socket counterclockwise will allow the roller to run farther down. Turning it
clockwise will shorten operation, causing it to stop sooner. One full revolu-
tion of the socket will alter the stopping position of the viewing surface by
approximately 1
1
/
4
".
“UP” LIMIT SWITCH—Up stopping position can be adjusted by turning the
yellow socket (located on motor end of screen). Turning the socket counter-
clockwise will allow the roller to run farther up. Turning it clockwise will cause
the roller to stop sooner. One full revolution of the socket will alter the stopping
position of the viewing surface by approximately 1
1
/
4
".
AT NO TIME SHOULD SURFACE BE UNROLLED ENOUGH TO EXPOSE
ANY PART OF SCREEN ROLLER.
Built-in LowVoltage Control
Junction box at
left end of screen
Internal screen wiring
White (Neutral)
Black (Hot)
Green (Ground)
Dashed wiring
by electrician
110v AC supply
N
L1
Built-in Video Interface Control
Junction box at
left end of screen
Internal screen wiring
White (Neutral)
Black (Hot)
Green (Ground)
Dashed wiring
by electrician
110v AC supply
Trigger signal
VIC115 (115 VAC, white cord & plug)
VIC12 (12 VDC, brown & orange leads)
N
L1
Adjustments (Masking Motor)
Screen has been factory set and should not normally require further adjust-
ment. However, if youdesire to change the “up” and “down” stopping positions,
proceed as follows:
CAUTION: Be sure all switches are in “off” position before adjusting limit
switches. Always be prepared to shut screen off manually when new adjust-
ment is being tested. Screen may be severely damaged if surface is allowed
to run too far up or too far down.
“DOWN” LIMIT SWITCH—Down stopping position can be adjusted by turning
knob #2 (on motor end of masking roller). Turning the knob counterclockwise
will allow the roller to run farther down. Turning it clockwise will shorten opera-
tion, causing it to stop sooner.
“UP” LIMIT SWITCH—Up stopping position can be adjusted by turning knob
#1 (on the motor end of masking roller). Turning the knob counterclockwise
will allow the roller to run farther up. Turning it clockwise will cause the roller to
stop sooner.
www.draperinc.com (765) 987-799
9
Access MultiView by Draper page 4 of 4
Case Dimensions
Wiring Diagram
Single Station Control
Internal Wiring
White (Common)
Down*
Up*
Green (Ground)
Dashed wiring
by electrician
Control
switch
Single gang box by others
Min. 4" x 2
1
/
8
" x 1
7
/
8
" deep
Blue
Black
Red
Location of key
operated on-off
switch if furnished
To 115V Line
Multiple Station Control
Internal Wiring
White (Common)
Down*
Up*
Green (Ground)
Dashed wiring
by electrician
Red
Red
Black
Blue
Blue
Cap off with wire
nut and tape
Black
Red Blue
Black Single gang box by others
Min. 4" x 2
1
/
8
" x 1
7
/
8
" deep.
3 shown. More or less equally
feasible.
Location of key
operated on-off
switch if furnished
To 115V Line
Low Voltage (& Wireless) Control Wiring Diagram
Internal Wiring
White (Common)
Up*
Down*
Green (Ground)
Dashed wiring by electrician
110-120V AC
Supply
Screen and masking system are
independently wired, each using any
control offered on the reverse, from
a single junction box.
*Wire colors:
Up Down
Screen Red Black
Masking Black Red
Screen Motor Lead Masking Motor Lead
IGC/3N1
Access MultiView Control
6-Conductor
Modular Cable
by others
Down (BK)
Up (RD)
Neutral (WH)
Ground (GN)
Up (BK)
Down (RD)
Neutral (WH)
Ground (GN)
Neutral (WH)
Hot (BK)
Ground (GN)
115 VAC
Supply
BK BK
RD
RD WH
WH
Dashed wiring
by electrician
STOPSTOP
3 Button Wall Switch
DOWN - Black
COM - White
UP - Red
White- Common to screen, 110-120V AC
Red-to screen (directional)
Brown-to screen (directional)
Yellow-to 110-120V AC
Black-to 110-120V AC
Green-Ground
Eye Port for IR Eye, RF Receiver or LED
Switch. If more than one of these three is
used with one LVC-III, a splitter is required.
Aux Port for connecting
LVC-III modules (up to six-
connect from Aux to Eye)
MultiViewL
Series E 7"
Series VVaries
Overall case length
L
Viewing Surface: Series E shown; Series Vwith tab
tensioning system also available.
Shown with
masking
partially
lowered
Mounting brackets slide
left and right as needed.
Screen roller
(Series Vshown)
Masking roller
77/16"
8"
Overall
flange width
65/8"
3
7
/
16
"
13/16"
21/8"
slot
www.draperinc.com (765) 987-799
9

Other Draper Projection Screen manuals

Draper Targa Manual

Draper

Draper Targa Manual

Draper Salara User manual

Draper

Draper Salara User manual

Draper Access XL Manual

Draper

Draper Access XL Manual

Draper Ropewalker Programming manual

Draper

Draper Ropewalker Programming manual

Draper Cinefold User manual

Draper

Draper Cinefold User manual

Draper MC1 User manual

Draper

Draper MC1 User manual

Draper Clarion User manual

Draper

Draper Clarion User manual

Draper M Series User manual

Draper

Draper M Series User manual

Draper Loke User manual

Draper

Draper Loke User manual

Draper Ambassador Manual

Draper

Draper Ambassador Manual

Draper Targa Manual

Draper

Draper Targa Manual

Draper 220V Signature Series E Manual

Draper

Draper 220V Signature Series E Manual

Draper Targa Manual

Draper

Draper Targa Manual

Draper Signature E Series Manual

Draper

Draper Signature E Series Manual

Draper AKT 315 IX Manual

Draper

Draper AKT 315 IX Manual

Draper Targa User manual

Draper

Draper Targa User manual

Draper Envoy Manual

Draper

Draper Envoy Manual

Draper M Series Manual

Draper

Draper M Series Manual

Draper 220V Signature/Series E Manual

Draper

Draper 220V Signature/Series E Manual

Draper Targa Manual

Draper

Draper Targa Manual

Draper Silhouette/Series V Manual

Draper

Draper Silhouette/Series V Manual

Draper Targa Manual

Draper

Draper Targa Manual

Draper 220V Ultimate Access User manual

Draper

Draper 220V Ultimate Access User manual

Draper Access FIT E Programming manual

Draper

Draper Access FIT E Programming manual

Popular Projection Screen manuals by other brands

Mustang SC-E92D169 Specifications

Mustang

Mustang SC-E92D169 Specifications

SI Sensation Series installation guide

SI

SI Sensation Series installation guide

EluneVision Atlas Series user manual

EluneVision

EluneVision Atlas Series user manual

Razer BLUE SCREEN Master guide

Razer

Razer BLUE SCREEN Master guide

Elite Screens M85XWS1-SRM manual

Elite Screens

Elite Screens M85XWS1-SRM manual

JohnsonSuisse daintree KSSDA26CHCLS installation guide

JohnsonSuisse

JohnsonSuisse daintree KSSDA26CHCLS installation guide

Seymour Screen Excellence TAM Assembly manual

Seymour Screen Excellence

Seymour Screen Excellence TAM Assembly manual

REMACO TECHNOLOGIES PLT-419C installation guide

REMACO TECHNOLOGIES

REMACO TECHNOLOGIES PLT-419C installation guide

Elite Screens F100NWH user guide

Elite Screens

Elite Screens F100NWH user guide

iGGUAL PSIMS200 user guide

iGGUAL

iGGUAL PSIMS200 user guide

SCREENLINE INCEILING instructions

SCREENLINE

SCREENLINE INCEILING instructions

Grandview Large-flat Series installation guide

Grandview

Grandview Large-flat Series installation guide

Screen Excellence RM2-T installation instructions

Screen Excellence

Screen Excellence RM2-T installation instructions

Derksen USA GL150-MARATHON Installation and operating instructions

Derksen USA

Derksen USA GL150-MARATHON Installation and operating instructions

RepTerraX Screen Cage manual

RepTerraX

RepTerraX Screen Cage manual

Da-Lite PERM WALL FRAME installation instructions

Da-Lite

Da-Lite PERM WALL FRAME installation instructions

Grandview GRIP084V user manual

Grandview

Grandview GRIP084V user manual

Elite Screens Elite Ez-Frame Series user guide

Elite Screens

Elite Screens Elite Ez-Frame Series user guide

manuals.online logo
manuals.online logoBrands
  • About & Mission
  • Contact us
  • Privacy Policy
  • Terms and Conditions

Copyright 2025 Manuals.Online. All Rights Reserved.