3
WARMING BOTTLES AND FOOD JARS
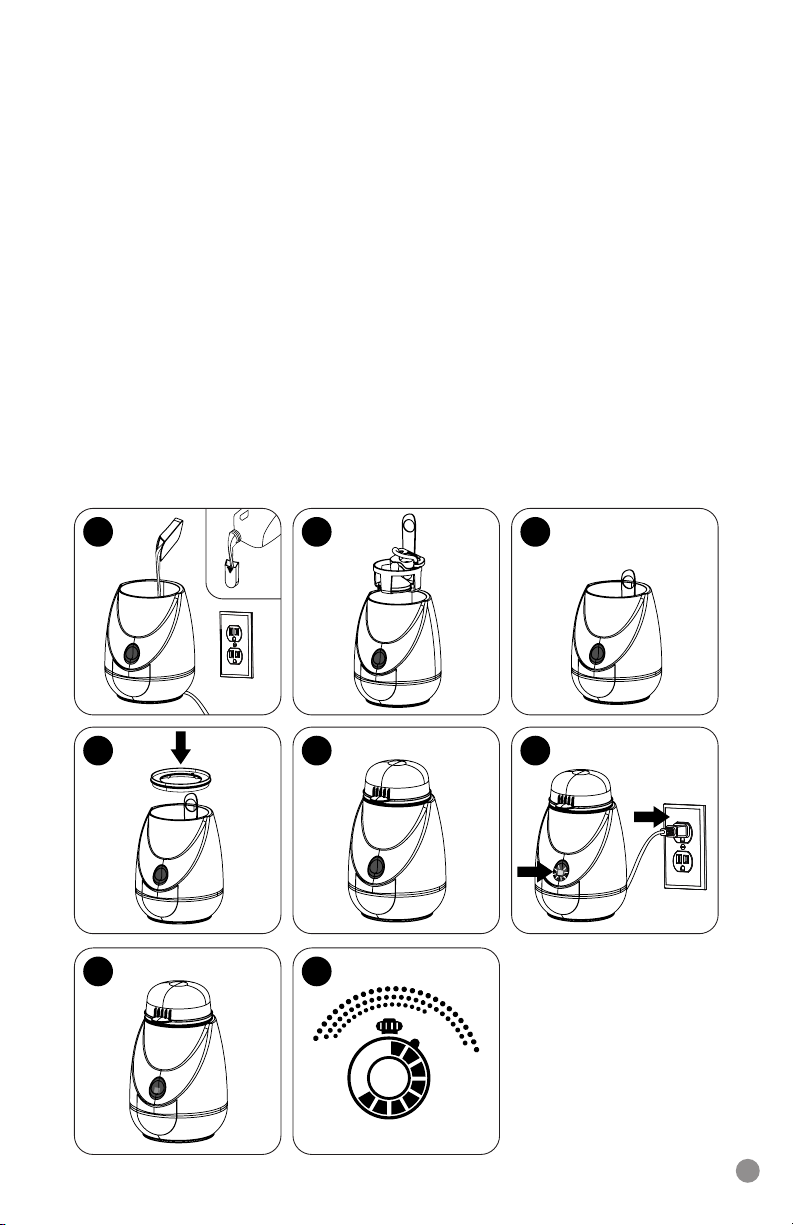
Always unplug the warmer before lling.
1. Remove the Measuring Cup from the rear of the warmer.
2. Add DISTILLED water to the Measuring Cup, following
the Warming Guide on page 5 to determine the
amount of water to add based on your bottle type.
NOTE: These amounts are a guide only. There
are many variables that can impact the nal
temperature of the bottle or food jar you are
warming, such as starting temperature, size, and
shape. Always test the temperature before feeding
your baby.
3. Pour the DISTILLED water from the Measuring Cup directly into the Warming
Chamber. Do not overll, as overlling may cause the bottle/food jar to be overheated
or may cause damage to the unit.
4. Replace the Measuring Cup and plug in the power cord.
NOTE: The rst time the unit is plugged in, the warming cycle may begin
automatically. If the Indicator Light is on upon plugging unit in, wait for the
warming cycle to end (Indicator Light will turn o) and allow the unit to cool
down for 10 minutes before using.
5. Place the bottle or food jar inside the Warming Chamber as outlined below.
• Wide Neck Bottle: Place bottle directly into Warming Chamber.
• Narrow Bottle: Place Adapter Ring on top of Warming Chamber, then
place bottle in Warming Chamber. The Adapter Ring will keep your bottle
centered over the heating plate for even warming.
NOTE: To prevent leakage when warming Dr. Brown’s®
bottles, remove the internal parts, collar, and nipple/teat,
and replace with the included Storage Cap.
• Food Jar: Place food jar into the Lift-Out Basket, then place
Lift-Out Basket in Warming Chamber.
NOTE: Always remove the lid of the food jar prior to warming. After
warming cycle is complete, be sure to stir food thoroughly until it is
an even temperature throughout.
6. Press the Power Button. The Indicator Light will turn on, indicating the warming
cycle has begun.
CAUTION: Always add water and then press Power Button. If the Power
Button is pressed rst, steam may form when water is added.
NOTE: If the Power Button is pressed without water added, the unit will shut
o automatically after a short period. If this happens, wait at least 10 minutes
to allow warmer to cool before adding water and starting warming cycle.
7. When the Indicator Light turns o, the warming cycle is done. Remove the
bottle/food jar promptly to avoid overheating.
NOTE: Always test the temperature before feeding your baby. Adjust the
amount of water added to the warming chamber as needed; if the bottle/
food jar is too cold, add slightly more water next time. If the bottle/food jar
is too warm, use slightly less water next time.
8. Wait at least 10 minutes to allow warmer to cool before using again.
USE DISTILLED
WATER ONLY!
Tap water and bottled
water contain minerals
that shorten the life of this
appliance. Damage from
use of non-distilled water
will void the warranty.