DrBrowns NaturalFlow AC148-INTL User manual

™
INSTRUCCIONES
DE USO
GEBRUIKSAANWIJZING
PENTUNJUK
PENGGUNAAN
INSTRUCTIONS
FOR USE
Deluxe Bottle Warmer and Sterilizer
Model Number AC148-INTL, AC149-INTL, AC221-INTL
Calentador de
biberones y
Esterilizador
Deluxe
Números de modelo
AC148-INTL
AC149-INTL
AC221-INTL
Deluxe-
essenwarmer
en sterilisator
Modelnummer
AC148-INTL
AC149-INTL
AC221-INTL
AC148-INTL
AC149-INTL
AC221-INTL
Deluxe Bottle
Warmer and
Sterilizer
Nomor Model
AC148-INTL
AC149-INTL
AC221-INTL

1
EN INSTRUCTIONS FOR USE
Package Contents:
Deluxe Bottle Warmer and Sterilizer
2x Storage Caps
Instruction Manual
IMPORTANT SAFEGUARDS
WHEN USING ELECTRICAL APPLIANCES, PRECAUTIONS SHOULD ALWAYS BE
FOLLOWEDTO REDUCETHE RISK OF FIRE, ELECTRICAL SHOCK AND INJURYTO PERSONS,
INCLUDING THE FOLLOWING:
• Read all instructions before operating. Detailed instructions are available online
at drbrowns.co/intl
• Failure to operate the product correctly can result in damage to the product,
personal property and cause serious injury.
• Close supervision is necessary when any appliance is used near children.
Do not attempt disassembly.
• Ensure that the wall outlet voltage matches the voltage of the appliance.
• Do not operate appliance after it malfunctions or has been damaged in any
manner. Return appliance to the nearest authorized service facility for
examination, repair or adjustment.
• If the supply cord or plug is damaged, it must be replaced by the manufacturer,
its service agent or similarly qualied person in order to avoid hazard.
• Place appliance on a level, heat-resistant surface.
• Do not place on or near a hot gas or electric burner, or in a heated oven.
• Do not let cord hang over the edge of a table or counter, or touch hot surfaces.
• Do not use an extension cord.
• DO NOT IMMERSE IN WATER.
• HOUSEHOLD USE ONLY.Do not use outdoors.
• Unplug from outlet when not in use and before adding water.
• Do not spill liquid on cord or plug.
• Do not move appliance while in use or when it contains hot liquids.
• To operate, plug cord into wall outlet. To disconnect, ensure the unit is o, then
remove plug from wall outlet.
• DO NOT open lid or reach over the appliance while in use, as steam will
cause burns and serious injuries.
• DO NOT touch hot surfaces, including lid and interior parts, during use.
When the cycle is complete, open lid by front tab and carefully remove
contents by hand or with lift-out basket.
• Do not add water directly to warming chamber.
• Never freeze glass containers, as glass may break.
• Before feeding, pour a few drops of contents from bottle or food jar onto the
back of your hand to test the temperature.
• Food should not be heated for too long.
•Always test content temperature before feeding your baby.
• Allow to cool before putting on or taking o parts.
• Unplug from outlet and allow to cool before cleaning and descaling the unit.
• Beware of steam and avoid spilling or splashing water on yourself when
removing contents.
• The heating element surface is subject to residual heat after use.
• Children should not use or play with the appliance.
Specications:
Nominal voltage: 220-240VAC/50Hz 500W

2
• Keep the appliance and its cord out of reach of children.
• Do not use appliance for other than intended use.
• Appliances are not intended to be operated by means of an external timer or
separate remote-control system.
• NOT FOR SPACE HEATING PURPOSES.
• This appliance can be used by children aged from 8 years and above and persons
with reduced physical, sensory or mental capabilities or lack of experience and
knowledge if they have been given supervision or instruction concerning use of
the appliance in a safe way and understand the hazards involved. Cleaning and
user maintenance shall not be made by children without supervision.
• This appliance is designed to be used for domestic and like applications such as:
— sta kitchen areas in shops, oces and other working environments;
— farm houses;
— use by hotel, motel customers and other accommodation environments;
— bed and breakfast environments
SAVE THESE INSTRUCTIONS
7
6
5
4
8
1
3
2
PARTS:
1. Warming Chamber
2. Heating Plate (inside)
3. Controls
4. Lid
5. Reservoir
6. Lift-Out Basket
7. Warming Basket
8. Storage Caps
PREPARING FOR USE
CAUTION: Unplug from outlet before adding water.
1Remove the reservoir from the rear of the warmer.
2Add NON-MINERAL BOTTLED WATER to the reservoir. Replace water after 24 hours or
when water is depleted (whichever comes rst).
3Put the reservoir back in place. Ensure warming basket and lift-out basket are in warming
chamber. Plug into wall outlet.
CAUTION: Place appliance on a level, heat-resistant surface.

3
13
2
2
USE
NONMINERAL
BOTTLED WATER
Water with minerals
may shorten the life
of this appliance.
Power Up
Cycle Start
Down
Starting
Temperature
Condition
Vessel/Volume/
Units Selection
WARMING
CAUTION: ALWAYS TEST CONTENT TEMPERATURE BEFORE FEEDING YOUR BABY.
1Follow steps 1-3 in Preparing for Use section.
2Ensure warming basket and lift-out basket are in warming chamber. Never use without
baskets in place.
3Place item into warmer as outlined below.
BOTTLE:Remove bottle components and add storage cap
for leak-free warming. Place into warming basket.
FOOD JAR: Loosen lid of food jar. Place into lift-out basket,
then lower into warming basket.
Note: This warmer should only be used with plastic and glass bottles and glass food jars.
It is not designed to heat or thaw plastic food tubs, food pouches or breast milk storage bag
4Close the lid.
5Press the Power Button.

4
6 Set warming time:
APress the Vessel/Volume/Units Button once or twice to choose the vessel material.
Plastic Bottle Glass Bottle
Note: Select Glass Bottle for food jar.
BUse the Up or Down Arrow Button to choose a preset volume of liquid.
If your volume of liquid is not an option, select closest preset below your volume
and manually increase time in the next step.
Vessel/Units
Volume Amount
Note: Select 150 mL (5 oz) for food jar.
To change between oz and mL, hold the button for three seconds.
Press the StartingTemperature Condition Button until the temperature
condition of the vessel appears.
Room Temperature Refrigerated Frozen
Timer Display
Starting
Temperature
Condition
Manual Time Adjustment: In Starting Temperature Condition mode,
use Up or Down Arrow Button to increase or decrease time.
Note: The last used warming time is remembered for your next use.
C

5
Warming Time Chart
Times are pre-programmed for full bottles.
150 mL / 5 oz 2:45 4:00
Wide-Neck
Narrow
270 mL / 9 oz 3:30 5:00
325 mL / 11 oz 3:45 6:00
12:15
15:00
17:00
60 mL / 2 oz 2:00 3:00
120 mL / 4 oz 2:30 3:45
250 mL / 8 oz 2:45 4:30
8:45
10:15
13:30
DR. BROWN’S PLASTIC BOTTLE
VESSEL/VOLUME STARTING TEMPERATURE CONDITION
150 mL / 5 oz 2:15 3:45
Wide-Neck
Narrow
270 mL / 9 oz 2:45 4:15
X
X
120 mL / 4 oz 1:45 3:30
250 mL / 8 oz 2:30 4:00
X
X
DR. BROWN’S GLASS BOTTLE
VESSEL/VOLUME STARTING TEMPERATURE CONDITION
(22
°
C/
72
°
F
)
(4
°
C/
39
°
F
)
(-17
°
C/
0
°
F
)
(22
°
C/
72
°
F
)
(4
°
C/
39
°
F
)
(-17
°
C/
0
°
F
)
(22
°
C/
72
°
F
)
(4
°
C/
39
°
F
)
(-17
°
C/
0
°
F
)
113 g / 4 oz 2:15 3:45 X
FOOD JAR*
VESSEL/VOLUME STARTING TEMPERATURE CONDITION
*For shortcut to food jar times, use Glass Bottle 150 mL / 5 oz preset.
THIS TIME CHART IS APPROXIMATE. WARMING TIMES WILL VARY DEPENDING ON THE VESSEL MATERIAL,
SHAPE AND VOLUME. TEMPERED GLASS HAS BEEN TESTED FOR USE IN THIS WARMER.
CAUTION: NEVER FREEZE GLASS CONTAINERS, AS GLASS MAY BREAK.
7
Press the Cycle Start Button.
WARNING: DO NOT open lid or reach over the appliance while in use,
as steam will cause burns and serious injuries.
DO NOT touch hot
surfaces, including lid and interior parts, during use.
8When the cycle is complete, the display will ash 00:00 for 60 seconds and then shut o,
allowing contents to cool slightly before removal. Promptly remove vessel to avoid
overheating. Gently stir or swirl content to ensure it warms evenly. DO NOT shake.
CAUTION: Open lid by front tab and carefully remove contents
by hand or with lift-out basket. Beware of steam and avoid
spilling or splashing water on yourself when removing contents.
Note: If removing lift-out basket, carefully empty liquid that collected
from steam.

6
STERILIZING
This appliance can sterilize any item that can withstand boiling water, such as
paciers/soothers, teethers, toys and utensils.
1Wash items to be sterilized in hot, soapy water and rinse well.
2Follow steps 1-3 in Preparing for Use section.
3Ensure warming basket and lift-out basket are in warming chamber.
Never use without baskets in place.
4Place item into sterilizer as outlined below.
BOTTLE:Place reservoir tube and bottle upside down in
in lift-out basket. Lower into warming basket. Put remaining
items inside lid.
SMALL ITEMS:Place items into lift-out basket, then lower into warming basket.
Put remaining items inside lid.
5Close the lid.
6Press the Power Button.
7Press the Starting Temperature Condition Button until the
Sterilize icon appears. The appliance will default to 6:00.
8Press the Cycle Start Button.
WARNING: DO NOT open lid or reach over the appliance while in
use, as steam will cause burns and serious injuries.
DO NOT touch hot
surfaces, including lid and interior parts, during use.
9When the cycle is complete, the display will ash 00:00 for 60 seconds and then shut o,
allowing contents to cool slightly before removal.
CAUTION: Open lid by front tab and carefully remove contents
by hand or with lift-out basket. Beware of steam and avoid
spilling or splashing water on yourself when removing contents.
Sterilize

7
TROUBLESHOOTING
If the warmer is not operating, check that:
1The power cable is connected to the power outlet.
2Water has been added to the reservoir.
3The appliance is correctly assembled.
4If display shows the error “ERR-H2O,” the warmer has low water condition.
Unplug from power. Fill water to the correct level. Reconnect to Power.
CLEANING
CAUTION:
Unplug from outlet and allow to cool before cleaning and
descaling.
DO NOT IMMERSE IN WATER.
Note: Regularly check the heating plate for milk residue or mineral deposits. As
mineral deposits build, it can slow or disrupt the warming process/sterilizing cycle.
Using non-mineral bottled water can help prevent buildup, but regular descaling is
needed for best performance. See cleaning instructions below to remove milk and
descaling instructions to remove mineral deposits. DO NOT use bleach, scouring
pads, abrasive cleaners or solvents for cleaning or descaling.
WARMING CHAMBER: Wipe all surfaces with a damp cloth or sponge.
WARMING BASKET,LIFTOUT BASKET, LID AND RESERVOIR: Clean in hot, soapy water
and rinse well, or in a dishwasher (top rack only). Allow to air dry.
Descaling
If buildup forms on the heating plate, follow the steps below.
1Empty reservoir and baskets.
2Descale utilizing a mixture of vinegar/water:
AMix 50 mL (2 oz) of white vinegar with 100 mL (4 oz) of non-mineral bottled water
in reservoir.
Note: Ensure proper ventilation when cleaning with vinegar.
BPlug into wall outlet, press the Power Button and run a Sterilize cycle.
CWhen the cycle is complete, ensure the unit is o and remove plug from wall outlet.
DRemove vinegar and water solution from warming chamber and reservoir.
Thoroughly rinse with clean water.
WARRANTY
This warming appliance is warranted against defective material or workmanship for a period
of one year from the date of purchase. Any defective part will be repaired or replaced at no
charge if it has not been tampered with and appliance has been used according to these
printed instructions.
This warranty does not cover a defect that has been caused by negligence, accidents or
improper use of the appliance. To keep this appliance in good condition and retain your
warranty, USE ONLY AS DIRECTED.
CUSTOMER SERVICE
If you experience unsatisfactory operation or have questions/comments, please contact your
local Dr. Brown’s distributor. See drbrownsbaby.com/distributors to nd your local contact.

8
NL GEBRUIKSAANWIJZING
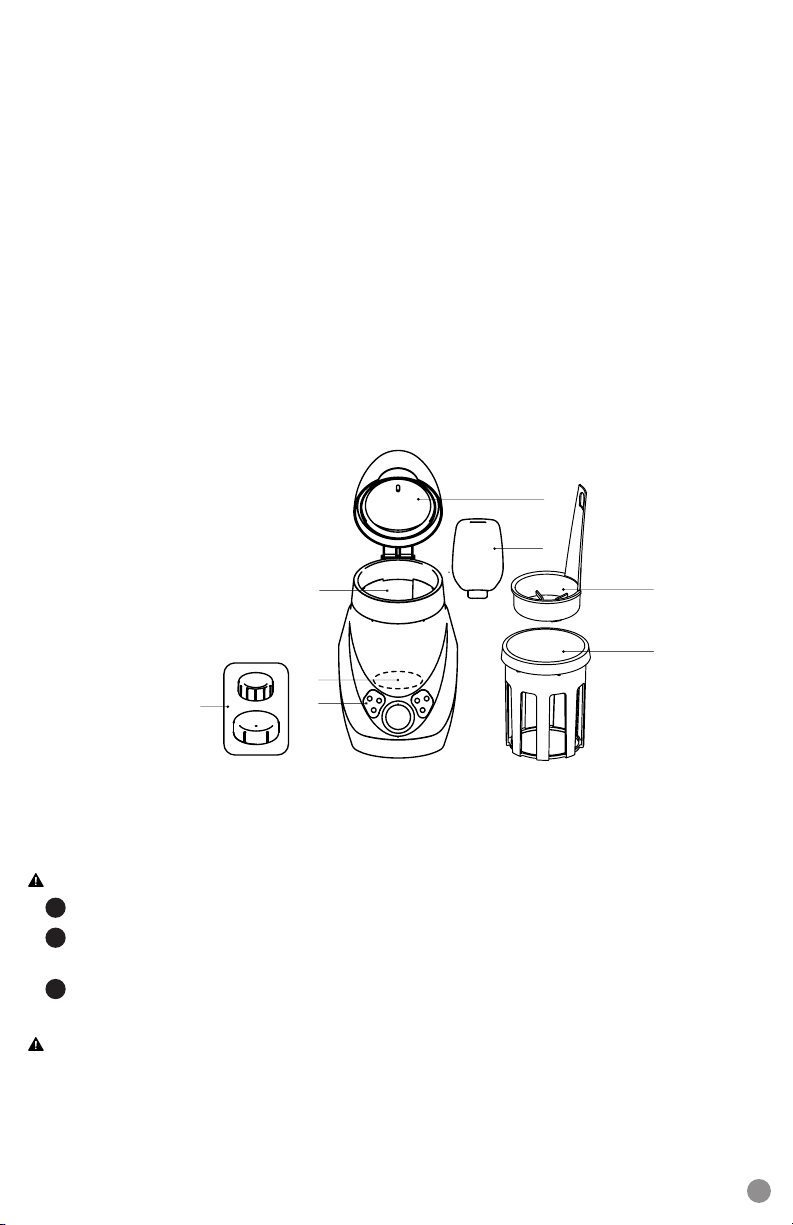
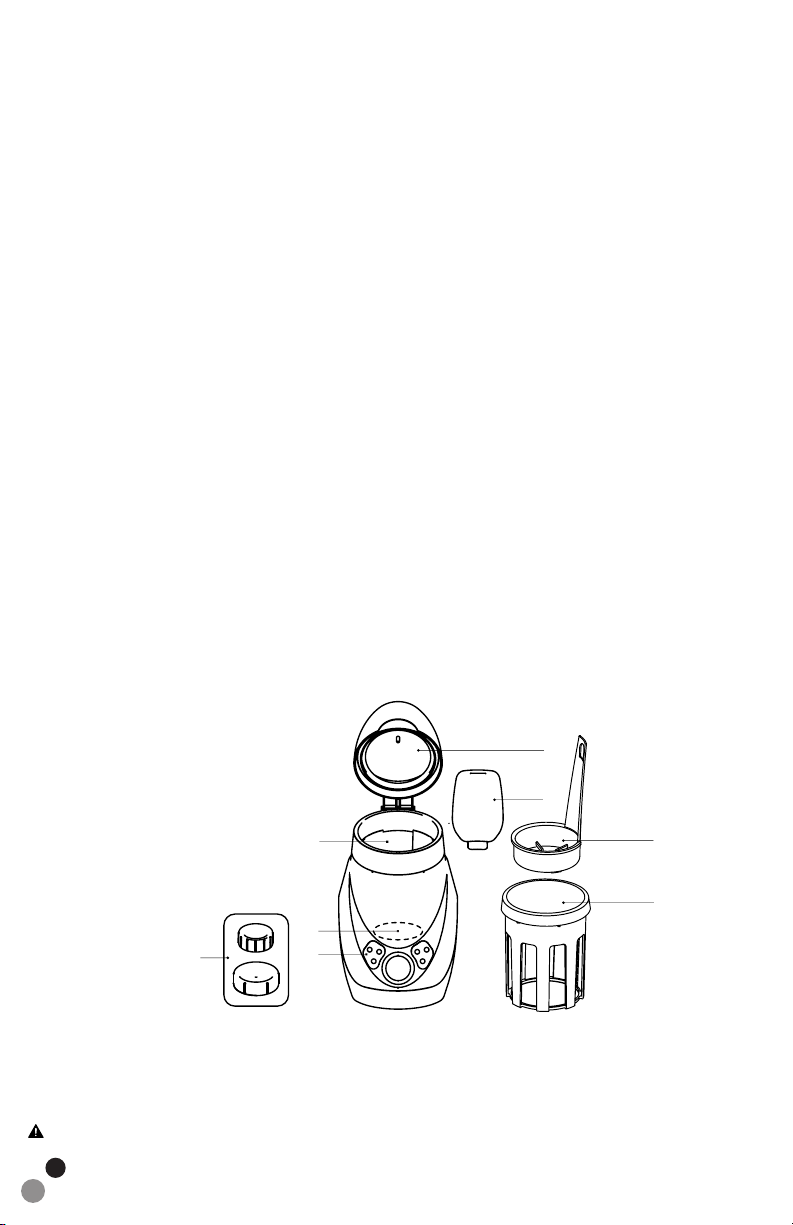
Inhoud pakket:
Deluxe-essenwarmer en sterilisator
2 x afsluitdoppen
Instructiehandleiding
BELANGRIJKE VOORZORGEN
BIJ HET GEBRUIK VAN ELEKTRISCHE APPARATEN DIENEN ALTIJD VOORZORGEN
GENOMEN TE WORDEN OM HET RISICO OP BRAND, ELEKTRISCHE SCHOKKEN EN
VERWONDINGEN TE BEPERKEN, ZOALS ONDER MEER:
• Lees alle instructies alvorens het apparaat in bedrijf te stellen. Gedetailleerde
instructies kunt u lezen op drbrowns.co/intl
• Als met het product niet op een veilige en verstandige manier wordt
omgesprongen, kan dit leiden tot schade aan het product of persoonlijke
bezittingen en ernstige verwondingen veroorzaken.
• Als een apparaat in de buurt van kinderen wordt gebruikt, is streng toezicht
noodzakelijk. Probeer het apparaat niet te demonteren.
• Zorg ervoor dat de stroomspanning van het stopcontact overeenkomt met de
stroomspanning van het apparaat.
• Bedien het apparaat niet als het het laat afweten of op welke manier dan ook
beschadigd is. Breng het apparaat binnen bij het dichtstbijzijnde erkende
service centrum voor onderzoek, reparatie of afstelling.
• Als het snoer of de stekker beschadigd is, dient het vervangen te worden door
de fabrikant, zijn onderhoudsvertegenwoordiger of vergelijkbare
gekwaliceerde persoon om gevaar uit de weg te gaan.
• Zet het apparaat op een vlak en hittebestendig oppervlak.
• Zet het apparaat niet op of naast een warme pit van een gas- of elektrische kook
plaat of in een warme oven.
• Laat het snoer niet over de rand van een tafel of aanrecht hangen, of raak geen
hete oppervlakken aan.
• Gebruik geen verlengsnoer.
• Dompel het apparaat niet onder in water.
• UITSLUITEND VOOR HUISHOUDELIJK GEBRUIK. Gebruik het apparaat niet buiten.
• Trek de stekker uit het stopcontact wanneer het apparaat niet in gebruik is en
voordat u water toevoegt.
• Mors geen vloeistof op het snoer of de stekker.
• Verplaats het apparaat niet wanneer het in gebruik is of hete vloeistoen bevat.
• Om het apparaat te bedienen, steekt u het stekker in het stopcontact. Om het
appa raat los te koppelen zorgt u ervoor dat het apparaat uit staat voordat u de
stekker uit het stopcontact trekt.
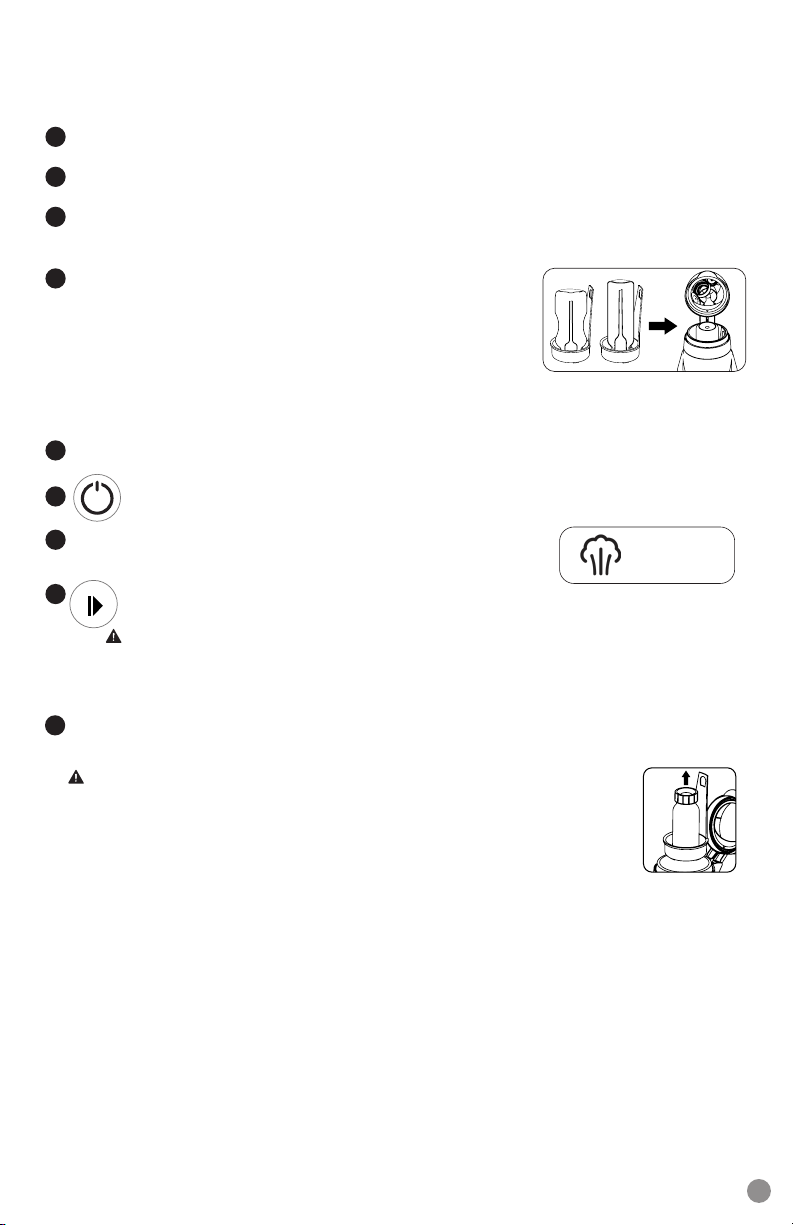
• Het deksel NIET openen of NIET over het apparaat reiken als het
apparaat in gebruik is, omdat stoom brandwonden en ernstige
verwondingen kan veroorzaken.
• Raak tijdens het gebruik GEEN hete oppervlakken aan, zoals het deksel en
het binnenwerk. Wanneer de cyclus ten einde is, opent u het deksel met het
lipje vooraan en haalt u de inhoud er voorzichtig uit met de hand of het
hefsysteem van de houder.
• Voeg niet onmiddellijk water toe aan de stoomcabine.
• Leg nooit glazen verpakkingen in de diepvriezer omdat glas bij
vriestemperaturen kan breken.
• Giet vóór het voeden een paar druppels inhoud uit de es of het potje op de rug
van uw hand om de temperatuur te controleren.
Specicaties:
Nominale spanning: 220-240VAC/50Hz 500W

9
• De voeding mag niet te lang worden opgewarmd.
•Controleer altijd de temperatuur van de inhoud voordat u uw baby voedt.
• Laat het apparaat eerst afkoelen alvorens er onderdelen op te zetten of
af te nemen.
• Trek de stekker uit het stopcontact en laat het apparaat afkoelen voordat
u het reinigt en ontkalkt.
• Pas op voor stoom en zorg ervoor dat u op uzelf geen water morst of spat,
wanneer u de inhoud uit het apparaat haalt.
• Het oppervlak van het verwarmingselement bevat restwarmte na gebruik.
• Het apparaat is geen gebruiksvoorwerp of speelgoed voor kinderen.
• Houd het apparaat en het snoer buiten het bereik van kinderen.
• Gebruik het apparaat uitsluitend waarvoor het bedoeld is.
• De apparaten zijn niet bedoeld voor gebruik met een externe timer
of aparte afstandsbediening.
• Niet bedoeld om de ruimte te verwarmen.
• Het apparaat kan worden gebruikt door kinderen vanaf 8 jaar en ouder en
personen met een beperkt fysiek, zintuiglijk of mentaal vermogen of een
gebrek aan ervaring en kennis als op gebruik van het apparaat op een veilige
manier wordt toegekeken en er uitleg over is gegeven en ze weten welke
gevaren eraan verbonden zijn. Kinderen mogen het apparaat niet reinigen en
onderhouden zonder dat erop wordt toegekeken.
Dit apparaat dient voor gebruik thuis en soortgelijke toepassingen zoals:
— keukens voor het personeel in winkels, kantoren en andere
werkomgevingen,
— boerderijen;
— gebruik door hotel- en motelgasten en andere verblijfplaatsen;
— bed and breakfast-accommodaties
BEWAAR DEZE INSTRUCTIES
7
6
5
4
8
1
3
2
ONDERDELEN:
1. Stoomcabine
2. Verwarmingsplaat (binnenin)
3. Bedieningsknoppen
4. Deksel
5. Reservoir
6. Hefsysteem houder
7. Houder
8. Afsluitdoppen
GEREEDMAKEN VOOR GEBRUIK
VOORZICHTIG: Trek de stekker uit het stopcontact voordat u water toevoegt.
1Haal het reservoir uit de achterkant van de warmer.

10
2Voeg NIET-MINERAAL FLESSENWATER toe aan het reservoir. Vul na 24 uur water bij
of zodra het water op is (wat het eerst komt).
3Zet het reservoir terug op zijn plaats. Zorg ervoor dat de houder en het hefsysteem
van de houder in de stoomcabine zitten. Steek de stekker in het stopcontact.
VOORZICHTIG: Zet het apparaat op een vlak en hittebestendig oppervlak.
13
2
2
GEBRUIK
NIETMINERAAL
FLESSENWATER
Door de mineralen in
water gaat dit apparaat
minder lang mee.
Aan-uitknop Omhoog
Start cyclus
Omlaag
Temperatuur
starten
Fles/volume/
keuze van
eenheid
OPWARMEN
VOORZICHTIG: CONTROLEER ALTIJD DE TEMPERATUUR VAN DE INHOUD
VOORDAT U UW BABY VOEDT.
1Volg de stappen 1-3 in het deel Gereedmaken voor gebruik.
2Zorg ervoor dat de houder en het hefsysteem van de houder in de stoomcabine zitten.
Nooit gebruiken zonder dat de houders op hun plaats zitten.
3Zet het voorwerp in de warmer zoals hieronder uiteengezet.
FLES:Verwijder de esonderdelen en breng de afsluitdop
aan voor opwarming zonder lekken. Zet de es in de houder.
POTJESVOEDING: Draai het deksel van het potje los. Zet het
potje in het hefsysteem van de houder en laat het vervolgens
zakken tot in de houder.
Opmerking: Deze warmer is uitsluitend geschikt voor gebruik met plastic en glazen
essen evenals glazen potjes. De warmer dient niet voor het opwarmen of ontdooien
van plastic maaltijdbakjes, maaltijdzakjes of bewaarzakken voor moedermelk.
4Sluit het deksel.
5Druk op de Aan-uitknop.

11
6 De opwarmtijd instellen:
ADruk een- of tweemaal op de knop Fles/volume/eenheid om het
essenmateriaal te kiezen.
Plastic es Glazen es
Opmerking: Selecteer glazen es voor potjesvoeding.
BGebruik de knop omhoog of omlaag om een vooraf ingesteld vloeistofvolume te
kiezen. Als uw vloeistofvolume geen keuzemogelijkheid is, kies dan het
dichtstbijzijnde vooraf ingestelde volume onder uw volume en verleng manueel
de tijd in de volgende stap.
Fles/eenheid
Volume
Opmerking: Selecteer 150 mL (5 oz) voor potjesvoeding.
Om te wisselen tussen oz en mL, houdt u de knop drie seconden lang ingedrukt.
Druk op de knop Temperatuur starten tot de temperatuur van de es verschijnt.
Kamertemperatuur Gekoeld Ingevroren
Weergave
timer
Temperatuur
starten
Manuele tijdsinstelling: Gebruik in de modus Temperatuur starten de knop
omhoog of omlaag om de tijd te verlengen of te verkorten.
Opmerking: De laatst gebruikte opwarmtijd wordt onthouden voor uw
volgende gebruik.
C

12
Tijdstabel voor opwarming
De tijden zijn vooraf geprogrammeerd voor volle essen.
2:45 4:00
Brede hals
Smal
3:30 5:00
3:45 6:00
12:15
15:00
17:00
2:00 3:00
2:30 3:45
2:45 4:30
8:45
10:15
13:30
DR. BROWN’S PLASTIC FLES
FLES/VOLUME TEMPERATUUR STARTEN
2:15 3:45
Brede hals
Smal
2:45 4:15
X
X
1:45 3:30
2:30 4:00
X
X
DR. BROWN’S GLAZEN FLES
FLES/VOLUME TEMPERATUUR STARTEN
(22
°
C/
72
°
F
)
(4
°
C/
39
°
F
)
(-17
°
C/
0
°
F
)
(22
°
C/
72
°
F
)
(4
°
C/
39
°
F
)
(-17
°
C/
0
°
F
)
(22
°
C/
72
°
F
)
(4
°
C/
39
°
F
)
(-17
°
C/
0
°
F
)
2:15 3:45 X
POTJESVOEDING*
FLES/VOLUME TEMPERATUUR STARTEN
*Gebruik als snelle oplossing voor de tijden van potjesvoeding de voorinstelling voor Glazen es 150 mL / 5 oz.
150 mL / 5 oz
270 mL / 9 oz
325 mL / 11 oz
60 mL / 2 oz
120 mL / 4 oz
250 mL / 8 oz
150 mL / 5 oz
270 mL / 9 oz
120 mL / 4 oz
250 mL / 8 oz
113 g / 4 oz
DE TIJDEN IN DEZETABEL ZIJN BIJ BENADERING. DE OPWARMTIJD VARIEERT AFHANKELIJK VAN HET MATERIAAL
VAN DE FLES, VORM ENVOLUME. GEHARD GLAS IS GETEST VOOR GEBRUIK IN DEZE WARMER.
VOORZICHTIG: LEG NOOIT GLAZEN VERPAKKINGEN IN DE
DIEPVRIEZER OMDAT GLAS BIJ VRIESTEMPERATUREN KAN BREKEN.
7
Druk op de knop Start cyclus.
WAARSCHUWING: Het deksel NIET openen of NIET over het apparaat
reiken als het apparaat in gebruik is, omdat stoom brandwonden en ernstige
verwondingen kan veroorzaken. Raak tijdens het gebruik GEEN hete
oppervlakken aan, zoals het deksel en het binnenwerk.
8Wanneer de cyclus ten einde is, knippert de display gedurende 60 seconden 00:00 en schakelt
vervolgens uit, waardoor de inhoud een beetje kan afkoelen voordat hij uit het apparaat wordt
gehaald. Haal de es onmiddellijk uit het apparaat om oververhitting te vermijden. Roer of schep
voorzichtig door de inhoud, zodat die gelijkmatig opwarmt. NIET schudden.
VOORZICHTIG: Open het deksel met het lipje vooraan en haal
de inhoud er voorzichtig uit met de hand of het hefsysteem
van de houder. Pas op voor stoom en zorg ervoor dat u op
uzelf geen water morst of spat, wanneer u de inhoud uit het
apparaat haalt.
Opmerking: Als u het hefsysteem van de houder verwijdert, giet dan voorzichtig de vloeistof
weg die afkomstig is van de stoom.

13
STERILISEREN
Dit apparaat kan om het even welk voorwerp steriliseren dat bestand is tegen kokend water,
zoals fopspenen, bijtringen, speeltjes en eetgerei.
1Was de te steriliseren voorwerpen af in een warm sopje en spoel ze goed af.
2Volg de stappen 1-3 in het deel Gereedmaken voor gebruik.
3Zorg ervoor dat de houder en het hefsysteem van de houder in de stoomcabine zitten.
Nooit gebruiken zonder dat de houders op hun plaats zitten.
4Plaats het voorwerp in de sterilisator zoals hieronder uiteengezet.
FLES:Plaats de ventielschacht en es ondersteboven in
het hefsysteem van de houder. Laat de es zakken tot in
de houder. Leg de overige voorwerpen in het deksel.
KLEINE VOORWERPEN:Leg de voorwerpen in het
hefsysteem van de houder en laat het vervolgens zakken
tot in de houder. Leg de overige voorwerpen in het deksel.
5Sluit het deksel.
6Druk op de Aan-uitknop.
7Druk op de knop Temperatuur starten tot het sterilisatiesymbool
verschijnt. De standaardinstelling is 6:00.
8Druk op de knop Start cyclus.
WAARSCHUWING: Het deksel NIET openen of NIET over het apparaat
reiken als het apparaat in gebruik is, omdat stoom brandwonden of ernstige
verwondingen kan veroorzaken. Raak tijdens het gebruik GEEN hete
oppervlakken aan, zoals het deksel en het binnenwerk.
9Wanneer de cyclus ten einde is, knippert de display gedurende 60 seconden
00:00 en schakelt vervolgens uit. waardoor de inhoud een beetje kan
afkoelen voordat hij uit het apparaat wordt gehaald.
VOORZICHTIG: Open het deksel met het lipje vooraan
en haal de inhoud er voorzichtig uit met de hand of het
hefsysteem van de houder. Pas op voor stoom en zorg
ervoor dat u op uzelf geen water morst of spat, wanneer
u de inhoud uit het apparaat haalt.
PROBLEEMOPLOSSING
Als de warmer niet werkt, controleer dan het volgende:
1De stroomkabel is aangesloten op het stopcontact.
2Water is toegevoegd aan het reservoir.
3Het apparaat is correct in elkaar gezet.
4Als de display de fout “ERR-H2O” weergeeft, zit er onvoldoende water in de warmer. Trek
de stekker uit het stopcontact. Vul met water tot het juiste niveau. Sluit de stekker terug aan
op het stopcontact.
Steriliseren

14
REINIGING
VOORZICHTIG: Trek de stekker uit het stopcontact en laat het apparaat
afkoelen voordat u het reinigt en ontkalkt. DOMPEL HET APPARAAT NIET
ONDER IN WATER.
Opmerking: Controleer de verwarmingsplaat regelmatig op melkaanslag of minerale
afzetting. Naarmate de minerale afzetting toeneemt, kan het opwarmingsproces/
de sterilisatiecyclus vertragen of ontregeld raken. Het gebruik van niet-mineraal
flessenwater kan aanslag helpen voorkomen, maar regelmatige ontkalking is
onontbeerlijk voor de best mogelijke werking. Zie onderstaande reinigingsinstructies
om melk te verwijderen evenals ontkalkingsinstructies om minerale afzetting op te
lossen. Gebruik voor de reiniging of ontkalking GEEN bleekwater, schuursponsjes,
schuurmiddel of oplosmiddel.
STOOMCABINE: Reinig alle oppervlakken met een vochtige doek of spons.
HOUDER, HEFSYSTEEM HOUDER, DEKSEL EN RESERVOIR: Was ze af in een warm sopje
en spoel ze goed af, of zet ze in de vaatwasser, uitsluitend in het bovenste rek. Laat ze aan de
lucht drogen.
Ontkalken
Als er zich aanslag vormt op de verwarmingsplaat, volg dan onderstaande stappen.
1Maak het reservoir en de houders leeg.
2Ontkalk met een mengsel van azijn en water:
AMeng 50 mL (2 oz) witte azijn met 100 mL (4 oz) niet-mineraal essenwater in het reservoir.
Opmerking: Zorg voor voldoende ventilatie wanneer u met azijn reinigt.
BSteek de stekker in het stopcontact, druk op de Aan-uitknop en voer een sterilisatiecyclus uit.
CWanneer de cyclus ten einde is, zorgt u ervoor dat het apparaat uit staat voordat u de
stekker uit het stopcontact trekt.
DGiet de azijn- en wateroplossing weg uit de stoomcabine en het reservoir. Spoel ze
grondig af met schoon water.
GARANTIE
Dit opwarmingsapparaat wordt geleverd met één jaar garantie tegen fouten in het materiaal
of de afwerking vanaf de datum van aankoop. Elk defect onderdeel wordt kosteloos
gerepareerd of vervangen als er niet mee geknoeid is en het apparaat gebruikt is
overeenkomstig deze afgedrukte instructies.
Deze garantie dekt geen storingen die veroorzaakt zijn door onachtzaamheid, ongevallen of
verkeerd gebruik van het apparaat. Om dit apparaat in goede staat te houden en uw garantie
te behouden, GEBRUIKT U HET UITSLUITEND ZOALS AANGEGEVEN.
KLANTENDIENST
Als u niet tevreden bent met de werking of vragen/opmerkingen hebt, neem dan contact op
met uw lokale Dr.Brown’s-verdeler. Raadpleeg drbrownsbaby.com/distributors om uw lokale
contactpersoon te vinden.

15
Especicaciones:
Voltaje nominal: 220-240 V CA/50 Hz 500 W
ES INSTRUCCIONES DE USO
Contenido del paquete:
Calentador de biberones y
Esterilizador Deluxe
2 Tapas para almacenamiento
Manual de instrucciones
PRECAUCIONES IMPORTANTES
CUANDO USE APARATOS ELÉCTRICOS, SIEMPRE DEBE SEGUIR LAS PRECAUCIONES
PARA REDUCIR EL RIESGO DE FUEGO, DESCARGA ELÉCTRICA Y LESIONES PERSONALES,
INCLUYENDO LO SIGUIENTE:
• Lea todas las instrucciones antes de usar. Las instrucciones detalladas están
disponibles en Internet en drbrowns.co/intl
• No utilizar correctamente el producto puede causar daño al producto y a la
propiedad personal, así como lesiones serias.
• Cuando use cualquier aparato cerca de los niños es necesario supervisar de
forma constante. No intente desarmarlo.
• Asegúrese de que el voltaje de la toma de corriente en la pared es igual al voltaje
del aparato.
• No haga funcionar el aparato después de que haya funcionado mal o haya
sufrido cualquier otro daño. Lleve el aparato al centro de reparaciones
autorizado más cercano para que lo examinen, reparen o ajusten.
• Si el cable de corriente o el enchufe están dañados, tienen que ser reemplazados
por el fabricante, su agente de servicio u otra persona igualmente capacitada,
para evitar riesgos.
• Coloque el aparato sobre una supercie nivelada resistente al calor.
• No lo coloque sobre o cerca de un quemador caliente a gas o eléctrico,
ni dentro del horno caliente.
• No permita que el cable cuelgue del borde de una mesa o encimera, ni que
toque supercies calientes.
• No use una extensión eléctrica.
• NO LO SUMERJA EN AGUA.
• SOLAMENTE PARA USO EN EL HOGAR.No use el aparato al aire libre.
• Desenchufe el aparato cuando no esté en uso y antes de añadir agua.
• No derrame líquidos sobre el cable o el enchufe.
• No mueva el aparato mientras esté en uso o si contiene líquidos calientes.
• Para encender, conecte el cable en una toma de corriente en la pared. Para
desconectarlo, asegúrese de que la unidad está apagada y luego desenchufe
de la toma de corriente en la pared.
•NO abra la tapa ni intente alcanzar algo por encima del aparato mientras
esté en uso, ya que el vapor puede causar quemaduras y lesiones graves.
•NO toque las supercies calientes, incluyendo la tapa y las partes
interiores, durante el uso. Cuando se ha acabado el ciclo, abra la tapa por
la lengüeta delantera y retire con cuidado el contenido manualmente
o con la cesta extraíble.
• No agregue agua directamente a la cámara de calentamiento.
• Nunca congele los envases de vidrio, ya que se pueden romper.
• Antes de alimentar al bebé, ponga unas gotas del líquido contenido en el biberón
o en el envase de comida en el dorso de su mano para probar la temperatura.
• Los alimentos no se deben calentar durante demasiado tiempo.
•Siempre compruebe la temperatura del contenido antes de alimentar a su bebé.

16
• Permita que se enfríe antes de colocar o quitar piezas.
• Desenchufe de la toma de corriente y deje enfriar antes de limpiar y desincrustar
la unidad.
• Tenga cuidado con el vapor y evite derrames o salpicaduras de agua sobre
usted al retirar el contenido.
• La superficie de la placa calentadora puede guardar calor residual después de su uso.
• Los niños no deben jugar con o utilizar el aparato.
• Mantenga el aparato y el cable fuera del alcance de los niños.
• No use el aparato para otro n que no sea para el que fue diseñado.
• Los aparatos no están diseñados para ponerse a funcionar a través de un
temporizador externo o un sistema de control remoto separado.
• NO ES PARA CALENTAR EL AMBIENTE.
• Este aparato puede ser utilizado por niños a partir de 8 años y personas con
capacidades físicas, sensoriales o mentales reducidas o con falta de experiencia y
conocimiento si han recibido supervisión o instrucciones sobre el uso del aparato de
forma segura y comprenden los peligros involucrado. La limpieza y el
mantenimiento del usuario no deben ser realizados por niños sin supervisión.
• Este aparato está diseñado para uso doméstico y usos similares, tales como:
— áreas de cocina con empleados en establecimientos, ocinas y otros
ambientes de trabajo;
— casas de granjas;
— uso por clientes en hoteles, moteles y otros ambientes de alojamiento:
— ambientes de alojamiento y desayuno
GUARDE ESTAS INSTRUCCIONES
7
6
5
4
8
1
3
2
PIEZAS:
1. Cámara de calentamiento
2. Placa de calentamiento (dentro)
3. Controles
4. Tapa
5. Depósito
6. Cesta extraíble
7. Cesta del calentador
8. Tapas para almacenamiento
PREPARACIÓN PARA USAR
PRECAUCIÓN: Desenchufe antes de añadir agua.
1Retire el depósito de la parte posterior del calentador.
2Añada AGUA EMBOTELLADA SIN MINERALES al depósito. Reemplace el agua después
de 24 horas o cuando se agote (lo que ocurra primero).
3Vuelva a colocar el depósito en su lugar. Asegúrese de que la cesta del calentador y la
cesta extraíble estén en la cámara de calentamiento. Enchufe en una toma de corriente
en la pared.

17
PRECAUCIÓN: Coloque el aparato sobre una supercie nivelada resistente al calor.
13
2
2
UTILICE
AGUA
EMBOTELLADA
SIN MINERALES
El agua con minerales
puede acortar la vida
de este aparato.
Encendido Arriba
Iniciar ciclo
Abajo
Condición de
temperatura
de inicio
Selección de
envase/
volumen/
unidades
CALENTAR
PRECAUCIÓN: SIEMPRE COMPRUEBE LATEMPERATURA DEL CONTENIDO
ANTES DE ALIMENTAR A SU BEBÉ.
1Siga los pasos 1 al 3 en la sección Preparación para usar.
2Asegúrese de que la cesta del calentador y la cesta extraíble estén en la cámara
de calentamiento. No lo use nunca sin las cestas en su lugar.
3Coloque la pieza en el calentador como se describe a continuación.
BIBERÓN: Retire los componentes del biberón y agregue
la tapa de almacenamiento para evitar escapes al calentar.
Coloque en la cesta delcalentador.
ENVASE DE COMIDA: Aoje la tapa del envase de comida.
Coloque dentro de la cesta extraíble, luego bájelo en la
cesta del calentador.
Nota: Este calentador solo debe usarse con biberones de plástico y de vidrio y con
envases de comida de vidrio. No está diseñado para calentar o descongelar envases de
plástico para comidas, bolsas de comida o bolsas para almacenar leche materna.
4Cierre la tapa.
5Presione el Botón de encendido.

18
6 Ajustar el tiempo de calentamiento:
APulse el Botón Envase/Volumen/Unidades una o dos veces para elegir
el material del envase.
Biberón de
plástico
Biberón de
vidrio
Nota: Seleccione Biberón de vidrio para los envases de comida.
BUse el Botón de la echa hacia arriba o hacia abajo para seleccionar un
volumen preestablecido de líquido. Si su volumen de líquido no está entre las
opciones, seleccione el más cercano por debajo de su volumen y aumente
manualmente el tiempo en el siguiente paso.
Envase/Unidades
Cantidad de volumen
Nota: Seleccione 150 mL (5 oz) para envases de comida.
Para cambiar entre oz y mL, mantenga presionado el botón durante 3 segundos.
Presione el Botón de condición de temperatura de inicio hasta que vea
la condición de temperatura del envase.
Temperatura
ambiente Refrigerado Congelado
Pantalla del
temporizador
Condición de
temperatura
de inicio
Ajuste manual del tiempo: En el modo de Condición de temperatura de inicio, use
el Botón de la flecha hacia arriba o hacia abajo para aumentar o reducir el tiempo.
Nota: El tiempo de calentamiento que se usó la última vez se recuerda para el
siguiente uso.
C

19
Tabla de tiempo de calentamiento
Los tiempos están preprogramados para biberones llenos.
2:45 4:00
Ancha
Estrecha
3:30 5:00
3:45 6:00
12:15
15:00
17:00
2:00 3:00
2:30 3:45
2:45 4:30
8:45
10:15
13:30
BIBERÓN DE PLÁSTICO DR. BROWN’S
ENVASE/VOLUMEN CONDICIÓN DE TEMPERATURA DE INICIO
2:15 3:45
Ancha
Estrecha
2:45 4:15
X
X
1:45 3:30
2:30 4:00
X
X
BIBERÓN DE VIDRIO DR. BROWN’S
ENVASE/VOLUMEN CONDICIÓN DE TEMPERATURA DE INICIO
(22
°
C/
72
°
F
)
(4
°
C/
39
°
F
)
(-17
°
C/
0
°
F
)
(22
°
C/
72
°
F
)
(4
°
C/
39
°
F
)
(-17
°
C/
0
°
F
)
(22
°
C/
72
°
F
)
(4
°
C/
39
°
F
)
(-17
°
C/
0
°
F
)
2:15 3:45 X
CONDICIÓN DE TEMPERATURA DE INICIO
ENVASE DE COMIDA*
ENVASE/VOLUMEN
*Para acceso directo a los tiempos para los envases de comida, use el ajuste para Biberón de vidrio de 150 mL / 5 oz.
150 mL / 5 oz
270 mL / 9 oz
325 mL / 11 oz
60 mL / 2 oz
120 mL / 4 oz
250 mL / 8 oz
150 mL / 5 oz
270 mL / 9 oz
120 mL / 4 oz
250 mL / 8 oz
113 g / 4 oz
ESTA TABLA DE TIEMPOS ES APROXIMADA. LOS TIEMPOS DE CALENTAMIENTO VARIARÁN DEPENDIENDO
DE LA FORMA Y ELVOLUMEN DEL ENVASE. EL USO DE VIDRIO TEMPLADO HA SIDO PROBADO EN ESTE CALENTADOR.
PRECAUCIÓN: NUNCA CONGELE LOS ENVASES DE VIDRIO,
YA QUE SE PUEDEN ROMPER.
7
Presione el Botón de iniciar ciclo.
ADVERTENCIA: NO abra la tapa ni intente alcanzar algo por encima
del aparato mientras esté en uso, ya que el vapor puede causar
quemaduras y lesiones graves. NO toque las supercies calientes,
incluyendo la tapa y las partes interiores, durante el uso.
8Cuando el ciclo se haya completado, la pantalla parpadeará 00:00 durante 60 segundos y luego
se apagará, dejando que el contenido se enfríe ligeramente antes de retirarlo. Retire el envase
enseguida para evitar que se sobrecaliente. Remueva o revuelva suavemente el contenido para
asegurarse de que caliente de manera uniforme. NO lo agite.
PRECAUCIÓN: Abra la tapa por la lengüeta delantera y retire
con cuidado el contenido manualmente o con la cesta
extraíble. Tenga cuidado con el vapor y evite derrames o
salpicaduras de agua sobre usted al retirar el contenido.
Nota: Si retira la cesta extraíble, vacíe con cuidado el líquido que se deposita por el vapor.
Other manuals for NaturalFlow AC148-INTL
1
This manual suits for next models
2
Table of contents
Languages:
Other DrBrowns Bottle Warmer manuals

DrBrowns
DrBrowns natural flow Insta-Feed AC184 User manual

DrBrowns
DrBrowns natural flow User manual

DrBrowns
DrBrowns 850T User manual

DrBrowns
DrBrowns Natural Flow Insta-Feed AC185-INTL User manual

DrBrowns
DrBrowns MilkSPA AC143 User manual

DrBrowns
DrBrowns NaturalFlow AC148-INTL User manual

DrBrowns
DrBrowns Insta-Feed AC184-INTL User manual

DrBrowns
DrBrowns natural flow MilkSPA AC143 User manual

DrBrowns
DrBrowns natural flow Insta-Feed AC184 User manual

DrBrowns
DrBrowns 850T User manual