Easee Ready Troubleshooting guide

Easee Ready
User / installation guide

2
Introduction
Introduction
Product overview
Technical specifications
Safety
Safety instructions
Before the installation
Planning the installation
Installation
Installation instructions
Daily use and operation
Maintenance
Practical details
3
4
4
5
6
8
14
14
Table of contents
IMPORTANT:
Read carefully before use. Keep for future reference.

3
The Easee Ready includes a backplate and a blind
cover. By installing it you can extend your charging
infrastructure at any time in the future. This is easily
done with the Easee Plug & Play product by mounting
the new Chargeberry in the empty Easee Ready
backplate without the need of an electrician.
Intended use
This product is intended solely as a prepared charging
point for an Easee Charging Robot.
The product must be firmly mounted on a wall or
structure that covers the entire back side of the product
and has a sufficient load-bearing capacity. It may only
be operated with the approved operating parameters
and under the specified environmental conditions (see
page 4).
Uses other than those specified here are not permitted.
Conventions
This symbol indicates that the respective
instructions must only be carried out by an
authorised electrician.
This symbol indicates an immediate danger to
life and health of individuals due to the effects
of electrical energy. Non-observance of these
instructions will result in serious damage to
health – up to and including life-threatening
injuries.
Introduction

4
Technical
specifications
General
Dimension (mm): H: 256 x W: 193 x D: 78
Wall mounting (mm): c/c H: 160 x W: 125
Colour: Black
Installation kit included
Wire terminals
Wire cross-section: up to 16 mm2(single cable)/ up to
10 mm2(parallel connection)
Cable diameter: 8–22 mm
Terminal torque: 5 Nm
Cable strip length: 12 mm
Installation
Installation network: TN, IT or TT
Installation circuit breaker: Max 40 A (Easee Home) or
max 80 A (Easee Charge) overload protection. The short-
circuit current at the charging point (IkMax) must not
exceed 10 kA. If required by the installation, type-A earth
fault protection can be used for the circuit.
Protection
Degree of protection: IP44
Impact resistance: IK08
Fire class: UL94
Product overview
Installation kit
x5x2x3 x4x2
x1
Blind cover
Protects the electrical
connections from
external influences.
Backplate
For attaching and
connecting to the
charging infrastructure.
Tool
Used for removing the
blind cover, after the
screw has been removed.

5
Read the entire manual carefully before installing
and operating the product. Observe the following
instructions:
Safety instructions for the installation
— This product shall only be installed, repaired or
serviced by an authorised electrician. All applicable
local, regional and national regulations for electrical
installations must be respected.
— Danger to life due to high electrical voltage. Never make
any changes to components or connecting cables.
— The installation must not be carried out in the vicinity
of explosive atmospheres or in areas where there is a
risk of flowing water.
— The product must be installed on a permanent
location. The connections of the backplate are
designed for a limited number of plugging cycles.
— The product must be installed on a wall or structure
with sufficient load bearing capacity.
— The product should always be installed on a surface
that covers the entire back side area of the product.
— The terminals in the backplate are energised when
the power circuit is closed and must never be in direct
contact or in contact with anything other than the
plug-in electronics (Chargeberry).
Safety instructions Safety instructions for operation
— Danger to life due to high electrical voltage. Never
make any changes to components, software or
connecting cables.
— Never use or touch the product if it is damaged or
does not function properly.
— Always have the prescribed maintenance, installation
and any repair work carried out by an authorised
electrician and in accordance with local requirements.
— If a fire occurs, do not use water for extinguishing.
— Never clean the product with high pressure or running
water.
— Do not immerse the product in water or other liquids.
— Make sure that children do not play with the product.
— Even if the product is designed to withstand normal
weather conditions, we recommend protecting it
from direct sunlight or exposure to extreme weather
conditions.

6
WARNING! This product shall only be installed,
repaired or serviced by an authorised
electrician. All applicable local, regional and
national regulations for electrical installations
must be respected.
Prior to the installation, it is important that you consider
present and future charging needs, so that you can
easily expand accordingly in the future.
If several Charging Robots are used on one circuit, the
total current is dynamically distributed between the
connected Charging Robots. The connected Charging
Robots communicate via radio signal with the main unit,
thus ensuring that the specified total charging current
of the charging infrastructure is not exceeded. The
maximum charging current is set during configuration.
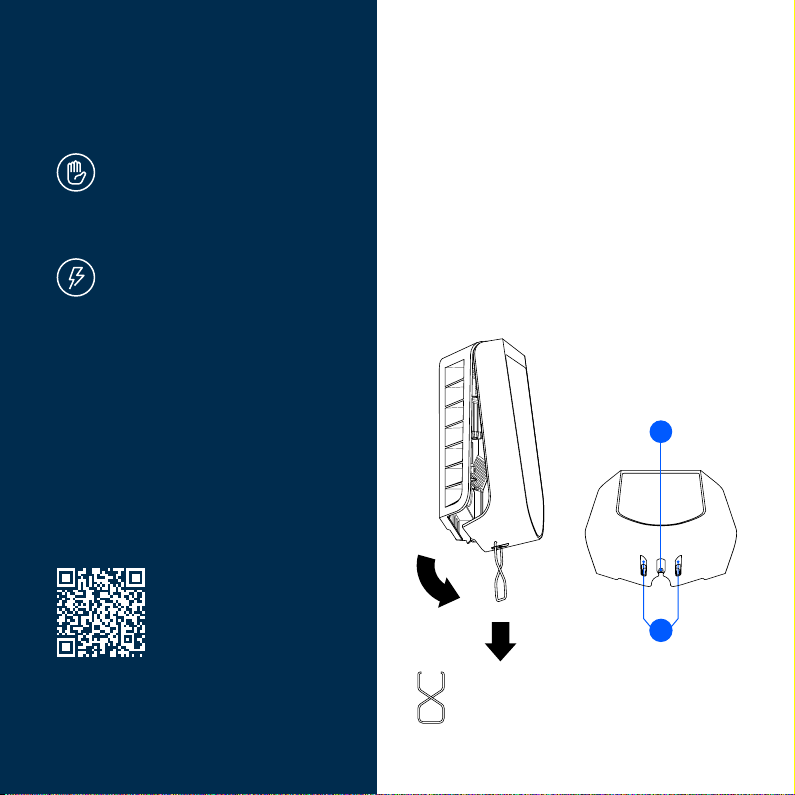
Check the following before starting the installation
— Where should the Easee Ready be installed?
— Is the connected electrical load of the building
sufficient or does it need to be increased? Does a
new cable have to be laid? (An external approval may
be required). Should the incoming supply cable be
upgraded?
— How is the electrical circuit protected?
— Which installation method is planned to be used?
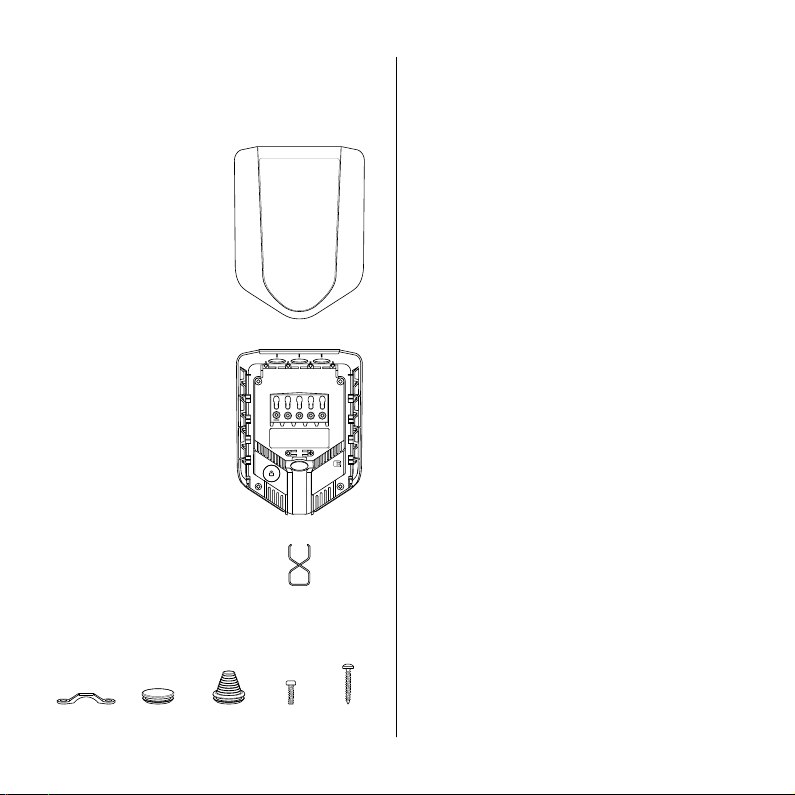
Planning the
installation
Pay attention to the following when planning the
installation
— The correct selection of the grounding/earthing
system, conductors and protective measures (basic
protection/ fault protection).
— The correct insulation of touchable and conductive parts.
— Sufficient dimensioning of cables and lines.
— The selection of the overcurrent and overvoltage
protection.
— The correct calculation of the short-circuit current as
well as a short-circuit proof installation method.
Residual Current Device (RCD)
A Residual Current Device (RCD), according to EN 61008-1
and IEC 62955, is integrated in the Charging Robot. This
will switch off the current to the electrical vehicle if a
residual current of 4-6mA DC and/or 20-30mA AC occurs.
The RCD is reset by unplugging the charging cable and
plugging it in again. The integrated RCD is automatically
tested and calibrated at regular intervals by the Charging
Robot.
The integrated RCD has no influence on the function
of external protective devices. If a Class II installation
is supplying the Charging Robot(s), no external RCD is
normally required. Local wiring regulations must however
always be followed.
For an optimal result, we recommend that you do the
following
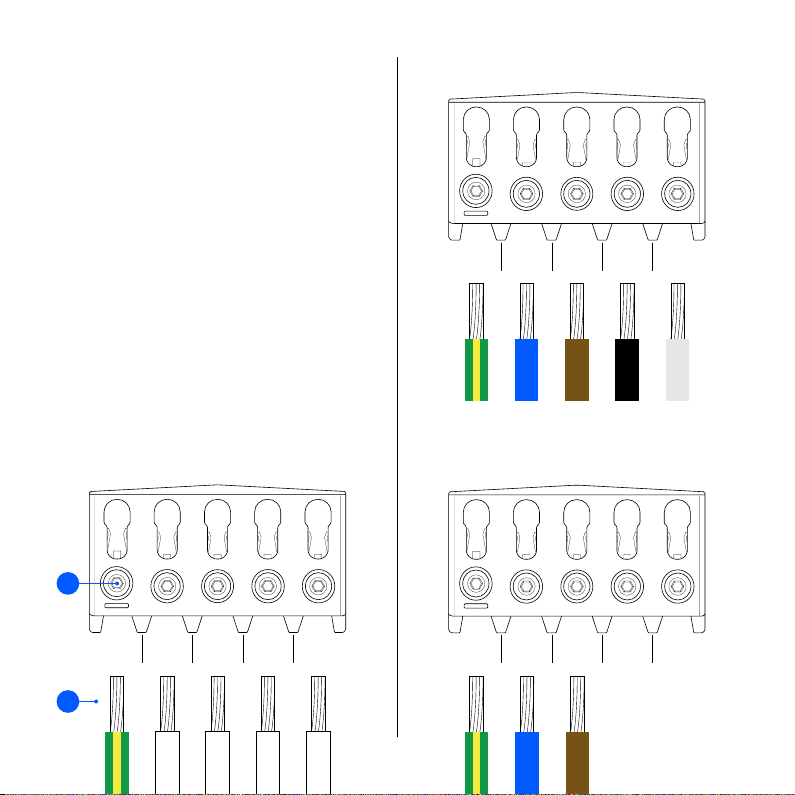
— We always recommend a 3 phase installation if
possible, to make it future-proof.
— If possible, use the largest approved cable cross-
section (see page 4).

7
Special notes
— In addition to the integrated residual current device
(RCD), an overload protection is integrated in the
Charging Robots.
— Several backplates can be connected in parallel, as
each Charging Robot has its own protective device.
— The Charging Robots can handle a maximum short-
circuit current (Ipk, max) of 10 kA. When surveying
the installation, it must be checked whether further
protection should be provided.
— If the charging infrastructure includes more than one
Charging Robot, the backplate that is configured first
becomes the master of its circuit.
— If more than 2 units are installed, the master unit
should be located in the middle of the installation (if
possible) for an optimal Easee Link communication.
Technical notes for Easee Home installation
— The circuit with one or more Charging Robots can be
fused up to 40 A as long as the maximum short-circuit
current (Ipk, max) of 10 kA is not exceeded.
— A maximum of 3 Charging Robots on the same circuit
(fuse) is supported with Easee Home.
Technical notes for Easee Charge installation
— The circuit with one or more Charging Robots can be
fused up to 80 A as long as the maximum short-circuit
current (Ipk, max) of 10 kA is not exceeded.
— A maximum of 101 Charging Robots on the same
circuit (fuse) is supported with Easee Charge.
— Site Key: During installation, a Site Key must be used
to assign the Charging Robots to the correct location
in the Easee Cloud. A Site Key will automatically be
generated when creating a new charging site using
the Easee installer app or it can be obtained by
creating a new charging site at easee.cloud.
Your house, power grid and EV
The Charging Robot automatically adapts to the power
grid, the electric car and the capacity of the electrical
installation. In the diagram below you can see what
charging effect you can expect from your installation
and situation. The table below is only meant as a guide.
NOTICE! The type of installation as well as cable cross-
sections must be determined by a qualified electrician
in accordance with valid local, regional and national
regulations for electrical systems.
1Example for 400 V TN, deviating values for other grid types.
Load Charging power
Ampere (A) 1 phase (kW) 3 phase (kW)1
6 1.4 4.1
8 1.8 5.5
10 2.3 6.9
13 3.0 9
16 3.7 11
20 4.6 13.8
25 5.8 17.3
32 7.4 22

8
WARNING! This product shall only be
installed, repaired or serviced by an
authorised electrician. All applicable
local, regional and national regulations
for electrical installations must be
respected.
WARNING! Turn off the power before
you begin the wiring. Use extreme
caution and follow instructions carefully.
Installation
instructions
WARNING! Be sure to read the safety instructions (page
5) of this product before you start the installation.
1. Unscrew the locking screw at the bottom of the Easee
Ready.
2. Insert the two ends of the included tool into the two
openings at the bottom of the Easee Ready cover.
3. Pull until the cover comes loose.
4. Lift the cover from the bottom and upwards.
1Opening
Easee Ready
In addition to the instructions presented on the
next pages, we recommend that you watch
the installation videos available on our website:
easee.support.
1
2
1
3
4

9
1. Fix the backplate to a wall or structure with sufficient
load-bearing capacity using the 4 screws provided in
the mounting kit. Use suitable wall plugs for mounting
and observe the recommended installation height
(see below).
2. Turn off the power before proceeding with the
installation.
NOTICE! If you are going to install multiple backplates,
now would be a good time to mount them as well.
IMPORTANT! The installation wall must cover the entire
back of the product.
1
Backplate
Mounting
2
130–140 cm
Recommended installation height
1
1
1
1
Backplate
Preparing3
1. Shorten the sealing plug to fit the cable. The hole
should be slightly smaller to ensure a good seal.
2. Insert the cable through one of the 4 cable entries
and secure it to the backplate with the strain relief
provided.
3. Close all cable entries that are not in use with the
blind sealing plugs supplied.
1 2
3
33
1 2 3

10
1. Strip the individual wires by 12 mm. If the cable has
flexible conductors, it is recommended to use ferrules
on stranded wires. Use correct tools to press them.
2. Tighten the screws with a torque of 5 Nm.
NOTICE! Pull each wire to double check that they are
connected properly.
NOTICE! When connecting multiple backplates in
parallel, each terminal serves as a coupling point for
adjacent backplates. All backplates must be connected
with the same phase sequence. External junction boxes
or flat cables can be used if it is more convenient.
Backplate
Wiring4TN/TT 3-phase (230/400 V)
PE N L1 L2 L3
TN 1-phase (230 V)
PE N L1 – –
PE
1
2

11
NOTICE! It's recommended to follow the existing colour
codes used in the installation. Depending on national
standards, the colours of the cables can vary from the
illustrations. The illustrations in this manual follow the
IEC 60446 standard.
NOTICE! Before turning on the power, make sure the
wires are properly connected and tightened. Test this by
pulling on each wire.
IT/TT 3-phase (230 V)
PE L1 L2 L3 –
IT/TT 1-phase (230 V)
PE L1 L2 – –

12
1. Scan the QR code to download the Easee Installer
App and create a free account. The app is available
on App Store and Google Play.
NOTICE! Your phone needs to support NFC.
2. Select one of the three site setups in the Installer App:
Create new site: If this is a completely new charging site,
select "Create new site". Enter the installation details
and follow the on-screen instructions.
Backplate
Installing5Ongoing sites: If you have an incompleted site, e.g. with
missing information or not uploaded to the Cloud, go to
"Ongoing sites" and complete them.
Update existing site: If this site already has one or more
Charging Robots installed or if it has been created by
an operator (Easee Charge), select "Update existing site"
and search for the site address. On "Site overview", select
the circuit that you want the backplate to be part of and
select "Add another backplate". Follow the on-screen
instructions.

13
1. Hang the blind cover at the top of the backplate and
let it fall into place.
2. Press the bottom of the blind cover until you hear a
click.
3. Screw in the locking screw at the bottom of the
backplate to secure the blind cover.
Your Easee Ready is now installed!
3
Blind cover
Closing6
1
3
2
”CLICK!”
3

14
General maintenance
If the product is installed in public spaces and is
accessible to everyone, observe local and national
requirements (e.g. Norway NEK400 part 6.1) in addition to
the procedures below.
Cleaning
The product does not require cleaning to operate
properly. Nevertheless, if the product needs to be
cleaned for cosmetic reasons, this is possible.
— Use a damp cloth and an all-purpose household
cleaner. Avoid using strong chemicals that contain oil
or alcohol, as this will discolour the plastic.
— Do not use running water or high pressure water jets.
Insulation testing (authorised electrician only)
When carrying out periodic insulation testing
of a charging circuit, it is recommended that
you remove the Chargeberry from its backplate
before measuring between all phases joined
together towards earth. Testing the circuit
insulation with the Chargeberry installed in
the backplate may damage the electronics or
impact the reading negatively.
Maintenance Practical details
Warranty
The device is free from material defects and is in
accordance with laws and regulations for consumer
protection in the country where the product is
purchased. All correctly installed Easee hardware is
covered by our 3 years limited warranty. If your charger
needs to be repaired within this warranty period, please
contact your Easee supplier. Further information can be
found at easee.support.
Safety
The product shall be installed according to local
regulations for low voltage electrical installations.
When completely installed and fitted with a
Chargeberry
Standards: Hereby, Easee AS declares that this product,
Easee Ready, is in compliance with the Low Voltage
Directive 2014/35/EU and RoHS Directive 2011/65/EU.
The full text of the EU Declaration of Conformity is
available at the following internet address: easee.support.

15
Product life cycle
Transportation: The product should always be
transported within its original packaging. No other
items should be stored on top of the box other than
Easee chargers. Should the box be dropped or otherwise
impacted, a visual inspection should be done in order to
verify potential damage.
Storage: To preserve the packaging and its contents,
we recommend storage in a tempered, dry and well-
ventilated area. Relative humidity should not exceed
80% and no corrosive gas should be present. Storage
or transportation environment should never exceed the
limits provided in the technical specifications of the
Easee Ready (see page 4).
Dismounting: Perform a factory reset of the device
before powering it down. This is done via the Installer
app. Dismounting shall only be performed by an
authorised electrician. The power supply to the charger
must be isolated before dismounting starts. Use the
installation guide and follow the steps in reverse in order
to dismount the Easee Ready in the correct order.
Disposal: This electronic equipment must not be
disposed of in household waste. For the return of old
devices, free collection and acceptance points may be
available in your vicinity. Observe local regulations for
correct and environmentally friendly disposal. If the old
electronic equipment contains personal data, you are
responsible for deleting it yourself before returning it.
Data protection
When the product connects to the Internet, personal
data is sent to Easee AS. You will receive more
information about data protection during the
configuration of your product.
Repair
If your product needs to be repaired, please contact your
Easee supplier.
Returns and complaints
Contact your distributor or Easee Customer Support
regarding the return and complaint of your product.
Customer support
Download the latest manuals, find answers to frequently
asked questions and useful documents and videos for
your product at easee.support.
Contact details
Easee AS
Grenseveien 19
4313 Sandnes, Norway
Org. nr: 920 292 046
You can find additional contact details for your country
at easee.com.

THIS DOCUMENT CONTAINS INFORMATION THAT IS
SUBJECT TO CHANGE WITHOUT NOTICE.
The latest version of this publication can be downloaded
at http://easee.support
No part of this publication may be reproduced or
transmitted in any form or by any means, electronic
or mechanical, including, but not limited to, copying,
recording, retrieving data, or computer networks without
the written permission of Easee AS.
Easee and all other Easee product names and slogans
are trademarks or registered trademarks of Easee AS.
Easee products can be protected by one or more
patents.
All other products and services mentioned may be
trademarks or service marks of their respective owners.
Illustrations of the product and user interface are
exemplary and may differ from the actual appearance.
Jun 2021 – Version 1.00
© 2021 by Easee AS. All rights reserved.

17
Other manuals for Ready
1
Table of contents
Other Easee Batteries Charger manuals

Easee
Easee Equalizer User manual

Easee
Easee Charging Robot Assembly instructions

Easee
Easee Charge Lite Assembly instructions

Easee
Easee Home Troubleshooting guide

Easee
Easee Equalizer User manual

Easee
Easee One User manual

Easee
Easee Ready Assembly instructions

Easee
Easee Chargeberry User manual

Easee
Easee Equalizer Amp User guide

Easee
Easee Charge User manual
Popular Batteries Charger manuals by other brands

Volkswagen
Volkswagen Flexible fast charging station Maintenance Instruction

Porsche
Porsche Mobile Charger Connect operating manual

Hilti
Hilti RC 4/36 manual

Motorola solutions
Motorola solutions PMLN6621 user guide

VeriFone
VeriFone e355 Gang Charger quick start guide

Optimate
Optimate TM270 Instructions for use